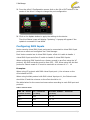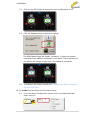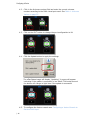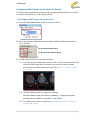
1
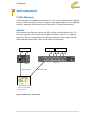
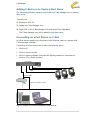
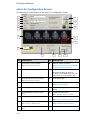
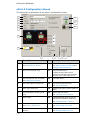
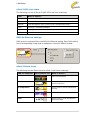
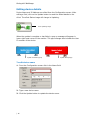
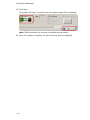
C-Net Manager User Manual Connecting ePort-41 / ePort-2 Version 3.2012 Compulite Systems (2000) Ltd. 9 Hanagar St. Neve Ne'eman B Industrial Zone Hod Hasharon, 45421, Israel Tel: 972 9 744 6555 ~ Fax: 972 9 746 6515 ~ www.Compulite.com C-Net Manager Copyright © 2012 Compulite Systems (2000) Ltd. All rights reserved. This guide is delivered subject to the following conditions and restrictions: This product or document is protected by copyright and distributed under licenses restricting its use, copying, distribution and de-compilation. No part of this product or document may be reproduced in any form by any means without the prior express written authorization of Compulite Systems (2000) Ltd. and its licensors (if any). Information contained herein is subject to change without notice. 1| Table of Contents 1 Table of Contents 1 TABLE OF CONTENTS .............................................................. 2 2 INTRODUCTION ...................................................................... 3 C-Net Manager .............................................................................. 3 ePorts .......................................................................................... 3 3 GETTING STARTED ................................................................. 4 Installing C-Net Manager ................................................................ 4 Adding C-Net icon to Vectors Start Menu ........................................... 5 Connecting an ePort Device to C-Net ................................................ 5 Connecting ePort-41 ................................................................. 6 Connecting ePort-2 ................................................................... 7 Configuring the Network for C-Net Manager ....................................... 8 Starting C-Net Manager .................................................................. 8 4 WORKING WITH C-NET MANAGER .......................................... 9 The Net Modules Pane .................................................................... 9 The Configuration Screen ...............................................................11 ePort-41 Configuration Screen ........................................................12 ePort-41 LED color codes..........................................................13 DMX-On-Ethernet settings ........................................................13 ePort-41 Status icons...............................................................13 ePort-2 Configuration Screen ..........................................................14 ePort-2 LED color codes ...........................................................15 DMX-On-Ethernet settings ........................................................15 ePort-2 Status icons ................................................................15 Editing device details.....................................................................16 Device Properties ..........................................................................18 Updating Device Software ..............................................................19 5 CONFIGURING A DEVICE ...................................................... 21 Configure DMX-On-Ethernet ...........................................................21 Configure DMX Universes ...............................................................22 Changing Ports on ePort-2 .............................................................22 Configuring DMX Inputs .................................................................23 Configuring DMX Inputs on an ePort-2 Device .............................24 Configuring DMX Inputs on an ePort-41 Device ............................27 Configuring a Vector Console to Receive DMX Input .....................28 |2 C-Net Manager 2 Introduction C-Net Manager C-Net Manager is an application installed on a PC, or a Compulite Vector lighting console used to remotely monitor, configure, and update devices on the lighting network, especially ePort devices and CompuPack / CompuRack dimmers. ePorts ePort devices are Ethernet devices for DMX routing and distribution via VC or Art-Net. Typically, ePort devices are located in dimmer rooms or on hanging positions. They are connected to the lighting network using a single Ethernet cable and allow short DMX cable runs to the end equipment. DMX IN/OUT DMX IN ePort-41 ePort-2 Ethernet Cable DMX OUT Ethernet Cable C-Net Manager installed on a PC or Compulite Vector console Figure 1: Basic C-Net / ePort setup 3| Getting Started 3 Getting Started C-Net Manager needs to be installed on a PC or Vector console in order to communicate and configure an ePort device. Installing C-Net Manager Install C-Net Manager using the packaged CD that came with the ePort device or download C-Net Manager from the Compulite website. To install C-Net Manager 1. Insert the packaged CD into the CD-ROM drive. The Install wizard starts. 2. On the Welcome screen click Next. 3. Click on the Accept agreement radio button, click Next. 4. Click Next to install C-Net Manager to the default location or select another location. NOTE: When installing C-Net Manager on a PC, the default location folder is C:\Program Files\Compulite\C-Net Manager. When installing C-Net Manager on a Vector console, manually select the location folder D:\Program Files\Compulite\C-Net Manager. 5. Once the correct location has been selected, click Next to continue. 6. Click Install. Install will begin. 7. Check or Uncheck Run C-Net Manager, then click Finish. A C-Net Manager icon menu. will be placed on your desktop and PC Start Note: The icon needs to be added manually on a Vector console. See on page 5, Adding C-Net icon to Vectors Start Menu |4 C-Net Manager Adding C-Net icon to Vectors Start Menu The following procedure explains how to add the C-Net Manager icon to Vectors Start menu. To add icon 1. Browse to drive D:\. 2. Locate the C-Net Manager icon. 3. Right click on the C-Net Manager icon and select Pin to Start Menu. The C-Net Manager icon will be added to the Start menu. Connecting an ePort Device to C-Net An ePort device needs to be connected via an Ethernet cable to a system with C-Net Manager installed. Connecting an ePort device can be done the following ways: ePort to PC ePort to Vector console ePort to lighting network (Provided the lighting network is connected to either a PC or Vector console) ePort Device DMX DMX DMX Ethernet cable Lighting network Hub Direct connection to ePort PC or Vector console with C-Net Manager Figure 2: Example of connection possibilities using ePort-41 5| Getting Started Connecting ePort-41 Configuration and updating of ePort properties can be performed once ePort is connected to a system with C-Net Manager. Connecting ePort-41 to C-Net is via an Ethernet data cable. To connect ePort-41 1. Connect AC power cable to ePort-41 AC inlet, then connect power cable to power source. 2. Connect one end of an Ethernet cable to the Ethernet port on ePort-41. 3. Connect the other end of the Ethernet cable to either: Ethernet port on the PC Ethernet port on a Vector console Ethernet port on an Ethernet hub Note: When using an Ethernet hub, make sure the hub is connected to a PC or Vector console with C-Net installed. 4. Turn ON ePort-41 from the Power button. If an Ethernet link has be established, the ePort-41 Ethernet Link LED will illuminate green. (If LED is OFF check Ethernet connection) ePort is now ready to be configured. |6 C-Net Manager Connecting ePort-2 Configuration and updating of ePort properties can be performed once ePort is connected to a system with C-Net Manager. Connecting ePort-2 to C-Net is done using an Ethernet data cable. To connect ePort-2 1. Connect AC power adaptor to ePort-2 AC inlet (Front of unit), then connect the AC adaptor to a power source. ePort-2 will turn ON with the power LED illuminated red. 2. Connect one end of an Ethernet cable to the Ethernet port on ePort-2. 3. Connect the other end of the Ethernet cable to either: Ethernet port on the PC Ethernet port on a Vector console Ethernet port on a Ethernet hub Note: When using an Ethernet hub, make sure the hub is connected to a PC or Vector console with C-Net installed. If an Ethernet link has been established, the ePort-2 Ethernet Link LED will blink green. (If LED is OFF, check Ethernet connection) ePort is now ready to be configured. 7| Getting Started Configuring the Network for C-Net Manager Compulite lighting consoles and ePort devices are factory configured with the correct Subnet Mask. The Subnet Mask for a PC running C-Net Manager does not need to be configured as it will communicate with the network under all conditions. All lightning consoles in the network must have the same Subnet Mask, for example; 255.0.0.0 Starting C-Net Manager At start-up C-Net Manager will identify any devices that are currently connected. A pop-up will appear for every device found with the text “New Device” together with the device User ID. Connected devices will be displayed in the Net Modules pane. If a device is connected after C-Net Manager has started, the device will be identified automatically and placed in the Net Modules tree. Device User ID number Figure 3: New Device pop-up Connected devices in the Net Modules tree Figure 4: Net Modules pane To start C-Net Manager From the Start menu click on the C-Net Manager icon. -OR- |8 Click on the C-Net Manager icon on the Desktop. C-Net Manager 4 Working with C-Net Manager C-Net Manager’s screen contains the Net Modules pane and Configuration screen. Device information and device image is displayed in the Configuration screen once selected from the Net Modules tree. Net Modules Pane Configuration Screen Device Image Figure 5: C-Net Manager Screens The Net Modules Pane Devices connected to C-Net Manager will appear in the Net Modules pane. Each device is automatically placed in a tree form according to device type. The Net Modules pane can be hidden or displayed. A disconnected device will be marked with an Connected Devices Disconnected Device Figure 6: Net Module Pane 9| Working with C-Net Manager To hide Net Modules pane From the Net Modules pane click on the X. -OR- From the Menu tool bar, select View ► Toolbars and deselect Workspace. To display Net Modules pane From the Menu toolbar, select View ► Toolbars and select Workspace. | 10 C-Net Manager The Configuration Screen The Configuration screen displays details of a selected device. C-Net Manager’s configuration screen enables you to do the following: View a real-time representation of a selected device Edit device name Edit device IP address View properties of a selected device View and edit DMX input connector configuration of a selected device View and edit DMX output connector configuration of a selected device To view a connected device From the Net Modules pane, select a device to view. Select device to view Note: Each ePort device has slightly different configuration screens. For more information see: ePort-41 Configuration Screen ePort-2 Configuration Screen 11 | Working with C-Net Manager ePort-41 Configuration Screen The following is a description of the ePort-41 configuration screen. 1 13 2 3 14 4 5 15 6 7 16 17 8 9 10 11 12 No. Description No. Description 1 ePort Name (Can be edited) 10 DMX-On-Ethernet settings See: Editing device details 2 ePort User ID (Read only) See: DMX-On-Ethernet settings and Configure DMX-On-Ethernet 11 Keep Last DMX Value: If ticked the ePort will keep on sending the last DMX value that was received, even if the signal is lost. 3 ePort IP Address (Can be edited) 12 Clear DMX button 13 View ePort Properties button See: Editing device details 4 ePort MAC Address (Read only) See: Device Properties 5 ePort Type (Read only) 14 Update fields button (Sends update to ePort) 6 Current Software Version (Read only) 15 Update Software button ePort image 16 7 See: Updating Device Software Color coded indication LED’s See: ePort-41 LED color codes 8 ePort Status image See: ePort-41 Status icons 9 | 12 Subnet number (Only used with ArtNet) 17 Configurable DMX universe numbers See: Configure DMX Universes C-Net Manager ePort-41 LED color codes The following is a list of ePorts-41 DMX LED’s and their meanings: Color What it means… Purple ePort disconnected Red Not receiving Ethernet transmission Red blink Keep last DMX values (If ticked in configuration screen) Green Receiving Ethernet transmission Green blink Merging input from more than one source DMX-On-Ethernet settings DMX protocol is selected from the DMX-On-Ethernet setting. Each DMX setting has a corresponding image that is displayed in the ePort Status window. ePort-41 Status icons The following are the Status icons for ePort-41 and their meanings: DMX-On-Ethernet ePort Status icon What it means… Device is set to use VC protocol (Virtual Connector) VC Device is set to use VC protocol (Virtual Connector) VC Compression Device is set to use VC Compression protocol Art-Net Device is set to use Art-Net protocol 13 | Working with C-Net Manager ePort-2 Configuration Screen The following is a description of the ePort-2 configuration screen. 1 13 2 3 14 4 5 15 6 16 7 17 18 8 9 10 11 12 No. Description No. Description 1 ePort Name (Can be edited) 10 DMX-On-Ethernet settings See: Editing device details 2 ePort User ID (Read only) See: DMX-On-Ethernet settings and Configure DMX-On-Ethernet 11 Keep Last DMX Value: If ticked the ePort will keep on sending the last DMX value that was received, even if the signal is lost. 3 ePort IP Address (Can be edited) 12 Clear DMX button 13 View ePort Properties button See: Editing device details 4 ePort MAC Address (Read only) See: Device Properties 5 ePort Type (Read only) 14 Update fields button (Sends update to ePort) 6 Current Software Version (Read only) 15 Update Software button ePort image 16 7 See: Updating Device Software Configurable DMX buttons (Can be configured to DMX IN or DMX OUT) See: Changing Ports on ePort-2 8 ePort Status image 17 See: ePort-2 Status icons 9 | 14 Subnet number (Only used with Art-Net) Color coded indication LED’s See: ePort-2 LED color codes 18 Configurable DMX universe numbers See: Configure DMX Universes C-Net Manager ePort-2 LED color codes The following is a list of ePorts-2 DMX LED’s and their meanings: Color What it means… Purple ePort disconnected Red No DMX512 received Red blink Keep last DMX512 values (If ticked in the Configuration screen) Green Receiving / transmitting DMX512 Green blink Merging input from more than one source Orange / Off Software update / error DMX-On-Ethernet settings DMX protocol is selected from the DMX-On-Ethernet setting. Each DMX setting has a corresponding image that is displayed in the ePort Status window. ePort-2 Status icons The following are the Status icons for ePort-2 and there meanings: DMX-On-Ethernet ePort Status icon What it means… ePort is disconnected VC Device is set to use VC protocol (Virtual Connector) VC Compression Device is set to use VC Compression protocol Art-Net Device is set to use Art-Net protocol SACN Device is set to use S-ACN protocol (Streaming ACN) 15 | Working with C-Net Manager Editing device details Device Name and IP Address are edited from the Configuration screen. After editing a field, click on the Update button to send the edited details to the ePort. The ePort Status image will change to Updating. ePort Updating image When the update is complete or has failed, a pop up message will appear in lower right hand corner of the monitor. The pop message also includes the User ID number of the device. Update successful popup Update failed popup To edit device name 1. From the Configuration screen click in the Name field. 2. Type a new device name. 3. Click the Update button to update the device name. | 16 C-Net Manager To edit device IP address 1. From the Configuration screen click in the IP Address field and enter a new IP address. 2. Click the Update button to update the device IP. 17 | Working with C-Net Manager Device Properties Device properties of a selected device can be viewed by clicking on the Properties button in the Configuration screen. Hardware and current traffic information is displayed. The following is a description of the device Properties dialog: 7 8 1 2 3 4 5 6 No. Fields 1 Serial Number 2 Board Type 3 Date 4 PCB Rev 5 Assembly Rev 6 Info Rev 7 Port 8 Traffic Description This information shows the manufacturer’s details for the hardware device. You may be asked to provide this information if you request help from Compulite support. This shows VC traffic per DMX universe. To view device properties and current traffic 1. From the Configuration screen click on the Properties button. The Properties dialog will open. 2. Click Exit to return the main screen. | 18 C-Net Manager Updating Device Software Device software of a selected device can be updated via the Update Software button in the Configuration screen. To update device software 1. From the Net Modules pane select a device to update. 2. From the Configuration screen click on the Update Software button. The Open dialog box will open to the default software location. You may need to browse to a different folder if your software version is not located in the default location. 3. From the Open dialog box double click on the device folder. 4. Select the new software version. 19 | Working with C-Net Manager 5. Click Open. The update will begin. A progress bar and update image will be displayed: Note: DMX transmission is temporarily disabled during update. 6. When the update is complete, the current device status is displayed. | 20 C-Net Manager 5 Configuring a Device Configuring a selected device is done from the configuration screen. DMX-OnEthernet settings can be selected and DMX universes can be configured. Configure DMX-On-Ethernet The following are the steps to configure the DMX-On-Ethernet settings for ePort-41 and ePort-2. To set DMX-On-Ethernet 1. From the Net Modules pane select a device. 2. From the device Configuration screen select a DMX-On-Ethernet setting. ePort -41 ePort-2 Note the following for VC and Art-Net: VC Art-Net Subnet mask not applicable Subnet mask must be configured from 0 to 15. DMX512 output ports are 1 to 255 DMX512 output ports are 0 to 15 ATTENTION! When using Art-Net protocol the Subnet mask must be the same Subnet mask as the console. Under Art-Net protocol DMX port 1 is universe 0, port 2 is universe 1, etc. 21 | Configuring a Device 3. Enter a Subnet Mask in the Subnet field if Art-Net is selected. 4. Click on the Update button to apply the settings to the device. The ePort Status image will display “Updating”. A popup will appear if the update is successful or has failed. Configure DMX Universes The following are the steps to configure DMX universes for ePort devices. To configure DMX universes 1. From the device Configuration screen click in the Universe number field. Universe number field 2. Type in the new Universe number. 3. Use the keyboard tab key to move to the next Universe field and continue to enter in the new Universe numbers. 4. Click on the Update button to apply the settings to the device. The ePort Status image will display “Updating”. A popup will appear if the update is successful or has failed. Changing Ports on ePort-2 ePort-2 has 2 DMX ports that can be used as either DMX OUT or DMX IN. The ports can be changed from the ePort-2 Configuration screen in C-Net Manager. To change ePort-2 ports IN or OUT 1. From the Net Modules pane select the ePort-2 device. | 22 C-Net Manager 2. From the ePort-2 Configuration screen click on the IN or OUT buttons in the center of the ePort-2 image to change the port configuration. 3. Click on the Update button to apply the settings to the device. The ePort Status image will display “Updating”. A popup will appear if the update is successful or has failed. Configuring DMX Inputs Vector console virtual DMX Input ports can be connected to virtual DMX Input ports on an ePort and configured via C-Net Manager. Each Vector console has 4 virtual DMX Inputs. ePort-41 is able to handle 1 virtual DMX Input and ePort-2 is able to handle 2 virtual DMX Inputs. When configuring DMX Inputs from a Vector console to an ePort using the VC protocol, the DMX universes must be from 252 – 255. When using the Art-Net protocol a Subnet mask of 15 must be used with a universe of 11 – 14. Examples: When using VC protocol with DMX virtual Input port 1, the universe on the ePort should be 252. When using Art-Net protocol with DMX virtual Input port 1, the Subnet mask should be 15 and the universe on the ePort should be 11. See table below for the correct universe values according to each DMX port and protocol: Table 1: Universe Values DMX IN – Ports VC : Universe Art-Net: Subnet – Universe (on Vector Console) (on ePort) (on ePort) Port 1 252 15 - 11 Port 2 253 15 - 12 Port 3 254 15 - 13 Port 4 255 15 - 14 23 | Configuring a Device Configuring DMX Inputs on an ePort-2 Device The following procedure will guide through configuring DMX Inputs on an ePort2 device using either VC or Art-Net protocols. To configure DMX Inputs on an ePort-2 1. From the Net Modules pane select an ePort-2 device. 2. From the device Configuration screen select a DMX-On-Ethernet protocol; VC or Art-Net: For VC Protocol follow Step 3 For Art-Net Protocol follow Step 4 3. For VC Protocol follow the procedure below: 3.1. From the device Configuration screen click in the Universe number field and enter the correct universe number according to the DMX virtual port used: See Table 1: Universe Values on page 23 | 24 C-Net Manager 3.2. Click on the OUT button to change the port configuration to IN: 3.3. Click the Update button to apply the settings: The ePort Status image will display “Updating”. A popup will appear indicating if the update is successful or has failed. The border around the button will change to light blue if the update is successful: 3.4. To configure the Vector console see: Configuring a Vector Console to Receive DMX Input 4. For Art-Net Protocol follow the Procedure below: 4.1. From the device Configuration screen click in the Subnet field and enter value 15: 25 | Configuring a Device 4.2. Click in the Universe number field and enter the correct universe number according to the DMX virtual port used: See Table 1: Universe Values on page 23 4.3. Click on the OUT button to change the port configuration to IN: 4.4. Click the Update button to apply the settings: The ePort Status image will display “Updating”. A popup will appear indicating if the update is successful or has failed. The border around the button will change to light blue if the update is successful: 4.5. | 26 To configure the Vector console see: Configuring a Vector Console to Receive DMX Input C-Net Manager Configuring DMX Inputs on an ePort-41 Device The following procedure will guide through configuring DMX Inputs on an ePort41 device using either VC or Art-Net protocols. To Configure DMX Inputs on an ePort-41 1. From the Net Modules pane select an ePort-41 device: 2. From the device Configuration screen select a DMX-On-Ethernet protocol; VC or Art-Net: For VC Protocol follow Step 3 For Art-Net Protocol follow Step 4 3. For VC Protocol follow the procedure below: 3.1. From the device Configuration screen click in the Universe number field under the DMX Input port and enter the correct universe number according to the DMX virtual port used: See Table 1: Universe Values on page 23 3.2. Click the Update button to apply the settings. The ePort Status image will display “Updating”. A popup will appear indicating if the update is successful or has failed. 3.3. To configure the Vector console see: Configuring a Vector Console to Receive DMX Input 27 | Configuring a Device 4. For Art-Net Protocol follow the Procedure below: 4.1. From the device Configuration screen click in the Subnet field and enter value 15: 4.2. From the device Configuration screen click in the Universe number field under the DMX Input port and enter the correct universe number according to the DMX virtual port used: See Table 1: Universe Values on page 23 4.3. Click the Update button to apply the settings. The ePort Status image will display “Updating”. A popup will appear indicating if the update is successful or has failed. 4.4. To configure the Vector console see: Configuring a Vector Console to Receive DMX Input Configuring a Vector Console to Receive DMX Input A Vector console needs to be configured to receive DMX Input from an ePort device. To Configure Vector for DMX Input 1. From the Vector Menu bar click on Tools ► Settings. The System Settings dialog will open. 2. From System Settings click on the DMX Protocols tab: | 28 C-Net Manager 3. Click on the DMX Input button: 4. Select the correct DMX-On-Ethernet protocol button. NOTE: The DMX-On-Ethernet protocol must be the same as the ePort configuration. When using Art-Net, there is no need to enter a Subnet. 5. Click Apply then click OK. 29 |