1
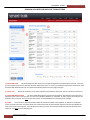
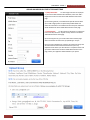
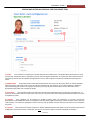
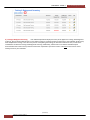
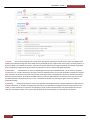
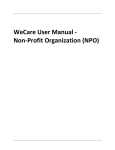
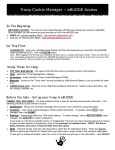
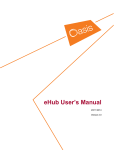
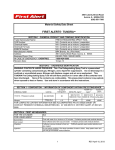
[USER MANUAL – VOLUME 1]
Smart‐TRAK Management System
Training Manual, Volume 1
Date: August 22, 2011
Smart‐TRAK Administration
……………………………………………………………………………………………………………………….………………………….. 2
Adding an Individual Profile or Group to Smart‐TRAK ……………………………………………………………………………………………………………………….. 3
Viewing and Editing an Individual Profile in Smart‐TRAK
…………………………………………………………………………………………………………. 4
Sending a Training or Background Screening Invitation in Smart‐TRAK …………………………………………….……………………………………………… 7
Approving Attributes Interests in Smart‐TRAK
…………………………………………………………………….…………………………………………………. 8
1
Volume 1, Version 1.8.22.11
[USER MANUAL – VOLUME 1]
Smart‐TRAK Management System
ADDING A VOLUNTEER OR EMPLOYEE TO SMART‐TRAK
1 | Smart‐TRAK Tools
The Smart‐TRAK Tools box allows you to navigate through the Smart‐TRAK system with ease. From here,
you can navigate to the various Tools that the Smart‐TRAK system offers. To access your employee and volunteer information, select
the Smart‐TRAK Administration link. You should automatically be directed to this page upon log‐in.
2 | Search Tool
The search tool allows you to locate employees and volunteers within your church, or within the Conference.
3 | Smart‐TRAK Administration
The Smart‐TRAK Administration page houses all employee and volunteer information that is
entered into the system. From this page, you may enter individual volunteers or employees, or import a group of employees and
volunteers from a .CSV file. Click here to learn how to enter an individual applicant or upload a group of people.
4 | Profile
The volunteer or employee profile includes all information related to that applicant. In addition to storing their
contact and vital information, the profile allows you to add notes specific to that individual, approve or decline the individual for
work within certain interest groups, send invitations for training or events, and communicate directly with the individual via the
email tool. Click here to view a sample profile.
2
Volume 1, Version 1.8.22.11
[USER MANUAL – VOLUME 1]
Smart‐TRAK Management System
ADDING AN INDIVIDUAL PROFILE TO SMART‐TRAK
1 | Add / Edit Profile
To add a single volunteer or employee
to your Smart‐TRAK Administration database, select the ‘Add a
Single Person’ link from the Smart‐TRAK Administration home
page.
Upon selecting this link, a window will be opened that will allow
you to add a single profile. Complete the provided fields and
select the save button. The window will close and your individual
will be added to the Smart‐TRAK Administration home page.
2 | Upload Group
To add a group of volunteers or employees
from a .CSV file, select the ‘Import a Group’ link from the Smart‐
TRAK Administration home page.
Upon selecting this link, you will be redirected to another page
which will outline the instructions for uploading a .CSV file.
Once you have uploaded your .CSV file, the system will verify that
all information has been entered and will alert you to any
duplicate emails within your file. Select the ‘complete’ button and
you will be redirected to the Smart‐TRAK Administration home
page, where your applicants will be added to your queue.
3
Volume 1, Version 1.8.22.11
[USER MANUAL – VOLUME 1]
Smart‐TRAK Management System
VIEWING AND EDITING AN IDIVIDUAL PROFILE IN SMART‐TRAK
1 | Profile
Each volunteer or employee has a profile within the Smart‐TRAK system. This profile allows administrators to track
not only their involvement with the organization, but also their training and certifications. The profile also allows administrators to
communicate directly with the individual through the Email Tool, as well as approve or decline the individual for participation in
events.
2| Update Profile
Each profile will be created with the information that you put into the system when you add the individual
either through the “Add / Edit Profile” tool or through the “Upload Group” tool. However, if you need to update the applicant’s
information during their tenure as an employee or volunteer, you may select this link and enter the new information in the
appropriate fields. Select save to update the profile.
3 | View Notes
Each individual profile can include notes specific to the individual based on performance and preferences. To
add a note to the profile, select the “View Notes” link. Enter your note information within the pop‐up window and select save to exit
and update the profile.
4 | Locations
Each individual can be assigned to multiple locations within the Conference to promote cross‐church
participation. To add additional locations to the applicant and make them eligible to participate in other location’s events, select the
“Edit Locations” tool. Select the appropriate locations from the pop‐up window and then select the save button to exit and update
the profile.
5 | Interests
Each church has the ability to approve or decline individuals based on the specific interest they have requested. This
is displayed in the Interests section of the profile. Click here to learn how to approve or decline individuals for attributes.
(Continued)
4
Volume 1, Version 1.8.22.11
[USER MANUAL – VOLUME 1]
Smart‐TRAK Management System
6 | Training & Background Screening
Each individual profile will display the history of the applicant’s training and background
screening. This tool allows administrators to view which training or screening sessions has been sent to the individual, whether they
have completed the training or are still in the process of completing the training, the date the invitation was sent, as well as the
renewal dates for both the training and background screening. Additionally, administrators can view the individual reports
associated with that session and any reference information requested as part of that session. Click here to learn how to send a
training session to your individuals.
(Continued)
5
Volume 1, Version 1.8.22.11
[USER MANUAL – VOLUME 1]
Smart‐TRAK Management System
7 | Events
This tool allows administrators to both invite and approve individuals for specific events. Events are added to each
profile by the individual through their Smart‐TRAK account (created when they complete their first training or screening session). To
approve or decline an individual for an event, select the icon located under the Event Approval heading. From the pop‐up window,
select the appropriate approval setting, and select the save button to exit the window and update the profile.
8 | Documents
Administrators can store corresponding documents to each individual profile, such as resumes, certificates,
consent forms, etc. To add a document to the report, select the ‘Add Document’ link. In the pop‐up window, complete the required
fields and attach the document to the report by selecting the ‘Browse’ button, navigating to the document, and then selecting the
document from the window. To complete the addition process, select the upload button to save and exit. From this tool you may
also delete documents by selecting the red “x” icon, or download the document by selecting the green arrow icon under the
‘Download’ heading.
9 | Email Log
Utilizing the email tool to contact your applicants allows administrators to update individuals on newly required
training, event details, or reminders for background screening. Each correspondence is logged into the Email Log feature for each
profile. To review the details of a particular correspondence, locate the desire email and select the yellow notepad icon located
under the ‘View Details’ header. You may then view the details of the correspondence or resend the email as required.
6
Volume 1, Version 1.8.22.11
[USER MANUAL – VOLUME 1]
Smart‐TRAK Management System
SENDING A TRAINING OR BACKGROUND SCREENING INVITATION IN SMART‐TRAK
1 | Select Training
The first step in sending a training or background screening invitation is to select the training session you
would like to invite your applicant to. From the drop down menu, select your desired training session. If your location has the ability
to request background screening on the individual, a package selection tool will also be displayed where you can select the
appropriate background screening package.
2 | Applicant Information
Next, enter your applicant’s email into the Applicant Email field. If your applicant already exists
within the system, the First, Middle and Last Name will be populated with the stored information. If the applicant you are entering is
attempting to use an email address that is already in use, a notification will alert you to enter a different email address. If you have
not yet entered an applicant profile for the individual you are sending training to, a profile will be created upon sending the
invitation.
3 | References Required
Based on your church or conference qualifications, your individual may be required to provide
references prior to employment or volunteering. To set the required number of references for your applicant, select the
appropriate number from the drop down menu.
4 | Bill To
Each administrator has the ability to set payment responsibility to either the organization to the applicant. By
selecting the organization, the screening and training will be billed to your monthly statement. Selecting the applicant will require
the applicant to provide electronic payment when they attempt to complete their training session.
5 | Recurrence
Based on your church or conference qualifications, select the recurrence for each training or background
screening session in months. To send the invitation, select the Send button.
7
Volume 1, Version 1.8.22.11
[USER MANUAL – VOLUME 1]
Smart‐TRAK Management System
ADDING AND EDITING INDIVIDUAL ATTRIBUTES IN SMART‐TRAK
1 | Attributes
To edit an individual for a particular attributes, you will need to navigate to the interest section of their profile.
This can be done by either selecting the applicant’s name from the Smart‐TRAK Administration home page, or by selecting the
Manage >> Attributes link from the Smart‐TRAK Tools box. When the Edit Attributes link is clicked, you will be able to check off
which attributes you would like for the employee or volunteer to have. More attributes may be added by selecting Manage >>
Attributes under the Smart-Trak Tools.
8
Volume 1, Version 1.8.22.11