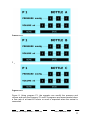
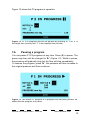
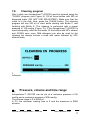
1
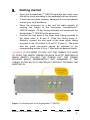
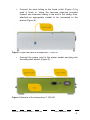
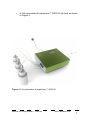
Autoperfuser™
OS2100
A fully automated animal perfusion system
For research use ONLY
USER
MANUAL
Last modified 28 January 2014
Manual for Autoperfuser™ OS2100
www.osenses.com
2
Table of Contents
1.
2.
3.
4.
5.
6.
7.
Packing list .................................................................................. 4
Safety rules ................................................................................. 4
Getting started............................................................................. 5
Interaction with Autoperfuser ...................................................... 8
Principle ...................................................................................... 9
Typical perfusion pressure .......................................................... 9
Programs..................................................................................... 9
7.1.
DeAir program.................................................................... 10
7.2.
P1 and P2 programs .......................................................... 10
7.3.
P3 program ........................................................................ 12
7.4.
Insertion program ............................................................... 13
7.5.
Running a program ............................................................ 13
7.6.
Pausing a program............................................................. 15
7.7.
Terminating a program....................................................... 16
7.8.
Cleaning program............................................................... 17
8.
Pressure, volume and time range ............................................. 17
9.
Bottles and connectors ............................................................. 18
10.
On screen messages ................................................................ 18
10.1.
NO FLOW ........................................................................ 18
10.2.
PRESSURE ..................................................................... 19
10.3.
DO NOT OPEN ................................................................ 19
11.
Trouble shooting ....................................................................... 20
12.
Warranty.................................................................................... 21
13.
Help........................................................................................... 21
14.
Disclaimer ................................................................................. 21
Manual for Autoperfuser™ OS2100
www.osenses.com
3
1.
Packing list
Components provided:
1) Autoperfuser™ OS2100 with the OS2100 software preinstalled
2) 3x 2L HDP bottles fitted with quick connectors
3) 2x Extension tubing
4) 2x Two-way stopcocks
5) 5x blunt end needle (18G)
2.
Safety rules
•
•
•
•
•
•
•
•
•
When using Autoperfuser™ OS2100 basic safety
precautions should always be followed.
Read all instructions and information in this manual before
using the instrument.
To protect against fire, electric shock and personal injury do
not immerse cord, plugs or the appliance in water or other
liquid.
Unplug from outlet when not in use.
Do not operate the instrument with a damaged cord or plug
or after the appliance has been damaged in any way.
Contact the nearest authorized service centre.
Do not use accessory attachments not recommended by
Osenses.
Do not use outdoors.
Do not let cord hang over edge of table or touch hot
surfaces.
Always turn the power “OFF”, then plug the cord into the wall
outlet. To disconnect, turn the switch to “OFF”, then remove
plug from the wall outlet.
When in operation:
• Do not open bottles or disconnect air/liquid hoses.
Any servicing, other than cleaning and user maintenance, should be
performed by an authorized service centre.
Do not disassemble the appliance. There are no user serviceable
parts inside. Repair should be done by authorized service personnel
only.
Manual for Autoperfuser™ OS2100
www.osenses.com
4
3.
Getting started
•
•
•
•
Open the Autoperfuser™ OS2100 package and make sure
that all the items according to the packaging list are included.
If there are any parts missing, damaged or incorrect please
contact your local distributor.
Place the instrument on a dry and flat table capable of
carrying the weight of the instrument. Autoperfuser™
OS2100 weighs ~10 Kg. Keep preferably the animal and the
Autoperfuser™ OS2100 at the same level.
Connect the free ends of the three clear tubing provided to
the liquid inlets A, B and C. Push the tubing firmly in.
Similarly, connect the free ends of the three green tubing
provided to the Air outlets A, B and C (Figure 1). The ends
with the quick connectors should be attached to the
corresponding bottles A, B or C filled with the desired liquids.
CAUSION: IF YOU NEED TO PULL OUT THE TUBING YOU HAVE
TO PUSH THE WHITE, GREEN OR BLUE PLASTIC SKIRTING IN
WHILE GENTLY PULLING THE TUBING OUT. THE TUBING
HOUSING MIGHT PERMANENTLY GET DAMAGED IF THE
TUBING IS PULLED OUT FORCEFULLY WITHOUT PUSHING THE
SKIRTING IN.
Figure 1. Left side panel of the Autoperfuser™ OS2100
Manual for Autoperfuser™ OS2100
www.osenses.com
5
•
Connect the clear tubing to the liquid outlet (Figure 2) by
push it firmly in. Using the two-way stopcock provided
connect one extension tubing to the end of the tubing. Now,
attached an appropriate needle to be connected to the
animal (Figure 4).
Figure 2. Right side panel of Autoperfuser™ OS2100
•
Connect the power cord to the power socket and plug into
the wall power socket (Figure 3).
Figure 3. Backside of the Autoperfuser™ OS2100
Manual for Autoperfuser™ OS2100
www.osenses.com
6
•
A fully assembled Autoperfuser™ OS2100 will look as shown
in Figure 4.
Figure 4. Fully assembled Autoperfuser™ OS2100
Manual for Autoperfuser™ OS2100
www.osenses.com
7
•
Switch the power on, the LCD touchscreen panel will be lit
shortly thereafter (Figure 5).
Figure 5. Front side of the Autoperfuser™ OS2100
4.
Interaction with Autoperfuser
The operator interacts with the Autoperfuser™ OS2100 via a water
resistant LCD touchscreen panel (Figure 6).
Figure 6. Homepage of the Autoperfuser™ OS2100
Manual for Autoperfuser™ OS2100
www.osenses.com
8
5.
Principle
Autoperfuser™ OS2100 operates under a pre-defined pulsating
pressure delivering liquid from the Bottle A-C in a pulsating manner
to the tissues. It mimics the pulsating blood flow to achieve an
outstanding tissue perfusion of ultimate quality. Note that the flow
rate will be adjusted naturally according to the cardiovascular
resistance of the animal being perfused. The perfusion is
reproducible and consistent.
The degree of perfusion may be manipulated by adjusting the
pressure, volume or duration of the perfusion.
6.
Typical perfusion pressure
Table 1 depicts the blood pressure in commonly used laboratory
animals. A pressure similar to the natural blood pressure of the
animal is typically used for the perfusion.
Species
Blood pressure mmHg (Systolic / Diastolic)
Mouse
Rat
Hamster
Rabbit
Cat
Dog
Baboon
Rhesus
Pig
113 / 81
116 / 90
150 / 110
110 / 80
120 / 75
112 / 56
148 / 100
160 / 127
170 / 108
Table 1. Blood pressure in commonly used laboratory animals (Green, C.J.
Animal Anaesthesia. Laboratory Animal Handbooks 8. Laboratory Animals Ltd.,
London, UK. 1979: 123-124)
7.
Programs
Autoperfuser™ OS2100 is fitted with six programs: DeAir, Insertion,
P1, P2, P3 and Cleaning. P1-P3 programs can be edited, run to
completion, extended, fast forwarded, paused or terminated.
Manual for Autoperfuser™ OS2100
www.osenses.com
9
7.1.
DeAir program
Running the DeAir program is recommended before execution of any
of P1, P2 or P3 programs (Figure 7).
DeAiring purges the tubing system with liquids to eliminate the air
bubbles which may block the small blood vessels hence preventing a
thorough perfusion.
DeAiring is performed at 100 mmHg for 50 ml of each bottle
connected starting from bottle C and finishing with Bottle A. DeAir
program requires no editing by the end user. Bottles C and/or B can
be skipped by pressing the “>>”.
Figure 7. DeAir step. DeAiring is performed to purge the tubing system with
liquid. Click on the >> to skip bottle C and/or B.
7.2.
P1 and P2 programs
Using programs P1 or P2 the operator is able to edit (EDIT in Figure
6) and save the changes (SAVE in Figure 8). The editable
parameters are pressure (mmHg) and volume (ml). P1 and P2
programs are recommended when a flow rate of at least 60 ml/min is
expected when the animal is connected.
Adult rat, guinea pig, rabbit can be perfused using P1 or P2
programs.
Manual for Autoperfuser™ OS2100
www.osenses.com
10
Figure 8.1/3.
Figure 8.2/3
Figure 8.3/3
Figure 8. Using program P1, the operator can modify the pressure and
volume and save the changes. P1 and P2 programs are recommended when
a flow rate of at least 60 ml/min or more is expected when the animal is
connected.
Manual for Autoperfuser™ OS2100
www.osenses.com
11
7.3.
P3 program
Using P3 program, the operator is able to edit (EDIT in Figure 6) and
save the changes (SAVE in Figure 9). The editable parameters are
pressure (mmHg) and time (minute).
Figure 9.1/3
Figure 9.2/3
Figure 9.3/3.
Figure 9. Using program P3, the operator can modify the pressure and time
and save the changes.
Manual for Autoperfuser™ OS2100
www.osenses.com
12
P3 program is recommended when a flow rate of below 60 ml/min is
expected when the animal is connected. Mouse can be perfused
using P3 program.
7.4.
Insertion program
This step is included to have Autoperfuser™ OS2100 running under
a low pressure delivering dropwise liquid while the animal is being
prepared. The pressure (hence the flow rate) can be adjusted as
required (Figure 10).
Figure 10 depicts INSERTION program. The Flow may be altered by
adjusting the pressure using “<<” or “>>”.
7.5.
Running a program
To run a program, simply press the desired program in the LCD
touchscreen. While P1-P3 is being used, “<<” can be pressed to rerun a current step without interruption. Similarly, if desired, “>>” can
be pressed to skip the current step. When “<<” is pressed the LCD
touchscreen will turn to green to indicate that the extension step is
chosen. Forward step “>>” can also be chosen when running DeAir
program. A program can also be stopped by pressing STOP button.
To switch from Insertion program to the actual perfusion P1-P3
programs, the INSERTION program has to be stopped first to return
to the HOME page and then press the desired program.
Manual for Autoperfuser™ OS2100
www.osenses.com
13
As examples, three screenshots of the LCD panel are shown in
Figure 11 (1-3).
Figure 11.1/3
Figure 11.2/3
Figure 11.3/3
Figure 11. P1 in progress (11.1/3); running Bottle A has been extended
(11.2/3); P1 was run to the completion (11.3/3). In Figure 11.1/3, the “300” is
the target volume (ml) and “150” is the passed through volume (ml).
Manual for Autoperfuser™ OS2100
www.osenses.com
14
Figure 12 shows the P3 program in operation.
Figure 12. P1 is in progress and can be paused by pressing “II”. The “5” is
the target time (minute) and “1” is the elapsed time (minute).
7.6.
Pausing a program
You can pause P1-P3 programs at any time. Press (II) to pause. The
pause sign then will be changed to “▶” (Figure 13). While in pause,
the pressure will gradually drop but the flow will stop immediately.
To resume the program, press “▶”, the pressure will then increase to
the original pressure and flow continues.
Figure 13. The actual P1 program is in progress but has been paused. “▶”
shows that the program is in pause.
Manual for Autoperfuser™ OS2100
www.osenses.com
15
7.7.
Terminating a program
A program can be terminated by pressing the STOP button (Figure
13). When P1-P3 programs are stopped a warning message “DO
NOT OPEN” will appear briefly and the “STOP” button will change to
“HOME” button (Figure 14).
“DO NOT OPEN” warning means that the bottle caps should not be
opened due to the high pressure. The message will disappear when
the pressure is dropped below 50 mmHg. Press HOME button to
return to the main menu (Figure 6).
Figure 14 shows P1 program has been terminated and the “DO NOT OPEN”
warning appears.
Manual for Autoperfuser™ OS2100
www.osenses.com
16
7.8.
Cleaning program
After a daily use Autoperfuser™ OS2100 must be cleaned using the
“CLEAN” program (see Figure 6). Fill all three bottles with 500 ml
deionised water (DO NOT USE MQ WATER!). Make sure that the
outlet is in the sink. Now, press the CLEAN button. The cleaning
program will use 200 ml of each bottle starting with Bottle C and
finishing with Bottle A. The cleaning is performed with a preset
pressure of 100 mmHg (Figure 15). If the Autoperfuser™ OS2100 is
used infrequently, after the first wash, fill the bottles with 20% ethanol
and CLEAN once more. Mild detergent can also be used for the
cleaning but always include a rinse with water followed by 20%
ethanol wash.
Figure 15. CLEAN program in progress. Cleaning can be stopped or fast
forwarded.
8.
Pressure, volume and time range
Autoperfuser™ OS2100 can be set at a minimum pressure of 60
mmHg and a maximum pressure of 299 mmHg.
The volume range is 0 to 9999 ml.
In P3, the minimum running time is 0 and the maximum is 9999
minutes.
Manual for Autoperfuser™ OS2100
www.osenses.com
17
9.
Bottles and connectors
Autoperfuser™ OS2100 is provided with 3x 2 L of graduated HDP
bottles with the lids fitted with quick connectors.
All the connectors are equipped with check valves ensuring no
leakage if any of tubing is disconnected.
Bottle A is typically used for the first washing step; Bottle B is used
for the actual fixative and Bottle C is optional.
Any bottle not in use can be disconnected. If connected and still not
in use, then the bottle either should be filled with liquid or skipped
(using “>>”), alternatively it should be programmed at “0” ml (in P1
and P2 programs) or “0” minute (in P3 program).
10. On screen messages
Three messages might appear on the LCD screen: 1. NO FLOW 2.
PRESSURE 3. DO NOT OPEN
10.1.
NO FLOW
NO FLOW warning message appears if the flow rate is below 60
ml/min (Figure 16). Make sure that you have the bottles filled with the
liquid and the two way stopcock is open. If the problem persists while
you are using P1 or P2 program then switch to P3 program instead.
Figure 16. Warning message NO FLOW indicates a flow rate of below 60
ml/min.
Manual for Autoperfuser™ OS2100
www.osenses.com
18
10.2.
PRESSURE
PRESSURE warning message indicates that the actual pressure is
not identical to the programmed one (Figure 17). Make sure that the
bottles are tightly capped and the two way stopcock is in the open
position.
Figure 17. Warning message PRESSURE appears if the programmed
pressure is not reached.
10.3.
DO NOT OPEN
DO NOT OPEN warning message appears if the pressure inside the
bottles are above 50 mmHg. This message should disappear within a
minute or so (Figure 14, 16, 17).
Manual for Autoperfuser™ OS2100
www.osenses.com
19
11. Trouble shooting
Problem
Apparatus does
not start
Possible cause
No power
No flow
Bottles are empty;
blocked tubing
No flow
Flow rate below 60
ml/min;
Two way stopcock is
closed
The caps are not properly
tightened; damaged
tubing
No flow
Low pressure
Manual for Autoperfuser™ OS2100
Remedy
Make sure that the
apparatus is plugged
in and there is a
power
Fill the bottle with
the desired liquid
and clean the tubing
Use P3 program
Set the stopcock in
the open position
Make sure that caps
are tight and the
tubing
is
not
damaged
www.osenses.com
20
12. Warranty
Osenses warrants the Autoperfuser™ OS2100 to be free from
defects in material and workmanship for a period of one year from
the date of original purchase. This warranty covers parts and labour.
We may repair or replace defective apparatus at our option.
Osenses disclaims all responsibility for consequential damages of
incidental losses caused by the use of Autoperfuser™ OS2100,
except where such disclaimer is not allowed by law.
There is no warranty on consumables supplied with the instrument.
The warranty does not cover damage from abuse, neglect or use for
purposes other than those intended and described in the manual.
13. Help
If you have any questions or suggestions, feel free to contact us by
email [email protected] . We would be delighted to hear from
you.
14. Disclaimer
Osenses Pty Ltd reserves the right to make changes to both its
products and product data without notice.
Osenses makes no warranty, representation or guarantee regarding
the suitability of its products for any particular purpose, nor does
Osenses assume any liability arising out of the use or application of
any Osenses products. Osenses specifically disclaims any and all
liability, including without limitation incidental or consequential
damages. Osenses and its suppliers hold no responsibility for
damage expenses, lost profits, or any other claims arising from the
use of these products.
Any customer purchasing or using Osenses product(s) shall
indemnify and hold Osenses and its officers, employees, related
companies, affiliates and distributors harmless against all claims,
costs, damages, expenses, and reasonable legal fees arising out of,
directly or indirectly, any claim of loss, personal injury or death
associated with such unintended or unauthorized use, even if such
claim alleges that Osenses was negligent regarding the design or
manufacture of the relevant product(s). Autoperfuser™ is designed
for research use ONLY.
Manual for Autoperfuser™ OS2100
www.osenses.com
21
Manual for Autoperfuser™ OS2100
www.osenses.com
22
Manual for Autoperfuser™ OS2100
www.osenses.com
23