1
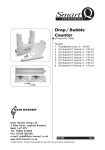
CARE AND CLEANING
Correct care of your SCIENCEWARE® GRANDE DESICCATORS will maintain their
appearance, utility, and life. Do not use abrasive cleansers which will leave
scratches. We recommend the use of Bel-Art Products’ Aquet™ Detergent, Cat. No.
F17094-0020 or F17094-0030.
Every joint on these desiccators was factory sealed with high-quality silicon seals and
the bolts were all tightened at the factory to exacting standards. Do not loosen any
bolts; doing so will void the warranty. Inspect bolts for tightness at least 2 times per
year. Gently Hand-tighten if needed.Over tightening can cause damage to the unit.
IMPORTANT INFORMATION
CAUTIONS for all Scienceware® Grande Desiccators:
•
•
•
•
•
•
•
•
•
•
•
Do not place in front of a heating or air-conditioning duct
Do not place near a heating device
Do not place in direct sunlight
Do not place in areas with smoke or steam
Do not attempt to introduce vacuum inside the cabinet
Do not attempt to introduce pressure in excess of 1 to 2 psi inside the cabinet
Do not place any explosive or hazardous chemicals in the cabinets
Do not autoclave
Do not expose to organic solvents or concentrated acids
Indoor use only
Use only within ambient temperature range of 5° C to 40°C
The user should be aware that if the equipment is used in a manner not specified by
the manufacturer, the protection provided by the equipment may be impaired.
I N S T R U C T I O N S
Scienceware® Grande Desiccators
STANDARD
AUTOMATIC
GAS PURGE
SHELVES
CATALOG NUMBER F43000-1010
CATALOG NUMBER F43020-1010
CATALOG NUMBER F43010-1010
CATALOG NUMBER F43000-0001
PRINCIPLES OF OPERATION
Each of the three Scienceware® Grande Desiccator maintains a desiccated
environment in a specific manner:
Standard (F43000-1010) requires a user-supplied desiccant* (Bel-Art Products
recommends the color-indicating, rechargeable desiccant catalog number
F42045-0250, Desiccant in a Cartridge). Instructions for installation are
provided below.
Automatic (F43020-1010) utilizes the Scienceware® Auto-Desiccator Module to
automatically and continually regenerate the color-indicating silica gel desiccant,
providing worry-free desiccation. Instructions for installation are provided below.
Gas Purge (F43010-1010) is supplied with pre-drilled holes on the back panel
and two gas port fittings with stop cock valves. Instructions for installation are
provided below.
*NOTE: Do not use concentrated acids as desiccants. Do not expose the desiccator
to organic solvents as these materials may attack the clear polycarbonate
material and cause crazing (hairline cracking). Such crazing could eventually
weaken the desiccator walls. Should you have any questions or problems with
the desiccators, please contact Bel-Art Products Technical Support for help.
INSTRUCTIONS FOR ASSEMBLY AND USE
Standard (F43000-1010): No assembly is required. Remove desiccator from the
box and remove the packaging materials from around the shelves (inside the unit).
Place the desiccator on a flat horizontal surface, leaving room in front for the door
to swing open. Place a desiccant of your choice* (Bel-Art Products recommends the
color-indicating, rechargeable desiccant catalog number F42045-0250, Desiccant in
a Cartridge) in the space below the bottom shelf. Close door and secure both top and
bottom latches with a ¼ turn clockwise.
661 Route 23 South, Wayne, NJ 07470
TEL: 1-800-4BEL-ART • FAX: 973-694-7199 • www.belart.com
Scienceware® is a registered TM of Bel-Art Products.
Bel-Art Products assumes no obligation or liability for any advice furnished by it, or for results
obtained with respect to these products. All such advice is given and accepted at the buyer’s risk.
© 2012 Bel-Art Products. All Rights Reserved.
943001015 – 03/12
Automatic (F43020-1010): Installation of the Scienceware® Grande AutoDesiccator is fast and easy. Remove desiccator from the box and remove the packaging
materials from around the shelves (inside the unit). Place the desiccator on a flat
horizontal surface, leaving room in front for the door to swing open. When placing
the left side of the cabinet near a wall, be sure to leave several inches to ensure that
Scienceware® Auto-Desiccator Module has room for proper venting. Next, connect
the electrical cord to the supplied transformer. Locate the transformer and remove
it from its packaging. Locate the electrical cord extending from the desiccator. With
the transformer UNPLUGGED from the power source, fully insert each of the two
terminals (located at the end of the electric cord) under each of the screw covers on the
transformer (one terminal per screw cover). The Scienceware® Auto-Desiccator
Module is not polarized so either terminal can be attached to either screw. Fasten
the terminals to the transformer by tightening the screws with a screwdriver. Plug the
transformer into a properly functioning 120VAC electrical outlet. The internal green
light inside the Scienceware® Auto-Desiccator Module glows indicating the unit is
in operation. Once plugged in, the dehumidifying cycle will start immediately and
the cabinet’s moisture will be absorbed by the silica gel beads contained within the
Scienceware® Auto-Desiccator Module. This will be followed by a brief heating cycle
within the electric unit and then by a discharge cycle when the moisture is released
to the external atmosphere. Initially the cabinet should be left closed for
approximately 8 hours to bring the relative humidity reading down into the 25%
range. The Scienceware® Auto-Desiccator Module contains four air flow ports that are
opened and shut by flapper valves. These valves were carefully aligned during factory
installation to ensure proper function. DO NOT tamper with or pull on the valves. Close
door and secure both top and bottom latches with a ¼ turn clockwise.
Gas Purge (F43010-1010): Place the desiccator on a flat horizontal surface, leaving
room in front for the door to swing open. Locate the two pre-drilled holes on the back
of the desiccator. Referring to the illustration, slip one of the O-rings (Item 2) over the
threaded end of the stopcock (Item 1). Insert the threaded end of the stopcock into
one of the holes in the cabinet from the outside. Holding the stopcock in place with
one hand screw the nut (Item 3) onto the threaded end by inserting your hand through
the open door and hand tighten it. Using a 5/8” socket wrench, tighten the nut so the
O-ring seats. Repeat the process with the second stopcock. Close door and secure
both top and bottom latches with a ¼ turn clockwise.
Parts list:
Item 1 Stopcock (2)
Item 2 O-ring (2)
Item 3 Nut (2)
The gas ports permit creation of a gasspecific atmosphere. The cabinet is not
designed to withstand negative pressure
and there is a high danger of implosion
if a vacuum line is connected. Similarly,
high pressure gas entry is not advised
as this may rupture the cabinet. If Carbon
Dioxide, Nitrogen or other gas is to be
introduced, make sure that both
stopcocks are open. If the gas is
heavier than air, the inlet source
should be connected to the lower
stopcock; if the gas is lighter than air,
connect the inlet source to the upper
stopcock. The gas should enter at a
pressure of one to two psi to sweep
out the air through the other stopcock.
When it is felt that a sufficient exchange
has been made, close the entry stopcock first then close the exit stopcock.
This will avoid pressure build-up in the
cabinet.
Shelving: Two shelves are supplied with every Scienceware® Grande Desiccator.
Additional shelves (2 per pack) can be purchased as desired under Bel-Art Products
Cat. No. F43000-0001. Each shelf will support a maximum of 10 lbs. Shelves can
be repositioned as desired to rest upon any of the epoxy-coated wire rail supports
except the top rail. Shelves are designed to slide back and forth and will extend
forward approximately half the depth of the shelf. Under shelf guides prevent side
to side motion and tall tail edges prevent accidental forward tipping of the shelf.
To remove a shelf, slide the shelf forward and lift the front edge as needed so that
the under shelf guides (both front and rear) can pass over the wire rail supports.
SPECIFICATIONS
CATALOG NO. F43000-1010, F43010-1010, and F43020-1010
Overall External Dims: 26” x 26” x 24” (W x H x D)
Construction Materials (Body): Clear Polycarbonate
Construction Materials (Shelves): Clear Acrylic
Construction Materials (Door): Clear Polycarbonate