1
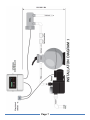
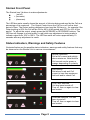
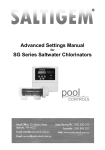
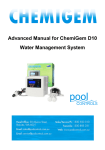
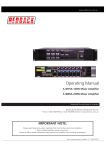
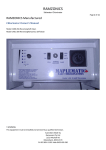
User Manual for Sterisel
Salt Water Chlorinator
Contents
Manufacturers’ Warranty
Introducing the Sterisel
How it Works
Initial Pool Balance
Installation Guide
Sterisel Front Panel
Status Indicator, Warnings and Safety Shutdowns
Maintenance
Troubleshooting
2
4
5
6
8
8
9
10
10
IMPORTANT
If the power cord is damaged the unit must be returned to Pool
Controls for repair.
Always read the instructions and warnings on chemical
containers before using chemicals.
Serial Number........................................
Date of Installation................................
Installed by.............................................
Page 1
Manufacturer’s Warranty
Pool Controls products come with guarantees that cannot be excluded under the Australian
Consumer Law. You are entitled to a replacement or refund for a major failure and for
compensation for any other loss or damage. You are also entitled to have the goods
repaired or replaced if the goods fail to be of acceptable quality and the failure does not
amount to a major failure. The benefits under this warranty are in addition to other rights
and remedies under a law in relation to the goods.
Pool Controls warrants all components of the Sterisel to be free from defects in material
and/or workmanship for a period of 2 years from the original date of purchase or
installation.
Additional Pro-rata Warranty on Multi-electrodes and Cells
Pool Controls warrants the Sterisel Electrode (Cell) to be free from defects in material
and/or workmanship for a period of 2 years, followed by 36 months pro-rata warranty.
WARRANTY OBLIGATIONS OF POOL CONTROLS
If a defect in workmanship or materials in any Pool Controls product covered by this
warranty is discovered during the term of the warranty, and provided the warranty holder
follows the procedure set out below, Pool Controls will, at its option, repair or replace that
item.
PROCEDURE FOR CLAIMING UNDER THIS WARRANTY
In order to claim under this warranty, the warranty holder must:
Contact Pool Controls Service as soon as possible after the discovery of the
defect and in any event, within the relevant warranty period;
Provide proof of purchase and confirm date of installation;
Confirm that the installation was completed by a suitably qualified technician, as
set out in the installation manual; and
If required, arrange for the relevant Pool Controls’ product to be returned to Pool
Controls for repair, and the warranty holder is responsible for the cost and risk of
any freight or transportation to and from Pool Controls.
CALL OUT FEES
If the Pool Controls product needs to be serviced, replaced or repaired at a place
other than Pool Controls’ premises, a call out fee will be charged to cover the cost
of travel by an authorised Pool Controls technician. Please note that this call out
Page 2
fee will NOT be charged when the relevant Pool Controls product is returned to
Pool Controls for repair.
If an authorised Pool Controls technician repairs or replaces a Pool Controls
Product and this warranty does NOT apply, a fee for labour and parts supplied will
be charged in addition to the call out fee.
If the Pool Controls product needs to be returned for repairs under this warranty,
the warranty holder is responsible for the cost and risk of any freight or
transportation to and from Pool Controls.
WARRANTY EXCLUSIONS
This warranty extends to the original owner only, beginning on the date of
installation and is not enforceable by any other party without the prior written
consent of Pool Controls.
Pool Controls is not responsible for any cost of freight or transportation to or from
its Service Department.
Pool Controls is not liable under this warranty if the installation of the Pool
Controls product was not carried out by a suitably qualified technician.
To the extent permitted by law, Pool Controls is not liable for any incidental or
consequential loss incurred in connection with the removal or replacement of the
Pool Controls product under this warranty.
To the extent permitted by law, Pool Controls disclaims all other warranties, either
express or implied, including, but not limited to, implied warranties of
merchantability and fitness for a particular purpose with regard to Pool Controls
products, parts and/or any accompanying written materials.
REGISTER YOUR WARRANTY NOW
Go to www.poolcontrols.com.au, click on the warranty registration tab and fill in your
details.
CONTACT POOL CONTROLS
Pool Controls is based at 20 Abrams Street, Balcatta, Western Australia. We also have
service technicians based in NSW, Queensland and Victoria.
Service Email: [email protected]
Service Phone: 1300 550 010
Page 3
Introducing the Sterisel
What’s in the box?
The Sterisel Box contains the following components:
Mounting brackets; top and bottom
Sterisel Salt Cell
Sterisel Power Supply and Mains Cable
Mounting hardware (raw plugs, screws and paper template)
Page 4
How it works:
The Sterisel is a salt chlorinator, which works by putting a dc current through an electrolytic
cell in a flow of salt water. Salt is made up of sodium and chloride ions. Electrolysis of salt
produces chlorine gas, which dissolves almost instantly to form free chlorine in the water.
This free chlorine is a highly effective sanitiser for your pool.
The Sterisel constantly adds a dose of chlorine to the water when it is operating. The
amount of chlorine added depends upon the cell output and the running time.
Initial pool balance
Before you begin using the Sterisel make sure your pool water is balanced as follows:
Salt
There should be between 3000 and 5000ppm of salt in the pool ideally 4000ppm.
3
This is achieved by adding 4kg of salt for every 1000 litres (1m ) of pool volume. Note that
this amount of salt will take time to dissolve.
Note: keep salt below 7500ppm to avoid overloading the cell and causing shutdown.
Chlorine
If it is a new installation, add enough chlorine (liquid or granular) to achieve a reading of
3ppm on an appropriate test kit.
Stabiliser
If the pool is outdoors, it is vital that stabiliser (also known as cyanurate and cyanuric acid)
be added and maintained at 40ppm to 60ppm. This compound reduces chlorine
destruction due to sunlight. However, too much stabiliser will reduce the effectiveness of
chlorine and can result in poor quality water so ensure stabiliser does not exceed 80ppm.
pH
For chlorine to be effective, the pH must be within a certain range. This is usually between
6.8 (fibreglass/liner pools) or 7.2 (concrete/plaster) and 7.8.
Adjust pH down with acid – powder, liquid sulphuric or liquid hydrochloric. Be very careful
with acid as it can be harmful and corrosive.
Total Alkalinity (TA)
Total alkalinity is also known as carbonate hardness or TA for short. The recommended
level is between 80 and 120ppm.
TA is related to pH in that it stops the pH from varying quickly with small additions of acidic
or alkaline chemicals. When the TA is low it is almost impossible to control the pH. To
raise the TA, buffer (sodium bicarbonate) is added. This must be done slowly as buffer will
also cause the pH to rise. As an approximate rule every increase of 20ppm of TA will also
cause a 0.1 rise in pH. Once buffer is added it should be left to mix in the pool for a few
hours before reducing the pH.
Page 5
Installation Guide
Choosing a good location
The Sterisel is manufactured from weather resistant materials and is designed for
operation in full sun and rain. However, your Sterisel will benefit if it is protected from the
weather.
The Sterisel should not be mounted in areas where chemicals are stored (eg acid and
chlorine) as vapours from these chemicals are corrosive and may damage the electronic
controls within the units.
Insect intrusion (particularly ants) can cause problems with all equipment. Ensure that the
pool equipment area is kept free of insects as much as possible. Insect intrusion is not
covered under the warranty.
Installing the Sterisel Power Supply Unit
Locate the Power Supply Unit close to the filtration equipment so that it may be connected
easily. Connect the Power Supply to the mains power outlet of the pool area or controller
and make sure this outlet meets all applicable Australian Standard at the time of
installation.
Mount the Sterisel Power Supply Unit at least 1.5m above the ground and at least 3m from
the pool water. A mounting template has been provided that shows you where to place
screws on either a wall or post.
Installing the Sterisel Cell
The Sterisel cell housing assembly should be plumbed into the pool return line after all
other accessories (and prior to any heating take-offs).
Remember that the cell will need to be removed from its housing periodically for cleaning –
do not place it where its removal will be obstructed.
Note any water flow direction on the cell housing.
Connect the cell cable to the cell connector on the base of the Sterisel Power Supply.
Ensure that all 3 connections (2 for cell power and 1 for gas sensing) are colour matched
and not loose. .
Page 6
Page 7
Sterisel Front Panel
The Sterisel has 3 buttons to make adjustments:
(on/off)
+ (increase)
- (decrease)
The LED bar meter usually shows the amount of chlorine being produced by the Cell as a
percentage of its maximum. The Output Control turns the Cell on or off over a short
period of time. The Output setting determines how long the ON time is – for example if the
Output setting is 60% the Cell will be ON for 60% of the period and OFF for 40% of the
period. To adjust the output, simply press the INCREASE or DECREASE buttons. The
LED bar will change to a point meter (in red) while any adjustment is being made to
indicate output from 10% to 100%. The LED bar meter will return approximately 10
seconds after any adjustment is made.
Status Indicators, Warnings and Safety Features
Illustrated below are the possible status indicators, warnings and safety features that may
be observed on the Sterisel Unit in various circumstances.
Normal Operation
Cell at full current and salinity
above minimum. Note that the
Cell current can be green or
orange depending on polarity.
Low Salinity
Salt alarm is red and Cell
current is less than maximum.
Add salt and/or check Cell.
Flow Fault detected.
Cell has been turned off.
Turn off, then on again to clear
and restart.
Overload detected, Cell has
been turned off.
Turn off, then on again to clear
and restart.
Page 8
Maintenance
Like all equipment the Sterisel will look better and last longer if it is maintained and
operated in accordance with these instructions.
Sterisel Power Supply
The Gemini Power Supply has been design for operation in full sun and weather. However,
it will benefit from being under cover.
There is little maintenance required, however – some Do’s and Don’ts –
Don’t:
Install it in a small sealed enclosure (so it does not overheat)
Install it in a very hot unventilated shed (so it does not overheat)
Allow insects to nest in the unit (because they will prevent it from functioning)
Install chemical drums under or close to the unit (to prevent corrosion)
Forget about the unit once installed – it should be checked regularly to ensure
that it is working for you
Do:
Install it as per the instructions
Check it regularly
Make sure the pool balance is checked regularly
Trouble-shooting
Before requesting service, you may wish to run through the check list below but feel free
to call Pool Controls Service on 1300 550 010 or log a service call via our website –
www.poolcontrols.com.au.
If there appears to be low or no Chlorine Residual:
1.
2.
3.
4.
5.
6.
7.
8.
9.
Check stabiliser level is 40ppm – 60ppm. Add if necessary and wait for it to dissolve.
Have you added any chemical additives recently?
Check pool for phosphates and remove if necessary
If the unit is not running at all, check the fuse.
Are the operating hours sufficient?
Is the Chlorine Output set to 100%?
Is there enough salt in the water? (4000ppm)
Is the temperature of the water low?
Is the Cell scaled heavily?
If either unit is not running at all check the fuse in the bottom of the units.
Page 9
Cell Cleaning
The Cell is self-cleaning, however, some conditions such as very hard water can cause the
cell to become scaled over time.
The Cell uses an electronic means (polarity reversal) to remove scale from its cathodes.
This system works very well in most pools unless there is extreme hardness and/or mineral
levels. Even in the extreme cases where scaling does occur the rate at which it occurs is
far slower than for normal Cells.
If scale has become thick enough to nearly bridge between the Cell electrodes, it is time to
clean the Cell. Cells can be cleaned in a solution of hydrochloric acid.
Please read the warnings and instructions on the acid container.
To make the acid solution, add 1 part hydrochloric acid to 4 parts water in a suitable
container. This solution can be used a number of times so a re-useable container with a lid
can be used, but make sure it is stored safely.
Alternatively a commercial Cell Cleaning solution can be used according to the
manufacturer’s instructions.
The pump controller should be turned off so that any AutoMode functions cannot turn it
back on until after the Cell is clean and back in its housing.
Remove the Cell from its housing and immerse in the acid solution. Note that it may foam
up and overflow the sides of the container – so take care!
The Cell should not take longer than a few minutes to clean. It may also be possible to
remove some or most of the scale with a jet of water.
Never use a stiff brush or hard implement to clean the cell because this will damage
the coating.
Page
10