1
SifoScopes 4.11
Network Behavior Monitor
User Manual
February 2009
OD5000UME01–3
NOTICE
No part of this document may be reproduced or transmitted in any form or by any means, electronic or mechanical, for
any purpose, without receiving written permission from O2Security.
O2Security and its subsidiaries reserve the right to make changes to their documents and/or products or to discontinue
any product or service without notice, and advise customers to obtain the latest version of relevant information to verify,
before placing orders, that information being relied on is current and complete. All products are sold subject to the terms
and conditions of sale supplied at the time of order acknowledgement, including those pertaining to warranty, patent
infringement, and limitation of liability.
O2Security warrants performance of its products to the specifications applicable at the time of sale in accordance with
O2Security’s standard warranty. Testing and other quality control techniques are utilized to the extent O2Security deems
necessary to support this warranty. Specific testing of all parameters of each device is not necessarily performed, except
those mandated by government requirements.
Customer acknowledges that O2Security products are not designed, manufactured or intended for incorporation into any
systems or products intended for use in connection with life support or other hazardous activities or environments in
which the failure of the O2Security products could lead to death, bodily injury, or property or environmental damage
("High Risk Activities"). O2Security hereby disclaims all warranties, and O2Security will have no liability to Customer or
any third party, relating to the use of O2Security products in connection with any High Risk Activities.
Any support, assistance, recommendation or information (collectively, "Support") that O2Security may provide to you
(including, without limitation, regarding the design, development or debugging of your circuit board or other application)
is provided "AS IS." O2Security does not make, and hereby disclaims, any warranties regarding any such Support,
including, without limitation, any warranties of merchantability or fitness for a particular purpose, and any warranty that
such Support will be accurate or error free or that your circuit board or other application will be operational or functional.
O2Security will have no liability to you under any legal theory in connection with your use of or reliance on such Support.
Information in this document is subject to change without notice.
©2008 O2Security Ltd. All rights reserved. O2Security is a subsidiary of O2Micro International Ltd. (NASDAQ: OIIM, SEHK:
0457). O2Security and SifoScopes are trademarks of O2Micro International Ltd.
Table of Contents
1 Product Overview .........................................................................................................................1
1.1 What is SifoScopes?........................................................................................2
1.2 What can SifoScopes Do? ................................................................................3
2 Introduction ...................................................................................................................................9
2.1 SifoScopes Deployment Topology .................................................................... 10
2.2 Basic System Operations ............................................................................... 12
2.3 SifoScopes User Interface .............................................................................. 13
2.4 Task List...................................................................................................... 20
3 System Settings ...........................................................................................................................25
3.1 Overview..................................................................................................... 26
3.2 Configuring Network Settings ......................................................................... 26
3.3 Managing Administrator Accounts ................................................................... 33
3.4 Configuring Basic System Parameters.............................................................. 35
3.5 Import/Export System Configuration File.......................................................... 39
3.6 Update System Software ............................................................................... 40
4 Network Activity Analysis........................................................................................................41
4.1 Overview..................................................................................................... 42
4.2 Managing the Logged / Ignored User Lists........................................................ 43
4.3 Configuring Access Record Attributes............................................................... 55
4.4 Viewing Access Records According to Users ...................................................... 62
4.5 Viewing Access Records According to Service Type ............................................ 71
4.6 Set Up Content Audit .................................................................................... 76
5 IM/P2P Software Access Control .............................................................................................79
5.1 Overview..................................................................................................... 80
5.2 Managing IM Access...................................................................................... 80
5.3 Managing P2P Usage ..................................................................................... 95
6 Real-time Flow Analysis............................................................................................................97
6.1 Overview..................................................................................................... 98
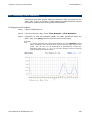
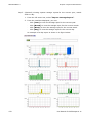
6.2 Viewing Top 10 Charts for Today’s Network Activities ......................................... 98
6.3 Viewing History Top N Charts ....................................................................... 101
6.4 Checking Flow Statistics .............................................................................. 105
7 Anomaly Flow Detection.........................................................................................................107
7.1 Overview................................................................................................... 108
7.2 Activating Anomaly Flow Detection................................................................ 108
7.3 Monitoring Detected Suspicious IP ................................................................ 111
8 Remote Backup Management.................................................................................................113
8.1 Overview................................................................................................... 114
8.2 Set up Remote Backup ................................................................................ 114
8.3 Browsing Backup Data Remotely................................................................... 115
9 System Maintenance ................................................................................................................117
9.1 Overview................................................................................................... 118
9.2 Managing the Local Hard Disk ...................................................................... 118
9.3 Viewing Statistical Reports ........................................................................... 120
9.4 Monitoring System Status ............................................................................ 124
9.5 Restoring System Data................................................................................ 127
1
Chapter
Product Overview
1
This chapter includes the following sections:
z
What is SifoScopes?
Briefly introduces the SifoScopes product and the various models in
the SifoScopes product family.
z
What can SifoScopes Do?
Introduces the various SifoScopes functions.
For an overall understanding of the SifoScopes product, please refer to
this chapter.
User Manual for SifoScopes 4.11
1
OD5000UME01-3
Chapter 1 Product Overview
1.1 What is SifoScopes?
SifoScopes is a powerful network management device with the ability to
record, analyse and control employees’ network activities including web
page browsing, mail send/receive via mail clients (such as Outlook) or
webmail, IM (Instant Messaging) software access (such as MSN, QQ,
Yahoo etc.), FTP and Telnet access etc.
Using SifoScopes, employees can be prevented from using the company’s
network resources for personal activities, thus increasing productivity. IT
administrators can also utilize the system’s flow analysis function to
understand the network’s bandwidth utilization. This facilitates network
management and maintenance.
The SifoScopes product family includes the following device models:
z
SifoScopes CM1000
z
SifoScopes CM2000
z
SifoScopes CM3000
The term “SifoScopes” is used in this document to refer to all the above
models.
2
User Manual for SifoScopes 4.11
Chapter 1 Product Overview
OD5000UME01-3
1.2 What can SifoScopes Do?
The main functions provided by SifoScopes include:
1.2.1 Comprehensive Network Activity Analysis
Users’ access to commonly used network services can be recorded by
SifoScopes for analysis. Administrators can view web activity records
based on user (records for all accessed services for each user) or service
(records of all accesses for a particular service).
The network services include:
z
z
HTTP
−
Supports proxy server mode, logging the correct URL accessed via
the proxy server
−
Records the full URL of the page being browsed
−
Correctly stores all web page contents, especially for websites
using Cookies. SifoScopes is able to correctly record the full
content of all webpages and operations accessed by this user after
he login to the site instead of only recording the site’s login page.
−
Powerful searching function, allowing administrators to search
HTTP records using the website name, user name, start/end time
of the access and even webpage content.
−
Inbuilt language encoding mechanism unique to SifoScopes
provides multi-language support. Websites records are displayed
correctly within the same list even if the sites are of different
languages. Administrators need not manually change the display
language to view the record.
−
Displays websites using site title instead of pure URL, facilitating
recognition by administrators.
SMTP, POP3/IMAP
−
Multi-language support for mail content storage. The system can
also automatically store mail contents using the Unicode encoding,
preventing characters from being unrecognizable due to encoding
issues.
−
Powerful searching function, allowing administrators to search
recorded mails using various criteria such as mail sender, recipient,
subject, whether the mail includes attachments, attachment file
names, start/end time and even mail content. This tool allows
administrators to find the desired mail records easily.
−
To provide greater convenience to users when managing mails, the
system also supports import of mails into its record list. The file
formats supported include: Outlook Express (.dbx), Outlook (.pst),
Mailbox (.mbx, .mbox).
User Manual for SifoScopes 4.11
3
OD5000UME01-3
Chapter 1 Product Overview
z
z
z
Web SMTP, Web POP3
−
Supports commonly used web mails including Yahoo, Gmail,
Hotmail, Yeah.net (网易), Sina (新浪), Sohu (搜狐), Tom, Pchome,
Hinet, Seednet, Videotron, Visnetic, Yam.com (蕃薯藤) etc.
−
An automatic webmail signature pattern database update system
uniquely designed for SifoScopes ensures the completeness and
accuracy of webmail activity records
−
Comprehensive searching function allows administrators to search
recorded webmails using various criteria such as mail sender,
recipient, subject, whether the mail includes attachments,
attachment file names, start/end time and even mail content. This
tool allows administrators to find the desired mail records easily.
IM
−
Multi-language support for IM records based on the system’s
unique language encoding mechanism
−
Stores conversation text messages and backup files transferred
over IM applications
−
Supports recording of IM activities using MSN proxy and Web MSN.
Also supports bi-directional audio record for the Skype application.
Using SifoScopes, you can not only view records of text-based
Skype conversations, but also replay or downloaded audio
conversations carried out using Skype.
−
Separates recorded contents sent from different IM accounts using
a unique categorizing mechanism, allowing administrators to easily
search for and view recorded IM data
−
Supports emailing of record contents to specific personnel for audit
purposes
FTP, Telnet
−
4
Detailed recording of all transmitted data using FTP or Telnet
services. The system also backup all uploaded or downloaded files.
Administrators will be able to open these files from the system to
view.
User Manual for SifoScopes 4.11
Chapter 1 Product Overview
OD5000UME01-3
SifoScopes allows administrators to choose between three options,
determining the level of details included in records kept for each type of
service data. These options include:
z
Content
Selecting this option enables the system to record detailed data
contents for the corresponding service type. For example, enable the
option “Content” for data transmitted via the SMTP service from LAN
users. SifoScopes will record detailed information for all mails sent by
LAN users, including the mail subject, mail content body and
attachments.
z
Message
This option enables to system to only record a brief summarized list
containing information on each access for the corresponding service
type. For example, select the option “Message” for LAN user access to
the HTTP service. SifoScopes will only record a list of HTTP web site
hyperlinks accessed by LAN users. The content of each accessed
webpage will not be stored.
z
Not Recording
Stop recording access information for the corresponding service type.
For example, select the “Not Recording” option for HTTP access by
WAN users to the internal HTTP server. The system will not store any
information on external accesses to the internal HTTP server.
1.2.2 IM/P2P Software Usage Management
SifoScopes supports strict management of IM/P2P applications, allowing
administrators to control the types of IM/P2P applications that users can
access.
For IM applications, administrators can:
z
Only allow authenticated users to access IM applications
You can set up the system to authenticate users via a user list added
locally to SifoScopes or via remote RADIUS, POP3 or LDAP
authentication servers.
z
Define IM access rules for each user, stating whether the user is
allowed, allowed to use specific IM applications, denied access to
specific IM applications and whether he can transfer files over IM
applications.
For P2P applications, administrators can define access rules for each user,
allowing or denying the user’s access to commonly used P2P applications.
User Manual for SifoScopes 4.11
5
OD5000UME01-3
Chapter 1 Product Overview
1.2.3 Analysis based on Real-time/Specific Time Interval Traffic Flow
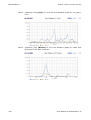
SifoScopes can generate statistics and analysis of traffic flow for both
real-time traffic and traffic generated over a specific time interval. This
gives administrators an in-depth analysis of network traffic.
Traffic flow statistics display changes in network activities during a
specific time period. Based on such statistics, administrators can
determine the overall status of the network and detect time intervals
where there are abnormal amounts of traffic flow. Ranking (top N) charts
for the current date and history data functions ranks traffic flow
generated by each user, department/group and service during a specific
time period.
For example, when viewing the statistics reports, an administrator find
that the network traffic is abnormally high during a particular time
interval. He can then view the top N charts to find the cause of this traffic,
such as which user caused this traffic when accessing which service.
1.2.4 Anomaly Flow Detection and Co-defense Mechanism
SifoScopes supports an innovative internal flow detection mechanism,
monitoring traffic generated by each internal user according to a
threshold defined by the administrator. When a large amount of data
packets is transmitted from a particular address, the system assumes
that this address is virus infected (for internal address) or is attempting
an intrusion attack on the network (for external address). Together with a
router/switch, SifoScopes can then block the source IP, preventing the
network from becoming crippled due to such attacks.
1.2.5 Remote Backup and Browsing Capability
You can set up the system to automatically backup all data to a remote
NAS (Network Attached Storage) or file server periodically. You can also
perform this backup manually.
SifoScopes also allows you to browse backup data via the SifoScopes
administrative UI directly.
6
User Manual for SifoScopes 4.11
Chapter 1 Product Overview
OD5000UME01-3
1.2.6 Access Control Based on Company’s Organization Structure
On the SifoScopes system, administrators can define groups
(departments), categorizing each user into the various groups. Each
administrator account can be assigned to monitor and browse activities of
users from specific groups.
An administrator will only be able to view and manage user records for
users belonging to the groups they are assigned to.
1.2.7 Automatic Generation of Periodic/History Reports
SifoScopes can automatically generate periodic reports for system traffic
flow and hard disk utilization. You can also manually generate history
reports via the system. This allows administrators to monitor the overall
operating status of the network.
User Manual for SifoScopes 4.11
7
2
Chapter
Introduction
2
This chapter comprises of the following sections:
z
SifoScopes Deployment Topology
Explains the two SifoScopes deployment modes
z
Basic System Operations
Guides you through the procedure to login and logout of the system’s
user interface
z
SifoScopes User Interface
Describes the SifoScopes UI (user interface) and the various system
menu options
z
Task List
Lists the various tasks a SifoScopes administrator may need to
perform when managing the system and network activities.
User Manual for SifoScopes 4.11
9
OD5000UME01-3
Chapter 2 Introduction
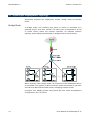
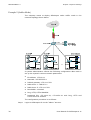
2.1 SifoScopes Deployment Topology
SifoScopes supports two deployment modes: Bridge mode and Sniffer
mode.
Bridge Mode
In bridge mode, one interface port (Port1 or Port2) is connected to a
gateway device, such as a firewall. The other port is connected to a hub
or switch device within the internal networks. An example network
topology when deploying SifoScopes in bridge mode is shown below.
When working under bridge mode, all functions of the SifoScopes device
is accessible. The system is able to monitor network activities in real time
and can also block IM and P2P access, managing network traffic.
Configure your SifoML system using the IP, ftp user name and password
configured on the FTP server.
10
User Manual for SifoScopes 4.11
Chapter 2 Introduction
OD5000UME01-3
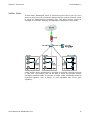
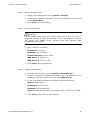
Sniffer Mode
In this mode, SifoScopes’ Port1 is connected to the mirror port of a core
switch or any port of a Hub device deployed in the internal network. Port2
is used for administrative purposes only. The figure below shows an
example of a network topology if SifoScopes is deployed in this mode.
Under sniffer mode, SifoScopes is only able to monitor network activities
in real time. The system will not be able to block IM and P2P access,
managing network traffic. To operate in sniffer mode, SifoScopes must be
deployed together with a switch or hub equipped with mirror port
capability.
User Manual for SifoScopes 4.11
11
OD5000UME01-3
Chapter 2 Introduction
2.2 Basic System Operations
2.2.1 System Login
SifoScopes administrators can login to the system’s UI via a standard
web browser after SifoScopes is installed and connected to your network.
Note:
Please refer to the “Quick Start Guide for SifoScopes 4.05” for a step by
step guide to installing your SifoScopes device in the network.
The login procedure is as follows:
Step 1
Activate your web browser on the administrative PC.
Your administrative PC must be able to access the network where
SifoScopes is deployed in. If your PC is directly connected to SifoScopes
via a cross-over cable, please ensure that your PC’s IP address is within
the same subnet as the IP address of SifoScopes’ administrative interface.
Step 2
In the address bar, enter the IP address of SifoScopes’ administrative
port. (Example: http://192.168.1.1).
The default IP address of SifoScopes’ Port2 interface is 192.168.1.1.
Please refer to “3.2 Configuring Network Settings” for details on
modifying the ports’ IP address.
Step 3
A login dialog window will appear. Enter your user name and password in
the respective textboxes.
The system default administrator account is “admin” with the password
“admin”. For security purposes, we recommend that you change the
default administrator password at the initial login. For information on
changing account password, please see “3.3 Managing Administrator
Accounts”.
Step 4
Click [OK] to login to the system.
2.2.2 System Logout
Log out of the SifoScopes system after completing configuration or
monitoring activities enhances system and network security.
12
Step 1
Select “System > Logout” from the left menu bar. A confirmation
prompt will be displayed.
Step 2
Click [OK] to confirm from the prompt window to confirm the logout
operation. Note that you must close and re-activate the web browser if
you wish to re-login to the system.
User Manual for SifoScopes 4.11
Chapter 2 Introduction
OD5000UME01-3
2.3 SifoScopes User Interface
Upon successful login, the SifoScopes administrative UI will be displayed.
SifoScopes web UI includes 2 different areas:
z
Menu Bar
The leftmost column of this interface is the menu bar. You can
navigate to the configuration/monitoring interfaces of the various
system functions by selecting the corresponding menu options. The
tables later in this section briefly explain each option.
z
Operation Window
The right frame of the web UI is the operation window where you can
configure the system, monitor network activities etc. Detailed
information regarding the various system functions can be found in
the later chapters of this manual (Chapters “3 System Settings” to “9
System Maintenance”).
User Manual for SifoScopes 4.11
13
OD5000UME01-3
Chapter 2 Introduction
Module: System
Description
Sub Menu Options
14
Admin
To manage the administrator accounts that can
login to SifoScopes UI. This includes adding and
deleting of accounts, modifying account access
authority and password etc.
Interface IP
Here, you can modify the IP addresses of
SifoScopes’ ports, gateway, DNS servers etc.
Setting
Various system settings such as setting up email
alert notifications, device deployment mode,
export/import
configuration
files,
web
management port numbers, log storage time,
system restore, format hard disk etc.
Date/Time
Configure to synchronize system date and time
with local PC or an internet server.
Permitted IPs
Set up a list of IP addresses from which
administrators
are
allowed
to
login
to
SifoScopes web UI. Login attempts from PCs
with IP addresses not included in this list will be
denied.
Language
Select
the
interface
display
language.
Languages available include: English, Simplified
Chinese and Traditional Chinese
Installation Wizard
Activate an installation wizard that guides you
through the basic system configurations such as
date/time, administrator accounts etc.
Logout
Logout from the system.
Software Update
Update the system firmware version.
User Manual for SifoScopes 4.11
Chapter 2 Introduction
OD5000UME01-3
Module: User List
Description
Sub Menu Options
Setting
From this interface, you can import/export the
list of users from/to the administrative PC and
specify user group names.
Logged
Here you can add subnets to be monitored by
SifoScopes and view a list of all users within the
added subnets whose activities will be logged by
the system.
You can view logged user list according to the
subnets or department/group users belong to.
Ignored
Here you can manage a list of all users within
the monitored subnets whose activities are not
logged by the system.
You can view users according to the subnets or
department/group they belong to.
User Manual for SifoScopes 4.11
15
OD5000UME01-3
Chapter 2 Introduction
Module: IM Management
Description
Sub Menu Options
Configure
Logon
Notice
Enable/Disable NetBIOS alert notification
sent to the user when he login to his IM
account. You can also send notification
messages when he successfully logs-in to
particular IM software including MSN,
Yahoo and ICQ/AIM.
Authentication
Setting
Enter a message displayed to users
accessing SifoScopes’ IM authentication
login screen.
User
Manage user accounts that are allowed to
access IM software. These users are
authenticated locally by SifoScopes.
RADIUS
Enable and set up a remote RADIUS
server for user authentication.
POP3
Enable and set up a remote POP3 server
for user authentication.
LDAP
Enable and set up a remote LDAP server
for user authentication.
Default
Rule
Set up IM access default rules to be
applied on all authenticated IM users. You
can also export/import IM user list from
this interface.
Account
Rule
From this interface,
specific IM access rules
is assigned a specific
corresponding default
applicable to this user.
Rule
Module: P2P Management
you can assign
to users. If a user
account rule, the
rule will not be
Description
Sub Menu Options
16
Default Rule
Set up P2P access default rules to be
applied on all authenticated P2P users.
User Rule
From this interface, you can assign specific
P2P access rules to users. If a user is
assigned a specific account rule, the
corresponding default rule will not be
applicable to this user.
User Manual for SifoScopes 4.11
Chapter 2 Introduction
OD5000UME01-3
Module: Record
Description
Sub Menu Options
Setting
Setting
Here, configure the basic settings for
recording of user web activities including
updating the Web Mail, IM and P2P
signature database; user name binding
option; plugins; record activities for which
services; whether to record LAN to LAN
traffic; number of records to display per
page in the UI; mail reports; character
encoding for stored data; whether to store
entire http pages etc.
User
Logged
View the records of all activities for each
user individually.
Service
SMTP
View records of all mail activities by users
via the SMTP service.
POP3/IMAP
View records of all mail activities by users
via the POP3/IMAP service.
HTTP
View records of all webpage browsing
activities by users via the HTTP service.
IM
View records of all IM access by users.
Web SMTP
View records of all web mail activities by
users via the Web SMTP service.
Web POP3
View records of all web mail activities by
users via the Web POP3 service.
FTP
View records of all file transfer events by
users via the FTP service.
Telnet
View records of all users’ telnet activities.
Module: Content Auditing
Description
Sub Menu Options
Setting
User Manual for SifoScopes 4.11
Set up SifoScopes to send
from the previous 1 day via
daily. Only logs matching
criteria will be sent to the
recipient.
logs collected
email at 0:30
the specified
corresponding
17
OD5000UME01-3
Chapter 2 Introduction
Module: Flow Analysis
Description
Sub Menu Options
Today Top-10
View user, department/group and service Top10 ranking charts for traffic flow generated
within any time interval between 0:00 on the
current day to the current time.
History Top-N
View the Top N user, department/group, or
service charts for traffic flow generated during
the specified time interval.
Flow Statistics
View traffic flow graphs for the past 1 day,
hour or 5 minutes to analyse changes to
network traffic during a particular time period.
Note: The “Flow Analysis” function is only available for SifoScopes CM2000 and
SifoScopes CM3000. All other models do not support this function.
Module: Anomaly Flow IP
Description
Sub Menu Options
Setting
Configure anomaly flow detection settings
including whether to enable anomaly flow IP
blocking, enable co-defense systems etc. You
can also set up a list of IP addresses that will
not be checked for anomaly flow here.
Virus-Infected IP
List of blocked internal IP
suspected to be virus-infected.
Intrusion IP
List of blocked external IP addresses
suspected
to
be
initiating
DoS/DDoS
intrusion attacks on the internal network.
Module: Local Disk
addresses
Description
Sub Menu Options
18
Storage Time
Manage the number of days to store logs for
each type of service.
Disk Space
This interface allows you to view the amount
of disk space used by specific users or
department/group for each service type.
User Manual for SifoScopes 4.11
Chapter 2 Introduction
OD5000UME01-3
Module: Remote Backup
Description
Sub Menu Options
Setting
Browse
Backup
Setting
Here, configure whether to enable and set up
the system to periodically backup logged
information in its hard disk to a remote disk,
view hard disk utilization and enable email
notification for backup operations.
Browse
Setting
Select whether to enable administrators to
browse backup information on the remote disk
from SifoScopes’ web UI directly.
SMTP
Browse logged records of all SMTP activities
stored on the remote backup disk.
POP3/IMAP
Browse logged records of all POP3/IMAP
activities stored on the remote backup disk.
HTTP
Browse logged records of all HTTP activities
stored on the remote backup disk.
IM
Browse logged records of all IM activities
stored on the remote backup disk.
Web SMTP
Browse logged records of all Web SMTP
activities stored on the remote backup disk.
Web POP3
Browse logged records of all Web POP3
activities stored on the remote backup disk.
FTP
Browse logged records of all FTP activities
stored on the remote backup disk.
Telnet
Browse logged records of all Telnet activities
stored on the remote backup disk.
Module: Report
Description
Sub Menu Options
Setting
Configure the system to generate and send
(via email) reports periodically. You can also
generate and send a report containing history
data from a particular time range here.
Traffic Report
Reports containing bar charts for different
types of protocols (TCP, UDP, and ICMP)
showing the traffic generated using these
protocols in the network.
Storage Report
Chart-based report on system disk storage
utilization for each service type.
User Manual for SifoScopes 4.11
19
OD5000UME01-3
Chapter 2 Introduction
Module: Status
Description
Sub Menu Options
System Info
View various system information including
system uptime and resource utilization etc.
Current Session
Lists all currently established user sessions
that are being monitored by SifoScopes.
IM/P2P Log
Log of all user IM/P2P accesses.
Event Log
Log list recording all system and administrator
events over the system.
2.4 Task List
The table below contains a list of possible tasks an administrator may
need to perform when configuring the system or monitoring network
activities via SifoScopes.
Task Type: System Settings
20
Task Name
Carried Out When…
Reference
Configuring
Network Settings
You need to set up network related
configurations including system work
mode, interface address etc. to
connect the system to the network.
3.2
Managing
Administrator
Accounts
You want to add, modify or delete
administrator accounts.
3.3
Configuring Basic
System
Parameters
You need to set up email
notifications, web management port
numbers, log storage time, and
synchronize system date and time
etc.
3.4
Import/Export
System
Configuration File
You need to export the current
system’s configurations into a file or
restore the system’s settings by
importing a previously backup
configuration file.
3.5
Update System
Software
You want to update the system
software.
3.6
User Manual for SifoScopes 4.11
Chapter 2 Introduction
OD5000UME01-3
Task Type: Network Activity Analysis
Task Name
Carried Out When…
Reference
Managing Logged
and Ignored User
List
You need to manage the user
department/groups, assign users to
be monitored to the logged list or
assign users that will not be
monitored to the ignored list.
4.2
Set Up Record
Attributes
You want to update the system’s
Web Mail, IM and P2P software
signature database, select user
name binding option, download
plugins, enable recording of LAN to
LAN activity, select the services to
record, specify the number of list
items to display per UI page, select
the character encoding used to store
data, whether to store entire web
pages, mail reports, etc.
4.3
View Records By
User
You want to view and analyse
network activity records for each
user
4.4
View Records By
Service
You want to view and analyse
network activity for each service
type
4.5
Set up Content
Audit
You want to set up the system to
send records, from the previous 1
day, fulfilling specific criteria at 0:30
daily.
4.6
User Manual for SifoScopes 4.11
21
OD5000UME01-3
Chapter 2 Introduction
Task Type: IM/P2P Software Access Control
Task Name
Carried Out When…
Reference
Managing IM
Access
You need to manage user accesses
to popular IM software such as MSN,
Yahoo Messenger etc.
5.2
Managing P2P
Usage
You need to control file transfer over
commonly used P2P programs such
as eDonkey, Bit Torrent etc.
5.3
Task Type: Real-time Flow Analysis
22
Task Name
Carried Out When…
Reference
Viewing Top 10
Charts for Today’s
Network Activities
You want to view the top 10 users,
groups and services ranked
according to the amount of traffic
generated within any time interval
between 0:00 today till the current
time.
6.2
Viewing History
Top N Charts
You want to view top N charts of
users, groups or services ranked
based on traffic flow during any time
interval.
6.3
Flow Statistics
You want to view graphs of traffic
flow for the past 1 day, 1 hour or 5
minutes to analyse changes to
network traffic.
6.4
User Manual for SifoScopes 4.11
Chapter 2 Introduction
OD5000UME01-3
Task Type: Anomaly Flow Detection
Task Name
Carried Out When…
Reference
Activate Anomaly
Flow Detection
You need to enable SifoScopes to
detect anomaly traffic from
suspicious IP addresses.
7.2
Monitor Detected
Suspicious IP
You want to view the list of blocked
virus/intrusion IP addresses.
7.3
Task Type: Backup Remote Management
Task Name
Carried Out When…
Reference
Configuring
Remote Backup
You want to enable the remote
backup function to backup data to a
remote NAS (Network Attached
Storage) or file server.
8.2
Browsing Backup
Data
You want to view previously backup
history data from the remote server.
8.3
Task Type: System Maintenance
Task Name
Carried Out When…
Reference
Managing Local
Disk Storage
You want to view the utilization of
the local hard disk and modify the
storage period for records for each
type of service.
9.2
Viewing Statistical
Reports
You need to view or email statistical
reports on local disk storage
utilization and network traffic.
9.3
Checking System
Status
You need to check system’s
performance, view established
sessions and event logs.
9.4
Restore System
Data
You need to restore system
configuration to factory default
setting, format system hard disk, or
check and repair the system’s
database.
9.5
User Manual for SifoScopes 4.11
23
3
Chapter
System Settings
3
The following sections can be found in this chapter:
z
Overview
Briefly introduces the various functions included when setting up the
system.
z
Configuring Network Settings
Details the configuration of various network parameters to connect
SifoScopes to your network.
z
Managing Administrator Accounts
Explains the management of SifoScopes administrator accounts and
the various levels of access authority that can be assigned to each
account.
z
Configuring Basic System Parameters
Details the configuration of basic system parameters.
z
Import/Export System Configuration File
Explains how to import/export system configuration files to/from
SifoScopes.
z
Update System Software
Describes the update procedure to update your device’s software
version.
You should refer to this chapter when you want to perform operations
related to configuration of various system settings.
User Manual for SifoScopes 4.11
25
OD5000UME01-3
Chapter 3 System Settings
3.1 Overview
This series of operations allow you to set up SifoScopes such that it is
connected and operates normally in the network. The operations include:
network settings configuration, administrator account management,
configuration file import/export, software update etc.
3.2 Configuring Network Settings
Through this function, you specify various SifoScopes network
parameters such as working mode, interface IP address etc., ensuring
that the system connects to the network correctly.
Depending on the deployment of SifoScopes in the network, the system
can operate in one of two modes: Bridge mode and Sniffer mode. For
more information on each mode, please refer to “2.1 SifoScopes
Deployment Topology”.
SifoScopes also supports VLAN networks. Please specify the VLAN ID for
the corresponding interface when configuring the system.
To further enhance the system’s security, you can also restrict the IP
addresses that are allowed to login to SifoScopes. Administrative PCs
using an IP not included in this list of addresses will not be able to login
to the system. To enable this function, first add the administrative IP(s).
Next, disable “Ping”, “HTTP” and “HTTPS” from the “System > Interface
IP” configuration page.
26
User Manual for SifoScopes 4.11
Chapter 3 System Settings
OD5000UME01-3
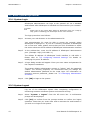
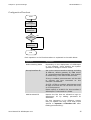
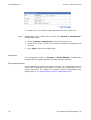
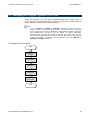
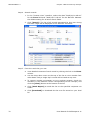
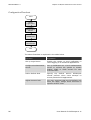
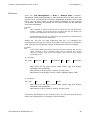
Configuration Flowchart
Start
Select
Working Mode
Set up
Interface IP
No
Add
Permitted IP?
Yes
Add
Permitted IP
End
Each operation in the flowchart above is explained in the table below.
Operation
Explanation
Select Working Mode
Depending on the deployment of SifoScopes
in your network, select whether the system
operates in Bridge or Sniffer mode.
Set up Interface IP
Set up the various interface settings including
IP address, default gateway IP, DNS server
IP, upload/download bandwidth, and whether
to enable Ping, HTTP and HTTPS services.
If Ping is enabled, administrators will be able
to execute the Ping command on this
interface’s IP address.
If HTTP, HTTPS is enabled, administrators will
be able to access the UI via either the HTTP
or HTTPS protocol.
Please specify a VLAN ID for this interface if
SifoScopes is connected to a VLAN.
Add Permitted IP
Restrict the PCs that are allowed to login to
SifoScopes’ UI by adding permitted IP
addresses.
For this restriction to be effective, ensure
that you disable the Ping, HTTP and HTTPS
options in “System > Interface IP” after
adding permitted IP(s).
User Manual for SifoScopes 4.11
27
OD5000UME01-3
Chapter 3 System Settings
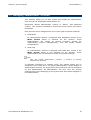
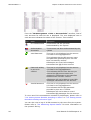
Example 1 (Bridge Mode)
The company wants to deploy SifoScopes under bridge mode in the
network topology shown below.
A system administrator collects the following necessary configuration
data.
z
IP address: 172.19.0.1
z
Netmask: 255.255.255.0
z
Default gateway: 172.19.1.254
z
DNS Server 1: 168.95.1.1
z
DNS Server 2: 172.19.1.254
z
Bandwidth: unlimited
z
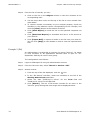
Ping, HTTP, HTTPS enabled
z
Permitted IP: no restriction
The configuration procedure is as follows:
Step 1
28
Login to SifoScopes via the “admin” account.
User Manual for SifoScopes 4.11
Chapter 3 System Settings
Step 2
OD5000UME01-3
Select working mode
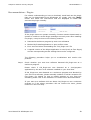
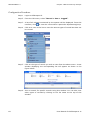
1. From the left menu bar, select “System > Setting”.
2. From the interface displayed, scroll to the “Deployment Mode” area.
Select the Bridge Mode option.
3. Click [OK] from the bottom of this interface to save the setting.
Step 3
Set up interface IP
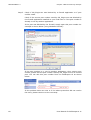
1. Select “System > Interface IP” from the left menu bar.
2. On this interface, configure as follows:
IP Address: 172.19.0.1
Netmask: 255.255.255.0
Default Gateway: 172.19.1.254
DNS Server 1: 168.95.1.1
DNS Server 2: 172.19.1.254
Max. Downstream Bandwidth: 204800
Max. Upstream Bandwidth: 204800
3. Check the checkboxes to enable the Ping, HTTP and HTTPS services.
4. Click [OK] to save the configurations.
User Manual for SifoScopes 4.11
29
OD5000UME01-3
Chapter 3 System Settings
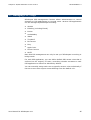
Example 2 (Sniffer Mode)
The company wants to deploy SifoScopes under sniffer mode in the
network topology shown below.
A system administrator collects the following configuration data used to
set up the system’s various network parameters.
z
IP address: 172.19.0.1
z
Netmask: 255.255.255.0
z
Default gateway: 172.19.1.254
z
DNS Server 1: 168.95.1.1
z
DNS Server 2: 172.19.1.254
z
Bandwidth: unlimited
z
Ping, HTTP, HTTPS disabled
z
Permitted IPs: 172.19.10.10, 172.19.20.10 with Ping, HTTP and
HTTPS services enabled
The configuration procedure is as follows:
Step 1
30
Login to SifoScopes UI via the “admin” account.
User Manual for SifoScopes 4.11
Chapter 3 System Settings
Step 2
OD5000UME01-3
Specify working mode
1. Select, from the left menu bar, “System > Setting”.
2. Scroll to the “Deployment Mode” area in the displayed interface and
select Sniffer Mode.
3. Click [OK] to save the setting.
Step 3
Specify interface IP
Warning
Do not disable Ping, HTTP and HTTPS during this step or you will no
longer be allowed to login to SifoScopes’ UI via the network interface.
You should only disable these services from this interface after
completing Step 4 below.
1. From the left menu bar, select “System > Interface IP”.
2. Here, configure as follows:
IP Address: 172.19.0.1
Netmask: 255.255.255.0
Default Gateway: 172.19.1.254
DNS Server 1: 168.95.1.1
DNS Server 2: 172.19.1.254
3. Click [OK] to save the settings.
Step 4
Adding permitted IPs
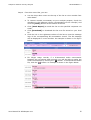
1. From the left menu bar, select “System > Permitted IPs”.
2. A list of permitted IP addresses allowed to login to SifoScopes UI is
displayed. From the bottom of the list, click [New Entry].
3. In the “Add New Permitted IPs” interface, enter the following:
Name: Management_1
IP Address: 172.19.10.10
Netmask: 255.255.255.255
Service: Check the checkboxes to enable “Ping”, “HTTP” and “HTTPS”
4. Click [OK] to save the new permitted IP.
User Manual for SifoScopes 4.11
31
OD5000UME01-3
Chapter 3 System Settings
5. Repeat (2) to (4) to add another permitted IP (“172.19.20.20”).
Step 5
Disable Ping, HTTP, HTTPS services from the “System > Interface IP”
configuration page.
1. Select “System > Interface IP” from the left menu bar.
2. Uncheck the “Ping”, “HTTP” and “HTTPS” checkboxes to disable these
services.
3. Click [OK] to save the configuration.
Reference
The configuration steps in “System > Install Wizard” interface also
includes certain system settings (including network settings).
Recommendations
After completing the system’s network settings, we recommend that you
record the configuration information or export this configuration into a
locally stored file. For details on exporting system configuration files,
please refer to “3.5 Import/Export System Configuration File”.
32
User Manual for SifoScopes 4.11
Chapter 3 System Settings
OD5000UME01-3
3.3 Managing Administrator Accounts
This function allows you to add, delete and modify the administrator
accounts via the SifoScopes administrative UI.
SifoScopes default administrator account is “admin” with password
“admin”. This account is allowed to access the entire system and cannot
be deleted.
Each account can be assigned with one of two types of access authority:
z
Read/Write
An administrator account is assigned with Read/Write access if the
Write Access option is selected for the account. These
administrators can access all system functions (except for
administrator account management), view and modify system
configurations.
z
Read-only
An administrator account is assigned with Read-only access if the
Write Access option is not selected for the account. These
administrators are not allowed to modify any system settings.
Note:
Only the default administrator
administrator accounts.
(“admin”)
is
allowed
to
manage
To facilitate monitoring of network users, the system allows you to
categorize users using up to 12 groups (departments). When adding an
administrator account, you must select the groups that can be monitored
by this administrator. An administrator can only view the records
collected from users belonging to the groups that have been assigned to
this administrator.
User Manual for SifoScopes 4.11
33
OD5000UME01-3
Chapter 3 System Settings
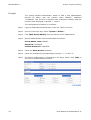
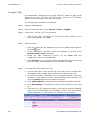
Example
The system default administrator wants to add a new administrator
account for Blake, with the account name “BlakeIT”, password
“12345678”. This account is assigned with read/write authority and can
monitor users belonging to groups 1, 2 and 3.
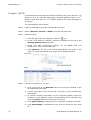
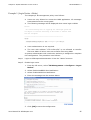
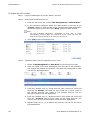
The configuration procedure is as follows:
Step 1
Login to SifoScopes administrative UI via the “admin” account.
Step 2
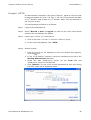
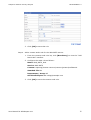
From the left menu bar, select “System > Admin”.
Step 3
Click [New Group-Admin] from the bottom of the displayed list.
Step 4
Specify administrator account information as follows:
Group-Admin name: BlakeIT
Password: 12345678
Confirm Password: 12345678
34
Step 5
Check the Write Access checkbox.
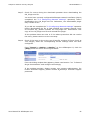
Step 6
Check the checkboxes corresponding to groups “1”, “2” and “3”.
Step 7
The above configuration is illustrated in the figure below. Click [OK] to
save the new administrator account.
User Manual for SifoScopes 4.11
Chapter 3 System Settings
OD5000UME01-3
Reference
Please refer to “4 Network Activity Analysis” for details on user groups
and browsing of user records.
The system also supports a mechanism that tracks the number of login
failures for each administrator, locking accounts that failed to login
successfully after a certain number of times for a specified time period.
To set up this function, please configure the After _ time(s) of
unsuccessful logon attempt(s), block the IP address for _
minute(s) field at the “Web Management (Port Number)” area of the
“System > Setting” interface. For more details, please refer to “3.4
Configuring Basic System Parameters”
Recommendations
We recommend that only a limited number of administrator accounts are
assigned with write access. Also, ensure that account passwords are
modified periodically. This will enhance the security and stability of the
system.
3.4 Configuring Basic System Parameters
Basic system parameters include configuring email alert notification, web
management port numbers, log storage time, system date/time etc.
Configuration Procedure
Step 1
Login to SifoScopes UI via a read/write administrator account.
Step 2
Select “System > Setting” from the left menu bar.
Step 3
In this interface, set up the parameters accordingly.
Step 4
Click [OK] to save the system settings.
Step 5
From the left menu bar, select “System > Date/Time”.
Step 6
Select to Enable synchronize with an Internet time Server and
configure the parameters accordingly.
Step 7
Click [OK] to save the date/time settings.
User Manual for SifoScopes 4.11
35
OD5000UME01-3
Chapter 3 System Settings
Reference
The various parameters that you may need to configure during the above
procedure are explained in the tables below.
“System > Setting” interface “E-mail Settings”
Parameter Name
Explanation
Configuration
Company Name
Name of the company where
SifoScopes is deployed
[How to Configure]
Enter the value in
the textbox
[Range] Up to 32
characters
Device Name
Name of
device
the
SifoScopes
[How to Configure]
Enter the value in
the textbox
[Range] Up to 30
characters
Sender Address
Sender
address
for
all
notification emails sent by
the system
[How to Configure]
Enter the email in
the textbox
[Range] Up to 60
characters
SMTP Server
Domain name or IP address
of the SMTP server used to
send the notification emails
[How to Configure]
Enter the value in
the textbox
[Range] Up to 80
characters
[Example]
mail.mydomain.co
m
E-mail Address 1 /
E-mail Address 2
Email address(es) of the
recipient(s) of notification
mails
[How to Configure]
Enter the value in
the textbox
[Range] Up to 60
characters
36
User Manual for SifoScopes 4.11
Chapter 3 System Settings
OD5000UME01-3
Parameter Name
Explanation
Configuration
Username
You must Enable SMTP
Server Authentication if
[How to Configure]
z
you want to check the
validity of the recipient
email
addresses
(email
address 1 / email address
2)
z
or if the SMTP server
requires SifoScopes to be
authenticated before it is
allowed to send mails.
Enter the value in
the textbox
This is the username used to
authenticate the system with
the SMTP server
Password
Corresponding password to
authenticate SifoScopes with
the SMTP server
[How to Configure]
Enter the value in
the textbox
“System > Setting” interface “Web Management (Port Number)”
Parameter Name
Explanation
Configuration
HTTP Port
Port number used to login to
SifoScopes UI via the HTTP
protocol
[How to Configure]
Enter the value in
the textbox
[Default] 80
HTTPS Port
Port number used to login to
SifoScopes UI via the HTTPS
protocol
[How to Configure]
Enter the value in
the textbox
[Default] 443
After X time(s)
of unsuccessful
logon
attempt(s),
block the IP
address for Y
minute(s)
Specify the maximum number
of consecutive login failures for
each administrator (X). When
an administrator fails to login to
the system after this number of
tries, his IP address will be
blocked for a specific period of
time (Y).
[How to Configure]
Enter the values in
the textboxes
[Default]
0 time, 0 minute
This function is disabled by
default (default value “0”).
User Manual for SifoScopes 4.11
37
OD5000UME01-3
Chapter 3 System Settings
“System > Setting” interface “Log Storage Time”
Parameter Name
Explanation
Configuration
Storage Time
Number of days to store logs.
All logs older than this value
will be deleted from the system
[How to Configure]
Enter the value in
the textbox
[Range] 1 - 999
[Default] 14
“System > Date/Time” interface
38
Parameter Name
Explanation
Configuration
Enable
synchronize with
an Internet time
Server
Synchronize SifoScopes’ date
and time with the specified
internet server
[How to Configure]
Use Daylight
Saving Time
Select this option if the device
is located in a region that
follows daylight saving. When
selected, the device time will
be shifted forward by 1 hour
during the time period when
daylight saving is in effect
[How to Configure]
From / … To /
Specify the time period during
which daylight saving is in
effect
[How to Configure]
Check the
checkbox to enable
Check the
checkbox to enable
Select the starting
time (From) and
ending time (To)
from
the
drop
down menu in the
format MM/DD
Server IP /
Name
IP address or domain name of
the Internet time server to
synchronize with
[How to Configure]
Update system
clock every X
minutes
Time interval between each
synchronization
of
system
date/time with the Internet
time server
[How to Configure]
Enter the value in
the textbox
Enter the value in
the textbox
[Range] 0 – 99999
User Manual for SifoScopes 4.11
Chapter 3 System Settings
OD5000UME01-3
3.5 Import/Export System Configuration File
You can export SifoScopes current configurations into a file for backup
purposes, allowing you to restore these configurations in the future
simply by importing the file.
Configuration Procedure
Step 1
Login to SifoScopes UI via a read/write administrator account.
Step 2
From the left menu bar, select “System > Setting”. From the
“SifoScopes System Configuration” area at the top of this interface, you
can:
z
z
Export current system configurations
−
Click [Export].
−
Specify the file name and directory path to store the configuration
file to.
Import a previous backup configuration file into the system
−
Click [Browse…].
−
Select the configuration file to be uploaded.
Recommendations
We recommend that you export system configurations for backup
purposes periodically or before performing any major changes to system
settings. This allows you to restore the system to a stable state easily
should abnormalities occur.
User Manual for SifoScopes 4.11
39
OD5000UME01-3
Chapter 3 System Settings
3.6 Update System Software
This function allows you to upgrade your system’s software version.
Configuration Procedure
Warning:
Please do not perform any other operations on SifoScopes, disconnect the
device’s power source or shutdown the device during the update process.
Step 1
Login to SifoScopes UI via a read/write account.
Step 2
From the left menu bar, select “System > Software Update”.
Step 3
Click [Browse…] to select the update patch file. Click [OK] to begin the
update. The update process takes approximately 3 minutes. The device
will automatically reboot once the update completes.
Recommendations
We recommend that administrators perform the update system software
version operation using a workstation located in the internal network.
This prevents update failures due to network disconnection.
40
User Manual for SifoScopes 4.11
4
Chapter
Network Activity Analysis
4
This chapter includes the following sections:
z
Overview
Briefly explains the network activity record analysis function and
related concepts.
z
Managing the Logged / Ignored User Lists
Introduces, in detail, how to define user groups/departments, and set
up the lists of users whose activities should be logged/ ignored by the
system.
z
Configuring Access Record Attributes
Explains the procedure to set up the system to automatically update
its Webmail/IM/P2P signature database and various other record
attributes such as whether to record activities from internal sources
to internal destinations, which services are to be recorded, HTTP web
page storage, character encoding etc.
z
Viewing Access Records According to Users
Describes how to view and analyse access records based on users.
z
Viewing Access Records According to Service Type
Describes how to view and analyse access records for each service
type.
z
Set Up Content Audit
Introduces the system content audit function and the procedure to set
up the system to search, at 0:30 daily, for records satisfying certain
criteria from the previous 1 day, sending these records to the
specified recipients.
Network/department administrators can refer to this chapter when they
need to monitor the network activities of employees.
User Manual for SifoScopes 4.11
41
OD5000UME01-3
Chapter 4 Network Activity Analysis
4.1 Overview
Record and analysis of network activities is a core function of the
SifoScopes system. You must define the logged and ignored user lists and
configure record attributes to set up this function. You can then view and
analyse network activity records based on user or service type. The
system also allows you to send specific records to various personnel for
audit purposes.
z
User
To be specific, these refer to the PCs used by internal employees that
can be monitored by SifoScopes. Generally, each employee is
assigned a fix PC to work with. Hence, the term “User” can also refer
to the employee who uses a monitored PC.
z
Group
These are user groups defined in the system to facilitate management.
Multiple users can be assigned to each group but each user can only
belong to one group. You can define up to 128 groups.
Each SifoScopes administrator can only view and monitor the records
of users belonging to the groups that are assigned to his account.
Records of all other users will not be available. For details on
assigning administrator access authority, please refer to “3.3
Managing Administrator Accounts”.
Sections “4.4 Viewing Access Records According to Users” and “4.5
Viewing Access Records According to Service Type” below explain how
to view user activity records.
z
Logged List
This is a list of all users whose activities are to be monitored by
SifoScopes. The system displays network activities generated by
these users only.
By default, the system adds all newly added/detected users into the
logged list.
z
Ignored List
This is a list of all users whose activities will not be monitored by
SifoScopes. You will not be able to view records of activities generated
by these users from SifoScopes.
42
User Manual for SifoScopes 4.11
Chapter 4 Network Activity Analysis
OD5000UME01-3
4.2 Managing the Logged / Ignored User Lists
Using this function, you can set up department/groups, assign users to
their respective groups and specify which users are to be monitored and
which users are to be ignored by the system.
Note:
In the “Record > Setting > Setting” interface, if the “AD Server”
option is used to bind user names and the various parameters of the AD
server has been configured, SifoScopes automatically disables searching
and management of logged user list based on subnet addresses.
Administrators will also not be able to manage the logged user list. The
user list will be automatically retrieved from the AD server or from the PC
running the plugin (CM_Plugin.exe) downloaded from the “Record >
Setting > Setting” interface.
Configuration Flowchart
Start
Define
Department /
Groups
Add Subnet
Add Users
Manage
Logged List
Manage
Ignored List
End
User Manual for SifoScopes 4.11
43
OD5000UME01-3
Chapter 4 Network Activity Analysis
The table below explains the operations in the above flowchart.
44
Operation
Explanation
Define Department /
Groups
Enter the names of the departments/groups
to categorize users into
Add Subnet
Add the subnets that are to be monitored by
SifoScopes. You can skip this step if you
have already added all subnets via the
“System > Installation Wizard” interface.
Add Users
Add users by importing a .csv file or via the
search function.
Manage Logged List
Newly added users will be assigned to the
logged list by default. This operation allows
you to modify various user attributes (such
as user group etc.) from this list or delete
users from the list.
Manage Ignored List
Move all users that need not be monitored by
SifoScopes from the logged list to the
ignored list or directly delete the user from
the lists.
User Manual for SifoScopes 4.11
Chapter 4 Network Activity Analysis
OD5000UME01-3
Example 1 (Add Users via the Search Function)
The company’s organization structure and network topology are as
follows:
z
Operations department
Users
in
this
department
are
located
in
the
subnet
172.19.10.0/255.255.255.0. All users in this subnet (except for
172.19.10.10) must be monitored by SifoScopes.
z
Research department
Users
in
this
department
are
located
in
the
subnet
172.19.20.0/255.255.255.0. All users in this subnet (except for
172.19.20.10) must be monitored by SifoScopes.
z
Production department
Users
in
this
department
are
located
in
the
subnet
172.19.30.0/255.255.255.0. All users in this subnet (except for
172.19.30.10) must be monitored by SifoScopes.
z
Management department
Users
in
this
department
are
located
in
the
subnet
172.19.40.0/255.255.255.0. The users within the address range
172.19.40.1 – 172.19.40.10 need not be monitored by SifoScopes.
The system should monitor all other users in this subnet.
A system administrator using the default administrator account “admin”
needs to set up the system according to the above requirements.
The configuration procedure is as follows:
Step 1
Login to SifoScopes UI via the “admin” account.
Step 2
Define groups
1. From the left menu bar, select “User List > Setting”.
2. In the “Department / Group” area of the interface displayed, enter the
following department names:
1: Operations
2: Research
3: Production
4: Management
3. Click [OK] to save the settings. A success message should be
displayed.
User Manual for SifoScopes 4.11
45
OD5000UME01-3
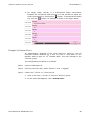
Step 3
Chapter 4 Network Activity Analysis
Add subnets
1. Select “User List > Logged” from the left menu bar.
2. Click the [Add] button next to the Subnet Setting heading.
3. Enter
the
Subnet
address
“172.19.10.0”
and
Netmask
“255.255.255.0”. Select to add new users detected in this subnet to
the Group “Operations”.
4. Click [OK] to save the new subnet.
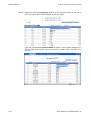
5. Repeat (2) to (4) to add the remaining 3 subnets (172.19.20.0/24,
172.19.30.0/24, and 172.19.40.0/24). The figure below shows the
logged list after adding the 4 subnets.
Step 4
Add users
icon
1. From the logged list (“User List > Logged”), click the
corresponding to the “Subnet: 172.19.10.0” row in the list. A new
window will appear and the system will automatically begin to search
for users located in the 172.19.10.0 subnet.
2. Wait 1-2 minutes for the search to complete. All users found will be
listed in the new window. Check the checkboxes for all detected users.
Note:
By default, the system searches all IP addresses in the specified subnet.
You can specify to only search for users within a specific range of IP
(belonging to this subnet) in the window that appears.
3. Click [New User]. Return to the logged list to view all added users in
this subnet.
4. Repeat (1) to (3) to search for and add users for the remaining three
subnets.
46
User Manual for SifoScopes 4.11
Chapter 4 Network Activity Analysis
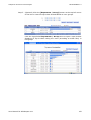
Step 5
OD5000UME01-3
Manage logged list
Check the list of users in the logged list (“User List > Logged”). From
this list, you can:
Step 6
z
Click on a user in the list to modify the user’s attributes such as group
information.
z
Delete a user by checking the checkbox next to the user name and
clicking the [Remove] button above the list. For example, you may
want to delete a detected IP address if it corresponds to a server and
not an actual user.
Manage ignored list
icon
1. From the logged list (“User List > Logged”), click the
corresponding to the “Subnet: 172.19.10.0” row. The interface will
refresh to display all users located in this subnet detected by
SifoScopes.
2. Check the checkbox corresponding to the user “172.19.10.10”. Click
the [Ignore] button from the top of the list. This will move the user
to the ignored list.
3. Repeat (1) and (2) to move the users “172.19.20.10”, “172.19.30.10”,
and “172.19.40.1” – “172.19.40.10” to the ignored list.
Note:
You can view the ignored list by selecting “User List > Ignored” from
the left menu bar.
User Manual for SifoScopes 4.11
47
OD5000UME01-3
Chapter 4 Network Activity Analysis
Example 2 (Importing Users using an Excel File)
The company’s organization structure and network topology are as
follows:
z
Operations department
Users in this department are located in the subnet 172.19.10.0/25
5.255.255.0. Network activities of the user 172.19.10.10 will not b
e logged by SifoScopes. All other users within the IP range 172.19.
10.1 – 172.19.10.20 will be monitored.
z
Research department
Users in this department are located in the subnet 172.19.20.0/25
5.255.255.0. Network activities of the user 172.19.20.10 will not b
e logged by SifoScopes. All other users within the IP range 172.19.
20.1 – 172.19.20.20 will be monitored.
z
Production department
Users in this department are located in the subnet 172.19.30.0/25
5.255.255.0. Other than user 172.19.30.10, all users within the IP
range 172.19.30.1 – 172.19.30.30 will be monitored.
z
Management department
Users in this department are located in the subnet 172.19.40.0/25
5.255.255.0. The users within the address range 172.19.40.1 – 17
2.19.40.10 need not be monitored by SifoScopes. All users in the I
P range 172.19.40.11 – 172.19.40.20 will be monitored.
A system administrator using the default administrator account “admin”
needs to set up the system according to the above requirements.
The configuration procedure is as follows:
Step 1
Login to SifoScopes UI via the “admin” account.
Note:
Completing steps 2 to 4 below simplifies the creation of the Excel file. You
may skip these steps and directly create the Excel file if you are familiar
with the format requirements. For more information on the Excel file
format, please refer to “Reference” section below.
48
User Manual for SifoScopes 4.11
Chapter 4 Network Activity Analysis
Step 2
OD5000UME01-3
Define groups
1. From the left menu, select “User List > Setting”.
2. In the “Department / Group” area of the interface displayed, enter the
following department names:
1: Operations
2: Research
3: Production
4: Management
3. Click [OK] to save the settings. A success message should be
displayed.
Step 3
Add subnet
1. From the left menu bar, select “User List > Logged”.
2. Click the [Add] button from the top of this interface.
3. Enter
the
Subnet
address
“172.19.10.0”
and
Netmask
“255.255.255.0”. Select to add new users detected in this subnet to
the Group “Operations”.
4. Click [OK] to save the new subnet.
5. Repeat (2) to (4) to add the remaining 3 subnets (172.19.20.0/24,
172.19.30.0/24, and 172.19.40.0/24).
Step 4
Export user list into an Excel file.
1. Select “User List > Setting” from the left menu bar.
2. At the top of this interface, click [Download]. Select to save the file
(“user_set.csv”) to your local PC.
Step 5
Modify the .csv file
1. Double-click the downloaded file to open. You can also activate the
Excel application and open the file. Note that all rows beginning with
the character “#” represent comments.
User Manual for SifoScopes 4.11
49
OD5000UME01-3
Chapter 4 Network Activity Analysis
2. Add the following lines below the “172.19.10.0” row.
172.19.10.1
*
*
3
00:05:5D:11:4A:60
1
*
172.19.10.2
*
*
3
00:80:C8:EF:4E:27
1
*
172.19.10.3
*
*
3
00:13:D4:C2:8C:7D
1
*
172.19.10.4
*
*
3
00:0C:29:5B:3C:35
1
*
172.19.10.5
*
*
3
00:90:FB:09:F3:D2
1
*
172.19.10.6
*
*
3
00:07:E9:19:CB:21
1
*
172.19.10.7
*
*
3
00:13:D4:00:C5:A3
1
*
172.19.10.8
*
*
3
00:90:FB:0B:D5:C0
1
*
172.19.10.9
*
*
3
00:12:97:01:59:1C
1
*
172.19.10.10
*
*
0
00:12:97:01:58:8C
1
*
172.19.10.11
*
*
3
00:0C:29:40:B8:86
1
*
172.19.10.12
*
*
3
00:13:D4:25:01:BB
1
*
172.19.10.13
*
*
3
00:90:FB:09:F3:D2
1
*
172.19.10.14
*
*
3
00:30:18:A3:7C:B8
1
*
172.19.10.15
*
*
3
00:0C:29:AB:75:57
1
*
172.19.10.16
*
*
3
00:0C:29:B8:B3:59
1
*
172.19.10.17
*
*
3
00:11:43:CE:51:50
1
*
172.19.10.18
*
*
3
00:90:0B:09:8C:36
1
*
172.19.10.19
*
*
3
00:0C:29:D7:BB:96
1
*
172.19.10.20
*
*
3
00:12:97:00:19:43
1
*
Note:
The MAC addresses above are examples. When modifying the file, please
enter the actual MAC addresses.
All columns showing “*” represent that the corresponding attribute value
is null. You can enter the actual value if you have access to the
corresponding information.
3. Add the following below the “172.19.20.0” row.
50
172.19.20.1
*
*
3
00:05:5A:11:4A:60
2
*
172.19.20.2
*
*
3
00:80:CB:EF:4E:27
2
*
172.19.20.3
*
*
3
00:13:DC:C2:8C:7D
2
*
172.19.20.4
*
*
3
00:0C:2D:5B:3C:35
2
*
172.19.20.5
*
*
3
00:90:FA:09:F3:D2
2
*
172.19.20.6
*
*
3
00:07:EB:19:CB:21
2
*
172.19.20.7
*
*
3
00:13:DC:00:C5:A3
2
*
172.19.20.8
*
*
3
00:90:FD:0B:D5:C0
2
*
172.19.20.9
*
*
3
00:12:9A:01:59:1C
2
*
172.19.20.10
*
*
0
00:12:9B:01:58:8C
2
*
172.19.20.11
*
*
3
00:0C:2C:40:B8:86
2
*
172.19.20.12
*
*
3
00:13:DD:25:01:BB
2
*
172.19.20.13
*
*
3
00:90:FA:09:F3:D2
2
*
172.19.20.14
*
*
3
00:30:1B:A3:7C:B8
2
*
172.19.20.15
*
*
3
00:0C:2C:AB:75:57
2
*
172.19.20.16
*
*
3
00:0C:2D:B8:B3:59
2
*
172.19.20.17
*
*
3
00:11:4A:CE:51:50
2
*
172.19.20.18
*
*
3
00:90:0B:09:8C:36
2
*
172.19.20.19
*
*
3
00:0C:2C:D7:BB:96
2
*
172.19.20.20
*
*
3
00:12:9D:00:19:43
2
*
User Manual for SifoScopes 4.11
Chapter 4 Network Activity Analysis
OD5000UME01-3
4. Add the following below the “172.19.30.0” row.
172.19.30.1
*
*
3
00:0A:5D:11:4A:60
3
*
172.19.30.2
*
*
3
00:8B:C8:EF:4E:27
3
*
172.19.30.3
*
*
3
00:1C:D4:C2:8C:7D
3
*
172.19.30.4
*
*
3
00:0D:29:5B:3C:35
3
*
172.19.30.5
*
*
3
00:9A:FB:09:F3:D2
3
*
172.19.30.6
*
*
3
00:0B:E9:19:CB:21
3
*
172.19.30.7
*
*
3
00:1C:D4:00:C5:A3
3
*
172.19.30.8
*
*
3
00:9D:FB:0B:D5:C0
3
*
172.19.30.9
*
*
3
00:1A:97:01:59:1C
3
*
172.19.30.10
*
*
0
00:1B:97:01:58:8C
3
*
172.19.30.11
*
*
3
00:CC:29:40:B8:86
3
*
172.19.30.12
*
*
3
00:1D:D4:25:01:BB
3
*
172.19.30.13
*
*
3
00:9A:FB:09:F3:D2
3
*
172.19.30.14
*
*
3
00:3B:18:A3:7C:B8
3
*
172.19.30.15
*
*
3
00:CC:29:AB:75:57
3
*
172.19.30.16
*
*
3
00:0D:29:B8:B3:59
3
*
172.19.30.17
*
*
3
00:1A:43:CE:51:50
3
*
172.19.30.18
*
*
3
00:9B:0B:09:8C:36
3
*
172.19.30.19
*
*
3
00:CC:29:D7:BB:96
3
*
172.19.30.20
*
*
3
00:1D:97:00:19:43
3
*
5. Add the following below the “172.19.30.0” row.
172.19.40.1
*
*
0
00:05:5D:11:AA:60
4
*
172.19.40.2
*
*
0
00:80:C8:EF:BE:27
4
*
172.19.40.3
*
*
0
00:13:D4:C2:CC:7D
4
*
172.19.40.4
*
*
0
00:0C:29:5B:DC:35
4
*
172.19.40.5
*
*
0
00:90:FB:09:A3:D2
4
*
172.19.40.6
*
*
0
00:07:E9:19:BB:21
4
*
172.19.40.7
*
*
0
00:13:D4:0C:C5:A3
4
*
172.19.40.8
*
*
0
00:90:FB:0D:D5:C0
4
*
172.19.40.9
*
*
0
00:12:97:01:A9:1C
4
*
172.19.40.10
*
*
0
00:12:97:01:B8:8C
4
*
172.19.40.11
*
*
3
00:0C:29:40:C8:86
4
*
172.19.40.12
*
*
3
00:13:D4:25:D1:BB
4
*
172.19.40.13
*
*
3
00:90:FB:09:A3:D2
4
*
172.19.40.14
*
*
3
00:30:18:A3:BC:B8
4
*
172.19.40.15
*
*
3
00:0C:29:AB:C5:57
4
*
172.19.40.16
*
*
3
00:0C:29:B8:D3:59
4
*
172.19.40.17
*
*
3
00:11:43:CE:A1:50
4
*
172.19.40.18
*
*
3
00:90:0B:09:BC:36
4
*
172.19.40.19
*
*
3
00:0C:29:D7:CB:96
4
*
172.19.40.20
*
*
3
00:12:97:00:D9:43
4
*
6. Save and close the file.
User Manual for SifoScopes 4.11
51
OD5000UME01-3
Step 6
Chapter 4 Network Activity Analysis
Import the file
1. From the left menu bar, select “User List > Setting”.
2. At the top of this interface, click [Browse…] and select the modified
file “user_set.csv”.
3. Click [OK] to begin importing the file.
4. When the import completes, you can view the added users from the
“User List > Logged” and “User List > Ignored” interfaces.
Reference
When a data packet from an undiscovered user within any of the
monitored subnets is detected, SifoScopes will automatically add this
user into the logged list.
The system displays user names according to the following:
52
z
If available, the user name displayed is the computer name.
Otherwise, the system displays the user PC’s DNS name. If neither of
this information is available, the IP or MAC address will be displayed.
z
DNS name: If a DNS server is specified, the system will automatically
send a query to the server to obtain the user’s DNS name. This name
will be displayed in the list. Please refer to “3.2 Configuring Network
Settings” for information on specifying DNS servers.
z
IP address/MAC address: The system will display the user’s IP
address as the user name if the “IP Addresses” option is selected for
the User Name Binding field in the “Record > Setting > Setting”
interface. If the “MAC Addresses” option is selected, the user name
displayed will be the corresponding MAC address. If “AD Server” is
selected, the system will display the user’s account name as stored in
the AD server.
User Manual for SifoScopes 4.11
Chapter 4 Network Activity Analysis
OD5000UME01-3
The content of the .csv file containing user information must be of a
specific format. For example:
#########################################################
#Cell Format:
#Department / Group :
# ~1
Group_1
# ~2
Group_2
#
#User List :
#Subnet
Netmask
#IP User Name
Default Group Number
Computer/Login Name
User Type
MAC Group Number DNS Name
#
#Comments:
# IP:
#
"0" : This user list can only be imported when using user name - login
name binding.
#
"192.168.1.1" : This user list can only be imported when using user name -
IP / MAC binding.
# User Name Computer/Login Name
#
DNS Name:
"*": The display name will be chosen from user name its computer/login name
#
its entry from the DNS server
#
The display name varies with the name binding method.
then its IP / MAC address.
# User Type:
#
"1" : Ignored
#
"3" : Logged
#
#
#Note:
# "Space" or "comma" is not allowed in a cell.
#
#########################################################
Department / Group :
~1
Operations
~2
Research
~3
Production
~4
Management
~5
Group_5
~6
Group_6
~7
Group_7
~8
Group_8
~9
Group_9
~10 Group_10
~11 Group_11
~12 Group_12
User List :
172.19.10.0
255.255.255.0
172.19.10.1
*
*
0
00:05:5D:11:4A:60
1
*
172.19.10.2
*
*
3
00:80:C8:EF:4E:27
1
*
2
*
172.19.20.0
255.255.255.0
172.19.20.1
*
User Manual for SifoScopes 4.11
*
3
1
2
00:25:5D:11:4A:60
53
OD5000UME01-3
Chapter 4 Network Activity Analysis
172.19.20.2
*
*
3
00:20:C8:EF:4E:27
2
*
172.19.30.0
255.255.255.0
172.19.30.1
*
*
3
00:35:5D:11:4A:60
3
3
*
172.19.30.2
*
*
3
00:30:C8:EF:4E:27
3
*
172.19.40.0
255.255.255.0
172.19.40.1
*
*
0
00:45:5D:11:4A:60
4
4
*
172.19.40.2
*
*
3
00:40:C8:EF:4E:27
4
*
In the above example:
z
All rows beginning with the character “#” are comments and will not
be read by the system.
z
“Department / Group :” area
The first area of this file read and imported into the system defines
group names. The first row specifies the name of group 1, next row
defines the name of group 2 and so on.
Please only edit the 2nd column (group name column) if you wish to
modify group names.
z
“User List :” area
The next area of the file that is read and imported into the system
defines subnet and user information. This area can be made up of
several blocks, each defining a single subnet and the corresponding
user information. Each block is separated by an empty row.
Within each block, the first row defines the subnet information using
the format: Subnet IP | Netmask | Subnet number
Note that the subnet number must be unique.
From the 2nd row onwards of each block, each row represents a user
and includes 7 columns of information:
−
Column 1: IP address
−
Column 2: User name
−
Column 3: Computer name
−
Column 4: User Type
Enter “3” for users whose activities are to be monitored by
SifoScopes. For users that are not monitored, enter “0”.
−
Column 5: MAC address
−
Column 6: Group number
Please enter the group number defined in the “Department /
Group :” area of this file.
−
Column 7: DNS name
Enter “*” to specify a null value for any of the above columns.
54
User Manual for SifoScopes 4.11
Chapter 4 Network Activity Analysis
OD5000UME01-3
4.3 Configuring Access Record Attributes
This function allows you to update the Webmail, IM and P2P signature
database, select how the system binds user name to data, whether to
record LAN to LAN traffic, download an external plugin to be used to
facilitate the recording of network data by the network monitoring system
(the plugin must be installed onto the AD serer or a user PC), select the
level of detail when recording network access for each type of service,
character encoding, report mailing etc.
Note:
You can click the [Download] button located on the “Plug-in for Binding
to AD Server and Recording Skype Text Conversation” area of the
“Record > Setting > Setting” interface to download the installation file
for the plugin.
For more information on this plugin, please click the [Help] button
located in the same area on the interface.
For the system to accurately recognize activities using Webmail, IM and
P2P applications, SifoScopes automatically searches an online server for
signature database updates hourly, performing an update when necessary.
You can also manually initiate an update event.
SifoScopes is able to record network activities for the following types of
services:
z
SMTP
z
POP3/IMAP
z
HTTP
z
IM
z
Web SMTP
z
Web POP3
z
FTP
z
Telnet
You can select the types of services to be recorded by the system in the
“Content / Message Recording Settings” area of the “Record > Setting
> Setting” interface.
From the “LAN to LAN Activity Recording” area (“Record > Setting >
Setting”), you can specify whether SifoScopes should log or ignore
traffic from an internal source to an internal destination. If internal users
access the Internet using a proxy server, you should log such traffic by
selecting the “Logged” option.
User Manual for SifoScopes 4.11
55
OD5000UME01-3
Chapter 4 Network Activity Analysis
Note:
The system determines whether an address is from the internal network
according to the user’s subnet. When the address is within any of the
subnets being monitored by SifoScopes, the system assumes it to be an
internal address. Otherwise, it will be treated as an external address. For
more information on users and the subnets monitored by SifoScopes,
please refer to “4.2 Managing the Logged / Ignored User Lists”.
Configuration Procedure
56
Step 1
Login to SifoScopes UI via a read/write administrator account.
Step 2
From the left menu bar, select “Record > Setting > Setting”.
Step 3
On this interface, configure the system according to your network’s
requirements.
Step 4
Click [OK] to save your configurations.
User Manual for SifoScopes 4.11
Chapter 4 Network Activity Analysis
OD5000UME01-3
Reference
The table below explains the various record attributes you need can set
up from the “Record > Setting > Setting” interface.
Parameter Name
Explanation
Configuration
User Name
Binding
When SifoScopes detects data
packets from a new user, the
system will assign this user a
user name according to this
setting. The options include:
[How to Configure]
z
IP Address –
This option is recommended if:
1. Your network searches for
workstations based on IP
addresses.
2. The user is behind a router
while SifoScopes is deployed in
front of a router. In this
situation, the MAC address of
the data packet points to the
router instead of to the user.
z
Select the radio
button
corresponding to
the desired option.
[Range]
z
IP Address
z
MAC Address
z
AD Server
MAC Address
You should select this option if
dynamic IP addresses are
assigned to users (such as via
a DHCP server).
z
AD Server
For networks using external
AD servers, we recommend
that the system binds user
names to the AD server.
Plug-in for
Binding to AD
Server and
Recording
Skype Text
Conversation
Plugins help SifoScopes process
encrypted records (such as
Skype transmissions). You can
click the [Help] button for more
information.
[How to Configure]
LAN to LAN
Activity
Recording
Set up the system to log or
ignore internal traffic (both
source and destination
addresses are internal
addresses).
[How to Configure]
Generally, if internal users
access the Internet using a
proxy server, you should log
such traffic by selecting the
“Logged” option.
User Manual for SifoScopes 4.11
Enter the port
number into the
textbox.
Select the
appropriate radio
button.
[Range]
z
Ignored
z
Logged
57
OD5000UME01-3
Chapter 4 Network Activity Analysis
Parameter Name
Explanation
Configuration
Content /
Message
Recording
Settings
Select which types of services
will be recorded by SifoScopes
for LAN to WAN traffic and WAN
to LAN traffic independently.
[How to Configure]
By default, the system records
all activities using the SMTP,
POP3/IMAP, HTTP, IM, Web
SMTP, Web POP3, FTP and
Telnet services.
You can specify how detailed the
system stores access records for
each service type independently.
The maximum
entries to be
displayed on
the page
Check the
checkboxes to
record activities
using the
corresponding
service.
[Range]
z
Content
z
Message
For example, select the option
“Message” for LAN to WAN traffic
for the HTTP service. SifoScopes
will only record a list of links to
HTTP web site accessed by LAN
users. The content of each
accessed webpage will not be
stored.
z
Not Recording
Specify the maximum number of
items to be displayed per page
of a list on the WebUI.
[How to Configure]
Enter the number
in the textbox.
[Range] 10 – 200
Report
Browsing
Settings
(Search
Results/ Audit
Report)
Select whether to enable
hyperlinks to report sent via
email. Configure the IP Address
and Port number to use when
accessing reports via hyperlink
from an external network.
Specify the length of time these
hyperlinks will be accessible.
[How to Configure]
Check the
checkbox to enable
hyperlinks and
enter the values in
the textboxes.
Click [Help] to obtain more
information on these
parameters.
Default
Character
Encoding
58
The default character encoding
used to record data detected by
the system if the data does not
contain specific encoding
information.
[How to Configure]
Select from the
drop down menu.
[Recommended]
Simplified Chinese
GB2312
User Manual for SifoScopes 4.11
Chapter 4 Network Activity Analysis
OD5000UME01-3
Recommendations – Plugins
For a basic understanding on how to download, install and use the plugin
that can be downloaded from SifoScopes UI, simply click the [Help]
button and follow the instructions that are displayed to install and
activate the plugin normally.
If the plugin does not operate normally, function remains deactivated or
system is unable to record Skype messages correctly even after installing
the plugin, it may be due to the following reasons:
z
Detected as malicious program by anti-virus softwares
z
Blocked by firewall applications or port conflict exists
z
Error occurred when downloading the “CM_Plugin.exe” file
z
A special version of the Skype application is used (such as Tom Skype)
and the corresponding access settings have not be configured.
The following procedure helps you to troubleshoot and resolve this
problem:
Step 1
Check whether your anti-virus software detected CM_Plugin.exe as a
malicious program.
Please check if CM_Plugin.exe was detected as a virus/spyware
application by the anti-virus software installed on your local host.
If CM_Plugin.exe was detected as a malicious program and blocked by
your anti-virus software, please manually unblock or add an exception for
this plugin. For details on how to modify settings on your anti-virus
software, please refer to the software’s or vendor’s own documentations.
If your anti-virus software did not detect CM_Plugin.exe as a malicious
program or if the above procedure did not resolve the issue, please
continue to the next step.
User Manual for SifoScopes 4.11
59
OD5000UME01-3
Step 2
Chapter 4 Network Activity Analysis
Check if CM_Plugin.exe was blocked by a firewall application or if port
conflict exists.
Check if the service port number used by CM_Plugin.exe was blocked by
the firewall application installed on your local host or if the port number is
already in use by another application.
If the port was blocked by the firewall, simply open this port number. An
example is shown below (using Windows Firewall):
If the port number is in use by another application, thus causing port
conflict, please edit the port number used by CM_Plugin.exe to an unused
port. You can edit this port number from the SifoScopes UI as shown
below:
If this problem does not exist or if the above procedure did not resolve
the issue, please continue to the next step.
60
User Manual for SifoScopes 4.11
Chapter 4 Network Activity Analysis
Step 3
OD5000UME01-3
Check for errors during the download operation when downloading the
CM_Plugin.exe file.
You must have correctly configured SifoScopes network interfaces (that is,
completed the “3.2 Configuring Network Settings” operation) before
downloading the CM_Plugin.exe file. Otherwise, the downloaded plugin
may contain errors.
If you did not complete the “3.2 Configuring Network Settings” operation
before downloading the file or had modified any network settings (such
as interface IP), please uninstall the CM_Plugin.exe. Download a new
copy of the CM_Plugin.exe file and reinstall the plugin.
If this problem does not exist or if the above procedure did not resolve
the issue, please continue to the next step.
Step 4
Check if the issue is due to the use of specific versions of Skype (such as
Tom Skype) while the corresponding access settings have not been
configured.
From “Record > Setting > Setting” on the SifoScopes UI, click the
[Help] button as shown in the figure below.
From the dialog window that appears, please read section “4-1 To Record
Skype Conversation” and configure accordingly.
If the problem persists, please contact your system administrator. For
further technical support, please contact O2Security’s technical support
personnel.
User Manual for SifoScopes 4.11
61
OD5000UME01-3
Chapter 4 Network Activity Analysis
4.4 Viewing Access Records According to Users
This function allows you to view and analyse the records of all network
activities for each user.
SifoScopes displays each user’s records into various lists including:
List Name
Description
Today Log
Displays all records of the user’s activities when
accessing all service types (SMTP, POP3/IMAP,
IM, HTTP, Web SMTP, Web POP3, FTP and Telnet)
for the current date.
SMTP
Displays user’s mail activities over the SMTP
service.
By default, the system lists only records for the
current day. You can use the search function to
specify various criteria to search for specific mail
records. Search criteria includes start/end time,
sender address, recipient address, mail subject,
whether
the
mail
includes
attachment,
attachment file name etc.
POP3/IMAP
Displays
user’s
mail
POP3/IMAP service.
activities
over
the
By default, the system lists records for the
current day only. You can use the search function
to specify various criteria to search for specific
mail records. Search criteria includes start/end
time, sender address, recipient address, mail
subject, whether the mail includes attachment,
attachment file name etc.
HTTP
Displays user’s web browsing activities over the
HTTP service.
By default, the system only lists records for the
current day. You can search for specific records
based on start/end time, name of the website,
web page content, traffic direction (upload or
download) etc.
IM
Displays user’s activities over the IM applications.
By default, the system lists records for the
current day. You can use the search function to
specify various criteria to search for specific
records based on start/end time, type of IM
application,
account
name,
file
name,
authentication name etc.
62
User Manual for SifoScopes 4.11
Chapter 4 Network Activity Analysis
OD5000UME01-3
List Name
Description
Web SMTP
Displays user’s mail activities over the Web SMTP
service.
By default, the system lists records for the
current day only. You can search for specific mail
records according to the start/end time, sender
address, recipient address, mail subject, mail
content, whether the mail includes attachment,
attachment file name etc.
Web POP3
Displays user’s mail activities over the Web POP3
service.
By default, the system lists records for the
current day only. You can search for specific mail
records according to the start/end time, sender
address, recipient address, mail subject, mail
content, whether the mail includes attachment,
attachment file name etc.
FTP
Displays user’s file transfer activities over the FTP
service.
By default, the system lists records for the
current day only. Specify various criteria
including start/end time, file name, host name,
file size etc. to search for specific records.
Telnet
Displays user’s activities over the Telnet service.
By default, the system lists records for the
current day only. Specify various criteria
including start/end time, host name etc. to
search for specific records.
Custom View
A customizable list that only displays records of
user activities for all service types (SMTP,
POP3/IMAP, HTTP, IM, Web SMTP, Web POP3,
FTP and Telnet) that satisfy the specified criteria.
Using the search function, you can search for
specific records from this list based on start/end
time, service type etc.
You can view search results directly in the record list window, download
the resultant list to a file for local storage or send the list to a previously
specified email address.
Note:
You must enable and set up the system’s email notification function
before you can send the search results via email. Please refer to “3.4
Configuring Basic System Parameters” for details on setting up email
notification.
To view a particular user’s network activity records, the administrator
must be assigned with the monitoring authority for the group this user
belongs to. “3.3 Managing Administrator Accounts” provides more
information on assigning administrators’ access authority.
User Manual for SifoScopes 4.11
63
OD5000UME01-3
Chapter 4 Network Activity Analysis
Configuration Procedure
64
Step 1
Login to SifoScopes UI.
Step 2
From the left menu, select “Record > User > Logged”.
Step 3
A list of all subnets monitored by the system will be displayed. From this
to view the users within a particular department/group.
interface, click
Step 4
Click on a user in the list to view the various types of record lists that can
be viewed.
Step 5
Click on the type of record you wish to view from the above menu. A new
window displaying the corresponding list will appear as shown in the
figure below:
Step 6
View or search for specific records using this window. You can also view
other types of records by clicking on the list name at the top of this
window.
User Manual for SifoScopes 4.11
Chapter 4 Network Activity Analysis
OD5000UME01-3
Example 1 (HTTP)
An administrator, assigned to the group “Service”, wants to view the web
browsing activities of a user “172.16.1.1” via the HTTP protocol from 8am
on 10th October 2008 to 6pm on 13th October 2008. This user belongs to
the “Service” group.
The configuration procedure is as follows:
Step 1
Login to the SifoScopes UI.
Step 2
Select “Record > User > Logged” to view the list of all users whose
activities are recorded by the system.
Step 3
Locate user “172.16.1.1” from this list
1. Click on the user “172.16.1.1” from the “Service” group.
2. In the menu that appears, click “HTTP”.
Step 4
Search records.
1. From the top of the list displayed on the new window that appears,
click the
icon.
2. In the “HTTP Search” interface, check the checkbox to the left of the
Starting Search from parameter.
3. Select the date “2008/10/10 08:00”
“2008/10/13 18:00” for the To field.
for
the from
field
and
4. Click [Search]. The list of all records generated by this user during
this time range will be displayed below.
User Manual for SifoScopes 4.11
65
OD5000UME01-3
Step 5
66
Chapter 4 Network Activity Analysis
From the list of records, you can:
z
Click on the link in the Web Site column to view the contents of the
corresponding web page.
z
Only a single day’s record will be listed at any time. You can use the
drop down menu at the top of the list to view records from other
dates.
z
To remove records unnecessary to your analysis purpose, check the
checkbox in the leftmost column corresponding to the record(s) and
click the [Clear] button at the bottom of the list.
z
Click [Send Report] to send this list to the specified recipients via
email.
z
Click [Download] to download this list to a file stored on your local
PC.
User Manual for SifoScopes 4.11
Chapter 4 Network Activity Analysis
OD5000UME01-3
Example 2 (SMTP)
An administrator, assigned to the group “Service”, wants to view all SMTP
mail activities of a user “172.16.1.240” from 8am on 10th October 2008
to 6pm on 13th October 2008. This user belongs to the “Service” group.
The configuration procedure is as follows:
Step 1
Login to SifoScopes UI.
Step 2
From the left menu bar, select “Record > User > Logged”.
Step 3
Locate user “172.16.1.240” from this list
1. Click on the user “172.16.1.240” from the “Service” group.
2. In the menu that appears, click “SMTP”.
Step 4
Search records.
1. From the top of the list displayed on the new window that appears,
click the
icon.
2. In the “SMTP Search” interface, check the checkbox to the left of the
From parameter.
3. Select the date “2008/10/10 08:00” for the From field and
“2008/10/13 18:00” for the To field.
4. Click [Search]. The list of all records generated by this user during
this time range will be displayed in the “Results” list below.
Step 5
From this record list, you can:
z
Click on the link in the Subject column to view the contents of the
corresponding mail.
z
Only a single day’s record will be listed at any time. You can use the
drop down menu at the top of the list to view records from other
dates.
z
To remove records unnecessary to your analysis purpose, check the
checkbox in the leftmost column corresponding to the record(s) and
click the [Clear] button at the bottom of the list.
z
Click [Send Report] to send this list to the specified recipients via
email.
z
Click [Download] to download this list to a file stored on your local
PC.
z
Click [Export Mail] to export all mails in this list into your local PC.
You can click [Help] to view details on how to view the exported mail
files.
User Manual for SifoScopes 4.11
67
OD5000UME01-3
Chapter 4 Network Activity Analysis
Example 3 (IM)
An administrator, assigned to the group “Service”, wants to view all IM
activities of a user “172.16.1.117” from 8am to 6pm on 13th October
2008. This user belongs to the “Service” group.
The configuration procedure is as follows:
Step 1
Login to SifoScopes UI.
Step 2
From the left menu bar, select “Record > User > Logged”.
Step 3
Locate user “172.16.1.117” from this list
1. Click on the user “172.16.1.117” from the “Service” group. In the
menu that appears, click “IM”.
Step 4
Search records.
1. From the top of the list displayed on the new window that appears,
click the
icon.
2. In the “IM Search” interface, check the checkbox to the left of the
Starting search from parameter.
3. Select the date “2008/10/13 08:00”
“2008/10/13 18:00” for the To field.
for
the from
field
and
4. Click [Search]. The list of all records generated by this user during
this time range will be displayed in the “Results” list below.
Step 5
68
From this list of IM records, you can:
z
Use the drop down menu at the top of the list to view records from
other dates. Only a single day’s record will be listed at any time.
z
To remove records unnecessary to your analysis purpose, check the
checkbox in the leftmost column corresponding to the record(s) and
click the [Clear] button at the bottom of the list.
z
Click [Send Report] to send this list to specified recipients via email.
z
Click [Download] to download this list to a file stored on your local
PC.
z
Click the link in the rightmost column of the list to view the message
logs of the corresponding IM conversation record. The IM message
will be displayed in a new window. An example is shown below:
User Manual for SifoScopes 4.11
Chapter 4 Network Activity Analysis
z
OD5000UME01-3
For Skype usage records, if a bi-directional audio conversation
between the two parties had occurred, you will be able to replay the
audio conversation by clicking the “ ” button. To download the audio
file, click the “ ” button. An example is shown in the figure below:
Example 4 (Custom View)
An administrator, assigned to the group “Service”, wants to view all
recorded network activities of a user “172.16.1.1” from 8am on 10th
October 2008 to 6pm on 13th October 2008. This user belongs to the
“Service” group.
The configuration procedure is as follows:
Step 1
Login to SifoScopes UI.
Step 2
From the left menu bar, select “Record > User > Logged”.
Step 3
Locate user “172.16.1.1” from this list.
1. Click on the user “172.16.1.1” from the “Service” group.
2. In the menu that appears, click “Custom View”.
User Manual for SifoScopes 4.11
69
OD5000UME01-3
Step 4
Chapter 4 Network Activity Analysis
Search records.
1. In the “Custom View” interface, select the date “2008/10/10 08:00”
for the From field and “2008/10/13 18:00” for the To field. Maintain
the default setting for all other search fields.
2. Click [Search]. The list of all records generated by this user during
this time range will be displayed in the “Results” list below.
Step 5
70
From the result list, you can:
z
View detailed contents of each record by clicking the link in the Event
column.
z
Use the drop down menu at the top of the list to view records from
other dates. Only a single day’s record will be listed at any time.
z
To remove records unnecessary to your analysis purpose, check the
checkbox in the leftmost column corresponding to the record(s) and
click the [Clear] button at the bottom of the list.
z
Click [Send Report] to send this list to the specified recipients via
email.
z
Click [Download] to download this list to a file stored on your local
PC.
User Manual for SifoScopes 4.11
Chapter 4 Network Activity Analysis
OD5000UME01-3
4.5 Viewing Access Records According to Service Type
This function allows you to view and analyse the records of all network
activities for each user. The various concepts relating to this function is
identical to “4.4 Viewing Access Records According to Users” above.
Configuration Procedure
Step 1
Login to SifoScopes UI.
Step 2
From the left menu bar, select “Record > Service > SMTP /
(POP3/IMAP) / HTTP / IM / Web SMTP / Web POP3 / FTP /
Telnet” to view the corresponding list of records for the selected service
type.
Step 3
From the record list, you can:
z
View detailed contents of each record by clicking the record’s
hyperlink in the list.
z
Use the drop down menu at the top of the list to view records from
other dates.
z
To remove records unnecessary to your analysis purpose, check the
checkbox in the leftmost column corresponding to the record(s) and
click the [Clear] button at the bottom of the list.
z
Click the
User Manual for SifoScopes 4.11
icon to specify various criteria to search the list.
71
OD5000UME01-3
Chapter 4 Network Activity Analysis
Example 1 (HTTP)
An administrator authorized to browse records for the group “Service”. He
wants to view all recorded web pages accessed between 8am on 10th
October 2008 and 6pm on 13th October 2008 by all users belonging to
this group.
The configuration is as follows:
Step 1
Login to SifoScopes using his administrator account.
Step 2
Select “Record > Service > HTTP” from the left menu bar.
Step 3
Search records.
1. From the top of the list displayed, click the
icon.
2. In the “HTTP Search” interface, check the checkbox to the left of the
Starting Search from parameter.
3. Select the date “2008/10/10 08:00”
“2008/10/13 18:00” for the To field.
for
the from
field
and
4. Click [Search]. The list of all records generated by all users in the
“Service” group during this time range will be displayed below.
Step 4
72
From the resulting list, you can:
z
Click on the link in the Web Site column to view the contents of the
corresponding web page.
z
Use the drop down menu at the top of the list to view records from
other dates.
z
To remove records unnecessary to your analysis purpose, check the
checkbox in the leftmost column corresponding to the record(s) and
click the [Clear] button at the bottom of the list.
z
Click [Send Report] to send this list to specified recipients via email.
z
Click [Download] to download this list to a file stored on your local
PC.
User Manual for SifoScopes 4.11
Chapter 4 Network Activity Analysis
OD5000UME01-3
Example 2 (SMTP)
An administrator is authorized to monitor the group “Service”. He wants
to view all mails sent/received (via SMTP) between 8am on 10th October
2008 and 6pm on 13th October 2008 by all users belonging to this group.
The configuration is as follows:
Step 1
Login to SifoScopes UI using his administrator account.
Step 2
From the left menu bar, select “Record > Service > SMTP”.
Note:
You can import mails into the SMTP list using files of the following format:
Outlook Express (.dbx), Outlook (.pst), Mailbox (.mbx, .mbox). To import
a file, click the
icon at the top of the list. In the dialog window that
appears, select the file to import and click [Import].
Step 3
Search records.
icon.
1. From the top of the list displayed, click the
2. In the “SMTP Search” interface, check the checkbox to the left of the
Starting Search from parameter.
3. Select the date “2008/10/10 08:00”
“2008/10/13 18:00” for the To field.
for
the from
field
and
4. Click [Search]. The list of SMTP mail records for all users in the
“Service” group during this time range will be displayed below.
User Manual for SifoScopes 4.11
73
OD5000UME01-3
Step 4
Chapter 4 Network Activity Analysis
From the list of records, you can:
z
Click on the link in the Subject column to view the contents of the
corresponding mail.
z
Use the drop down menu at the top of the list to view records from
other dates.
z
To remove records unnecessary to your analysis purpose, check the
checkbox in the leftmost column corresponding to the record(s) and
click the [Clear] button at the bottom of the list.
z
Click [Send Report] to send this list to the specified recipients via
email.
z
Click [Download Report] to download this list to a file stored on
your local PC.
z
Click [Export Mail] to export all mails in this list into your local PC.
You can click [Help] to view details on how to view the exported mail
files.
Example 3 (IM)
An administrator is authorized to monitor the group “Service”. He wants
to view accesses to IM applications between 8am to 6pm on 13th
September 2008 by all users in this group.
The configuration is as follows:
Step 1
Login to SifoScopes UI using his administrator account.
Step 2
From the left menu bar, select “Record > Service > IM”.
Step 3
Search records
1. From the top of the list displayed, click the
icon.
2. In the “IM Search” interface, check the checkbox to the left of the
Starting Search from parameter.
3. Select the date “2008/10/13 08:00”
“2008/10/13 18:00” for the To field.
for
the from
field
and
4. Click [Search]. The list of IM access records for all users in the
“Service” group during this time range will be displayed below.
74
User Manual for SifoScopes 4.11
Chapter 4 Network Activity Analysis
Step 4
OD5000UME01-3
From this record list, you can:
z
Use the drop down menu at the top of the list to view records from
other dates.
z
To remove records unnecessary to your analysis purpose, check the
checkbox in the leftmost column corresponding to the record(s) and
click the [Clear] button at the bottom of the list.
z
Click [Send Report] to send this list to the specified recipients via
email.
z
Click [Download] to download this list to a file stored on your local
PC.
z
Click the link in the rightmost column of the list to view the message
logs of the corresponding IM conversation record. The IM message
will be displayed in a new window. An example is shown in the figure
below:
z
For Skype usage records, if a bi-directional audio conversation
between the two parties had occurred, you will be able to replay the
audio conversation by clicking the “ ” button. To download the audio
file, click the “ ” button. An example is shown in the figure below:
User Manual for SifoScopes 4.11
75
OD5000UME01-3
Chapter 4 Network Activity Analysis
4.6 Set Up Content Audit
Through this function, you can add content audit rules to set up
SifoScopes to search for records fulfilling certain criteria from the
previous 1 day at 00:30am daily. The system will send these records to
specific recipients via email.
Example
The human resource manager requests to receive daily record lists
containing SMTP and Web SMTP mail activities for all monitored users.
The mail content should contain the keywords “reporting”, “human
resource”, “resume”, “private” and “confidential”.
The system administrator must therefore add a content audit rule to set
up SifoScopes to send all records fulfilling these criteria to the manager’s
email (“[email protected]”).
The configuration procedure is as follows:
Step 1
Login to SifoScopes UI via the “admin” account.
Step 2
From the left menu bar, select “Content Auditing > Setting” to view
the list of content audit rules.
Step 3
Add a content audit rule for the SMTP service.
1. Click [New Entry] to view the “Add New Audit” interface.
2. Configure the audit rule as follows:
Name: SMTP_Rule
Service: SMTP
Content: reporting|human resource|resume|private|confidential
Attached File: No
Department / Group: All
Send Audit Report To: [email protected]
76
User Manual for SifoScopes 4.11
Chapter 4 Network Activity Analysis
OD5000UME01-3
3. Click [OK] to save this rule.
Step 4
Add a content audit rule for the Web SMTP service.
1. From the content audit rule list, click [New Entry] to view the “Add
New Audit” interface.
2. Configure the audit rule as follows:
Name: Web_SMTP_Rule
Service: Web SMTP
Content: reporting|human resource|resume|private|confidential
Attached File: No
Department / Group: All
Send Audit Report To: [email protected]
3. Click [OK] to save the content audit rule.
User Manual for SifoScopes 4.11
77
5
Chapter
IM/P2P Software Access Control
5
This chapter includes the following sections
z
Overview
Briefly introduces the aim of this chapter.
z
Managing IM Access
Explains, in detail, how SifoScopes can be set up to control and
monitor access to instant messaging software by users in the network.
z
Managing P2P Usage
This section introduces SifoScopes control over user’s P2P access.
To understand the usage of IM/P2P control and how to configure
SifoScopes to achieve your desired control over user accesses to such
programs, please refer to this chapter.
User Manual for SifoScopes 4.11
79
OD5000UME01-3
Chapter 5 IM/P2P Software Access Control
5.1 Overview
This series of operations allow you to set up SifoScopes to define whether
a user account is allowed access to which IM/P2P programs, whether he
is allowed to transfer files over IM software, monitor IM conversations etc.
This allows administrators to ensure that network bandwidth is used
efficiently and enhancing the security of the network.
5.2 Managing IM Access
IM access management allows you to control IM access by internal users
via SifoScopes. SifoScopes is able to detect and manage various
commonly used IM applications including MSN, Yahoo, QQ, ICQ/AIM,
Skype, Gadu-Gadu, Google Talk and Web IM applications.
Note that IM management can only be set up if SifoScopes is working in
bridge mode.
SifoScopes supports
applications including:
various
management
mechanisms
for
IM
1. Enable the system to send a NetBIOS message to users when they
login to an IM application. Such messages can be used to announce
company’s policies regarding use of such applications.
For MSN, ICQ/AIM and Yahoo messaging software, you can also select
to send a notification message to the user through the application’s
messaging window directly.
2. Set up an authentication mechanism, only allowing users who have
been authenticated via SifoScopes to access IM applications.
SifoScopes supports various authentication methods including local
authentication via a user list maintained on the SifoScopes device,
remote authentication by connecting the device to RADIUS, LDAP or
POP3 authentication servers deployed in the network.
When authentication is required, users must first open their web
browser, enter the address “http://SifoScopes administrative IP/auth”
and enter their authentication information. They can only access IM
applications after authentication is successful.
3. Administrators can define access rules for MSN, Yahoo, QQ, ICQ/AIM,
Skype, Gadu-Gadu, Google Talk and Web IM applications.
You can define default rules to be enforced on the majority of users
for each IM application. The table below explains each default rule
option.
80
User Manual for SifoScopes 4.11
Chapter 5 IM/P2P Software Access Control
OD5000UME01-3
For users that require rules differing from the default rule, you can
manually assign specific account rules. Three account rules are
available for each IM application including: “Accept”, “Accept (No File
Transfer)” or “Drop”.
Default Login Rule Setting (“IM Management > Rule > Default Rule”)
IM Application
Rule
Description
MSN
Accept: Unencrypted
message
Only allow transmission of
unencrypted MSN
messages.
Drop: Encrypted message
Accept: Authenticated user
sending unencrypted
message
Drop: Unauthenticated user
or encrypted message
Accept: Authentication user
Drop:
users
Unauthenticated
Accept: Everyone
Drop: None
Accept: None
Drop: Everyone
Yahoo
Accept: Everyone
Drop: None
Accept: Authentication user
Drop: Unauthenticated user
Accept: None
Drop: Everyone
User Manual for SifoScopes 4.11
Only authenticated users
are allowed to login to
MSN. All messages
transmitted via MSN must
not be encrypted.
Authenticated users are
allowed to login to MSN.
All MSN login attempts are
accepted.
All MSN login attempts will
be dropped.
All Yahoo messenger login
attempts are accepted.
Only authenticated users
are allowed to login to
Yahoo messenger.
All Yahoo messenger login
attempts are dropped.
81
OD5000UME01-3
Chapter 5 IM/P2P Software Access Control
IM Application
Rule
Description
QQ
Accept: Valid password
Users must enter the
correct QQ account name
and password in the “Add
QQ Account” interface to
access QQ.
Drop: Invalid password
To view this interface,
enter the URL
“http://SifoScopes
Administrative IP/qq” in
the web browser.
(Example:
http://192.168.1.1/qq”).
Note:
QQ encrypts messages before
transmission. Hence, users must
provide a valid QQ account name
and password to SifoScopes. This
will allow the system to decrypt
and record QQ conversations.
Accept: Authenticated user
with valid password
Drop: Unauthenticated user
or invalid password
Accept: Authentication user
Drop: Unauthenticated user
Only authenticated users
whose QQ passwords have
been verified by
SifoScopes can login to
their QQ accounts.
Only authenticated users
can login to their QQ
account.
Note:
As SifoScopes is unable to obtain
the QQ account’s password, only a
log of the user’s QQ access will be
recorded. The system will not
record the contents of QQ
conversations for these users.
Accept: Everyone
Drop: None
All QQ login attempts are
accepted.
Note:
As SifoScopes is unable to obtain
the QQ account’s password, only a
log of the user’s QQ access will be
recorded. The system will not
record the contents of QQ
conversations for these users.
Accept: None
Drop: Everyone
82
Block all QQ login
attempts.
User Manual for SifoScopes 4.11
Chapter 5 IM/P2P Software Access Control
OD5000UME01-3
IM Application
Rule
Description
ICQ / AIM
Accept: Everyone
Allow any user to login to
ICQ / AIM.
Drop: None
Accept: Authenticated user
Drop: Unauthenticated user
Accept: None
Drop: Everyone
Skype
Accept: User running
IR_Plugin.exe
Drop: Others
Only authenticated users
can access ICQ / AIM.
Block all users ICQ / AIM
login attempts.
Only allow users to login to
Skype if their host PC is
running a specific plugin.
This plugin can be
downloaded from the
“Record > Setting >
Setting” interface.
For a guide on
troubleshooting errors
when using this plugin,
please refer to the
“Recommendations –
Plugins” section in “4.3
Configuring Access Record
Attributes”.
Accept: Everyone
Drop: None
Accept: None
Drop: Everyone
Gadu-Gadu
Accept: Unencrypted
message
Drop: Encrypted message
Accept: Authenticated user
sending unencrypted
message
Drop: Unauthenticated user
or encrypted message
Accept: Authentication user
Drop: Authentication failure
Accept: Everyone
Drop: None
Accept: None
Drop: Everyone
User Manual for SifoScopes 4.11
Allow any user to login to
Skype.
Block all user Skype login
attempts.
Only allow transmission of
unencrypted Gadu-Gadu
messages.
Only authenticated users
are allowed to login to
Gadu-Gadu. All messages
transmitted must be
unencrypted.
Only authenticated users
are allowed to login to
Gadu-Gadu.
All Gadu-Gadu login
attempts are accepted.
Block all Gadu-Gadu login
attempts.
83
OD5000UME01-3
Chapter 5 IM/P2P Software Access Control
IM Application
Rule
Description
Google Talk
Accept: Everyone
Allow any user to login to
Google Talk.
Drop: None
Accept: None
Drop: Everyone
84
Block all user Google Talk
login attempts.
User Manual for SifoScopes 4.11
Chapter 5 IM/P2P Software Access Control
OD5000UME01-3
IM Application
Rule
Description
Web IM
Accept: Everyone
Allow any user to login to
Web IM applications.
Drop: None
Accept: Official MSN Web
Messenger
Drop: Others
Only allow users to login to
the official web MSN
(http://
webmessenger.msn.com/).
Access via all other Web
IM applications will be
blocked by the system.
Accept: None
Block Web IM application
login attempts by all users
Drop: Everyone
Default File Transfer Setting (“IM Management > Rule > Default
Rule”)
IM Application
Rule
Description
MSN
Accept
Allow file transfer.
Drop
Block all file transfer attempts.
Yahoo
QQ
ICQ / AIM
Gadu-Gadu
Google Talk
By default, the system enforces the default rule on all IM users in the
network. Administrators can select to enable one or more of the above IM
access control mechanisms according to the network requirements.
User Manual for SifoScopes 4.11
85
OD5000UME01-3
Chapter 5 IM/P2P Software Access Control
Configuration Flowchart
Start
Set up
Login Notice
Configure
Authentication
Servers
Define
Default Rule
Adjust
Account Rule
End
The above flowchart is explained in the table below.
86
Operation
Explanation
Set up Login Notice
Enable the system to send notification to
users logging in to access IM applications.
Configure Authentication
Server
Set up SifoScopes as a local authentication
server or connect the system to remote
Radius, POP3 or LDAP servers for user
authentication.
Define Default Rule
Specify the default actions SifoScopes
should perform when users attempt to
access particular IM applications.
Adjust Account Rule
For user accounts that the IM default rule
does not apply, assign these accounts to
specific account rules.
User Manual for SifoScopes 4.11
Chapter 5 IM/P2P Software Access Control
OD5000UME01-3
Example 1 (Login Notice + Rules)
The company’s IM management policy is as follows:
z
Users are only allowed to access the MSN application. All messages
transmitted must be unencrypted.
z
The following message will be displayed when users login to MSN:
Notice:
All instant message will be logged by the SifoScopes System and
are subject to archival monitoring or disclosure to someone other
than the recipient.
=====================================================
请注意:
实时通讯软件所传递的讯息或活动,将被 SifoScopes System 所记录。
z
User authentication is not required.
z
The user with address “172.19.20.0/24” is not allowed to transfer
files over MSN. All other users can transfer files using MSN.
A system administrator with read-write authority is assigned to complete
this configuration. The procedure is as follows:
Step 1
Login to SifoScopes administrative UI via the “admin” account.
Step 2
Enable login notice
1. From the left menu, select “IM Management > Configure > Logon
Notice”.
2. Select Enable NetBIOS Alert Notification.
3. Select Enable MSN Alert Notification.
4. Enter the message into the textbox below.
5. Click [OK] to save the configuration.
User Manual for SifoScopes 4.11
87
OD5000UME01-3
Step 3
Chapter 5 IM/P2P Software Access Control
Define default access rules
1. From the left menu bar, select “IM Management > Rule > Default
Rule”.
2. In the “Default Login Rule Setting” area of the displayed interface,
select the “Accept: Unencrypted message Drop: Encrypted message”
rule for the MSN application. Block all other IM applications.
3. Scroll to the “Default File Transfer Setting” area at the bottom of this
interface. Select to allow file transfer over MSN. Drop all file transfer
attempts for other IM applications.
4. Click [OK] to save the default rule.
88
User Manual for SifoScopes 4.11
Chapter 5 IM/P2P Software Access Control
Step 4
OD5000UME01-3
Import user accounts
1. Create a “MSN_List.csv” file containing a list of all employees’ MSN
accounts and the corresponding IP address. The figure below shows
an example of this file.
Note:
Please refer to the “Reference” section below for more information on
importing/exporting user IM account lists.
2. From the SifoScopes interface, select “IM Management > Rule >
Default Rule” from the menu bar.
3. At the top of this interface, click [Browse…].
4. Select the “MSN_List.csv” file to import the user list.
Step 5
Adjust individual account rules
1. From the left menu bar, select “IM Management > Rule > Account
Rule”.
2. Click “MSN” at the top of the interface to navigate to the account rule
lists for the MSN application. The accounts imported in Step 4 above
should be shown in the top “MSN account of default rule” list.
3. Check the checkbox to the left of the user “172.19.20.0/24” in this
list.
4. Click [to Accept(No file transfer)] from the top of the list. This
user account will be moved to the “MSN Accept Account(No file
transfer)” account rule list below.
User Manual for SifoScopes 4.11
89
OD5000UME01-3
Chapter 5 IM/P2P Software Access Control
Example 2 (Login Notice + Authentication + Default Rule)
The company’s IM management policy is as follows:
z
The following message will be displayed when users login for IM
access:
Notice:
All instant message will be logged by the SifoScopes System and
are subject to archival monitoring or disclosure to someone other
than the recipient.
=====================================================
请注意:
实时通讯软件所传递的讯息或活动,将被 SifoScopes System 所记录。
z
Users must be authenticated via a remote RADIUS server before they
can access IM applications.
IP address of the RADIUS server is 192.168.123.12:1812. Shared
secret key is sifoRad.
A system administrator with read-write authority is assigned to complete
this configuration. The procedure is as follows:
Step 1
Login to SifoScopes UI via the “admin” account.
Step 2
Enable login notice
1. From the left menu, select “IM Management > Configure > Logon
Notice”.
2. Select Enable NetBIOS Alert Notification. Also enable alert
notification for MSN, ICQ / AIM and Yahoo applications.
3. Enter the message into the Content textbox.
4. Click [OK] to save the configuration.
90
User Manual for SifoScopes 4.11
Chapter 5 IM/P2P Software Access Control
Step 3
OD5000UME01-3
Manage the RADIUS authentication server
1. From the left menu bar, select “IM Management > Authentication
> RADIUS”.
2. Select Enable RADIUS Server Authentication and configure as follows:
RADIUS Server (IP or Domain Name): 192.168.123.12
RADIUS Server Port: 1812
Shared Secret: sifoRad
3. Click [OK] to save the configuration.
Step 4
Define default rules to only allow IM applications by authenticated users
1. Select “IM Management > Rule > Default Rule”.
2. In the “Default Login Rule Setting” area of the displayed interface,
select the “Accept: Authenticated user Drop: Authentication failure”
rule.
User Manual for SifoScopes 4.11
91
OD5000UME01-3
Step 5
Chapter 5 IM/P2P Software Access Control
Click [OK] to save the default rule.
Note:
After completing the above configuration, users must first access the
SifoScopes interface “http://SifoScopes administrative IP/auth” and enter
their authentication information. They will only be able to access IM
applications when they have been successfully authenticated.
92
User Manual for SifoScopes 4.11
Chapter 5 IM/P2P Software Access Control
OD5000UME01-3
Reference
From the “IM Management > Rule > Default Rule” interface,
SifoScopes allows administrators to export IM account rule lists from the
system into a .csv format file. Using an appropriate program, such as MS
Excel, you can then modify or add account information to the exported
list directly. Importing the edited file will then modify the IM accounts
stored by SifoScopes.
Note:
Only modified or added accounts will be imported into the SifoScopes
system. Deleting an account from the exported file will not delete this
account from SifoScopes when the file is imported.
Rows beginning with the “#” character in the exported are comments and
will not be imported into SifoScopes.
Within the .csv file, all rows beginning with the “#” character are
comments and will not be read by the system when the file is imported.
User accounts can be defined using 2 formats within the file including:
Note:
If the system binds user names using the AD server method, the “IP” and
“MAC” columns in the 2 formats below will be replaced by a single
“AD_User” column. This column will contain users’ account name stored
on the AD server.
z
Format 1
IM_Type
z
Account
Rule
AuthName
IP
MAC
AuthType
−
Valid values for IM_Type column: MSN, Yahoo, QQ, ICA, Skype,
GaduGadu and GoogleTalk.
−
Valid values for Rule column: Default, Accept, Drop
−
Valid values for AuthType column: USER, RADIUS, POP3, LDAP
Format 2
IM_Type
IP
MAC
Rule
−
Valid values for IM_Type column: MSN, Yahoo, QQ, ICA, Skype,
GaduGadu and GoogleTalk.
−
Valid values for Rule column: Default, Accept, Drop
The above Information on the format of the .csv file can also be found
within the exported file. An example is shown below:
User Manual for SifoScopes 4.11
93
OD5000UME01-3
Chapter 5 IM/P2P Software Access Control
From the “IM Management > Rule > Account Rule” interface, lists of
user accounts for each IM rule is displayed. The icon displayed next to
each account indicates the status of the account. This includes:
Icon
Status
Description
Un-authenticated
This account has not yet been
authenticated by the system
Authentication
Successful
This account has been authenticated by the
system
Valid Password
This icon is only displayed on the account
rule lists for the QQ application.
This indicates that the QQ account name
and password specified by this user has
been successfully verified.
SifoScopes can record all messages
transmitted via QQ for this account.
Password validity
is yet to be
verified
This icon is only displayed on the account
rule lists for the QQ application.
This indicates that the user has not yet
entered his QQ account name and
password in SifoScopes or the specified
password has not been verified.
SifoScopes will not be able to record QQ
messages transmitted for this account.
Invalid Password
This icon is only displayed on the account
rule lists for the QQ application.
This indicates that the QQ password
provided by this user is invalid.
SifoScopes will not be able to record
transmitted QQ messages for this account.
To view users’ IM conversations recorded by SifoScopes, please refer to
“4.4 Viewing Access Records According to Users” or “4.5 Viewing Access
Records According to Service Type”.
You can also view a log of all IM accesses by the users from the system.
Please refer to “9.4 Monitoring System Status” for more information on
the system’s IM log.
94
User Manual for SifoScopes 4.11
Chapter 5 IM/P2P Software Access Control
OD5000UME01-3
5.3 Managing P2P Usage
SifoScopes P2P management function allows administrators to control
accesses to P2P applications by internal users. Various P2P applications
can be managed by SifoScopes including:
z
WinMX
z
Edonkey (including Emule)
z
KuGoo
z
AudioGalaxy
z
iMesh
z
Thunder5
z
Bit Torrent
z
Foxy
z
Apple Juice
z
Direct Connect
z
MUTE
Note that P2P management can only be set up if SifoScopes is working in
bridge mode.
For each P2P application, you can define default P2P access rules that is
enforced on the majority of users, controlling whether accesses to each
P2P application is allowed or blocked by default.
You can manually assign each user to specific account rules individually if
there are users who require access differing from the default rule.
User Manual for SifoScopes 4.11
95
OD5000UME01-3
Chapter 5 IM/P2P Software Access Control
Configuration Procedure
Step 1
Login to SifoScopes UI via the “admin” account.
Step 2
Define default P2P access rule
1. From the left menu bar, select “P2P Management > Default Rule”.
2. In the interface displayed, select the radio button to the left of the
“Accept” option to allow access to the corresponding P2P application.
Select the button to the left of the “Drop” option to block access.
Note:
For the Thunder5 application, SifoScopes is only able to block
downloading activities from the Thunder5 server. Users can still use
Thunder5 to download files from HTTP or FTP sources.
3. Click [OK] to save the default rule.
Step 3
(Optional) Move users to specific account rules
1. Select “P2P Management > User Rule” from the left menu bar.
2. Click the name of the P2P application from the top of this interface.
The system will display the account rules and users assigned to each
rule for this P2P application.
3. From the “default rule” or “Drop Account” lists, select the users and
click the “to Accept” link from the top of this list to move users to
the “Accept Account” list. Users in the “Accept Account” list are
allowed to access this P2P application
4. From the “default rule” or “Accept Account” lists, select the users and
click the “To Drop” link to move users to the “Drop Account” list.
Users in this list are not allowed to access this P2P application.
5. Repeat steps (2) to (4) to adjust the account rule list for the other
P2P applications.
96
User Manual for SifoScopes 4.11
6
Chapter
Real-time Flow Analysis
6
This chapter includes the following:
z
Overview
Briefly explains SifoScopes real-time flow analysis function.
z
Viewing Top 10 Charts for Today’s Network Activities
Describes, in detail, how to view charts showing the top 10 users,
groups and services with the largest amount of traffic during any time
period within the interval from 00:00am of the current day to the
current time.
z
Viewing History Top N Charts
Introduces the system’s history Top N charts which can help
administrators understand the traffic flow generated by users, groups
and services during a particular time period.
z
Checking Flow Statistics
Explains the flow statistical charts that can be viewed from the
SifoScopes interface. These charts can be used to analyse changes to
network traffic within a period of time.
Please read this chapter to understand and analyse the network traffic
statistical data collected by SifoScopes.
User Manual for SifoScopes 4.11
97
OD5000UME01-3
Chapter 6 Real-time Flow Analysis
6.1 Overview
SifoScopes “Flow Analysis” function generates real-time and history
network traffic statistical data, helping network administrators to
understand the utilization of the network’s bandwidth. The reports
generated by the system include details on the traffic generated by each
user and each service type, making it more convenient for administrators
to manage and maintain the network.
The real-time flow analysis function is only supported by SifoScopes
CM2000 and SifoScopes CM3000 devices. All other SifoScopes device
models do not support this function.
6.2 Viewing Top 10 Charts for Today’s Network Activities
Using this function, you can view the top 10 users, groups or services
that generated the largest amount of traffic flow during any time period
within the interval from 0:00 of the current day to the current time.
Configuration Procedure
The procedure to view top 10 real-time traffic charts for the current day
are as follows:
Step 1
Login to SifoScopes UI.
Step 2
From the left menu bar, select “Flow Analysis > Today Top-10” to
view the top 10 charts for all traffic flow between 0:00 today till the
current time.
Step 3
By moving the slider at the top of this page, you can select to only view
top 10 charts for traffic flow from the selected time to the current time.
For example, moving the slider as shown in the figure below will refresh
the top 10 charts to only include statistics of traffic generated between
12:08pm and 16:18pm today.
The following figures show the top 10 user, group and service real-time
traffic charts.
98
User Manual for SifoScopes 4.11
Chapter 6 Real-time Flow Analysis
User Manual for SifoScopes 4.11
OD5000UME01-3
99
OD5000UME01-3
Step 4
100
Chapter 6 Real-time Flow Analysis
(Optional) For more in-depth analysis, you can view more detailed
information for each user/group/service in the top 10 charts.
z
From the top 10 “User” chart, click a hyperlinked user name from the
User Name row. A top N chart ranking the top services accessed by
this user will be displayed in a new window.
z
From the top 10 “Department / Group” chart, click the group name
from the Department / Group row to view the chart ranking the top
10 users of this group with the greatest amount of traffic generated.
User Manual for SifoScopes 4.11
Chapter 6 Real-time Flow Analysis
z
OD5000UME01-3
From the top 10 “Service” chart, click the name of the service from
the Service Name row. A new window will appear, displaying the top
10 users of this service during this period of time.
6.3 Viewing History Top N Charts
Using this function, you can view the top N users, groups or services that
generated the largest amount of traffic flow between any history time
period during the system’s uptime.
Configuration Procedure
The procedure to view top N history traffic charts are as follows:
Step 1
Login to SifoScopes UI.
Step 2
Select “Flow Analysis > History Top-N” from the left menu bar.
Step 3
From the top of the interface displayed, specify the date and time interval
using the From and To drop down menus. Click [Refresh] to display top
N statistics for traffic generated during the time interval specified.
User Manual for SifoScopes 4.11
101
OD5000UME01-3
Step 4
Chapter 6 Real-time Flow Analysis
(Optional) Click the [User] button at the top left corner of the list to view
the top N chart ranked based on users.
Note:
Click [Refresh] to refresh the displayed top N chart. Click [Send Report]
to send the displayed top N list to specified recipients via email. Click
[Download] to export the list into a file stored in your local PC.
Click the hyperlinked User Name to open a new window displaying a Top
N chart ranking the services accessed by this user.
102
User Manual for SifoScopes 4.11
Chapter 6 Real-time Flow Analysis
Step 5
OD5000UME01-3
(Optional) Click the [Department / Group] button at the top left corner
of the list to view the top N chart ranked based on user groups.
Click the hyperlinked Department / Group name to open a new window
displaying a Top N chart ranking the users (according to traffic flow) in
this group.
User Manual for SifoScopes 4.11
103
OD5000UME01-3
Step 6
Chapter 6 Real-time Flow Analysis
(Optional) Click the [Service] button at the top left corner of the list to
view the top N chart ranked based on service types.
Click the hyperlinked Service Name to open a new window displaying a
Top N chart ranking the users (according to traffic flow) accessing this
service.
104
User Manual for SifoScopes 4.11
Chapter 6 Real-time Flow Analysis
OD5000UME01-3
6.4 Checking Flow Statistics
SifoScopes generates graphs displaying network traffic generated for the
past 1 day, 1 hour or 5 minute. These graphs help administrators analyse
changes to network traffic during these time periods.
Configuration Procedure
Step 1
Login to SifoScopes UI.
Step 2
From the left menu bar, select “Flow Analysis > Flow Statistics”.
Step 3
(Optional) to view the statistical graph for traffic generated within the
past 1 day, click [Day] from the top left corner of this page.
Note:
To refresh the graph only when administrators click the [Refresh] button,
select “manually” from the drop down menu at the top right corner of the
graph. You can also set up SifoScopes to automatically refresh the
displayed graph every 3, 10 or 30 seconds. Simply select the desired
interval from the drop down menu.
User Manual for SifoScopes 4.11
105
OD5000UME01-3
106
Chapter 6 Real-time Flow Analysis
Step 4
(Optional) Click [Hour] to view the flow statistics graph for the past 1
hour.
Step 5
(Optional) Click [Minute] to view the statistics graph for traffic flow
generated in the past 5 minutes.
User Manual for SifoScopes 4.11
7
Chapter
Anomaly Flow Detection
7
This chapter includes the following:
z
Overview
Briefly introduces the aim of this chapter.
z
Activating Anomaly Flow Detection
Explains the anomaly flow detection function and how to configure the
system to detect and block suspicious IP addresses.
z
Monitoring Detected Suspicious IP
Guides you through the various logs collected by SifoScopes for
monitoring of the detected suspicious IP.
User Manual for SifoScopes 4.11
107
OD5000UME01-3
Chapter 7 Anomaly Flow Detection
7.1 Overview
SifoScopes “Anomaly Flow IP” function allows administrators to specify a
threshold value, monitoring all traffic generated by network users. When
an abnormally large amount of traffic is generated by a particular IP (due
to internal addresses becoming infected with virus or external intrusion
attempts), the system can automatically detect and block the address,
preventing such activities from crippling the network. Administrators will
be able to view a list of all blocked addresses from the SifoScopes system.
This function also includes a co-defense system with third-party switches.
When SifoScopes detects and blocks a suspicious IP address, the system
can inform a switch deployed in the network. The switch can then block
this IP address, providing a more frontline layer of defense to ensure
network stability.
7.2 Activating Anomaly Flow Detection
This section guides you through the procedure to enable SifoScopes
“Anomaly Flow IP” function.
Configuration Procedure
The configuration procedure is as follows:
Step 1
Login to SifoScopes UI via the “admin” account.
Step 2
Select “Anomaly Flow IP > Setting” from the left menu bar.
Step 3
Make the necessary configurations in the “Anomaly Flow IP Setting” area
of this interface.
Step 4
Click [OK] to save the settings.
Step 5
(Optional) Specify non detected IP addresses
1. In the “Non-detected IP” area at the bottom of this interface, click
[New Entry] to view the “Add new IP Address” interface.
2. Here, you can either specify a specific IP address (with netmask
255.255.255.255) or enter a subnet address. All addresses within this
subnet will not be monitored for flow anomaly.
3. Click [OK] to add this address.
4. Repeat (1) to (3) to add other addresses that will not be monitored
for flow anomaly.
108
User Manual for SifoScopes 4.11
Chapter 7 Anomaly Flow Detection
OD5000UME01-3
Reference
The configurable parameters in the “Anomaly Flow IP > Setting”
interface are explained below.
Parameter Name
Explanation
Configuration
The threshold
sessions of anomaly
flow (per Source IP)
When the number of
sessions established per
second by a single IP
address
exceeds
this
value, SifoScopes detects
this IP as a flow anomaly
and
performs
the
appropriate actions.
[How to Configure]
Enable Anomaly Flow
IP Blocking
When enabled, suspicious
IP addresses detected by
the
system
will
be
temporarily blocked.
[How to Configure]
Blocking Time
The amount of time to
block each suspicious IP
address if Anomaly Flow
IP Blocking is enabled
[How to Configure]
If this is enabled, the
system will send an email
notification
to
the
administrator(s) when a
flow anomaly is detected.
[How to Configure]
Enable E-Mail Alert
Notification
Enter the value in
the textbox
[Range] 1 – 9999
[Default] 100
Check the
checkbox to enable
Enter the value in
the textbox
Check the
checkbox to enable
You must set up email
notification from the
“System > Setting”
interface before enabling
this function. Please refer
to “3.4 Configuring Basic
System Parameters” for
more information.
Enable NetBIOS Alert
Notification
If enabled, the system
sends a NetBIOS message
to both the administrator
and the user
corresponding to the IP
address detected to be
generating a flow
anomaly.
[How to Configure]
IP Address of
Administrator
The IP address of the
administrator to notify if
NetBIOS Alert
Notification is enabled
[How to Configure]
User Manual for SifoScopes 4.11
Check the
checkbox to enable
Enter the IP
address in the
textbox
109
OD5000UME01-3
Chapter 7 Anomaly Flow Detection
Parameter Name
Explanation
Configuration
Enable Co-Defense
System
If enabled, whenever a
suspicious IP address is
detected,
SifoScopes
notifies the connected core
switch
to
block
this
address.
[How to Configure]
Switch Model
If Co-Defense System is
enabled, select the switch
model from the following
list:
[How to Configure]
IP Address of switch /
Username / Password
110
z
Alcatel 6300
z
SMC 6128L2
z
SMC 6726AL2
z
ML-9260
z
ML-9280
z
Planet WGSW-2840
z
Planet WGSW-5240
z
SH-6926GX
These parameters are
used to connect
SifoScopes to the switch
and can only be configured
if Co-Defense System is
enabled.
Check the
checkbox to enable
Select the
appropriate model
from the drop
down menu
[How to Configure]
Enter the values in
the textboxes.
User Manual for SifoScopes 4.11
Chapter 7 Anomaly Flow Detection
OD5000UME01-3
7.3 Monitoring Detected Suspicious IP
When a flow anomaly is detected, SifoScopes will perform the following
operations depending on the “Anomaly Flow IP Setting” configuration:
z
Send alert notifications to the administrator and the user
corresponding to the detected IP address if email alert notification
and NetBIOS alert notification is enabled.
z
Blocks the IP address for a period of time if Anomaly Flow IP
Blocking is enabled.
z
Notifies a third-party switch to block the detected IP address if CoDefense System is enabled.
SifoScopes logs information on all IP addresses blocked due to flow
anomaly. The system separates blocked IP into 2 log lists. This includes:
z
Virus-infected IP
The virus infected IP log records information on all internal IP
addresses that were blocked by the “Anomaly Flow IP” function. The
information recorded for each log record includes the User Name and
MAC address of the workstation using this IP address, the blocked IP,
and the time this IP was blocked.
z
Intrusion IP
The intrusion IP log records information on all IP addresses from
unknown sources that were blocked by the “Anomaly Flow IP”
function. The information recorded for each log record includes the
blocked IP, and the time it was blocked.
Configuration Procedure
Step 1
Login to SifoScopes UI.
Step 2
Select “Anomaly Flow IP > Virus-Infected IP” from the left menu bar
to view the list of all internal IPs that were blocked by SifoScopes.
Step 3
From the left menu bar, select “Anomaly Flow IP > Intrusion IP” to
view the list of all external IP addresses that were blocked by the system.
User Manual for SifoScopes 4.11
111
8
Chapter
Remote Backup Management
8
The following functions are explained in this chapter
z
Overview
Briefly introduces SifoScopes remote backup management function.
z
Set up Remote Backup
Explains detailed information on how to configure connection to a
remote backup server, specify the type of services that should be
included during a backup operation and set up backup time. You can
also check the system’s hard disk utilization and enable backup
notification via email through this function.
z
Browsing Backup Data Remotely
Describes how to browse backup history data from the backup server
remotely.
We recommend that you read this chapter when you need to set up the
system to backup network activity records to a remote server or browse
previously backup data from the remote server.
User Manual for SifoScopes 4.11
113
OD5000UME01-3
Chapter 8 Remote Backup Management
8.1 Overview
SifoScopes provides a comprehensive data backup mechanism that is
able to backup local data to a remote NAS (network attached storage) or
file server. Administrators can manually initiate backup operations or set
up the system to automatically perform backup operations periodically.
Backup data stored on the backup server can also be browsed remotely
via the SifoScopes administrative UI directly.
8.2 Set up Remote Backup
Here, you can set up SifoScopes to connect to a remote backup server,
specify the type of services to backup records of, time at which the
system performs a backup operation automatically, view hard disk
utilization and enable email notification after each backup operation.
Configuration Procedure
Step 1
Login to SifoScopes UI using a read/write administrator account.
Step 2
From the left menu bar, select “Remote Backup > Setting > Backup
Setting” to view the configuration interface.
Step 3
In the “E-mail Setting” area, you can set up the system to send an email
notification after each backup operation.
To enable this function, check the “The recorder appliance sends mail
notice after backup had completed” checkbox.
Note:
You must first enable and set up email notification from the “System >
Setting” interface before you can enable this function. Please refer to
“3.4 Configuring Basic System Parameters” for details.
Step 4
From the “Backup Setting” area, specify the IP or computer name of the
remote NAS or file server, the directory on the server to save the backup
files to and the login ID and password used by SifoScopes to login to the
server.
Next, select the types of services whose records are to be included in
each backup operation. Also select the time during which the system
performs a backup automatically.
Step 5
114
(Optional) To check if the system is able to connect to the remote server,
click the “Test” link. From the new window that appears, click
[Connection Test] to begin the connectivity test. The result of the test
will be displayed.
User Manual for SifoScopes 4.11
Chapter 8 Remote Backup Management
OD5000UME01-3
Step 6
(Optional) To manually perform a backup operation immediately, scroll to
the “Backup Immediately” area of the configuration interface. Check the
checkbox next to the From field and specify time interval of the records
to include in the backup. Next, select the service types to be included.
Step 7
Click [OK] to save the configuration. A success message should be
displayed.
8.3 Browsing Backup Data Remotely
This function allows you to browse the backup data stored on the remote
server.
Read-only administrator accounts will be able to browse stored backup
data from the remote server. However, if any modifications to the browse
settings (such as remote server’s IP address/domain name etc.) are
necessary, you must login to the system using a read/write access
account.
Configuration Procedure
Step 1
Login to SifoScopes UI.
Step 2
(Optional) Modify browse settings, ensuring that the system is connected
to the correct remote server.
1. Select “Remote Backup > Setting > Browse Setting” from the
left menu bar.
2. From the interface displayed, enter the IP address or computer name
of the remote NAS or file server, the server directory where backup
files are stored and the login ID and password used by the system to
login to the remote server.
3. (Optional) To check if the system is able to connect to the remote
server, click the “Test” link. From the new window that appears, click
[Connection Test] to begin the connectivity test. The result of the
test will be displayed.
4. Click [OK] to save the configuration.
Step 3
From the left menu bar, select “Remote Backup > Setting > Browse
Setting” and check the connection status of SifoScopes with the
currently specified remote server.
This information can be viewed in the “Connection Status of Remote Hard
Disk” area at the top of this interface. Please proceed to Step 4 if a
“Connection Status: Success” message, indicating that the system is
connected to the remote server is displayed. Otherwise, please return to
Step 2 above.
User Manual for SifoScopes 4.11
115
OD5000UME01-3
Step 4
Chapter 8 Remote Backup Management
Browse backup data
You can browse backup data according to service types. The menu
options include:
z
Select “Remote Backup > Browse > SMTP” to view all backup
SMTP records.
z
Select “Remote Backup > Browse > POP3/IMAP” to view all
backup POP3/IMAP records.
z
Select “Remote Backup > Browse > HTTP” to view all backup
HTTP records.
z
Select “Remote Backup > Browse > IM” to view all backup IM
records.
z
Select “Remote Backup > Browse > Web SMTP” to view all
backup Web SMTP records.
z
Select “Remote Backup > Browse > Web POP3” to view all
backup Web POP3 records.
z
Select “Remote Backup > Browse > FTP” to view all backup FTP
records.
z
Select “Remote Backup > Browse > Telnet” to view all backup
Telnet records.
Note:
To search for records satisfying certain criteria, click the
icon and
enter your search criteria. Click [Search] to begin searching the backup
records. This search function is similar to that provided in the “Record”
function. For details on the search function, please refer to “4.4 Viewing
Access Records According to Users” and “4.5 Viewing Access Records
According to Service Type”.
116
User Manual for SifoScopes 4.11
9
Chapter
System Maintenance
9
This chapter includes the following sections:
z
Overview
Briefly introduces the main operations included in the system
maintenance function.
z
Managing the Local Hard Disk
Explains how to view and manage the usage of SifoScopes’ local hard
disk.
z
Viewing Statistical Reports
Describes the various reports that you can generate to monitor hard
disk utilization including yearly, monthly, weekly and daily reports.
z
Monitoring System Status
Allows you to view system performance data, check the list of
currently established sessions, IM/P2P and system event logs to
understand the system’s overall operating status.
z
Restoring System Data
Guides you through the procedure to restore system setting to factory
default, format hard disk, check/repair system’s database, helping
you restore the system in the event of system failures.
Please refer to this chapter when performing various system maintenance
operations.
User Manual for SifoScopes 4.11
117
OD5000UME01-3
Chapter 9 System Maintenance
9.1 Overview
This set of operations introduces the various system maintenance
functions provided by SifoScopes. This includes hard disk management,
disk usage statistical reports, system resource utilization and data
restoration.
9.2 Managing the Local Hard Disk
A local hard disk is built into the SifoScopes device used to store records
of user online activities logged by SifoScopes. To optimize the utilization
of this local disk, the system allows administrators to specify the amount
of time records are stored for each type of online service.
Configuration Procedure
To manage the storage period for each service type, complete the
following procedure:
Step 1
Login to SifoScopes UI via a read/write administrator account.
Step 2
(Optional) View hard disk utilization
1. Select “Local Disk > Disk Space” from the left menu bar.
2. The total utilization of the local hard disk is shown using a colored bar
at the top of this interface. Each color in the bar represents a different
service. (White represents unused disk space).
3. Click the [User Name] or [Department / Group] buttons to view
the top N charts ranking each user or group according to the total
amount of hard disk taken up by each user’s/group’s records for each
service type.
Step 3
Specify storage time
1. From the left menu bar, select “Local Disk > Storage Time”.
2. In the displayed interface, specify the Storage Time in units of days
for each service protocol.
118
User Manual for SifoScopes 4.11
Chapter 9 System Maintenance
Step 4
OD5000UME01-3
Click [OK] to save the configuration.
Reference
The system automatically deletes all records older than the storage time
specified here. To archive records for long term storage, you can backup
records to a remote hard disk. Please refer to “8 Remote Backup
Management” for more information.
User Manual for SifoScopes 4.11
119
OD5000UME01-3
Chapter 9 System Maintenance
9.3 Viewing Statistical Reports
You can set up SifoScopes to generate and send hard disk utilization and
traffic reports to the specified administrators periodically via email. The
system can generate yearly, monthly, weekly and daily storage and traffic
reports.
Reports are sent to the administrators’ email as a .PDF format file.
Configuration Procedure
The configuration procedure is as follows:
Step 1
Login to SifoScopes UI via a read/write administrator account.
Step 2
(Optional) Enable automatic sending of reports periodically
1. From the left menu bar, select “Report > Setting”.
2. At the top of the displayed interface, select Enable E-mail periodic
report and select the reports to send.
3. Click [OK] to save the setting.
Step 3
(Optional) Generate and send history reports
1. Select “Report > Setting” from the left menu bar.
2. From the bottom half (“History Report”) of the interface, select the
report to generate.
3. From the corresponding drop down menu(s) to the right, specify the
time interval of records to include in the report.
4. Click [Send Report] to send the history yearly report to the
administrator’s email address.
Note:
Both traffic and storage reports are included in each send report
operation.
120
User Manual for SifoScopes 4.11
Chapter 9 System Maintenance
Step 4
OD5000UME01-3
(Optional) Viewing network traffic reports for the current year, month,
week or day, categorized according to the protocols used (TCP, UDP and
ICMP).
1. Select “Report > Traffic Report” from the left menu bar.
2. In this interface, you can:
−
Click [Year] to view the traffic report for the current year.
−
Click [Month] to view the traffic report for the current month.
−
Click [Week] to view the traffic report for the current week.
−
Click [Day] to view the traffic report for the current day.
An example of a day report is shown in the figure below.
User Manual for SifoScopes 4.11
121
OD5000UME01-3
Step 5
Chapter 9 System Maintenance
(Optional) Viewing system storage reports for the current year, month
week or day.
1. From the left menu bar, select “Report > Storage Report”.
2. From the interface displayed, you can:
−
Click [Year] to view the storage report for the current year.
−
Click [Month] to view the storage report for the current month.
−
Click [Week] to view the storage report for the current week.
−
Click [Day] to view the storage report for the current day.
An example of a day report is shown in the figure below.
122
User Manual for SifoScopes 4.11
Chapter 9 System Maintenance
OD5000UME01-3
Reference
The schedule for generation and sending of periodic reports are:
z
Yearly reports
Yearly reports are generated at 00:00 on the 1st of January of each
year. The report will include all storage utilization and network traffic
statistics for the past 1 year.
z
Monthly reports
Monthly reports are generated at 00:00 on the 1st of each month. The
report will include all storage utilization and network traffic statistics
for the past 1 month.
z
Weekly reports
Yearly reports are generated at 00:00 on the 1st day of each week.
The report will include all storage utilization and network traffic
statistics for the past 1 week.
z
Daily reports
Yearly reports are generated at 00:00 daily. The report will include all
storage utilization and network traffic statistics for the past 1 day.
Reports are sent to the administrators via email attached as a .PDF
format file. Using the acrobat reader or similar programs, the
administrator can open the .PDF report file sent to his email address to
view the report.
You must have already set up email notification from the “System >
Setting” interface. Please refer to “3.4 Configuring Basic System
Parameters” for information on email notification configurations.
User Manual for SifoScopes 4.11
123
OD5000UME01-3
Chapter 9 System Maintenance
9.4 Monitoring System Status
System monitoring allows administrators to check various system status
including resource utilization, current sessions and their corresponding
traffic flow established in the network that are monitored by SifoScopes.
The system also provides IM/P2P and event logs, recording all IM/P2P
accesses and system/administrator initiated events over SifoScopes.
The system monitoring tools are explained in the table below.
System Monitoring Tools
Description
Performance data
Includes CPU, Hard Disk, Memory and
RAM utilization charts.
(“Status > System Info”)
SifoScopes displays, in chart from, the
system’s resource utilization for the
past 10 hours, using data collected
every 10 minutes..
List of currently
sessions
established
(“Status > Current Session”)
Displays the number of sessions
currently established in the network
for each type of service (HTTP, SMTP,
POP3/IMAP, Web Mail, IM, P2P, FTP,
Telnet).
The
total
number
of
established sessions is also displayed.
The information displayed for each
session includes the source IP,
destination IP, port numbers, start
time, total traffic flow etc.
IM/P2P access log
(“Status > IM/P2P Log”)
System / Administrator initiated
event log
(“Status > Event Log”)
Records
all
IM/P2P
application
management events including whether
a particular user’s access to an IM/P2P
application was accepted or dropped.
Records all administrator and system
initiated events such as administrator
login, modifying settings etc.
When checking system’s operating status, you can select any number of
the above monitoring tools to use according to your requirements.
124
User Manual for SifoScopes 4.11
Chapter 9 System Maintenance
OD5000UME01-3
Configuration Procedure
The following procedure shows how to access the various system
monitoring tools provided by SifoScopes.
Step 1
Login to SifoScopes UI.
Step 2
(Optional) Checking system performance
1. Select “Status > System Info” from the left menu bar.
2. From this interface, you can view various basic system information
and resource utilization charts. This includes:
Step 3
−
Size of system memory
−
System’s hard disk operating status
−
Amount of time the system has been online
−
CPU, hard disk, memory and RAM utilization charts
Viewing currently established sessions
1. Select “Status > Current Session” to view the total number of
currently established sessions for each service type.
2. From this list, you can:
−
Click the service type from the Service column to view details of
the individual sessions established using this service.
Note:
Click the “Total” link in the list to view the list of sessions for all types of
services.
−
Click the
icon from the top left corner of this list to search for
specific sessions.
User Manual for SifoScopes 4.11
125
OD5000UME01-3
Step 4
Chapter 9 System Maintenance
Viewing IM/P2P logs
1. Select “Status > IM/P2P Log” from the left menu bar.
2. From the IM/P2P log list displayed, you can:
Step 5
−
Display logs from another date by selecting the date from the drop
down menu at the top of the list.
−
Click the
icon from the top left corner of this list to search for
specific logs.
Viewing event logs
1. Select “Status > Event Log” from the left menu bar.
2. The log list of all administrator and system initiated events will be
displayed. From this list, you can:
−
View various log information including the date and time the event
occurred, name of the administrator that performed this event, IP
address of the administrator’s PC and the event description.
Note:
No Admin Name will be displayed for system initiated events. For such
events, the logged IP Address is “LOCALHOST”.
126
−
View configuration details
configurations by clicking the
for events involving system
icon from the Detail column.
−
Search for specific logs by clicking the
corner of the list.
icon from the top left
User Manual for SifoScopes 4.11
Chapter 9 System Maintenance
OD5000UME01-3
9.5 Restoring System Data
This set of operations includes restoring SifoScopes’ configurations to
factory default settings, formatting the local hard disk, checking and
repairing the system’s database etc., allowing you to restore your system
in the event of system failures.
Warning
Restoring the system’s configurations may disconnect all system
operations from the network. You may be required to reconfigure your
system to re-connect it to the network. Therefore, we recommend that
you backup the current system’s configurations before the restore
operation.
If SifoScopes is unable to display recorded data properly or data is
corrupted, you can use the system’s database check and repair function
to correct these errors. Please avoid performing a database check/repair
during time intervals with heavy network traffic to prevent overloading
the SifoScopes system.
We recommend initiating a system restore operation via the SifoScopes
web UI. If you are unable to login to the system’s web based interface,
please connect your PC to SifoScopes management console port and
execute the restore operation.
Configuration Procedure (Via Web UI)
Step 1
Login to SifoScopes via a read/write administrator account.
Step 2
Select “System > Setting” from the left menu bar.
Step 3
From this interface, you can:
z
Click [Repair Now] in the “Database Check / Repair” area to check
and repair any errors in the system’s database.
z
Check the Format the Built-In Hard Disk checkbox and click [OK]
to format the system’s hard disk.
z
Check the Reset to Default Setting checkbox and click [OK] to
reset the system’s configurations to the factory default settings.
User Manual for SifoScopes 4.11
127
OD5000UME01-3
Chapter 9 System Maintenance
Configuration Procedure (System Restore Via Console Port)
Step 1
Using a serial cable, connect SifoScopes’ management console port to
your administrative PC.
Step 2
Activate a hyper terminal program on the administrative PC and establish
a connection with SifoScopes. Configure the connection properties as
follows:
Bits per second: 9600
Data bits: 8
Parity: None
Stop bits: 1
Flow Control: None
Step 3
Login to the console interface using the default administrator account
“admin”. The default password for this account is “admin”.
Step 4
The following will be displayed upon successful login:
Recorder->_
Step 5
Type “?” to view the system menu.
Recorder->?
Command :
ifconfig
: Show Internal IP
reset
: Reset Factory Setting
passwd_recover
: Administrator Password Recover
help
: Help
?
: Help
Exit
: Exit
Recorder->_
Step 6
From this menu, you can:
1. Enter “ifconfig” to view the internal IP address of the SifoScopes
system.
2. Enter “reset” to reset the system configurations to factory default
settings.
3. Enter “passwd_recover” to reset the password of the “admin” account
to default (“admin”).
128
User Manual for SifoScopes 4.11