1
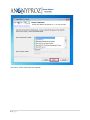
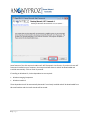
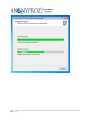
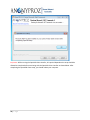
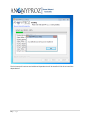
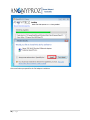
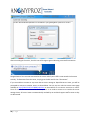
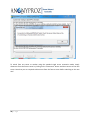
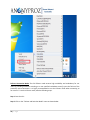
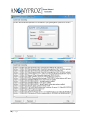
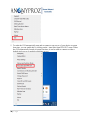
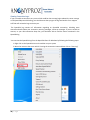
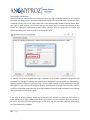
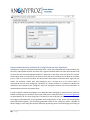
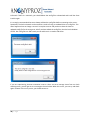
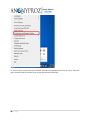
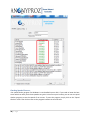
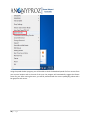
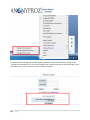
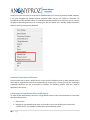
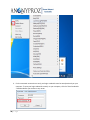
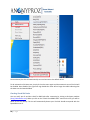
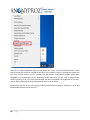
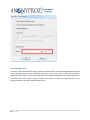
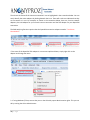
User Manual for Anonyproz Pre-configured OpenVPN GUI Client
Anonyproz offers a modified/customized version of the open source OpenVPN GUI by Mathias
Sundman. Using our modified version, our subscribers can benefit from the added features which can
greatly improve their OpenVPN tunneling experience. The new modified GUI is now bundled with our
speed checker and connection simulator programs. Anonyproz client GUI comes with all our OpenVPN
servers config files pre-configured and are automatically copied to the OpenVPN system folder on your
computer. Using our pre-configured and customized GUI installer, our subscribers can perform the
following directly from the GUI:
•
•
•
•
•
•
•
•
•
•
•
•
•
•
•
•
Connect to any server of choice
Force all applications on your PC to connect to internet only through the VPN encrypted tunnel
Switch between any server with a single click
Connect to our servers in 3 different modes: Standard, Failover and Switching Connection Modes
Automatic server failover to a redundant server upon the failure of previously active server
Login credentials secure saving (AES 256 cipher) for automatic connection
Integrity and authenticity validation for Client config files using secure hash algorithm
Switch between Google DNS, OpenDNS, Anonyproz DNS (with malware filtering support)
Flush DNS cache and ARP (Address Resolution Protocol) easily with a single click
Check all servers speed to determine the server which offers the best speed from a location
Simulate login/connection and routing (internet access via OpenVPN)
Change OpenVPN password with our secure OpenVPN password reset web form
Change SSH password with our secure SSH password reset web form
Automatic connection to a default pre-selected server at GUI launch
Automatic GUI start and connection to a default pre-selected server at system startup/boot
Automatic server switching at a pre-determined time duration
This manual is organized in sections which describe in detail how to install and use our pre-configured
OpenVPN client for Windows which is required to connect to our OpenVPN servers. It is organized in
sections as shown in the content below:
1|Page
Contents
Downloading/Installing the GUI:................................................................................................................... 2
Connection Modes ...................................................................................................................................... 20
Integrated Firewall for prevention of IP leaks: ........................................................................................... 33
Viewing Connection Logs: ........................................................................................................................... 40
Saving Login Credentials: ............................................................................................................................ 41
Integrity and Authenticity Validation for Config Files (Secure Hash Algorithm): ....................................... 42
Checking Real-Time Server Status: ............................................................................................................. 45
Checking Speed of Servers: ......................................................................................................................... 49
Simulating your Connection and Routing (Internet Access via the VPN) Checks: ...................................... 51
Changing OpenVPN Password: ................................................................................................................... 53
Automatic Connection at GUI launch ......................................................................................................... 56
Connecting to a Single Default Server at GUI launch: ................................................................................ 56
Changing the Default Server ....................................................................................................................... 59
Automatic GUI Start and Connection at System Startup ............................................................................ 60
Checking IP and DNS Leaks ......................................................................................................................... 62
Preventing DNS Leaks ................................................................................................................................. 65
Proxy Setting: .............................................................................................................................................. 66
Switching DNS Server: ................................................................................................................................. 67
DNS Switching Pre-requisites ...................................................................................................................... 69
Preventing DNS and ARP Cache Poisoning by Clearing DNS and ARP Cache:............................................. 72
Secure Access to Member Area: ................................................................................................................. 72
Contacting Support: .................................................................................................................................... 73
Software Warranty and Third Party Usage: ................................................................................................ 74
Credits: ........................................................................................................................................................ 74
Downloading/Installing the GUI:
Anonyproz OpenVPN GUI can be downloaded in the link below:
http://www.anonyproz.com/openvpnclient.exe
2|Page
After downloading the program, proceed to run the application.
Select the preferred language for the setup and click on OK.
3|Page
Click “Next”
4|Page
Click “I Agree” to license
5|Page
Click “Next”. All the check boxes are required!
6|Page
Leave the default location and click “install”
7|Page
Some features of the GUI requires the Microsoft .NET Framework 4 to function. If you do not have .NET
framework installed on your computer, the setup wizard will detect it and will be downloaded and
installed automatically. Click on Install to proceed.
If installing on Windows XP, 2 other dependencies are required:
•
•
Windows Imaging Component
Windows Installer 3
These dependencies will be automatically detected if not already installed and will be downloaded from
Microsoft website and the install wizards will be started:
8|Page
Click on Next
9|Page
Accept the license and click on Next to begin the installation. At the end of the setup, the Windows
Imaging Component setup will begin. Follow the same procedure to begin the installation.
10 | P a g e
11 | P a g e
12 | P a g e
Accept the license and install on Install.
13 | P a g e
14 | P a g e
Click on Finish to complete the .NET framework installation.
15 | P a g e
Important: While running the OpenVPN client installer, all required dependencies setup should be
allowed to complete before continuing with the OpenVPN client installer as shown below. After
completing the OpenVPN client setup, you should reboot your computer.
16 | P a g e
The GUI setup will continue and additional dependencies will be installed. Click OK to install the
dependencies.
17 | P a g e
Click Install when prompted for the TAP adapter installation.
18 | P a g e
Leave the “Show Readme” checkbox checked and click on “Finish” to finish the setup. The GUI user
guide document will automatically open on your computer. Please make sure you read this guide in
order to familiarize yourself with the GUI.
Important: After installing the GUI, you must restart your computer to save the system changes.
After completing the setup and rebooting your computer, you will now see the OpenVPN GUI icon in
your desktop. To start it, simply double click on the icon and the GUI icon will become visible in your
taskbar as shown below
19 | P a g e
Important: For Windows 7/Vista users, you must run the GUI as “Administrator”. To run the GUI as
Administrator, simply right click on the GUI desktop icon and click on “Run as administrator” as shown
below:
Connection Modes
Three modes of connection to our OpenVPN servers are possible with the GUI as follows:
•
•
•
Standard Single Server Connection Mode
Failover Connection Mode
Switching Connection Mode
20 | P a g e
Tip! Before deciding on the mode of connection to use and connecting with the GUI, the following are
recommended:
•
Verify the server config file for authenticity and integrity using the “Verify” button
•
Check our real-time server status page to check if the server is active by going to:
http://184.22.136.125:8080/index.htm
•
Run the speed checker program by clicking on the “Speed Checker” menu in order to determine the
server which will offer you the best speed from your location
The 3 modes of connections are explained as follows:
Standard Single Server Connection: In the Standard Single Connection mode, users can connect to any
single server of choice by simply right clicking on the GUI icon and navigating to the server name and
clicking on “Connect” as illustrated in the screenshot below:
21 | P a g e
You will be prompted for your username and password which will be passed on to the server over the
secure TLS channel. If the credentials are correct, you will be authenticated and connected to the server.
When authenticating to the server, make sure you tick the “Save Credentials” checkbox in order to
securely save your login credentials on your system so that you don’t have to enter your login each time
you connect to our servers.
22 | P a g e
After connecting to the server, the GUI icon will change to green indicating a successful connection.
Congratulations! You are now connected to the server and all your traffic is now routed via the server
securely. To disconnect from the server, simply go to the GUI and click on “Disconnect”.
If you are unable to connect to any server due to server outrage or OpenVPN server issues, you will be
prompted to connect to another server as shown below. You can use our real-time server status page
available at http://184.22.136.125:8080/index.htm to know which of our servers are active or online.
Since all our servers are monitored in real-time, there is no need to contact us to resolve the server
outrage issues. All server issues are automatically resolved by our technical support staff as soon as they
are discovered.
23 | P a g e
To switch from one server to another using the standard single server connection mode, simply
disconnect from the former server by clicking on the “Disconnect” button and then connect to the new
server. Note that you are required to disconnect from the former server before switching to the new
one!
24 | P a g e
Failover Connection Mode: The GUI failover mode ensures high availability and redundancy for our
users by providing automatic switching to a user specified redundant server(s) upon the failure of the
previously active connection. It is highly recommended to use the Failover mode when connecting to
our servers. To use the Failover mode, take the following steps:
Step 1: Start the GUI.
Step 2: Click on the “Failover and Switcher Mode” menu as shown below:
25 | P a g e
Step 3: On the Failover/Switcher window, select the Failover mode and select your desired servers
(redundant servers). You can select any number of servers as your redundant servers. After selecting
your desired servers, click on “Connect” to start the connection. Please note that the order in which the
servers are listed from top to bottom in the OpenVPN client main interface is order the servers will run
no matter which server is ticked first.
Important:
The order in which the servers are listed from top to bottom is order the servers will run no matter
which server is ticked first.
In the Failover and Switcher mode interface, the Servers will run from left to right and from top to
bottom. For instance if a user selects servers in this order:
USA 3 >>>> USA 1>>>>France 1 >>>>Canada
Then the GUI will connect to the servers in this order:
Canada >>>> France 1 >>>>USA 1 >>>> USA 3
When selecting your redundant servers, make sure you select your favorite servers or servers which
offer you the best speed from your location. For instance, if you are interested in USA servers, you
26 | P a g e
should select our 3 USA servers as your redundant servers. To know which server which offers you the
best speed from your location, use our speed checker program which can also be accessed from the
GUI.
As an illustrative example as shown in the screenshot below, we selected USA Server 1, USA server 2
and USA server 3 in this order and ticked the failover connection mode. With this configuration, the GUI
will first connect to USA server 1 and will remain connected until there is an outrage or failure in USA
server 1. In the event that USA server 1 connection fails, the GUI will automatically failover or connect to
USA server 2 using your saved login credentials. If also in the event that USA server 2 fails, the GUI will
then failover to USA server 3 until USA server 3 fails. In the event that USA server 3 fails, the GUI will
loop back to USA server 1 and will continue in this cyclic manner in order to ensure high availability and
uninterrupted connection. The duration between the server switches takes approximately 30-38
seconds.
To disable or remove a particular server as a redundant server, simply untick the checkbox beside the
server and click on “Exit” and the server will be removed or disabled from the failover mode of
connection. Please note that you must de-select all the servers in the window if you wish to use the
standard single server connection mode thereafter.
27 | P a g e
To discard the failover mode, simply unselect ALL selected servers and click on “Exit”
If it is your first time of authenticating to our servers, the login prompt window will appear as shown
below. Please enter your correct member username and password and make sure you tick the “Save
Credentials” checkbox before clicking on OK. Your login credentials is only saved securely on your
computer after successfully connecting to a server.
28 | P a g e
29 | P a g e
If you wish to terminate the failover mode and disconnect from your current active connected server
while running the GUI in the failover mode, simply navigate to the current connected server and click on
“Disconnect”.
Switching Connection Mode: Instead of connecting to a single server one at a time each time the GUI is
launched, you may want to connect and switch between multiple pre-selected server locations for
increased anonymity. The GUI offers you the ability to connect to multiple pre-selected server locations
at set time intervals thereby changing your IP address during each server switching. In addition to the
increased anonymity benefits, by switching between multiple OpenVPN servers at scheduled time
interval, certain Deep Packet Inspection or Firewalls can be bypassed.
As most DPI devices tend to block encrypted traffic which are characterized by very high encrypted
traffic volume to a single destination or server, it is recommended that excessive and prolonged
connections to a single OpenVPN server be avoided. In addition, most DPI tend to block VPN
connections not by IP or port, but by simply cutting off any connection that sends too much data to a
single location or server.
The following steps show how to run the GUI in switching connection mode:
Step 1: Start the GUI
Step 2: Navigate to the “Failover and Switcher Mode” menu
30 | P a g e
Step 3: Click on the “Failover and Switcher Mode”menu and you will be presented a window to select
the servers you wish to switch between.Enter a desired time interval in minutes between each rotation
and then finally click on “Connect”. Note that the server switching connections will be made in that
order in which they are ticked in the server switcher settings window.
Step 4: After clicking on Connect button, the GUI will automatically connect to the first server selected
in the queue and will automatically re-connect to the next server on queue after the set time interval
31 | P a g e
has elapsed. After connecting to the last server selected on the switching queue, the GUI will connect to
the first server again and continue this in a cyclic manner.
If a particular server in the queue cannot be connected due to server outrage, the server will be
bypassed and you will be connected to the next server in queue.
As soon as a new connection is made to a new server, you should see a connection notification message
pop up on the taskbar. A sample is shown below
Note: While the GUI is switching from one server to another, you will be unable to connect to the
internet. This is done to safeguard your connection and ensure that your real IP do not leak while the
GUI is switching servers. The server switching duration normally takes just few seconds to complete.
Step 5: To disconnect the connection, simply locate the current active servers that in the queue by
looking for the right mark before the server or by hovering your mouse over the GUI taskbar icon. Then
click on “Disconnect” to disconnect from the VPN server.
Note: If a default server is enabled in the GUI, you must disable the default server before running the
GUI in Switcher or Failover modes. Otherwise, the failover or switcher modes of connection cannot be
started.
Switching from Failover or Switcher Connection Modes to Standard Single Server Connection Mode
If you wish to switch to the standard single server connection mode after exiting from the failover mode
then go to the failover and switcher mode window and un-tick or un-select all selected servers and
finally click on the “Exit” button. After this, you can then connect to any server in the standard single
server connection mode.
32 | P a g e
Integrated Firewall for prevention of IP leaks:
Anonyproz pre-configured and customized OpenVPN client GUI enables you to force all
applications on your computer to only work once connected to our OpenVPN servers. This
ensures that all applications in your PC will only work behind a secure encrypted connection.
This is useful in the event of an unexpected disconnection from our VPN servers, you can be
sure that any application will not revert back to using your default unencrypted internet
connection thereby exposing your real IP in the process.
When the GUI is started, the integrated firewall is automatically started and when you attempt to
open any application without being connected to our OpenVPN servers, you will not be able to
access internet. The only outbound connections possible when the GUI is started are connections
to any of our OpenVPN servers, our website (www.anonyproz.com) and our real-time server
status page. In order to allow applications to access internet without connecting to the OpenVPN
server, the GUI must be exited in your PC.
Benefits of the Integrated Firewall in Anonyproz OpenVPN GUI Client
1. In the event of an unexpected disconnection from our VPN servers, none of your
applications will revert back to using your default unencrypted internet connection
thereby preventing the exposure of your real IP. (IP Leaks)
2. Prevents the accidental exposure of your real IP when you forget to connect to our
OpenVPN servers and therefore start using applications such as your web browser with
your normal internet connection.
3. By activating the “auto start at system boot time” feature of the OpenVPN GUI client, the
GUI can be made to automatically secure your real IP immediately after your system
boots and ensure that you do not forgot to run any application unless through the
OpenVPN tunnel
33 | P a g e
How it Works and Instructions
The customized OpenVPN GUI client is integrated with a powerful firewall based which is
automatically executed when you start the GUI. On exiting the GUI, the firewall is automatically
disabled and your system returns to the normal state. Note that the firewall feature of the
OpenVPN client is only supported in Windows Vista (SP2), 7 and 8. Windows XP is not
supported. Note that in order to ensure that the GUI runs properly, you should disable any
running firewall on your PC prior to running the OpenVPN GUI.
The following steps are required to secure your real from exposing when connected to any of our
OpenVPN servers using our customized GUI client:
1. After completing the OpenVPN client GUI setup, you will see the OpenVPN GUI icon in
your desktop. To start it, simply double click on the icon and the GUI icon will become
visible in your taskbar as shown below:
At this point the firewall is automatically activated and ALL applications on your PC will not be
able access internet anymore until you connect to any of our OpenVPN servers.
Important: For Windows 7/Vista users, you must run the GUI as “Administrator”. To run the
GUI as Administrator, simply right click on the GUI desktop icon and click on “Run as
administrator” as shown below:
34 | P a g e
Should you attempt to run the GUI without the appropriate privileges, the User Access Control
(UAC) on your system if enabled, will prompt you to allow the GUI to run. Simply accept it.
2. Right click on the GUI icon on your system taskbar and choose any server to connect:
35 | P a g e
3. After authentication, you will be connected to the VPN server. Thereafter, all applications on
your system can now access internet behind the secure encrypted connection. In the event
that the OpenVPN server unexpectedly disconnects or the connection is terminated, the GUI
will prevent your applications from accessing internet as long as the GUI client is still
running.
36 | P a g e
4. To disconnect from the OpenVPN server and return your system to the normal state, simply
disconnect from the OpenVPN server and exit the GUI as shown below:
37 | P a g e
5. To make the GUI automatically start and or connect to any server of your choice at system
boot time, you can enable this by clicking on the “Auto Start OpenVPN GUI” menu. When
the GUI automatically launch at system boot time, it can be made to connect to either a
default single server or multiple switching servers.
38 | P a g e
If desired, you can optionally select a default server which you want the GUI to
automatically connect to when it starts.
To de-activate the GUI Auto start, simply click on the menu again and the automatic start of the
GUI will be disabled. Once disabled, the right mark sign beside the menu will no longer be
visible indicating that the Auto start has been disabled.
39 | P a g e
Viewing Connection Logs:
If you are unable to connect to any server which could be due to wrong login credentials, server outrage
or ISP OpenVPN protocol blocking, you should ensure that you get the logs and send it to our support
staff. We will review the logs and assist you.
The OpenVPN log contains all information regarding an OpenVPN connection, including extra
connection details about your connection, warning messages, and error messages. If you are unable to
connect, or your VPN connection drops out, you should be able to find the reason contained in the
OpenVPN log.
You can view the OpenVPN Log from the OpenVPN client for Windows by following the following steps:
1. Right click on the OpenVPN icon on the taskbar on your system
2. Move the mouse to the server which is having the connection issue and then click on “View Log”
40 | P a g e
Saving Login Credentials:
The GUI includes an optional feature to enable you save your login credentials securely in an encrypted
form (AES 256 cipher) on your computer when authenticating to the OpenVPN server. To save your login
credentials, simply click on the “Save” check box on the authentication window as shown below. Once
your login is saved securely, the GUI will then use this saved login to connect automatically to the
servers for subsequent connections thereby saving you the stress of typing your username and
password manually each time you wish to connect to the server.
In addition, using the encrypted saved login credentials for automatic connections can prevent the
possibility of a keylogger (hardware and software that’s designed to secretly record your keystrokes) or
spyware program to steal or capture your login. Once the login is saved, it is encrypted using strong AES
256 ciphers on your system and you do not have to manually enter your login anymore when you wish
to connect to the VPN server. Note that your login credentials are only saved securely on your computer
after successfully connecting to a server.
If you wish to delete previously saved login credentials, just uncheck the check box and click OK as
shown below and the login credentials will be erased securely from your computer when you connect to
the server. Thereafter you can proceed to login to the server with the new login credentials while ticking
the “Save Credentials” checkbox.
41 | P a g e
Integrity and Authenticity Validation for Config Files (Secure Hash Algorithm):
Anonyproz is using the "Asymmetrical Authentication" server-client authentication method where only
the server authenticates itself to the client with a signed certificate while the client authenticates itself
to the server with a username/password which is passed on to the server over the secure TLS channel.
On the other hand, it is necessary for the client to verify the server certificate via the Root CA certificate
(ca.crt). That is to say that the server will only accept clients whose certificates were signed by the
master CA certificate. Please note that Anonyproz uses a shared ca.crt in all servers which is
incorporated into the client config files. Therefore, for security reasons it is essential to validate the
authenticity and integrity of the config files since the config files contains the critical information to
authenticate the client to the remote server.
In order to detect unauthorized changes to our OpenVPN client config files or ensure that our clients are
indeed connecting to our authentic and current VPN servers, SHA-512 hashes (secure hash algorithm)
are generated for all our client config files. The hashes for the config files can be used to confirm both
the integrity and authenticity of our OpenVPN client config files for all our servers. By comparing the
config files hashes against a list of officially generated hashes for the config files makes it possible to
detect changes in the config files thereby effectively preventing users from unknowingly connecting to
42 | P a g e
rogue servers setup by attackers assuming your system is infected with a backdoor or trojan that is
capable of secretly editing the .ovpn files with fake data so that you can connect to the fake servers.
In addition to using the hash algorithm to ensure the integrity and authenticity of our config files,
Anonyproz never uses hostnames of our OpenVPN servers in our config files. All connections are made
directly to the servers IPs on port 443. This effectively prevents against DNS Cache Poisoning or DNS
spoofing attacks which is another popular MITM attack which is based on simple convention of IP to
host resolution. If an attacker is able to edit your system Host file via Trojans or backdoors, then the
Hosts file can be used to hard code domain name translations and direct you to a different rogue server.
Please note that it is never 100% safe to rely on the server IP as a proof of being actually connected to
the real server because if an attacker is able to trick you to connect to the rogue server, then it is very
possible that the real server IP can be spoofed. The only sure means of confirming the integrity and
authenticity of the OpenVPN config files is by ensuring that the hashes match. Hence users are advised
to always verify the integrity of the config files by ensuring that the hashes match those published by
Anonyproz.
With our new client GUI, the hashes comparison is automatically done by simply clicking on the “Verify”
button for each server as shown below:
The hash is automatically generated when the verify button is clicked and then compared to the hash
value securely stored on our server. When the hashes match or there is a mismatch, the user will be
43 | P a g e
informed. If there is a mismatch, you should delete the config files or download and install the client
installer again.
It is strongly recommended that users always validate the config files before connecting to the server.
Sometimes, the hash mismatch can be caused as a result of using an outdated client or config files. This
often happens when we change a server IP or replace a server and you do not have the latest or
updated config file for the new server. Also if you have edited the config files, then the hash validation
will fail. Our config files are 100% ready-to-use and there is no need to edit them.
If you are experiencing internet connection issues or there are server outrage issues from our hash
checking server, you will get an error message as shown below. When this occurs, you can try and check
again. However if the error persist, you should contact us.
44 | P a g e
Please note that the client installer should always be downloaded from our official site. Do not
download the GUI installer from third party sites or mirror sites!
Important: Please note that our OpenVPN client config files are changed very infrequently. When we
make any changes to the config files, you will be informed by email or via our secured News area on our
support page. You should be suspicious of any messages claiming that the config files have changed with
a link to download the config files which is not from our official website. Should you receive any
suspicious email, you should immediately contact us. Our pre-configured OpenVPN client installer and
config files should ONLY be downloaded from our official website here.
Checking Real-Time Server Status:
Before connecting to any server listed on the GUI, it is advisable that you first check the real-time status
of all the servers. The status of all our OpenVPN servers can be viewed in real-time using our online
server status interface by simply clicking on the “Real-Time Server Status” menu on the GUI. Once
clicked, you will be re-directed to the real-time server status page. Here you will see all our server
locations and the current status of the servers.
45 | P a g e
46 | P a g e
The following legend is applicable:
OK: Server is Online
Down: Server is currently down. Anonyproz is already aware of it and is working to restore access to it.
If you are unable to access the online real-time status page due to the checker server outrage, you can
use the Connection and Routing Checker application which you can access directly by clicking on the
“Connection and Routing Checker” menu in the GUI as shown below:
47 | P a g e
To start the tests, simply enter your member username and password and click on “Start”. After the
tests, you will be able to connect to any server that reported “Successful”
48 | P a g e
Checking Speed of Servers:
Our speed checker program for Windows is now bundled into our GUI. If you need to know the best
server which can offer you the best speed at any point in time from your location, you can use our speed
checker program to test the speeds of our servers. To start the program, simply click on the “Speed
Checker” menu. Then click on start on the program interface to start the tests.
49 | P a g e
Using the speed checker program, you will be able to check the download speed of all our servers from
your current location and at the end of the test; the program will automatically suggest the fastest
server for you. After running the tests, you will be presented with the servers speed/ping values and a
bar graph for each server.
50 | P a g e
Simulating your Connection and Routing (Internet Access via the VPN) Checks:
The OpenVPN GUI is now bundled with our Server-Client connection simulator software. The program
can be used to simulate your login on our servers to determine the status of your account and which
servers are online. The software can also be used for performing routing checks (internet access via the
OpenVPN) and as automatic account troubleshooting notifier to our support staff.
To start the connection and routing checks, simply click on the “Connection and Routing Checker” menu
as shown in the screenshot below:
51 | P a g e
To learn more how the program works and how to use, please download the user guide from the link
below:
http://www.anonyproz.com/openvpnchecker.pdf
52 | P a g e
Changing OpenVPN Password:
Please note that you cannot change the password to authenticate to the OpenVPN servers from your
member area as your member area password and OpenVPN password are not linked. However, by
default,your login credentials you chose when you signed up securely (SSL/https) for your member
account is the same as the login credentials for the OpenVPN . If you need to change the password to
authenticate to the OpenVPN servers after your signup,simply click on the “Change OpenVPN Password”
from the “Change Password” menu in the GUI to go our secure OpenVPN password reset web form.
53 | P a g e
Enter the requested information and click on “Change Password”. After the password is changed, you
can then connect to all our servers with the new password you have chosen.
54 | P a g e
It is also possible to change your member profile password via your member area by clicking on the
“Change profile password” link. If you have forgotten your member area login or the default login to the
OpenVPN servers, you can retrieve it from our member interface.
55 | P a g e
Simply enter your username or email and the password will be re-sent to the email provided. However,
if you have changed your default member password before and you are unable to remember the
first/default member password which is the default OpenVPN password, the only way you can retrieve
the default OpenVPN password is by contacting us. We will request your member profile information
and then securely send you the password.
Automatic Connection at GUI launch
The GUI allows you to select a specific server of your choice as a default server or select multiple servers
which will be rotated and make the GUI automatically connect to the server(s) using your saved login
credentials whenever the GUI is launched or restarted. The following explains how each mode of
operation is carried out.
Connecting to a Single Default Server at GUI launch:
To make the GUI automatically connect to a single default server of your choice whenever it is launched,
take the following steps:
1. Start the GUI
2. Navigate to your desired server which you intend to set as your default server and click on
“Default Server”. An example is shown below for Luxembourg server.
56 | P a g e
3. After clicking on the “Default Server”, confirm that the server has been made the default server
by looking for a right mark
57 | P a g e
before the “Default Server” button as shown below
4. For the automatic connection to work, your login credentials must be saved previously on your
computer. To save your login credentials securely on your computer, click the “Save Credentials
“checkbox before you connect to any server.
58 | P a g e
5. When next you launch the GUI, the GUI will automatically select the default server and will
connect to the server without any input or action from you.
Note: You must disable User Access Control (UAC) on your system if you intend to make the GUI
auto start and connect to a default server at system boot time unattended. If UAC is not disabled,
you will get security prompts as shown below:
In Windows 7/Vista, you can easily disable/enable UAC from the command Line by running the following
commands:
Disable UAC
C:\Windows\System32\cmd.exe /k %windir%\System32\reg.exe ADD
HKLM\SOFTWARE\Microsoft\Windows\CurrentVersion\Policies\System /v EnableLUA /t
REG_DWORD /d 0 /f
Enable UAC
C:\Windows\System32\cmd.exe /k %windir%\System32\reg.exe ADD
HKLM\SOFTWARE\Microsoft\Windows\CurrentVersion\Policies\System /v EnableLUA /t
REG_DWORD /d 1 /f
After you enable or disable UAC, you will have to reboot your computer for the changes to take
effect.
Note: Please note that the above commands are single line commands. Enter the commands in a single
line.
Changing the Default Server
To disable the current active default server and select a new default server, simply go to the current
default and click on the “Default Server” button to deselect/de-activate the server as the default server.
59 | P a g e
Thereafter, you can select a new server as your default server by clicking on the “Default Server” button
for the new server. As soon as the server has been deselected as the current active server, the right
mark will be removed.
Automatic GUI Start and Connection at System Startup
Sometimes it can be useful to have the GUI automatically startup and connect to a server at system boot
time. For example, supposing you wish to run the GUI on unattended systems or servers and you require
that certain applications or programs access the internet securely via OpenVPN connection at all times,
you can install the GUI on the unattended systems and setup the GUI to automatically start and connect
to the VPN server(s) at boot time or during system restarts; all in unattended mode. When the GUI
automatically launch at system boot time, it can be made to connect to either a default single server or
multiple switching servers.
To configure the GUI to automatically connect to a pre-selected default server or multiple rotating
servers configured in the automatic server switcher settings window at system boot, click on the “Auto
Start OpenVPN GUI” menu to activate it as shown below
60 | P a g e
Once activated, the right mark sign will appear beside the menu as shown below.
Note: Make sure that the right marks are present in the “Default Server” and the “Auto Start
OpenVPN GUI” menus for the automatic connection to the default server at system boot time
to be active! For example, in the sample screenshot shown below, the GUI will automatically
connect to the Luxembourg server when the system restarts or boots up.
61 | P a g e
Once activated, the GUI will automatically start and connect to the default server.
To de-activate the GUI Auto start, simply click on the menu again and the automatic start of the GUI will
be disabled. Once disabled, the right mark sign beside the menu will no longer be visible indicating that
the Auto start has been disabled.
Checking IP and DNS Leaks
You can verify your IP and also check for DNS leaks after connecting by visiting a third-party website
(http://dnsleaktest.com). When you click on the “Check IP and DNS Leaks” menu on the GUI, you will be
taken to this site directly. The site will automatically detect your IP which should correspond with the
OpenVPN server IP.
62 | P a g e
Also you can check for DNS leaks using this site. Simply click on the “Check for DNS leaks now!” button
and the results will display all the DNS servers which your system is using for resolving sites. Make sure
that your ISP DNS servers are not included. The DNS servers should always display Google DNS,
OpenDNS or our private DNS servers depending on the DNS server you are using if using the DNS
switching feature of our GUI. Since the hostnames and IPs for OpenDNS and Google DNS is not static,
you can always identify them by the displayed ISP name as shown below:
Note: Our private DNS servers are currently hosted by Santrex Internet Services. Anonyproz is in no way
affiliated with Santrex Internet Services.
63 | P a g e
OpenDNS:
Google DNS:
64 | P a g e
Anonyproz Private DNS:
Preventing DNS Leaks
If the displayed results from the site include a strange DNS server or that of your ISP, the following steps
may help to stop the DNS leaks:
1. Ensure that you set static values as provided by your ISP for your LAN IPv4 settings for your real
network adapter:
• IP Address
• Subnet Mask
• Default Gateway
2. Ensure that your OpenVPN TAP adapter name is exactly named “Local Area Connection 2”. If this
is not so, rename it
3. Switch to another DNS server from the GUI. Our OpenVPN servers uses a default Google DNS
servers. However, you can switch to OpenDNS or our private DNS servers. We have observed
that OpenDNS appears to work best in preventing DNS leaks and DNS query interception by
ISPs.
4. Click on the “Flush DNS and ARP cache” button under the Switch DNS menu in the GUI.
5. Recheck your DNS again and see if you still have DNS leaks.
65 | P a g e
Proxy Setting:
OpenVPN supports connections via proxy servers. HTTP and SOCKS proxies are currently supported. SSH
Socks 5 proxy is also supported. To connect to any of the server via a proxy, simply click on the “Proxy
Settings” menu and configure the proxy settings.
66 | P a g e
Switching DNS Server:
Anonyproz offers subscribers the ability to switch the DNS used for resolving websites when connected
to our OpenVPN servers using the OpenVPN client GUI. Using the GUI, you can easily switch between
Google DNS, OpenDNS or our private malware domain filtering enabled DNS servers. Switching between
these DNS servers only requires a single click when connected to the VPN. Your connection will not be
disconnected when you switch between DNS servers.
67 | P a g e
By default, after connecting to any of our servers, the OpenVPN server will automatically push Google
DNS servers to you and your default ISP DNS servers are automatically bypassed thereby enabling you to
resolve websites using Google DNS servers. However, it is possible to switch from the default Google
DNS to our private DNS (with malware domain filtering support) or OpenDNS if desired.
Note that OpenDNS and Google DNS are public DNS servers which offer large scale caching system and
offers fast DNS look ups using a technology known as “anycast routing” to direct all DNS queries to the
closest DNS server to you. Thus, by using OpenDNS or Google DNS, your browsing experience can be
improved significantly and websites are more likely to be resolved faster.
By offering our subscribers the option to switch between our private DNS, Google DNS and OpenDNS,
our clients can then utilize any of the DNS which offers them the best browsing experience and speed.
Please note that when using one of these free public DNS servers (Google DNS and OpenDNS), all DNS
queries will originate from the server IP and not your personal IP hence your privacy is assured. To learn
more about Google DNS and OpenDNS, please go to the links below:
68 | P a g e
OpenDNS: http://www.opendns.com/
Google DNS: https://developers.google.com/speed/public-dns/
The table below summarizes the main differences between Google DNS, OpenDNS and our private DNS
servers:
DNS Server
OpenDNS
Google DNS
Anonyproz DNS
Malware Domain Filtering
YES
NO
YES
Redirection (Advertising)
YES
NO
NO
Logging
YES
YES
NO
By using our private DNS servers you can take advantage of our malicious domain filtering service which
will detect and block all DNS requests to known malicious sites obtained from various user contributed
sources such as malware and phishing sites as part of our service. Once connected to our OpenVPN
servers, access to these known malicious sites are automatically blocked at the DNS level (DNS sinkhole)
thereby preventing the sites from loading in your browser. You will be automatically redirected to our
malware alert page at: http://184.22.136.125 when a DNS request is made for a malicious domain listed
in our database.
Our custom DNS sinkhole system is currently blocking over 300,000 malicious domains.
To see these blocked domains, please go to our Malware DNS Sinkhole web portal at:
https://www.anonyproz.com/dnssinkhole/
DNS Switching Pre-requisites
To ensure that the DNS switching feature works correctly and reliably, there are certain pre-requisites
that are necessary. These are as follows:
69 | P a g e
1. Ensure that the OpenVPN TAP adapter name for your computer LAN (Local Area Network)
settings is named” Local Area Connection 2”. You can confirm the name of your LAN adapters in
Windows 7 by going to Windows Control Panel then under "Network and Internet", select "View
network status and tasks":
Click "Change adapter settings":
70 | P a g e
Then check the names of the Internet connection's icon as highlighted in the screenshot below. You can
easily identify the active adapters by looking beneath the icons. Those will a red cross indicates that they
are not active or in use. For example, as shown in the screenshot below, there are 2 active network
adapters; the LAN adapter for your normal internet connection and the TAP adapter for your OpenVPN
connection.
The DNS switching function requires that the OpenVPN connection adapter name be “ Local Area
Connection 2”
If the name of the OpenVPN TAP adapter is not same as explained above, simply right click on the
adapter and change the name.
2. If using Windows 7/Vista, ensure that you run the GUI with proper Administrative rights. This you can
do by running the GUI as Administrator.
71 | P a g e
Preventing DNS and ARP Cache Poisoning by Clearing DNS and ARP Cache:
The GUI includes a feature to clear your DNS and ARP (Address Resolution Protocol) cache which
effectively fixes DNS cache poisoning (which is a filtering method commonly used by ISPs to block access
to certain sites) and ARP cache poisoning. Note that in order to help speed up Web browsing, Windows
comes with a local cache containing any DNS addresses that have been looked up recently. Once an URL
has been resolved by an Internet name server into a numerical IP, the information is stored locally.
Anytime your browser requests an URL, Windows first looks in the local cache to see if it is there before
querying the external name server used by your ISP. If it finds the resolved URL locally it uses that IP.
However, this DNS cache can be poisoned by ISPs for sites such as Youtube, Facebook, Twitter etc when
you attempt to visit these restricted sites before connecting to the VPN. Sometimes even after
connecting to the OpenVPN server, you will still be unable to access these sites for at least 5 minutes
which is the default time for retaining a negative DNS query response in the DNS resolver cache. In other
words, once a negative response is received you will not be able to connect to the site for at least five
more minutes.
Thus in order to avoid this 5 minutes delay nuisance, you can simply click on the “Clear DNS and ARP
cache” menu on the GUI under the “Switch DNS Servers” main menu to effectively clear the DNS
resolver cache to remove any corrupted or poisoned DNS entries in your existing resolver cache.
On the other hand, the ARP Cache is a collection of ARP entries that are created when a hostname is
resolved to an IP address and then an IP address is resolved to a MAC address thereby enabling the
computer to communicate with the IP address. However, with time, ARP cache entries can become stale
and it is possible for additional entries to the ARP cache table to be made without removing expired
entries from the stored table. Eventually, this will result in errors that can significantly impact computer
or network performance and can cause issues with Internet connections and Web page loading. Hence,
by clearing the ARP cache, these issues can be resolved.
Important Tip: We recommend that you always clear your DNS and ARP cache before connecting to the
VPN server. Doing this will help prevent certain internet connection and website resolution issues!
Secure Access to Member Area:
As a subscriber of Anonyproz OpenVPN services, you can access your member or client area securely by
clicking on the “Member Area” button which will redirect you to our secure client area. From the client
area, you can manage your account and view your subscriptions. You can also browse and order for
additional services which we offer directly from your member area.
72 | P a g e
Contacting Support:
If you have any questions or issues with your connection or account, you can reach our support center
URL by clicking on the “Support” menu. Always ensure that you provide your member username when
creating trouble tickets in order to assist us to resolving your issues as quickly as possible.
73 | P a g e
Software Warranty and Third Party Usage:
THIS SOFTWARE IS A FREE SOFTWARE BASED ON THE OPEN SOURCE OPENVPN CLIENT BY MATHIAS
SUNDMAN.THE SOFTWARE IS PROVIDED "AS IS" AND ANY EXPRESS OR IMPLIED WARRANTIES,
INCLUDING, BUT NOT LIMITED TO, THE IMPLIED WARRANTIES OF MERCHANTABILITY, OF SATISFACTORY
QUALITY, AND FITNESS FOR A PARTICULAR PURPOSE OR USE ARE DISCLAIMED.
FREE UNRESTRICTED USAGE OF THE SOFTWARE IS PERMITTED FOR NON-SUBSCRIBERS OF ANONYPROZ
OPENVPN SERVICES. HOWEVER, SOME FEATURES OF THE SOFTWARE MAY NOT WORK FOR THIRD
PARTY USAGE. USE AT YOUR OWN DISCRETION.
Credits:
We are grateful to Mathias Sundman for the Open Source OpenVPN GUI without which this modified
version of the GUI would not have been possible.
Last Modified: 17/11/2012
http://www.anonyproz.com
74 | P a g e