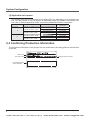
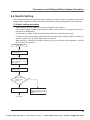
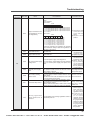
1
INSTRUCTION MANUAL CC-Link Safety System Remote I/O Unit with Connectors for Light Curtain SF-CL1T264T © Panasonic Electric Works SUNX Co., Ltd. 2011 MJE-SFCL1T264T No.0018-64V Phone: 800.894.0412 - Fax: 888.723.4773 - Web: www.clrwtr.com - Email: [email protected] Thank you very much for using Panasonic Electric Works SUNX products. Please read this Instruction Manual carefully and thoroughly for the correct and optimum use of this product. Kindly keep this manual in a convenient place for quick reference. Before using the product, please read this manual, the relevant manuals introduced in this manual, standard PLC manuals, and the safety standards carefully and pay full attention to safety to handle the product correctly. Notes 1) All the contents of this instruction manual are the copyright of the publishers, and may not be reproduced (even extracts) in any form by any electronic or mechanical means (including photocopying, recording, or information storage and retrieval) without permission in writing from the publisher. 2) The contents of this instruction manual may be changed without prior notice for further improvement of the device. 3) Though we have carefully drawn up the contents of this instruction manual, if there are any aspects that are not clear, or any error that you may notice, please contact our local 4) English and Japanese version of this instruction manuals are original. 1 Phone: 800.894.0412 - Fax: 888.723.4773 - Web: www.clrwtr.com - Email: [email protected] Safety Precautions In this manual, the safety instructions are ranked as “DANGER” and “CAUTION.” Make sure to follow those instructions for safe use of this product. “DANGER” indicates that mishandling of this system may result in death or serious injury, and this word is limitedly used in the extremely hazardous situations. “WARNING” indicates that mishandling of this system may result in death or serious injury. Note that the “CAUTION” level may lead to a serious consequence according to the circumstances. Always follow the instructions of both levels because they are important to personal safety. The light curtains that can be used in combination with this product are as follows. SF4B / SF4B<V2> series and / When connecting this product to light curtain, be sure to use the following exclusive cables. If you use a cable other than the following, the product may not operate properly. Bottom cap cable Extension cable with connectors on both ends !"#$%&%' !(#$%%&)%' !"bilities may not be maintained and it may malfunction. This product has been developed / produced for industrial use only. This product is suitable for indoor use only. Use of this product under the following conditions or environment is not presupposed. Please consult us if there is no other choice but to use this product in such an environment. 1) Operating this product under conditions and environment not described in this manual. #$%&%'&***!* combustion facilities, medical systems, aerospace development, etc. Before using this product, check whether the device performs properly with the functions and ca% In case of disposal, dispose this product as industrial waste. 2 Phone: 800.894.0412 - Fax: 888.723.4773 - Web: www.clrwtr.com - Email: [email protected] Table of Contents Safety Precautions...................................................................... 2 Before Using This Product......................................................... *%+)%)&/ .................................................................... 6 1-1 Features.............................................................................................6 *%03$57%&$ ............................................... 8 #+579:% .........................................................................8 #+#:"!:% ..............................................8 #+;:!%<! ....................................................9 *%9*&5&$3 .......................................................... ;+5> ........................................................................10 3-2 Connection.......................................................................................12 3-2-1 Terminal layout drawing ............................................................................. 12 3-2-2 Wiring example of light curtain and peripheral devices ............................ 12 3-2-3 Wiring example of solenoid interlock :;= and emergency-stop switches ..................................................................................................... 13 3-3 I/O Signals .......................................................................................14 ;+?: ........................................................................15 Chapter 4 Functions ................................................................. ? 4-1 Function List ....................................................................................16 4-2 Input Function ..................................................................................16 4-3 Output Function ...............................................................................18 4-4 Protection Function ..........................................................................19 4-5 Error History Function ......................................................................20 *%@%%&.................................................... 5-1 Parameter List .................................................................................23 D+#! ............................................................................24 5-2-1 Input parameter ......................................................................................... 24 5-2-2 Output parameter ...................................................................................... 27 Chapter 6 Procedures and Settings Before System Operation . 29 6-1 Procedures and Settings before System Operation ........................29 6-1-1 Procedure from unit installation to system operation ................................ 29 6-1-2 Replacement procedure of the unit ........................................................... 30 6-2 Mounting and Installation .................................................................32 6-2-1 Handling precautions ................................................................................. 32 6-2-2 Installation environment ............................................................................ 33 Q+;Y .....................................................................34 6-4 Check of Unit Status (Self-Loopback Test) ......................................36 3 Phone: 800.894.0412 - Fax: 888.723.4773 - Web: www.clrwtr.com - Email: [email protected] 6-5 Wiring...............................................................................................37 6-5-1 Precautions for handling CC-Link cables .................................................. 37 6-5-2 Connecting CC-Link cables ....................................................................... 37 6-5-3 Precautions for wiring unit power supply ................................................... 37 6-5-4 Precautions for wiring safety devices ........................................................ 38 6-5-5 Safety devices and wiring example ........................................................... 39 6-6 Switch Setting ..................................................................................40 Chapter 7 Maintenance and Inspection .................................. 43 Z+5"< ...............................................................................44 7-2 Periodic Inspection ..........................................................................45 7-3 Time for Replacement of this Product..............................................45 Chapter 8 Troubleshooting ...................................................... 46 8-1 Troubleshooting Basics....................................................................46 8-1-1 Precautions for troubleshooting................................................................. 46 8-2 Troubleshooting with Indicators .......................................................47 8-2-1 Flowchart for when the POWER indicator does not light up ..................... 48 8-2-2 Flowchart for when the RUN indicator does not light up ........................... 49 [+#+;Y&& \\] ......................................... 50 8-2-4 Flowchart for when the SAFETY indicator does not light up ..................... 51 8-2-5 Flowchart for when the ERR. indicator lights up ....................................... 53 8-2-6 When the L RUN indicator does not light up ............................................. 53 [+#+ZY&&> \\]....................................... 54 8-2-8 When the L ERR. indicator light up ........................................................... 55 [+#+_`\!"% ................................. 55 8-3 Verifying Errors from Indicator Status ..............................................56 [+?{%&|9 ................................................58 8-5 Error Code List.................................................................................59 Chapter 9 Dimensions .............................................................. 63 *%+% ....................................................................... 64 5}+5: ~%:!" ..........................................64 4 Phone: 800.894.0412 - Fax: 888.723.4773 - Web: www.clrwtr.com - Email: [email protected] Before Using This Product $#$%$"=Q$/$(&%&)3 %>:!& ~:>&%9 machinery and ensuring compliance with the directives, refer to “Chapter 3 EMC and Low Voltage 9:~ &$"~ : The CE logo is printed on the rating plate of the unit, indicating compliance with the directives. {! ~:>&%9*:; ~: >&%9::+>!:~ ware)” produced by Mitsubishi Electric Corporation. When using this product as a CE Marking conforming product, the cable length between this product and the light curtain should be total 30m or less (emitter and receiver, respectively). Conformance to Standards / Regulations In North America &"!:>#>D}[!>!%`:: Generic terms and abbreviations &*!&%%!9 to explain the CC-Link Safety remote I/O unit. Generic Term / Abbreviation X?X Safety remote I/O unit Safety master station Safety remote I/O station Safety remote station Safety master unit Standard remote I/O unit SB SW RX RY Safety CPU unit Safety PLC Standard PLC |9 Abbreviation of CC-Link Safety System Remote I/O Unit Other name for X?X (hereinafter called this product or the unit). Station which controls the CC-Link Safety system. One station is required per system. Remote station which handles only the information in bit unit. Compatible with the safety-related system. Other name for safety remote I/O station. Other name for CC-Link Safety system master unit. |!QD{5+5Q*QD{5+5Q*QD{+Q?*QD{+Q?*QD{+Q?<[D#|7{ Link special relay (For CC-Link Safety system) Information of the bit unit that indicates the unit operation status and data link status of the safety master station. Represented by SB expediently. Link special register (For CC-Link Safety system) Information of the 16-bit unit that indicates the unit operation status and data link status of the safety master station. Represented by SW expediently. Remote input (For CC-Link Safety system) Information which is input in bit unit from the safety remote station to the safety master station. Represented by RX expediently. Remote output (For CC-Link Safety system) Information which is output in bit unit from the safety master station to the safety remote station. Represented by RY expediently. 9}}5:"": General name for safety CPU unit, safety power supply unit, safety main base unit, CC-Link Safety master unit and CC-Link Safety remote I/O unit. |!~ > :+*~ > :+*~ > :+ MELSEC-FX series. (Used for distinction from safety PLC.) |!!*[D:+|*[D:+|+*[D:+|+ [D:+|+ Outputs a pulse to turn OFF the input / output when it is ON, and performs the failure diagnostics to contacts including external equipment. Packing list The following indicates the packing list of this product. Item X?X Instruction Manual (this manual) " 1 unit 1 pc. 5 Phone: 800.894.0412 - Fax: 888.723.4773 - Web: www.clrwtr.com - Email: [email protected] *%+)%)&/ 7%3 The following describes the features of this product. Easy connection to light curtain manufactured by Panasonic Electric Works SUNX The light curtains that can be used in combination with this product are as follows. SF4B / SF4B<V2> series and / Incorporated M8 connector for the light curtain. Up to 2 sets of the light curtain can be easily connected. It is possible to connect the light curtain to input terminals. [&3)$#3#0**%$)\7&%Q {%9>:< :Q5D}[<>;$* EN ISO 13849-1 (Category 4, PLe)]. {"+"!&%"% 9$*&/&3#0$%09Q {"!%%";%"? <75;[?_+5%cording to the combination of wiring and parameters. *3)&303Q3& :!"!&""*"!%&! space. ]*%$)$#/&%&/$%^#5&0 Adopting a 2-piece terminal block allows shortened wiring work hours so that incorrect wiring can be avoided at unit replacement. In addition, multiple COM terminals avoid the necessity to add a relay terminal block. ?&3##7&$ When a failure occurs inside the unit, the self-diagnostics function detects the failure and turns OFF the output. _"Q#&7%Q&$3&3 :%%%$&% safety devices included. The self-diagnostics such as memory diagnostics or circuit block diagnostics is conducted. `&*3&3&*%%3 Using the parameter setting screen of the programming tool allows the easier settings for the safety remote I/O unit. 6 Phone: 800.894.0412 - Fax: 888.723.4773 - Web: www.clrwtr.com - Email: [email protected] Overview j]*%$)Q&&&0%$7$7%% Classifying error information into major / moderate / minor allows the easier judgment of failures / errors. q3)&#$%3&$Q7 When an error occurs in the unit, resetting a single unit is possible without turning the power from OFF to ON. X$Q7&3Q&3&z$%&&$3 {%;D!!&< 35mm width DIN rail 7 Phone: 800.894.0412 - Fax: 888.723.4773 - Web: www.clrwtr.com - Email: [email protected] *%03$57%&$ {"!%*"!! product. +)%$57%&$ {&%"!% This product is connected to various safety devices such as an emergency stop or a light cur*"+"!%"!%&": safety master unit. Power supply / CPU / CC-Link Safety master unit SF-CL1T264T CC-Link Safety GX Developer (Version 8.65T or later) Safety equipment Light curtain 7&$3$03$57%&$ {!&%9&age to use this product. :**&3%7& This product can connect to only the safety master unit. :**&3$#/%*^ The following shows the software package compatible with this product. % |9 Model No. [D:+| Version 8.65T or later Remark Necessary. MELSEC PLC programming software 8 Phone: 800.894.0412 - Fax: 888.723.4773 - Web: www.clrwtr.com - Email: [email protected] 03$57%&$ 9:**&7&)%3&$ This product may not be connected to the safety CPU unit depending on its technical version. Use the product in such a manner as described below. For details of the safety CPU unit, refer to “Safety Application Guide” produced by Mitsubishi Electric Corporation. Technical version of The first five digits of the Setting of the safety remote this product serial No. on safety CPU unit |9 Technical version A The first five digits of the serial No. is before“10031”. Technical version B A Technical version A The first five digits of the serial No. is after“10032”. Technical version B Technical version A The first five digits of the serial No. is before“10031”. Technical version B B Technical version A The first five digits of the serial No. is after“10032”. Technical version B Connection Connectable Not connectable Connectable Not connectable Not connectable Connectable Connectable Connectable 9$5%&@%$Q7&$]#$%&$ {!!% of the unit. Model name Technical version Manufacturing information Compatible standard mark is indicated. 9 Phone: 800.894.0412 - Fax: 888.723.4773 - Web: www.clrwtr.com - Email: [email protected] *%9*&5&$3 9&3$#*&5&$3 % Item Model No. Applicable standard Connectable light curtain No. of input points (Note 2) 7 < Insulation method Rated input voltage Rated input current Operating voltage range Max. simultaneous input points ON voltage / ON current OFF voltage / OFF current Input resistance Input type Response time Safety remote station input response time No. of output points Insulation method Rated load voltage Rated load voltage range Max. load current Inrush current Leakage current Residual voltage Protective function Output type Response time Safety remote station input response time Surge protection Voltage External power Current supply Protective function (Note 4) Fuse Wiring method for common Common current No. of stations occupied No. of access to nonvolatile memory Safety refresh response processing Unit power (Note 4) Voltage Current Protective function Fuse Momentary power failure period Noise immunity Protection Ambient temperature Ambient humidity &9% Insulation resistance CC-Link Safety system I/O unit with connectors for light curtain X?X IEC / EN 61508 (SIL3), EN ISO 13849-1 (JIS B 9705-1) (Category 4, PLe), UL 508 SF4B / SF4B<V2> series, / (Note 1) <%'#&9;$ <!'Q!'5#$ Photocoupler #?: Approx. 4.6mA #?:5}\+5} 5}} 5D:!`#!! D:`}D! DQ Negative common 7YY7'}?!#?:$*77YY'}?!#?:$ {9';#!+!5!*D!*5}!*#}!*D}!$ {9'55#!+!5!*D!*5}!*#}!*D}!$ ?"$*#"$ Photocoupler #?: #?:5}\+5} 0.5A / point 1.0A, 10ms or less 0.5mA or less 5}: Output short-circuit protection function "*" 7YY7'}?!#?:$*77YY'}?!#?:$ {9';#! {9'77YY'5}?!*7YY7'55#! Zener diode #?:5}\+5} Q}!#?:*&7*%$ External power supply overvoltage / overcurrent protection function 8A (Not replaceable) 16 input points /common, 4 output points /common (Terminal block 2-wire type) Max. 4A (Total of inputs and outputs) 1 station 1012 times {9';[! {9'_Q! #?:5}\+5} 5?}!#?:*&7$ Unit power overvoltage / overcurrent protection function 0.8A (Not replaceable) 10ms or less {":+"!&9%D}}+* noise width of 1μs and frequency of 25 to 60Hz. IP20 }DD:&$*%'+?}ZD: D_D\ *%'D_D\ D}}:&:!%*5! 5}~!&:!%*"D}}: resistance tester 10 Phone: 800.894.0412 - Fax: 888.723.4773 - Web: www.clrwtr.com - Email: [email protected] *&5&$3 Constant Half acceleration amplitude — 3.5mm Under intermit- 5 to 9Hz tent vibration 9 to 150Hz 9.8m/s2 — — 1.75mm Under contin- 5 to 9Hz uous vibration 9 to 150Hz — 4.9m/s2 Frequency Vibration resistance Shock resistance YD$ Proof test interval (T1) (Note 6) PFHd(Note 7) MTTFd(Note 8) Overvoltage category (Note 9) Pollution level (Note 10) Operating ambiance Operating altitude (Note 11) Installation area Equipment category Weight Communication section, unit E x t e r n a l c o n - power section nection system External power supply section, I/O section < Applicable crimp-style terminal Applicable crimp-style terminal Sweep count 10 times each in X, Y, Z directions respectively (Conforming to JIS B 3502, IEC 61131-2) 147 m/s2, duration of action 11ms, three times in X, Y, Z directions respectively by sine halfwave pulse(Conforming to JIS B 3502, IEC 61131-2) 2.57 × 10⁻⁵ 5 years 1.15 × 10⁻⁹ More than 100 years II or lower 2 or lower No corrosive gas 2,000m (6562 ft.) or less Within a control panel Class III Approx. 0.70kg 7-point detachable terminal block (Transmission circuits, unit power, FG) ~;%D#!!$*%%'}?#D}DZD!*#!+"! 7-point, 18-point detachable terminal block (External power supply, I/O signals) ~;%D#!!$*%%'}?#D}DZD!*#!+"! TH35 to 7.5Fe, TH35 to 7.5Al (Conforming to JIS C 2812) 0.3 to 2.0mm2 \5#D+;:!%<#[}D$&'};5#D!!2) V2-MS3 (JST Mfg. Co., Ltd.), RAP2-3SL (Nippon Tanshi Co., Ltd.), TGV2-3N (Nichifu) &'5#D#!!2) ' 5$ When using this product as a CE Marking conforming product, the cable length between this product and the light curtain should be total 30m or less (emitter and receiver, respectively). #$ {![*#75`#$#% cutains. Two inputs terminals are assigned for each input since dual wiring is supported. 3) Up to three sets of light curtain (the number of beam channels allowable is max. 192 beam channels in total) can be connected in series to the connector 1 or 2 of this product. In case of connecting light curtains to the connectors both 1 and 2 of this product, the interference prevention function works between the connector 1 and 2 if the connected light curtains are up to three sets in total (the number of beam channels allowable is max. 192 beam channels in total). However, take care if the connected light curtains are over three sets or the total number of beam channels is over 192 beam channels, the interference prevention function does not work between the connector 1 and 2. ?$ {&"!"&%' 5 >" >&%$' ?[!$ #:!&>>&%9$ ;79%Q#Q?:\'5}$ <4> Corresponding to CLASS 2 (only for requiring UL Listing Mark / c-UL US Listing Mark conformation). 5) Probability of failure on demand. 6) Functional proof test interval for system related safety. (Replacement interval of this product) 7) Probability of dangerous failure per hour. 8) Mean time to dangerous failure. 9) This indicates the section of the power supply to which the equipment is assumed to be connected between the public electrical power distribution network and the machinery within premises. Category <<!&&!{%9% withstand level for up to the rated voltage of 300V is 2,500V. 10) This index indicates the degree to which conductive material can be generated in terms of the environment where the equipment is used. In the environment corresponding to “Pollution level 2,” basically only nonconductive pollution occurs, however temporary conductivity may occur due to occasional condensation. 55$ >:9!&% than the atmospheric pressure at the altitude of 0m. 11 Phone: 800.894.0412 - Fax: 888.723.4773 - Web: www.clrwtr.com - Email: [email protected] *&5&$3 3-2 Connection 9X%&0$7Q%/& 3-2-2 Wiring example of light curtain and peripheral devices Muting sensor B (Note) Muting sensor C (Note) Muting sensor D (Note) Light curtain Muting sensor A (Note) CC-Link cable Muting lamp 1 (Note) Muting lamp 2 (Note) ' 5$ {!%!%!&!&% connected to either this product or standard remote I/O unit. 2) Control the muting sensors and the muting lamps using the safety CPU unit. 12 Phone: 800.894.0412 - Fax: 888.723.4773 - Web: www.clrwtr.com - Email: [email protected] *&5&$3 Parameter setting Parameter item {!!9 %" detection time Input dark test selection Setting terminal X0 to X9 Setting value 1ms X0 to X9 100ms X0, X1, XA, XB X2 to X9 Execute Not execute ?}}¡ &%$ Not execute Execute 1ms Input dark test pulse OFF time Method of wiring of output Y0 to Y3 Y0, Y1 Y2, Y3 Output dark test selection Output dark test pulse OFF time 3-2-3 {&%&z*$#3$$&Q&%$^:;=Q%03$*3/&3 A, B, C: Emergency stop switches Light curtain Light curtain AZM 200 CC-Link cable ' <$* % 7{$ :;= can be connected to either this product or standard remote I/O unit. Parameter setting Parameter item {!!9 Setting terminal X0, X1 X2 to XB Setting value 5ms 1ms %" detection time X0 to XB 100ms Input dark test selection X0 to X3 X4 to XB Execute Not execute ?}}¡ &%$ Not execute Execute 1ms Input dark test pulse OFF time Method of wiring of output Output dark test selection Output dark test pulse OFF time Y0 to Y3 Y0, Y1 Y2, Y3 13 Phone: 800.894.0412 - Fax: 888.723.4773 - Web: www.clrwtr.com - Email: [email protected] *&5&$3 3-3 I/O Signals This product is operated as a safety remote I/O station of 1 occupied station. Number of I/O points per station is 32 points. However, in this product, only 16 input points and 4 output points of them are available. Assignment of I/O signal Remote input (RX) RX0 RX1 RX2 RX3 RX4 RX5 RX6 RX7 RX8 RX9 RXA RXB RXC \ RXE RXF \5$} to \5$Y Remote input (RX) RY0 RY1 RY2 RY3 RY4 to RYF \¢5$} to \¢5$Y External input signal X0 of this product External input signal X1 of this product External input signal X2 of this product External input signal X3 of this product External input signal X4 of this product External input signal X5 of this product External input signal X6 of this product External input signal X7 of this product External input signal X8 of this product External input signal X9 of this product External input signal XA of this product External input signal XB of this product External input signal XC of this product (connects to 755$ % 7#5$ External input signal XE of this product (connects to 75#$ External input signal XF of this product (connects to 7##$ Use prohibited (Note) External input signal Y0 of this product External input signal Y1 of this product External input signal Y2 of this product External input signal Y3 of this product Use prohibited (Note) ' {9" When used (ON / OFF) by a user, normal operation is not guaranteed. 14 Phone: 800.894.0412 - Fax: 888.723.4773 - Web: www.clrwtr.com - Email: [email protected] *&5&$3 q&$3&*3/]~+3&3 Relationships between I/O signals are shown in the following table. Input X00 X01 OFF OFF OFF ON ON OFF ON ON Output RXn0 RXn1 OFF OFF OFF OFF OFF OFF ON ON Remark 1 signal for 2 inputs. (Note) When 2 inputs are mismatched, both RXn0 and RXn1 are turned OFF. ' Y%!*\}\5 Remote output RYn0 RYn1 OFF — — ON ¢} OFF OFF Output Y0OFF OFF ¢5 — — OFF OFF OFF — ON OFF ON — — ON ON — OFF ON OFF ON OFF OFF OFF ON OFF OFF OFF ON — — — — Setting of “Method of wiring of output” parameter Remark Reserved 7¢}$¢}+$!7YY9\¢} is turned ON. %&% $ 2 outpus for 1 signal. ¢}$ (Y0-) turn ON when RYn0 is turned ON. %&% $ 2 outputs for 2 signals. ¢}$ ¢5$ simultaneously turn ON when both RYn0 and RYn1 are turned ON. $&&$$#3&3Q7 &%*!%&% Signal X2 X3 RXn2 RXn3 Remote output (RY) RYn0 Output signal (Y) ¢} Y0- Combination of outputs RYn0 RYn2 RYn1 RYn2 RYn3 RYn1 RYn3 ¢5 ¢# ¢; ¢} ¢# Y1Y2Y3¢5 ¢; Input signal (X) Remote input (RX) Signal X4 X5 RXn4 RXn5 Combination of inputs X6 X8 X7 X9 RXn6 RXn8 RXn7 RXn9 X0 X1 RXn0 RXn1 XA XB RXnA RXnB XC RXnC \ XE XF RXnE RXnF 9*&5&$3 Use dedicated CC-Link cables for the CC-Link Safety system. The performance of the CC-Link Safety System cannot be guaranteed when any other cables are used. Y"*9&%&' ::+>''``&&&+%` 15 Phone: 800.894.0412 - Fax: 888.723.4773 - Web: www.clrwtr.com - Email: [email protected] Chapter 4 Functions 7&$&3 Function list is described as follows. : Function Function used to double the input wiring. Function used to set the filter time for reducing noise of the input signal. Function used to double the output wiring. Function used to confirm whether I/O signal is I/O diagnostics function normal. Hardware diagnostics Y!&function erates normally. Y!&99% Self-diagnos- Power supply diagnosundervoltage occurs to the power supply which is tics function Safety functions tics function input. CC-Link diagnostics Function used to confirm whether the CC-Link function Safety System operates normally. Function used to avoid the effects of overvoltage Protection function and overcurrent to other units of the safety-related system. Function used to save the error description saved inside this product to the inside nonvolatile memoError history Error history function ry as an error history. function Function used to send the saved error history to the safety CPU unit. Function used to set the input parameter. Parameter func- Input setting function tion Output setting function Function used to set the output parameter. Input / Output Input function function Output function Reference Section 4-2 4-3 — — — — 4-4 4-5 5-2-1 5-2-2 4-2 Input Function {&%!9 Input dual wiring function This function is used to double the input wiring. An input error can be detected immediately after verifying input signals by doubling the wiring. 2 inputs T0 T1 X0 Safety remote I/O unit X1 Verify 1 signal 16 Phone: 800.894.0412 - Fax: 888.723.4773 - Web: www.clrwtr.com - Email: [email protected] Functions $&3%$)5% {!%%{!9&%9% 1ms 5ms 10ms 20ms 50ms !9{!!9! Y%{!!9*X&$#$&3%$)5%” in “]*7*%%.” The longer the noise removal filter is, the higher the durability to chattering or noise becomes. However, the response to the input signal will become slow. 7*!9* signal becomes. However, the durability to chattering or noise will become low. Example When setting “1ms” to “Time of noise removal lter.” <*!{!!9 time taken from when the external input turns ON / OFF until when X input signal inside the unit turns ON / OFF will be equal. ON External input OFF X input signal inside the unit ON OFF 1ms 1ms 17 Phone: 800.894.0412 - Fax: 888.723.4773 - Web: www.clrwtr.com - Email: [email protected] Functions 4-3 Output Function The output function has output dual wiring function. Output dual wiring function This function is used to double the output wiring. An output error can be detected immediately after verifying output signals by doubling the wiring. The following two methods are available for doubling the wiring of this product. Select either of them depending on the method for wiring with external safety devices to be connected. &%!!% Source output Y0+ + - 0V Safety remote I/O unit 24V DC Safety relay Sink output Y0- &%!!% Source output Y0+ + - 0V Safety remote I/O unit 24V DC Source output Y1+ Safety relay Safety relay COM- Set the method of output wiring in the “Method of wiring of output” parameter. For the setting of the “Method of wiring of output,” refer to “=$Q$#/&%&$#$7*7” in “+7*7*%%.” 18 Phone: 800.894.0412 - Fax: 888.723.4773 - Web: www.clrwtr.com - Email: [email protected] Function <Reference> (1) On this product, the dual wiring method for combining a sink output and a sink output cannot be used. (2) In case of dual wiring combining a source output and a sink output, up to 0.2ms time %!"&7`7YY!%¢}7`7YY!%¢}+ shown below due to the internal processing of this product. The following wave pattern may be detected on the output terminal, there is no effect to operation of the external safety device. Y0+ Y0- External safety device (safety relay etc.) 0.2ms max. 0.2ms max. : ON / OFF timing lag 4-4 Protection Function {9"&&% % Unit power supply overvoltage protection function Unit power supply overcurrent protection function Purpose 9%! to the primary side overvoltage. 9%! to the primary side overcurrent. I/O control power supply over- 9%! voltage protection function load circuit due to the overvoltage. I/O control power supply over- 9%! current protection function load circuit due to the overcurrent. 9%! Output overload protection to the overcurrent or overheat caused by the function short-circuit of the output circuit. Operates when the unit internal power supply goes into the primary side overvoltage status. Operates when the unit internal power supply goes into the primary side overcurrent status. Operates when the I/O control power supply circuit goes into the primary side overvoltage status. Operates when the I/O control power supply circuit goes into the primary side overcurrent status. Operates when 5A /1 point or more current ]& Recovers when the safety remote I/O unit is reset in the condition that the load becomes the rated load. 19 Phone: 800.894.0412 - Fax: 888.723.4773 - Web: www.clrwtr.com - Email: [email protected] Functions "%%$%[&3$%07&$ The error history function has saving and reading of the error history. Saving of the error history When an error occurs in this product, the error description is saved to the nonvolatile memory inside the unit as an error history. Reading of the error history The description of error saved in the nonvolatile memory inside this product can be read from ":"9<&%!"|9 The safety CPU unit reads all the error histories inside this product. "!%"* Y!%*8-4 Troubleshooting with GX Developer.” Y*`"%%$%$Q&3.” The reading procedure of error history is shown in the following table. Start ¤ Terminal block removal Turn OFF the power supply of this product and remove the terminal block part. ¤ Switch setting <& > ¤ "! :!&"97YY ¤ Start of reading the error history Turn ON the power supply of this product. The safety CPU unit automatically reads the error history from the safety remote I/O unit. ¤ Completion of reading the error history Completion of reading the error history ! When RUN indicator (green) flashes, the reading of error history is completed normally. Turn OFF the power supply of this product. \\$]*%"!pleted abnormally. Turn OFF the power supply of this product and read the error history again. RESET LINK ID LBT EL SET STATION NO. 6 5 4 B RATE 0 1 2 3 2 3 2 3 7 0 1 0 1 0 1 6 5 4 6 5 4 X10 X1 2 3 4 Link ID setting switch [Normal] Flashes [Error] Flashes <Reference> (1) The reading of error history can be used only when this product can be connected with CC-Link Safety at power-on. When reading of error history is impossible, deal with it in accordance with troubleshooting. (Refer to “8-2 Troubleshooting with indicators.”) (2) Perform the reading of error history for one safety remote I/O unit per read. When the reading of error history is simultaneously performed in the multiple safety remote I/O units, the error histories in the multiple units are displayed together on the PLC diagnostics display. 20 Phone: 800.894.0412 - Fax: 888.723.4773 - Web: www.clrwtr.com - Email: [email protected] *%@%%& This chapter describes the parameter setting of this product. The following must be considered for this product before setting the parameter. !9"%"+"tion organization. !%9*&%!%% "%" The parameters of this product are written via the safety master unit at the following operation. Reset operation or power-off to -on of the safety CPU unit at the safety master station Reset operation or power-off to -on of the safety remote I/O unit @%%3&$Q The parameter setting of this product is made on the network parameter setting screen of |9 Y ! | 9* | 9 [ 7% Manual” produced by Mitsubishi Electric Corporation. {!%!"|9&& (&3*0$#3&$&#$%&$3&3% !&!CC-Link Station information button to display the station information setting screen. (&3*0$#3#0%$3&$3&3% Click the Setting button on the station information setting screen to display the safety remote station setting screen. =$QQ7&&)%3&$3&3 Set the model and unit technical version of this product. For checking the unit technical version, refer to “9$5%&@%$Q7&$]#$%&$.” <Reference> The “Unit technical version” shows the function of this product. Q@%$Q7&$&#$%&$3& To manage a system by the production information, put a check in "specify production infor!§ When a check is put, whether the safety remote I/O unit connected to the safety master station is correct can be judged. For details of the production information management, refer to “CC-Link Safety System Mas~"~ : For checking the production information, refer to “9$5%&@%$Q7&$]#$%&$.” <Reference> The “Production information” shows the management number inherent to this product. As for production information, enter the 16 digits described in SERIAL column of the rated plate. 21 Phone: 800.894.0412 - Fax: 888.723.4773 - Web: www.clrwtr.com - Email: [email protected] Parameter Setting @%%3& The parameter setting is made for each parameter. For the parameter, refer to “]*7*%%” and “+7*7*%%.” #&3^ Click the Check !!% When the setting is incorrect, an error occurs. For the error code, refer to “`"%%$%$Q&3.” @%%3&$*&$ Click the End button to complete each parameter setting. #0@5%&3%&$ {":!%!"! station. The parameters of the safety remote station cannot be set without safety CSP file corresponding to the technical version of this product. 7%`%%":%9uct is described below. #0@5Q$/$Q & " : ! ::+> & Panasonic Electric Works SUNX website. ::+>&''``&&&+%` &''``++&`` #0@5%&3%&$ &"::| 9 22 Phone: 800.894.0412 - Fax: 888.723.4773 - Web: www.clrwtr.com - Email: [email protected] Parameter Setting @%%&3 The parameters of this product are listed in the following table. Parameter name Type Parameter item !% signal. {!!%< test pulse OFF time. '5! %%'5!*D!*5}!*#}!*D}! Sets the ON / OFF transient state time in 20ms _%" unit at redundant wiring. % time X0, X1 If the ON / OFF disagreement state continues discrepancy de- Input to for more than setting time, an error occurs. tection time 16. %" '5¨#}!$ time XE, XF %%'5#D¨#}!$ 17. Input dark test selection X0, X1 Sets whether the “Input dark test function” of this to product diagnostics function is executed or not. Input dark test Input 24. Input dark test selection XE, XF ' selection %%' :** *Y'Y$ ' Sets the OFF pulse width that T0 and T1 terminals Input dark test output. Input 25. Input dark test pulse OFF time pulse OFF time '?}}¡ %%'?}}¡*5!*#! Sets the “Output wiring method.” 26. Output wiring method Y0 ' Output wiring Output to %%' method 29. Output wiring method Y3 '&%$ '&%$ Sets whether the “Output dark test function” of this 30. Output dark test selection Y0 product diagnostics function is executed or not. Output dark test Output to ' selection 33. Output dark test selection Y3 %%' ' Sets the OFF pulse width used in the output dark 34. Output dark test pulse OFF time Y0 Output dark test test. Output to pulse OFF time '?}}¡ 37. Output dark test pulse OFF time Y3 %%'?}}¡*5!*#! 5{!!9}*5 Time of noise Input to !9 [{!!9 *Y Reference section 5-2-1 (1) 5-2-1 (2) 5-2-1 (3) 5-2-1 (4) 5-2-2 (1) 5-2-2 (2) 5-2-2 (3) 23 Phone: 800.894.0412 - Fax: 888.723.4773 - Web: www.clrwtr.com - Email: [email protected] Parameter Setting @%%(&3 This section describes the settings of each parameter. ]*7*%% {!!%%"egory is shown in the following diagram. Parameter setting start Set “Time of noise removal filter.” [Refer to “(1) Time of noise removal filter.”] Set “Doubling input discrepancy detection time.” [Refer to “(2) Doubling input discrepancy detection time.”] Set “Input dark test selection.” [Refer to “(3) Input dark test selection.”] Not execute Execute Use the diagnostics function of the connection target device? Set “Input dark test pulse OFF time.” [Refer to “(4) Input dark test pulse OFF time.”] Use Safety category 4 Not use Safety category 3 <Reference> 7"%!&%"%" Y&%%"!"%" a safety-related system, refer to “Safety Application Guide” produced by Mitsubishi Electric Corporation. 24 Phone: 800.894.0412 - Fax: 888.723.4773 - Web: www.clrwtr.com - Email: [email protected] Parameter Setting X&$#$&3%$)5% {!!%%# points unit. The settings are shown in the following table. Parameter item Setting range 1ms 5ms 10ms 20ms 50ms 1ms 5{!!9}*5 #{!!9#*; ;{!!9?*D ?{!!9Q*Z D{!!9[*_ Q{!!9* Z{!!9:* [{!!9 *Y The following error occurs depending on the setting value. 7%%{!!9 For the error, refer to “`"%%$%$Q&3.” <Reference> {!!9%<7YY! *&{!!9ter” and the “Input dark test pulse OFF time” need not be considered. For the setting of the “Input dark test pulse OFF time,” refer to “]*7Q%^3*73 OFF time.” ($7&&*7Q&3%*0Q&$& This parameter is used to set the 2 inputs state disagreement tolerance time at dual wiring in 2 input points unit. The settings are shown in the following table. Parameter item Setting range 1 to 25 (×20ms) 1 (×20ms) _%"!}*5 5}%"!#*; 55%"!?*D 5#%"!Q*Z 5;%"![*_ 5?%"!* 5D%"!:* 5Q%"! *Y <9%%*%%% discrepancy detection time” occurs. For the error, refer to “`"%%$%$Q&3.” 25 Phone: 800.894.0412 - Fax: 888.723.4773 - Web: www.clrwtr.com - Email: [email protected] Parameter Setting 9]*7Q%^33&$ This parameter is used to set in 2 input points unit if the "Input dark test function" of this product diagnostics function is executed or not. The settings are shown in the following table. Parameter item Setting range Execute Not execute Execute Not execute Not execute 17. Input dark test selection X0, X1 18. Input dark test selection X2, X3 19. Input dark test selection X4, X5 20. Input dark test selection X6, X7 21. Input dark test selection X8, X9 22. Input dark test selection XA, XB #;<:* 24. Input dark test selection XE, XF An error out of the setting range of “Input dark test selection” occurs depending on the setting value. For the error, refer to “`"%%$%$Q&3.” ]*7Q%^3*73+& This parameter is used to set the OFF pulse width that T0 and T1 terminals output in every unit. The settings are shown in the following table. Parameter item Setting range 25. Input dark test pulse OFF time ?}}¡ 1ms 2ms ?}}¡ When a value out of the setting range is set, an error out of the setting range of “Input dark test pulse OFF time” occurs. For the error, refer to “`"%%$%$Q&3.” 26 Phone: 800.894.0412 - Fax: 888.723.4773 - Web: www.clrwtr.com - Email: [email protected] Parameter Setting +7*7*%% {!!%%"egory is shown in the following diagram. Parameter setting start Set “Method of wiring of output.” [Refer to “(1) Method of wiring of output.”] Set “Output dark test selection.” [Refer to “(2) Output dark test selection.”] Not execute Execute Use the diagnostics function of the connection target device? Set “Output dark test pulse OFF time.” [Refer to “(3) Output dark test pulse OFF time.”] Use Safety category 4 Not use Safety category 3 <Reference> 7"%!&%"%"Y&%%"!"%" as a safety-related system, refer to “Safety Application Guide” produced by Mitsubishi Electric Corporation. 27 Phone: 800.894.0412 - Fax: 888.723.4773 - Web: www.clrwtr.com - Email: [email protected] Parameter Setting =$Q$#/&%&$#$7*7 This unit is used to set the “Method of wiring of output” in the output point unit. The settings are shown in the following table. Parameter item Setting range No use &%$ &%$ No use 26. Method of wiring of output Y0 27. Method of wiring of output Y1 28. Method of wiring of output Y2 29. Method of wiring of output Y3 When a value out of the setting range is set, the following errors occur. Out of the setting range of “Method of wiring of output” Output wiring method combination error For the error, refer to “`"%%$%$Q&3.” +7*7Q%^33&$ This parameter is used to set in the output point unit whether the "Output dark test function" of this product diagnostics function is executed or not. The settings are shown in the following table. Parameter item Setting range Execute Not execute Execute 30. Output dark test selection Y0 31. Output dark test selection Y1 32. Output dark test selection Y2 33. Output dark test selection Y3 When a value out of the setting range is set, the following errors occur. Out of the setting range of “Output dark test selection” Output dark test selection combination error For the error, refer to “`"%%$%$Q&3.” 9+7*7Q%^3*73+& This parameter is used to set the OFF pulse width used in the output dark test in the output point unit. The settings are shown in the following table. Parameter item Setting range ?}}¡ 1ms 2ms ?}}¡ 34. Output dark test pulse OFF time Y0 35. Output dark test pulse OFF time Y1 36. Output dark test pulse OFF time Y2 37. Output dark test pulse OFF time Y3 When a value out of the setting range is set, an error out of the setting range of “Output dark test pulse OFF” occurs. For the error, refer to “`"%%$%$Q&3.” 28 Phone: 800.894.0412 - Fax: 888.723.4773 - Web: www.clrwtr.com - Email: [email protected] Chapter 6 Procedures and Settings Before System Operation This chapter describes the procedures and settings before the operation of this product. ?@%$Q7%3Q&3#$%03+*%&$ This section describes the procedures before the operation of this product and the replacement of the unit. ?@%$Q7%#%$7&&3&$$303$*%&$ The procedure from the installation of this product to the CC-Link Safety system operation is shown in the following diagram. In addition, parameters are considered to be separately created. For the parameter setting, refer to “*%@%%&.” Y&":|9*|9 Version 8 Operating Manual (Safety PLC)” produced by Mitsubishi Electric Corporation. Start ¤ Unit installation Install this product to a control panel and a machine. ¤ Power supply wiring Wire the power supply to this product. ¤ Self-loopback test execution Execute the self-loopback test of this product. ¤ Switch setting 9%<*!mission speed setting switch of this product to the nonvolatile memory inside the unit. ¤ Unit wiring (Note) Turn OFF the power supply of this product and wire to the followings. Various types of safety devices Safety master unit ¤ Parameter writing !|9": (The parameters are written to this product via the safety master unit.) ¤ Connection to CC-Link Safety system Connect to the CC-Link Safety system with the setting saved to the nonvolatile memory inside the unit by resetting or powering this product from OFF to ON. ¤ :!"! ":{ {~7 ! system operation. ¤ Start of system operation For the installation and setting of this product, refer to “6-2 Mounting and Installation.” For the procedure of the self-loopback test, refer to “6-4 ^$#&73#$$*^X3.” For the switch setting, refer to “6-6 Switch Setting.” For the wiring of this product, refer to “Safety Application Guide” produced by Mitsubishi Electric Corporation. For writing parameters to the safety CPU unit, refer to “GX 9[7%~"~subishi Electric Corporation. Y % " : { { ~7 * :~Y *%!$ produced by Mitsubishi Electric Corporation. :%":!Y {¢~7 %|9 :%":!Y {¢~7 Y%%Y {¢~7 ":* :~Y *%! %|9 Fundamentals)” produced by Mitsubishi Electric Corporation. ¤ Completed ' 9&9"9*!&%"& When the external supply power is not wired, an error of the external supply power occurs. For the error, refer to “`"%%$%$Q&3.” 29 Phone: 800.894.0412 - Fax: 888.723.4773 - Web: www.clrwtr.com - Email: [email protected] Procedures and Settings Before System Operation ?q**%$Q7%$#7& The replacement procedure of this product is shown in the following diagram. in the following indicates the operation for managing the production information. For the function differences between managing and not managing the production information, refer to “@%%3&$Q” in “*%@%%&.” Y&":|9*|9oper Version 8 Operating Manual (Safety PLC)” produced by Mitsubishi Electric Corporation. Replacement start ¤ :!& Execute the self-loopback test of new safety remote I/O unit. For the self-loopback test, refer to “6-4 Check of Unit Sta73#$$*^X3.” ¤ Switch setting of new unit 9%<*!mission speed setting switch of the new safety remote I/O unit to the nonvolatile memory inside the unit. For the switch setting, refer to “6-6 Switch setting." ¤ :%{ {~7 :% " : ! { { ~7 %|9 Y%%{ {~7 ":* :~Y *%! Fundamentals)” produced by Mitsubishi Electric Corporation. ¤ Production information change 1) Change the production information of the safety remote I/O unit to that of the new safety remote I/O unit using |9 2) !%"|9 safety CPU unit. The parameters are written to the safety remote I/O unit via the safety master unit at data link. For writing parameters to the safety CPU unit, refer to “GX 9[7%~"~subishi Electric Corporation. ¤ %] Make the set production information valid by resetting or powering the safety CPU unit from OFF to ON. ¤ Power-off Turn OFF the power supply of this product. ¤ (To next page) This operation is not required when the production information is not managed. 30 Phone: 800.894.0412 - Fax: 888.723.4773 - Web: www.clrwtr.com - Email: [email protected] Procedures and Settings Before System Operation (From previous page) ¤ Terminal block removal Remove the 2-piece terminal block of this product with keeping the wiring. ¤ Unit replacement 1) Remove this product. 2) Install the new remote I/O unit to a control panel and a machine. For the installation and setting of this product, refer to “6-2 Mounting and Installation.” ¤ Terminal block installation Install the 2-piece terminal block, which was removed with wiring, to the replaced safety remote I/O unit. ¤ Power-on Connect to the CC-Link Safety system with the setting saved to the nonvolatile memory inside the unit by turning ON the power supply of this product. ¤ :%Y {¢~7 This operation is not required when the production information is not managed. :%":!Y {¢~7 %|9 Y%%{ {~7 ":* :~Y *%! Fundamentals)” produced by Mitsubishi Electric Corporation. ¤ Replacement completed <Reference> (1) When managing the production information, change the production information to the number of the new safety remote I/O unit. If not doing so, production information mismatch error occurs. For product information mismatch error, refer to “CC-Link Safety System Master Unit User’s Manual” produced by Mitsubishi Electric Corporation. (2) When changing the production information, change the safety CPU operation mode to { {~7 <Y {¢~7 *!% 31 Phone: 800.894.0412 - Fax: 888.723.4773 - Web: www.clrwtr.com - Email: [email protected] Procedures and Settings Before System Operation 6-2 Mounting and Installation In order to increase the reliability of the system and exploit the maximum performance of its functions, this section describes the methods and precautions for the mounting and installation of the system. ?[Q&*%7&$3 This section provides handling precautions for use of this product. !&& % Be sure there are no foreign substances such as sawdust or wiring debris inside the unit. *!%* !!" %**¬"* If the product is repaired or remodeled by other than our company, the warranty is not covered. "9!{% the conductive parts could cause an operation failure or give damage to the unit. Since the unit case is made of resin, do not drop or apply any strong impact to the unit. %!"!% When installing this product to a control panel, provide clearance of at least Q}!!&`!"! ]&!!" Tighten a terminal block mounting screw and a terminal screw within the spec% If the terminal block mounting screw or terminal screw is too loose, it may **! If too tight, it may damage the screw and / or the unit, resulting in a drop of the screw or unit, a short circuit or malfunctions. When disposing of the unit, treat it as industrial waste. ~&<" Completely turn off the externally supplied power used in the system before mounting or removing the unit to / from the panel. Not doing so may result in a fault or malfunctions of the unit. 32 Phone: 800.894.0412 - Fax: 888.723.4773 - Web: www.clrwtr.com - Email: [email protected] Procedures and Settings Before System Operation !9:$! %!" <] <]*!":*% Tighten the terminal block screws within the following torque range. Overtightening may result in damage to the screws or the unit case. Screw % Terminal block screw (M3 screw) }?#D}D#D! 2-piece terminal block screw (M3.5 screw) }Q[}}_#}! %<*"&%' :**&(]%&$Q$#$%&$!]` TH35-7.5Fe TH35-7.5Al ]3&$3%/&%)3 Tighten the screws at pitches of 200mm or less. Y%!9%`!<*&% [$/$&3&3*%$Q7$(]%& 1. Fit the front part of the installing section of this ;D!!&< 2. Press down the rear part of the installing section <$< [$/$%$)&3*%$Q7#%$(]%& ;<%]9* to remove this product. 2 1 35mm width DIN rail 3 3 3 6-2-2 Installation environment For installation environment, refer to “9&3$#*&5&$3.” 33 Phone: 800.894.0412 - Fax: 888.723.4773 - Web: www.clrwtr.com - Email: [email protected] Procedures and Settings Before System Operation 6-3 Functional Description 10 20 1 2 12 16 13 17 14 3 18 15 19 9 4 20 5 8 No. 1 2 3 4 5 6 7 % Connector 1 for the emitter of the light curtain Connector 1 for the receiver of the light curtain Connector 2 for the emitter of the light curtain Connector 2 for the receiver of the light curtain Setting saving switch 7 Connects the emitter 1 of the light curtain. Connects the receiver 1 of the light curtain. Connects the emitter 2 of the light curtain. Connects the receiver 2 of the light curtain. Saves the values set by switches 6 to 8 into the nonvolatile memory inside this product. Setting 0 1 2 3 4 Transmission speed setting switch ><%& LBT 10 11 Transmission speed 156kbps 625kbps 2.5Mbps 5Mbps 10Mbps Always set this switch within a range of 0 to 4. Set station No. of this product within a range from 0 to 64. (Note 1) Station No. setting Tens place of station No. is set by “X10.” switch Units place of station No. is set by “X1.” EL 9 21 6 Setting 0 to 7 8 11 Reset switch Input indicator (X0 to XF) (Red) Output indicator (Y0 to Y3) (Red) ><% Setting for reading error logs (For error logs, refer to “"%%$%[&3$%07&$.”) Setting for self-loopback test Y%+*6-4 Check of Unit Status #$$*^X3.”] To update the changed switch setting, reset or power OFF and ON this product. Resets the hardware of this product. Indicates the I/O status of this product. 7'<`77 7YY'<`77YY 34 Phone: 800.894.0412 - Fax: 888.723.4773 - Web: www.clrwtr.com - Email: [email protected] Procedures and Settings Before System Operation No. % 12 POWER indicator (Green) 13 RUN indicator (Green) (Note 2) 14 SAFETY indicator (Green) (Note 2) 15 ERR. indicator (Red) (Note 2) 16 L RUN indicator (Green) 17 L ERR. indicator (Red) 20 (Green) \ (Green) 2-piece terminal block 21 < 18 19 Indicates the power status of this product. >%'!"& {7YY'&&$ Indicates the operating status of this product. >%'!"%*! Y'9%&% {7YY' Indicates the CC-Link Safety system connection status of this product. >%':::+>""!;$*+!!" Y'+ {7YY'::+>""!*+! Indicates failure or error status of this product. >%'*+! \%$7YY' Y'~ {7YY'!"% Indicates the communication status of this product in the CC-Link Safety system. >%'!"!!%::+>""! {7YY':!!::+>""!{!$ Indicates the communication error status of this product in the CC-Link Safety system. >%'"><*!*!%&% Y%"'%><*!*`!%&ent from that of the internal nonvolatile memory Y%"'%!%*] {7YY'!"% Indicates the sending status of this product in the CC-Link Safety system. >%'% Indicates the receiving status of this product in the CC-Link Safety system. >%'%9 2-piece terminal block for connection of I/O unit power, transmissions, and I/O signals. %< Press the center part of the hook until a click is heard. ' 5$ uplicate station number setting is not allowed. 2) Although the RUN indicator (green), SAFETY indicator (green) and ERR. indicator (red) momentarily light up immediately after power-up or reset, it does not mean any fault. 3) The SAFETY indicator (green) turns off when no safety remote I/O station parameters have been received during connection to the CC-Link Safety system. 35 Phone: 800.894.0412 - Fax: 888.723.4773 - Web: www.clrwtr.com - Email: [email protected] Procedures and Settings Before System Operation ?^$#&73#$$*^X3 The self-loopback test checks whether this product operates correctly in stand-alone. Be sure to execute the self-loopback test before connecting the system. The self-loopback test cannot be performed properly in the condition that the communication cables and I/O wires are connected. Execute the self-loopback test in the following procedure. Start ¤ Power supply wiring Wire the power supply to this product. + - ¤ ><&% <&>{ RESET LINK ID ¤ Power-on Turn ON the power supply of this product. LBT EL SET STATION NO. 0 1 0 1 0 1 6 5 4 B RATE 0 1 2 3 2 3 2 3 7 24V DC 6 5 4 6 5 4 X10 X1 2 3 4 ¤ Start of self-loopback test Press the setting saving switch of this product once to start the self-loopback test. Y {¢%$]%+ *!!"9 ¤ Completion of self-loopback test ! When SAFETY indicator (green) lights up and ERR. indicator (red) turns OFF, the reading of error history is completed normally. When SAFETY indicator (green) turns OFF and ERR. indicator (red) lights up, the reading of error history is completed abnormally. Replace the unit for a hardware error of this product. Link ID setting switch Y ޣNormalޤ >% { ޣErrorޤ { >% <Reference> When the self-loopback test is not started, reexecute the procedure shown in the above with attention to the following points. (1) <&"77 \%$% #$ <&"7<%&>{ (setting at self-loopback test) in the power-off status? (3) Is the setting saving switch pressed after (2)? When the self-loopback test is not started again, replace the unit. 36 Phone: 800.894.0412 - Fax: 888.723.4773 - Web: www.clrwtr.com - Email: [email protected] Procedures and Settings Before System Operation ?{&%& This section describes the wiring precautions and wiring examples of this product. ?@%7&$3#$%Q&&^3 This section explains how to handle dedicated CC-Link cables. !"&%*!&!%::+>' Compressing the cable with a sharp object Twisting the cable excessively Pulling the cable too hard (exceeding the allowable tension) Stepping on the cable Placing an object on the cable Scratching the cable sheath ?$&&^3 {&%%&&&::+> Safety master unit (Blue) DA Terminal (White) resistor DB (Yellow) DG SLD FG Safety remote I/O unit CC-Link cable Safety remote I/O unit DA DA DB DB DG DG SLD SLD CC-Link cable FG Terminal resistor FG <Reference> 5$ :&::+>>!*% both ends to the protective ground connectors via F.G. terminals. {>Y|! (2) Always connect terminal resistors to the unit located on both ends of the data link network. :!&! ?9@%7&$3#$%/&%&7&*$/%37**0 When wiring the unit power supply of this product, note the following. Cable length of the unit power supply must be within 10m. 37 Phone: 800.894.0412 - Fax: 888.723.4773 - Web: www.clrwtr.com - Email: [email protected] Procedures and Settings Before System Operation ?@%7&$3#$%/&%&3#0Q)&3 This section describes precautions for wiring to each safety device. {&%&$#&*7%&3&$ $&&$3$#&*7%&3 Input terminals can be used in the following combinations only. Using them in any other combination will result in a medium failure. X0 and X1, X2 and X3, X4 and X5, X6 and X7 [_**:* Y Not good Good T0 T1 X0 X1 X2 T0 T1 Safety remote I/O unit X0 X1 X2 Safety remote I/O unit $&&$3$#3*73$7*7%&3 Using the same test pulse for one device is not allowed. If the same test pulse is used in combinations such as X0 and T0, X1 and T0, a medium failure will occur. Not good Good T0 T1 㨄0 Safety remote I/O unit 㨄1 T0 T1 㨄0 㨄1 Safety remote I/O unit 38 Phone: 800.894.0412 - Fax: 888.723.4773 - Web: www.clrwtr.com - Email: [email protected] Procedures and Settings Before System Operation {&%&$#$7*7%&3&$ Use sink outputs in combination with source outputs. Combinations of two sink outputs or single use of sink output is not allowed. Good Source output Y0 24V DC Good Safety remote I/O unit Safety relay Source output Y0 24V DC Safety remote I/O unit Source output Y1 Safety relay Safety relay 0V 0V COM Sink output Y0 Not good Sink output Y0 24V DC Safety relay Safety remote I/O unit 0V Sink output Y1 COM Safety relay ?#0Q)&3Q/&%&z* This section describes the wiring between this product and safety devices. {!&%%"?*&%&! product. Redundant input / output wiring Execution of the self-diagnostics function (dark test) For the wiring example between this product and safety devices which meets the above points, refer to “Safety Application Guide” produced by Mitsubishi Electric Corporation. 39 Phone: 800.894.0412 - Fax: 888.723.4773 - Web: www.clrwtr.com - Email: [email protected] Procedures and Settings Before System Operation 6-6 Switch Setting {%&%< setting switch, station No. setting switch and transmission speed setting switch of this product. /&3&*%$Q7% Switch setting must be made in the power-off status of this product. If the switch setting is made in the power-on status, it may result in an accident due to incorrect output or malfunction. <&+*!&%"!%" To return to the CC-Link Safety system with the changed switch setting, performing reset operation or power OFF to ON of this product is required. After making or canceling the switch setting, be sure to perform reset operation or power OFF to ON of this product. Setting start Turn OFF the power supply of this product. Change the link ID switch, station No. setting switch and transmission speed setting switch. Turn ON the power supply of this product. Does L ERR. indicator (red) light up? YES NO Press the setting saving switch once. Perform a troubleshooting referring to Item 1 of “(2) Troubleshooting for switch setting.” To next page 40 Phone: 800.894.0412 - Fax: 888.723.4773 - Web: www.clrwtr.com - Email: [email protected] Procedures and Settings Before System Operation From previous page Does RUN indicator (green) flash? NO YES Are the change canceled? YES Does L ERR. indicator (red) flash? NO YES NO Set the link ID setting switch, station No. setting switch and transmission speed setting switch to the original settings. Press the setting saving switch once after one second passed. Perform a troubleshooting referring to item 2 of “(2) Troubleshooting for switch setting.” Perform a troubleshooting referring to item 1 of “(2) Troubleshooting for switch setting.” RUN indicator (green) lights up, and L ERR. indicator (red) turns OFF. Perform reset operation or power OFF to ON of this product Setting cancellation completed Did the flash interval of RUN indicator (green) change? NO YES Perform reset operation or power OFF to ON of this product. Perform a troubleshooting referring to item 3 of “(2) Troubleshooting for switch setting.” Completed 41 Phone: 800.894.0412 - Fax: 888.723.4773 - Web: www.clrwtr.com - Email: [email protected] Procedures and Settings Before System Operation X%$73$$&#$%3/&3& Corrective actions for the invalid indicator operation at switch setting are shown in the following table. Item Indicator status 1 After power-on or during switch setting, L ERR. indicator (red) lights up. 2 %9% switch is pressed, RUN indi%$] 3 After the second setting saving switch is pressed, the ]9\tor (green) is not changed. Check description Corrective action : < % switch, station No. setting switch and transmission speed setting switch are pointing positions outside the setting range or not. : < % switch, station No. setting switch and transmission speed setting switch is changed or not after the setting saving switch is pressed. <%&*tion No. setting switch and transmission speed setting switch within the setting range. If the position each setting switch is set within the setting range, replace this product. Make the switch setting again from the beginning of the procedure. If each setting switch is not changed after the setting saving switch is pressed, replace this product. Press the setting saving switch after one or more Check if the second setting seconds passed. saving switch is pressed or not <]9\%$ & not change when the second setting saving switch one was pressed. is pressed after one or more seconds passed, replace this product. 42 Phone: 800.894.0412 - Fax: 888.723.4773 - Web: www.clrwtr.com - Email: [email protected] Chapter 7 Maintenance and Inspection !&& % Turn off all phases of the external supply power used in the system when cleaning the unit or retightening the terminal block mounting screws and terminal screws. Not doing so could result in an electrical shock. Tighten a terminal block mounting screw and a terminal screw within the spec% If the terminal block mounting screw or terminal screw is too loose, it may **! If too tight, it may damage the screw and / or the unit, resulting in a drop of the screw of the unit, a short circuit or malfunctions. !!" %**¬"* If the product is repaired or remodeled by other than our company, the warranty is not covered. Restrict the mounting / removal of a unit, base unit, and terminal block up to D}!!%<;D}#*< :Q55;5+#$* product. Failure to do so may cause the unit to malfunction due to poor contact of connector. Since the unit case is made of resin, do not drop or apply any strong impact to the unit. %!"!% Completely turn off the externally supplied power used in the system before installing or removing the unit to / from the panel. Not doing so may result in a fault or malfunctions of the unit. In order that you can use the safety PLC in normal and optimal condition at all times, this section describes those items that must be maintained or inspected daily or at regular intervals. 43 Phone: 800.894.0412 - Fax: 888.723.4773 - Web: www.clrwtr.com - Email: [email protected] Maintenance and Inspection _(&0]3*&$ The items that must be inspected daily are listed in the following. 3 4 Connection Unit indicator at power-on / reset 2 Unit indicator during operation 1 Installation Item Inspection item < < rail Looseness and instability of 2-piece terminal block mounting screws Adhesion of dirt or foreign matter Inspection Judgement Check that this prodThis product must be stable. uct is stable. Remedy \< rail. Try to further tighten screws with a screw Screws must not be loose. driver. Retighten the 2-piece terminal block mounting screws. Check visually. Try to further tighten Looseness of termiscrews with a screw nal screws driver. Proximity of solderl e s s t e r m i n a l s t o Check visually. each other POWER indicator Check that the indi(Green) cator lights up. Check that the indiRUN indicator cator momentarily (Green) lights up. Check that the indiSAFETY indicator cator momentarily (Green) lights up. Check that the indiERR. indicator cator momentarily (Red) lights up. POWER indicator Check that the indi(Green) cator lights up. RUN indicator Check that the indi(Green) cator lights up. SAFETY indicator Check that the indi(Green) cator lights up. ERR. indicator (Red) Check that the indicator is OFF. L RUN indicator (Green) Check that the indicator lights up. L ERR. indicator (Red) Check that the indicator is OFF. (Green) \ (Green) Check dicator up. Check dicator up. that the indimly lights that the indimly lights Input indicator (X0 to XF) (Red) Check that the indicator lights up and turns off. Output indicator (Y0 to Y3) (Red) Check that the indicator lights up and turns off. % ! ! Remove and clean. present Screws must not be loose. Retighten the terminal screws. Solderless terminals must be posiCorrect. tioned at proper intervals. The indicator (green) must light up. (Abnormal if the indicator is OFF.) Refer to “8-2 Troubleshooting with indicator.” The indicator (green) must light up. (Abnormal if the indicator is OFF.) The indicator (green) must light up. (Abnormal if the indicator is OFF.) Replace the unit. The indicator (red) must turn OFF. (Abnormal if the indicator is OFF.) The indicator (green) must light up. (Abnormal if the indicator is OFF.) The indicator (green) must light up. (Abnormal if the indicator is OFF.) The indicator (green) must light up. (Abnormal if the indicator is OFF.) The indicator must be OFF. Abnormal if the indicator lights up ]$ Refer to “8-2 Troubleshooting The indicator (green) must light up. with indicator.” (Abnormal if the indicator is OFF.) The indicator must be OFF. Abnormal if the indicator lights up ]$ The indicator must dimly light up (green). (Abnormal if the indicator is OFF.) The indicator must dimly light up (green). (Abnormal if the indicator is OFF.) The indicator must light up (red) when the input power is turned ON. The indicator must be extinguished when the input power is turned OFF. Abnormal if the indicator does not light up or turn OFF as indicated above. Replace the unit. The indicator must light up (red) when the output power is turned ON. The indicator must be extinguished when the output power is turned OFF. Abnormal if the indicator does not light up or turn OFF as indicated above. 44 Phone: 800.894.0412 - Fax: 888.723.4773 - Web: www.clrwtr.com - Email: [email protected] Maintenance and Inspection 7-2 Periodic Inspection The items that must be inspected one or two times every 6 months to 1 year are listed below. !!9!*"&%%*! inspection. 3 4 Ambient temperature Ambient humidity Atmosphere Inspection Judgment Remedy Measure with a tem- }DD: perature and a hygromD_D\ eter. Measure corrosive gas- Corrosive gasses must ses. not be present. Change the ambient environment according to the judgement. Measure a voltage Change the supply power accordacross the terminals of #5Q#Q?: ing to the judgement. #?: Looseness and instabil- Try to further tighten Screws must not be Retighten the 2-piece terminal ity of 2-piece terminal screws with a screw loose. block mounting screws. block mounting screws driver. Line voltage check Installation 2 Connection 1 Inspection item Ambient environment (Note) Item Adhesion of dirt or forCheck visually. eign matter % ! Remove and clean. must not be present. Try to further tighten Looseness of terminal Screws must not be screws with a screw Retighten the terminal screws. screws loose. driver. Solderless terminals Proximity of solderless Check visually. must be positioned at Correct. terminals to each other proper intervals. ' >:*9!!!9! 7-3 Time for Replacement of this Product In order to keep the safety system, replace the old product with new product in each 5 years. 45 Phone: 800.894.0412 - Fax: 888.723.4773 - Web: www.clrwtr.com - Email: [email protected] Chapter 8 Troubleshooting This section describes the various types of trouble that occur when this product is operated, and causes and remedies of these troubles. `X%$73$$&3&3 In order to increase the reliability of the system, not only highly reliable devices are used but also the speedy startup of the system after the occurrence of trouble becomes an important factor. To start up the system speedily, the cause of the trouble must be located and eliminated correctly. The basic three points that must be followed in the troubleshooting are as follows. &37&3*&$ Visually check the following. 1) Movement of this product (stop status and operation status) 2) Power supply status of this product 3) Status of extenal devices 4) Installation condition of the safety power supply unit, safety CPU unit and safety master unit 5) Status of wiring (I/O wires, power cables, CC-Link dedicated cables) Q$"9"7 \*\*Y {¢ indicator, ERR. indicator, etc.) 7) Status of setting of various types of set switches %5$Z$*|9":*>:agnostics or monitor the operating condition and program contents of the safety CPU unit. ^$#%$7 Check to see how the operating condition of this product varies while the following are operated. 1) Set the safety CPU unit RUN / STOP / RESET switch connected to this product to “STOP.” 2) Reset the trouble with the safety CPU unit RUN / STOP / RESET switch connected to this product. 3) Turn ON and OFF the power supply of this product. 4) Reset the trouble with this product reset switch. 9%%$/&Q$/%$#%$7$7%%733 Estimate the troubled part in accordance with items (1) and (2) above. 1) This product or external devices 2) Safety master unit or others 3) Safety CPU unit 4) PLC program `@%7&$3#$%%$73$$& This product is designed to have various diagnostics circuits and detect an error. *: <* 46 Phone: 800.894.0412 - Fax: 888.723.4773 - Web: www.clrwtr.com - Email: [email protected] Troubleshooting 8-2 Troubleshooting with Indicators {"! Error occurrence Doesn’t the POWER indicator (green) light up? NO “8-2-1 Flowchart for when the POWER indicator does not light up” YES Doesn’t the RUN indicator (green) light up? NO “8-2-2 Flowchart for when the RUN indicator does not light up” YES Does the ERR. indicator (red) flash? YES “8-2-3 Flowchart for when the ERR. indicator flashes” NO Doesn’t the SAFETY indicator (green) light up? NO “8-2-4 Flowchart for when the SAFETY indicator does not light up” YES Does the ERR. indicator (red) light up? YES “8-2-5 Flowchart for when the ERR. indicator lights up” NO Doesn’t the L RUN indicator (green) light up? NO “8-2-6 When the L RUN indicator does not light up” YES Does the L ERR. indicator (red) flash? YES “8-2-7 Flowchart for when the L ERR. indicator flashes” NO Does the L ERR. indicator (red) light up? YES “8-2-8 When the L ERR. indicator lights up” NO Doesn’t the SD / RD indicator (green) dimly light up? YES NO “8-2-9 When the SD / RD indicator does not dimly light up” Please contact our office. 47 Phone: 800.894.0412 - Fax: 888.723.4773 - Web: www.clrwtr.com - Email: [email protected] Troubleshooting `$/%#$%/@+{"q&Q&$%Q$3$&7* {&%&]&&7 \%$% at power-on of this product or during operation of the unit. POWER indicator (green) does not light up. Do indicators other than the POWER indicator light up? YES NO Is the power supplied to this product? Replace this product. NO YES Supply the power to this product. Check the supplied power status by a tester. Is the power supply voltage within the specification range? NO YES Replace this product. Supply the following range power voltage 21.6 to 26.4V DC 48 Phone: 800.894.0412 - Fax: 888.723.4773 - Web: www.clrwtr.com - Email: [email protected] Troubleshooting 8-2-2 Flowchart for when the RUN indicator does not light up {&%&]&&\%$% power-on of this product or during operation of the unit. RUN indicator (green) does not light up. Does the RUN indicator (green) light up right after reset cancel / power-on? NO Replace this product. YES Is the reset switch left pressed? YES Undo the reset switch. NO Perform reset operation / power OFF to ON of this product. Does the RUN indicator (green) light up? YES Completed NO Does the ERR. indicator (red) light up? NO YES Replace this product. Contact our office. 49 Phone: 800.894.0412 - Fax: 888.723.4773 - Web: www.clrwtr.com - Email: [email protected] Troubleshooting `9$/%#$%/"qq&Q&$% 33 {&%&]&& \\$]&+ this product or during operation of the unit. ERR. indicator (red) flashes. Conduct PLC diagnostics with GX Developer connected to the safety CPU unit. For PLC diagnostics, refer to “GX Developer Version 8 Operating Manual (Safety PLC)” produced by Mitsubishi Electric Corporation. Can the error information of this product be acquired? YES Perform troubleshooting according to the acquired error information. For error codes, refer to “8-5 Error Code List.” NO Read the error history. For reading of the error history, refer to “4-5 Error History Function.” Could the error history of this product be read? NO YES Is there error information at the estimated time in the error history? Replace this product. YES Perform troubleshooting according to the acquired error information. For error codes, refer to “8-5 Error Code List.” NO End reading the error history. For reading of the error history, refer to “4-5 Error History Function.” Is the ERR. indicator (red) turned off? YES NO Replace this product. Completed 50 Phone: 800.894.0412 - Fax: 888.723.4773 - Web: www.clrwtr.com - Email: [email protected] Troubleshooting 8-2-4 Flowchart for when the SAFETY indicator does not light up {&%&]&&Y {¢%$% at power-on of this product or during operation of the unit. SAFETY indicator (green) does not light up. Does the SAFETY indicator (green) light up right after reset cancel / power-on? NO Replace this product. YES Is the proper transmission speed set? NO Match the transmission speed setting switch of this product to the setting of the safety master unit. YES Is the proper link ID set? NO Match this product link ID setting switch to the setting of the safety master unit. YES Is the proper number set? station NO Match the station number setting switch of this product to the setting of the safety master unit. YES Is the data link on at the safety master unit side? NO Perform troubleshooting of the safety master unit. For troubleshooting of the safety master unit, refer to “CC-Link Safety System Master Unit User's Manual” produced by Mitsubishi Electric Corporation. YES Don't multiple master stations exist on the same data link? YES Set one safety master unit on the same data link. NO Is the corresponding station type set to “Safety remote I/O station” in CCLink parameters? YES NO Set the corresponding station type to “Safety remote I/O station” in CC-Link parameters. For the settings of station information, refer to “CC-Link Safety System Master Unit User's Manual” produced by Mitsubishi Electric Corporation. To next page 51 Phone: 800.894.0412 - Fax: 888.723.4773 - Web: www.clrwtr.com - Email: [email protected] Troubleshooting From previous page Isn't the time of the data link monitoring timer up? YES Check the relationships among the safety master station scan time, transmission speed and data link monitoring timer. For the data link processing time and the data link monitoring timer, refer to “CC-Link Safety System Master Unit User's Manual” produced by Mitsubishi Electric Corporation. NO Isn't cable breaking? YES NO Isn't the transmission line affected by noises? Check the cable status and replace. YES Improve the laying by separating the bunching part from the power line or by installing a shield. NO Isn't a poor connection occurring in the 2-piece terminal block? YES Softly push or shake the block terminal. Replace the 2-piece terminal block. NO Doesn't the station exist with the SD indicator (green) left lighting up? YES Eliminate the station with the SD indicator left lighting up from the CC-Link Safety system. NO Are the cable wiring and the terminal resistance value proper? NO Check the cable wiring and terminal resistance value of all the stations. Check if the DA-DB terminal is not reversely connected. YES Is the station-to-station / overall cable length within the specification range? YES NO Check the station-to-station / overall cable length and make it within the specification range. Replace this product. 52 Phone: 800.894.0412 - Fax: 888.723.4773 - Web: www.clrwtr.com - Email: [email protected] Troubleshooting `$/%#$%/"qq&Q&$%&37* {&%&]&& \\$%&+ this product or during operation of the unit. ERR. indicator (red) lights up. Perform reset operation / power OFF to ON of this product. Is the ERR. indicator (red) turned off? YES NO Replace this product. Completed `?{q&Q&$%Q$3$&7* The following shows the case when the L RUN indicator (green) does not light up at poweron of this product or during operation of the PLC. If the L RUN indicator (green) does not light up when the SAFETY indicator (green) lights up, replace this product. When the SAFETY indicator (green) does not light up, refer to “8-2-4 Flowchart for when the SAFETY indicator does not light up.” 53 Phone: 800.894.0412 - Fax: 888.723.4773 - Web: www.clrwtr.com - Email: [email protected] Troubleshooting `_$/%#$%/"qq&Q&$% 33 {&%&]&&> \\$]&+ this product or during operation of the unit. L ERR. indicator (red) is flashes. Is the link ID switch, station number setting switch or transmission speed setting switch operated during the unit operation? YES Undo the switch setting. For the switch settings, refer to “6-6 Switch Setting.” NO Don't multiple master stations exist on the same data link? YES Set one safety master unit on the same data link. NO Isn't the transmission line affected by noises? YES Improve the laying by separating the bunching part from the power line or by installing a shield. NO Isn't a poor connection occurring in the 2-piece terminal block? YES Softly push or shake the block terminal. Replace the 2-piece terminal block. NO Are the cable wiring and the terminal resistance value proper? NO Check the cable wiring and terminal resistance value of all the stations. Check if the DA-DB terminal is not reversely connected. YES Is the station-to-station / overall cable length within the specification range? YES Replace this product. NO Check the station-to-station / overall cable length and make it within the specification range. 54 Phone: 800.894.0412 - Fax: 888.723.4773 - Web: www.clrwtr.com - Email: [email protected] Troubleshooting ``{"qq&Q&$%&7* The following explains the case when the L ERR. indicator (red) lights up at power-on of this product or during operation of the unit. If the L ERR. indicator (red) lights up when the ERR. indicator (red) is turned OFF, replace this product. \\$]*8-2-3 Flowchart for when the ERR. indica$% 33.” When the ERR. indicator (red) lights up, refer to “`$/%#$%/"qq&Q&cator lights up.” 8-2-9 When the SD / RD indicator does not dimly light up {&%&`\%$!"% at power-on of this product or during operation of the unit. <`\%$!"%&Y {¢%$ lights up, replace this product. When the SAFETY indicator (green) does not light up, refer to “8-2-4 Flowchart for when the SAFETY indicator does not light up.” 55 Phone: 800.894.0412 - Fax: 888.723.4773 - Web: www.clrwtr.com - Email: [email protected] Troubleshooting 8-3 Verifying Errors from Indicator Status The following table lists causes and corrective actions for errors indicated by indicators on this product when the network parameters are properly set and also the MST indicator of the safety !%$"!%!& below. Station No.1 Unit A Station No.2 Unit B Station No.3 Unit C <Verifying errors from indicator status> Indicator status Safety master unit ERR. or ERR. ¯ Unit A POWER L RUN L ERR. POWER L RUN L ERR. POWER L RUN L ERR. Unit B ¯ ¯ ¯ ¯ * * * POWER L RUN ¯ L ERR. * POWER L RUN L ERR. POWER L RUN L ERR. POWER L RUN L ERR. Unit C ¯ ¯ ¯ POWER L RUN ¯ L ERR. * POWER L RUN L ERR. POWER L RUN L ERR. POWER L RUN L ERR. ¯ ¯ ¯ POWER L RUN ¯ L ERR. * Cause Corrective action Normal — Since the indicators on the unit A * #? & supplied or voltage is low. The unit A is malfunctioning and the indicators are unstable (all lights are off, in many cases). : 9% #? power supply, and supply the proper power to the unit. Replace the unit A. Find the shorted cable among the three transmission cables and repair it. The transmission cable is wired Verify wiring in the terminal box of incorrectly. the unit and correct. The transmission cable is shorted. '>%*¯'{7YY*±'>%*Y*{7YY 56 Phone: 800.894.0412 - Fax: 888.723.4773 - Web: www.clrwtr.com - Email: [email protected] Troubleshooting %�&%%$%3#%$&Q&$%373{q&Q&$%%Q$3$&7* Indicator status Safety master unit ERR. or ERR. Unit A Unit B Unit C POWER L RUN L ERR. ¯ POWER L RUN ¯ L ERR. ¯ POWER L RUN ¯ L ERR. ¯ POWER L RUN ¯ L ERR. ¯ POWER L RUN L ERR. ¯ POWER L RUN ¯ L ERR. ¯ POWER L RUN L ERR. ¯ POWER L RUN ¯ L ERR. ¯ POWER L RUN L ERR. ¯ ¯ Cause A line failure such as a cable failure / terminal resister failure / cable or terminal block poor connection is occurring between the unit A and B. The line failure (terminal block poor connection, cable disconnection, etc.) is occurring between the units B and C. The units B and C are affected by noises. The L RUN indicators (green) of the units A and C are OFF, indicating the station numbers for A and C are overlapping. The L RUN indicator (green) of the unit B is OFF, indicating the transmission speed setting for unit B is invalid within the setting range (0 to 4). Corrective action :>%% of the transmission cable. Conform that cables are laid out as far as possible from the power line (100mm or more). Narrow down the line failure part using bisection algorithm or tester. Restart the power supply after the overlapped station numbers for the units are corrected. Restart the power supply after the transmission speed is set correctly. '>%*¯'{7YY %�&%%$%3#%$&Q&$%373{"qq&Q&$%%Q&37* Indicator status Safety master unit ERR. or ERR. Unit A Unit B Unit C POWER L RUN L ERR. ¯ POWER L RUN L ERR. POWER L RUN L ERR. ¯ ¯ POWER L RUN L ERR. ¯ POWER L RUN L ERR. POWER L RUN L ERR. POWER L RUN L ERR. ¯ POWER L RUN L ERR. ¯ POWER L RUN L ERR. Cause The L ERR. indicator (red) of the unit B lights up, indicating that the unit B is being affected by noises. L RUN indicator (green) may be off. All line failure such as a cable failure / terminal resister failure / cable or terminal block poor connection is occurring. The line failure (terminal block poor connection, cable disconnection, etc.) is occurring between the units B and C. The units B and C are affected by noises. A terminal resistor is not attached. L RUN indicator (green) may be off. Corrective action Correctly perform grounding of the F.G.s for the master unit and all units. :>%% of the transmission cable. Conform that cables are laid out as far as possible from the power line (100mm or more). Narrow down the line failure part using bisection algorithm or tester. Check if a terminal resistor is attached. '>%*¯'{7YY 57 Phone: 800.894.0412 - Fax: 888.723.4773 - Web: www.clrwtr.com - Email: [email protected] Troubleshooting 8-4 Troubleshooting with GX Developer &9>:%|9 Reading an error code When an error occurs, its error code, error message, etc. can be read using the PLC diag|9 Errors of this product are registered as remote I/O station error information in “Operation / error history.” The error history of this product must be sent to the safety CPU unit beforehand. For sending the error history of this product, refer to “"%%$%[&3$%07&$.” {&%&%!|9 5$|9 2) Connect the CPU unit and personal computer. ;$7|9*7\!>:!¬ from the safety CPU unit. ?$:%>:%! 5) If the error display part in “Present error” or “Operation / error log” is double-clicked, the error details dialog box appears. Y>:%*|9[7%~" PLC)” produced by Mitsubishi Electric Corporation. For the error, refer to “`"%%$%$Q&3.” 58 Phone: 800.894.0412 - Fax: 888.723.4773 - Web: www.clrwtr.com - Email: [email protected] Troubleshooting `"%%$%$Q&3 This product sends the error information to the safety CPU unit via a safety master unit when the moderate error 1 (Note) occurs at power-on or during operation of the unit. The error codes that this product sends are listed in <Error Code List>. For reading an error code, refer to “8-4 Troubleshooting with GX Developer.” ' {!*!*!¬&& However, minor error is not applied to this product. ~' !"&!" ~' !""& ~¬' !""& Outputs will be all points OFF when moderate errors or major errors occur. 59 Phone: 800.894.0412 - Fax: 888.723.4773 - Web: www.clrwtr.com - Email: [email protected] Troubleshooting <Error code list> Error Erro item 302 0000 0000 0001 304 0002 0003 0000 0001 0002 0003 305 CC-Link Safety protocol (Out of receive command range) CC-Link Safety protocol division number error (Product information) CC-Link Safety protocol division number error (Safety slave station parameters) CC-Link Safety protocol division number error (Error information) CC-Link Safety protocol division number error (Safety slave station internal information) CC-Link Safety protocol product mismatch ><!!$ CC-Link Safety protocol product mismatch (Manufacturer code mismatch) CC-Link Safety protocol product mismatch (Unit inherent code mismatch) CC-Link Safety protocol product mismatch (Unit technical version mismatch) 0004 CC-Link Safety protocol product mismatch (Product information mismatch) 0005 CC-Link Safety protocol product mismatch (Model name information mismatch) 0001 0002 306 % 0003 0004 0005 CC-Link Safety protocol safety slave station parameter error (Verification request acceptance disabled) Safety slave station parameters Out of parameter number range Safety slave station parameters Same parameter number setting Safety slave station parameter Out of setting range CC-Link Safety protocol safety slave station parameter error (CRC32 mismatch) Corrective action An unexpected protocol occurred. The continuity of division numbers collapsed in the send / receive processing of product information. The continuity of division numbers collapsed in the send / receive processing of the safety slave station parameters. The continuity of division numbers collapsed in the send / receive processing of error information. The continuity of division numbers collapsed in the safety slave station internal information access processing. {<9!"! and that of the host station are different. The manufacture code received from the safety master station and that of the host station mismatched in !9% The inherent code received from the safety master station and that of the host station mismatched in !9% The unit technical version received from the safety master station and that of the host station mismatched !9% The product information received from the safety master station and that of the host station mismatched in Error codes of CC!9% !5*#'>&5Q! Link Safety protocol to !Z*[' %5Q! The model name information received from the safety master station and that of the host station mismatched !9% 5_ 5'Y #'+: ;'>5 ?'{# D'Q? Q'{ Z' [' _'}}}#} {9"9 parameters is accepted from the safety master station. However, it is not supported by the local station. The number of the safety slave station parameters is out of range. The same number is set for the safety slave station parameters. The settings of the safety slave station parameters are out of range. For the safety slave station parameters received from the safety master station, the CRC32 calculated from the overall parameters and the received one mismatch. 60 Phone: 800.894.0412 - Fax: 888.723.4773 - Web: www.clrwtr.com - Email: [email protected] Troubleshooting Error Erro item 0917 350 Name Safety slave station parameter mismatch. <Error details 2> #}5'~!{!!9 Input dark test pulse OFF time is greater {!!9}*5 Q}5'~!~&% Safety slave station pa rameter mismatch method of wiring of output, the setting of the paired method of wiring of output is not the same. Z}5'7!! method of wiring of output, the setting of output dark test selection is not the same. 0719 CC-Link Safety protocol safety slave station parameter number error 0102 % ancy detection time 0203 Output overload error (At Safety pre-diagnostics) Corrective action !!match according to the error details 2 on the left and correct parameters. After checking that the CSP file is not damaged and that the latest CSP file is registered, set the unit parameters again. After checking that the CSP file is not damaged and that The received numbers of safety slave station pathe latest CSP file rameters are out of range. is registered, set the unit parameters again. A mismatch has been detected in paired inputs (X0 Reexamine the conand X1, X2 and X3, etc.) over the doubling input nected devices and discrepancy detection time. the wiring. The overcurrent protection or overvoltage protection has been activated in the output circuit transistor. The read-back value and the output value do not match. <Error details 2> Upper 8 bits 8 bits bit 7 bit 6 bit 5 bit 4 bit 3 bit 2 bit 1 bit 0 bit 0: Y0 0: Output read-back value ON, 1: Output read-back value OFF bit 1: Y1 0: Output read-back value ON, 1: Output read-back value OFF bit 2: Y2 0: Output read-back value ON, 1: Output read-back value OFF bit 3: Y3 0: Output read-back value ON, 1: Output read-back value OFF bit 4 to 7: Fixed to 0 450 0204 Lower 8 bits Output read-back error (At Safety pre-diagnostics) 8 bits bit 7 bit 6 bit 5 bit 4 bit 3 bit 2 bit 1 bit 0 bit 0: Y0+ 0: Output value ON, 1: Output value OFF bit 1: Y1- 0: Output value ON, 1: Output value OFF bit 2: Y2+ 0: Output value ON, 1: Output value OFF bit 3: Y3- 0: Output value ON, 1: Output value OFF bit 4: Y0- 0: Output value ON, 1: Output value OFF bit 5: Y1+ 0: Output value ON, 1: Output value OFF bit 6: Y2- 0: Output value ON, 1: Output value OFF bit 7: Y3+ 0: Output value ON, 1: Output value OFF 0209 (1) Reexamine the connected devices and the wiring. (2) R e p l a c e t h i s product. Because of restrictions on hardware, the sink side output read-back always reads ON regardless of ON / OFF of the output. The overcurrent protection or overvoltage protecOutput overload error (At mid-Safety connection tion has been activated in the output circuit transisdiagnostics) tor. 61 Phone: 800.894.0412 - Fax: 888.723.4773 - Web: www.clrwtr.com - Email: [email protected] Troubleshooting Error Erro item Name Corrective action The read-back value and the output value do not match. <Error details 2> Upper 8 bits 8 bits bit 7 bit 6 bit 5 bit 4 bit 3 bit 2 bit 1 bit 0 bit 0: Y0 0: Output read-back value ON, 1: Output read-back value OFF bit 1: Y1 0: Output read-back value ON, 1: Output read-back value OFF bit 2: Y2 0: Output read-back value ON, 1: Output read-back value OFF bit 3: Y3 0: Output read-back value ON, 1: Output read-back value OFF Output read-back error bit 4 to 7: Fixed to 0 0210 (At mid-Safety connec- Lower 8 bits tion diagnostics) 8 bits bit 7 bit 6 bit 5 bit 4 bit 3 bit 2 bit 1 bit 0 bit 0: Y0+ 0: Output value ON, 1: Output value OFF bit 1: Y1- 0: Output value ON, 1: Output value OFF bit 2: Y2+ 0: Output value ON, 1: Output value OFF bit 3: Y3- 0: Output value ON, 1: Output value OFF bit 4: Y0- 0: Output value ON, 1: Output value OFF bit 5: Y1+ 0: Output value ON, 1: Output value OFF bit 6: Y2- 0: Output value ON, 1: Output value OFF bit 7: Y3+ 0: Output value ON, 1: Output value OFF 0304 0305 0402 450 0404 0908 0911 1213 (1) Reexamine the connected devices and the wiring. (2) R e p l a c e t h i s product. Because of restrictions on hardware, the sink side output read-back always reads ON regardless of ON / OFF of the output. The test pulse could not be detected during the (1) Reexamine the Input dark test error input dark test. connected devices and the wiring. The test pulse could not be detected during the Output dark test error (2) Replace this product. output dark test. (1) Reexamine the connected devices and the wiring. I/O contorl power supply overvoltage error. (2) Match the timI/O control power supply The overvoltage / undervoltage has been detected ing of powering voltage error in the I/O control power supply that poles every on the external 10ms. power supply to that of powering on this product. I/O control power supply voltage switching-off circuit error. Reexamine the wiring External power supply This product could not turn ON the I/O control and voltage of the exerror power supply at start-up. ternal power supply. Record of error history reading status. The error history is read in a status where no error Error history reading Use the unit as is, history exists. status record since it is normal. After the new error code is stored, this error code will not be read from the history. The operation of this product has stopped by receivRefer to the error ing a forced stop command from the master unit. history of the safety Unit forced stop control Unit forced stop control. CPU unit / safety However, errors received after an error is sent or errors master unit. received at the time of reading error history are eliminated. (1) 7 power supply or reset with pressing the setting registration switch. (2) If this error occurs at powerSetting registration on or reset The ON status of the sensing registration switch is switch status error at operation without detected at power-on. power-on pressing the setting registration switch, the failure is due to the setting registration switch. Replace this product. 62 Phone: 800.894.0412 - Fax: 888.723.4773 - Web: www.clrwtr.com - Email: [email protected] Chapter 9 Dimensions (Unit: mm) 190 76.2 44.5 13.5 35.3 25 39 15.2 25 98 25 15.2 10 14.5 6.5 10 Comply with 35mm width DIN rail 118 120 35 27 83 66 63 Phone: 800.894.0412 - Fax: 888.723.4773 - Web: www.clrwtr.com - Email: [email protected] Chapter 10 Other 10-1 CE Marking Declaration of Conformity Itemized Essentials of EC Declaration of Conformity Manufacturer’s Name: Panasonic Electric Works SUNX Co., Ltd. Manufacturer’s Address: 2431-1, Ushiyama-cho, Kasugai, Aichi 486-0901, Japan Identity of Manufacturer in Charge: Divisional General Manager, Sensor Division EC Representative’s Name: Panasonic Electric Works Europe AG EC Representative’s Address: Rudolf-Diesel-Ring 2, 83607 Holzkirchen, Germany Product: Remote I/O unit with connectors for Light Curtain Model Name: SF-CL1T264T Trade Name: Panasonic Application of Council Directive: - 2006/42/EC Machinery Directive - 2004/108/EC EMC Directive Tested according to: - EN ISO 13849-1: 2008 - EN 61131-2: 2007 - IEC 61508-1: 1998 - IEC 61508-2: 2000 - IEC 61508-3: 1998 - IEC 61508-4: 1998 Type Examination::"{²\<9|! ! Grauen Stein, 51105 Köln Germany { ! 9 % !" & 9 9 { ! & ! 9 64 Phone: 800.894.0412 - Fax: 888.723.4773 - Web: www.clrwtr.com - Email: [email protected]