1
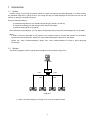
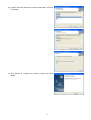
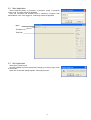
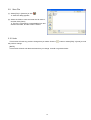
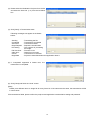
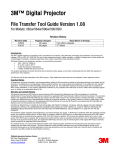
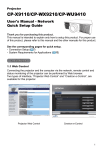
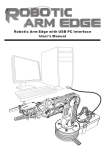
Projector Image Tool
Ver.3.07
Instruction Guide
Contents
1
2
3
4
INTRODUCTION.......................................................................................................................................... 3
1.1
OUTLINE ................................................................................................................................................. 3
1.2
SYSTEM.................................................................................................................................................. 3
INSTALLATION........................................................................................................................................... 4
2.1
SYSTEM REQUIREMENTS ......................................................................................................................... 4
2.2
PROJECTOR IMAGE TOOL INSTALLATION.................................................................................................. 5
OPERATING INSTRUCTIONS .................................................................................................................... 7
3.1
CREATE LOGIN ACCOUNTS ...................................................................................................................... 7
3.2
START APPLICATION ............................................................................................................................... 9
3.3
QUIT APPLICATION.................................................................................................................................. 9
3.4
MAIN SCREEN ....................................................................................................................................... 10
3.5
OPEN THE IMAGE FILE........................................................................................................................... 11
3.6
CROP THE IMAGE .................................................................................................................................. 11
3.7
ADD TEXT ............................................................................................................................................ 12
3.8
OPTIMIZE & CREATE PJ1 FILE .............................................................................................................. 12
3.9
SAVE FILE ............................................................................................................................................ 13
3.10
UNDO ................................................................................................................................................... 13
3.11
SENDING MYIMAGE FILE ........................................................................................................................ 14
3.12
ABOUT THIS APPLICATION ..................................................................................................................... 16
LIMITATIONS ............................................................................................................................................ 17
・ Microsoft and Windows is the registered trademark of Microsoft Corporation in the US and other countries.
・ Pentium is the registered trademark of Intel Corporation in the US and other countries.
・ All other trademarks are the property of their respected owners.
Warning
・ This software is free. The manufacturer has no responsibility for any errors that may occur while using this software.
・ This software, or any product used with this software may not be used for any act which obstructs the Maintenance
of the International Peace and Safety.
2
1 Introduction
1.1
Outline
Projector Image Tool (PJImg) provides the ability to create a proprietary formatted MyImage (or e-Shot) file from
any standard image file or typing the text. The PJImg will help to create MyImage file and send the file over the
network for testing or verification purpose.
PJImg provides the ability to:
✗ Create MyImage file from any standard image file (jpeg, bitmap, gif and etc)
✗ Create Text message on plain background or add on the image
✗ Send the MyImage file to a projector
After verification of MyImage file, you can deploy the MyImage file(s) using Projector Management Tool (PJMan).
[Note]
In order to send the MyImage to the projector, the computer needs to connect the network and be able to
communicate with the projector. Please see ‘User’s Manual-Network Functions’ for the details.
Please see ‘User’s Manual-Operating Guide’ and ‘User’s Manual-Network Functions’ about MyImage
functionality.
1.2
System
The following diagram shows a typical network diagram for the Projector Image Tool.
LAN
HUB
LAN
LAN
LAN
LAN
Projectors
Use a UTP cable category 5 or higher for a Local Area Network cable.
3
2 Installation
2.1
System Requirements
The following are the minimum system requirements of hardware and software to use the Projector Image Tool.
(1) Operating System
Windows 2000 Professional
Windows XP Home Edition
Windows XP Professional
Windows Vista Home Basic (32-bit)
Windows Vista Home Premium (32-bit)
Windows Vista Business (32-bit)
Windows Vista Ultimate (32-bit)
(2) CPU
Pentium3 500MHz or higher
(3) Memory
128MB or higher
(4) Hard Disc
Minimum 20MB free space for installation.
(5) Local Area Network port (RJ-45)
4
2.2
Projector Image Tool Installation
The installation process of Projector Image Tool is shown below. Please follow each step.
(1) Double click the file “InstForPJImg.exe”.
(2) Select the language (English, Japanese or Chinese [Simplified]) during
the installation process. And then click [OK].
(3) Click [Next]
(4) Read “License Agreement” and select “I accept the terms of
the license agreement” and click [Next] if you agree the license
agreement. Otherwise, click [Cancel] and stop the installation.
(5) Confirm the program folder, and then click [Next].
5
(6) Confirm the install folder and program folder again, and then
click [Next].
(7) Click [Finish] to complete the Projector Image Tool setup
wizard.
6
3 Operating Instructions
3.1
Create login accounts
The Projector Image Tool requires a login name and password to launch the software. The Projector User
Administration Tool helps you to create new user accounts.
3.1.1 How to launch
Double Click “PJUsrEdit.exe” that is located on same folder
that you installed Projector Image Tool.
It automatically launches the Projector User Administration Tool,
if no user accounts are created yet. Also Projector Image Tool
has a short cut [File]
[User Configuration] to launch Projector
User Administration Tool.
3.1.2 How to exit
Select [File]
[Exit] from the menu or click [x] button of the top right corner. If the changes are made, you will be
required to confirm the changes.
3.1.3 Main Window
Menu
User List
(1) Menu
Menu
File
Edit
Sub Menu
Save
Exit
Add New User
Change User
Delete User
Description
Save user data
Exit
Create new user
Edit user account
Delete user account
(2) User List
The status in the User List is described below.
Row name
Description
User Name
Username (ID)
Description
Comment
Man
“●” shows that the user can access to the PJMan (Projector Management Application).
Ctrl
“●” shows that the user can access to the PJCtrl (Projector Control Application).
Img
”●” shows that the user can access to the PJImg (Projector Image Tool).
FTP
”●” shows that the user can access to the PJTransfer (Projector File Transfer Tool).
7
3.1.4 Creating new user account
Select [Edit]
[Add New User] or right click on the user list and
select [Add New User]. The following dialog window appears.
User
Description
User Rights
Select All
UnSel All
--- Define user name, up to 20 characters
--- Add comments, up to 50 characters
--- Define accessibility. It defines the
accessibility for the application software
by each user account. The user can use
allocation
only
marked
application
software.
--- Select all application software.
--- Unselect all application software.
Press [OK] button after entering user name. The [Change Password]
dialog appears. Enter new password and confirm entered password.
The password is up to 20 characters and case sensitive.
3.1.5 Edit user account
Double click a username on the user list or select [Edit]
[Change User] after choosing user to open edit dialog. You can edit
username, description and accessibility (user rights).
Click the button to change password. Enter old and new password,
and re-enter new password to confirm.
3.1.6 Delete user account
Select [Edit]
popup.
[Delete User] or right click on the user list and select [Delete User]. The confirmation window will
3.1.7 Save user account
Select [File]
\UserList”.
[Save]. The date is stored in the file,
“C:\Program Files\Common Files\Projector Tools\config
8
3.2
Start Application
Select Windows [Start]
[Program]
[Projector Tools]
[Projector
Image Tool]. The login window is appeared.
Enter the username and password that is created by “Projector User
Administration Tool”. After logged in, a following window is appeared.
Menu
Tool Bar
Task Pain
3.3
Quit Application
Select [File] - [Exit] to quit.
It is also possible to quit this software by clicking [x] on the top right corner
of the window.
When the confirmation dialog appears, select [OK] to finish.
9
3.4
Main Screen
(1) Menu
The functions of the main window are as follows.
Menu
File
Edit
Send
Help
Sub-Menu
Function
Open
Load the image file from the PC and display it on Main Screen.
Save As
Save the image file on Main Screen as a Projector GIF type.
User Configuration
Launch Projector User Administration Tool.
Exit
Quit Application.
Undo
Undo a previous change.
Crop
Crop the image on Main Screen.
Add Text
Add the text on the Image file.
Background Color
Fill the background selected color.
Optimize Image & Resize to the maximum size, and convert to a Projector GIF(PJ1) file.
Create PJ1 File
Refer to “4 Limitations” for the maximum size.
Send
Send the image file on Main Screen to the projector.
About Projector
Display the version of this application.
Image Tool
(2) Toolbar
The functions of these icons correspond with the menus as follows:
Icon
Menu
[File]−[Open]
[File]−[Save As]
[Edit]−[Undo]
[Edit]−[Crop]
[Edit]−[Add Text]
[Edit]−[Background Color]
[Edit]−[Optimize Image & Create PJ1 File]
[Send]−[Send]
[Help]−[About Projector Image Tool]
(3) Task Pane
The functions of these icons correspond with the menus as follows:
Menu
Original
Image
Sub Menu
File Name
Size
New Image
File Name
Size
Crop
Handles
Add Text
Optimize &
Create PJ1
File
Save As
Send
Function
Show Name of the opened file.
Show Width/ Height information of the opened
file.
Show Name of the Edited image.
Show Width/ Height information of the Edited
image.
Show the Aspect of Crop area.
Show the Crop area.
[Edit] - [Crop]
[Edit] – [Add Text]
[Edit] – [BackGround]
Aspect
Left, Right, Top, bottom
Crop
Add Text
BackGround
-
[Edit] – [Optimize & Create PJ1 File]
-
[File]−[Save As]
[Send]−[Send]
10
3.5
Open the Image File
To create the MyImage file from the image file, please open the file from Menu or drag and drop the file to the main
window.
(1) Select [File]
[Open]or click
“Open File” dialog appears:
:
(2) Select the image file and then click [Open] button.
Also you can use plain background without the image file
(1) Select [Edit]
[Background Color], click
[Background Color] Button.
Color dialog appears.
, or Click
(2) Pick the background color and then click [OK]...
3.6
Crop the Image
(1) Please select the Cropping area using the mouse or enter the
coordinates of Crop Handles that is shown on the left side
pane.
(2) If you want to set an aspect of Crop area at 4:3 or 16:9, Please
choose 4:3 or 16:9 among an Aspect pull-down box.
(3) Select [Edit]-[Crop], or click
or Click [Crop] button.
11
3.7
Add Text
(1) Select [Edit]
[Add Text], or click
Button.
”Add Text” Dialog appears.
, or Click [Add Text]
(2) The text in the edit box.
• The text updates simultaneously.
• Use the mouse to change the position and size of text field
• Press Font or Color button to change the text attributes
(3) Click [OK].
The text will be merged into the image.
[Note]
This function is effective for images more than 8bit such as “jpg”.
3.8
Optimize & Create PJ1 File
The MyImage file is required propriety formatted file and limited size. The Optimize function will help you to create
MyImage file with appropriate file format and size.
(1) Select [Edit]
or Click [Optimize & Create PJ1 File] Button
[Optimize & Create PJ1 File], click
Optimize the Image size and convert into “PJ1” file. And then Save File dialog appears.
12
3.9
Save File
(1) Select [File]
[Save As] or click
Save File dialog appears
:
(2) Select the folder to save and enter the file name o,
and then Click [Save].
The file is converted to a transmittable form and
saved in the folder, and the screen is closed.
3.10 Undo
This function will undo any previous change that you made. Click the
the previous change.
button or select [Edit]
[NOTE]
This function will work until the three times that you change. It would not go back further.
13
[Undo] to undo
3.11 Sending MyImage file
In order to display MyImage file on the projector, you need to send the file and store in the projector. The projector
can store up to 4 images. Projector Image Tool only support sending a file to the single projector for verification
purpose. If you need to deploy the MyImage file to multiple projectors, Please use Projector Management Software
(PJMan).
<<< Following procedure may need to change. >>>
(1) Select [Projector]-[Send], or click
“Confirm” dialog appears.
:
(2) Click [OK]
It will display projectors that are founded by
discovery function on the network
When a password is set in a projector, it is necessary for even
application software to set a password.
Please click [Authentification].
“Authentication” screen appears. Please enter Password.
In spite of Discovery function it will not display projectors,
Please click [Add Projector].
“Input Connection Information” screen appears.
Please enter the IP address that you want to add.
The authentication is enabled on the adding projector, marked
Authentication and enter the password.
Click [OK] to complete.
14
(3) Please select the Destination Projector from the list,
and select the Store No. (1~4) from the left below
box.
(4) Click [Send]
Transmission starts.
Following messages can appear in the Status
column:
Sending
Completed
Send error
Illegal Request
Processing
:
:
:
:
:
File Size Over
Other error
Cancel
Illegal data
:
:
:
:
Transmitting the file
Transmission succeeded
Transmission failed
Request is unauthorized
The projector is processing
the image.
File size is over
Other Error Occurred
Transmission is canceled
Projector’s set authentication but application doesn’t.
(5) If “Completed” appeared in Status term, the
transmission is completed.
(6) Click [Close] and finish the “Send” screen.
[Note]
Please put a different name on image file for every Store No. If the names are the same, the transmission will fail
in some cases.
If file transmission failed, please confirm the projector and application’s authentication setting and password.
15
3.12 About this Application
To show the software version, please select
[Help]
[About Projector Image Tool], or click
.
16
4 Limitations
・ The maximum file size is shown as follows.
Less than equal 130,816byte
・ In some case the Projector Menu moves slowly during the Image Transmission.
・ The time for the Transmission complete differs according the Projector’s processing situation.
17