1
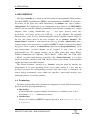
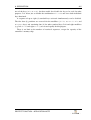
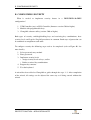
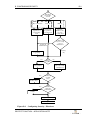
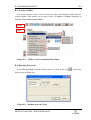
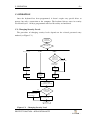
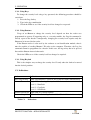
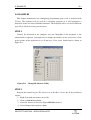
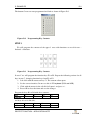
PROTECT FUNCTION A Security Feature APPLICATION NOTE Tipro USB Controllers ProtectFunction_AN_V2.doc Version 02 November 17, 2009 TABLE OF CONTENTS II TABLE OF CONTENTS A. DESCRIPTION.............................................................................................................A-1 A.1. Terminology ..........................................................................................................A-1 A.2. Security Levels......................................................................................................A-2 A.3. Log On ..................................................................................................................A-3 A.4. Passwords ..............................................................................................................A-3 A.4.1. Key Passwords...............................................................................................A-3 A.4.2. ASCII Passwords...........................................................................................A-3 A.5. Log Off..................................................................................................................A-4 A.6. Disabling Keys ......................................................................................................A-4 A.7. Restricting Key Combinations ..............................................................................A-4 B. CONFIGURING SECURITY....................................................................................... B-1 B.1. Security Toolbar .................................................................................................... B-3 B.2. Entering Passwords ............................................................................................... B-3 B.2.1. Key Passwords............................................................................................... B-5 B.2.2. ASCII Passwords ........................................................................................... B-5 B.3. Log On – Log Off.................................................................................................. B-6 B.4. Assigning Security Levels..................................................................................... B-6 B.5. Restricting Key Combinations .............................................................................. B-7 C. OPERATION ................................................................................................................ C-1 C.1. Changing Security Levels ..................................................................................... C-1 C.1.1. Using Keys..................................................................................................... C-2 C.1.2. Using iButtons ............................................................................................... C-2 C.1.3. Using Keylock ............................................................................................... C-2 C.2. Indications ............................................................................................................. C-2 D. EXAMPLES .................................................................................................................D-1 E. REFERENCES.............................................................................................................. E-1 F. NOTICES .......................................................................................................................F-1 F.1. Disclaimer ...............................................................................................................F-1 F.2. Copyright Notice.....................................................................................................F-1 PROTECT FUNCTION – APPLICATION NOTE A. DESCRIPTION A-1 A. DESCRIPTION The Tipro controller is a central part of all modular and programmable Tipro products: keyboards (FREE), touchmonitors (FREE+) and touchcomputers (BeFREE). It represents a bus master on the Tipro bus which interconnects all modules (bus slaves) within a configuration. The configuration is any composition of up to fourteen (14) FREE/FREE+ modules and one controller. Modules perform their basic functions (scanning keys, reading magnetic cards, reading identification tags, …) and report detected events (key press/release, card swipe, presence of an ID tag, …) to the controller. The controller interprets these events in a way defined/configured (using ChangeMe software utility) by the user and reports them to the host computer via its primary interface. The interpretation is normally a conversion of an event (e.g. pressing a physical key) into a sequence of key codes generated by a standard QWERTY computer keyboard by multiple key presses. Such a sequence of standard keys represents one programmable key. Up to four interpretations (so-called layers) can be assigned to each event, i.e. each programmable key. The primary interface can be USB, and/or PS/2 and/or RS232. Standard combinations are “USB only”, “PS/2 + RS232”, “USB + PS/2” and “USB + PS/2 + RS232” (so-called Omni-Interface Controller). The “Protect Function” is a security feature of all Tipro controllers with USB interface. Some recent variants of the controller support the feature also at PS/2 interface. The “Protect Function” (referred to as “Security” from this point on) modifies the interpretation of an event depending on the access rights granted to a user who has previously presented the corresponding password. Once the security is configured, all related settings permanently reside within the controller’s non-volatile memory, thus making the product “secured by hardware”. A.1. Terminology For better understanding of this document it is important to clearly differentiate between physical, standard and programmable keys. ♦ Physical key A keyswitch inside a keyboard module described by its coordinates (row: A, B, C, … and column: 1, 2, 3, …) within the key matrix. ♦ Standard key Any key in a standard QWERTY computer keyboard, such as Control, Tab, F1, S, 5, Delete, … PROTECT FUNCTION – APPLICATION NOTE A. DESCRIPTION A-2 ♦ Programmable key A sequence of standard keys (also referred to as content) sent to the computer when a physical key is activated The security is a possibility to supervise output of the controller. The supervision is performed in two ways: by disabling or enabling particular physical keys entirely or by restricting certain contents (i.e. sequences of standard keys). Different security levels, accessed by respective passwords, provide different access rights/levels. A.2. Security Levels USB controllers support up to four security levels, from Level 0 to Level 3. Level 0 is the default level (after a reset or power-on) with the lowest access rights and without a password protection. The higher the security level the more access rights are granted to the user. Consequently, higher security levels have more keys enabled and less restricted contents than the lower levels. Security levels and layers represent two different and independent properties of a programmable key and can be therefore represented as a two-dimensional matrix. Each programmable key can have up to four (4) different contents, one per layer. Layers are accessed by pressing a key with ShiftToLayer or LockToLayer content. Security levels are accessed by presenting respective passwords. Each security level can have its own default layer assigned to. Figure A.1 An Illustration of Security Levels PROTECT FUNCTION – APPLICATION NOTE A. DESCRIPTION A-3 A.3. Log On In order to change the security level, the user needs to log on and enter a password. The password is typically entered from the keyboard by pressing a number of physical keys in an exact order, but can also be activated from a Keylock module (by turning the lock into respective position) or an iButton reader (by inserting the iButton with respective identification number). The Log On Procedure starts with a notification to the controller that a password is to be entered. For that purpose one of the keys needs to be programmed with a special content to operate as Log On Key. Alternatively, with keylock module or iButton reader, the log on command can be a part of the programmable header. After an activation of the log on key, the LED indicators (NumLock, CapsLock and ScrollLock) start blinking simultaneously to acknowledge the action. The controller expects a password to be entered. If the password was correct, one of the LEDs blinks (several times) to confirm the new security level: ♦ NumLock LED for security level 1 ♦ CapsLock LED for security level 2 ♦ ScrollLock LED for security level 3 If the password was not entered within a certain timeframe or if it was incorrect, the LEDs blink one after another in a circular fashion and the security level does not change. A.4. Passwords There are two basic types of passwords: Key passwords and ASCII passwords. Key passwords are used when a keyboard module or a keylock is the input device. ASCII passwords are used in combination with an iButton reader. Each security level can have more than one password (providing for more users with equal access rights) while the same password can not be used twice (for different security levels). The total number of all passwords is limited to forty eight (48). A.4.1. Key Passwords The Key Password is a series of physical keys to be activated orderly. The actual content of the key is not relevant, but rather its physical position in the keyboard module. The length of key passwords is selectable between one (1) and eight (8) physical keys. A.4.2. ASCII Passwords The ASCII Password is a string of characters. The length is user definable between one (1) and fifteen (15) characters. In case of an iButton the string is exactly the iButton’s 12character unique identification number. PROTECT FUNCTION – APPLICATION NOTE A. DESCRIPTION A-4 A.5. Log Off The Log Off is reverting to the Level 0, the default level with the lowest access rights. It is activated automatically (auto-restore feature) after a time out period. The period is user configurable, in minutes. Selecting zero value disables the auto-restore feature. Alternatively, the log off procedure can be started manually at any time by pressing a key programmed with a special content to operate as Log Off Key. A.6. Disabling Keys Each physical key may have a security level assigned to. This is the level from which the key is enabled. By default this security level is 0, what means the key is always enabled. Only the keys with a security level equal or lower than the current level are enabled. For instance, a key with security level 2 is disabled in Level 0 and Level 1, and enabled in Level 2 and Level 3. For a disabled key when pressed, the respective content is not sent to the computer. Nevertheless, such a key can still be used for a password entry. A.7. Restricting Key Combinations Besides enabling/disabling individual physical keys, the other aspect of the Security is to restrict certain contents. Effectively this is reduced to suppression of certain combinations of standard keys while keeping each of the keys individually active. Restricted key combination: CTRL + ALT + DEL Figure A.2 CTRL + ALT + A CTRL + SHIFT + DEL CTRL + ALT + DEL An Example of Restricted Key Combination For instance, in Windows, the key combination Alt+Tab switches between applications. If a user is to be prevented from doing this, one way to achieve it is to disable PROTECT FUNCTION – APPLICATION NOTE A. DESCRIPTION A-5 one of the keys (Alt or Tab), but that would also disable the key to be used for other purposes. It is better just to disable the combination Alt+Tab and leave both individual keys functional. A sequence of up to eight (8) standard keys activated simultaneously can be disabled. The first four (4) positions are reserved for the modifiers (Shift, Control, Alt and Windows keys) and remaining four (4) for other standard keys. Left and right modifiers (e.g. left Shift and right Shift) are treated equally for this purpose. There is no limit to the number of restricted sequences, except the capacity of the controller’s memory chip. PROTECT FUNCTION – APPLICATION NOTE B. CONFIGURING SECURITY B-1 B. CONFIGURING SECURITY What is needed to implement security feature in a FREE/FREE+/BeFREE configuration? 1. USB Controller (any) or PS/2 Controller (firmware version 5.0.0 or higher) 2. Module with programmable keys 3. ChangeMe software utility (version 5.0.0 or higher) Both types of security, enabling/disabling keys and restricting key combinations, have security levels and Log On / Log Off procedures in common. Both ways of protection can be combined to complement each other. To configure security the following steps need to be completed (refer to Figure B.1 for more details): 1. Select password entry method 2. Enter passwords 3. Implement security levels • Assign security levels to keys, and/or • Define restricted key combinations 4. Program key contents 5. Test the keyboard A wizard has been added to ChangeMe to guide through the steps 1 - 3. After completion of the wizard, all settings can be adjusted the same way as if being entered without the wizard. PROTECT FUNCTION – APPLICATION NOTE B. CONFIGURING SECURITY B-2 Key combination Record the key sequences for each security level Keylock iButton Assign each key position to a security level Enter the iButton codes for each security level Is iButton used only for security or also for identification? Security & Identification Security only Define one key as Log On key Yes Manual Log Off? No Set an inactivity timeout for each security level Define one key as Log Off key Yes Disable keys in certain levels? Assign security levels to keys No Yes Enter restricted contents Disable certain key combinations? No Program key contents Update Figure B.1 ASCII password Key password How will the password be entered? Configuring Security – Flowchart PROTECT FUNCTION – APPLICATION NOTE B. CONFIGURING SECURITY B-3 B.1. Security Toolbar All security features can be accessed from the menu item Security and/or from the security toolbar. This toolbar can be made visible via Options→Toolbars→Security, or Security→Show/Hide Security toolbar. Toolbar Menu Figure B.2 Toolbar and Corresponding Menu Items B.2. Entering Passwords Select Edit passwords from the Security menu, or click on the icon dialog shown in Figure B.3. Figure B.3 Defining Password Type PROTECT FUNCTION – APPLICATION NOTE , to open the B. CONFIGURING SECURITY B-4 Firstly, one password entry method should be selected amongst the following three choices: 1. pressing a sequence of keys, like a PIN code for example 2. turning the keylock into a certain position 3. placing an iButton into the reader The first two are implemented as Key passwords, the last one as ASCII password. Select the appropriate password type in the dropdown box and set the length of the password. The maximal length for a key password is eight (8) physical keys. After pressing Set, the other options become visible. All settings and passwords will be erased when the Password type or the Password length is changed! The next step is to define General security settings as shown in Figure B.4 below. 1. Success sequences for each security level are sent to the computer upon successful Log On, to notify the application software. If Log On failed, the Fail sequence is sent. 2. When a wrong password is entered, the Fail sequence is sent. 1 5 2 4 3 Figure B.4 General Security Settings 3. After a restore, either manually by Log Off or automatically because of inactivity timeout, the Restore sequence is sent. These (1, 2 and 3) entire fields can be left empty, so nothing is sent upon associated events. 4. For each security level a default layer (i.e. Destination Layer) can be set. PROTECT FUNCTION – APPLICATION NOTE B. CONFIGURING SECURITY B-5 5. The last column defines the inactivity timeout after which the controller reverts to the Level 0 (auto-restore feature). A timeout of 0 (default) means no auto-restore ever occurs. B.2.1. Key Passwords The easiest way of entering passwords is to record the key presses. Push the Record button on the toolbar and then press the keys for the password. Figure B.5 Recording Key Passwords Press Add to update the password list, press Stop to return to the password form. Key passwords can be edited. M1:A1 means: Module 1, Key A1. Play shows a simulation of the selected password. B.2.2. ASCII Passwords Enter ASCII passwords by typing the password in the edit field. Press the Add button to add the password to the list. PROTECT FUNCTION – APPLICATION NOTE B. CONFIGURING SECURITY Figure B.6 B-6 Entering ASCII Passwords Tip: Use the wizard to enter passwords for iButtons. The wizard can record the passwords directly from the iButton. B.3. Log On – Log Off To program a key as Log On key, simply choose Set LOGON key from the menu or toolbar . Click on the key you want to be the Log On key. Only single keys can be defined as Log On or Log Off keys, and as such can not be used for any other purpose (e.g. as normal content keys). The procedure is the same for the Log Off key. Note: If the wizard has been used to enter passwords for the iButton, there is no need to set a Log On key. This has already been programmed in the iButton’s header. B.4. Assigning Security Levels Make sure that the security levels are visible on the keys. (Security→View→View security levels, or ). Select the level to be assigned by pressing one of on the toolbar. The cursor changes to indicate the level being set. Now PROTECT FUNCTION – APPLICATION NOTE B. CONFIGURING SECURITY B-7 select the keys to be enabled in this security level. Remember that keys are enabled not only in the assigned security level, but also in the higher levels. Figure B.7 Assigning Security Levels B.5. Restricting Key Combinations Choose menu Security→Protected key combinations, or from the toolbar. Enter the sequence you want to restrict. The sequence can be a combination of up to eight (8) keys pressed at the same time, the first up to four (4) of them being modifiers . In the given example (see Figure B.8), the combination of any Ctrl and any Alt and Delete can not be sent to the system, when the security level is lower than Level 3. Contents are restricted up to the designated security level. If content is disabled in the security level 3, it is always disabled. Figure B.8 Entering Restricted Contents PROTECT FUNCTION – APPLICATION NOTE C. OPERATION C-1 C. OPERATION Once the keyboard has been programmed, it doesn’t require any special driver to operate, but only a connection to the computer. The keyboard always starts in security level 0 and layer 1. All keys programmed with level 0 security are functional. C.1. Changing Security Levels The procedure of changing security levels depends on the selected password entry method (see Figure C.1). Changing security level Password entry method? Key password Keylock iButton iButton is identification & security or just security device? Identification and Security Press LogOn key Type in password Press LogOn key Turn key to desired position Place iButton Controller checks password with programmed passwords No Password matches with one in list? Indicate FAILED status, security level doesn’t change Yes Activate and indicate new security level Finished Figure C.1 Changing Security Level PROTECT FUNCTION – APPLICATION NOTE Security only C. OPERATION C-2 C.1.1. Using Keys To change the security level using a key password, the following procedure should be carried out: 1. Press the Log On key 2. Type in the key combination 3. Check the LEDs to see if the security level has changed as requested C.1.2. Using iButtons Usage of an iButton to change the security level depends on how the reader was programmed to operate. If operating only as a security module, the Log On command is already a part of the header. Consequently, changing the security level requires only the iButton to be inserted in the reader. If the iButton reader is also used by the software as an identification module, then it must be capable of sending iButtons’ ID codes to the computer. Therefore, the Log On command cannot be programmed as a header. In this case, the log on key has to be pressed first and the iButton inserted afterwards. Check the LEDs to see if the security level has changed as required. C.1.3. Using Keylock This is the simplest way to change the security level. It only takes the lock to be turned into the desired position. C.2. Indications Action Indication Press Log On Key LEDs for NumLock, CapsLock and ScrollLock blink simultaneously Correct Password Single LED indicating security level blinks several times: Level 1 – NumLock Level 2 – CapsLock Level 3 – ScrollLock Incorrect Password LEDs blink in a circular fashion Restore / Log Off Table C.1 LEDs for NumLock, CapsLock and ScrollLock blink simultaneously Indications PROTECT FUNCTION – APPLICATION NOTE D. EXAMPLES D-1 D. EXAMPLES This chapter demonstrates the configuring/ programming process for a keyboard with 32 keys. The keyboard will be used for a calculator program, so it will incorporate a numerical layout and some additional functions. The keyboard will be secured in different ways. Keys will be used for password entry. STEP 1 Connect the keyboard to the computer and run ChangeMe (if the keyboard is not automatically recognized, you might need to change the interface to the correct one). Click on the picture of the keyboard to see all the keys. Your screen should look as shown in Figure D.1. Figure D.1 ChangeMe Software Utility STEP 2 Program the numerical part. The easiest way to do this is to use one of the predefined layouts. 1. Right click with your mouse on key D1 2. Choose Load default content 3. If needed, browse to directory \Tipro\MID40\Predefined 4. Select Numpad.mtx and press Open PROTECT FUNCTION – APPLICATION NOTE D. EXAMPLES D-2 The bottom 5 rows are now programmed and look as shown in Figure D.2. Figure D.2 Programming Key Contents STEP 3 We will program the contents of the upper 3 rows with functions we need for our – fictional - calculator. Figure D.3 Programming Key Contents In row C we will program the function keys F1 to F4. Repeat the following actions for all keys in row C, changing function keys from F1 to F4 1. Left click with the mouse on key C1. The content editor opens 2. Set the correct interface. In our case this is PC keyboard (PS/2 and USB) 3. Click with the mouse in the edit field of Layer 1 and press F1. 4. Press OK to close the form and save the changes Program the keys B1 to B4 with these contents: key: contents B1 Ctrl+C B2 Ctrl+V B3 Tab and keys A1 to A3 like this: key: contents A1 Ctrl A2 Alt A3 Win PROTECT FUNCTION – APPLICATION NOTE B4 Esc D. EXAMPLES D-3 STEP 4 Program the LogOn key. Make sure the security toolbar is shown (Menu: Security→Show security toolbar). Select the set Log On key button , and click on the upper right key, A4 to set it to Log On key. Figure D.4 Log On Key STEP 5 Assign security levels to the keys. The whole numerical part will be accessible for anyone, so we can leave it to the default Level 0. The keys in row B will be accessible from Level 1, the function keys from Level 2. Keys A1 and A2, Ctrl and Alt, will be enabled in Level 2, A3, the Windows key, will be enabled in security level 3. Figure D.5 Assigning Security Levels To accomplish this, we need to select the button Set keys to security level 1 from the toolbar. Click on all keys in row B to set them to security level 1. Repeat this step for PROTECT FUNCTION – APPLICATION NOTE D. EXAMPLES D-4 security level 2 and row C, and security level 3 and row A. The result is shown in the Figure D.5. Tip: To enlarge the symbols for security levels on the keys, hide the key types, by clicking button . STEP 6 Program restricted combinations. Certain key combination will be restricted, especially the ones that interact with Windows. The Windows key is already disabled till level 3, so just the administrator can reach the start menu. Because the key combination Ctrl+Esc has the same effect as the Windows key, we will disable this combination. Only in Level 3, the administrator level, it will be enabled. 1. Open the protected sequences form, by clicking on the toolbar 2. Select the Control modifier 3. Go with the mouse to the sequences edit field and press Esc 4. Select Disabled in Level 2 5. Press Add Figure D.6 Restricting Key Combinations PROTECT FUNCTION – APPLICATION NOTE D. EXAMPLES D-5 Repeat this for the combinations Alt+Tab (switch applications in Windows) and Ctrl+F4 (Close application). Last but not least, we will disable the combination Ctrl+Alt+Del, which gives access to the task manager in Windows. Select the modifiers Ctrl and Alt, press Del as sequence and disable this combination till level 2. Finally, press OK to close the window. STEP 7 General security settings. Press on the toolbar. This opens the password form. Since we will type in our passwords, we have to choose Key passwords from the dropdown box. We will use a length of 4. After pressing Set, the general security settings appear. Figure D.7 General Security Settings In this case we will not send anything to the system when the security level changes or when the password is wrong. We will change the Timeout for security level 1 & 2 to 5 minutes, and for level 3 to 1 minute. After these periods of inactivity the keyboard will return to security level 0. STEP 8 Program passwords. PROTECT FUNCTION – APPLICATION NOTE D. EXAMPLES D-6 1. Click on the tab Level1 to open the password editor for security level 1. Figure D.8 Recording Passwords 2. Press the Record button and press the following keys, one after another: E1, E2, F1, F2. 3. Press the Add button, to add this password to Level 1 4. Repeat the steps above for the second and third password. We will program the following passwords for this level: password order of keys to press 7845 E1, E2, F1, F2 4512 F1, F2, G1, G2 8956 E2, E3, F2, F3 5. Press the Stop button to return to the password form. Figure D.9 Level 1 Passwords 6. Repeat the actions above for Level 2, with the passwords PROTECT FUNCTION – APPLICATION NOTE D. EXAMPLES D-7 password order of keys to press 7182 E1, G1, E2, G2 7193 E1, G1, E3, G3 7. Repeat the actions above for the password for the highest security level with password password order of keys to press 8246 E2, G2, F1, F3 8. Press OK to close the password edit form Note: LogOn/LogOff and keys used for passwords can only be single-sized keys. With our NumPad layout, we cannot use 0, + or Enter in a password. STEP 9 Save the layout and program it into the keyboard (Update). Programming Figure D.10 Programming Keyboard STEP 10 Test the security. Open the text window in ChangeMe (Menu: Tools→Text Window, or press F5). By default the keyboard starts in security level 0, so just the NumPad keys should work now. Try some function keys or the windows key on the upper row. None of these keys should work. Now we will go to security level 1: PROTECT FUNCTION – APPLICATION NOTE D. EXAMPLES D-8 1. Press the Log On key (upper right corner). The 3 LEDs should start blinking. 2. Enter one of the passwords for level 1, for instance: 7845 3. If we programmed everything correctly, and also typed in the correct password, the LED for NumLock (the “1”) will blink 10 times to show that we are in security level 1 Try the Copy, Paste and Tab key. Select some text with your mouse, press Copy and then Paste. This should work now. The function keys on row 3 still don’t work. Go to level 2. Press F1. The Help should come up. The Windows key still doesn’t work. Switch NumLock off, try the combination Ctrl+Alt+Del (Keys A1, A2 and H3 together), nothing should happen because we restricted this key combination. Now switch to the highest security level. All keys should function. Try to enter the Windows Start menu by pressing the Win key. Alt+Tab should switch the application, Ctrl+Alt+Del will open the task manager. PROTECT FUNCTION – APPLICATION NOTE E. REFERENCES E. REFERENCES 1. “ChangeMe” – User’s Manual PROTECT FUNCTION – APPLICATION NOTE E-1 F. NOTICES F-1 F. NOTICES F.1. Disclaimer Information furnished by Tipro is believed to be accurate and reliable. However, Tipro makes no representations or warranties regarding the accuracy or completeness of the contents of this document and reserves the right to make changes to specifications and product descriptions at any time without notice. F.2. Copyright Notice 2003-2009 Tipro. All rights reserved. Trademarks and registered trademarks are the property of their respective owners. PROTECT FUNCTION – APPLICATION NOTE