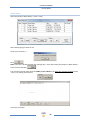
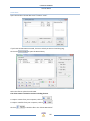
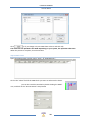
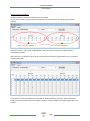
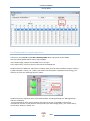
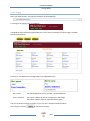
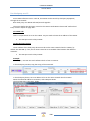
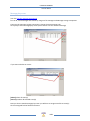
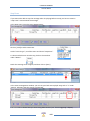
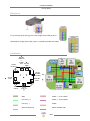
1
ATEIS INTERNATIONAL LAPG2 MANUAL Full instruction guide for the Linked Audio Processor Generation 2 Ateïs International 13/4/2010 Version : EN.12 LAPG2G2 MANUAL Version EN.12 CONTENTS INTRODUCTION ................................................................................................................................. 7 WELCOME ..................................................................................................................................... 7 PRESENTATION ............................................................................................................................. 7 PRODUCTS................................................................................................................................. 7 DEVELOPMENT.......................................................................................................................... 7 ATEÏS Field of applications ............................................................................................................ 8 LAPG2 G2 PRESENTATION................................................................................................................. 8 INSTALLATION ................................................................................................................................... 9 SYSTEM OVERVIEW ......................................................................................................................... 10 MACHINE..................................................................................................................................... 10 AUDIO ......................................................................................................................................... 10 NETWORKING ............................................................................................................................. 10 SYSTEM CONFIGURATION ........................................................................................................... 11 PRESET MANAGEMENT............................................................................................................... 11 SYSTEM CONTROL ....................................................................................................................... 11 CONNECTION .............................................................................................................................. 11 COMPONENTS............................................................................................................................. 12 SYSTEM ....................................................................................................................................... 12 MONITOR (custom designable graphical user environment) ..................................................... 12 OFFLINE PROGRAMMING ........................................................................................................... 12 EASY OPERATION ........................................................................................................................ 12 ADDITIONAL FEATURES............................................................................................................... 12 SCHEDULER ................................................................................................................................. 12 MESSAGE PLAYER........................................................................................................................ 12 FOR YOUR SAFETY ........................................................................................................................... 13 CONTACTS ....................................................................................................................................... 14 HARDWARE DESCRIPTION .............................................................................................................. 15 FRONT PANEL .............................................................................................................................. 15 1) AUDIO section ............................................................................................................... 15 2) STATUS LEDs .................................................................................................................. 16 3) SCREEN .......................................................................................................................... 16 4) KNOB.............................................................................................................................. 17 REAR PANEL ................................................................................................................................ 18 1) POWER SECTION ................................................................................................................. 18 2) 24 V POWER SUPPLY (BACKUP) CONNECTORS ................................................................... 18 3) RS485 CONNECTORS ........................................................................................................... 18 4) Ateïs Network Slot .............................................................................................................. 19 5) RS232 CONNECTOR............................................................................................................. 20 6) ETHERNET (RJ45) CONNECTOR ........................................................................................... 21 7) CONTROL INPUT CONECTORS............................................................................................. 21 8) RELAY CONNECTORS ........................................................................................................... 22 9) LOGIC OUTPUTS CONNECTORS .......................................................................................... 22 10) AUDIO INPUT/OUTPUT CONNECTOR ............................................................................... 23 SYSTEM INSTALLATION ................................................................................................................... 23 SOFTWARE GENERALITIES .......................................................................................................... 23 SYSTEM REQUIREMENTS ............................................................................................................ 23 SOFTWARE INSTALLATION .......................................................................................................... 24 ACCESS / PASSWORD .................................................................................................................. 25 UPDATE LAPG2 SOFTWARE AND FIRMWARE ................................................................................. 26 2 LAPG2G2 MANUAL Version EN.12 PREPARATIONS ........................................................................................................................... 26 1. Get Recent Software from the WWW ................................................................................ 26 2. Remove Older Version ........................................................................................................ 26 Install New Version ..................................................................................................................... 26 FIRMWARE UPDATE .................................................................................................................... 26 ADDITIONAL DEVICES FOR LAPG2 SYSTEM ..................................................................................... 27 URC (LINKED REMOTE CONTROL) ............................................................................................... 27 PPM ............................................................................................................................................. 27 PPM- SP (stacking paging)........................................................................................................... 27 RAC (REMOTE ACCESS CONTROL) ............................................................................................... 28 JB (JUNCTION BOX) ..................................................................................................................... 28 SOFTWARE PRESENTATION ............................................................................................................ 29 General View............................................................................................................................... 29 TITLE BAR .................................................................................................................................... 30 MAIN MENU BAR ........................................................................................................................ 30 File ........................................................................................................................................... 30 Edit .......................................................................................................................................... 33 View ........................................................................................................................................ 35 User ......................................................................................................................................... 45 User Management ....................................................... 46 ID Management ........................................................... 46 Compile ................................................................................................................................... 47 Operation ................................................................................................................................ 47 Tools ........................................................................................................................................ 48 Lock ......................................................................................................................................... 56 Window ................................................................................................................................... 57 Help ......................................................................................................................................... 57 Start a project (basics and generalities) ......................................................................................... 59 Generalities (software philosophy)............................................................................................. 59 1) Prepare your new project ....................................................................................................... 60 2) Define which hardware is used in your project ...................................................................... 60 3) Define control inputs as TTL (logic) or Analogue Inputs ......................................................... 62 TTL and Groups ....................................................................................................................... 63 4) Create audio signal path ......................................................................................................... 64 5) Assignation philosophy (choose which adjustments will be piloted by what) ....................... 65 Right click on a LED of a parameters of a component ............................................................ 65 Right click on a Logic button of a parameters of a component .............................................. 65 Right click on a analogical button of a parameters of a component ...................................... 66 How to… .......................................................................................................................................... 68 Connect PC to LAPG2 .................................................................................................................. 68 Generalities ............................................................................................................................. 68 Ethernet connection ............................................................................................................... 68 LAPG2 system connection ...................................................................................................... 72 Change IP address of LAPG2 ....................................................................................................... 72 Create a system with several LAPG2 in the NETWORK .............................................................. 73 Check LAPG2 version .................................................................................................................. 74 Updating Software LAPG2/URC/PPM firmware version............................................................. 75 Update DSP ............................................................................................................................. 75 Update MCU ........................................................................................................................... 75 Update URC............................................................................................................................. 76 3 LAPG2G2 MANUAL Version EN.12 Update PPM ............................................................................................................................ 76 Upload (Store) a design file into LAPG2 ...................................................................................... 77 Adjust Time / Date ...................................................................................................................... 78 Adjust Time/Date with NTP ........................................................................................................ 79 Create new Users and assign specific rights ............................................................................... 80 Use the Virtual window (Create Virtual control) ........................................................................ 81 Use the Monitor window ............................................................................................................ 82 Use the monitor window in auto-logon...................................................................................... 84 Use Master Preset /Sub Preset ................................................................................................... 88 Master preset.......................................................................................................................... 88 Sub Preset ............................................................................................................................... 88 Use a PPM ................................................................................................................................... 90 Connect PPM........................................................................................................................... 90 Define system with PPM ......................................................................................................... 91 Search and set PPM ................................................................................................................ 91 Adjust PPM parameter............................................................................................................ 93 Rear PPM adjustments............................................................................................................ 94 Assign chime to PPM............................................................................................................... 94 Create paging of PPM with NPC.............................................................................................. 98 Use PPM KeypadG2 to trig Message Events ......................................................................... 101 Use PPMTouch .......................................................................................................................... 103 Define the PPMTouch in the LAPg2 software ....................................................................... 104 Setup the PPMTouch ............................................................................................................ 105 Define Paging ........................................................................................................................ 106 Define Messages ................................................................................................................... 107 Define Control ....................................................................................................................... 107 Use an URC................................................................................................................................ 112 Connect URC ......................................................................................................................... 112 Define the system with URC ................................................................................................. 112 Search and set URC ............................................................................................................... 113 Define and adjust URC’s parameters .................................................................................... 115 Global Parameters tab .......................................................................................................... 117 Sub Preset and Parameters tab ............................................................................................ 119 Sub-Preset ............................................................................................................................. 121 Element Control .................................................................................................................... 123 Assign adjustments ............................................................................................................... 123 Set adjustments .................................................................................................................... 124 Protect the access to URC with Password ............................................................................ 126 Use Control inputs .................................................................................................................... 127 Analogue ............................................................................................................................... 127 Logic inputs ........................................................................................................................... 128 Logic inputs in binary mode (group, only for selector component) ..................................... 128 Use Control Inputs to trig Events (as messages)................................................................... 130 Use Logic Output....................................................................................................................... 131 Use Third party Control............................................................................................................. 132 Read Value ............................................................................................................................ 133 Checksum calculation ........................................................................................................... 134 Set Third party control parameters ...................................................................................... 134 Use third party over IP .............................................................................................................. 135 Use Events (Element adjustment, Master-Preset, Sub-Preset) ................................................ 137 Event Triggering .................................................................................................................... 137 4 LAPG2G2 MANUAL Version EN.12 Events types .......................................................................................................................... 137 Change master preset ........................................................................................................... 138 Change Sub Preset ................................................................................................................ 138 Element adjustment.............................................................................................................. 138 Set TTL-Out ........................................................................................................................... 140 Stop event ............................................................................................................................. 141 Message play event .............................................................................................................. 142 Use Third Party to trig Events (as messages) ............................................................................ 145 Use Scheduler to trig Events (as messages).............................................................................. 146 Occurrence field .................................................................................................................... 147 Event list................................................................................................................................ 147 Event control ......................................................................................................................... 147 Use the Message player component ........................................................................................ 149 LAPG2 Messages Management ........................................................................................... 150 Message play Event .............................................................................................................. 151 Stop Event ............................................................................................................................. 154 Store message into LAPG2 .................................................................................................... 155 Recover wave file from LAPG2 .............................................................................................. 156 Play message from LAPG2 .................................................................................................... 156 Use the Auto Noise Gain Component (A.N.G) .......................................................................... 157 Procedure to set the ANG ..................................................................................................... 157 Use the A.N.G ........................................................................................................................ 159 NSM Sensing Microphone..................................................................................................... 161 Use the Ducker Component ...................................................................................................... 163 Remote Devices Hardware Connections ...................................................................................... 164 Connection example for one PPM with JB................................................................................ 165 Connection example for several PPMs with JB ......................................................................... 166 Connection example for several PPM with and without JB...................................................... 167 Rj45 pin out ............................................................................................................................... 168 Junction Box .............................................................................................................................. 168 Connect JB to LAPG2 ............................................................................................................. 170 Connect URC LAPG2 with JB ................................................................................................. 170 Connect URC to LAPG2 ......................................................................................................... 170 Connect PPM to JB ................................................................................................................ 171 Connect PPM to LAPG2 ......................................................................................................... 171 Connect RAC ............................................................................................................................. 171 Audio component description ...................................................................................................... 172 Input .......................................................................................................................................... 172 Output ....................................................................................................................................... 174 Mixer ......................................................................................................................................... 175 Matrix Mixer ......................................................................................................................... 175 Standard Mixer ..................................................................................................................... 177 AutoMixer ............................................................................................................................. 178 Compressor/Limiter/Expander ................................................................................................. 181 Limiter ....................................................................................................................................... 181 Compressor ........................................................................................................................... 183 Expander ................................................................................................................................... 185 Comp-Limiter ........................................................................................................................ 186 Equalizer................................................................................................................................ 186 PEQ ........................................................................................................................................ 187 GEQ ....................................................................................................................................... 188 5 LAPG2G2 MANUAL Version EN.12 Delay ......................................................................................................................................... 189 Delay (basics) ........................................................................................................................ 189 Delay (advanced) .................................................................................................................. 190 Gate........................................................................................................................................... 191 Gate Voice ............................................................................................................................. 191 Gate Mono ............................................................................................................................ 192 Gate With Sidechain ............................................................................................................. 193 Gate Stereo ........................................................................................................................... 194 AGC ........................................................................................................................................... 195 Inverter ..................................................................................................................................... 197 Filter .......................................................................................................................................... 197 High or Low Pass ................................................................................................................... 198 Band Pass .............................................................................................................................. 199 Band Stop .............................................................................................................................. 200 Notch filter ............................................................................................................................ 201 Shelving filter ........................................................................................................................ 202 All Pass filters ........................................................................................................................ 203 Cross over ............................................................................................................................. 204 Feedback ................................................................................................................................... 205 Network input and Network output ......................................................................................... 206 Page control .............................................................................................................................. 207 S/W Page control .................................................................................................................. 207 NPC........................................................................................................................................ 210 Selector ..................................................................................................................................... 211 Ducker ....................................................................................................................................... 211 Noise generator ........................................................................................................................ 213 White noise generator .......................................................................................................... 213 Pink noise generator ............................................................................................................. 214 Tone generator ..................................................................................................................... 215 Meter ........................................................................................................................................ 216 Level control ............................................................................................................................. 217 Auto Noise Gain ........................................................................................................................ 218 Message Player ......................................................................................................................... 220 6 LAPG2G2 MANUAL Version EN.12 INTRODUCTION WELCOME Thank you for choosing ATEÏS LAPG2. We (at ATEÏS) hope you will enjoy using this exciting piece of technology as much as we enjoy developing and building it. This manual version is: EN.12 This file has been written with the LAPG2 software version: V1.0.0.34 This manual can be updated at any time without prior notice in order to keep this manual up to date. In case of errors in this manual or not clear process description, feel free to submit us mistakes, suggestions or questions by sending an email: [email protected] subject: LAPG2 manual corrections. This document intends to be a complete manual and we hope that this will provide you all information or answers needed. However if you have any questions, feel free to contact us. PRESENTATION ATEÏS is a leading supplier of high-quality PA/VA audio equipment with distributors and subsidiaries in 23 countries throughout Europe, States, Middle East and Asia. Since 1981 we are manufacturing reliable and high quality loudspeakers, amplifiers, security matrices and other audio components. Our products are manufactured to IS0 9001 standards and, when possible, meet local requirements. With more than twenty years of experience, ATEÏS has quickly established itself as a leading manufacturer of Public Address, Voice Alarm systems and counter intercoms. The constant growth of market share in Europe provides confirmation of the quality of ATEÏS’s commercial and technical approach. PRODUCTS The company now offers a full range of sound equipment: microphones, preamplifiers, digital processors, digital audio matrixes, loud-speaker monitoring systems, amplifiers, etc. ATEÏS designs and manufactures leading products in the voice alarm systems market which have been certified EN60849 compliant by the TÜV. DEVELOPMENT Thanks to a development team that includes thirty engineers, and to constant investment, we are able to respond quickly to the demands of our various markets with specific solutions and cutting edge technology. We have distributors in more than fifteen countries in Europe and the Middle East, with whom we have carried out major projects. In choosing ATEÏS, you are guaranteed a trustworthy partner that can be counted on for the long term. 7 LAPG2G2 MANUAL Version EN.12 ATEÏS Field of applications ATEÏS's audio systems have been installed into following markets: - Railways - Subways - Airports - High raise buildings - Hotels - Restaurants - Shopping centre and Malls - Theme parks - Places of worship - Stadia - Museums - Industrial buildings - Industrial plants - Commercial buildings LAPG2 G2 PRESENTATION The ATEÏS LAPG288 G2 is the new generation of Linked Audio Processor developed by ATE ÏS. Why Generation 2? Our developers completely re-design the old LAPG2. Now the processor is the state-of-the-art solution to meet almost all requirements of modern sound design in contemporary applications. Designed for Commercial application, the LAPG2 is the new DSP audio Matrix for big paging application and multi zone audio routing. According to its powerful audio numerical signal treatment and its new audio I/O boards, the LAPG2 can easily be used in an exigent environment requiring high audio quality. Thanks to its Ethernet port you can easily connect and pilot the LAPG2 through an IP network or direct from a PC by using RJ-45 connector. LAPG2's programming is done through convivial software based on graphical Windows® design environment. The signal path is defined by adding DSP components (Equalizer, Gate, Compressor, delay...), simply inserted in a clear and easy graphical window by "drag en drop" operation. You can recreate a complex audio system in a simple 1U space machine. Forget the addition of machines that required racks and kilometers of cables in the past. Once programmed, you can pilot your system through PC, VITY, Crestron or AMX. You can also disconnect the PC and the networked devices run as a standalone system; however it can be controlled through a range of controllers (logical TTL Input, logical TTL Output, analogical inputs, RS485 network). Wall mounted source selectors, smart controllers and programmable paging mikes are available. Choose from five LAPG2 hardware configurations, having a different number of in- and outputs, which suits best in a particular point of the network and tie them together by CAT5 cable or optical fiber. The fully redundant ATEÏS-NET forms the backbone of the system. It will deliver 48 channels of crystal clear (48 kHz sampling rate) real time (latency less than 2 ms) audio even in the remotest corner of the site. Four different network cards especially designed for LAPG2 networks are available. 8 LAPG2G2 MANUAL Version EN.12 INSTALLATION RACK MOUNTING If needed, fit the rack mounting brackets to each side of the LAPG2 by using the 6 pcs Phillips M3X screws supplied with the package. SITTING The LAPG2 takes only a single 19’’ rack space and generates little heat itself. Consider leaving enough ventilation space above and below the unit. Do not mount the LAPG2 directly above heat generating devices like power supplies or power amplifiers. LAPG2 cooling is provided by a fan at the left side of the unit. Be sure to not to block the air vent holes along the sides of the housing. Normal operation is ensured within a temperature range between 0°C and 40°C (32 °F to 104 °F). POWER CONNECTION Connect the AC to the mains supply via a power cord. Check your line voltage before plugging in. The power supply of the LAPG2 accepts AC voltages ranging from 100 V to 240 V, 50/60 Hz. The LAPG2 can also be powered up from a 24 VDC supply; i. e. backup battery. 9 LAPG2G2 MANUAL Version EN.12 SYSTEM OVERVIEW MACHINE The LAPG2 is made of: 4 slots of 4 audio channels 16 (0 to 5 VDC) Control inputs either analogue or Logical (contacts) 8 logic outputs (Dry contacts) RS-232 serial interfacing for third party control Ethernet port (RJ-45) TCP/IP based RS-485 for connecting ATEÏS remote devices (URC, PPM-SF) 100 Mbyte memory Message player (Wave format, 16/24/48kHz, 16bits) Ateïs net card: up to 32 units can be networked either via standard CAT5 cable or multimode optical fiber. One microcontroller and two DSPs for standalone operation AUDIO For audio connection the LAPG2 has got 4 audio board slots named A, B, C and D. These slots can take up different audio boards. By now analogue input and analogue output boards are available, each offering 4 channels. Audio boards can be fitted in any combination or be omitted. The LAPG2 currently is available in five different audio board configurations: LAPG216IN: 16 analogue inputs (4 analogue input boards) LAPG212/4: 12 analogue inputs, 4 analogue outputs (3 analogue input boards, 1 analogue output board) LAPG28/8: 8 analogue inputs, 8 analogue outputs (2 analogue input boards, 2 analogue output boards) LAPG24/12: 4 analogue inputs, 12 analogue outputs (1 analogue input board, 3 analogue output boards) LAPG216OUT: 16 analogue outputs (4 analogue output boards) The excellent sonic performance is being achieved by the advanced 24 bit A/D and D/A converters, together with the 48/96 kHz capable audio processing and the 400MHz SIMD SHARC Core, capable of 2.4 GFLOPS peak performance. Every single analogue audio input can be software defined for five different sensitivities (input gain of 0dB, 12dB, 24dB, 40dB or 54dB it means the input device have sensitivities of 0dB, -12dB, -24dB, -40dB or -54dB) and for 48V phantom power operation. This can be set for each single channel and each machine independently. NETWORKING Up to 32 units can be networked either via standard CAT5 cable or multimode optical fibber featuring interconnection of 48 audio channels at 32 bit and control data with a latency of less than 2ms. Four different NET cards are available. The LAPNET cards each have two ports labelled 'A' and 'B', where the 'A' port is the input and the 'B' port goes to the next sub-device in the line. Depending on which network medium is used for the next LAPG2 in the network (cable (CAT5, RJ45 < 100 meters) or optical fibber (ST) < 2 kilometres) you can choose among four different LAPNET cards available: 10 LAPG2G2 MANUAL Version EN.12 LAP NET 1 LAP NET 2 LAP NET 3 LAP NET 4 SYSTEM CONFIGURATION To tell the machine what to do with audio and control signals there is a Windows® based graphical design and operating environment software. With this all-in-one program you build up the network, design signal processing from a huge library of DSP components and apply control sources. In the 'Monitor' part you can choose the parameters that make sense to be edited by the user and create an individual graphic user interface. To keep your design protected from unauthorized altering, there are many password locked user levels. The signal path of the LAPG2 is built from virtual elements called 'Components', providing the functionality of simple preamps, filters, dynamics, delays, or more complex processors like automatic mixers, crossovers or feedback killer. Their control windows hold all the buttons, faders, knobs, meters etc. to set the desired values. After selecting, placing and wiring DSP 'Components', your 'System' will be compiled and sent to the LAPG2 via TCP/IP Ethernet port. PRESET MANAGEMENT The LAPG2 includes two types of presets: Sub-preset: They enable values of multiple parameters of the same design, such as levels, gains, EQ, etc. to be restored either from the PC software, the remote controllers or the control inputs. Master preset: They enable completely different designs to be restored. Application examples for this feature are hotel meeting rooms with removable walls. These 'Master Presets' and 'Sub-Presets' residing in the LAPG2's memory which can be accessed in many ways: PC, Logic inputs, Third party. The maximum numbers of Presets depend of the UAPG2's memory space available. This limitation doesn't depend of the number of linked LAPg2. SYSTEM CONTROL Once a 'System' is stored into the LAPG2s memories, you can disconnect your PC and run it as a standalone audio network. You can control all parameters like 'Channel Level', 'Master Volume' etc. from assignable control sources or from front knob. There is a range of control devices built for the system you can operate. The LAPG2 integrates perfectly into third party control systems like: VITY, AMX, Audacity, Crestron, etc. CONNECTION Audio and control connections are made via Euro-block connectors on the rear panel of the units. 11 LAPG2G2 MANUAL Version EN.12 COMPONENTS Huge library with audio tools for all applications (routing, paging, signal processing, networking, speaker managing, etc) SYSTEM System design by drag & drop DSP design by drag & drop from component library Changeable appearance of the control elements MONITOR (custom designable graphical user environment) Freely designable user interface Import graphics or pictures from .jpeg, .bmp, .ico, .emf or .wmf files Graphic object functions: Resize, alignment, pack, space, order OFFLINE PROGRAMMING Design and editing of 'DSP designs' EASY OPERATION Standard cut, copy and paste commands Contextual menu items Stackable floating docking or sliding control windows Resizable animated sliders, knobs and buttons Values can be typed directly into value fields Edit parameters of EQs or dynamics in graphic curve display. ADDITIONAL FEATURES User-management: Up to 40 users with individual access rights, password protected 3rd Control table, with the addresses (names) and commands of all the control parameters accessible via the RS232 serial port and through TCP/IP. SCHEDULER The scheduler allows planning of events (preset change, message play, close/open TTL out or change component’s adjustments). Up to 128 different schedules can be scheduled. In one schedule you can define up to 100 events. MESSAGE PLAYER The Message player incorporated into the LAPG2 allows you to play any kind of message to be played. Two messages per LAPG2 can be run at a time. With the 100 Mbyte memory, the following storage times are available in WAV format: • Format : 48kHz, 24kHz, 16kHz / 16 bits • • • Up to 53 minutes in 16 bits and 16 kHz sampling rate. Up to 34 minutes in 16 bits and 24 kHz sampling rate. Up to 17 minutes in 16 bits and 48 kHz sampling rate. Caution : The message player cannot be used with the LAPG2 set at 96kHz. The LAPG2 must be set at 48kHz. 12 LAPG2G2 MANUAL Version EN.12 FOR YOUR SAFETY Please follow the instructions in this chapter to get the optimum results from these units. EXCLUSION OF RESPONSIBILITY Manufacturer, importer, or dealer shall not be liable for any incidental damages including personal injury or any other damages caused by improper use or operation of the LAPG2. INTERFERENCE Like all computing devices, the LAPG2 uses high frequency digital circuitry that may cause interference on radio or television equipment placed close to the unit. The best solution for problems like this is to relocate the affected parts. WARNING Do not expose the LAPG2 to extreme temperatures, direct sunlight, humidity, or dust, which could cause fire or electrical shock hazard. Keep away water or other liquids from the LAPG2. Otherwise fire or electrical shock may result. Connect the power cord only to an AC outlet of the type stated in this Owner's Manual or as marked on the unit. Otherwise fire and electrical shock hazard results. When disconnecting the power cord from an AC outlet always grab the plug. Never pull the cord. A damaged power cord is a potential risk of fire and electrical shock hazard. Avoid touching power plugs with wet hands. Doing so is a potential electrical shock hazard. Take care for correct polarity when operating the LAPG2 from a DC power source. Reversed polarity may cause damage to the unit or the batteries. Avoid placing heavy objects on power cords. A damaged power cord is a fire and electrical shock hazard. Do not cut, scratch, bend, twist, pull, or heat the power cord. A damaged power cord is a fire and electrical shock hazard. Ask your ATEÏS dealer for replacement. Turn off the unit immediately, remove the power cord from the AC outlet and consult your ATEÏS dealer in any of the following circumstances: o Smoke, odour, or noise getting out of the unit. o Foreign objects or liquids get inside the LAPG2. o The unit has been dropped or the shell is damaged. o The power cord is damaged. If you continue using the LAPG2, fire and electrical shock may result. Do not drop or insert metallic objects or flammable materials into the unit as this may result in fire and electrical shock. Do not remove the LAPG2 s cover, as there are exposed parts inside carrying high voltages that may cause an electrical shock. Contact your ATEÏS dealer if internal inspection, maintenance, or repair is necessary. Do not try to make any modifications to the LAPG2. This is a potential fire and electrical shock hazard. Avoid the LAPG2’s ventilation slots to be blocked. Blocking the ventilation slots is a potential fire hazard. 13 LAPG2G2 MANUAL Version EN.12 CAUTION To prevent the unit from falling down and causing personal injury and/or property damage, avoid installing or mounting the unit in unstable locations. Leave enough space above and below the unit to provide good ventilation of the LAPG2. If the airflow is not adequate, the LAPG2 will heat up inside and may cause a fire. Operate the LAPG2 in an environment with a free-air temperature of between 0 °C and 40 °C (32 °F and 104 °F). Turn off all audio equipment when making any connections to the LAPG2, and make sure to use adequate cables. Do not use benzene, thinner, or chemicals to clean the LAPG2. Use only a soft, dry cloth. If the LAPG2 is moved from a cold place (e.g. overnight in a car) to a warmer environment, condensation may form inside the unit, which may affect performance. Allow the LAPG2 to acclimatize before use. CONTACTS INTERNATIONAL Ateïs International S.A. Chemin du Dévent, 1024 Ecublens -Switzerland Phone: +41 (0)21 881 25 10 Fax: +41 (0)21 881 25 09 Web: http://www.ateis-international.com/ Mail: [email protected] Ateïs Middle East Building SEA, room 324, DAFZA, DUBAÏ, United Arab Emirates Phone: +971 4609 1325/24 Fax: +971 4609 1326 Web, contact: http://www.ateis-international.com/ Ateïs France 34, avenue de l’Europe, Z.A Font Ratel, CLAIX, FRANCE Phone: +33 (0) 4 76 99 26 30 Fax: +33 (0) 4 76 99 26 31 Web, contact: http://www.ateis-france.fr/ Ateïs Germany Industriestrasse 8, D-63801 Kleinostheim, Deutschland Phone: +49(0)60 27 97 98 85 Fax: +49(0)60 27 97 98 80 Web: http://www.ateis-germany.de/ Mail: [email protected] Ateïs UK Fountain Court, 2 Victoria Square, Victoria Street, St. Albans, Hertfordshire, AL1 3TF, UK phone: + 44 (0) 8456 521 511 Fax: + 44 (0) 8456 522 527 Web, contact: http://www.ateis.co.uk/ Ateïs China, 亚提斯(中国)技术服务中心 地址:上海市闵行区吴宝路255号力国大厦610室 电话:021-54495191/92 传真 021-54495193 Web, contact: http://www.ateis.com.cn 14 LAPG2G2 MANUAL Version EN.12 HARDWARE DESCRIPTION FRONT PANEL 1) AUDIO section Inside the LAPG2 you have 4 audio slots (named A, B, C and D). Each of these audios slots receives either 4 audio inputs channels or 4 audio outputs channels. IN/OUT: When you switch on the LAPG2 you can see which kind of audio card is fitted in each slots with the top IN/OUT led. The top led AES/EBU shows if the AES/EBU interface is used.(not available) The clip led indicates that the audio signal is above the clip threshold. The signal led lit when an audio signal is detected on the input. When a signal passes through an input or an output the corresponding LED will light. The Phantom led shows if the phantom power is activated on the channel. 15 LAPG2G2 MANUAL Version EN.12 2) STATUS LEDs Fault: light when an error has occured Power: light when the LAPG2 is switched on. Evac: light when an evacuation situation is started. (Not implemented yet) AT-NET: doesn't light if the LAPG2 is linked to another LAPG2, and blink if the physical link match with the configuration design. Ethernet: lights when the LAPG2 is connected to an Ethernet network. 3) SCREEN The LCD display is used for status information, login and parameters settings. In normal stat, it displays: the LAPG2 number (its place in the network) the IP address of the LAPG2 the date & time the function&stats of the LAPG2 : Two letter are displayed to give these informations: P1 & P2 When P1 can be: M=Master S=Slave N=not configured "-"=single LAPG2, not linked And P1 can be: S=Start of backup B=Bypass E=End of backup " "=no backup These two letter are very usefully to find which link is broken or absent. The broken link is the link between the LAPG2 which display P2=S (start of backup) and P2=E (end of backup). For more information please refer to the document (in the CD): 16 LAPG2G2 MANUAL Version EN.12 4) KNOB Dial push knob is used for front panel operation (parameters setting, user management, Status reading). You can have access to some settings directly on the front of the LAPG2. You can enter the user name and the password or select menu and adjust some parameters by turning and pushing the knob. The default user name is “ADMIN” and the password is “ “ (empty). System Setting Time Setting Time format 24Hours AM/PM Date Setting Date Format YY/MM/DD MM/DD/YY DD/MM/YY Ethernet Setting IP Addr Setting Sub Mask Setting Gateway Setting Receive Port Set Send Port Set Return About Machine Status Power On OK Store Config End Return Parameter Set No Parameter Return Power Switch Standby Mode Return Log In Log Out Temperature Return 17 LAPG2G2 MANUAL Version EN.12 REAR PANEL 1) POWER SECTION Insert provided power cable first into LAPG2 then in the wall power connector. Power switch: | (engaged) = ON; O (engaged) = OFF 2) 24 V POWER SUPPLY (BACKUP) CONNECTORS You can power up the LAPG2 with a 24VDC power supply (for backup battery powering). 3) RS485 CONNECTORS Here starts the RS485 network (connection for PPM and/or URC): Power: + and – DATA: A and B The RS485 port at the rear side of the unit is used for additional units like the URC (Linked Remote Controller) or the PPM (Programmable Paging Microphone). Note: The maximum cable length depends on the type of cable used and should not exceed 300 m with standard CAT5. This restriction is mostly due to supply voltage drops with low wire gauge in longer cable runs and can be obviated by using external power supplies (Junction Box) or higher diameter cables. However, we have seen data cable lengths up to 850m working just fine. You will have to put external power every three remote devices (PPM or URC) or every 300m. Note: It is recommended to not put more than 8 remote devices (PPM and/or URC) on one LAPG2. You can of course use more remote devices (LAPG2 can manage up to 16 PPMs), but this increase the response time of the devices and you will have to be very careful in the wiring by adding external power supply. 18 LAPG2G2 MANUAL Version EN.12 4) Ateïs Network Slot Ateïs has developed its own audio networking system ‘’Ateïs-Net’’. This Ethernet based network is able to simultaneously transport 48 audio channels (32 bits, 48KHz sampling rate) with a latency < 2msec together with the necessary control data. For decentralized or big applications, an optional Ateïs-Net networking card can be inserted inside the LAPG2s. Thanks to its loop architecture, the Ateïs-Net audio network is fully redundant. If a problem (Line open or shorted) occurs on a loop segment, it will be automatically isolated without affecting the system functionalities. Up to 32 LAPG2s can be connected together on the same network. As the Network addresses are auto-negotiated, the network set up is very easy. The LAPG2NET cards each have two ports labelled 'A' and 'B', where the 'A' port is the input and the 'B' port goes to the next sub-device in the line. Dependent on which network medium is used for the next LAPG2 in the network (cable (CAT5, RJ45 < 150 meters) or optical fibber (ST) < 2 kilometres) you can choose among four different LAPG2NET cards available: LAPG2 NET1 With two RJ45 connectors for CAT5 cabling, max 100m between two LAPG2s. LAPG2 NET2 With one RJ45 connector (left) and one ST-Fibber connector (right). LAPG2 NET3 With two ST-Fibber connectors, Multimode, max 2000m between two LAPG2s. LAPG2 NET4 With one RJ45 connector (right) and one ST-Fibber connector (left). Connection with CAT5 cable is not complicated. Just use a straight cable (not crossed). 19 LAPG2G2 MANUAL Version EN.12 With optical cables make sure to cross Tx and Rx between port 'A' and port 'B': WRONG connection RIGHT connection Make sure to close the loop by connecting the 'B' of the last LAPG2 to the 'A' of the first one. If the network is well connected the twos LEDs (Port A and Port B) should blink. 5) RS232 CONNECTOR Connect third party device (Crestron, AMX, VITY) to pilot some desired features of your LAPG2 system by using the Ateïs Third party protocol. At the rear side of the LAPG2 you also find a DB9f connector for RS232 data communication. This port can be used for transparent RS232 data multipoint communication through the network (for using with IDA4) or for 3rd party control applications. Note: RS232 does support cable lengths up to 15 m. P i n Signal 1 2 3 4 5 6 7 8 9 CD RXD TXD DTR GND DSR RTS CTS RI Text carrier detect (n.c.) receive data transmit data data terminal ready (n.c.) ground data set ready (n.c.) request to send (n.c) clear to send (n.c.) ring indicator (n.c.) (n.c):non connected 20 LAPG2G2 MANUAL Version EN.12 6) ETHERNET (RJ45) CONNECTOR For connecting the LAPG2 in a TCP/IP based network or directly to a computer: To load design in a LAPG2 system To pilot LAPG2 system To monitor LAPG2 system 7) CONTROL INPUT CONECTORS Either connects logical input (TTL IN, dry contact) or analogical input (10 k Ohm potentiometer). Simply connect the switch or relay or potentiometer between the number (1 and 16) and the G (ground). The number indicates which control logic channel will be used (when you define the action of the control input). If you use control Input as analogue input: You can connect Remote Controllers RAC5 or RAC8. Or a simple variable resistor (10K) to the analogue control inputs as follows: You can reduce the step by putting a 100uF capacitor in parallel across the contact. If you use control Input as Logic input: Caution: The logic In is momentary activate when the contact is open. If you want to active a parameter when the contact closes, then you have to use the event Management (in menu View), to create "Element control" event. Then you can assign this event either to an opened or closed contact. For more details please see How to use Events chapter. Simple activation of the TTL inputs can be made like this: 21 LAPG2G2 MANUAL Version EN.12 8) RELAY CONNECTORS Can engage a relay if the LAPG2 is powered up via 24 VDC (NO = normally open, NC = normally close, RC = Relay common). The contact has both normally open (NO) and normally closed (NC) relay contacts. When the machine is powered-up and working properly, the NC contact is closed and the NO contact is open. -On power failure or power-off the NC contact is open and the NO contact is closed. -All along the start-up of the LAPG2 (7 seconds) the NC contact is open and the NO contact is closed. 9) LOGIC OUTPUTS CONNECTORS The Contact closes when the Logic Output is active. The logic outputs are simple dry contact or relay contact, with a common rail. The common rail is linked to the ground. Caution: Do not connect voltage (24V) to the common rail. No voltage is provided. Contact rating: (relays EGE type EDR201A0500) Maximum voltage 100 VDC, Maximum switching current 0.5 amps, Maximum switching power 10VA If the RS485 bus is unused, then you can easily use the 24V DC output of the LAPG2 to feed 8 LEDS that each have a 2k2 current limiting resistor. 22 LAPG2G2 MANUAL Version EN.12 10) AUDIO INPUT/OUTPUT CONNECTOR Balanced Audio input or output: S = Shield + = Hot audio signal - = Cold audio signal Input and output cards have different connector colours: BLACK = OUTPUT GREEN = INPUT If you want to use unbalanced signal please connect the Cold (-) pin with the Shield (S) pin. There is a hardware clip operation on input board over 15dBu. SYSTEM INSTALLATION SOFTWARE GENERALITIES The LAPG2 software is a powerful, yet easy to handle tool to assist you creating, controlling and monitoring DSP-Designs for LAPG2 systems, supporting up to 12 processors including all the controlling gear connected to it. After the determination of which type and how many units would make up your network, you can start designing signal paths with all the exiting features the huge component library offers simply by drag and drop and connect different audio component. This all is done in a straight forward and clear manner, helping you to concentrate on creating state-of-the-art electro-acoustic environments. After a Design is successfully compiled and loaded into the machine(s), you have full access to all the parameters in the system. There are a lot of controlling features starting from simple TTL I/O's over analog voltage control to advanced data communication. You can choose from a range of controlling devices or remote microphones suitable to access parameters within the whole networked system. LAPG2-Design also provides a multi level user management administrating up to 40 different sets of user privileges. You also can create unique bespoke graphical environments that only consist of control elements you want operators to have access to. Many of the concepts in this program are based on modern graphic design environments, using similar tools and techniques to provide the functionality, speed and intuitive feel of contemporary user interfaces. The LAPG2 Software gives you control over all the design features needed to build and control a DSP System using LAPG2 Processors and all its accessories. Also it provides a graphical design environment to create custom user interfaces. SYSTEM REQUIREMENTS • • • • • IBM compatible computer with Pentium III MMX CPU, 400 MHz or faster 256 MB RAM Hard drive with at least 20 MB of free space CD-ROM or DVD drive or a connection to the www (for installation only) VGA display (1024 x 768, 256 colour or better recommended) 23 LAPG2G2 MANUAL Version EN.12 • • One free USB-port Operating system: Windows 2000® Professional (Service Pack 3 or greater), Windows XP® Home or Professional (Service Pack 2 or greater) NOTE: If you use Windows VISTA® be sure to be in compatibility mode. SOFTWARE INSTALLATION Don't plug in your LAPG2 yet! Install and launch the software first! Before installing the LAPG2 software check if your PC meets the system requirements. Turn on your PC and allow Windows to start up Insert the supplied CD-ROM into your drive. If the content of the CD-ROM is not displayed automatically double click the 'My Computer' icon and navigate to the 'DVD/CD' drive. Note: If you have access to the WEB: goes to www.ateis-international.com and download the latest software version. You may need to update firmware see FIRMWARE UPDATE chapter. Copy the file 'ATEIS LAPG2 v.1.x.x setup' using the copy and paste commands or by drag and drop to the 'Desktop'. Wait until the task has finished. Start the program 'ATEIS LAPG2 v.1.x.x setup' by double click on its icon and follow the instructions to install the LAPG2 software onto your hard drive. Click . Type in user name and your organization name if you want and click By default the program 'LAPG2-PPM v1.x.x.exe' is installed under the path <<C:\Program Files\ATEIS\ATEIS LAPG2-PPM v1.x.x\>>. Change installation path (by clicking ) if required, and click . 24 LAPG2G2 MANUAL Version EN.12 As usual with the install shield wizard a window appears showing all information before the actual installation. You can enter corrections at this point by clicking . If there is nothing to change click to execute the installation. After all installation tasks have been finished successfully click to exit wizard. The installation program creates a shortcut to the 'LAPG2-PPM v1.x.x.exe' named 'LAPG2-PPM v1.x.x' on your 'Desktop' with the LAPG2 icon. Double click the icon to start the program. Plug in your LAPG2's and install the drivers. ACCESS / PASSWORD At the software start-up an UserID will be requested to have an access to the software. UserID: software & configuration file access (with user privileges) Default UserID: User = ADMIN / Password= (no password) See also User Management chapter. There is a second level access for the Master-Preset. Every configuration contains at least one Master-Preset. These Master-Preset is protected by the IDM. It will be requested to store a Master-Preset, to reverse a configuration file or to connect to a Master-Preset. IDM: Master-Preset Access (with lock time) Default IDM: User = ADMIN / Password= (no password) See also ID Management chapter. 25 LAPG2G2 MANUAL Version EN.12 UPDATE LAPG2 SOFTWARE AND FIRMWARE PREPARATIONS 1. Get Recent Software from the WWW You can download the most recent version of the LAPG2 software from our homepage www.ateisinternational.com click on “PRODUCTS” and select LAPG2 product. You will find all the downloadable files related to the LAPG2. Download latest software version. (User: ateisint, password: ateisint) 2. Remove Older Version Before you can upgrade or reinstall LAPG2 software you have to remove the older version from your applications folder. To do this, follow the instructions below: • Choose: > Start > Program files > ATEIS > LAPG2-G2 > LAPG2-G2 v1.x.x-(yyy)_Uninstall • Follow the instructions You can also follow those steps: • Choose: > Start > Settings > Control Panel • Double click the 'Add or Remove Programs' icon • Locate and choose 'ATEIS LAPG2-PPM v1.x.x' and click the 'Remove' button • Follow the instructions to remove the 'ATEIS LAPG2-PPM v1.x.x' software from your hard drive Install New Version Proceed similar as stated in software installation chapter. Upgrading to a higher version sometimes makes it necessary to upgrade the LAPG2’s MCU and DSP firmware also. Refer to the following chapter to update firmware. FIRMWARE UPDATE Updating the LAPG2 software sometimes makes necessary to update the LAPG2's firmware also. To do this, follow those steps: • • • • Connect LAPG2 to your PC Launch the LAPG2 software Open the Ethernet connection Choose menu: >Help > Version (See Check LAPG2 version ) If something is displayed in red: • Update firmware (see Updating ) 26 LAPG2G2 MANUAL Version EN.12 ADDITIONAL DEVICES FOR LAPG2 SYSTEM To maintain simple, secure and intuitive interfaces for operators, the LAPG2 offers different types of remote controllers: Linked Remote Control (URC) Programmable Paging Microphone (PPM) RAC5 or RAC8 To connect several devices on a LAPG2 It may be helpful to use a Junction Box (JB) Note: It is recommended to not put more than 8 remote devices (PPM and/or URC) on one LAPG2. Putting more will increase the time response of the URCs and/or PPMs. URC (LINKED REMOTE CONTROL) URC can be fully programmed via LAPG2 software to adjust every setting you want: volume, mute, preset, components' adjustments... This remote device is connected to the LAPG2 via the RS485 port. PPM Allow you to have up to 64 buttons (with additional Keypad). With the LAPG2 Software you can select in which area(s) (outputs) the microphone will be heard when you press a PPM's key. You can also define pre or post chime when an announcement is done. This remote device is connected to the LAPG2 via the RS485 port. The PPM has an Omni directional microphone capsule. PPM- SP (stacking paging) Same features as the PPM and a small memory (2min audio) in the PPM-SP allow storing the message if the PPM-SP cannot rout the message to the desired zone. When the zone becomes available the message will be played. The PPM has a Cardio directional microphone capsule and an enhanced audio quality. If the PPM-SP is linked to an additional keypad V2, the keypad is able to start messages. 27 LAPG2G2 MANUAL Version EN.12 RAC (REMOTE ACCESS CONTROL) Allow using analogue inputs for selecting a channel among 5 or 8 and setting the volume. RAC5 - Wall-mounted level and 5 sources selectors RAC8 - Wall-mounted level and 8 sources selectors JB (JUNCTION BOX) Easy chain connection of LAPG2 peripherals (URC and PPM), using standard CAT5 cables. KEY FEATURES: • 5 x RJ45: 1) Connection to previous JB (or LAPG2 bus on the first JB) 2) RS485-SIDE for URC connection 3) Easy connection to a Master PPM using the supplied 10 pins cable. 4) Connection to first Slave PPM (feature not available by now) 5) MAIN OUT connection to next JB • 2 internal screw connectors for 0 dB audio: audio output from PPM microphone --> Audio Output (connect to the Audio In of the LAPG2) audio input to PPM speaker --> Audio Input (connect to the Audio Output of the LAPG2, if needed) • 1 input for additional 24V power supply. (Depending on distance between LAPG2 and PPM/URC you will have to put an external power supply) • 1 internal switch for PPM Master or Slave selection. (Slave features are not available for the moment) • 1 internal switch for System or Local power supply selection. 28 LAPG2G2 MANUAL Version EN.12 SOFTWARE PRESENTATION General View 1 TITLE BAR 2 MENU BAR 3 TOOLS BAR 4 TAB BAR 5 DESIGN COMPONENTS AREA (call windows) 6 WORKING AREA 7 PROPERTIES CONTROL AREA (call windows) 8 STATUS AREA Displays the path name of the current file Holds all the functionalities of the software (windows and tools), arranged by topic. Short access to main functionalities that are hidden into menu bar. Shows the window title of all opened windows (design, components control windows) for quick access. Contains all “virtual devices” you can use to build up and design your system. It is the space where you create your “virtual system” and make your design. Access to some information (summaries) and functionalities regarding all communications aspects (RS-232, TTL I/O analog Input, etc..) Indicates connections status between LAPG2 and PC, and also compilation process. Next pages show a description off all the windows and choice that are in the software. 29 LAPG2G2 MANUAL Version EN.12 TITLE BAR The title bar displays LINKED AUDIO PROCESSOR G2- untitled, if you start a new system design, or the full path name of the current saved file. At the right hand corner you can find the usual Windows minimize button and the close box (in red), which exit the program. MAIN MENU BAR We will explain in details all the features of all topics and items accessible through Main menu bar. It means we will explain all the functionalities of the software. The main menu bar contains the following menus: • File • Edit • View • User • Operation • Tools • Lock • Window • Help Here is a description of all the topics File In this menu, you will find everything related to system/design files as well as printing command. All the LAPG2 files are saved under the *.LAPG2 extension. The File menu contains the following items: New Save Save As… Open Open autosaved Recent files Print Header Settings Print… Print Preview… Print Setup… Exit New Opens a new blank project (new system/design file) 30 LAPG2G2 MANUAL Version EN.12 Save Saves the current file you are currently working with Save as… Opens the “Save as…” dialog box to save the current working project with a different name and/or path Open… Opens the “Open...” dialog box which allows you to select a path and open a saved file Open autosaved Opens the last auto saved file Recent files Quick access to the last opened files Print Header Settings Opens the “Print header settings” window which allows you to set the headers (name, company, etc.) for the printed design You have the possibility to print your project either for site technical documentation or for filing. You can enter project name, date, and name of the designer, a description for the project, the reference and the model of LAPG2 used. You can choose the position of this header on the paper. You can also choose Font size, type and colour and also background colour of the header. Finally you have the choice to display this header or not when you print your design. Print Open your “Windows© print” dialogue box which allows you to print the design file. 31 LAPG2G2 MANUAL Version EN.12 Print Preview Opens the “Print preview “dialog box which allows you to see before printing what your print will look like. Here is an example with a factice simple design: Top left you can see the header (blue box), defined via the “print header settings” window. Opens the “Windows© Print” dialog box to print the file Opens the “Windows© Print settings” dialog box to set your printer Choose which Master Preset you want to preview Choose which Items you want to preview Zoom or un-zoom See the complete page See only the part of the page where there is the design Navigates between all the printable pages Print Setup Opens the “Windows© Print settings” dialog box to set your printer. This dialog box allows you to select which printers you will use and set your printer by clicking on properties. You can also choose the size of paper and if you want normal or landscape. This window is generated by your OS. 32 LAPG2G2 MANUAL Version EN.12 Exit Terminates the current LAPG2 session after asking to save modified files Edit Here you will find all the common basic edition tools of windows based software. The Edit menu contains the following items: undo Redo Cut Copy Paste Delete Alignement Pack Space Order Undo Will undo the last actions Redo Will redo the last action or will retrieve the last state in case undoing too far Cut Cuts out the active selection and copies it to the operating system’s clipboard Copy Copies the active selection to the operating system’s clipboard Paste Pastes the content of the operating system’s clipboard Delete Deletes (erases) the active selection 33 LAPG2G2 MANUAL Version EN.12 Alignment You can select several elements (by maintaining left click and move the mouse you will have a selection square) then you can align all the elements. Pack You can select several elements (by maintaining left click and move the mouse you will have a selection square) then you can pack the elements. Space You can select several elements (by maintaining left click and move the mouse you will have a selection square) then you can define the space between all the elements. It is interesting if you pack the elements first. Order If you have elements which are under other elements, you can define by selecting one element if this will be to the front or to the back. Pay attention sometimes element can be totally hidden with this action. It is useful with background image and buttons for example. 34 LAPG2G2 MANUAL Version EN.12 View In this topic you will find practically every windows of the software. Most part of those windows has short access from the TOOL BAR. We are going to introduce you every items. To learn how to use those items please refer to the “create a project” and “how to” sections. The View menu contains the following items: System Components System status Third Party Control Logic in Logic out Analog in Sub Preset List Remote List PPM Manager Chime Data Store Wave File Manager PPM vs Wave Table Logo Manager Logo Lobrary Event Management Schedule Management Virtual Control Monitor Monitor Settings Toolbars System Opens the system window, in the DESIGN COMPONENTS AREA You have to explain to the software which Hardware will be used for you project. Here you can find the virtual system machines: The processor (LAPG2) The paging microphone (PPM) the remote controller (URC) When you define your system you will drag and drop those virtual machines in the WORKING AREA. For example if you use three linked LAPG2 you will drag and drop three virtual LAPG2 from this window. Then if you use PPM you will drag and drop virtual PPM and “virtually connect” them in desired inputs of the virtual LAPG2s (be sure to connect them in the same way as the hardware). 35 LAPG2G2 MANUAL Version EN.12 Components Opens the Components window, in the DESIGN COMPONENTS AREA Once your (virtual) system has been defined you will define what the processor will do between Inputs and Outputs. Here are all the tools you can use for signal processing and for Audio routing etc. Simply double connect in the LAPG2 (defined in the System window in the WORKINF AREA) and then drag and drop the desired components and create wiring between inputs and outputs. All those components are going to be explained in the COMPONENT chapter. System status Opens the system status window in the PROPERTIES CONTROL AREA The first TAB contains the “Log file “, the second TAB shows the compilation results (error and warnings). You can save log file by clicking number and by clicking “Get” “Clear”). or you can see the different recorded events selecting the or you can clean the Log file (click 36 LAPG2G2 MANUAL Version EN.12 Third Party control Opens the Third Party Control window in the PROPERTIES CONTROL AREA This section shows you all the detail of all the elements or events which are designated to be controlled via third party device (Crestron, AMX, VITY, …) Two different TABS, One to show the Elements controlled via third party protocol: The second to show the Events controlled via third party protocol For more information, see the “HOW TO: use the Third Party Control” chapter of this manual. Logic in Opens the Logic IN Control window in the PROPERTIES CONTROL AREA You have a lot of possibilities to use the 16 controlled inputs (either analogue or Logic) If you need to use Logic inputs you can control and do a lot of different things. Following windows shows you the details of what is controlled and what you are doing with Logic input: 1) You can make some group (use Logic inputs has “bit” for different choice): 2) You can use Logic input in order to change preset: 37 LAPG2G2 MANUAL Version EN.12 3) You can use logic in to pilot every logic adjustments in every LAPG2 of the system (bypass, mute, routing, solo,…): 4) Finally you can choose to start events with logic input: For more information, see the “HOW TO: use Logic Input” chapter of this manual. Logic out Opens the Logic OUT Control window in the PROPERTIES CONTROL AREA You have two possibilities to control the 8 logic outputs of one LAPG2. The window shows you which output is controlled by what. 1) Elements can control a logic output (mute, bypass, signal, routing,…) 38 LAPG2G2 MANUAL Version EN.12 2) Logic inputs of a LAPG2 can control a Logic output of a remote LAPG2 (in order to give some logic signal to a remote device for example): For more information, see the “HOW TO: use Logic Output” chapter of this manual. Analog in Opens the Analog in window in the PROPERTIES CONTROL AREA You can control some analogical elements with remote 10kOhm potentiometer (volume, attack time or threshold of a compressor, gate,…). This window shows every analogue adjustment you have defined: For more information, see the “HOW TO: use Analogue Input” chapter of this manual. Sub Preset List Opens the Sub Preset elements window in the PROPERTIES CONTROL AREA Show all the elements controlled (“virtually photographed”) for each Sub Preset. This window is a kind of reminder. 39 LAPG2G2 MANUAL Version EN.12 Remote List Opens the Remote List window in the PROPERTIES CONTROL AREA When you want to use Ateïs remote device (PPM or URC, through RS-485 network), you have to follows few steps (see HOW TO use PPM or URC chapters), one of those step is the searching process: The LAPG2 scans the system and attributes a specific IP address for each remote device (PPM and URC) automatically From those windows you will have a summary of each PPM and URC with their serial number and where they are connected. You can also start the search process by clicking . PPM Manager Opens the PPM Manager window in the PROPERTIES CONTROL AREA This window gives all the details of each PPM you are using in the system. Chime Data Store Opens the Chime Data Store window (floating window) With this window you can load chime (wave mono 16Hz, 128kbits max) in PPM. First you will have to define the wave file by using the wave file manager. 40 LAPG2G2 MANUAL Version EN.12 Wave File Manager Opens the Wave Files List window (floating window) With this window you select which wave file will be used with your project. PPM versus Wave Table Opens the PPM vs Wave Table window (floating window) Gives details about which wave file is loaded in which PPM (wave file associated to which LAPG2 and input’s number) Logo Manager Opens the Logo Manager window (floating window) You can post two different logos on the URC’s display. This window shows you which logo is in your project and you will define which logo you will use with the URC. 41 LAPG2G2 MANUAL Version EN.12 Logo Library Opens the Logo Library window (floating window) With this window, you choose which logo you will use in your project. Event Management Opens the Event Management window (floating window) Here you can add, define, select or clear some events. You cans choose between five different kinds of events: Change master preset Change Sub Preset Adjust element (volume change, mute…) Pilot TTL Output (Logic output) Stop event You can also choose to command events via third party protocol. Schedule Management Opens the Schedule Management window (floating window) Here you can define to start events automatically (you define when you want and how many times you want to start events or an event sequence (addition, sequence, of several different events). 42 LAPG2G2 MANUAL Version EN.12 Virtual Control Opens the Virtual Control window (floating window) and Virtual tools in the DESIGN COMPONENTS AREA The “virtual Control” allow you to define group of buttons, LEDs, or faders. You can import these groups in the Monitor Window. You can add as many “virtual logical in”, “virtual logical out” and “virtual analogical in” as required. Simply drag and drop object from the virtual tools menu in the PROPERTIES CONTROL AREA Monitor Opens the Monitor window (floating window) and the Monitor tools window in the DESIGN COMPONENTS AREA The Monitor window is a window in which you can bring all the adjustments and indicators you need for your project. This is helpful if you want to have a graphical control interface. You can define users whom have restricted access to the software; they will have access to this window (monitor) only. So you can put in this window all the adjustments the users will need in order to prevent improper use of the program. You can add as many “monitor logical in”, “monitor logical out” and “monitor analogical in” as required. Simply drag and drop object from the Monitor tools menu in the PROPERTIES CONTROL AREA 43 LAPG2G2 MANUAL Version EN.12 When a specific restricted access user will start the software he will see the monitor window. So it is why there are a lot of small sized tools (the same as in the TOOLS BAR). Establish Ethernet link Open LAPG2 project file Save LAPG2 project file Connect PC too LAPG2 system Disconnect Pc from LAPG2 system Upload design in the LAPG2 system Select Master preset Select Sub Preset Save Sub Preset (take “photography” of the states of the selected adjustments in the Sub Preset) Load Sub Preset Delete selected item Lock the LAPG2 software (if you go for lunch you can be sure that nobody plays with your computer) Enter the password for software lock Shortcut to see which firmware is installed in each LAPG2 of the system Open a soft keyboard (in case of using touch screen computer) Change user (logout) Exit (close the software) Here is a picture of the virtual soft keyboard: For more information regarding USER, please see the HOW TO chapter. 44 LAPG2G2 MANUAL Version EN.12 Monitor Settings Opens the Monitor settings window (floating window) When you use monitor window you can choose to hide some tools (of the monitor window tools bar) Disable the possibility to change Master or Sub presets from the monitor window. The master-Preset menu on the monitor window is grey out. Disable the possibility to save or load LAPG2 design file The software connects (live) automatically to the LAPG2 master-preset by using the default IDM (ADMIN) which has an access to all master-presets. Disable the possibility to close the software from the monitor window For more information, please see the HOW TO chapter. Toolbars Choose which kind of tools will be “shortcuted” in the TOOLS BAR User In this topic you will find windows related to system communication (Ethernet: ID and LAPG2 system: User). Most part of those windows has short access in the TOOL BAR. We are going to introduce you every items. To learn how to use those items please refer to the “create a project” and “how to” sections. The User menu contains the following items: User Management ID Management Logout User Logout ID 45 LAPG2G2 MANUAL Version EN.12 User Management Opens the User Management window (floating window) You have the possibility to define up to 40 different users with different access privileges. Click [Add] to add a new User (open the “Add new user window”), [Delete] to delete one user, [Store] to load new user in LAPG2 system. [Close] to close window. If you select a User and click *Edit+ you will have access to “Add new user window” to modify access privilege or change code: This window allows you to give access password, name and to define access privileges. Simply read what you want to allow as rights and notch the corresponding blank square. Bottom of the window you can define which LAPG2 file will be opened when the user will log in. ID Management Opens the ID Management window (floating window) This feature is available to prevent all unauthorized people to connect to the system via the network. The ID management allows to gives access to the Master-Preset with an user name and password. With this window you can create new user ([Add]) Erase users ([Delete]) Close the window ([Close]) Finally Edit user’s right *Edit+) this last button opens the following ID Information window. Password field: enter desired password Idle to lock XX minutes: If the user doesn’t use software during XX, the connection will be closed user will have to log again. When the software was locked, users should enter an 46 LAPG2G2 MANUAL Version EN.12 account with a correct password. Or the software will be locked permanently. Keep preset for next user: It is possible that a user doesn’t have the right to log in with the last preset used by another user (the one who just logged out) by clicking this option you assign the right to this user to log in and use system even he doesn’t have the right with this preset. Box at the right part of the window: Show all master presets of the system. Choose which Master Preset the IDM user will have right to access and operate. Logout User Opens the User Login window (floating window) Allow to logout or change users. Available only when unconnected. Logout ID Opens the IDM Confirmed window (floating window) Allow to logout or change ID users. Compile Start the compile process. The software verifies that no major errors remain before uploading the design into LAPG2 system. Operation In this topic you will find windows related to system connection. Most part of those windows has short access in the TOOL BAR. We are going to introduce you every items. To learn how to use those items please refer to the “create a project” and “how to” sections. The Operation menu contains the following items: Store Reverse Connect Disconnect Audio Enable Audio Disable Store Starts the Store process which upload your design into the LAPG2 system 47 LAPG2G2 MANUAL Version EN.12 Reverse Starts the reverse process which download the design from the LAPG2 system into your computer Connect Connects your computer to the LAPG2 system NOTE: You have to have opened the good corresponding design file to connect to LAPG2 system. Disconnect Disconnects your computer from the LAPG2 system Allow you to change settings and re-upload them into LAPG2 system Audio Enable Activates the Audio (Outputs) of the LAPG2 g2 system Audio Disable Stops every audio signals going out of the LAPG2 system Tools In this topic you will find windows related to system configuration and software settings. We are going to introduce you every items. To learn how to use those items please refer to the “create a project” and “how to” sections. The Tools menu contains the following items: Update Machine Configuration Parameter Setting Clear Remote IP Clear MCU Data VR Calibration Options Establish Ethernet Link Reset Configure machine IP 48 LAPG2G2 MANUAL Version EN.12 Update Opens the Firmware update window (floating window) The software contains every updated firmware. If you have to update LAPG2 or PPM or URC, just click on [update] button. Note: Always update DSP before MCU and never reset between the two update processes. Machine Configuration Opens the Machine Configuration window (floating window) When you are connected to the LAPG2 system This window allows you to read and set some internal LAPG2 information. Date/time: set the internal date and time of the LAPG2 Click [read] to see which settings are into each LAPG2 of the system Click [SET] to load some settings changes Click [Get Current Time] to get computer date and time directly Time adjustment: If you use the UAPg2 connected to internet, our advice is to synchronize the time with NTP protocol. If you use the UAPg2 in stand alone, then the only way to adjust the time if needed is to use the parameter "Time error (Sec)". At first, set the time (from the PC or with NTP), and remember this time. 49 LAPG2G2 MANUAL Version EN.12 Leave the machine working in stand-along during one month. After one month, record the current time and see the formula. Time Error(sec)=(current time -previous time)/30 Set time error sec in machine configuration. Every day at 00:00, the machine will automatically increase/decrease the time(calibration time). See "Adjust Time/Date" chapter. RS-232 SET: Set the RS232 communication, Baud rate, parity, Stop bit and connected target. Click [read] to see which settings are into each LAPG2 of the system Click [SET] to load some settings changes NTP: Set the LAPG2 to have the date/time updated in real-time by the NTP servers. NTP means Network Time Protocol. Click [read] to see which settings are into each LAPG2 of the system Click [SET] to load some settings changes See "Adjust Time/Date with NTP" chapter. 50 LAPG2G2 MANUAL Version EN.12 Parameter Setting Opens the Parameter setting window (floating window) This window is applied to setting the parameter of dsp elements with maximum and minimum value. There are two tab sheets: Global: Here you can define a range or specifics values and give a name to this specific range then in the Private tab you can assign this specific range to specific component. Private: Here you can assign specific range (define in global) to a component in the design. For example if there is a element ranged from 20 to -90, if we add a row on the Global tab and set maximum as 50 and minimum as 0 then give it a name “mm”. Next, change to private tab and select the “mm” item in Change to follow global and click ok. The element will have a new maximum 50 and minimum 0 now 51 LAPG2G2 MANUAL Version EN.12 Clear Remote IP Opens the Parameter setting window (floating window) Clear the IP addresses of the remote devices (PPM, URC) connected to the selected LAPG2(s). If you add new remote device or change something in the system you may have to clean all IP addresses and re-give addresses (Search process in the remote list window: sheet 40). Clear MCU Data Opens the Clear MCU table window (floating window) Clean the memory (design) of the connected LAPG2. This feature is useful when the LAPG2 have strange behaviours due to an error during datas transfers or an old improper design. VR Calibration Opens the VR Calibration window (floating window) Here you calibrate all the remote potentiometer (Variable Resistors) connected in the control inputs (defined as analogue inputs) and the 8 front knobs of the LAPG2. Simply choose the LAPG2 of the system and the control input (or the front knob) then put it at the minimum and click on [Minimum]’s button then put the potentiometer (or the front knob) to the maximum and press the [Maximum]’s button. After that switch off/on the LAPG2 and the potentiometers are calibrated. 52 LAPG2G2 MANUAL Version EN.12 Option Opens the options window (floating window) This option window contains 6 different tabs. Here are the details of each tab: DSP design: Active some option regarding design (working area): 1) Show animation, the Icons are animated 2) Show print boundaries, you will see on the working area the limits of each page. So you can be sure that your design is not between two pages if you want to print it. 3) Component first seat, when you drag and drop the component from the component system windows (design component area) you can choose either that every components are put on top left or are put where your mouse is when you release the right button after drag and dropping. File: 1) Autosave your design, notch it if you want that LAPG2 software auto save your current project 2) Autosave every XX minutes, choose the time between two project saves 3) YY recent files, Choose the number of files which will be accessible from the “recent files” option in the file menu (p. 31). Colour Scheme: Change the colour of the audio component windows For example if you use colour settings Default setting: Change settings: 53 LAPG2G2 MANUAL Version EN.12 Results: Store: 1) Auto Connect to system, notch it if you want that LAPG2 software auto connect after uploading a design file into LAPG2 system. If you do not active this option a message box will appears asking you if you want to connect or not. 2) Auto enable Audio after connecting, notch if you want that audio can go out from LAPG2 after uploading a design. If you do not active this, a message box will appears asking you if you want to order audio enable. 3) Auto configure remote, If you have remote devices (PPM, URC) the software will ask you if you want to configure them each time you upload (store) a design file. By activating this option the configuration will be automatic. Network: 1) NIC, Define which net-card of your computer is used by the LAPG2. Be sure the right card is used. If you are connected directly be sure that is not the WIFI card which are define here. 2) IP Address gives you the IP address used by your Net-card. By default LAPG2 is set on address: 192.168.100.XY, be sure your computer is also set on this network and be sure the computer is not using the same as a LAPG2. To be sure use 192.168.100.1 for your computer. 3) UDP Broadcasting Port, be sure to use same UDP port between your computer and LAPG2… (Try as possible to keep the 19760) Internet Protocol (TCP/IP): Here are options to change default TCP/IP parameters. Be sure you know TCP/IP basics and use to change settings. You can change from here IP parameters of LAPG2. Here for example the address of the LAPG2 is: 192.168.100.6 54 LAPG2G2 MANUAL Version EN.12 Establish Ethernet Link Opens the IP Setting window (floating window) When you want to use LAPG2 system you have first to open communication (Ethernet link) between your computer and the LAPG2 system. 1) If you do not know the LAPG2 IP address click on [search]. Be sure to be on right network: 192.168.100.XY (factory settings) 2) If you know the IP address enter it and click [connect] Reset Opens the Machine List windows (floating window) You can select a LAPG2 of your system and reset all the parameters. Use it if you have some trouble with your system and you do not know why. Configure machine IP Opens the LAPG2 Machine Configuration windows (floating window) This options is used when you use linked LAPG2 (A system of LAPG2) in order to get and set the order of the several devices on the network (give a unique number to each LAPG2, identification number) 55 LAPG2G2 MANUAL Version EN.12 Lock In this topic you will find windows related to secure the software when you leave it. You have the possibility to lock the software in order to prevent unwanted use when you are away from it. The Lock menu contains the following items: Lock Password Setup Lock Block the computer First define a password by clicking “Password Setup” Then click “Lock” To unlock software, click [Unlock] button. And enter the password defined in the password setup window. Note: you have to re-define a password each time you lock the software. Password Setup Choose a password to lock Software You will have to enter a password each time you want to lock software. 56 LAPG2G2 MANUAL Version EN.12 Window In this topic you will find tools to re-arrange windows or find hidden opened windows. The Window menu contains the following items: Cascade Tile Arrange Icons Current opened windows list name Cascade Arrange every opened window in cascade mode Tile Arrange every opened window in tile mode Arrange Icons If you have a lot minimized windows everywhere on the working area, this Items will arrange them Help In this topic you will find some features. The Tools menu contains the following items: Version Activate About Soft-Keyboard Version Opens the Version window (floating window) This window allows you to know which versions are installed into LAPG2, PPM, URC and which version has to be used with the current software. 57 LAPG2G2 MANUAL Version EN.12 If the version is displayed in red it means the version is mismatching and you will have to update the LAPG2 or the remote devices. Activate This feature is not used in Europe. You do not have to activate your product when you receive it. About Some information about the software Soft-Keyboard Opens a Soft-Keyboard in order to use LAPG2 software with touch screen computer or with computer without keyboard This Soft-Keyboard has a fixed size optimized for screen resolution of 1280x800 pixels. 58 LAPG2G2 MANUAL Version EN.12 Start a project (basics and generalities) Generalities (software philosophy) When you want to design a project: After installing hardware (connection, powering etc.) see Connect PC to LAPG2 (page 68 ), you will use LAPG2 software to: 1. Design signal path 2. Define paging 3. Define control of the system (logic I/O, URC, RAC, Third party, monitor) 4. Define monitoring (monitor window) 5. Upload design into LAPG2 system see LAPG2 system connection (page 72) To do so you have three different levels in the software: 1. System Hardware definition (re-create your hardware in the software) 2. Define LAPG2 (Define the signal path inside LAPG2) 3. Define component (adjustments and also control of parameters) Level 1 System Hardware definition First you have to explain to the software which hardware you are using Here you have two LAPG2s, three URCs and two PPMs Level 2 Define LAPG2 Now you can enter into each LAPG2 to create design (signal path) just double-click on the LAPG2 icon you want to design. Then drag and drop components between input and output and connect them as you need Here we use three inputs with limiter-compressor and parametric equalizer Those inputs are connected individually to outputs: In C1Out B1 In C2Out B2 In C4 Out B3, B4 and D1 Level 3 Define components After designing signal path it is time to tune, monitor or control system: By double-clicking the desired component you open it and have the following possibilities: 1. Monitor some audio 2. Adjust settings 3. Assign control to various controllers, (logic I/O analogue, URC, Third party…) Right click on the virtual parameter( Button, 59 LAPG2G2 MANUAL Version EN.12 fader, LED: see: 5) Assignation philosophy (choose which adjustments will be piloted by what) page 65) 1) Prepare your new project To start a new project file choose: > File > New from the main menu. You can also type: [Ctrl]+[N], or click the 'New' icon in the toolbar. < or > 2) Define which hardware is used in your project The term 'System' in LAPG2's terminology refers to one or up to 32 LAPG2 machines linked via NetCards, with the 'System' window in the 'Design View Area' providing the canvas to build it up in an icon based way using drag and drop technique. At the left side of the main window you can see the 'System' control window holding the system elements. Clicking -item next to the folders will show their content: 'Audio Processor' folder: o LAPG2 Drag and drop this icon into the 'System' window to add a LAPG2 processor to your system (according to the number of LAPG2 you will physically use). 'Remote' folder: o URC o PPM Adds an URC 'Linked Remote Controller' to your system. Control remote Adds a PPM 'Programmable Paging Microphone' to your system. Paging Microphone Grab the LAPG2 icon from the 'Audio Processor' folder and drop it anywhere into the 'System' window (working area). Note: Notice the cursor changing to a ‘Paste Cursor’ as you move it over the ‘System’ window. Note: A modal type dialog window titled 'Configure Modules' pops up asking you to put in the audio board slot configuration of the LAPG2 you are about to add to the system. 60 LAPG2G2 MANUAL Version EN.12 Since there are many combinations audio boards can be fitted or omitted, let's just take a detailed look to the configuration of the LAPG2 0808. Configurations of other machines are made respectively to their I/O boards fitted similar to the following instructions below. By default the LAPG20808 comes with the following boards fitted: o o o o Slot A: Slot B: Slot C: Slot D: Analogue Input Analogue Output Analogue Input Analogue Output Tips: If you are not sure about the hardware configuration of your LAPG2: BLACK Audio connectors = OUTPUT, GREEN Audio connectors = INPUT To choose these settings you can click into the scroll menu and select the corresponding board. But there is a much more efficient way to do this: Press the [Tab] key on your keyboard. The scroll menu of 'Audio Module A' is highlighted allowing you to select the audio board type by using the keyboard's arrow keys. As the LAPG20808 comes with an analogue input board fitted to slot 'A' no action is required. To go on press the [Tab] key on your keyboard again. The scroll menu of 'Audio Module B' is highlighted. As the LAPG20808 comes with an analogue output board fitted to slot 'B', select the audio board type 'Output' using the keyboard's arrow key. Go on pressing the [Tab] key on your keyboard. The scroll menu of 'Audio Module C' is highlighted. As the LAPG2 0808 comes with an analogue input board fitted to slot 'C', select the audio board type 'Input' using the keyboard's arrow key. Go on pressing the [Tab] key twice on your keyboard. 61 LAPG2G2 MANUAL Version EN.12 Since the setting of the 'Audio Module D' corresponds to the default LAPG20808 audio board configuration no selection is necessary. Hit the [Tab] key a second time to activate the [OK] button. Finish up the 'Configure Modules' dialog by clicking the [OK] button. If you right click on the dragged and dropped LAPG2 icon you will have access to some features: Name: give a name to this LAPG2 Delete: same issue as selecting and press “DEL” key (delete the virtual LAPG2) Dsp functions: same effect as double-clicking on the LAPG2 icon, open the DSP design working area (see create audio signal path) ExternalSelect: define the kind of each control input (Logic in (TTL) or analogue in) Name 3) Define control inputs as TTL (logic) or Analogue Inputs Simply right-click on the desired virtual LAPG2 and select ExternalSelect option and choose which input is what. Caution, in order all TTL IN must be before the Analogue. You cannot mix them freely. ExternalSelect The TTL inputs work by groups. In the Logic IN window, you have to assign each TTL input to a group. By default only the TTL inputs from 1 to 8 are already assigned to group 1 to 8. 62 LAPG2G2 MANUAL Version EN.12 If you set the others channel ( 9 to 16 ) in TTL IN mode, than you have to configure the groups 9 to 16 in the Logic IN window (that means assign TTLin 9 to group 9, and TTLin 10 to group 10, etc). Note: An analogue input can control a component's parameter only if his corresponding component's input and output are linked to something in the design. TTL and Groups In this example we will change the control 10 from analogue to TTL. By default the controls input are defined like this in the external settings: At first, change the control 10 to TTL: Then open View/Logic IN, and select the tab "Groups". Select your LAP. And then select the group number 10: Now to assign the control 10 to the group 10, push the button "10". An assigned button is pushed and displayed in black (not in grey). 63 LAPG2G2 MANUAL Version EN.12 Now you can use this control. Of course, you have to assign it to a component parameter. 4) Create audio signal path All of the DSP functions of a processor are made in their DSP function design windows. To access these windows double click the processors icon in the 'System' window or choose: > DSP Functions from its content menu. Your screen ought to look like this: At the left side in the 'Design Control Section' the control window 'Components' becomes active and the 'Design View Area' is showing the DSP design window entitled 'LAPG2 (LAPG2name) already holding the icons of the I/O modules you defined in the 'Configure Modules' dialog when you added the processor to the system. To create a signal path: The purpose is to connect Inputs to outputs through various modules (components) allowing to modify or route the signal. 64 LAPG2G2 MANUAL Version EN.12 5) Assignation philosophy (choose which adjustments will be piloted by what) Once your signal path is created by using component you can choose how to pilot or which action will produce each parameters of every components. To have access to parameters of components simply double click on the desired component. When you right click on an adjustment (parameter) of a component you will see all the action you can assign to this parameter For the example we have use the input component: Right click on a LED of a parameters of a component Copy: Copy the LED, to past it into monitor window Virtual Control: If you have defined one or several virtual logic output(s) (virtual window) you can assign this LED to one or several of those virtual LED(s). 1) Name of the type of virtual control (here Logic Output) 2) Name of the virtual control (here there is no virtual control defined) Control: Here you can choose to active one (or several) Logic connector(s) of the LAPG2 system with this LED 1) Name of the type of hardware connectors (here logic Output) 2) Name of the LAPG2 (if you have several LAPG2 here you choose which LAPG2) 3) Hardware channel output connector which will be assigned to this software LED (here the channel number 3, Logic output number 3 of the LAPG2 named 1) Right click on a Logic button of a parameters of a component Copy: Copy the Logic In button, to past it into monitor window Third party control: click on this item to select this adjustment for third party control. This action will put the adjustment (parameter) in the third party control list window. Subpreset: Click on this item to select this adjustment for subpreset control. When you use subpreset it is like you take photography of the states of the selected adjustments. Virtual Control: If you have defined one or several virtual logic input(s) or logic output (virtual window) you can assign this logic in to one or several of those virtual LED(s) or virtual Button(s). 1) Name of the type of virtual control 2) Name of the virtual control (here there is no virtual control defined). If you click none you erase all previous assignment of this parameter in this LAPG2. 65 LAPG2G2 MANUAL Version EN.12 Control: Here you can choose to active one (or several) Logic connector(s) of the LAPG2 system with this button (logic in) or to activate this button with hardware control input. 1) Type of hardware connectors assigned to this software logic In. 2) Name of LAPG2 in the system which will have the assigned connector. Here the 8 first control inputs of the LAPG2 named training1 are defined as logic input. If you click none you erase all previous assignment of this parameter in this LAPG2. 3) Number of the connector assigned to the software logic input Note: To define control input as logic(TTL) or Analogue input, see define control input. Event: You can choose to assign this software logic in to an Event (after you will have the possibility to select the state of this software logic input when the event is activated) URC: When you use a URC you first define “Label” it is just a name that appears on the URC’s screen. Here you can assign this software input to a specific label (after the LAPG2’s name and URC’s name, all the label will be listed for each URCs). Right click on a analogical button of a parameters of a component Copy: Copy the Logic In button, to past it into monitor window Third party control: click on this item to select this adjustment for third party control. This action will put the adjustment (parameter) in the third party control list window. Subpreset: Click on this item to select this adjustment for subpreset control. When you use subpreset it is like you take photography of the states of the selected adjustments. Virtual Control: If you have defined one or several virtual analogical input(s) (virtual window) you can assign this fader to one or several of those virtual knob(s). 1) Name of the type of virtual control 2) Name of the virtual control (here there is no virtual control defined). If you click none you erase all previous assignment of this parameter in this LAPG2. Adjust type: simply choose which can of analogical input it is (log, anti log or linear) Adjust direction: choose the direction for increasing (or decreasing) the value 66 LAPG2G2 MANUAL Version EN.12 Control: Here you can choose to pilot this fader with hardware control input. 1) Type of hardware connectors assigned to this software analogue in. 2) Name of LAPG2 in the system which will have the assigned connector. Here the 8 last control inputs of the LAPG2 named 1 are defined as analogue input. If you click none you erase all previous assignment of this parameter in this LAPG2. 3) Number of the connector assigned to the software analogical input (CH = control input, rear of the LAPG2 and FP front panel, front of the LAPG2) Note: To define control input as logic (TTL) or Analogue input, see define control input. Event: You can choose to assign this software logic in to an Event (after you will have the possibility to select the state of this software logic input when the event is activated) URC: When you use a URC you first define “Label” it is just a name that appears on the URC’s screen. Here you can assign this software input to a specific label (after the LAPG2’s name and URC’s name, all the label will be listed for each URCs). 67 LAPG2G2 MANUAL Version EN.12 How to… In this section you will have quick access to learn in details how to exploit LAPG2 capabilities. Please, except the first four sections, read the 68 LAPG2G2 MANUAL Version EN.12 Start a project (basics and generalities)chapter before this section in order to learn the basics. Connect PC to LAPG2 Generalities There are two types of connections with LAPG2 software: Ethernet connection LAPG2 system connection Ethernet connection This connection allows PC to discuss with LAPG2 (one or several LAPG2 in a network) once this connection established you can: Check version of LAPG2 system or remote device (PPM, URC) Update LAPG2 system or remote device (PPM, URC) Upload design file in LAPG2 system Connect PC to LAPG2 to adjust parameters in live Connect the device Connect your computer to the Ethernet connector of the LAPG2 using a straight CAT5 cable. You can also using an Ethernet HUB (router) to connect your computer to several LAPG2. And switch on the LAPG2. 1) Define IP address By default (factory settings) the address of the LAPG2 is 192.168.100.XYZ where XYZ is the specific address of the device. First of all you have to be sure that your computer net card is set on this network. Please refer to your network card user manual to set it. You can safely choose 192.168.100.1 as network address for your computer… With windows XP © you can proceed as follow to change your network address (With windows VISTA you should do similar steps). Note: for the picture the computer is in French… Click *Start+ button choose “parameters” “network connection” This action will open your Network connection window: 69 LAPG2G2 MANUAL Version EN.12 Right click on the icon of your connection (normally it is your local network) and choose “PROPERTIES” Then double click on “internet protocol TCP/IP” Choose: Use the following IP address And enter the desired IP address for your computer 2) Set Ethernet connection Now the computer is set for the right network let’s see how to choose which computer net card will be used by the LAPG2 software. Open the option window (menu tools) and choose the Network Tab 70 LAPG2G2 MANUAL Version EN.12 Here you can see which net card is used by LAPG2 software. And also which address and UDP Port are used by computer. Be sure to choose the right net card (NIC) (for example here we have the choice between the WIFI and Local network) 3) Scan (Search) every LAPG2 in the network Open the Establish Ethernet Link window (menu Tools) If you know the IP address of the LAPG2 you can enter it in the IP address field. If you doesn’t know the address or you have several LAPG2 connected in the network leave the field blank. Be sure the port field is the same as the one define in the (option window, network tab) To scan the network and detect LAPG2 click on [search] button 71 LAPG2G2 MANUAL Version EN.12 If you have this message box Verify the steps 1) and 2). And close LAPG2 software and re-open it Open Ethernet connection Select the LAPG2 you want to connect to (it makes sense when you have several LAPG2) and click [connect] button. Once the connection process complete (successful) the computer is ready to communicate with the LAPG2. To know if the Ethernet link is activated a green Ethernet led appears in the bottom right of the LAPG2 software. LAPG2 system connection This connection allows you to pilot audio settings of LAPG2 system, change Sub Preset or master preset, use monitor window… 72 LAPG2G2 MANUAL Version EN.12 To connect to the LAPG2 you have to be sure that the configuration file in the LAPG2 is the same as the file opened with the software. Then simply click on connect icon (or operation connect) This will start the connection process. If you are connected a green led will light on bottom left of LAPG2 software. Change IP address of LAPG2 To change the IP address of an LAPG2 1) Connect to the LAPG2 locally (LAPG2 have to be alone) 2) Open the “option” window (menu tools) 3) Choose the Internet Protocol (TCP/IP) Tab. 4) Enter the information you need (for our example we just change the 6 in an 8): 192.168.100.6 Becomes 192.168.100.8 If you need click on [Read] to know what the address of the connected LAPG2 is. When you have made changes click on [Save] to store changes into LAPG2. 5) RESTART the LAPG2 to make changes effective. If you start the search process the new address will appears: Create a system with several LAPG2 in the NETWORK 73 LAPG2G2 MANUAL Version EN.12 Thanks to its loop architecture, the Ateïs-Net audio network is fully redundant. If a problem (Line open or shorted) occurs on a loop segment, it will be automatically isolated without affecting the system functionalities. Up to 32 LAPG2s can be connected together on the same network. As the Network addresses are auto-negotiated, the network set up is very easy. When you define the system, you can see how to connect the LAPG2 in order to create the network. In this picture we see that we have to connect port B of the LAPG21 in the port A of the LAPG22 then because of the redundancy, connect port B of the LAPG22 to the port A of the LAPG21. Each LAPG2NET card has two ports labelled 'A' and 'B', where the 'A' port is the input and the 'B' port goes to the next sub-device in the line. Make sure to close the loop by connecting the 'A' of the last LAPG2 to the 'B' of the first one. If the network is well connected the twos LEDs (Port A and Port B) should blink. Connection with CAT5 cable is not complicated. Just use a straight cable (not crossed). But with optical make sure to cross Tx and Rx between port 'A' and port 'B': Right connection False connection If you have several LAPG2s in Network, to route the signal use Net input and Net output components. You will create an audio network by connecting an Input to a NEToutput and you can recover this signal in another LAPG2 by inserting a NETinput (with the same number as the NEToutput) . For example: If you want to have Input A1 of the LAPG21 to Output B2 of the LAPG22, connect LAPG21 A1 to a NEToutput (A1 for example) and connect Output B2 to the NETinput A1. Send audio through network Receive audio through network 74 LAPG2G2 MANUAL Version EN.12 Check LAPG2 version To know which versions are loaded in the devices and which version are available with the LAPG2 software: Choose menu: > Help > Version If you have trouble to read version it is probably due to the fact that the system is not configured. It means that the software doesn't know how many LAPG2 are connected to it and the LAPG2s doesn't know their place in the network (even if you have one LAPG2) to set up the system: 1) clean MCU 2) make a simple design (just define LAPG2 system) 3) compile it and load it. (If the system is not configured, the software will ask you if you want to do it. Click [yes]) The software will check if the version between the AP and the LAPG2 are matching. and tell you if it is not the case. After those Steps you can read the version. Note: During the Store process, the software verify the different versions (DSP, MCU, NET, PM and URC) If the version are not correct, a message appears. Connect LAPG2G » to your PC Launch the LAPG2 software Choose menu: > Help > Version Click Firmware Ver:: if red indicates that MCU has to be updated. DSP Ver:: if red indicates that DSP has to be updated. FPGA Ver:: if red indicates that NET has to be updated. Version mismatch is displayed in red, indicates that you have to update the Firmware 75 LAPG2G2 MANUAL Version EN.12 When you have URC or PPM defined and connected you can also check if versions are OK. Note : Updating the LAPG2 software sometimes makes necessary to update the LAPG2's firmware also. Updating the LAPG2 software sometimes makes necessary to update the LAPG2's firmware also. Updating Software LAPG2/URC/PPM firmware version For the software: New versions are available on the net. Read carefully the release note in order to determinate if updating is required or not for your specific system For the firmware: The purpose is to match the version contained in your LAPG2-PPM software with the version contained in LAPG2's hardware. First: Read version to know if there is versions mismatching. Then, if needed, proceed to the update Update: o DSP o MCU o PPM or URC Update DSP Updating the LAPG2 software sometimes makes necessary to update the LAPG2's firmware also. To do this follow these steps: Note: Update DSP always BEFORE a MCU firmware update; even if there is no MCU firmware mismatch when reading the firmware versions. Open the Ethernet connection Choose menu: > Tools > Update... (DSP Tab) Select the LAPG2 you want to update (click on the box on the left) Click [Update] Update MCU Update MCU always after a DSP firmware update; even if there is no MCU firmware mismatch when reading the firmware versions. Open the Ethernet connection Choose menu: > Tools > Update... (MCU tab) Note: 76 LAPG2G2 MANUAL Version EN.12 Select the LAPG2 you want to update (click on the box on the left) Click [Update] Note: you can update several LAPG2 at same time Update URC Open the Ethernet connection Be sure the URC is detected (search process and IP address given) and connected Choose menu: > Tools > Update... (URC tab) Select the URC you want to update (click on the box on the left) (you can update several URC at same time) Click [Update] Update PPM Open the Ethernet connection Be sure the PPM is detected (search process and IP address given) and connected Choose menu: > Tools > Update... (PPM tab) Select the PPM you want to update (click on the box on the left) (you can update several URC at same time) Click [Update] 77 LAPG2G2 MANUAL Version EN.12 Upload (Store) a design file into LAPG2 When all the settings (signal path) are Ok, we just have to upload them into the LAPG2 system. 1) Compile your project: menu: “Compile >Compile...” or hit Ctrl+F4 or click on this icon: 2) When this window appears click OK: If this window does not appear, or if there are warnings, there is some trouble with the configuration (design). Check it and correct the mistakes, sometimes it is preferable to restart the LAPG2 software if there is a trouble and to many error messages. 3) Now we are going to load the LAPG2 with our configuration: menu “Operations > Store...” or hit ctrl+F7 or click on this icon: 4) this window appears: 5) Click [Store], you will see the load process. 6, 7 and 8) FOR URC AND PPM only: 6) At the end, if the remote is well configured this dialogue box appears: 78 LAPG2G2 MANUAL Version EN.12 Note PPM: If this dialogue box does not appear, it means that the PPM is not recognized by the LAPG2. A yellow light flashes on the PPM (Fault led). You have to restart the research procedure. 7) Click Yes, the URCs and PPMs are configured when this dialogue box appears: 8) Click Ok. A dialogue box appears and asks if you want to connect to the machine. Click Yes if you want to pilot some settings with your computer. 9) Another dialogue box appears and asks if you want to “order audio_enable”. Click Yes if you want inputs and outputs to be active. Adjust Time / Date Select Tools --> Machine configuration This window open: Click [Read] to load the LAPG2 values. Set Date&Time manually: Click on (respectively) "Date" field and "Time" field, write the wished date & time. Then click [SET] to load these values into LAPG2. 79 LAPG2G2 MANUAL Version EN.12 Get Date&Time from the computer: Click on [Get Current Time] will display the date & time of the computer. Then click [SET] to load these values into LAPG2. Time adjustment: If you use the UAPg2 connected to internet, our advice is to synchronize the time with NTP protocol. If you use the UAPg2 in stand alone, then the only way to adjust the time if needed is to use the parameter "Time error (Sec)". At first, set the time (from the PC or with NTP), and remember this time. Leave the machine working in stand-along during one month. After one month, record the current time and see the formula. Time Error(sec)=(current time -previous time)/30 Set time error sec in machine configuration. Every day at 00:00, the machine will automatically increase/decrease the time(calibration time). Adjust Time/Date with NTP Set the LAPG2 to have the date/time updated in real-time by the NTP servers. NTP means Network Time Protocol. First of all, Select Tools Option Check the IP address on the both "Network" and "Internet Protocol" tab. The IP address of your PC (Network tab) must be in the same network than the IP address of the LAPG2 (Internet Protocol tab). The Gateway must match with the gateway of the local network where is connected the LAPG2. If you change a parameter, then the LAPG2 must be restarted. Unroll the "country" menu and select your time zone. Then next to "Network Time Protocol", select "On". 80 LAPG2G2 MANUAL Version EN.12 Click [read] to see which settings are into each LAPG2 of the system Click [SET] to load some settings changes Create new Users and assign specific rights You can define up to 40 different users. Each user is protected by password. Different user's rights are adjustable for each user. To set users right: Click menu: "User --> User management" A windows appears you can add new users click clicking or you can delete user by selecting it and . By clicking you will store the user's table in the LAPG2 (make sure that the LAPG2 is connected to the computer) By clicking you can adjust the users privileges and define password: 81 LAPG2G2 MANUAL Version EN.12 First enter User name then password. If you check Customized in the Set Access Privileges, By notching the white square you can select which are the privileges of this user (by notching what do you want). In the field "Select the files you wish to assign properties to" you can select LAPG2 files the user will have access to when he starts the LAPG2 software and enters his password. Use the Virtual window (Create Virtual control) The Virtual Control allows you to define group buttons, LEDs, or Fader. You can import those groups in the Monitor Window. Open Virtual Window: menu: > View > Virtual control (or F11) 1) Select by drag and drop (from the Design Control Area to the Virtual control window) which kind of controls or indicators (Logical In, Logical Out or Knob) you want. 2) Name the virtual adjustment by right-clicking on it: > Properties > “Function field”. You can also adjust some settings, in the properties window. 3) Assign which adjustments you want to control with this virtual adjustment (double click on the component icon then right-click on the adjustment and select Virtual control > analogue in, logic 82 LAPG2G2 MANUAL Version EN.12 in or logic out (depends on which kind of adjustment you want to control) > name of the virtual adjustment. 4) If you want to use the virtual adjustment in the Monitor window right click on the virtual adjustment and select > copy to Monitor then paste it on the monitor window. Use the Monitor window The Monitor window is a window in which you can bring all the adjustments and indicators you need for your project. This is helpful if you want to have a graphical control interface. See View/Monitor settings to set the options of the monitor window. 1) Open the Monitor Window: > View > Monitor (or F12) 2) For each adjustment you want to import in the monitor window: a) Double click on the component icon b) Right-click on the adjustment you want to import c) Select > Copy d) Then go to the Monitor window 83 LAPG2G2 MANUAL Version EN.12 e) Right-click where you want to paste the adjustment f) Select > Paste In the “Design Control Area” you have three choices (drag and drop to have them on the monitor window): Label: Adds a written message Group button: Adds a button which opens a submonitor window Image: Adds a background Image Password Setup / Lock If you want to protect the access to the LAPG2, click on . Chose and type two times a password (this is not an user or ID user management). Now you can lock the system by clicking on . To unlock, click on the button and type the password. 84 LAPG2G2 MANUAL Version EN.12 Tips: If you want to create a complex Monitor window (for operator only) create all the parameters you'll need in Administrator mode. Then create another user with the following rights, and made the window directly with the right window size (it is more convenient) Use the monitor window in auto-logon You can create a specific user to have only an access to the monitor window. This user must be associate with a configuration file (*.LAPG2). At first, disconnect with the LAPG2, and open File -> Save As. Save the configuration. Open User -> User Management: Click [Add] to create a new user: 85 LAPG2G2 MANUAL Version EN.12 Write the User Name and the Password. Unroll the menu and select "Operator", this predefined user has an access only to the monitor. He can connect or disconnect, enable the audio or not and change the control settings in the components. Click [Open] to open the browser and select your configuration file. This configuration will be automatically loaded when the user will type its user name and password. Click [Ok] to save and close the window. Click [Close]. Open View -> Monitor Settings: Notch the options of the monitor window. See View/Monitor settings for more details. To have an automatic logon, notch at least "Auto Connect". Click on [Close] to close the window. Compile. Save your configuration in the file . Then store the configuration. If the IDM is required (access to the Master-Presets), type the default IDM user which is ADMIN (no password): The system is ready. Disconnect and close the software. 86 LAPG2G2 MANUAL Version EN.12 Now to access to the machine, the monitor user has to follow these steps: 1. Open the LAPG2 software 2. Type the User and Password The ethernet connection and also the machine connection will be done automatically: Auto ethernet connection Auto machine connection Close these windows. Now the monitor window is opened, and the user is connected (ethernet and machine). Ethernet connection (Icon always available) User login (software & configuration access) (available if unconnected with machine) Machine connection lock/password 87 Software EXIT IDM login (Master-Preset access) LAPG2G2 MANUAL Version EN.12 To return in administrator mode, the user has to disconnect with the machine Click on the User Login , , and then type the default user ADMIN. If you find trouble check the following points: Control the settings in View -> Monitor Settings. Be sure to save the configuration file after compilation (needed after every change in the config). Master-Preset access limitation: If you want to limit the Master-Preset access depending of the user, then don't select the "autoconnect" option in the Monitor Setting window. Create an IDM (User -> ID Management) and select for this IDM the authorized Master-Presets. When the user will start the software, he will have to type the UserID. The ethernet connection will be done automatically, and the configuration will be loaded but the machine won't be connected. The user has to click on the "Machine connection" icon and type the IDM. Only the Master-Presets associated to the IDM will be loaded. 88 LAPG2G2 MANUAL Version EN.12 Use Master Preset /Sub Preset Master Preset allows storing of several different DSP design in a same configuration. For example if you have room which can be separated into two smaller sized rooms etc. Sub Preset allows you to store different adjustments (Level, mute) but not (as Master preset) to change DSP design (change routing, modules...) Master preset Master Preset allows storing of several different DSP design in a same configuration. : Indicates which current Master Preset you are working with. : Names the different Master Preset : Add or Delete Master Preset 1) Define (Add and Name) the number of Master Preset that you need. 2) Select the Master Preset you want to work with and make your design. 3) Do the same for each Master Preset To change Master Preset simply change the current Master Preset when the PC is connected, or use URC or Logical connectors (see corresponding How to.. chapter to know how to proceed) Sub Preset Sub Preset allows different adjustments (Mute, Volume,...) in a same Master Preset. But you cannot change the design as in the Master Preset. : Name of the current Sub Preset : Add (+) or Delete (-) a Sub Preset : Manages Sub Preset name : Saves (<) or Load (>) Sub Presets Example of use: For example we are going to define two sub-presets: - the first with all the C inputs on +20dB (Sub Preset's name: A + 20dB). - the second with C inputs set to -90dB and Mute on (Sub Preset's name: A mute). 1) Define the two Sub Presets. Click twice on the (to add two Sub Preset) 89 LAPG2G2 MANUAL Version EN.12 2) Click and enter the name of the Sub Preset: 3) Click the name of the current Sub Preset appears: 4) Then we are going to choose which adjustments we want to assign to the Sub Preset: Double click on the component you want, (for our example double click input C), then right click on the adjustments and assign the adjustment to the Sub Preset. A blue dot appears if there is a Sub Preset assigned to the adjustment. Repeat that for all the adjustments. 5) Set the adjustments: click on the Sub Preset you want to store the adjustments: For example A mute: Then adjust what you want: 6) When the adjustments are OK. Click to (save) in order to store your adjustments in the current Sub Preset (you make a kind of photocopy of the adjustments you have selected in this Sub Preset). Repeat those actions with the other Sub Preset. 7) If you want to load saved Sub Preset select the Sub Preset you want and click 90 (load). LAPG2G2 MANUAL Version EN.12 Use a PPM Because every remote device needs power, you will have to add external power supply every three remotes devices or every 300 meters. Except for the first three remote devices or the first 300m, power will be delivered by the LAPG2. The maximum distance between LAPG2 and remote device is 800m. There are four main steps to configure a (or several) PPM(s): 1) Connect the PPM 2) Define the system with the PPM 3) Search and set the PPM (The LAPG2 scans the system and attributes a specific IP address for each remote device (PPM and URC) automatically) 4) Adjust PPM's parameters You can also assign chime to a PPM. Note: Always clear remote address before installing or changing system with new PPMs. If during the search process the system do not find the correct number of remote devices clear remote IP then search again. If it doesn't correct the problem please check the wiring (to be sure that data A and B are well connected: A to A and B to B). Connect PPM To connect PPM, use the RS485 connector. For several PPMs you may have to use Junction boxes (JB). Connect Audio to the LAPG2 Input you want but take note of which PPM is connected to which input (note the serial number). After that, define the system with the PPM. Note: If you have a bad connection: Switch on the end line resistor on the last Master PPM (rear of PPM). Slave feature is not available for the moment. Maximum lengths: Without External Power Distance: • Between LAP and JB: 300m • Between JB and PPM: 2m With External Power Distance: • Between LAP and JB: 850m • Between JB and PPM: 2m Cable specifications : 4 Pairs Enhanced Cat.5e UTP 91 LAPG2G2 MANUAL Version EN.12 Define system with PPM Drag and drop the PPM in one of the LAPG2 inputs (A3 for our example) in accordance to the inputs you have physically connected the PPMs. If you have several PPMs repeat this for each PPM, then Search and Set the PPM(s) (gives IP address to each PPM). Search and set PPM 1) First make sure to clear all old remote IP address. 2) Click “View Remote list” or hit 2) A window appears, click on PPM’s page, not on URC’s one. 92 LAPG2G2 MANUAL Version EN.12 3) Click ... 4) A new dialogue window appears, Click again... 5) When the system has finished the search, a list with the various connected PPM appears. Each PPM is identified by its own serial number. This number is written on a sticker at the back of the PPM. The system finds automatically each PPM (In our example the PPM’s serial number is: R00126). Note: If the system doesn't find all the remote devices: clear all remote IP address (Shift+F5) and search again. 6) Click . 7) Select the PPM in the first window by assigning the corresponding serial number to each PPM (For our example on Input A2 of LAPG21 we have connected the PPM R00126): 93 LAPG2G2 MANUAL Version EN.12 8) Click , then click The system is now ready to work with the PPM connected on the input A2 of the LAPG21 (according to the last picture). Just let's adjust some PPM's parameters. Adjust PPM parameter Double click on the PPM icon in the system window: 2) A window appears: Serial No.: Name: Priority: Key: Serial number of the PPM connected on this input (on which we double clicked). Assign a name for this PPM Fix the priority of this PPM compared to others. (1 = highest priority, 8 =lowest) Number of key (8 for a single PPM, or more with extension’s modules, up to 64) Talk/Push: The microphone is switched on only if the Talk’s key is maintained. Talk/ Locked: A pressure on the Talk’s key to switch on the microphone, a second pressure to switch it off. 94 LAPG2G2 MANUAL Version EN.12 Message control: You can have access to this option only in connection state. If notched, the last keypad is able to start messages. To be able to start messages from the PPM-SP, a keypad V2 must be link to the PPM-SP. Even, if you add several keypads, only the last one is able to start messages. (With additional keypad, don't forget to change the Key number in the PPM setting). Stacking Paging Cancel: If not notched, the PPM-SP will record the announcements in case of the destination is already busy by another PPM-SP. The announcement will be play as soon as the destination will be available. Announcement Setup: Open a window to regulate the chime. See Configure Chime for further information. By default the PPM has two chimes in his internal memory, click on the "active" box and select which chime you want by clicking in the "Index" field. When all the settings are Ok, the PPM is ready to be used like any kind of input sources. To learn how to configure the system in order to control the access of the sound to various areas through the PPM’s keys, see the "define paging with PPM" chapter. Rear PPM adjustments At the rear of the PPM you can adjust level of mic, speak or chime. You can also have additional keys with PPM KEYPAD (the connector is on the left of the picture) Assign chime to PPM You can upload maximum 128Kb (of wave files 16 bits 16 kHz mono) in a PPM. The chime name is limited to 14 char including format. 1234567890.wav > OK 12345678900.wav > the name is too long, it won't appears in the wave library. There are three steps to load chime to a PPM: 1) Select chime 2) Load chime (Wave files) in the PPM 3) Adjust PPM's chime 95 LAPG2G2 MANUAL Version EN.12 Select chime Open the window “Wave library”, menu “view”: Select which gong you want to use. Clicks «save to library ». Click Note: If the file is already transfer the message says: "there are 0 wave file transfer to Wave library". Then close this window: . You can also load your own wave file: 16bits, mono, 16kHz in the wave file manager window (menu “view”): by clicking add from file: Then click [Transfer]. 96 LAPG2G2 MANUAL Version EN.12 Load chime Open the window “Chime data store” menu “view”: If you have several PPM connected, choose in which you want to load the gong. Click on the to open the Wave library. Select the files to upload in each PPM. The chime name is limited to 14 char including format. To import a wave from your computer, click on . To import a ZIP file from your computer, click on Click on . to send the file in the “Chime Data Store”. 97 LAPG2G2 MANUAL Version EN.12 Click (or if you change only one PPM chime select it and click Ind) The wave files are uploaded in the PPM. Depending on your system, this operation takes time. When the process is complete, close the window. Adjust PPM’s chime Open the PPM manager window menu “View” “PPM Manager” Click in the “Chime” field of the PPM which you want to authorize the chime. you can also reach this window by double clicking the PPM’s icon, and click on the “Announcement” Setup button 98 LAPG2G2 MANUAL Version EN.12 The PPM announcement manager window appears: Click in the Index field to select the wave files you want to use as a chime. Activate it by notching the Active box. If you have several PPMs, repeat the manipulation for each. When all those adjustments are done, compile your project and upload it in the LAPG2. Create paging of PPM with NPC To page the audio signal of PPMs you will use NPC (Network Page Control). NPC uses network channels. If you have several LAPG2s with several PPMs, you can re-use outputs of the NPC directly in the system window of another LAPG2. You can reach all the LAPG2 through the network You cannot add more than one NPC per LAPG2. If you have one PPM and several LAPG2s simply define one NPC for each LAPG2 but only define input for the LAPG2 physically connected to the PPM. For example if we have two PPMs on LAPG21 and one PPM on LAPG2: We add a NPC component with 2 inputs in first LAPG2 and a NPC with one Input in the second LAPG2: 99 LAPG2G2 MANUAL Version EN.12 PPM 1 of LAPG2 number 1: Double click on the component (NPC) of the first LAPG2. As you can see, when you open a NPC component you will always see all the NPC of the LAPG2 network. Select the "Input 1" tab, unroll "audio Module" and select the virtual input of LAPG2 where is connected the PPM 1. After that you can choose on which zones you will have microphone signal when a key is pressed by notching the boxes: If you want to route this PPM audio to the NPC of LAPG2 number 2, you don't need to add wires, simply notch the whished output of the NPC number 2, which is display on all NPC component in the system. 100 LAPG2G2 MANUAL Version EN.12 PPM 2 of LAPG2 number 1: Now select the "Input 2" tab, unroll "audio Module" and select the virtual input of LAPG2 where is connected the PPM 2. PPM of LAPG2 number 2: Select the "Input 1" tab, unroll "audio Module" and select the virtual input of LAPG2 where is connected the PPM. Caution: be sure to notch the boxes corresponding with the good NPC. In this example for a local paging we have to notch the boxes of NPC number 2 (1x8) and not NPC number 1 (2x8)… 101 LAPG2G2 MANUAL Version EN.12 Use PPM KeypadG2 to trig Message Events Connect to your PPM-SP or PPM-G2 a PPM-KeypadG2. Wire it physically to the LAPG2. Only the last KeypadG2 will be used to trig messages. In the System page, add the remote PPM icon to an input. In the menu Tools, clear the remote IP and search the PPM device. Double click on the PPM icon and select to number of Key that you have (1 PPM+1 Keypad = 16 Key / 1 PPM+2 Keypad = 24 Key / etc ). When you will be connected (after compilation and storing), you will have to notch the "Message control" option. Double click on the LAPG2 to enter in the draw window, and drag and drop the "Message Player", and LPC component. The message player must send its audio to the input of the LPC. If the PPM is also used as microphone, you have to mix the both microphone input and message player, you can do that by several ways, Matrices, Ducker, etc. 102 LAPG2G2 MANUAL Version EN.12 Then double click on the LPC component, and notch the table to make the routing as you which. Select the good audio input in the Audio Module Box. You cannot have fixed route for the messages, so don't assign zones to the Keypad Keys. In the message player component, add several Message events, and assign them to audio files. Double click on the "Message player" component, add several "Message Play" events and assign them to audio files. Open the Event management windows, and notch the "Third Party Cont." option for each message event. Open the "Third Party Control" floating window. Write PPMx under "Command_id" , where x is the Key number of the KeypadG2 (from 1 to 8). By this way you can chose which Key of the KeypadG2 will start which message. 103 LAPG2G2 MANUAL Version EN.12 After compilation and storing you can trig messages: -Select the zones where the message will be played by pushing some key on the PPM-SP(or G2), and then push the Key of the PPM-KeypadG2 (that's the message selection). Use PPMTouch At first connect the PPMTouch to your TCP/IP network. If your switch/hub provides PoE (power over ethernet) then you don't need to use a power supply, the switch/hub will bring power to the PPMTouch. If you don't have PoE, then power the PPMTouch with the external power supply. Set the IP settings of your PC to be on the same network than the PPMTouch. 104 LAPG2G2 MANUAL Version EN.12 Define the PPMTouch in the LAPg2 software With the PPMTouch, there is no need to put it in the System window as we do with the PPM and PPM-SP. Double-click in the LAPg2 icon, to open the component list. Drag and drop one of the LPC to the design area. The PPMTouch can have 16 output zones at max. Drag and drop the PPMTouch component to the design area. Link the PPMTouch component output to the input of the LPC. Connect also the LPC outputs to the zone outputs. 105 LAPG2G2 MANUAL Version EN.12 Setup the PPMTouch Open your web browser, and type the IP address of the PPMTouch. That will open the web interface of the PPMTouch. In the window's top, there is three buttons to access to the main pages: To configure the settings, click on [SETUP]. In this page you can set the network settings of the PPMTouch. PPM IP Address: UAP IP: Router: Priority: Don't forget to click on the IP address of the PPMTouch. the IP address of the controlled device, the LAPg2. the IP address of the gateway. not available (will be used to set the priority of the PPMTouch when there is several PPMTouch). to store these settings. 106 LAPG2G2 MANUAL Version EN.12 Define Paging Open your web browser, and type the IP address of the PPMTouch. To configure the paging, click on [PAGING]. The PPMTouch provides 30 programmable keys. These keys are displayed on three pages, available with the Page buttons. Each key on the PPMTouch is configurable on an independent box: Btn* name : The label displayed in the key number * of the PPMTouch. Zone* selection: The output numbers of the LPC component in the LAPg2. The output numbers must be separated with a space. You can set several outputs in one key, as you can see in the Btn12 example above. Don't forget to click on to store these settings. 107 LAPG2G2 MANUAL Version EN.12 Define Messages Open your web browser, and type the IP address of the PPMTouch. To configure the paging, click on [PAGING]. Don't forget to click on to store these settings. Define Control Control a fader In the LAPg2 software, open the component to control. To control a fader, right-click on the fader and select "Third Party". Open View/Third Party, and select the "Elements" tab. You can see the element control. At the moment, you cannot choose the increasing/decreasing step. It is fixed to 2,2 dB. Just add a "I" to the command ID (here C001) to increase or a "D" to decrease. In this example, the command IC001, will increase of 2,2 dB. The command DC001 will decrease of 2,2 dB. Not available in v1.0.0.34: Click on the three dots ( ) of the event, that will open this window. 108 LAPG2G2 MANUAL Version EN.12 Here you can see three different command: Increase, Decrease, Read and Write. If you want to increase or decrease the fader, then you have to write the step (in dB) in the horizontal fader in the window top. The Command will change, depending of the step. If you want to write a value, then you have to write this target value on the knobs, in the window bottom. The Command will change, depending of target value. If you want to read a value, then you don't have to set the knobs, just use the Command. You can read, under "Commands", the Command string to be set in the PPMTouch. Please see Set Control on PPMTouch chapter. Control a button To control a button, we need to use two events, one event is used to active the button and another to release it. Open View/Event Management. Click [Add] two times, to create two events. Under "control Type" select "Element Adjustment". Rename the event as you want. Now push your button to have it in its "active position". Then right-click in the button and select the event for the activation (in our example, Mute On). 109 LAPG2G2 MANUAL Version EN.12 Then do the same for the other button position. Release the button and assign it to the event for the release (in our example, Mute Off). Now open again View/Events Management. Notch the "third Party" option for the both events. Check on "Mount", it must be 1 if the event is assigned to an element parameter. Open View/Third Party, and select the "events" tab. You can see the both events. Click on the three dots ( )of the both events, one by one, that will open these windows. 110 LAPG2G2 MANUAL Version EN.12 You can read, under Command, the Command string to be set in the PPMTouch. Compile and store the configuration. Please see Set Control on PPMTouch chapter. Set the controls on PPMTouch Open your web browser, and type the IP address of the PPMTouch. That will open the web interface of the PPMTouch. In the window's top, there is three buttons to access to the main pages: To configure the controls, click on [CONTROL]. 111 LAPG2G2 MANUAL Version EN.12 In this page, you can see twelve boxes. Each one is a key on the PPMTouch. For example we will set the three controls, set in the previous chapters (See Control a button, and Control a fader chapters) : "Volume", "Mute On" and "Mute Off". We will use the key 1,2 and 3. For each key, write the name of the control which will be displayed in the PPMTouch. Under Destination IP, write the IP address of the LAPg2. In the Command String box, write the command string of the control. This command string is displayed in the third party window, in the LAPg2 software. (See Control a button, and Control a fader chapters) . Don't forget to click on to store these settings. 112 LAPG2G2 MANUAL Version EN.12 Use an URC Because every remote device needs power, you will have to add external power supply every three remotes devices or every 300 meters. Except for the first three remote devices or the first 300m, power will be delivered by the LAPG2. The maximum distance between LAPG2 and remote device is 800m. There are six main steps to configure a (or several) URC(s): 1) Connect the URC 2) Define the system with the URC 3) Search and set the URC (The LAPG2 scans the system and attributes a specific IP address for each remote device (PPM and URC) automatically) 4) Define and adjust URC's parameters 5) Assign adjustments 6) Set adjustments Note: If you have some troubles during the procedure, try to clean the LAPG2 memory (first try to clear remote IP address, after, if needed, try to clean MCU data then restart LAPG2-PPM software) Connect URC To connect URC, use the RS485 connector at the rear of the LAPG2. For several URCs you may have to use Junction boxes (JB), or you can daisy-chain them. Note: It is recommended to not put more than 8 remote devices (PPM and/or URC) on one LAPG2. Note: If you have a bad connection: Switch on the end line resistor on the last URC (Blue switch: 1 = inactive, White square = active). Define the system with URC Drag and drop the URC to the communication port of the LAPG2 (C, at the top of the inputs). If you have several URCs and several LAPG2, define the URC to the LAPG2 in the same way as the physical connection. 113 LAPG2G2 MANUAL Version EN.12 Search and set URC After defining the system, it is necessary to communicate where and who are the URCs to the system. The research procedure is automatic, but requires to be launched. 1) First make sure to clear all old remote IP address. 2) Click “View Remote list” or hit F9 You can also double click on one of the URC’s icons. A windows appears, click A window appears, click on URC’s page, not on PPM’s one. 3) Click ... 4) A new dialogue window appears, click again... 114 . LAPG2G2 MANUAL Version EN.12 5) When the system has finished the search, a list with the various connected URCs or PPMs appears. Each URC is identified by its own serial number. This number is written on a sticker on the URC. The system finds automatically each URC (in our example the URC’s serial numbers are: U00132 and U00117). Note: If the system doesn't find all the devices: Clear all remote IP address and search again 6) Click 7)SET the URC: Select the URC in the first window by assigning the corresponding serial number to each URC (for our example we have connected two URCs on LAPG2 1) : 8) Click , then click . The system is now ready to work with these two URCs. 115 LAPG2G2 MANUAL Version EN.12 Define and adjust URC’s parameters Double click on the URC icon (Ux) in the system window, the URC setting window opens: Serial No : Name: Indicates which URC you are going to configure. Gives a name for this URC. Essential when you have several URCs connected. All the following options will be explained in details. About: Assign right: Logo: Search: Global Parameters: You can write few words in the default menu called « About ». The user will also have access to the URC’s version number in this menu. You can also change the name of this menu. Enables to protect several settings with a password Enables to choose two different logos. Those logos will appear on the URC screen. You can launch the URC’s research process from here (see 6). Manage the choices of Master Preset to which you will have access with the URC. (Master Preset: change all the system’s design, Sub Preset and Parameters: You can manage the choices of parameters and Sub Preset to which you will have access with the URC. (Sub Preset: Change only the adjustments but not the whole internal design.) Memory: Indicate the state of filling of the URC’s internal storage. About By clicking on “About” this window appears: Title: Title for the menu which appears on the screen of URC after the various adjustments’ choices (Max. ten characters). Add and Delete: Adds or deletes a line of ten characters. Memory: Indicates the state of filling of the URC’s internal storage. 116 LAPG2G2 MANUAL Version EN.12 Assign right By clicking on Assign Right you can protect some adjustments you have created in the URC. Just select if you want the adjustment to the first layer (not protected) or in the protected layer. To access to the protected layer: Hold exit and back and push the knob. Then enter the IDM user and password, select [apply], enter the password and select [apply]. Logo It is possible to post two different images to the screen of the URC. Only one image at a time can be shown. By clicking the logo button the following window appears: Constant Mode Choose one image (A or B) to be posted on the screen of the URC. Advertisement Mode (warning mode) Alternate the two images every swap time seconds. Waiting time: Set the number of seconds before the URC returns to its initial state (apparent logo, and you have to push twice the rotate knob for accessing the adjustments). Be sure to let enough time to the user to read and choose. 117 LAPG2G2 MANUAL Version EN.12 Open: You can search and assign to the URC any images (be careful about the size...) you have on your computer by clicking on Windows File or Logo Library button. By clicking Logo manager, a window shows you which images you have selected for your URC: You can use any type of image you want. But the screen of the URC has only one colour (plus the black background). So the best image parameters are: Size: 128x64 pixels Colour: Black and white Search See Search and set URC chapter. Global Parameters tab On this tab you can create a Master-Preset selection on the URC. This tab is called "Global Parameter" because these parameters will be available from every Master-Preset. It's different than the others tab, "Sub-Preset and Parameters", where the parameters are depending of the MasterPreset. Of course at first the Master-Preset must be created. To create Master-Preset, please see MasterPreset chapter. To check your Master-Preset click on [Name] button, next to the Master-Preset unroll menu. Here you can see your Master-Preset list. 118 LAPG2G2 MANUAL Version EN.12 Open the URC settings window, and select the "Global Parameters" tab. Click on [+ Add], to create a Master-Preset selector. You can change the name in the Label space. Click on the three dots ( ) on the right of the “Assigned” space, a window opens and you can choose which Master Preset is accessible with this function (Here named: MP-SP SEL.) 119 LAPG2G2 MANUAL Version EN.12 With this adjustment, you can then choose to switch between two modes/master preset pages (conference or music for example) by clicking twice on the rotate knob of the URC and clicking on “MP-SP SEL.” on the URC. You can have several "MP-SP SEL." (by clicking [add]) with several Master Preset choices, just cross the check box after clicking the three dots on Assigned. The setting is complete. To activate this parameter, compile and store the configuration into LAPG2. Sub Preset and Parameters tab On this tab you can assign adjustments of component to a URC for a specific Master Preset. The parameter of this tab depends of the Master-Preset. You have to create the parameters for each Master-Preset individually. So at first select in which Master-Preset you want to have the adjustments. Open the URC settings window by clicking on the URC icon. Click on "Sub Preset and Parameters" tab. 120 LAPG2G2 MANUAL Version EN.12 You can then Add or Delete all the kind of adjustments you want to have on the URC. Be aware however not to overload the URC memory. Assign a Label (name) for each of them. Not that here you just define how many adjustments you will have with the URC. Unroll the "Control Type" menu, and select if it is a Sub-Preset control or an Element control. Follow the step in the chapter "Sub-Preset" or "Element Control". 121 LAPG2G2 MANUAL Version EN.12 Sub-Preset Now that we have create the Sub-Preset parameter (Sub Preset and Parameters tab chapter), we have to assign this control the sub-presets. The Sub-Presets must be created before. Check the Sub-Preset tool bar in the main window. If there is no name next to "Sub-Preset" that means that there is no Sub-Preset already created. In this case see Sub Preset chapter to create a sub-preset. You can display the Sub-Presets list by clicking on [Name] in the sub-preset tool bar. On the URC settings window, click on the three dots ( ) on the right of the “Assigned” space, a window opens and you can choose which Sub-Preset is accessible with this function. 122 LAPG2G2 MANUAL Version EN.12 Close this window. Now you can see the number 1 under "Assigned". The setting is complete. To activate this parameter, compile and store the configuration into LAPG2. With this adjustment, you can then choose to load a sub-preset by clicking twice on the rotate knob of the URC and clicking on “sub 1” (the Label) on the URC. 123 LAPG2G2 MANUAL Version EN.12 Element Control Now that we have create the Element parameter (Sub Preset and Parameters tab chapter), we have to assign this element control to an adjustment. To assign the control to a specific action (adjustments), go to the design (double click on the LAPG2’s icon), then double click on the component (module) of which you want to use an adjustment. Finally right click on the adjustments and select “URC > LAPG2 (or the name you have given) > URC (or the name you have given) > Label (or the name you have given)” see the next chapter Assign adjustments. Assign adjustments Caution, you cannot control an element if the corresponding inputs/outputs of the component are not linked to something. As example, to control the volume of the channel 3 on a volume control component, the input 3 and output 3 of the component must be linked to something. Go to the design (double click on the LAPG2’s icon), then double click on the component (module) of which you want to use an adjustment. Finally right click on the adjustments and select “URC LAPG2 (or the name you have given) URC (or the name you have given) Label (or the name you have given, in our example it's "volume")”. 124 LAPG2G2 MANUAL Version EN.12 If you see an asterisk, it means that another adjustment is linked to this label. It is impossible to assign two different types of adjustment s (for example a mute with a fader) on a same Label; they must be the same type of adjustment. Please see Assignation Philosophy chapter for more details. Now, on the URC setting window you can see the number "1" under "Assigned", that means that this control is assigned. The setting is complete. To activate this parameter, compile and store the configuration into LAPG2. With this adjustment, you can control an element by clicking twice on the rotate knob of the URC, clicking on “volume” (the Label), and move the knobs on the URC. After that, you can set the adjustments (default values, unity on URC's screen), by clicking on the three dots in the URC setting window. (next chapter). Set adjustments Open the URC setting window. You can see how many module's adjustment you have assigned to a label (number in the assigned column). For example, in the following window, we see that there are two actions connected to the VOL. CD label. 125 LAPG2G2 MANUAL Version EN.12 By clicking on the three dots ( , in assigned column) a box appears. According to the assigned function some adjustments are available by clicking in the box and set the value): LAPG2 Column: If there are several LAPG2s: shows on which the action is undertaken Component, ID Element, Input, Output, Band: Shows which components and which kind of adjustments are assigned to this label. Max, Min, Step, Type: Enables to adjust parameter adjustment. For example here we have fixed the max level at 20 (dB), the minimum at -40 (dB), Step: fix the incrementing. Type: choose Linear or Log. Unit: Insert a unity for the adjustments, here: level in dB, this unity will be displayed on the URC's screen. Memory Indicate the state of filling of the URC’s internal storage. Pay attention to not exceed the URC storage capacity. 126 LAPG2G2 MANUAL Version EN.12 Protect the access to URC with Password You can protect the access to the element of the URC with a Password. To do this, you have to use the IDM (access to Master-Presets), not the UserID. Open User->ID Management, and then create a new IDM associated with the Master-Presets. Our advice is to use a very short user name and password, because it takes time to enter these names with the knobs of the URC. On the URC window click on A window will open and display all the parameter created in the URC: Then for each parameter, select if you want the it in the first layer (not protected) or in the protected layer. Now, to access to the protected layer on the URC, the user will have to hold exit and back buttons and push the knob. Then enter the IDM user, select [apply], enter the IDM password and select [apply]. 127 LAPG2G2 MANUAL Version EN.12 Use Control inputs First you have to define if rear control input is logic or analogue input. You must be unconnected to do that. On the system window in the working area right click on the desired LAPG2 (if you have several LAPG2 in a system) and choose “ExternalSelect” option. Then in the “External channel type settings: #name of the LAPG2#”, select for each connector if it is a TTL IN (logic) or an Analogical IN. If you set the others channel ( 9 to 16 ) in TTL IN mode, than you have to configure the groups 9 to 16 in the Logic IN window (that means assign TTLin 9 to group 9, and TTLin 10 to group 10, etc). Caution: You cannot mix the TTL and Analogue freely. In order, all the TTL must be before all the analogue. Analogue Second step right click on the software adjustments you want to pilot with the control input and choose control option: 1) Type of control you can assign to this software control (adjustments) 2) Name of the LAPG2 in the system 3) Connector channel number (FP = front panel knob) Note : An analogue input can control a component's parameter only if his corresponding component's input and output are linked to something in the design. Don't forget to calibrate your external "variator resistance": Tools/VR calibration The "Machine" tab of the Analogue IN floating window able to check the analogue input. 128 LAPG2G2 MANUAL Version EN.12 Logic inputs The analog/logic input must be set as TTL IN in the external settings. Each used TTL IN must be assigned to a group to be available (Logic IN floating window). Second step right click on the software adjustments you want to pilot with the control input and choose control option: 1) Type of control you can assign to this software control (adjustments) 2) Name of the LAPG2 in the system 3) Connector channel number (FP = front panel knob) When you open the hardware contact this will active the selected software button. If you want to active a parameter when the contact closes, then you have to use the event Management (in menu View), to create "Element control" event. Then you can assign this event either to an opened or closed contact. Logic inputs in binary mode (group, only for selector component) The binary mode means use Logic inputs as “bit” for different choice. The analogue/logic input must be set as TTL IN in the external settings. To use the TTL IN in binary mode, several TTL IN must be assigned to a group. Open the Logic IN floating window: Assign several TTL IN to a group. In this example the TTL IN 2,3, and 4 have been unassigned to the group 2,3 and 4 (to make them free). Then all of them have been assigned to the group 1. The TTL IN number in black means "TTL IN selected for the group". 129 LAPG2G2 MANUAL Version EN.12 Second step right click on the selector you want to pilot with the control input and choose control option: 1) Select Logic IN 2) Select the name of the LAPG2 3) Select the "multi-logic" group The value of the controlled parameters will depend of the binary value of the group. TTL IN 4 TTL IN 3 TTL IN 2 TTL IN 1 Binary value Selector MSB LSB position 0 0 0 0 0000 1 0 0 0 1 0001 2 0 0 1 0 0010 3 0 0 1 1 0011 4 0 1 0 0 0100 5 0 1 0 1 0101 6 0 1 1 0 0110 7 ... ... ... ... ... ... 1 1 1 1 1111 16 Now if you open the Machine tab of the Logic In floating window you can see the multi-logic selector Multi-logic (Binary mode) single logic 130 LAPG2G2 MANUAL Version EN.12 Use Control Inputs to trig Events (as messages) Open Event management window menu view: According to the TTL state (High or Low) click on one of the two fields: Login IN (High or Low) And select the logic channel number: Do not forget to activate your choice by clicking [Save]. For more details please see How to use Events chapter. 131 LAPG2G2 MANUAL Version EN.12 Use Logic Output Right click on the software adjustments you want to pilot with the control input and choose control option: 1) Type of control you can assign to this software LED 2) Name of the LAPG2 in the system 3) Connector channel number (here we have define control 9 to 16 as analogue input…) FP = front panel knob These logic output are simple dry contact, there is no voltage on the output. The output contact is closed when the logical value is "1". It is open when logical value is "0". For example, if the logical output is assigned to a "signal led", which lit when an audio signal is above the threshold (logical value = 1), so the output contact will be closed. And it will be open when there is no audio signal. The "Machine" tab of the logic out floating window able to check the logical outputs. 132 LAPG2G2 MANUAL Version EN.12 Use Third party Control Select the adjustments you want to pilot with third party control: Double click on the component's icon then right click on the adjustment you want to control and select > Third party control. 2) Repeat this step for each adjustment you want to control. 3) Then open the third party control window: > View > 3rd party control You can change the command ID in the Command_id field. In order to make the names of parameters more explicit. (for example C001 --> INP1) Command_id must be 4 characters long. 133 LAPG2G2 MANUAL Version EN.12 To see which frame you have to send from the third party controller to pilot the LAPG2, simply click on the three dots ( ) in the Command field. Move the cursor on the left to see how to change value. For example: if you want to increase volume of the parameter C001 by step of 2 dB the “command” frame is IC0012. For all the received command, the LAPG2 acknowledge with ACK (0x10) or DLE ( 0x06 ). Caution! Each preset has its own third party command. That's mean, for example, the packet to increase the level of input A1 in the preset 1 is different than the packet to increase the level of input A1 in preset 2. Read Value In this example, the third party window of command C001 displays the packet which must be sent to read the level value. STX=0x02 ETX=0x03 In HEX format : In DECIMAL format : CR=0x0D [TX] - 02 52 43 30 30 31 03 26 0D [TX] - <STX> RC001 <ETX> & <CR> Here you can see the response of the LAPG2 (in this example the result is +09,9 dB). In HEX format : In DECIMAL format : [RX] - 02 52 43 30 30 31 2B 30 39 2E 39 03 0D [RX] - <STX> RC001+09.9 <ETX> <CR> 134 LAPG2G2 MANUAL Version EN.12 Checksum calculation The checksum is the sum of all data between STX and ETX. And keep only the least significant byte. In the following example: Data = WC0010 = 57 43 30 30 31 30 (in hexa) Sum of Data (in hexa) = 57+43+30+30+31+30 = 15B Checksum = the least significant byte of 15B = 5B Set Third party control parameters Select Tools --> Machine configuration Click [Read] to load the LAPG2 values, if you want to change values and load it into the LAPG2 click [SET] To set RS 232 click on each serial parameters field "Baud rate", "Parity", "Stop bit" and choose the setting in accordance with your third party device. You can use the RS232 connection for two tasks: 1) To control LAPG2 with a third party controller (Vity, Crestron, AMX,...) 2) To send data between IDA4 (multipoint data transmission) To select the type of task, select in the "Connect target" field between IDA4 and 3rd party 135 LAPG2G2 MANUAL Version EN.12 Use third party over IP Since LAPG2 software version 1.0.2.44, the LAPG2 can be control by third party equipment, through the IP network. Both third party over RS232 and UDP/IP work together. The way to define the third party control is the same as with RS232. Please read "Define third Party control" chapter on page 108. On LAPG2 side: There is no parameter to set on the LAPG2. You just need to know the IP address of the LAPG2. The UDP port used is always 19761. On the third party device: The IP address of the third party device must be on the same network than the LAPG2 ( by default 192.168.100.x). If not, the IP routers must be set to establish links between the different networks. The UDP port used is always 19761. Example: As example, I use UDP Test Tool software which is free on internet. In the third party window, copy the string of the command. In the third party device, set its IP address to be on the same network then the LAPG2. Write the LAPG2 IP address as remote IP, with UDP port 19761. The local UDP port is the same, 19761. 136 LAPG2G2 MANUAL Version EN.12 Now you can past or write the command string in the Data area. Then click on "Send" to send the string to the LAPG2. You can see the answer in the received data area. The LAPG2 answer "06 0D" as acknowledge, otherwise it answer "10D" or nothing. You can also use the test command “02 54 03 54 0D". The LAPG2 will just acknowledge if the connection is working. Caution : This test software is limited for Checksum max. up to 7D, If it's bigger than 7D, it will result error. So if you want test some function with checksum bigger than 7D, Set LAPG2 command only with NOT Checksum. 137 LAPG2G2 MANUAL Version EN.12 Use Events (Element adjustment, Master-Preset, Sub-Preset) Event Triggering There are several ways to trig (start) the events as "message play event" or "Stop Event": With Contact input > see Use Contact Inputs to trig Events (as messages) Scheduler > see Use scheduler to trig Events (as messages) With Third Party > see Use third party to trig Events (as messages) With PPMG2 Keypad > see Use PPMG2 Keypad to trig Events (as messages) At the moment, there is no way to use the virtual button to trig events. Events types If you have several master preset you will have to re-do the operation for each master preset. Click menu view Event management Columns: NO. Name Control Type Third party Cont. Login IN (H) Login IN (L) Mount Select Number of the event Name of the event (click on this filed to change name, click enter to finnish) Here you can define all events you need we have 5 different type of event: 1) Change master preset: This event will load the selected master preset 2) Change Sub preset: This event will load the selected Sub preset 3) Element adjustment: This event will adjust one or several adjustments (elements) to a designed state. 4) Set TTL-Out: This Event will pilot one TTL output during a designed time period. 5) Stop event: This event will stop another event. Select here if you want to start event also with Third party control define here if a TTL input will start the event, when TTL is High define here if a TTL input will start the event, when TTL is Low Number of parameters assigned to this event (clique on this field to assign or set some parameters or adjustments) Select event for further operations 138 LAPG2G2 MANUAL Version EN.12 Change master preset Once you have define several Master Preset and define an event which control Master Preset (Control Type) click on Mount field: And select which Master Preset will be called by this event (notch select box and click OK) Change Sub Preset Once you have define several Sub Preset and define an event which control Sub Preset (Control Type) click on Mount field: And select which Master Preset will be called by this event (notch select box and click OK) Element adjustment Choose which adjustments (elements of a component) will be adjusted by the event. Right click on the adjustments and choose event name of the event. You can assign more than on adjustments to an event (several events of several components) A yellow dot appears next an assigned adjustment. 139 LAPG2G2 MANUAL Version EN.12 Once all the adjustment s are assigned to desired events go on the Event manager window (menu view) and click on the Mount field of the event Note: you will see the number of adjustments assigned to the event in this mount field And adjust the value of each element (click on the virtual button or knob to fix the value) 140 LAPG2G2 MANUAL Version EN.12 Set TTL-Out This event pilot a Logic output of any LAPG2 of the system. Create an event which control TTL out (control type) then click in the Mount field of this event Select which output of which LAPG2 (if several LAPG2 in a system) will be open (and also the time of (kind of pulse capability) Enable: Notch it to active the Logic output channel. Process Time Enabled: If not notched, the process time will be ignored. The pulse will start directly. Process Time: Time before the beginning of the first pulse. Process Period Enabled: Notch this option if you want have cyclic pulses. If not notched, the pulse will be permanent. Process Period: Select here the time of the period. Logic: If notched, the default value during the process time is "1". The pulses are inversed. Note: be sure to click [save] to enable your action. 141 LAPG2G2 MANUAL Version EN.12 Stop event Two kind of event can be stopped: TTL output activation and Message play To stop an event, create an event which stop event (control type). Then click in the Mount field of this event. And then select which event you want to stop. 142 LAPG2G2 MANUAL Version EN.12 Message play event (see also Use the message component) First of all, Load messages into LAPG2 by using wav file manager and Message storage component. Then into the message storage component, choose the Event Settings tab: Click [Add] to add a message play event (events which start the selected message) If you want to delete an event: [Select] select all event(s) [Cancel] unselect all selected event(s) Now you have created message play event you will have to assign wave file to event(s): Click on Assigned field of the desired event: 143 LAPG2G2 MANUAL Version EN.12 144 LAPG2G2 MANUAL Version EN.12 Choose the wave file which will be played You can choose to repeat the message a fixed number of times: (Repeat field) or until a stop event appears (Forever field). (In the assigned field you will see the number of wave file assigned). Priority allows you to fixe if the event has a higher priority regarding another message event. 145 LAPG2G2 MANUAL Version EN.12 Use Third Party to trig Events (as messages) Open View > Event management: Here you can see the list of your events. To control an event from a third party, notch the "Third Party Cont." function of the event. Close this window. Open View > Third Party Control: Select the "Events" tab To see which frame you have to send from the third party controller to pilot the LAPG2, simply click on the three dots ( ) in the Command field. 146 LAPG2G2 MANUAL Version EN.12 Use Scheduler to trig Events (as messages) Open the schedule management window: menu view Schedule management This windows lists all the programmed schedule(s) [Add]: to add a schedule [Edit]: open the Schedule setting window to edit an existing schedule [Delete]: erase an existing schedule [Select]: select all schedules [Clear]: Clear all selected schedules [Close]: Close this window Click [Add] to create a new schedule (open the Schedule Settings): Occurrences field: Gives name to the schedule and set time period etc. Event List: List of all the defined events (here we do not have any event created, menu: view event management) Event control: define which event will be start by the schedule. You can also create a string of several events and define time between event’s launch. 147 LAPG2G2 MANUAL Version EN.12 Occurrence field Schedule Name: Name of the current schedule Start time: Beginning date of the current schedule End time: ending of the current schedule Enable: active the schedule Period: gives the repetition frequency for the event sequence (schedule) Event list List all the defined events. Event control Here you assign which event(s) will be started with the schedule. First create event group: Click [Add] Event group [Delete]: clear selected (click on the event group) group 148 LAPG2G2 MANUAL Version EN.12 Create event sequence (Event) Click [Add] Event [Delete]: clear selected (click on the event) event Simply drag and drop event from the event list to the event group or event field Note: By double clicking on the event field in the sequence you will open the event setting window. A time setting allows you to fix interval time between event groups (time displayed at the right of the event group) : Be carefully if you start a message before the end of the previous message, it won't be played. After all is defined, do not forget to click [ok] Then check the active box in the Schedule Management window: X= inactive, 0= active 149 LAPG2G2 MANUAL Version EN.12 Use the Message player component The audio file must be a wave mono file, 16 bits and with a bit rate of 16, 24 or 48kHz. Otherwise it won’t appear in the library. Caution : The message player cannot be used with the LAPG2 set at 96kHz. The LAPG2 must be set at 48kHz. Drag&drop the "Message player" component to the design area. And link its output to the destination output . Double click on the Message storage component. It contains two tabs: -LAPG2 Music Management -Event Settings 150 LAPG2G2 MANUAL Version EN.12 LAPG2 Messages Management This window allows managing of the message file between the library and the real LAPG2. On the left part, under "Message storage", you can see the messages of the library. On the right part, under "Machine storage", you can see the messages already stored into the LAPG2. When you open this window, first of all, click on the reading glass on the both side to display the messages files. To be played, the messages must be stored into the LAPG2. To do this, select the message in the library side, and then click on the arrow to store it into the LAPG2. Of course you can also retrieve a message from the LAPG2 to the library by clicking on the other arrow . You can find the library directly in your PC: C:\Programs\ATEIS\LAPG2-G2 v1.0.0.31\wave file 151 LAPG2G2 MANUAL Version EN.12 Message play Event This window allows managing of the message event. The messages use one "Message play" event to start the message. The messages use one "Stop Event" linked to the event, to stop the message. First, click on "Add" to add an event: Unroll the channel menu and select the output where the message will be played. Then click on the tree dots under "Assigned" to select which message will be played. 152 LAPG2G2 MANUAL Version EN.12 You can either select a file from the library or from the LAPG2. Message selection from LAPG2 As to be played, the message must be in the LAPG2, my advice is to click on "+Add from LAPG2" to open this window. Click on the reading glass to display the files, select one and then click on file to the message event. Click on the doors to quit this window. 153 to assign the message LAPG2G2 MANUAL Version EN.12 Message selection from Wave Library But if you want to import a file from your PC, click on "+Add from Wave library": Then click on "+Add" to open the browser which allows you to select the file to import. Click on "Close" to quit this window. You can see your selected message: Close this window. Now you can see your "play message event": The "1" under "Assigned" indicate that the event is assigned to a message. At this state, the message is ready to be played, but you have to choose how you want to trig it. From now we will works with the "play message event" that we have created. 154 LAPG2G2 MANUAL Version EN.12 Stop Event If you want to be able to stop the message when it's playing before its end, you have to create a "stop event" associate with the message. In the View menu, open the Event Management: Click on [+Add] to add a new event. Under "Control type", unroll the menu and chose "Stop Event": To choose which event must be stop, click on the tree dots under "Mount". Notch the message to be stopped, and then click on [Save]. In the event management window, you can see your both event play & stop, with a "1" under "Mount" indicating that the events are assigned. You have now to choose how you want to trig these events. (see "Event Triggering" chapter) 155 LAPG2G2 MANUAL Version EN.12 Store message into LAPG2 The audio file must be a wave mono file, 16 bits and with a bit rate of 16, 24 or 48kHz. The left window display the audio files available to be stored into LAPG2, the right window display which files are already stored into LAPG2. To be played, the message must be store into the LAPG2. First of all, to display the files click on the both reading glass. Click Search wave file button: By clicking in the "store message button", the selected wave file will be stored into LAPG2: Note: for the moment you cannot record message with LAPG2. Our engineers are working on this topic. 156 LAPG2G2 MANUAL Version EN.12 Recover wave file from LAPG2 You can recover message or music loaded into LAPG2, on the message storage field of the Message player component. To display the files click on the reading glass. Select wave file you want to copy from LAPG2 to your computer and click on the retrieve button,, wave file is copied into your computer. Play message from LAPG2 Click [PLAY] button in the message storage section: Note: for the moment you cannot record message with LAPG2. Our engineers are working on this topic. 157 LAPG2G2 MANUAL Version EN.12 Use the Auto Noise Gain Component (A.N.G) Procedure to set the ANG Connect the sensing microphone to the S.M. input, and the paging audio source to the P.M. input. The NSM sensing microphone need an input sensitivity of 0dB ( software). The max cable length between the NSM and the LAPG2 is 500 meter with CAT-5 cable. Link the output of the ANG component to an LAPG2 output where is connected a loudspeaker. Click on the Calibrate button, to start the calibration procedure. The system will start to estimate the acoustic transfer function between loudspeakers and microphone when user clicks the Calibration button, and it will automatically stop calibrating until the system find a better transfer function. The calibration red led light up, means the calibration procedure is running. During the procedure, don't move the physical installation, and don't make punctual noise. The calibration must be done in normal ambient conditions. Wait until the end of the calibration. The red calibration led light off, and the green calibration led light up. Now look the Over/Under red led: -If both Over/Under led are OFF, it means the calibration has properly finished and the ANG is ready. -If one of the Over/Under led light ON, it means the white noise level needed is out of range. Depending of the issue, a pop-up window will show you what to do. Follow the most usefully advice and restart the calibration procedure until the both Over/Under led are OFF after the calibration. 158 LAPG2G2 MANUAL Version EN.12 The system is properly set. Even when the paging is not active, the ANG is still adjusting the AGC level with the ambient noise to be ready when the paging will begin. Notice: The calibration should be done in normal ambient noise (shouldn't have suddenly loud noise during calibration). Do not adjust the gain of output, amplifier or sensing microphone during or after calibration. (You can adjust volume of the audio source connected to P.M input. Theoretically, when the calibration has finished, the AGC level will be stable around 0 dB in the environment of no increasing noise. But every calibration might exist deviation, if the AGC level is not stable around0 dB, user could adjust the gain of output function, amplifier or sensing microphone to let AGC level stable around 0 dB. When the system is calibrating, clicking on the calibration button will cancel the calibration at that moment. (The system will use the calibration result which was successfully calibrated at last time.) After calibration successful, the paging microphone shouldn't be placed nearly to sensing microphone.(because the user's voice will be also received into sensing microphone.) Inactive mode means that it is no paging. When the paging Microphone (or Music) input is inactive, in general, it needn't increase or decrease gain. But it is better to set an initial gain before outputs are active, then you become with a good approximation of gain. Suppose your AGC gain is -6dB and there is a lot of ambient noise. When outputs are active, but before it reach a correct gain, you won't hear the beginning of the announcement. 159 LAPG2G2 MANUAL Version EN.12 Use the A.N.G When the calibration green led lit, the system is ready. In our example, the A.N.G has detected an ambient noise average of -12dB. We choose a medium "response speed" and a short "sampling time" to be enough reactive quickly. Now the A.N.G will automatically adjust the level on the (P.M) signal depending on the ambient noise detected on the sensing microphone. The A.N.G will working when the paging activity led will light, meaning that an audio signal is detected on the (P.M) input. Dead Zone: If the sensing microphone doesn't detect more noise than during the calibration, the A.N.G works in the "Dead Zone" which means that there is no need to adjust the gain. As the noise level is near than during the calibration, the differential level is almost null. 160 LAPG2G2 MANUAL Version EN.12 You can see the AGC level near from 0 dB, meaning no compensation. Increase Zone: If the sensing microphone detects more noise than during the calibration, the A.N.G works in the "Increase Zone" which means that the gain must be increased to compensate the ambient noise. In our example, the noise is now louder than during the calibration. The differential level is around 4.4dB. You can see the AGC level at 3,5dB, meaning the (P.M) signal is increased of 3,5dB. As soon as the AGC level reach the level needed to compensate the ambient noise (or the Max Gain), the A.N.G will goes back in the "Dead Zone". Fast Increase Zone: If the sensing microphone detects more noise than during the calibration, the A.N.G works in the "Fast Increase Zone" which means that the gain must be quickly increased to compensate the loud ambient noise. 161 LAPG2G2 MANUAL Version EN.12 NSM Sensing Microphone The software module lets you handle any kind of microphone signal; line-level would be preferred because of the noise-picked-up by the cable length. For that reason we will provide a microphone module with a level raising amplifier, fed by Phantom power and/or 24VDC. There is a screw in the front hole, allowing you to modify the pre-amplifier gain of the microphone. Screwing will decrease the microphone sensitivity. Unscrewing will increase it. Because of the pre-amplifier, the NSM input sensitivity of the LAPG2 must be set at 0dB. Power led Pre-amplifier gain control On the LAPG2 connector, you have to wire the "audio -" with the shield: 162 LAPG2G2 MANUAL Version EN.12 Audio Specification: Item Microphone Input Sensitivity Audio Output Output Impedance Frequency Response T.H.D Ratio Condition 1 kHz 1 kHz 1 kHz - Min 48 dB - +0.2/-4dBu 60 Hz Typ. - Max. -40 dBu 60 dB 20 dBu 10 KOhm 10 kHz 50Hz ~ 20 kHz 0.3 % 0.5 % Typ. 24 Vdc Max 26 Vdc Power Specification: Item Power Input Condition - Min 22 Vdc Mechanical Characteristics: It is not IP55 compliant. The max cable length between the NSM and the LAPG2 is 500 meter with CAT-5 cable Dimension Top Panel / Microphone Head 62.5mm(DIAMETER) x 92mm(H Omni-directional electric condenser microphone cartridge Top Panel / LED Power indicator, Green light. Top Panel / Variable resistor Sensitivity adjustment range (-60 ~ -48dB)±0.5dB. Bottom Side / Power and signal connector Phoenix 4 pin connector. 163 LAPG2G2 MANUAL Version EN.12 Use the Ducker Component As simple example, we will set a system for a speaker with background music. When the speaker is talking, the background music must decrease its level. The speaking is using a standard dynamic microphone type SM58. The microphone is connected to the channel 2 of the "Input A" component, with a input sensitivity at -40dB (set in the input A component). Then the microphone is linked to the input (S) of the ducker. The music player (as a CD player) is connected to the input 1 of the "Input A" component. Then the music is linked to the input (A) of the ducker. Threshold: set at -18dB, because less would active the attenuation when the speaker is not talking if the microphone catch some unexpected noise. Response time: set very short, because the background music must be attenuated as soon as the speaker is talking. Attack and Release times: Which are the "fade in" and "fade out" on the background music. Set almost one second for the hearing comfort, we want a kind music transition. Hold time: Set at 700(ms), enough to avoid the music back during the speech breaks. Audio depth: Set at -20dB, to hear the music during the speech, but at very low level (depending of the context). 164 LAPG2G2 MANUAL Version EN.12 Remote Devices Hardware Connections Because of the bus 485 and the audio, the connection of several PPM is not easy. You normally have to create a bus with the RS485 (data and power) by using junction box (daisy-chain). All audio from PPM must be sent to the LAPG2. Each Junction box has an audio output which is the microphone signal of the PPM connected to the junction box. Connect audio output from each junction box to an audio input of the LAPG2. Each Junction box has also an audio input, used to get the audio from the LAPG2 and sent it to the PPM speaker. Only for the first PPM/JB : The audio of the first PPM is already on the RJ45 linked to the LAPG2, so you can either use the audio coming from the RJ45 or the audio coming from the JB audio output. In summary: 485 : Audio: daisy chain, datas and power go from the LAPG2 to the first JB (or PPM) then from the first JB (PPM) to the second, etc. "star" connection, Each microphone and/or speaker is connected to an input and/or output of the LAPG2 For other type of connection (Star connection, each PPM are directly connected to the LAPG2) we cannot ensure a proper working. Note: it is advised to not put more than 8 PPMs and or URCs on one LAPG2. It is working with up to 16 PPM but the response time is increased and you will have to use external power supply. 165 LAPG2G2 MANUAL Version EN.12 Connection example for one PPM with JB 166 LAPG2G2 MANUAL Version EN.12 Connection example for several PPMs with JB 167 LAPG2G2 MANUAL Version EN.12 Connection example for several PPM with and without JB Be caution with the wire colours, which are depending of the cable you use, 4 pairs or 5 pairs. 168 LAPG2G2 MANUAL Version EN.12 Rj45 pin out For practically all the wiring you'll need straight CAT5 cable (4 pairs): With PPM, a straight CAT5 cable 5 pairs is needed (provided with PPM): Junction Box RS-485 MAIN-IN + AUDIO OUT RS-485 SIDE AUDIO OUTPUT - SYS. PWR S + EXT. PWR LOCAL POWER (24 VDC) SLAVE PPM MASTER PPM S - + Master AUDIO INPUT Slave RS-485 MAIN-OUT GND 24VDC <- from LAPG2 Line OUT (+ -) 24VDC <- from adapter Line IN (+ -) 24VDC Slave RS-485 (A B) Master RS-485 (A B) 169 LAPG2G2 MANUAL Version EN.12 Connectors: AUDIO OUTPUT (line out): This signal comes from the PPM's microphone to be connected in a LAPG2 input (Shielded audio cable) RS-485 MAIN-IN + AUDIO OUT (To LAPG2): It is the BUS 485 to be connected into the LAPG2. You can also have access with this JB output to the PPM's microphone signal (to be connected to a LAPG2 input) Pin 1. RS-485 B Pin 2. RS-485 A Pin 3. Line in Pin 4. 24Vdc Pin 5. Ground Pin 6. Line in + Pin 7. Line out Pin 8. Line out + RS-485 SIDE: BUS 485 to connect URC Pin 1. RS-485 B Pin 2. RS-485 A Pin 3. NC Pin 4. 24Vdc Pin 5. Ground Pin 6 ~ 8. NC LOCAL POWER (24VDC):To gives power to the JB through a local power supply MASTER PPM (CAT5 5 pairs): To connect the PPM Pin 1. Slave RS-485 A Pin 2. 24Vdc Pin 3. Master RS-485 Pin 4. Master RS-485 A Pin 5. Line out + ( PPM Mic) Pin 6. Line out - (PPM Mic) Pin 7. Line in + (PPm speak.) Pin 8. Line in – (PPm speak.) Pin 9. Ground Pin10. Slave RS-485 B RS-485 MAIN-OUT (To next Master): To connect another JB (daisy-chain) Pin 1. RS-485 B Pin 2. RS-485 A Pin 3. NC Pin 4. 24Vdc Pin 5. Ground Pin 6 ~ 8. NC 170 LAPG2G2 MANUAL Version EN.12 AUDIO INPUT: To send audio signal from a LAPG2 output to the PPM speaker (Shielded audio cable) SLAVE PPM (CAT5 5 pairs): NOT AVAILABLE FOR THE MOMENT (to connect Slave PPM) Pin 1. Slave RS-485 B Pin 2. Slave RS-485 A Pin 3. Line in Pin 4. 24Vdc Pin 5. Ground Pin 6. Line in + Pin 7. Line out Pin 8. Line out + Internal Switches: POWER S/W: To choose between local power supply or the LAPG2 power supply Master/Slave: NOT AVAILABLE FOR THE MOMENT (choose if the PPM connected to this JB is a Master or a Slave) LEDs: POWER SYSTEM: Lights if the power comes from a local power supply POWER LOCAL: Lights if the power comes from LAPG2 READY: Lights if the Junction Box is ready to work Connect JB to LAPG2 Connect URC LAPG2 with JB URC Cat5 4 pairs Connect URC to LAPG2 171 TO RS-485 SIDE of the JB LAPG2G2 MANUAL Version EN.12 Connect PPM to JB Simply use the CAT5 5 pairs provided with your PPM or a standard CAT5 4 pairs (Straight): from PPM to MASTER PPM of the JB. If you use a CAT5 4 pairs you probably will hear some data into the speaker of the PPM. This is due to the internal wiring (if you do not use speaker, simply disconnect it). Connect PPM to LAPG2 There is two way to connect one PPM 1) Use a 4 pairs between the LAPG2 and the junction box, and then connect the PPM to MASTER PPM of the junction box with a 5 pairs.. 2) Use a CAT5 5 pairs directly between the PPM and the LAPG2, as follow. Connect RAC 172 LAPG2G2 MANUAL Version EN.12 Audio component description Audio component are all features tools you can use in the LAPG2 DSP to route, change or modify signal between inputs and outputs of LAPG2 system. Here are the details of all the components: Input Control the input signals parameters and monitor it. The analogue input modules represent the physical analogue inputs accessible on the rear panel of the LAPG2. There are four separate modules for use with each of the audio board slots A, B, C and D. Analogue input and output modules are added automatically to the DSP window of the relevant processor by defining their module configuration at the time you create them and should not be altered. The main control window of the input module is opened by a double click on the icon in the LAPG2 design window and appears like this: 173 LAPG2G2 MANUAL Version EN.12 Analogue Input Adjustments Parameter Range Comment Bypass On/Off Bypasses the channel fader settings. The channel gain will be equal to unity gain (0 dB); LED, lit green when activate. Mute On/Off Mutes or un-mutes the input channel; LED, lit red with channel muted. Sensitivity 0dB, 12dB, 24dB, Sets the input gain of the channel preamp. 40dB, 54dB Phantom Power On/Off Applies 48 VDC phantom power to the channel input for use with condenser mikes. RTO LED, Lit blue Indicates an input channel 'Routed To Output(s)'. Clip LED, lit red Indicates channel level above 'Clip Threshold (dB)'. Volume (dB) -20 to +20 dB Meter showing the channel RMS level. Signal LED, lit yellow Indicates audio signal presence above -30 dB from chosen 'Sensitivity'. Level (dB) -90.0 to +20.0 dB Signal output level of the module Clip Threshold -20.0 to +20.0 dB Sets the threshold of the Clip indicator. 174 LAPG2G2 MANUAL Version EN.12 Output Control the output signals parameters and monitor it. The analogue output modules represent the physical analogue outputs accessible on the rear panel of the LAPG2. There are four separate modules for use with each of the audio board slots A, B, C and D. Analogue input and output modules are added automatically to the DSP window of the relevant processor by defining their module configuration at the time you create them and should not be altered. The main control window of the analogue output module is opened by a double click on the icon in the LAPG2 design window and appears like this: Analogue Output Parameters Parameter Range Comment Clip LED, lit red Indicates channel level above chosen 'Clip Threshold (dB)'. Volume (dB) -90.0 to +20.0 dB Meter showing the channel level. Mute On/Off Mutes or un-mutes the output channel; LED, lit red with channel muted. Signal LED, lit blue @ -30 dB Indicates audio signal presence above 30 dB. Level (dB) -90.0 to +20.0 dB Signal output level of the module Clip Threshold -20.0 to +20.0 dB Sets the threshold of the Clip indicator. 175 LAPG2G2 MANUAL Version EN.12 Mixer Mix or route several signal to an Output. Since the LAPG2 software only compiles active nodes, there is no use having a whole bunch of mixers, like 2x1, 3x1, to (n)x1, then 2x2, 3x2, to (n)x2, etc. It simply makes no difference if you take a 4x4 from the 4x4 component or the 16x16. The mixer folder in the 'Component' control window holds three items: Within these items you can find the following modules: o Standard '4x4': 4 inputs mixing to 4 outputs, '8x8': 8 inputs mixing to 8 outputs, '16x16': 16 inputs mixing to 16 outputs. o Matrix '4x4': 4 inputs routing to 4 outputs, '8x8': 8 inputs routing to 8 outputs, 16x16: 16 inputs routing to 16 outputs. o Automixer '4x1': mixing/priority switching of 4 inputs to 1 output, '8x1': mixing/priority switching of 8 inputs to 1 output, '16x1': mixing/priority switching of 16 inputs to 1 output. Matrix Mixer Mix several signals to Output(s) The mixer components are organized in a subfolder named 'Standard' holding the modules '4x4', '8x8' and '16x16': The only difference of these modules is their number of in- and outputs, let's take a detailed look just to the smallest one, the 4x4. The control window of the 'Standard Mixer' module is opened by a double click on the icon in the 'LAPG2' design window and appears like this: 176 LAPG2G2 MANUAL Version EN.12 Clicking the orange coloured function [Output(n)] buttons under the label 'Variable Matrix' in the middle of the window opens the sub control windows of the particular output channels. In here you can create an individual mix of the input signals independently for the specified output. By default all levels are set to 0 db, which basically means, that all audio signals at the input are mixed with no attenuation and appear like this on every output. Standard Mixer (Master) Parameters Parameter Range Comment Input Mute On/Off Mutes or un-mutes the input channels. Input Level (dB) -90.0 to +20.0 dB Sets the input level of the channel Variable Matrix Button Opens the sub control window 'Standard Mixer nxn for routing and mixing input channels to the specified output Output Level (dB) -90.0 to +20.0 dB Sets the master output level of the channel Output Mute On/Off Mutes or un-mutes the output channel. Standard Mixer Parameters Parameter Range Comment Level (dB) -90.0 to +20.0 dB Sets the input levels mixed to the particular output 177 LAPG2G2 MANUAL Version EN.12 Standard Mixer Route several signals to Output(s) The matrix components are organized in a subfolder named 'Matrix' holding the modules '4x4', '8x8' and '16x16': Since the only difference of these modules is their number of in- and outputs, let's take a detailed look just to the smallest one, the 4x4. The control window of the 'Matrix' module is opened by a double click on the icon in the 'LAPG2' design window and appears like this: The matrix module is similar to the standard mixer, with the main difference, that there is no ability to make independent mixes for each output channel. So the module primary is used for simple routing purposes. By default routing is set 1 to 1; audio at each input channel only appears on the particular output channel with unity gain. In short: The module does nothing at all. Matrix Parameters Parameter Range Comment Input Mute On/Off Mutes or un-mutes the input channel. Input Level (dB) -90.0 to +20.0 dB Sets the input level of the channel. Routing Buttons On/Off Turns on/off the input on the particular output channel. Output Level (dB) -90.0 to +20.0 dB Sets the master output level of the channel. Output Mute On/Off Mute or un-mutes the output channel. 178 LAPG2G2 MANUAL Version EN.12 AutoMixer Allows mix several signals to one output. The Activation of channel(s) can be done manually or automatically by signal threshold and priority. The 'Automixer' components are organized in a subfolder named 'AutoMixer' holding the modules '4x1', '8x1' and '16x1': Since the only difference of these modules is their number of inputs, let's take a detailed look just to the smallest one, the 4x1. The control window of the 'Automixer' module is opened by a double click on the icon in the 'LAPG2' design window and appears like this: The auto mixer adjusts the signal output level on the output node depending on the number of activated input channels. This function can be useful in conference applications or houses of workshop, where usually unattended mixing has to be executed. A special feature of this component is the priority function, which can be used for auto-paging applications or to implement a voice triggered chairman's mike in a small conference system. 179 LAPG2G2 MANUAL Version EN.12 Automixer Parameters Parameter Range Comment Mute On/Off Mutes or un-mutes the input channel. Invert 0°/180° Inverts the polarity of the input channel. Solo On/Off Solos the input channel. (the channel goes directly to the output) Gate On LED, lit green Shows activation status of the input channel. Level (dB) -90.0 to +20.0 dB Adjusts the level of the output channel. Manual Mode On/Off Only used in manual mode (see "Manual/Automatic") It allows manual channel activation. Automatic Mode Priority Level 1 to (n) Sets the priority level of the channel. 1 is the most priority. Output mute On/Off Mutes or un-mutes the module's output. Output level (dB) -90.0 to +20.0 dB Sets the module's output level. Threshold (dB) -90.0 to +20.0 dB Sets the threshold for channel activation. Hold time (s) 0 to 10 s Sets a hold time for the gate deactivation. Attenuation Response time (ms) 10 ms to 10.0 s Sets a pre delay time for automatic attenuation. That's means the transition time of the attenuation when a channel is added or removed. Background threshold (%) 0.0 to 100.0% NOM attenuation step (dB) 0.0 to 6.0 dB NOM attenuation max (dB) 0.0 to 100.0 dB Limits the amount of attenuation to be applied. Attn. Gain (dB) -100.0 to +20.0 dB Indicates the amount of current gain reduction Last Mic. On On/Off Last Mic. On designated Ch 1 to (n), Last Mic. Open Mic. Limits Manual/Automatic 1 to Non Limit Manual or Automatic Sets how the input signal is interpreted to open a gate. The background level will increase the input activation level. Sets the amount of attenuation to be applied each time the number of activated channels increases. Enables the last mic on function. If activate, even if there is no audio on the inputs, one channel will stay open. (see "Last Mic.On designated" parameter) Defines which channel will stay open (Only if "Last Mic. On" is activated). Caution the channel will stay open even if it's muted. Chooses the maximum number of simultaneously activated channels. Select the mode, manual or automatic. Manual mode : Only manual channel activation (threshold and priority are ignored) Automatic mode : With priority and threshold channel activation. NOM attenuation mode Eq1 or Eq2 Chose here if you want a linear attenuation or a logarithmic attenuation which is more near of the reality. Eq1 : (NOM-1) x step (same attenuation for each addicting channel) Eq2: log2(NOM) x step On LAPG2 v1.0.0.31, the attenuation doesn't works if mic limit is set to "non limit". 180 LAPG2G2 MANUAL Version EN.12 Channel activation: At first, on the "Manual/Automatic" selector chose if you want manual or automatic channel activation. Manual: The activation is only done manually with the "Manual" buttons. The threshold and the priority are ignored. Automatic: The activation is depending of the threshold, and of the priority. It will pass only highest priority channel out. If several channels have the same priority, they all will be mixed to the output together when they will be priority. Attenuation: The attenuation is always active. It doesn't depend of the mode. On LAPG2 v1.0.0.31, the attenuation doesn't works if mic limit is set to "non limit". The background threshold: The background threshold allows adjusting the input level activation depending on the background level. If the background threshold is more than at 0%, the background level will increase the input activation level. You can adjust the relation between the background and the activation level by move the background threshold knobs. Threshold' = Threshold+(mixing input*Background threshold percent). PS: The used values to calculate are not in dB Example 1: one input in 0.5db => mixing input=1.059253725177289*1= 1.059253725177289 Threshold=0dB =1 Background threshold percent=5% Threshold'=1+(1.059253725177289*0.05)=1.052962686258864 in this case input=0.5db is almost critical point input >=0.5dB then on , input<0.5dB then off. Example 2: two input in 9.5db => mixing input=2.985382618917960*2=5.970765237835919 Threshold=5dB =1.778279410038923 Background threshold percent=20% Threshold'=1.778279410038923+(5.970765237835919*0.05)=2.972432457606106 in this case input=0.5db is almost critical point input >=9.5dB then on , input<9.5dB then off. 181 LAPG2G2 MANUAL Version EN.12 Compressor/Limiter/Expander The 'Compressor/Limiter/Expander' folder in the 'Component' control window holds for items: They represent the dynamic section and consist of the following modules: Limiter Compressor Single channel limiter, triggered by input level (Feed-Forward type). Single channel compressor, triggered by input level (Feed-Forward type). Expander Single channel expander, triggered by input level (Feed-Forward type). Comp-Limiter It provides a compressor and a limiter together. Limiter The second module within the 'Compressor/Limiter' folder is a simple single channel 'Feed-Forward' type limiter: The control window of the 'Limiter' module is opened by a double click on the icon in the 'LAPG2' design window and appears like this: The limiter's control window features a graphical display/editor window which is opened by a click on the [Graph] button at the top left side of the control window and looks like this: 182 LAPG2G2 MANUAL Version EN.12 The display/editor window displays an output to input graph, where the vertical axis corresponds to the output signal level in dB, while the horizontal axis displays the input signal level in dB. The green line reflects the currently set dynamic response graph of the compressor. The small squares act as handles that can be dragged to the desired position and show the following parameters: o red o blue o yellow Ratio x:1 Threshold (dB) Threshold range (dB) Hard Clipping mode : This is an example of a sinusoidal signal limited with and without Hard Clipping. Without Hard Clipping with Hard Clipping Limiter Parameters Parameter Range Comment Graph... Button Opens the graphical display/editor window. Threshold (dB) 60.0 to 20.0 dB Sets the threshold level above which limiting begins. Release time (ms) 10 to 1000 ms Sets the time it takes to release gain reduction. Bypass On/Off Bypasses the limiter's function. Hard Clipping On/Off Enables/disables the “Hard clipping” mode. Limiting LED, lit red Indicates limiting. Gain reduction (dB) 0.0 to -45.0 dB Reflects the current amount of gain reduction. 183 LAPG2G2 MANUAL Version EN.12 Compressor A compressor is an automatic volume control. Loud sounds over a certain threshold are reduced in level while quiet sounds remain untreated. In this way it reduces the dynamic range of an audio signal. This may be done for aesthetic reasons, to deal with technical limitations of audio equipment, or to improve audibility of audio in noisy environments. Compression reduces the level of the loud sounds, but not the quiet sounds, thus, the level can be raised to a point where the quiet sounds are more audible without the loud sounds being too loud. The first module within the 'Compressor/Limiter' folder is a simple single channel 'Feed-Forward' type compressor device: The control window of the 'Compressor' module is opened by a double click on the icon in the 'LAPG2' design window and appears like this: The compressor's control window features a graphical display/editor window which is opened by a click on the [Graph] button at the top left side of the control window and looks like this: The display/editor window displays an output to input graph, where the vertical axis corresponds to the output signal level in dB, while the horizontal axis displays the input signal level in dB. The green line reflects the currently set dynamic response graph of the compressor. 184 LAPG2G2 MANUAL Version EN.12 The small squares act as handles that can be dragged to the desired position and show the following parameters: o red Ratio x:1 o blue Threshold (dB) o yellow Threshold range (dB) Compressor Parameters Parameter Range Comment Graph... Button Opens the graphical display/editor window. Ratio x:1 0.10 to 1.00 Sets compression ratio. Threshold (dB) -60.0 to +20.0 dB Sets the threshold level above which compression begins. Threshold range (dB) 0.0 to 40.0 dB Sets the range of level, in which the ratio gradually alters from 1:1 to the value set by the ratio parameter (soft knee function). Attack time (ms) (Attack) 10 to 1000 ms Sets the time it takes to respond to the input signal. Release time (ms) (Release) 10 to 1000 ms Sets the time it takes to release gain reduction. Gain reduction (dB) 0.0 to -25.0 dB Reflects the current amount of gain reduction. Bypass On/Off Bypasses the compressor's function. Soft knee On/Off Enables/disables the “Soft Knee” mode. Compress LED, lit green Indicates compression. 185 LAPG2G2 MANUAL Version EN.12 Expander An expander works in an opposite fashion than the compressor, the threshold is set and any part of the signal dropping below this threshold will be affected by the expander and this level will be raised. The expander therefore like the compressor balances out the signal making it sound more professional. The expander allows having a signal with a bigger dynamic range. The only module within the 'Expander' folder is a simple expander of the same 'Feed-Forward' type like the compressor: The control window of the 'Expander' module is opened by a double click on the icon in the 'LAPG2' design window and appears like this: Expander Parameters Parameter Range Comment Ratio x:1 0.10 to 1.00 Sets expansion ratio. Threshold (dB) -60.0 to +20.0 dB Sets the threshold level above which expansion begins. Threshold range (dB) 0.0 to 40.0 dB Sets the range of level, in which the ratio gradually alters from 1:1 to the value set by the ratio parameter (soft knee function). Attack time (ms) 0 to 1000 ms Sets the time it takes to respond to the input signal. Release time (ms) 0 to 1000 ms Adjusts the time to stop the gain reduction. . Gain reduction (dB) 0.0 to -25.0 dB Reflects the current amount of gain reduction. Bypass On/Off Bypasses the expander's function. Soft knee On/Off Enables/disables the “Soft Knee” mode. Expand LED, lit red Indicates that the function is active. 186 LAPG2G2 MANUAL Version EN.12 Comp-Limiter The third module within the 'Compressor/Limiter' folder is a combination of the compressor and the limiter modules described earlier: The control window of the 'CompLimiter' module is opened by a double click on the icon in the 'LAPG2' design window and appears like this: As this component is works exactly like the separately described modules please refer to the parameter list of these modules. Equalizer The 'Equalizer' folder in the 'Component' control window holds two subfolders containing parametric and graphic EQs: 187 LAPG2G2 MANUAL Version EN.12 PEQ You have six different PEQ modules, 2, 4, 6, 8, 10, 16 bands: The control window of the 'PEQ' module is opened by a double click on the icon in the 'LAPG2' design window and appears like this (example for 6 bands): The display/editor window displays an output to input graph, where the vertical axis corresponds to the output signal level in dB, while the horizontal axis displays the frequencies. The green line reflects the currently set dynamic response graph of the equalizer. The small squares act as handles that can be dragged to the desired position and show the following parameters (example: 4 bands): orange Bandwidth (-) yellow Frequency (Hz) Parameter Range Comment Symmetry Not available on next versions Bypass all To bypass the EQ (all the frequency channel) Bypass Bypasses only the selected frequency channel Bandwidth Set the width around the frequency (Q factor) Frequency Selects the frequency to adjust Gain Set the gain (attenuate or increase the selected frequency) Graph Open the graphic window 188 LAPG2G2 MANUAL Version EN.12 GEQ You have three different GEQ modules, 1 Octave, 2/3 octave, 1/3 octave: The control window of the 'GEQ' module is opened by a double click on the icon in the 'LAPG2' design window and appears like this (example for 1/3 octave): The display/editor window displays an output to input graph, where the vertical axis corresponds to the output signal level in dB, while the horizontal axis displays the frequencies. The green line reflects the currently set dynamic response graph of the equalizer. The small squares act as handles that can be dragged to the desired position and show the following parameters (example: 4 bands): yellow Frequency (Hz) Equalizer Parameters Parameter Range Comment Graph Open the graphic window Bypass all To bypass the EQ (all the frequency channel) Bypass Bypasses only the selected frequency channel Gain Set the gain of the frequency Frequency show the frequency 189 LAPG2G2 MANUAL Version EN.12 Delay Delay (basics) Delay (basics) provides all to delay the signal. You have choice between seven times (you can adjust precise time) and each sub-folders contains three components with various numbers of outputs. The difference between basic and advanced is that for the advanced you can mute or bypass delayed channels. By double-clicking on the component's icon (for example: 5ms 4 Ch. ) a settings window appears: Delay Parameters Parameter Range Comment Type Chose between adjustments with Time or with Distance and temperature Delay time (us) Adjust the delay time (Type: switch on) Temp (C) Enter the ambient temperature in Celsius degrees (Type: switch off) Gain Adjust the distance in meter (Type: switch off) 190 LAPG2G2 MANUAL Version EN.12 Delay (advanced) Delay(Advanced) provides all to delay the signal. You have choice between seven times (you can adjust precise time) and each sub-folders contains three components with various numbers of outputs. The difference between basic and advanced is that for the advanced you can mute or bypass delayed channels. By double-clicking on the component's icon (for example: 50ms 4 Ch. ) a settings window appears: Delay (Advanced) Parameters Parameter Range Comment Mute all Button Mute all channels Bypass all Button Bypass all channels (disable the delay function) Mute Button Mute the channel Bypass Button Bypass the channel (disable the delay for this channel) Type Choose between adjustments with Time or with Distance and temperature Delay time (us) Adjust the delay time (Type: switch on) Temp (C) Gain Enter the ambient temperature in Celsius degrees switch off) Adjust the distance in meter (Type: switch off) 191 (Type: LAPG2G2 MANUAL Version EN.12 Gate The gate allows you to cut off the signal below a chosen threshold. You can choose between four different gates: Mono With Sidechain Stereo Gate Voice This component is gate which is using an active detection algorithm specially dedicated for voice. The gate is open only if a human voice pass is detected. For example you knock table, this noise will be stopped by Voice Gate, but when you speak then the voice gate will allow the human voice to open the gate. If there is a noise and a human voice present, the voice gate will open and both noise and voice will get through. This is NOT a noise cancellation component. The control window of the "Gate - Mono" module is opened by a double click on the icon in the DESIGN AREA and appears like this: Gate Parameters Parameter Range Comment Mute Button Mute the gate's module Bypass Button Switch off the gate's operation Gate on LED, lit green Flash when the gate is active (open) Hold time (ms) 10 to 1000 ms Time to close the output when no more human speech is detected. Release time (ms) 10 to 2000 ms Adjust the fade-out time of the signal to decrease the signal after the hold time. 192 LAPG2G2 MANUAL Version EN.12 Gate Mono The first module within the "Gate" folder is a simple single channel: The control window of the "Gate - Mono" module is opened by a double click on the component. Gate Parameters Parameter Range Comment Mute Button Mute the gate's module Bypass Button Switch off the gate's operation Gate on LED, lit green Flash when the gate is active (open) Thd. (Threshold) (dB) -60.0 to +20.0 dB Sets the threshold level above which the Gate will open. Response time 0 to 5000 ms Adjust the time between the level's detection and the beginning of the Gate operation Attack time (ms) 0 to 1000 ms Adjust the fade-in time of the signal when Gate is working. Hold time 0 to 5000 ms Adjust the time between the end level's detection and the end of the Gate operation Release time (ms) 10 to 10000 ms Adjust the fade-out time of the signal when Gate is no longer working Depth (dB) -100 to 0 dB Attenuate the level when the Gate is active. 193 LAPG2G2 MANUAL Version EN.12 Gate With Sidechain With this gate, you can control a gate on an audio channel (I) with an external sidechain signal(S). When the Sidechain input (S) input goes above the threshold, the gate becomes active and the signal on Input (I) goes to the output. Gate Parameters Parameter Range Comment Mute Button Mute the gate's module Bypass Button Switch off the gate's operation Gate on LED, lit green Flash when the gate is active (open) Sidechain gain (dB) -35.0 to 35.0 dB Set the volume of the signal connected in the input S Input gain (dB) -35.0 to 35.0 dB Set the volume of the signal connected in the input I Thd. (Threshold) (dB) 60.0 to 20.0 dB Sets the threshold level above which Gate will open. Response time 0 to 5000 ms Adjust the time between the level's detection and the beginning of the Gate operation Attack time (ms) 0 to 1000 ms Adjust the fade-in time of the signal when Gate is working. Hold time 0 to 5000 ms Adjust the time between the end level's detection and the end of the Gate operation Release time (ms) 10 to 10000 ms Adjust the fade-out time of the signal when Gate is no longer working Depth (dB) -100 to 0 dB Attenuate the level when the Gate is active. 194 LAPG2G2 MANUAL Version EN.12 Gate Stereo Simple double channel Gate The control window of the "Gate - Stereo" module is opened by a double click on the icon in The 'LAPG2' design window and appears like this: When one of the inputs goes above the threshold, the gate becomes active and the both left and right input signals are routed to the output. Gate Parameters Parameter Range Comment Mute Button Mute the gate's module Bypass Button Switch off the gate's operation Gate on LED, lit green Flash when the gate is active (open) Left gain (dB) -35.0 to +35.0 dB Set the volume of the signal connected in the input L Right gain (dB) -35.0 to +35.0 dB Set the volume of the signal connected in the input R Thd. (Threshold) (dB) -60.0 to +20.0 dB Sets the threshold level above which Gate will open. Response time 0 to 5000 ms Adjust the time between the level's detection and the beginning of the Gate operation Attack time (ms) 0 to 1000 ms Adjust the fade-in time of the signal when Gate is working. Hold time 0 to 5000 ms Adjust the time between the end level's detection and the end of the Gate operation Release time (ms) 10 to 10000 ms Adjust the fade-out time of the signal when Gate is no longer working Left Depth (dB) -100 to 0 dB Attenuate the level when the Gate is active. Right Depth (dB) -100 to 0 dB Attenuate the level when the Gate is active. 195 LAPG2G2 MANUAL Version EN.12 AGC With this Automatic Gain Control, you can adjust automatically the gain of the source by setting a target level. AGC Parameters Parameter Range Comment Release Button If the release button is pushed to green colour, the release time will be the user’s setting. Otherwise, the release time will be 10 Bypass Button Switch off the AGC operation Active LED, lit green Flash when the gain is controlled (AGC is active) Thd. (Threshold) (dB) -60.0 to +20.0 dB Sets the threshold level above which the gain will be controlled. Advice: don't set a too much low level, otherwise it will hear some unexpected little sound (breath, ambient noise…). Target level (dB) -35.0 to + 10.0 dB Determine which relative volume you want to target Max gain (dB) 0.0 to +18.0 dB Determine the maximum of automatic gain Advice: limit the max gain to keep a natural audio dynamic. Attack time (ms) 0 to 1000 ms Adjust the fade in time needed to reach the target level. Advice: A short time will give an uncomfortable hearing, with audio peak when the speaker begins to talk, or comes nearer of the micro. Release time (ms) 10 to 10000 ms Adjust the fade out time of the signal when AGC is no longer working. This value is ignored if the “Release button” is not pushed. Advice: A short time will give an uncomfortable hearing, with audio slack between the speaker's words. AVG time (ms) 0 to 1000 ms Average time needed by measurement input level Advice: A too long time will prevent the AGC from doing adjustment on short peaks. Level (dB) Indicator Level of the gain 196 LAPG2G2 MANUAL Version EN.12 Example of AGC using: As example, we want to automatically adjust the gain of a kind of SM58 microphone. On the "Input A" component, the input sensitivity is set to -40dB for standard dynamic microphone. Threshold: Set at -25dB. The level is adjusted only when the input signal is above -25dB. This is to keep a natural dynamic. Target level: We want a final target level at -10dB. Maximum gain: Set at 10dB, because giving more gain will generate some uncomfortable level differences. Release time: Set at 800(ms), enough time to avoid hard transition when the speaker talks again, after a little break. Attack time: Set at 400(ms), enough time to avoid hard transition when the speaker begin to talks, and not too long because we want a stable level quickly (not since the middle of the sentence). AVG time: Set at 200(ms), not too long, to detect short peaks in the speech and to be responsive. Not too short to avoid level change too often. You can see on the vu-meter that when the speaker talks at 18dBu, the final level is around -10.5dBu: Input level: AGC level: RMS vu-meter: AGC in AGC out 197 LAPG2G2 MANUAL Version EN.12 You can see on the vu-meter that when the speaker talks at 8 dBu, the final level is around -10.6 dBu: Input level: AGC level: RMS vu-meter: AGC in AGC out Inverter The control window of the "Inverter" module is opened by a double click on the icon in the 'LAPG2' design window and appears like this: Invert Parameters Parameter Range Comment Mute Button Mute the Inverter's module Invert. Button activate the inverter Filter The filters allow to attenuate or to select a specific frequency or band of frequency. The Crossover splits the signal in sub-signal with 2, 3 or 4 Way. Each way contains a specific frequency band. For example: Low, Bass medium, High medium and High (4 ways). Useful for active loudspeaker system. 198 LAPG2G2 MANUAL Version EN.12 High or Low Pass Allows you to filter Hi or low frequencies The small squares act as handles that can be dragged to the desired position and show the following parameters): Blue Frequency (Hz) Hi/Lo pass Parameters Parameter Range Comment Mode Type of filtering Slope [dB] 12, 24, 36, 48 Slope of attenuation Type Low/High Low or High pass Bypass Button Bypass the filter's module Mute Button Mute the filter's module Frequency [Hz] 20 to 20k Frequency of cut Level [dB] -90 to +20 gain 199 LAPG2G2 MANUAL Version EN.12 Band Pass Allow you to filter to have only a band of frequency The small squares act as handles that can be dragged to the desired position and show the following parameters): Blue Frequency (Hz) Yellow Bandwidth (-) Band pass Parameters Parameter Range Comment Mode Type of filtering Slope [dB] 12, 24, 36, 48 Slope of attenuation Type Low/High Low or High pass Bypass Button Bypass the filter's module Mute Button Mute the filter's module Frequency [Hz] 20 to 20k Frequency of cut Level [dB] -90 to +20 gain 200 LAPG2G2 MANUAL Version EN.12 Band Stop Allow you to filter to cut a band of frequency The small squares act as handles that can be dragged to the desired position and show the following parameters): Blue Frequency (Hz) Yellow Bandwidth (-) Band stop Parameters Parameter Range Comment Mode selector Type of filtering Slope [dB] 12, 24, 36, 48 Slope of attenuation Type Low/High Low or High pass Bypass Button Bypass the filter's module Mute Button Mute the filter's module Frequency [Hz] 20 to 20k Frequency of cut Level [dB] -90 to +20 gain 201 LAPG2G2 MANUAL Version EN.12 Notch filter Allow you to filter to cut a frequency The small squares act as handles that can be dragged to the desired position and show the following parameters): Blue centre Frequency (Hz) Yellow Bandwidth (-) Notch filter Parameters Parameter Range Comment Mode selector Type of filtering Slope [dB] 12, 24, 36, 48 Slope of attenuation Type Low/High Low or High pass Bypass Button Bypass the filter's module Mute Button Mute the filter's module Frequency [Hz] 20 to 20k Frequency of cut Level [dB] -90 to +20 gain 202 LAPG2G2 MANUAL Version EN.12 Shelving filter Allows you to smoothly filter Hi or low frequencies The small squares act as handles that can be dragged to the desired position and show the following parameters): Blue Frequency (Hz) Hi/Lo pass Parameters Parameter Range Comment Mode Hi or Low Type of filtering (high pass or low pass) Bypass Button Bypass the filter's module Frequency [Hz] 20 to 20k Frequency of cut Level [dB] -90 to +20 gain 203 LAPG2G2 MANUAL Version EN.12 All Pass filters An all-pass filter is a signal processing filter that passes all frequencies equally, but changes the phase relationship between various frequencies. It does this by varying its propagation delay with frequency. They are generally used to compensate for other undesired phase shifts that arise in the system The graphic displays the phase in degree. The small squares act as handles that can be dragged to the desired position and show the following parameters): Yellow Frequency (Hz) Orange Bandwidth All Pass filter Parameters Parameter Range Comment Bypass All Button Bypass the component (all the filter's module) Bypass Button Bypass the filter's module Bandwidth [Oct] 0,01 to 4 The transition bandwidth Frequency [Hz] 20 to 20k the frequency at which the phase shift crosses 90° 204 LAPG2G2 MANUAL Version EN.12 Cross over Use to filter signal for active audio pre amplifier for pro-audio sound. Three choice 2, 3 or 4 way In the example we have open the three way cross-over The small squares act as handles that can be dragged to the desired position and show the following parameters): Blue, yellow, red Frequency of each way (Hz) Hi/Lo pass Parameters (for each way) Parameter Range Comment Mode Hi or Low Type of filtering (high pass or low pass) Invert Button Invert the phase of the signal Slope [dB] 12, 24, 36, 48 Slope of attenuation Mute Button Mute the filter's module Frequency [Hz] 20 to 20k Frequency of cut Level [dB] -90 to +20 gain 205 LAPG2G2 MANUAL Version EN.12 Feedback The feedback analyzes the signal, detects feedback and attenuates the responsible frequency. There is several kind of feedback component. The difference is only the bandwidth which are tuned for Music high than speech (between it the bandwidth is decreasing). Each category has 4 different feedback it is only the number of filter (4, 8 12 or 16) that the feedback will use. The treatment time is increased with the number of filter. Tips: use feedback killers to detect feedback then note the frequency and replace feedback component with an Equalizer. And add a simply 4 notch feedback for security. Bypass: Bypass the feedback’s module Warning: By clicking on Bypass you will erase the captured Values (frequencies, bandwidth and gain)! Hold: when a Larsen is detected and a frequency locked the component hold this setting (like an Eq) Frequency: you can set the frequency Bandwidth: bandwidth of the notch filter to attenuate the feedback Gain: attenuation of the locked frequency Lock: shows if the feedback killers channel has detected and is erased a frequency responsible of a feedback Frequency: show the frequency locked Bandwidth: show the bandwidth of the notch filter locked Gain: show the attenuation of the frequency locked Bypass all: bypass all channels Hold all: hold all channels Manual all: active manual settings (with Frequency, Bandwidth and gain knobs) Lock time: interval time during the filter will be active when a feedback is detected. After that the captured values will be loose. Detect level: level of feedback detection: Depth: means maximum reduction gain for filter Caution : By storing again the configuration, you will erase the captured Values (frequencies, bandwidth and gain) ! 206 LAPG2G2 MANUAL Version EN.12 Network input and Network output The net input modules represent inputs from the ATEÏSNET. There are six separate modules named A, B, C, D, E, and F, each with 8 output nodes numbered from 1 to 48. You can add as many net input modules in any combination to your design but the total number of used output nodes is limited to 16 in each processor. Audio signals distributed to the network can be used everywhere they are needed throughout the system; i. e. the audio signal from a CD player on the analogue input of LAPG2 1 routed to channel 1 of the network can be taken from any LAPG2 device from the net input module A, node 1 within the network. Net input icons are showing active network channels graphically with their output nodes in a more dark blue colour. Since net input modules act as a unity gain network connection only, they got no control window themselves. The net output modules represent audio signal outputs to be distributed to the ATEÏSNET. There are six separate modules named A, B, C, D, E, and F, each with 8 output nodes numbered from 1 to 48. You can add as many net output modules in any combination to your design as long the total number of used output nodes doesn't exceed 16 channels within each LAPG2 device. Note: Net output modules offer no mixing or bus functionality. So every input node are usable only once in the whole system. For better clarity, occupied network channels are indicated by the icon's input nodes triangle showing a darker blue colour. Since the net input module act as a unity gain network connection only, they got no control window themselves. 207 LAPG2G2 MANUAL Version EN.12 Page control This component allows you to route (page) audio signal to one or several desired outputs. Two kinds of page control with various number of inputs and outputs S/W page control: for signal paging with contact IN and VOX. LPC: Only use with PPM (Ateïs Programmable Paging Microphone) allows defining key’s routing. (When you press one of the key of the PPM where the sound will be routed to.) S/W Page control With this component you can active and route the audio inputs to the outputs. Caution, this is not a mixer, only one input can be routed to an output. You can never have two inputs channels mixed to an output (even if they have the same priority), in this case the busy led of the lower channel number will light and theses channels won't be routed. Each outputs work separately. On each one output, only the channels with the gate ON and with the highest priority will be routed. Outputs control (routing): To route a channel to an output, click on an output button. This button can also be controlled. So you can change the routing on the outputs by several ways. To choose what kind of control will activate or not the "TTL In button", right click on an output button and choose in the list. Activation: Fixed: The gate of the channel is always activated. Only the highest priority channel of the activated channels will be routed to the output. 208 LAPG2G2 MANUAL Version EN.12 VOX: The gate is activated when the audio signal on the input is above the threshold. (Choose the threshold with knobs on the bottom). Only the highest priority channel of the activated channels will be routed to the output. Contact: The gate of the channel is activated when the "TTL In button" is activated. There is several ways to activate this button. Right click on the "TTL In button", and choose what control this button. Only the highest priority channel of the activated channels will be routed to the output. VOX + Contact: The gate of the channel is activated when the audio signal on the input is above the threshold, and if the "TTL In" button is activated. Only the highest priority channel of the activated channels will be routed to the output. Priority: You can set a priority number for each channel. 1 is the biggest priority. When several channels are active (gate open), only one of the channel with the biggest priority will be routed. If you have several channels with the same priority, only the highest channel number will be routed to the output. 209 LAPG2G2 MANUAL Version EN.12 Parameter Range Input Output Comment Channel number of the input button Click on the desired output’s button to rout input to desired outputs Button If you want to active the routing with a logical input (rear panel of LAPG2) Priority 1 to 8 Choose the priority of this input (1 is the biggest priority) Gate on LED, lit green Flash when the gate is active (open) Activation TTL In Type of activation of the routing (fixe, with TTL, or with a gate) Solo Button Route this input Busy LED, lit red Lit if the gate of the channel is open, but another channel with highest priority is already activate, and unable this channel to be routed to the output. Busy means: gate open, but channel not routed. Thd. (Threshold) (dB) -60.0 to +20.0 dB Sets the threshold level above which Gate will open automatically route the signal. Response time 0 to 5000 ms Adjust the time between the level's detection and the beginning of the Gate operation Hold time 0 to 5000 ms Adjust the time between the end level's detection and the end of the Gate operation 210 LAPG2G2 MANUAL Version EN.12 NPC There are several types of NPCs, various numbers of inputs as well as outputs. NPC uses network channels. .......... NPC uses network channels. If you have several LAPG2s with several PPMs, you can re-use outputs of the NPC directly in the system window of another LAPG2. You cannot add more than one NPC per LAPG2. If you have one PPM and several LAPG2s simply define one NPC for each LAPG2 but only define input for the LAPG2 physically connected to the PPM. By double clicking on the NPC icons the following window appears: PPM plug on: Table (key, Z1,..): Clear table: Select The PPM you want to configure with this NPC Enables to select the routing of the signal when the keys are inserted. Clear all the selection in the table To learn how to use NPC with PPM see Create paging of PPM with NPC. 211 LAPG2G2 MANUAL Version EN.12 Selector Simple selector to select different inputs to output Can be used with URC, RAC, analogue input or contact input in binary mode. Ducker The ducker is a kind of “sophisticated switch” allowing to attenuate or switch off automatically the signal arriving in input A when a chosen level (in dB) is perceived in input S. By double clicking on the Ducker icon the following window appears: Ducker Parameters Parameter Range Comment Bypass Button Switches off the Ducker’s operations Active LED, lit green Thd. (Threshold) (dB) 60.0 to 20.0 dB Threshold of detection on the input (S). The input (A) is attenuate when input signal (S) goes above this threshold. Advice : To avoid unexpected attenuation, don't set a low threshold level Response time 0 to 5000 ms Adjust the time between the S level's detection and the beginning of the Ducker’s operation on the A signal. Advice : Don't set a long "response time", otherwise you won't hear the beginning the (S) signal (as the first words of the speech). Attack time (ms) 0 to 1000 ms Adjust the fade-in time of the (A) signal when Ducker’s is working. Hold time 0 to 5000 ms Adjust the time between the end (S) level's detection and the end of the Ducker’s operation Flashes when the Ducker is active (Signal has been detected on input S) 212 LAPG2G2 MANUAL Version EN.12 Parameter Range Comment Advice : Set enough "Hold time" to avoid unexpected background level during the speech's breaks. Release time (ms) 10 to 10000 ms Adjust the fade-out time of the A signal when Ducker’s is no longer working Audio Depth (dB) -100 to 0 dB Adjusts the A level when the Ducker is active. Speech gain (dB) -60.0 to+ 20.0 dB Adjusts the S level when the Ducker is active. Example of Ducker using: As simple example, we will set a system for a speaker with background music. When the speaker is talking, the background music must decrease its level. The speaking is using a standard dynamic microphone type SM58. The microphone is connected to the channel 2 of the "Input A" component, with a input sensitivity at -40dB (set in the input A component). Then the microphone is linked to the input (S) of the ducker. The music player (as a CD player) is connected to the input 1 of the "Input A" component. Then the music is linked to the input (A) of the ducker. Threshold: set at -18dB, because less would active the attenuation when the speaker is not talking if the microphone catch some unexpected noise. Response time: set very short, because the background music must be attenuated as soon as the speaker is talking. Attack and Release times: Which are the "fade in" and "fade out" on the background music. Set almost one second for the hearing comfort, we want a kind music transition. Hold time: Set at 700(ms), enough to avoid the music back during the speech breaks. Audio depth: Set at -20dB, to hear the music during the speech, but at very low level (depending of the context). 213 LAPG2G2 MANUAL Version EN.12 Noise generator White noise generator This component generates a White noise. The White noise is a random signal (or process) with a flat power spectral density. In other words, the signal contains equal power within a fixed bandwidth at any center frequency. An infinite-bandwidth, white noise signal is purely a theoretical construction. By having power at all frequencies, the total power of such a signal is infinite and therefore impossible to generate. In practice, however, a signal can be "white" with a flat spectrum over a defined frequency band. As example, it can be used to set up the equalization for a concert or other performance in a venue, a short burst of white or pink noise is sent through the PA system and monitored from various points in the venue so that the engineer can tell if the acoustics of the building naturally boost or cut any frequencies. The engineer can then adjust the overall EQ to ensure a balanced mix. Parameter Range Comment Mute Button Mute the sound coming out from the component Level -100 to +20 (dB) Level of the white noise Measured white noise spectrum 214 LAPG2G2 MANUAL Version EN.12 Pink noise generator This component generates a Pink noise. Pink noise or 1/ƒ noise is a signal or process with a frequency spectrum such that the power spectral density is inversely proportional to the frequency. In pink noise, each octave carries an equal amount of noise power. Pink noise spectrum Parameter Range Comment Mute Button Mute the sound coming out from the component Level -100 to +20 (dB) Level of the pink noise Measured Pink noise spectrum 215 LAPG2G2 MANUAL Version EN.12 Tone generator Generates either tone (single frequency) or sweep sequence (between two fixed frequencies and in a defined interval of time) Parameter Range Comment Mute Button Mute the sound coming out from the component Level -100 to +20 (dB) Level of the signal Sweep button Active the sweep mode (sweep of frequency) Tone button Active Tone mode (one single frequency played) Sweep type selector Choose the interval between Min and Max frequencies (octave, 1/3 octave…) Tone Freq. 20 to 10k (Hz) If Tone mode is activated select the frequency played Start Freq. 20 to 20k (Hz) Select the minimum frequency in sweep mode Stop Freq. 20 to 20k (Hz Select the maximum frequency in sweep mode Inc. Time (ms) Select the time between the frequencies change in sweep mode 216 LAPG2G2 MANUAL Version EN.12 Meter This component able to see the audio level. Peak value: Maximum value of the signal RMS value: Power average of the signal Parameter Range Comment Indefinite Button Block the display of level value Measure type Rms/Peak Type of measure Hold time (ms) 10 to 1000(ms) Able to see keep displayed the value along a the hold time Value (dBu) Vu-meter Measure 217 LAPG2G2 MANUAL Version EN.12 Level control Various numbers of level controllers allows you to adjust the signal level for each channel independently. A global volume is also available. This is not a mixer. Parameter Range Comment Mute Button Mute the sound coming out from the component Bypass Button Ignore the level adjustment (level=0dB), and the mute button. Level -100 to +20 (dB) Increase signal Level of the channel Output Level -100 to +20 (dB) Increase the general signal Level 218 LAPG2G2 MANUAL Version EN.12 Auto Noise Gain Adjust the audio level of the paging input (P.M.) depending of the ambient noise. The ambient noise is measured with a sensing microphone connected to the sensing microphone input (S.M.). Our advice is to use the sensing microphone MSN (Ateïs), but you can also use another one. S.M: sensing microphone input P.M: paging input Parameter Range Comment Calibration Button Click on to start the automatic calibration procedure Calibration Lit all along the calibration procedure Calibration Lit when the A.N.G is properly calibrate Over Indicates the calibration result: The white noise level needed is over the range. A pop-up window will shows you what to do. Under Indicates the calibration result: The white noise level needed is under the range. A pop-up window will show you what to do : Response speed Selector Select here the reaction speed of the A.N.G. That's means the speed to adapt the P.M. audio level depending of the ambient noise. Min Gain -15 to 0 dB The minimum AGC level compensation Max Gain 0 to 15 dB The maximum AGC level compensation Sampling time 0.5 to 60 sec Determine the period time between two ambient noise measures 219 LAPG2G2 MANUAL Version EN.12 Parameter Range Comment Noise generator Meter White noise level, automatically Adjusted by the calibration Ambiant noise Meter AGC Level Meter Display the current compensation gain Hold time 1 to 5 sec Holding time between when the P.M. signal passes below the mode threshold and the end of the paging activity. Paging activity Light up when the paging is active. (when P.M. is above the mode threshold) Decrease Zone Indicates that the AGC gain is decreasing Dead Zone Indicates that the AGC is not changing Increase Zone Indicates that the AGC gain is increasing Fast Increase Zone Indicates that the AGC gain is increasing fast Sensing Mic Level Indicator /RMS Show the input level of the sensing microphone C/Sensing Mic Level Indicator Show the input level of the sensing microphone through the calibration transfer function Output Level Indicator /RMS Show the output level Differential Level Indicator Difference between the Output level and C/Sensing Mic level. For the procedures and use, please see Use the Automatic Gain Control. 220 LAPG2G2 MANUAL Version EN.12 Message Player This component is an internal messages player. It is able to play two different messages in the same time on two separate outputs M1 and M2 . You will have to store your Wave messages into the LAPG2 device. The component contains two Tabs: Events Settings LAPG2 Music Management (which should be understood as "Messages management") Event Settings tab: to create and manage the message play event: Playing a message is considered as an event: the "Message play" event. Like every event, it can be controlled by a lot of ways (contact In, scheduler, third party, etc). Here you can select the output used for each Message play event: This component window allows creation and assignation of the "play message" event. To set the control of this event, and also to create and use a "stop message event", you have to open View->Events Management. 221 LAPG2G2 MANUAL Version EN.12 LAPG2 Music management tab: load wave file into LAPG2 or recover wave file from LAPG2 to Computer. (Don't mind about "Music", it is the messages management) This tab contains two sides: Message Storage: files in the computer (in the wave library) Machine Storage: files in the LAPG2 Buttons actions Clicking on this button to display the messages either of the wave library or of the LAPG2 machine, depending of the side. To store the selected messages of the wave library into the LAPG2. To retrieve the messages from LAPG2 to the wave library To delete the selected messages. To play/Pause/Stop the message listening Select here the output used for the messages listening. For more information please see Use the message player component. 222 LAPG2G2 MANUAL Version EN.12 We all hope at Ateïs you will enjoy using this master piece of technology! We remains at your entire disposal for any comments or request do not hesitate to contact your local dealer for further information. 223