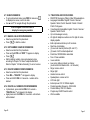
1
Published by PAVDII QUICK START GUIDE and MANUAL Assistive Technology Services “Our mission is to provide evaluation, consultation, spiritual guidance and assistive devices to make the quality of life better for those that need a little help.” Nashville, TN: Cookeville, TN: Murfreesboro, TN: 615-562-0043 931-303-5308 615-308-9165 To see MANY more assistive products, Visit our website: www.ATS-TN.com email: [email protected] PERSONAL ASSISTANCE VOICE DIALER II PAVDII QUICK START GUIDE INSTALLATION IMPORTANT: Telephone line needs to be disconnected prior to opening the battery compartment Unscrew battery compartment at bottom of unit Insert 4 Alkaline AA (LR06, 1.5V) batteries (not included) Close battery compartment Connect one end of phone line cord to telephone line wall jack and other end to back side of telephone Connect power adapter to connection at back panel and to available power socket STORING EMERGENCY CONTACT NUMBERS Set MENU switch at back of phone to “ON” Press PRO Press ▲2 x to select “STORE NUMBER” Press to enter Enter telephone number to be stored Press DEL to delete a wrong entered number Use ▲ and ▼ to move back and forward through number Press to confirm Enter name using characters on numeric keypad Press DEL to delete a wrong entered character Use ▲ and ▼ to move back and forward through characters Press to confirm Select “EMERGENCY OFF” or “EMERGENCY ON” Page 2 SERVICE According to FCC regulation, this equipment which has been certified and registered by the FCC, may only be repaired by authorized person, the FCC certification may be voided. Should you encounter any problems or need service, please call ASSISTIVE TECHNOLOGY SERVICES LLC Customer Service Hotline for assistance: 615-562-0043 Monday - Friday 8:00 am 5:00 pm CST. (If unit is under Warranty, PROOF OF PURCHASE MUST BE PROVIDED). For general inquires, e-mail [email protected] or visit website at www.ats-tn.com. LIMITED WARRANTY AND SERVICE ASSISTIVE TECHNOLOGY SERVICES warrants this product to be free from defective materials or factory workmanship and will replace or repair this unit or any part thereof, except batteries, if it proves to be defective in normal use or service within one year from date of original purchase. Our obligation under this warranty is the repair or replacement of the defective instrument or any part thereof, except batteries. Customer is responsible for all shipping costs of defective unit. This warranty will be considered void if unit is tampered with, improperly serviced or subjected to misuse, negligence or accidental damage. There are no other express warranties other than those stated herein. This warranty gives you specific legal rights and you may also have other rights which vary from state to state. Form 04162014 Page 23 It is important that the receiving party of an emergency call presses ‘0’ to accept the call. If the emergency call is not accepted, the telephone will call the next number from the emergency number list. NOTE: The system will continue to call the emergency contact numbers, in sequence, over and over until someone accepts the call or the call is terminated by the user. After 1 minute 50 seconds, a beep tone will indicate the emergency call will be terminated. The receiving party should press 1+5 to add an extra 2 minutes to the call. Once the receiving party has pressed 1+5 during the emergency call (or after 1 minutes 50 seconds to extend the call for another 2 minutes), SOS function will be deactivated. Once the receiving party has pressed 1+9 during the emergency call, the emergency call will be terminated. If the receiving party did not press 1+5 during the emergency call after 1 minute 50 seconds, the SOS function will not be deactivated and telephone will call the next number from the emergency number list. Each time a number is called, the system will dial for 1 minute. If the system does not hear a receiver press ‘0’ within 1 minute, it will hang up and dial the next number. NOTE: Calling can be stopped by pressing the Pendant button again or the SOS button located on the phone Page 22 In case of “EMERGENCY ON” you need to select the position of this number (specifies in what order it will be dialed) - Use ▲ or ▼ to select the position - Press to confirm In case you want to overwrite an existing position, you will have to confirm “OVERWRITE?” by pressing STORING EMERGENCY MESSAGE Press PRO Press ▲ 4 x to select “RECORD MESSAGE” Press and hold , wait for beep, “VOICE” icon is flashing After the beep, say the message Release the button to finish the recording Press PB/D to leave the menu The maximum length of recording is ‘20’ seconds TEST EMERGENCY MESSAGE Press PRO Press ▲ 5 x to select “CHECK MESSAGE” Press to listen to the recorded message Press PB/D to leave the menu TEST SYSTEM OPERATION First call your chosen emergency contacts to inform them they are on your emergency contact list. Instruct your contacts how to accept, extend and/or end the call with the proper procedure. After they have been informed to press 0 to accept, 1+5 to extend and 1+9 to terminate, press the Pendant button or the SOS button to perform an actual test. Now you can proceed with other features (i.e. contact name recording, etc.) Page 3 ATS Model PAVDII User Manual 1 FEATURES LIST 1.1 Emergency Features: Activates alarm for 15 seconds for immediate help within the house (begins phone contact after 15 seconds) If no help arrives, the phone dials in sequential order, the assigned emergency numbers from the phone book (up to 30) Plays a pre-recorded or user recorded emergency message When the receiver answers the call and presses ‘0’, a 2 minute speakerphone conversation will be activated Before the end of 2 minutes, receiver will hear 2 beeps and can press 1+5 to continue the conversation for another 2 minutes or after 2 minutes, the phone will dial the next emergency number from the phone book During the emergency conversation, the receiving party can press 1+9 to disconnect or caller can press Pendant or SOS button If the called party does not answer after 1 minute, system proceeds to call the next emergency contact The emergency call can work with system phone off-hook with wireless pendant only Pendant control range is over 100 feet in open area Pendant is totally waterproof Page 4 6.8 USING DIRECT MEMORY KEYS M1, 911 Press M1 or 911 Press to dial number, or Pick up handset or press for hands-free mode Press M1 or 911 to dial direct memory number 7 SOS FUNCTION Read carefully how SOS works – 1.1 Emergency Features 7.1 ACTIVATE SOS FUNCTION Press the Pendant button, or Press and hold SOS key on telephone for at least 3 seconds NOTE: If Pendant or SOS is accidentally pressed, pressing again with 15 seconds will deactivate and not call emergency contacts. *If telephone receiver is off the hook, emergency system will work with the wireless Pendant only 7.2 DEACTIVATE SOS FUNCTION Press the Pendant button Press SOS key on telephone 7.3 RECEIVING PARTY COMMANDS / KEY CODES Press 0 accept the emergency call Press 1+5 extend the call for another 2 minutes Press 1+9 deactivate and terminate the emergency call Page 21 6.7 USING PHONEBOOK To go to phonebook mode, press PB/D to make sure Is displayed on screen, next to the date Use ▲ and ▼ to navigate through the phonebook SOS will appear in front of clock in display for emergency numbers 6.7.1 MAKING CALLS FROM PHONEBOOK Select a number from the phonebook Press to dial the number 6.7.2 EDIT NUMBER / NAME IN PHONEBOOK Select a number from the phonebook Press and hold PRO until “EDIT ?” appears on display Press Start modifying number, name and emergency type according to Chapter “5.8 Store Telephone Numbers” Refer to Chapter “5.9 Name Recording” to record a name 6.7.3 DELETE NUMBER FROM PHONEBOOK Select a number from the phonebook Press DEL – “DELETE ?” will appear in display Press and HOLD DEL for 3 seconds – number will be deleted 6.7.4 DELETE ALL NUMBERS FROM PHONEBOOK In phonebook, press and hold DEL for 3 seconds – “DELETE ALL ?” will appear in the display Again press and HOLD DEL for 3 seconds – all numbers will be deleted Page 20 1.2 TELEPHONE AND CID FEATURES FSK/DTMF Emergency Talking Caller ID Speakerphone Languages Selectable: English / French / German / Spanish / Italian / Dutch / Swedish / Finnish / Danish / Polish / Portuguese Voice Reporting Selectable: English / French / German / Spanish / Italian / Dutch Up to 64 messages memory 22 digits for telephone numbers and 16 digits for name display capable Built-in phonebook holds up to 30 numbers Real time clock display (2) one-touch memory buttons (M1 and 911) (5) levels of LCD contrast adjustment Flash time 100/300/600ms selectable Tone / Pulse selectable In-use indicator Low and no battery indicator on display (must install 4 AA Alkaline LR6 – not included) Ringer volume control Ringer light Handset volume control Speakerphone volume control LCD back light External power: DC 9V 300mA adaptor Pendant operating frequency: 433.92 MHz Pendant battery: 23A 12V Alkaline Program key ON/OFF switch control Wall mountable Page 5 2 BUTTONS / CONNECTIONS (See picture) 1. LCD display 2. Direct memory key M1 3. Direct memory key 911 4. OK / Dial Key 5. Up key (▲) 6. Down key (▼) 7. Program key (PRO) 8. Delete key (DEL) 9. Phonebook / Caller ID list / Exit / Select key (PB/D) 10. Hands-free volume (slide bar) (below PB/D key) 11. Hands-free key 12. Redial / Pause key (RD/P) 13. Ringer LED 14. Flash key (FLASH) 15. Mute key (MUTE) 16. Curl cord connector (RJ9) 17. Numeric keypad 18. SOS key 19. Low battery / No battery LED 20. Hook switch 21. In-use LED 22. Program key ON/OFF switch 23. Ringer volume switch 24. Line connection (RJ11) 25. Power adapter connection 26. Curl cord connection (RJ9) 27. Handset volume switch 28. Wireless pendant 29. Pendant SOS button 30. Pendant transmission LED 6.6.1 MAKING CALLS FROM CALLER ID LIST Press Arrow down ▼ to select number from caller ID list Press 2 x to dial number 6.6.2 COPY NUMBER FROM CALLER ID LIST TO PHONEBOOK Select number from caller ID list Press and hold PRO for 2 seconds – “COPY TO MEMORY” will be displayed Press to store number 6.6.3 DELETE NUMBER FROM CALLER ID LIST Select number from caller ID list Press DEL – “DELETE ?” will appear on display Press and hold DEL for 3 seconds – number will be deleted 6.6.4 DELETE ALL NUMBERS FROM CALLER ID LIST In caller ID list press and hold DEL for 3 seconds – “DELETE ALL ?” will appear on display Press and hold DEL for 3 seconds – all numbers will be deleted RECEIVING CALLER ID INFORMATION Incoming call display will display number, area code, name, time and date of call. If provided by telephone company, you may see: “OUT OF AREA” – call is made through telephone company which does not offer Caller ID service or does not transfer calls by long distance net “PRIVATE CALL” – some areas allow callers to prevent their telephone data from being displayed Page 6 Page 19 6.3 DEACTIVATING MICROPHONE During a call, you can deactivate the microphone and talk freely without the caller hearing you Press and hold MUTE to mute the microphone 6.4 FLASH FUNCTION If dialing number is busy or conversation is complete, press FLASH key to disconnect line for dialing another number When equipped with PABX, telephone makes it easy to transfer calls Press FLASH key for call waiting Dial extension number of caller intended When party answers, hang up handset When line is busy or no answer, press FLASH again to 25 24 19 21 2 3 4 18 27 Page 18 M1 SOS 911 OK ABC DEF GHI JKL MNO PQRS TUV WXYZ PRO 17 6.5 LAST NUMBER REDIAL The telephone will remember the last number dialed Pick up handset or press for hands-free Press RD/P to redial last number called To review incoming calls, press PB/D to make sure “CLIP” is displayed next to date on display Use ▲ and ▼ to navigate through incoming calls 1 20 reconnect to caller 6.6 INCOMING CALLER ID LIST The telephone can store up to 64 calls in the caller ID list The display will show total of calls and number of new calls 23 22 DEL PB/D 16 MUTE FLASH RD/P 5 6 7 8 9 10 11 15 14 13 12 26 30 29 28 Pendant battery 12v Alkaline CN23A (included in pendant) Page 7 3 INSTALLATION Telephone line needs to be disconnected prior to opening the battery compartment! Put batteries in battery compartment to activate display Unscrew battery compartment on bottom of telephone Insert 4 Alkaline AA (LR06, 1.5V) batteries (not included) Close battery compartment Connect one end of telephone line cord to telephone wall jack and other end to back of telephone Connect power adapter to connection on back of telephone and to available power outlet If you do not install batteries, the “Low Battery / No Battery” LED will continue to flash When replacing batteries, pick up handset first, then replace batteries – otherwise time clock setting will be lost System will run on battery power for emergencies 4 DESCRIPTION OF DISPLAY Upper line displays basic information, middle line displays telephone number and bottom line displays name of caller is Low or No battery indicator “REPEAT” means the repeat of an incoming call “VOICE” means voice reporting indicator “NEW” means there are new incoming calls “SOS” means emergency calls “XX:XX XX/XX” means Hour / Minute - Month / Date Page 8 5 USING TELEPHONE 6.1 MAKING CALLS Enter telephone number Press DEL to delete wrong entered number Press or to make hands-free call or, Pick up handset to off-hook and enter telephone number Volume of handset can be set HI or LOW (27) During call made with handset, you can switch to handsfree by pressing and hanging up handset. Hands-free volume is adjusted using button (10) In case telephone is connected to PBX system it may be necessary to add a Pause after PBX access code. Telephone can generate a ‘4’ second Pause time. EX: 0 P 012345678 Press RD/P to enter a Pause Call duration timer will start in display 4 seconds after number is dialed. 6.2 RECEIVING CALLS When a call comes in, phone will ring and ringer LED will blink Pick up handset or press or Pendant to answer hands- free Use switch (23) to set ringer volume A call that has been accepted by use of the pendant can also be terminated by pressing the pendant again Page 17 5.11 CHECK EMERGENCY MESSAGE The message you recorded in previous Chapter can be verified Press PRO Press ▲ 5 x to select “CHECK MESSAGE” Press to listen to recorded message Press PB/D to leave menu To erase recording, press DEL during playback After all programming is complete, you can switch program lock ON (22) 5.12 PAIR NEW PENDANT / REMOVE ALL PENDANTS The pendant is registered in the telephone by its ID Code. In case of repair or other reason, it can be necessary to register the pendant to the telephone. The pendant can also be deleted from the telephone. A total of (5) pendants can be paired to the system. To pair a pendant: Press PRO Press ▼ 2 x to select “PAIR NEW PENDANT” Press “PAIRING” will be displayed Press to start pairing process Press button on pendant “DONE” will appear if pairing is successful Press PB/D to leave menu To remove a pendant: Press PRO Press ▼ 2 x to select “PAIR NEW PENDANT” Press “PAIRING” will be displayed Press ▲ or ▼ to select “DELETE ?” Press to delete all pendants Press PB/D to leave menu Page 16 is phonebook indicator “CLIP” means incoming Caller ID list “CALL #” means total number of incoming calls A. If time and date of incoming calls is different from telephone company, telephone will adjust the time and date automatically according to Telecom Provider when receiving calls B. If there is no operation or no incoming calls longer than 20 seconds, LCD only displays time and date, total number of received calls and number of new incoming calls C. Telephone can store up to 64 incoming calls. If there is a new call after the 64th call, the oldest call will be erased automatically and new call will be stored. 6 SETTINGS Settings for PROGRAM (PRO) menu switch (22) LCD Contrast (see 5.3) Enter Time / Date (see 5.4) Store Number (see 5.8) Name Recording (see 5.9) Check Message (see 5.10) LCD Language (see 5.1) Voice (see 5.2) Set Flash Time (see 5.7) Set Dial Mode (see 5.6) Pair New Pendant (see 5.12) Local Area Code (see 5.5) Page 9 5.1 LANGUAGE SETTING The telephone has (11) display languages: English (ENGLISH), French (FRANCAIS), German (DEUTSCH), Spanish (ESPANOL), Italian (ITALIANO), Dutch (NEDERLANDS), Swedish (SVENSKA), Finnish (SUOMI), Danish (DANSK), Polish (POLSKI) and Portuguese (PORTUGUES). To select the language follow these steps: Press PRO Press ▲ 6 x to select “LCD LANGUAGE” Press to enter the settings Use ▲ and ▼ to select the languages Press to confirm Press PB/D to leave menu 5.9 NAME RECORDING Once a number / name is stored, you can record the name. You can change the name you have recorded while storing a number / name in previous Chapter. Press PRO Press ▲ 3 x to select “NAME RECORDING” Press to enter Use ▲ or ▼ to navigate through all stored numbers / names 5.2 VOICE GUIDANCE The telephone has a voice guided menu and will also repeat every dialed digit by voice. You can select from six different voice languages: English (ENGLISH), French (FRENCH), German (GERMAN), Spanish (SPANISH), Italian (ITALIAN), Dutch (DUTCH) or disable the voice. Press PRO Press ▲ 7 x to select “VOICE” Press to enter settings Use ▲ and ▼ to select voice guidance Press to confirm If you don’t want voice guidance, select “VOICE NO” Press PB/D to leave menu You will hear recorded name while navigating through stored contacts. Press DEL to erase recording. When you have selected the contact, press and hold and wait for the beep - “VOICE” icon will flash After the beep, say the name of stored contact Release the button to finish recording Press PB/D to leave menu Maximum length of recording is ‘3’ seconds 5.10 RECORD MESSAGE For SOS calls, the telephone will broadcast a standard prerecorded message unless you record your own message. Press PRO Press ▲ 4 x to select “RECORD MESSAGE” Press and hold , wait for beep – “VOICE” icon will flash After the beep, record your message Release the button to finish recording Press PB/D to leave menu The maximum length of recording is ‘20’ seconds Page 10 The default message is: “THIS IS AN EMERGENCY CALL TO ACCEPT THIS CALL PRESS ZERO” Page 15 5.8.1 STORE NUMBER IN DIRECT MEMORY KEY (M1) Press PRO Press ▲ 2 x to select “STORE NUMBER” Press to enter Enter telephone number to be stored Press DEL to delete wrong entered digit Use ▲ and ▼ to move back and forward through number Press to confirm Press M1 key Press to save Press PB/D to leave menu CHANGE 911 KEY The 911 key is pre-programmed from the factory. If you need to change the 911 key, you may program another number following these steps: Press PRO Press ▲ 2 x to select “STORE NUMBER” Press to enter Enter telephone number to be stored Press DEL to delete a wrong entered digit Use ▲ and ▼ to move back and forward through number Press to confirm Press 911 key Press to save Press PB/D to leave menu 5.3 LCD CONTRAST You can set the LCD display contrast to 5 different levels: Press PRO Press to select “LCD CONTRAST” Use ▲ and ▼ to select desired level Press to confirm Press PB/D to leave menu 5.4 ENTER TIME AND DATE When you have subscription to Caller ID service and your telephone provider sends date and time together with telephone number, the phone’s clock will be set automatically. Press PRO Press ▲ 1 x to select “ENTER TIME / DATE” Press to enter settings Use ▲ and ▼ to change hour Press to confirm Use ▲ and ▼ to change minutes Press to confirm Use ▲ and ▼ to change month Press to confirm Use ▲ and ▼ to change date Press to confirm Press PB/D to leave menu 5.5 SET AREA CODE When you have subscription to Caller ID service, it can be necessary in some countries to enter your area code. You can set up to 5 digits for the area code. Press PRO Press ▼ 1 x to select “LOCAL AREA CODE” Page 14 Page 11 Press to enter settings Use ▲ and ▼ to change digit Press to move to next digit Repeat this sequence until all digits are set. Leave unused digits as “-“ Press PB/D to leave menu 5.6 SET DIAL MODE – PULSE OR TONE (DTMF) The telephone can dial in Tone (DTMF) or Pulse mode. By default the telephone is set to Tone (DTMF) mode. Press PRO Press ▼ 3 x to select “SET DIAL MODE” Press to enter settings Use ▲ and ▼ to select “PULSE” or “TONE” Press to confirm Press PB/D to leave menu 5.7 SET FLASH TIME Flash is used for services like “call waiting” (if service is provided by telephone company) or to transfer calls when connected to PBX system. Depending on the country, flash time can vary. The telephone supports (3) possibilities: 100, 300, 600 msec Press PRO Press ▼ 4 x to select “SET FLASH TIME” Press to enter settings Use ▲ and ▼ to select desired flash time Press to confirm Press PB/D to leave menu 5.8 STORE TELEPHONE / PHONEBOOK NUMBERS You can store up to 30 phone numbers / names in the telephone. As few as 1 or all 30 numbers can be set as emergency numbers. NOTE: If storing 911 in emergency contact list, store as the last emergency contact. Press PRO Press ▲ 2 x to select “STORE NUMBER” Press to enter Enter telephone number to be stored NOTE: To store a pause while programming, press RD/P To store a * or # while programming, press those keys Press DEL to delete a wrong entered number Use ▲ and ▼ to move back and forward through number Press to confirm Enter name using characters on numeric keypad Press DEL to delete a wrong entered character Use ▲ and ▼ to move back and forward through entered characters Press to confirm Select “EMERGENCY OFF” or “EMERGENCY ON” In case of “EMERGENCY ON” you need to select position of this number (specifies in what order it will be dialed) - Use ▲ and ▼ to select position - Press to confirm In case you want to overwrite an existing position, you will have to confirm “OVERWRITE?” by pressing . When number is saved, menu will automatically go to “NAME RECORDING” Press and hold and wait for a beep After the beep, say name of stored contact Release button to finish recording Press PB/D to leave menu The maximum length of the recording is ‘3’ seconds Page 12 Page 13