1
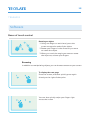
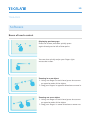
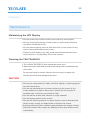
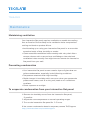
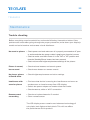
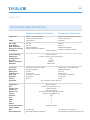
ts64a001
User
manual
MultiMedia
Touchscreen HDTV
with integrated PC
I
ts64a001
Product registration
Register online at tecslate.com/registration.
If you register your TAG product, we’ll notify you of new features and
software upgrades. Please print this page and keep the following information available in case you need to contact TAG Support.
Serial number:
Date of purchase:
Ii
ts64a001
Copyright
The documentation and the software included with this product are
copyrighted 2014 by TAG Global Systems, LLC. All rights are reserved.
TAG Global Systems, LLC. reserves the right to make improvements in
the products described in this manual at any time without notice.
No part of this manual may be reproduced, copied, translated or transmitted in any form or by any means without the prior written permission of TAG Global Systems, LLC. Information provided in this manual is
intended to be accurate and reliable.
However, TAG Global Systems, LLC. assumes no responsibility for its use,
nor for any infringements of the rights of third parties, which may result
from its use.
Acknowledgements
All other product names or trademarks are properties of their respective
owners.
Iii
ts64a001
Declaration of conformity
CE Conformity Statement
Radio products with the CE alert marking comply with the R&TTE Directive (1999/5/EC) issued by the Commission of the European Community.
Compliance with this directive implies conformity to the following European Norms (in brackets are the equivalent international standards):
EN 60950—1 (IEC60950—1) —Product Safety. Products that contain the
radio transmitter are labeled with CE alert marking and may also carry
the CE logo.
FCC Compliance Statement
This device complies with part 15 of the FCC Rules. Operation is subject
to the following two conditions:
1. This device may not cause harmful interference;
2. This device must accept any interference received, including
interference that may cause undesired operation.
Caution!
Exposure to Radio Frequency Radiation. The radiated output of this
device is far below the FCC radio frequency exposure limits. Nevertheless, the device shall be used in such a manner that the potential for
human contact during normal operation is minimized. When connecting
an external antenna to the device, the antenna shall be placed in such
a manner to minimize the potential for human contact during normal
operation. In order to avoid the possibility of exceeding the FCC radio
frequency exposure limits, human proximity to the antenna shall not be
less than 20cm (8 inches) during normal operation.
iV
ts64a001
Declaration of conformity
This equipment has been tested and found to comply with the limits for
a Class B digital device, pursuant to part 15 of the FCC Rules. These limits
are designed to provide reasonable protection against harmful interference in a residential installation. This equipment generates, uses and can
radiate radio frequency energy. However, there is no guarantee that interference will not occur in a particular installation. If this equipment does
cause harmful interference to radio or television reception, which can be
determined by turning the equipment off and on, the user is encouraged to
try to correct the interference by one or more of the following measures:
• Reorient or relocate the receiving antenna
• Increase the separation between the equipment and receiver
• Connect the equipment into an outlet on a circuit different from that
to which the receiver is connected
• Consult the dealer or an experienced computer technician for help
Technical Support and Assistance
1. Visit the Advantech website at http://support.advantech.com where
you can find the latest information about the product.
2. Contact your distributor, or sales representative for technical support
if you need additionalassistance. Please have the following information
ready before you call:
- Product name and serial number
- Description of your peripheral attachments
- Description of your software (operating system, version, application
software, etc.)
- A complete description of the problem
- The exact wording of any error messages
V
ts64a001
Safety instructions
CAUTION
• Before you clean your TAG product, shut down or disconnect the
computer. Otherwise, you may scramble the desktop icons or inadvertently activate applications when you wipe the screen.
• Avoid setting up and using the TAG product in an area with excessive
levels of dust, humidity and smoke.
• Make sure an electrical socket is near your TAG product and remains
easily accessible during use.
• For SMART Board 8055ie-SMP interactive flat panel only: The external
power supply needs to meet the Limited Power Source (LPS)
requirements of CSA/UL/IEC/EN 60950-1, when required.
• This TAG product should be used only with European TN and TT power
distribution systems.
It is not suitable for older, IT-type power distribution systems found in
some European countries. “This system (IT-type) is widely used isolated
from earth, in some installations in France, with impedance to earth, at
230/400V, and in Norway, with voltage limiter, neutral not distributed, at
230V line-to-line.” (IEC 60950:1999) Contact qualified personnel if you’re
uncertain of the type of power system available where you’re installing
your SMART product.
Important information about your touch screen display
You must connect the USB cable that came with your TECSLATE™ interactive flat panel to a computer that has a USB compliant interface and
that bears the USB logo. In addition, the USB source computer must be
compliant with CSA/UL/EN 60950 and bear the CE mark and CSA and/or
UL Mark(s) for CSA/UL 60950. This is for operating safety and to avoid
damage to the TAG TS64A001
VI
ts64a001
Safety instructions
WARNING
• Failure to follow the installation instructions shipped with your
TAG product could result in personal injury and product damage
which may not be covered by your warranty.
• Do not open or disassemble the TAG product. You risk electrical
shock from the high voltage inside the casing. Opening the casing
also voids your warranty.
• Do not stand (or allow children to stand) on a chair to touch the
surface of your TAG product. Rather, mount the product at the appropriate height.
• To reduce the risk of fire or electric shock, do not expose the TAG
product to rain or moisture.
• If your TAG product requires replacement parts, make sure the service technician uses replace ment parts specified by TAG or parts
with the same characteristics as the original.
• Ensure that any cables extending across the floor to your TAG
product are properly bundled and marked to avoid a trip hazard.
• Do not insert objects inside the cabinet ventilation holes, because
they could touch dangerous voltage points and cause electric
shock, fire or product damage which may not be covered by your
warranty.
• Do not place any heavy objects on the power cable. Damage to the
cable could cause shock, fire or product damage which may not be
covered by your warranty.
• Use only extension cords and outlets into which this product’s
polarized plug can be fully inserted.
• Use the power cable provided with this product. If a power cable
is not supplied with this product, please contact your supplier.
VII
ts64a001
Safety instructions
WARNING
Use only power cables that match the AC voltage of the power
outlet and that comply with your country’s safety standards.
• If the glass is broken, do not touch the liquid crystal. To prevent
injury, handle glass fragments with care when disposing of them.
• Do not move or mount the interactive flat panel by connecting
rope or wire to its handles. Be cause the interactive flat panel is
heavy, rope, wire or handle failure could lead to personal injury.
• Use only mounting hardware included in your packaging.
Disconnect all power cables for your interactive flat panel from
the wall outlet and seek assis tance from qualified service personnel when any of the following occurs:
The power cable or plug is damaged.
Liquid is spilled into the interactive flat panel.
Objects fall into the interactive flat panel.
The interactive flat panel is dropped.
Structural damage such as cracking occurs.
The interactive flat panel behaves unexpectedly when
you follow operating instructions.
VIII
ts64a001
Contents
Product features
1
Package contents
3
Optional accessories
Safety tips
4
5
Front panel keys
6
Port descriptions
Side view 7
Bottom view, Front view, Rear view Remote control
8
9
Getting Started 11
Software
Learning the tecslate pro tools 13
Before you use Tecslate Pro14
Calibrating the Touch Screen14
Getting to know TecslatePro 15
Bases of touch control 16
Maintenance
Maintataining the LCD Display 20
Cleaning the device 20
Maintaining ventilation 21
Preventing condensation 21
To evaporate condensation from your interactive flat panel 21
Trouble shooting 22
Technical specifications 23
1
ts64a001
Product features
The TAG TS64A001 is loaded with features to make your presentations shine.
LED Touchscreen Display
On board PC
Software
Network Connectivity
Blu-Ray/DVD
2
ts64a001
Product features
Brilliant 1080P LED Touchscreen Display
- 4000:1 Contrast Ratio makes blacks blacker and colors brighter
- 65” screen makes for easy viewing even from back of the room
- 120 Hz refresh rate for smooth video play back
- Anti-Glare Glass
- Low Power Consumption
- Finger or Stylus Input
- Available in 65”& 84”
On board PC
- 1TB Hard Drive
- Intel i7 Core processor
- Intel Video Card
- Multiple inputs for connectivity
Software
- Preloaded with Microsoft Windows 7 64bit OS
- Easy to use and intuitive Whiteboard software
- Adobe Acrobat Reader
- Can be preloaded with the software of your choice
- Input Devices
- Wireless IR Remote Control
- Wireless Mouse
- Wireless Keyboard
- Stylus Starter Package included
Network Connectivity
- Built In Wi-Fi for Plug and Play Connectivity
- Ethernet port
Blu-Ray/DVD
3
ts64a001
Package contents
Congratulations on your purchase of the TAG TS64A001! Please
keep packaging, box and all related materials in a safe place for
future transport needs.
1
3
7
4
8
1) 1920 x 1080 Tecslate Touch Monitor
2) Wall mounting fixture *
3) Wireless keyboard, mouse & dongle
4) Digital antenna
5) HD Webcam 720p
6) Remote control
2
6
5
9
10
7) Power adapter
8) Ethernet cable
9) 4 Stylus pens
10) VGA to USB touch cable
11) HDMI cable
11
4
ts64a001
Optional accessories
External Speakers or Soundbars
VIZIO S4251w-B4 5.1 Soundbar with Wireless
Subwoofer and Satellite Speakers
Custom Stands or Mounting Solutions
VIZIO S4251w-B4 5.1 Soundbar with Wireless
Subwoofer and Satellite Speakers
5
ts64a001
Safety tips
Safety tips
• When using the TAG TS64A001 display, please maintain a distance of
approximately 1 to 2 feet away from the screen.
• Do not touch screen without using a screen protector, as it can leave
hard to remove oils from your skin.
• Never remove back cover or serious damage/injury may occur due to
high voltage parts.
• Avoid exposing LCD display to direct sunlight or any other heat
sources.
• Exercise sufficient caution when moving or hanging the LCD display.
• Only set on TAG TS64A001 stand (sold separately) or hang on wall in a
well-ventilated area.
• Do not set any objects on top of LCD display, make sure all cords are
free as well.
• If anything unusual occurs while using the TAG TS64A001 display,
unplug immediately and call your dealer. It is not safe to continue to
use if not in perfect running condition.
• Do not apply too much pressure to LCD screen or unrepairable damage could occur
6
ts64a001
Front panel keys
Front panel keys
1.
2.
3.
4.
Power
Menu
Signal Source
(TV/Video)
VOL+/-
5.
CH+/-
Switching key between monitor standby and on mode.
If menu is hidden, press this key to display OSD menu;
if menu displays, press this key to exit current menu.
Switch among all available input signal sources
(AV1, S-VIDEO, COMPONENT1, COMPONENT2, HDMI2, VGA, USB)
Adjust sound output level of speaker (same function as volume key
on remote control). In OSD menu, it is used to move cursor left/right
or change settings (same function as cursor left/right key on remote
control).
In OSD menu, it is used to move cursor up/down (same function as
cursor up/down on remote control).
6. Power indicator
A red light indicates display is in standby mode; A green light indicates display is in working mode.
7.
A red light indicates display is in standby mode; A green light indicates display is in working mode.
PC
1
6
7
2
3
4
5
7
ts64a001
Port descriptions
Side view
Bluray DVD drive
Touch port
Wi-fi
Plug in Touch cable
here and other side
to USB pot above
Component
HDMI
VGA
Audio\video
USB
Plug in USB side
of touch cable here
VGA port
Ethernet
Audio IN
Audio OUT
Fiber out
Plug in digital
antenna coaxial
cable here
Power button
PC Connections
TV Connections
8
ts64a001
Port descriptions
Bottom view
Audio OUT
USB
HDMI
Front view
PC USB port
Main On/Off Power
Front panel key
Power
HDMI
Rear view
Sound Box
Speaker box switch
9
ts64a001
Remote control
CAUTION
• Do not subject the remote control to strong shock.
• Keep the remote control away from liquids. If it gets wet, wipe it dry
immediately.
• Do not expose the remote control to heat or steam.
• Do not open any part of the remote control other than the battery
compartment picture-in-picture compartment.
• The remote control system does not function when strong light
strikes the remote control sensor or when there is an object between
the remote control and its sensor.
WARNING
To reduce the risk associated with leaking batteries:
• use only AA type batteries
• do not mix used and new batteries
• orient the battery’s positive (+) and negative (-) terminals according to
the markings found on the remote control.
• do not leave the batteries in the remote control for an extended period
• do not heat, disassemble, short or recharge the batteries, or expose
them to fire or high temperature.
• avoid eye and skin contact if batteries have leaked
• dispose of exhausted batteries and product components in accordance
with applicable regulations.
Remote Control Battery Installation
1. Press the tab on the underside of the remote control, and then open the cover.
2. Remove the batteries if they are present.
3. Insert two new 1.5V AA batteries in the remote control. Ensure the + and markings on the batteries align with the markings in the remote control.
4. Replace the cover.
10
ts64a001
Remote control
Power: turn the monitor on\standby
Mute: Press to mute the sound
Number buttons: Press number button and
press OK button to play the channel.
Recall: Return to the previous channel viewed.
Nicam: Simple tone, stereo or bilingual mode/
only when it supported by broadcasting system.
P. Mode: Select the picture mode
S. Mode: Select the sound mode
Source: Display the input source menu
Menu: System setup menu
Info: Display current mode information
Exit: Exit the OSD menu
OK: Confirm button for menu
Aspect: Press to see top half of page double size,
press again to see the bottom half of page double
size, press again for normal size.
Sleep: Stanby timer.
Freeze: Holds the current picture.
TV:
USB:
Shift:
Subtitle:
Auto: Press to change auto reduction mode
FAV: Diplay the favourite program list
EPG: Press to display Electronic Program Guide
Text: Turn on/off teletext display
Open/Close program
Fast forvard
Fast reverse
Play/Pause program
Next chapter
Stop program
Previous chapter
Cursor button
In DVD source voice switching
In DVD source press to cycle to a desired position
Press to change the playing mode
Repeat segment between A and B
Shortcuts followed the coloured links
11
ts64a001
Getting started
Connection sequence (1-6)
1. Side view
Connect wireless
keyboard and mouse
dongle to USB port
3. Side view
Attach wifi antenna
to antenna port.
5. Side view
Set antenna up and
plug into the coaxial
port. Plug A\C Power
adapter into coax junction.
2. Side view
Connect 9 pin touch
cable to touch port,
connect other side
to USB port
4. Side view
Connect ethernet cable
to ethernet port and
exiting end into wall
6. Bottom view
Connect power
adapter to bottom
power socket
12
ts64a001
Getting started
Connection sequence (7-11)
7. Side view
Connect Blueray DVD
cord to HDMI port
underneath
9. Front view
Locate main power on
front right panel and
switch to ON position
8. Side view
Mount webcam and
connect to USB port
10. Front view
Turn on Power\Standby button located next
to PC button on front
lower right panel
11. Front view
Turn on PC button
located next Power\
Standby on front
lower right panel
Use the remote to
change inputs or control
the volume and channel.
(batteries included)
13
ts64a001
Software
Learning the Tecslate Pro™ tools
1. Select tool
2. Context menu: Cut, copy, Paste, Delete, Group, Arrange, Allign, Select all
3. Undo
4. Redo
5. Zoom: Zoom in, Zoom out, Zoom area
6. Roam tool
7. Pens tool: Pencil, Magic Pencil, Point to Point, Higlighter, Soft Brush,
Calligraphic Pen
8. Line
9. Property: Color, Transparency, Size
10. Eraser: Small, Middle, Big, Ellipse Eraser, Object Eraser, Page Eraser
11. Text tool
12. Switch to desktop screen
13. Fill
14. Border fill
15. Inserts
16. Math tools
17. Effects
18. Switch to the desktop screens
19. More
14
ts64a001
Software
Before you use Tecslate Pro™
To adjust Pen and Touch settings, tap Start > Control Panel > Pen and Touch
Calibrating the Touch Screen
To calibrate the touch screen, tap Start > Control Panel > Tablet PC Settings > Calibrate
15
ts64a001
Software
Getting to know Tecslate Pro™ software
Writing or drawing in Tecslate Pro™
Using pen supplied with your interactive flat panel, you can write or
draw digital ink over Tecslate Pro™ software and other programs.
To write or draw in your Tecslate Pro™ software
1. Pick up the pen.
2. Write or draw on the screen.
TIP: Don’t rest your elbow or the palm of your hand
on the screen while you’re writing.
Entering text on the interactive flat panel
You can enter text in text boxes on the interactive flat panel using the
on-screen keyboard or a keyboard attached to your computer.
TIP: Drag on-screen keyboard from top left corner of display.
To enter text
1. Select the area where you want to enter text using your finger
or a mouse connected to the computer.
2. Type on a connected keyboard or on-screen keyboard.
To erase digital ink
Pick up the eraser, and then press the eraser on the
screen and move it over the digital ink you want
to erase. Also, using your flattened fist, press the
screen and move your hand over the digital ink you
want to erase.
16
ts64a001
Software
Bases of touch control
Manipulating objects
Objects include icons, buttons, links and other components of programs
that appear on your screen. You can manipulate these objects on your
interactive flat panel as described below.
To select or clear the selection of an object
Quickly press and release the object.
TIP: This gesture performs a standard mouse click
and will start programs if your operating
system is set to start applications on a single click.
To double-click an object
Quickly press and release the object twice in the
same spot.
This gesture starts programs if your operating system is set to start applications on a double-click.
To right-click or Control-click an object
Press and hold the object.
17
ts64a001
Software
Bases of touch control
Moving an object
1. Press and hold the object and drag slowly
without releasing your finger.
2. When you reach the position you want to move
the object to, release your finger.
Single handed right-click
Using two fingers on the same hand, press and hold
the object with your left finger, and then press the
screen once with your right finger. You can also
press the Right-Click button on the pen tray, and
then press the object.
Resizing an object to be larger
1. Using one finger on each hand, press the screen
at opposite ends of the object.
2. Drag your fingers in opposite directions to enlarge the object.
Resizing an object to be smaller
1. Using one finger on each hand, press the screen
at opposite ends of the object.
2. Drag your fingers toward each other to reduce
the object.
18
ts64a001
Software
Bases of touch control
Rotating an object
1. Using one finger on each hand, press the
screen at opposite ends of the object.
2. Rotate your fingers in the direction you want
to rotate the object
3. When you reach the angle you want to rotate
the object to, release your fingers.
Browsing
In addition to manipulating objects, you can browse content on your screen.
To display the next page
Press the screen, and then quickly press again
directly to the right of that point.
You can also quickly swipe your finger right
across the screen
19
ts64a001
Software
Bases of touch control
Displaying previous page
Press the screen, and then quickly press
again directly to the left of that point.
You can also quickly swipe your finger right
across the screen.
Zooming in on an object
1. Using one finger on each hand, press the screen
at opposite ends of the object.
2. Drag your fingers in opposite direction to zoom in.
Zooming out on an object
1. Using one finger on each hand, press the screen
at opposite ends of the object.
2. Drag your fingers in same direction to zoom out.
20
ts64a001
Maintenance
Maintaining the LCD Display
• Do not scratch the surface of the screen with any hard objects.
• Do not spray liquid directly on the screen or allow excess liquid to
drip down inside the device.
• Do not place anything, such as food and drink, on the screen at any
time to prevent damage to the screen.
• Clean the LCD display only with a soft cloth dampened with denatured alcohol or a proprietary LCD screen cleaner.
Cleaning the TAG TS64A001
1. Turn off the TAG GD3015 and unplug the power cord.
2. Wipe the screen and exterior with a soft, damp cloth moistened only
with water.
Do not use liquid or aerosol cleaners on the screen, as these will
discolor the finish and damage the screen.
CAUTION
• Do not use compressed air, water, chemical agents or cleaning agents
to clean the sensors.
• Do not use permanent or dry-erase markers on the screen. If dryerase markers are used on the screen, remove the ink as soon as
possible with a lint-free, non-abrasive cloth.
• Do not rub the screen with a dense or rough material.
• Do not apply pressure to the screen.
• Do not use cleaning solution or glass cleaner on the interactive flat
panel screen, as they can deteriorate or discolor the screen.
• Avoid touching the silver reflective tape between the screen and the
bezel and ensure that it stays dry. Damage to this strip affects touch
interactivity.
21
ts64a001
Maintenance
Maintaining ventilation
Your interactive flat panel requires ventilation to enable the coolingfans to function. Dust buildup in the ventilation holes compromises
cooling and leads to product failure.
• Avoid setting up or using your interactive flat panel in an area with
excessive levels of dust, humidity or smoke.
• Clean accessible ventilation holes monthly with a dry cloth. Use a
vacuum cleaner with a narrow hose end fitting to clear the back
ventilation holes annually. You might have to remove the interactive
flat panel from your wall.
Preventing condensation
• Your interactive flat panel screen contains layers of glass that can
collect condensation, especially in the following conditions:
• Temperature extremes with high humidity
• Rapid changes in humidity, which can occur when you operate the
product near water, such as a sink, pool, kettle or air conditioner
ventilator
• Direct exposure to sunlight
To evaporate condensation from your interactive flat panel
1. Remove the humidity source from the interactive flat panel,
if possible.
2. Adjust the room temperature to normal operating ranges.
3. Turn on the interactive flat panel for 2–3 hours.
If the screen condensation doesn’t evaporate, contact TAG Support
http://www.tecslate.com/contactsupport
22
ts64a001
Maintenance
Trouble shooting
Before consulting a service technician, review the following instructions below. If the
problem still exists after going through the proper procedures, write down your display’s
model and serial number and contact a local distributor.
No sound or picture • Check power cord and make sure it is properly connected to AC power outlet and that the power outlet is getting an electrical current.
• Check to make sure Main Power is in the “ON” or “UP” position and
that the Standby/Power button has been pressed.
• Check volume and brightness/contrast settings of the picture.
Picture is normal,
but no sound
• Check volume buttons and sound system.
• Check mute button on remote control.
No picture, picture
is black& white
• Check brightness/contrast and color settings.
Interference with
sound or picture
• Find out what device is causing the interference and move to
anotherroom or location away from LCD display.
• Switch the power adapter to another electrical outlet.
• Check antenna, cable or Wi-Fi connection.
Remote control
not working
• Check and replace batteries if needed.
• Clean remote sensor.
The LCD display screen contains and advanced technology of
sub-pixels, both light and dark pixels. This will not affect
the performance of this product.
23
ts64a001
Technical specifications
Screen size
Model
Net weight
Gross Weight
Nude TV (L*H*W)
Package size (L*H*W)
VESA Mount
Touch technology
Writing style
Scanning speed
Tolerance
Power consumption
Resolution
Screen size
Resolution
Display color
Panel diagonal
Pixel pitch
Brightness
Contrast
Angle view
Motherboard
CPU
Graphics card
Sound card
Network card
Memory
Harddisk
VGA
HDMI
LAN
DC Jack
Authorized operating
system included
USB
Blueray DVD drive
Tecslate Standard (65 inches)
Tecslate Pro (84 inches)
AUO 65 inches LED (16:9),
120hz refresh rate panel
I-65E-AP/YH
AUO 84 inches LED (16:9), 120hz
refresh rate panel
I-84E-AP
176 lbs
196 lbs
1564*76*940mm
1800mm*280mm*1100mm
209 lbs
242 lbs
1981*109*1168mm
2260mm*406mm*1447mm
600mm*400mm
4 touch Infrared
Finger & stylus (or any solid object)
≤8ms
±1.5mm
≤80mA
4096×4096
1428.48 (H) x 803.52 (V)MM
1860.55 (H) x 1046.48 (V)MM
1920(H)×1080(V)
3840(H)×2160(V)
16.77M
16.77M
64.53 inches
84.04 inches
0.744mm x 0.744mm
0.4845mm x 0.4845mm
500 cd/m2
450 cd/m2
4000:1
5000:1
R/L 178 (Min.), U/D 178 (Min.)
Wibtek TB75G-P
Intel Core I7 Processor 3770
Intel® HD 4000
ALC 661 chipset
RTL 8111E 10/100/1000 BaseT LAN
Kingston 16G DDR3 1333
1 TB
1
1
1
1
Windows 7 64bt
4x USB (3.0)
ASUS SBC-06D2X-U (USB 2.0)
2x USB (2.0) + 2x USB (3.0)
Fujitsu/Sony/Pioneer/ASUS (USB 2.0)
24
ts64a001
Technical specifications
Tecslate Standard (65 inches)
Tuner
Video system
Audio system
TV tuner channel
Video feature
Speaker type
Speaker output
Audio Stereo
YPBPR
20’GP loading Qty
40’HQ loading Qty
Operation Tem
Operation Humidity
Storage Tem
Storage Humidity
Standby
Power rate
Limited Warranty
Authorized
Service Providers.
Nationwide ACS
Built-in programs
51pcs
102pcs
Tecslate Pro (84 inches)
1 (SIS221/SIS330)
PAL/SECAM, NTSC(Option)
BG, DK, I, (M/N, L, L’ Option)
200
Video process and transform
build speaker inside
10W × 2
balance, auto vol control, surround sound, optical, EQ
1
10pcs
25pcs
0°C ~ 40°C
10% ~ 80%
-20°C ~ 40°C
5% ~ 95%
≤1W
≤260W
≤430W
1. LED Monitor Touchscreen, On-board PC, Web Camera and accessories
(1) year Limited Warranty from date of purchase
2. Extended (2) year Limited Warranty available for an additional cost
3. Serviced by Regional TECSLATE Authorized Service Providers (RSP)
Provides Service in all US zip codes
Full onsite repair capabilities
Also authorized to do warranty work for Dell and HP as well
as other popular brands
Tecslate Pro
Smoothboard
Digital signage
WinSplit Revolution
ArcSoft TotalMedia Theatre
Please verify specifications before quoting. This guide is intended
for reference purposes only. All product specifications are subject
to change without notice. No part of this publication may be reproduced in any form or by any means, electronic, photocopying,
recording or otherwise, without prior written permission of the
publisher. All brand and product names are trademarks or registered trademarks of their respective companies.
tecslate.com