1
W ireMessAud 10
o
Soundbar
(Active Speaker System)
user manual
the _ossibiHities
l,,a
L,_ ,C,O IL,;
DL_;" ;-a/'Z
u_ [_/
:aJG£',_l;
l'.'l__-,£c,e i',__{II },t_- F , ,"_I.II" I'"I'0:.I I.I( t .-,t
,_=,.... _, ._, .,I _ ,SLII°iQ
i;-_o-Hat:._.- ', i_]c,lt'r_,,___,,.-,l,_,r { ;.: p.-,-_,_.]l_d l--v[!-.
L-_-
corr].ireqister
g p_C,]k_Lt
SoundConnect
SoundConnect [ets you play TV audio from a Btuetooth compliant Samsung TV on your Wireless Audio ° Soundbar via a
B[uetooth connection, and control the sound
HDMI
HDMI transmits video and audio signals simultaneously, and provides a clearer picture_
The unit is aso equipped with the ARC function which ets you isten to sound from your TV via an HDMI cabe through
the Wire ess Audio ° Soundbar_ This function is ony availab e if you connect the unit to an ARC comp iant %L
Sur_und Sound
The Surround Sound feature adds depth and spaciousness to your listening experience_
Wireless
Subwoofer
Samsung's wireless module does away with cables running between the main unit and the subwoofer_
Instead, the subwoofer connects to a compact wire ess modue that communicates with the main unit
Special Sound mode
Youcan seect from 5 different sound modes ° MUSIC,VOICE,SPORTS,CINEMA,and STANDARD
° depending on the
type of content you want to enioy_
Multi-function Remote Control
You can use the remote contro suppied with your Soundbar to contro the TV connected to this unit (Works ony for
Samsung TV£)
The remote control has a TV hotkey that enables you to perform various operations with the simple press of a button
Active
Speaker System
This unit features an Active Speaker System that provides high sound quality in a single, slim unit
This unit does not require any sate ite oudspeakers or speaker cab ing, which are norma y required by conventiona
surround sound system£
USB Host support
Youcan connect and pay musicflies from externa USBstorage devicessuch asMP3 payers,
USBthumb drives,etc_using the Soundbar'sUSBHOSTfunction_
BBetooth Function
You can connect a Biuetooth device to the Soundbar and enioy music in high quality stereo, all without
wires!
r_ DOLBY
Manufactured
Laboratodes_
under license from Do[by Laboratories_ Do[by and the doub[e=D symbol are trademarks
of Do[by
20 Cha,_nel
For DTS patents, see http:iipatents_dt£com_
Manufactured under license from DTS Licensing LimiteG DTS,the Symbo,
&DTS and the Symbo together are registered trademarks, and DTS Z0 Channe is a trademark of DTS, Inc_ @ DTS, Inc_AI
Rights ReserveG
i..l lm|
The terms HDMI and HDMI High-Definition
trademarks
Multimedia
Interface, and the HDMI Logo are trademarks
or registered
of HDMI Licensing LLC in the United States and other countdes_
- To send inquiries and requests regarding open sources, contact Samsung via Email (oss,request@samsungxom),
infomsaRion
SAFETY WARN mNGS
TO REDUCETHE RmSK
OF ELECTRICSHOCK_DO NOTREMOVETHE COVER (OR BACK), NO USER-SERVICEABLE
PARTSARE HNSmDE,
REFERSERVlCUNG
TO
QUALHFIED
SERVICEPERSONNEL
r
i
RISK
OFELECTRIC
SHOCK
DONOTOPEN
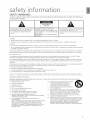
The lighting flash and Arrowhead within
the triangle are warning signs alerting
you to dangerous voltage tnside the
producL
CAUTION: TO REDUCE THE RISK OF
ELECTRICSHOCK, DO NOT REMOVE THE
COVER (OR BACK)_ NO USER SERVICEABLE
RARTStNStDE_
REFERSER\dCtNG TO QUAMFtED SERVICE
PERSONNEL
The exclamation point within the triangle
is a warning sign alerting you to
important instructions accompanying
the
producL
WARNING
• To reduce the risk of fire or electric shock, do not expose this appliance to rain or moisture_
• To prevent injury, this apparatus must be securely attached to the floor/wall in accordance with the installation instructions_
CAUTION
• Do not expose this apparatus to dripping or splashi g_ Do not put objects filled with liquids, such as vases on the apparatus_
• To turn this apparatus off completely, you must pull the power plug out of the wall sockeL Consequently, the power plug must be easily
and readily accessible at all times_
This product satisfies FCC regulations when shielded cables and connectors are used to connect the unit to other equipmenL To prevent
electromagnetic interference with electric appliances, such as radios and televisions, use shielded cables and connectors for connections_
FCC NOTE (for U_S_A):
This equipment has been tested and found to comply with the limits for a Class S digital device, pursuant to Part 1S of the FCC Rule£
These limits are designed to provide reasonable protection against harmful interference in a residential installation_
This equipment generates, uses and can radiate radio frequency energy and, if not installed and used in accordance with the instructions,
may cause harmful interference to radio communications_ However, there is no guarantee that interference will not occur in a particular
installation_
tf this equipment does cause harmful interference to radio or television reception, which can be determined by turning the equipment
and on, the user is encouraged to try to correct the interference by one or more of the following measures:
• Reorient or relocate the receiving antenna_
off
• Increase the separation between the equipment and receiver_
• Connect the equipment to an outlet that is on a different circuit than the radio or T\Z
• Consult the dealer or an experienced radioFV technician for help_
Caution : FCC regulations state that any unauthorized changes or modifications to this equipment may void the usePs authority to operate iL
Important Safety Instructions
Read these operating instructions carefully before using the unit. Follow all the safety instructions listed below. Keep these operating
instructions ISandy for future reterence_
1) Read theseinstructions_
10) Protect the power cord from being walked
on or pinched particularly at plugs,
2) Keep these tnstructions_
convenience receptacles, and the point
3) Heed allwamings_
where they exit from the apparatus_
4) Follow all instructions_
11) Onty use attachment/accessories specified
by the manufacturer_
S) Do not use this apparatus near water_
6)
Clean only with a dry cloth_
7)
Do not block any ventilation openings_ Install in
accordance with the manufactureCs instructions_
8)
Do not install near any heat sources such as
9)
Do not defeat the safety purpose of the polarized or
grounding-type
plug_ A polarized plug has two blades with one wider than the
other_ A grounding type plug has two blades and a third
obsolete outlet.
12)
Use only with the cart, stand, tripod, bracket, or table
specified by the manufacturer, or sold with the apparatus_
When a cart is used, use caution when moving the cart/
apparatus combination to avoid injury from tip-over_
13)
Unplug this apparatus during lightning storms or when
unused for log periods of time_
Refer all servicing to qualified sewice personnel_ Servicing is
required when the apparatus has been damaged in any way,
such as when the power-supply cord or plug is damaged,
liquid has been spilled or objects have fallen into the
apparatus, the apparatus has been exposed to rain or
moisture, does not operate normally, or has been dropped_
14)
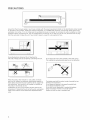
PRECAUTIONS
Ensure that the AC power supply in your house complies with the power requirements
listed on the identification
sticker located
on the back of your producL Instal! your product horizontally,
on a suitable base (furniture),
with enough space around it for
ventilation
(3~4 inches, 7~10 cm)_ Make sure the ventilation slots are not covered_ Do not place the unit on amplifiers or other
equipment which may become hoL This unit is designed for continuous
use_ To fully turn off the unit, disconnect the AC plug
from the wa!! outleL Unplug the unit if you intend to leave it unused for a long period of time_
During thunderstorms, disconnect the AC plug from the
wall outlet, Voltage peaks due to lightning could damage the unit,
/_<_
--
_
_:.'.
Protect the product from moisture (i,e, vases, spills), and excess
heat (e,g, fire, radiators) or equipment creating strong magnetic or
electric fields, Disconnect the power cable from the AC supply if the
unit malfunctions, Your product is not intended for industrial use,
This product is for personal use only,
Condensation may occur if your product has been stored in cold
temperatures, If transporting the unit during the winter, wait approxi _
mately 2 hours until the unit has reached room temperature before
using.
4
Do not expose the unit to direct sunlight or other heat sources,
This could lead to overheating and cause the unit to malfunction,
The batteries used with this product contain chemicals that are
harmful to the environmenL
Do not dispose of batteries in the general household trash,
Do not dispose of batteries in a fire,
Do not short circuit, disassemble, or overheat the batteries,
Danger of explosion if battery is incorrectly replace&
Replace only with the same or equivalent type,
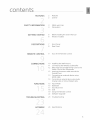
£onten
2
2
Features
License
3
4
Safety warnings
Precautions
6
6
Before reading the User's Manuai
What's inctuded
7
8
Front Panet
Rear Panet
9
four of the Remote Controt
10
11
12
Installing the Wal! Mount
Connecting the Wire!ess Subwoofer
Attaching the Toroidal Ferrite Core to the
Power Cord of the Subwoofer
12
Looping the power cable around the
foroidal Core
13
Connecting an externat device using
HDMI cable
14
Connecting an external device using Audio
(Analog) cable or Optical (Digital) cable
.it,
SAFETY _NFORMAT_ON
,t
F ¸¸¸¸¸¸
GETTING STARTED
REMOTE CONTROL
,, >x_¢{¸}
iiii_!j '_:ib_.##!:
_'
TROUBLESHOOTING
15
15
17
Btuetooth
SoundConnect
18
USB
19
22
Using the Remote Controt
Software Upgrade
23
......
' }iiiii...................
...........
ii
24
:i_}_:
_'i_ii_!'i
9e in
BEFORE READING THE USER'S MANUAL
Note the following terms before reading the user manual
_cons used in this manual
:
' i _i
Cautton
_J_;_Jx
Hndicatesa situation where a function does not operate or settings may
be cancelled
Safety _nstructions and Troubleshooting
n
i) Be sure to familiarize }ourself
with the Safety Instructions before using this product
page 3)
2) If a problem occurs, check Troubleshooting
(See
(See page 23)
@2014 Samsung Electronics Co ,Ltd
All rights reserved; no part or whole of this user's manual may be reproduced or copied without
the prior written permission of Samsung Electronics Co.Ltd_
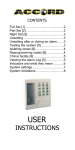
WHAT'S mNCLUDED
Check for the supplied accessoriesshown beiow.
iiiiiiiiiiiiiiiiiiiiii
_I _
The appearance of the accessories may differ s_ig,_tly from the i_ustrations
above_
Use t, _ededicated USB cable to connect externat USB devices to the unit_
descriptions
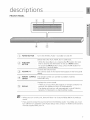
FRONT PANEL
1
POWER BUTTON
Turns the Wire!ess Audio o Soundbar on and off_
Se!ects the DJN, AUX, HDMI, BT, TV, USB inpuL
r_
(z
FUNCTION
BUTTON
° While the Soundbar is on pressing the (F.) button for' more
than 3 seconds sets the button to act as a MUTE button_
To cancel the MUTE button setup, press the (F.) button for'
morn than .Sseconds again_
Conbo!s the volume level
VOLUME +/-
[41
The numeric value of the volume level appears in the front panel
REMOTE CONTROL The remote control can operate Soundbars made by
SENSOR
SAMSUNG only_
Disptays the current mode_
DISPLAY
- !f there is no input from the product or remote controt for 15
seconds, the disptay will turn off automatical!y_
o The disp!ay will not turn off automatically in the Bit READY,
SEARCH, TV REQUEST, or USB PLAYING modes_
When you turn on this unit, there will be a 4 to 5 second de!ay before it produces
sound_
If you want to enioy the sound on!y from the Wireless Audio ,oSoundbar, you must
turn off the TV's speakers in the Audio Setup menu of your TV: Refer to the owner's
manuai supptied with your TVt
descriptions
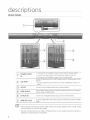
REAR PANEL
1, Connect the AC adaptor's
_I I
POWERSUPPLY
_N
power cord to the AC power supphy_
2, (.or]r]ect
theA(.power
adaptor,s
mir]ioplug
toPower
Supply
h or]theu!]it'
3_ Connect the AC adapter's
power cord to a wall outlet,
Connect USB devices such as MP3 phayers here to the phay fihes on the
2
__
USB PORT
devices_
o Use the supphied USB converter
a wall,
_
AUX
Connect to the Anabg
___
HDM_ _NJACK
Rnputs digitah video and audio signals simuhtaneoushy from an external
source using an HDMB cable,
OPTICAL_N
Connect to the digitah (opticah) output
HDM_ OUT JACK
Outputs
cable_
,bb
_N
When
disconnecting
output
of
if you have installed the product on
an
externah device_
of
an external device_
digital video and audio signals simultaneously
the power
cabte
of the AC power
adaptor
from
using an HDMI
a wail
out!et,
pull the plug_ Do not putl the cab!e_
Do not connect
between
t, Js unit or other
components
components
are comptete_
to an AC out_et
unti_ ail connections
rem otezoz o
I
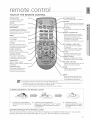
TOUR OF THE REMOTE CONTROL
POWER BUTTON
Turns the Wireless Audio Soundbar on and of L
POWER 8U_ON
Turns your Samsung TV on and off_
SOURCE
This button allows you to choose to
listen to audio from the Soundbar or
SPEAKER
Press to select a connected
Soundbar source_
AUTO POWER
your TV_
W SOURCE
Synchronizes the Soundbar to a
connected Optical source via the
Optical iack so it turns on automatically
when you turn on your T\4
Press to select a connected
Source_
Anynet+,
TV's video
SoundConnect
Anynet+ enables you to control
other Samsung Devices with ),our
Samsung TV's remote control
Also, produces T'v' sound on ),our
Soundbar via a Btuetooth
connection and controls the sound_
REPEAT
Select Repeat File, All, Random_
VOW M E
Adjusts the TV volume level
W MUTE
CHANNEL° AUDIO SYNC
Switches between the available
TV channets_
Used to help sync video to audio
when connected to a digital T\!I
Mutes the sound from the TM
Press again to restore the sound
to the previous volume level
_NFO, _
PREACH
Display current TV statu£
Moves to the previous TV channel
EXIT
Exits TV functions same as the
EXtT button of the TV remote_
SMART VOLUME
CONTROL 8U_ON
Play, pause or stop playing
a music file, or search forwards
or backwards for a music file_
Regulates and stabilizes the volume
level against a drastic volume change
SOUND EFFECT
Selects the Sound Effect:
(MUSIC, VOICE, SPORTS, CINEMA, and
SLQANDARD)
VOLUME,
SURROUND SOUND
TONE
This feature adds depth and
spaciousness to the sound_
(Surround Sound Expansion)
Individual BASS TREBLEadjustmep,t,
UseVOL adjustment keys,
Adjusts
Adjusts
S/W LEVEL
the volume level of the unit
the Subwoofer tevek
MUTE
Mutes the sound from the unit
Press again to restore the sound
to the previous volume level
]he
remote control
can operate
]Vs made by SAMSUNG
only_
Depending on the TV you are using, you may not be able to operate your TV with this remote contrd
you can% operate the TV using the TV's remote control
Surround Sound Expansion Technology is Powered by Sonic Emotion_
Installing batteries in the Remote Control
compartment
Operational
one year:
Range of the Remote Control
You can use the remote control up to 23 feet (7 meters) in a straight line from the unit You can also
operate the remote at a horizontal angle of up to 30 ° from the remote control sensor
tf
connections
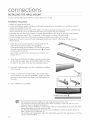
iNSTALLiNG THE WALL MOUNT
You can use the wall mount bracket to mount this unit on a wall
installation Precautions
• Instal! on a vertical wal! only_
• For the instal!ation, avoid a !ocation with high temperature or' humidity, or' a wail that cannot
sustain the weight of the seL
• Check the strength of the walk If the wall is not sbong enough to support the unit, reinforce the
wal! or install the unit on a different wall that can support the unit's weighL
• Purchase and use the fixing screws or moHys appropriate for the kind of wall you have (piaster'
board, iron board, wood, etc_)_ If possib!e, fix the support screws into wal! studs_
• Connect cab!es flora the unit to external devices before you instatl it on the waik
• Make sure the unit is turned off and unplugged before you install it Otherwise, it may cause an
electric shock
Hace the wa!i mount bracket on a wal! surface and
then secure it with two screws (not supplied}
If you are hanging the unit below a TV, be sure to instal!
the wal! mount bracket so that the arrow (t) is ptaced
in the Centre of the TV_
A!so make sure the unit is at ieast two inches (5 cm)
betow the TV_
2_
3_
4_
A!ign the two HOLDERoSCREWs with the screw holes
on the left and right sides of the MAIN UNIT, and then
fix them to the main unit with the supptied screws_
Insert the USBconverter into the unit before instailing
it on the waik
Fit the unit into the corresponding s!ots of the wal!
mount brackeL For secure instal!ation, make sure the
mounting studs stide firmiy down into the bottom of
the stots_
5_ The installation
is comptete_
2 inches (5 cm) or mo_
_;
Do not hang onto the installed unit and avoid any impact to the unit
Secure the unit firmly to the wall so that it does not fall off if the unit falls off, it may
cause an injuq! or damage the product
When the unit is installed on a wall, please make sure that children do not pull any of the
connecting canes, as it may cause it to fall
For the optimal performance of a wall mount installation, install the speaker system at
least 2 inches (5 cm) below the TV
For a better sound experience, place the subwoofer away from the wall at least 12 inches
(30 cm) when installing
I0
CONNECTING
THE WIRELESS SUBWOOFER
The SubwoofeCs !inking ID is preset at the factor}' and the main unit and subwoofer should link
(connect wire!essty) automatically when the main unit is turned on_ If the LINK indicator does not light
when the main unit and subwoofer are turned on, pteaseset the ID by foitowing the procedure be!ow_
Comptete this processwithin 30 seconds after the Link Indicator on the subwoofer starts blinking_
I,
Ptug the power cords of the main unit and subwoofer
into an AC wail out!eL
2_ Confirm that the main unit is off (in STANDBYMode)_
3, Pressthe ID SETbutton on the back of the subwoofer with a sma!l, pointed obiect for 5 seconds_
. TheSTANDBYindicator is turned off and the LINKindicator (Blue LED)blinks quickly
4, While the main unit is powered off (STANDBYmode),
press MUTE on the remote controt for 5 seconds_
5o The ID SETmessage appears on the main unit's OLEDdisptay_
6, 1-ofinatize the !ink, turn the main unit's power on whi!e the
subwoofeCs LiNK LEDblink£
• The main unit and the subwoofer should now be linked
. The LINK indicator (blue LED) on the subwoofer should be turned on and solid blue
. If the LINK indicator is not solid blue, the linking process has failed Turn off the main unit and start
again from Step 2
. You can enjoy better sound from the wireless subwoofer
by selecting the a Sound Effect (See page
'_ Before moving or installing the product, be sure to turn off the power and disconnect
the power cord
'_ If the main unit is powered off, the wireless subwoofer will be in the standby mode and
the STANDBY LED on the upper side will come on after the LINK indicator (Blue LED)
blinks for 30 seconds
'_ If you use a device that uses the same frequency (2 4GHz) as the unit near the unit,
interference may cause some sound interruption
'_ The transmission distance of the wireless signal between the main unit and subwoofer is
about 33 ft, but may vary depending on your operating environment If a steel-concrete
or metallic wall is between the main unit and the wireless subwoofer} the system may
not operate at all, because the wireless signal cannot penetrate metal
'_ If the main unit doesn't make a wireless connection, follow steps 1-5 above to retry the
connection between the main unit and wireless subwoofer
The wireless receiving antenna is built into the wireless subwoofer
from water and moisture
Keep the unit away
For optimal listening performance, make sure that the area around the wireless
subwoofer location is clear of any obstructions
11
connections
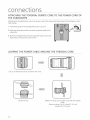
ATTACHING THE TOROIDAL FERRtTECORE TO THE POWER CORD OF
THE SUBWOOFER
Attaching the Toroidalfemte core to the power cord of the subwoofer helpsprevent RFinterferencefrom
radio signals
1 Pull the fixing tab of the Toroidal femte core to open it
2 Make two Hoopsaround the core with the power cable of the
subwoofer
3. Attach the Toroidaiferrite coreto the Subwoofer power cord asthe
figure shows, and then pressit unti! it c!ick£
LOOPING THE POWER CABLE AROUND
THE TOROIDAL CORE
J
Lift up to retease the iock and open the core_
Ctose the iock_
12
Make two ioops around the core with the power
cable_
(Start winding 2 to 4 inches [5-10 cm]
away from the core)_
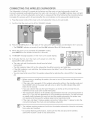
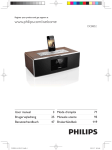
CONNECTING AN EXTERNAL DEVICE USING HDMI CABLE
HDMI is the standard digital interface for connecting
Bluoray players, set top boxes, and more_
to such devices as a TVs, projectors, DVD ptayers,
HDMI removes any loss of signal from analog conversion, enabling you to enjoy video and audio
sound quaiity as it was originaily created in the digitai source_
I
HDMI IN
°o , oI to
HDMI OUT
I
HDMI OUT
I°o , o to
HDMI IN
HDMI iN
Connect an HDMI cable (not supplied) from the HDMI IN iack on the back of the product to the HDMI
our iack on your digitai device_
and,
HDMI OUT (HDMI)
• Connectan HDMIcablefrom the HDMIOUTlack on the backof the productto the HDMIIN lack on your%{
HDMI is an interface t, at transmits digitai video and audio data with just a singie
connectorL
HDMI OUT (ARC)
. The ARCfunction allows digital audio to output via the HDMI OUT (ARC)port
It can be enabled only when the Soundbar is connectedto a TVthat supports the ARCfunction
. Anynet+ must be turned on
This function
is not a_ai_able if t, _e HDMI cable does not support ARC_
13
connections
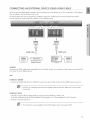
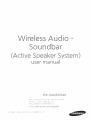
CONNECTING AN EXTERNAL DEVICE USING AUDIO (ANALOG)
CABLE OR OPTICAL (DiGiTAL) CABLE
This unit comes equipped with one opticai in digitai iack and one audio anaiog in iack, giving you two
ways to connect it to a TV_
AUX IN
OPTICAL
IN
Audio Cabie
or
OUT
- OPTICAL
OUT
i!ii@i]
¸iiiiiiiii!i,!iiii@i!iii!iii?iii_!i?iiiiiii_i
¸i_i_i!i!i!i!i!iil
_!i!i!i{_e'ii:_!!iil
0
_
0
Set°top box/
Game console
AUX IN
Connect AUX IN (Audio) on the main unit to the AUDIO OUT of the TV or Source Device
Be sure to match connector cotors_
or,
OPTICAL IN
Connect the Digitai Input on the main unit to the OPTICAL OUT of the TV or Source Device_
Do not connect the power cord of this product or your TV to the wail out!et until ati
connections between components are complete
Before moving or' instal!ing this product, be sure to turn off the power and
disconnect the power cord_
14
functions
INPUT MODE
You can seiect D_IN, AUX, HDMI, BT,TV input, or U.SB_
Press an appropriate button on the remote controi to seiect a desired mode, or press (R} to select :
DJN, AUX, HDMI, BT, T_4or USB mode_
OpticalDigitalinput
DiN
AUX
HDMH
BLUETOOTH
mode
BT
_J mode
TV
USBmode
USB
The unit turns off automatically
in the following
situations:
• BTfTV MODE
Bfthe connection
• USBiHDMB!ARC!DJN
has been off for about 25 minutes_
MODE
Bfthere is no audio signal for about 25 minutes_
• AUX Mode
When the AUX cable is connected,
Bfthe AUX cable is disconnected
The ARC function
if no key is pressed on the remote or unit panel for about 8 hours_
for about 25 minutes_
is activated in DiN mode if the unit is connected
To turn off the ARC function,
turn Anynet
to an ARC supporting
TV,
off_
Use the provided cable if a USB flash memory device cannot be connected
directly to the unit_
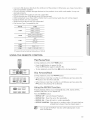
BLUETOOTH
You can use a Biuetooth device to enioy music with high quality stereo sound, aii without
wires!
What is Bluetooth?
Biuetooth is a technology that enables Biuetoothocompiiant
short, wireless connection_
• A B uetooth device may cause noise or ma function,
devices to interconnect easily with each other using a
depending on usage, when:
o A part of your body is in contact with the receiving/transmitting
o It is subiect to e ectrica variation from obstructions
system of the B uetooth device or the Soundbar,
caused by a wa,
corner, or office partition_
o It is exposed to e ectrica interference from same frequencyoband devices including medica equipment,
microwave ovens, and wireless LANs_
• Pair the Soundbar with the B uetooth device whie they are close together,
• The further the distance is between the Soundbar and B uetooth device, the worse the qua ity is_
If the distance exceeds the B uetooth operationa range, the connection is osL
• In poor receptionosensitivity areas, the B uetooth connection
may not work propery_
• The B uetooth connection ony works when it is dose to the seL The connection wiJ be automatica Jycut off if the
B uetooth device is out of range_ Even within range, the sound qua ity may be degraded by obstacles such as was
or doors_
• This wire ess device may cause e ectric interference during its operation_
IB
functions
To connect the Soundbar to a Bluetooth
device
Check if the Biuetooth device supports the Biuetooth compliant stereo headset function_
@
@
e
Connect
@
@
Bluetooth
1
Press the SOURCE button
on the remote control of the Soundbar
device
to display the BT message_
• You will see BT READY on the front disp ay of the SoundbaL
Z On the B[uetooth
user manuaL)
device you want
3_Select the Stereo headset
to connect,
open the B[uetooth
menu on the B[uetooth
menu_
(Refer to the B[uetooth
device's
device_
• You will see a i[st of scanned devices_
4_ Select "'[Samsung] Soundba¢
from the iisL
• When the Soundbar is connected to the B uetooth device, it will disp ay Device name '_ BT on the front disp ay_
• If the Bluetooth device has failed to pair with the Soundbar, delete the previous "[Samsung] SoundbaP found by
the Biuetooth device and have it search for the Soundbar again_
• If the Soundbar is in another mode (except TV mode), you can shift it to Biuetooth mode using your smart
device_
5_ Piay music on the connected device_
• You can isten to the music paying on the connected B uetooth device over the Wire ess Audio o Soundbar
system_
• In BT mode, Repeat functions are not availab e_ Forsome B uetooth device, PayiStopiNextiPrev
availabie_
You may be required to enter a PIN code (password) when connecting
SoundbaL If the PIN code input window appears, enter (0000}_
The Soundbar supports
the B[uetooth
function are not
device to the
SBC data (44_i kHz, 48kHz)_
The AVRCP feature is supported_
Connect only to a B[uetooth
device that supports
You cannot connect to a B[uetooth
Only one B[uetooth
the A2DP (AV) function_
device that supports
only the HF (Hands Free) function_
device can be paired at a time_
Once you have turned off the Soundbar and the pairing is disconnected,
restored automatica[[y_ To reconnect, you must pair the device again_
The Soundbar
cases:
may not run the B[uetooth
Search or Connection
the pairing wi[[ not be
functions
propedy in the following
If there is a strong electrical field around the Soundbar_
If several B[uetooth
If the B[uetooth
devices are simultaneously
device is turned
paired with the SoundbaL
off, not in place, or maffunctions_
Note that such devices as microwave ovens, wireless LAN adaptors, fluorescent lights, and gas
stoves use the same frequency range as the B[uetooth device, which can cause electric interference_
Once paired the device,on ARC!DIN!USBiHDMIiAUX
wi[[ automatically change to BT mode_
16
mode,se ect "[Samsung] Soundbar" from the ist
Todisconnect
the Bluetoothdevicefromthe Soundbar
}Ioucan disconnectthe Bluetoothdevk:efrom the Soundbar_
Forinstructions
see the Bluetoothdevk:e_susermanual
• The Soundbar willbe disconnecte&
• When the Soundbar isdisconnectedfrom the Bluetoothdevk:e the Soundbar willdisplay
BT DISCONNECTED
on thefrontdisplay_
To disconnect the Soundbar from the Bluetooth device
Press the (F.) button on the front panel of the Soundbar to switch from ST to another mode or turn off the Soundbar
• The connected Sluetooth devk:e will wait a certain amount of time for a response from the Soundbar before terminating
connection (Disconnection time may differ, depending on the Sluetooth devk:e)
• The currently connected
the
devk:e will be disconnecte&
'_ InSluetoothconnectionmode, the Sluetoothconnectionwillbe lostifthe distancebetween the Soundbar and the
SluetoothdevkTeexceeds 1625 fL (5m)_
'_ tf the Sluetooth devkTecomes back into the effective range after disconnecting
the pairing with the Sluetooth device_
Using the Bluetooth
When
the Soundbar
is turned
1_ Pair your smart device with
device's manuaL)
you can restart the Soundbar to restore
Power on
off, connect
your smart device to the Soundbar
the Soundbar
via gtuetooth_
(FOr information
ZTurn the Soundbar off, and then press and hold the ( F. ) button
Btuetooth Power On_
3Now, whenever the Soundbar is off, and you initiate a Btuetooth
itself on automatically
in Btuetooth mode_
via a Bluetooth
on gtuetooth
on the Soundbads
connection
connection
connections,
to turn it on_
refer to your smart
front panel until the Soundbar
with your smart device, the Soundbar
displays
wilt turn
• Select the desired music to play from your smart device_
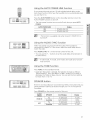
SOUNDCONNECT
SoundConnect lets you play TV audio from a Bluetooth compliant SAMSUNG TV on your Wireless Audio - Soundbar via a Bluetooth connection
• 1:o produce W sound on your Soundbar via a Bluetooth connection, you need to pair your Soundbar to a Bluetooth compliant TV Once
the pairing is established, the pairing information is recorded and kept No further Bluetooth connection messages will appear
• Bring the Soundbar and the W close together before pairing
• The unit will play the W's audio when it is set to SoundConnect mode and paired with the TV
• If you change to another mode, other than W mode, or turn off the Soundbar] you will hear audio fi;om the TV's speakers again
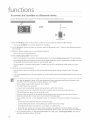
Connecting
the Soundbar to a Bluetooth
Compatible
Samsung TV
@
Connect
@
...............................................
,))
I_Turn on the Samsung TV and Soundbar_
2_ BetAdd New
Device in the TV's SoundConnect
Settingmenu to On_
• Depending on your TVItheTV's Bettingmenu may have a SoundSham menu iteminsteadof a SoundConnect menu item_
3_ Pressthe (F°)button to change the mode of the Soundbar to TV_ A message asking whether to proceed with gluetooth
pairingand "[Samsung] Soundbar" appeam on the TV screen_
4_ Select <:Yes) on the TV screen_ The TV pairs with
the Soundbar_
17
functions
• Once the pairing is established, when you change the Soundbar to the TV mode from other input modes, it
will automatica y connect to the TV_
• The Soundbar will piay the TV's audio when it is connected to the TV_
• Changing the Soundbar from TV mode to any other mode will cance the SoundConnect connection_
• If you want to cance the existing pairing of the Soundbar to a TV and pair your Soundbar to a different TV:
Press the PLAY/PAUSE button on the Soundbar for 5 seconds in the TV input mode to cance the existing
pairing_ You can now pair it to a different TV_
• In the SoundConnect mode, you can contro the voume and mute using either the TV remote or the Soundbar
remote_
TV SoundConnect
operation range
recommended pairing range: within 20 inches (within S0cm)
recommended operation range: within 1625 fL (Sm)
Bfthe distance betw'een the Soundbar and Samsung TV is over i 625 ft. (Sin), the connection or the
sound can be cut off, Bfthis occurs, connect to the Samsung TV again within the operational range.
Make sure the Samsung TV's SoundConnect
mode is on before you use this function.
The PLAY, NEXT, PREV, STOP buttons will not work in the SoundConnect mode.
Bluetooth Power On function
The Soundbar will be powered on automatica y when you turn the TV on if you connected the TV and
Soundbar with the SoundConnect function_
You can togge this function On/Off by pressing and ho ding the SOURCE button on the Soundbar
remote for more than S seconds when the Soundbar is powered of L If set to Off, the product turns off
automatica y when the TV turns off, but it does not turn on automatica y_
This feature is supported by TVs re eased beginning in 2013_
'_' The SoundConnect feature is supported by select models released from 2012 on_ Check whether },'our TV
supports SoundConnect (SoundShare) before you begin_ (For more information, refer to the user's guide of your
TV,)
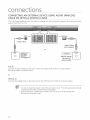
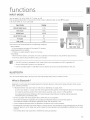
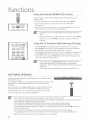
USB
!_ Connect a USB device to the USB port on the side of the unit.
2_ Press the (F.) button on the front panel of the Soundbar repeatedly until USBappears_
S_USB appears on the display screen and then disappears_
• The Wireless Audio o Soundbar connection
is compiete_
Before you connect a USB device
Be aware of the following:
• If the file name of a folder on a USB device exceeds i 0 characters,
it is not shown on the Soundbar's display.
• This product may not be compatible
storage media_
• The Soundbar
supports
with certain types of USB
the FAT16 and FAT32 file systems_
o The NTFSfile system is not supported_
18
• Connect USB devices directly to the USB port of the product_ Otherwise, you may encounter
USB compatibi!ity prob!em_
• Do not connect muitipte storage devices to the product via a multi-card reader_ It may not
operate properly_
• Digita! camera PTP protocols are not supported_
• Do not remove the USB device whi!e it is being read_
• DRM°protected
music fi!es (MP3, WMA) from a commercial web site will not be ptayed_
• External HDDs are not supported_
• Mobi!e phone devices are not supported_
• File Format Fype Compatibiiity
iist:
Format
a
C0dec
MPEG1Layer2
*imPS
MPEG 1 Layer3
MPEG 2 Layer3
*:wma
Wave_Format_MSAudiol
Wave_Format_MSAudio2
AAC
L
*
AAC-LC
.aa C
x
H E°AAC
*.wav
*iogg
OGG 1_!_0
*.Flac
FLAC 1_1_0,FLAC 12_1
_Supporting
Sampting
Rate above 16KHz
USING THE REMOTE CONTROL
During playback, press the _,lll
button_
. Pressthe _,II button to pause the file
Pressthe _H button again to play the file
. To stop playback, press the Stop (m) button during playback
Skip BsrwardiBack
During playback, press the I_q
button_
. When there is more than one file on a USBdevice and you press the
_l button, the next file is selected
. When there is more than one file on a USBdevice and you press the
I_ button, the previous file is selected
Using the REPEATfunction
Repeat pbyback allows you to repeatedly pby a file, repeat all files,
randomly play files, or turn Repeat off
Pressthe REPEATbutton
. REPEAT OFF : CanceB Repeat Playback_
. REPEAT FILE : P!ays the same fi!e repeatedly_
. REPEAT ALL : Plays al! tracks in order repeatedly_
. REPEAT RANDOM : P!ays tracks in random order_ (A track that has
aiready been ptayed may be ptayed again_)
'_ You can set the REPEATfunction while playing back music
from a USE}drive
19
functions
Muting the sound
Thisisusefuiwhenansweringa doorbeiior teiephonecaik
!_ To mute the sound of this unit, press the MUTE button on the remote controk
Z To mute the TV: press the W MUTE (_)
3_ Press MUTE / W MUTE ( _
+/-) to restore the sound_
button
on the remote controk
) on the remote controi again (or press VOLUME
Using the SURROUND SOUND function
The Surround Sound feature adds depth and spaciousness to the sound_
Press SurroSound on the remote controk
• Each time the button is pressed, the selection changes as follows :
SURROUND SOUND AUTO _ SURROUND SOUND ON _ SURROUND
SOUND OFF
'_ When you turn on Surround Sound, the Smart Volume and Sound
Effect functions automatica
y change to OFF,
Using the SMART VOLUME function
This wili regulate and stabilize the volume level against a drastic volume
change caused by a channe change or scene transition_
Press SMART VOLUME on the remote contro _
• Each time the button is pressed, the selection changes as follows :
SMART VOLUME ON ,,_ SMART VOLUME OFF
When you turn on Smart Volume, the Surround Sound and Sound
Effect function automatica
y change to OFF,
Using the SOUND EFFECTfunction
You can seect from 5 different sound modes o MUSIC, VOICE, SPORTS,
CINEMA, and STANDARD o depending on the type of sources you want to enioy_
PressSOUND EFFECTon the remote control
• Seect the STANDARD mode if you want to enioy the origina sound_
'_ We recommend that you select a Sound Effect based on the source
materia and your persona taste_
'_ When you choose a Sound Effect mode (except STANDARD), the
Surround Sound and Smart Voume functions are automatica y set to
OFF_
Using the SIW LEVEL function
You can control the base (subwoofer)
voiume with the SiW Levei button on the
remotecontrok
!_ Press the S/W LEVEL button
on the remote
controk
Z °SW 0_ appears on the display_
3_Press < or > button on the LEVEL key if you want to increase or decrease the
subwoofervoiume_
Youcansetit from SW°6to SW+6_
2O
Using the AUTO POWER LINK function
If you connect the main unit to a TV with a digital optical cable, set the
Auto Power function ON to have the Soundbar turn on automatically' when
you turn the TV on_
Pressthe AUTO POWER button on the Soundbar remote to turn the
AUTO POWER function on and off
• The Auto power function turns on and off each time you pressAUTO
POWER°
AUTO
POWERLiNK
ON
OFF
Display
POWERLIN_"ON
POWERUN_"OFF
'_ Thisfunction isavailableonly when Anynet+ (HDMDCEC)is
turned off
Using the AUDIO SYNC function
\4@o may appear out of synch with the audio if the Soundbar is
connected to a digital T\i_If this occurs, adjust the audio delay time to
match the video_
PressAUDIO SYNC +/o on the remote control of this unit
. You can use the +, - buttons to set the audio delay time between 0
ms and 300 ms
'_ In USE}mode, TV mode, or E}Tmode, the Audio Sync function
may not work
Using the TONE function
PressTONE on the Soundbar remote
. Each time the button is pressed, the selection changes as follows :
TREBLE '_ E}ASS_Press the VOL + or VOL - button to increase or
decrease the Treble or Bass votume_ You can set the 1-one setting
for each from o3 to +3_
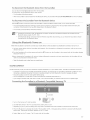
SPEAKER button
If the TV and Soundbar are connected via HDMI, this button !ets you
select between iistening to audio through your TV or through the
Soundbar_
Press SPEAKERon the remote control of this unit
AUDIO
MODE
NDMI IN
ARC
SPEAKER
_J
Soundbar
Scroll Display
Display
TV SPEA_'ER
,_TRSPEAKER
TV SP_"
HDMI
_J
TV SPEAKER
S MUTE
Soundbar
AVR SPEAKER
TV ARC
21
functions
Using the Anynet+(HDMIoCEC)
function
Anynet+ iets you control other Samsung Devices with your Samsung TV's
remote contro _
The Anynet+ function turns on and off each time you press Anynet+_
!_ Connect the product
(See page i3)
to a Samsung TV with an HDMI cable_
2_ Set the Anynet+ function on your TV and the Soundbar
the TV instruction manual for more information,)
'_ Depending on yourTV
work_
to ON_ (See
certain HDMI output resolutions may not
'_ Pease refer to the user's manua of your %/and
check for the _t_y_t:
ogo (If your TV has an _/I;;y_ ogo, then it supports the Anynet+
function)
Using the TV functions
o
_'_,,M {,,_,
(with Samsung TVs only}
PressTv' SOURCEon the remote control to change the TV's input source
os_st
Press_ INFO on the remote control to display the TV channel information
PressW CH on the remote contro to seect the TV channe _
_,;;_,_
...................
PressW VOL on the remote contro to increase or decrease the voume eve_
Use W PREoCHbutton to move to the previous TV channe in TV mode_
To exit the TV menu, use the W EXIT button_ (It functions the same as the
EXIT button of the TV remote contro _)
When you press the SoundConnect button, the ]V's sound is
transmitted through the Soundbar system via a Bluetooth
connection_ The Soundbar also controls the sound volume, sound
quality, etc_
The remote control can operate TVs made by SAMSUNG only_
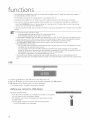
SOFTWARE UPGRAD E
Samsung may offer upgrades for the Wiretess Audio o Soundbar's system
firmware in the future
tf an upgrade is offered, you can upgrade the firmware by connecting a USB
drive with the firmware upgrade stored on it to the USBport on your
Soundbar
Note that if there are multiple upgrade files, you must load them onto the
USBdrive singly and use them to upgrade the firmware one at a time
Pleasevisit Samsung corn or contact the Samsung call center to receive
more information
about downloading
upgrade files
'_' insert a USBdrive containing the firmware upgrade into the USBport on the main uniL
'_' Do not disconnect the power or remove the USB drive while upgrades are being applied_ The main unit will turn off
automatically after completing the firmware upgrade_
When software is upgraded, settings you have made will return to their default (factor},])settings_
We recommend you write down },'our settings so that you can easily reset them after the upgrade_
'_' Once upgrading the product software is completed, turn off the product and then press and hold (m) button for a
while to reset the producL
'_' tf the firmware fails to upgrade, we recommend formatting the USBdevice in FAT16and trying again_
'_' Forupgrading purposes, do not format the USBdrive in NTFSformat because it is not a supported file system_
'_' Depending on the manufacturer, some USBdevices may not be supported_
22
Before requesting service, ptease review the fotiowing_
The unit will not turn on.
. Hsthe power cord plugged
into the ouSet?
. Connect the power plug to
the outlet
A function does not work when the
button is pressed.
. is there static electricity in
the air?
. Disconnect the power plug
and connect it again
Sound is not produced.
. B the unit propedy
connected to your TV?
. is the Mute function on?
. Connect it correctly
. B the voHume set to
minimum?
. Adjust the volume
The Picturedoes not appearon a TV
when a function isselected.
. is the TV connected
. Connect it correctly
The remote control does not work.
. Are the batteries drained?
. Replace with new batteries
- is the distance between
remote control and main
unit too far?
. Move closer to the unit
The sound from the left/right
channels are reversed.
. Are the Heft/right audio
output cables from the TV
connected properly?
. Checkthe left/right channel
and connect it/them
The SoundConnect (TV pairing)
failed.
. Does your TV support
SoundConnect?
. SoundConnect is supported
by some Samsung TVs
released from 20t2 on
Check your TV to see if it
supports SoundConnect
. is your TV firmware the
latest version?
. Does an error occur when
Reset the TV MODE and
connect again
. Pressthe Mute button to
cancel the Mute function
. Update your TV with the
latest firmware
. Contact the Samsung call
center
. Pressthe _H button for 5
seconds to reset the
23
appendix
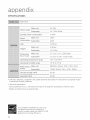
SPECtRCAT ONS
i
nwqsTo
Main unit
DC 24V
Subwoofer
AC 120V_60Hz
Power supply
Standby power consumption
0_45W
Power
30W
Main unit
Subwoofer
iii!i i!! ii!!!consumption
ii!ii i ii!ii!ii!ii!ii!ii!ii!ii!iiiii!ii!!iiii!
20W
USB
Weight
Dimensions
CWxHxDI
5Vi0_ 5A
Main unit
4_85 tbs
Subwoofer
21_61 tbs
Main unit
37_13 x 2_17 x2_36 inches
Subwoofer
12_03 x 15_16 x IZ03
inches
Operating temperature range
+41 °F to +95°F
Operating humidity range
10 % to 75 %
Rated outout Main unit
80WiCH, 3OHM, THD = I0%, I kHz
oower
160V'_ 3OHM, THD = I 0%, 100Hz
Subwoofer
S/N ratio (analog inout)
65 dB
Separation(lkHz
65 dB
* SiN ratio, distortion, separation and usable sensitivity are based on measurement
Engineering Society) guide!ine£
using AES (Audio
*: Nominal specification
oSamsung E!ectronics Co. Ltd reserves the right to change the specifications
oVVeight and dimensions are approximate_
As an ENERGY STAR Partner, Samsung
has determined that this product or
product mode!s meets the ENERGY STAR
guidelines for energy efficiency_
24
without
notice_
WARRANTY
This SAMSUNG brand product, as supplied and distributed by Samsung Electronics America, Inc. (SAMSUNG) and delivered
new, in the original carton to the original consumer purchaser, is warranted by SAMSUNG against manufacturing defects in
materials and workmanship for a limited warranty period of:
One (1) Year Parts and Labor*
(*90
Days Parts and Labor for Commercial
Use)
This timited warranty begins on the original date of purchase, and is valid only on products purchased and used in the United
States. To receive warranty service, the purchaser must contact SAMSUNG for probiem determination and service procedures.
Warranty service can only be performed by a SAMSUNG authorized service center. The original dated bitl of sate must be
presented upon request as proof of purchase to SAMSUNG or SAMSUNG's authorized service center. Transportation of the
product to and from
the service center is the responsibility of the purchaser.
SAMSUNG will repair or replace this product, at our option and at no charge as stipulated herein, with new or reconditioned
parts or products if found to be defective during the limited warranty period specified above. All replaced parts and products
become the property of SAMSUNG and must be returned to SAMSUNG. Replacement parts and products assume the
remaining original warranty, or ninety (90) days, whichever is longer.
SAMSUNG'sobligations with respectto software products distributed by SAMSUNGunder the SAMSUNGbrand name are setforth in the
applicable end user licenseagreement. NonoSAMSUNGhardware and software pro@acts,if provided, are on an _ASIS" basis.
NonoSAMSUNGmanufacturers, suppliers, p_Jbtishers,
and service providers may provide their own warranties.
This limited warranty covers manufacturing defects in materials and workmanship encountered in normal, and except to
the extent otherwise expressly provided for in this statement, noncommercial use of this product, and shall not apply to the
foliowing, including, but not iimited to: damage which occurs in shipment; delivery and installation; applications and uses for
which this product was not intended; altered product or serial numbers; cosmetic damage or exterior finish; accidents, abuse,
neglect, fire, water, lightning or other acts of nature; use of products, equipment, systems, utilities, services, parts, supplies,
accessories, applications, installations, repairs, external wiring or connectors not supplied and authorized by SAMSUNG, or
which damage this product or result in service problems; incorrect electrical line voltage, fluctuations and surges; customer
adjustments and failure to foltow operating instructions, cleaning, maintenance and environmental instructions that are
covered and prescribed in the instruction book; product removal or reinstaliation; reception problems and distortion related
to noise, echo, interference or other signal transmission and delivery problems. SAMSUNG does not warrant uninterrupted or
errorfree operation of the product.
THEREARE NO EXPRESSWARRANTIES OTHERTHAN THOSE LISTEDAND DESCRIBEDABOVE, AND NO WARRANTIES
WHETHER EXPRESSOR IMPLIED, INCLUDING, BUT NOT LIMITED TO, ANY IMPLIED WARRANTIES OF MERCHANTABILITY
OR FITNESSFORA PARTICULARPURPOSE,SHALL APPLYAFTERTHE EXPRESSWARRANTY PERIODSSTATEDABOVE, AND
NO OTHEREXPRESSWARRANTY OR GUARANTY GIVEN BY ANY PERSON,FIRM OR CORPORATIONWITH RESPECTTO THIS
PRODUCTSHALL BEBINDING ON SAMSUNG_ SAMSUNG SHALL NOT BE LIABLEFOR LOSSOF REVENUEOR PROFITS,FAILURE
TO REALIZESAVINGS OR OTHER BENEFITS,OR ANY OTHER SPECIAL,INCIDENTALOR CONSEQUENTIAL DAMAGES CAUSED
BYTHE USE, MISUSE OR INABILITY TO USETHIS PRODUCT,REGARDLESSOF THE LEGAL THEORY ON WHICH THE CLAIM
IS BASED,AND EVEN tF SAMSUNG HAS BEEN ADVISED OF THE POSSIBILITYOF SUCH DAMAGES_ NOR SHALL RECOVERY
OF ANY KtND AGAINST SAMSUNG BE GREATERtN AMOUNT THAN THE PURCHASE PRICEOF THE PRODUCT SOLD BY
SAMSUNG AND CAUSING THE ALLEGED DAMAGE_ WITHOUT LIMITINGTHE FOREGOING, PURCHASERASSUMES ALL RISK
AND LIABILITY FOR LOSS,DAMAGE OR INJURY TO PURCHASERAND PURCHASER'SPROPERTYAND TO OTHERSAND THEIR
PROPERTYARISING OUT OF THE USE, MISUSE OR INABILITY TO USETHIS PRODUCT SOLD BY SAMSUNG NOT CAUSED
DIRECTEYBY THE NEGLIGENCE OF SAMSUNG_ THIS LIMITED WARRANTY SHALL NOT EXTENDTO ANYONE OTHERTHAN THE
ORIGINAL PURCHASEROF THIS PRODUCT,IS NONTRANSFERABLEAND STATESYOUR EXCLUSIVE REMEDY,
Some states do not allow limitations on how long an implied warranty lasts, or the exclusion or limitation of incidental or
consequential damages, so the above limitations or exclusions may not apply to you. This warranty gives you specific legal
rights, and you may also have other rights which vary from state to state.
To obtain warrants, hardware service, please contact SAMSUNG customer care center.
QUESTIONS
BNTHE US
OR COMMENTS?
i 800 SAMSUNG
(7267864)
www_samsung_com!us!
support
Samsung Electronics America, Bnc_
85 Challenger Road Ridgefield Park,
NJ 07660
AH68o02681Eo00