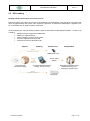
1
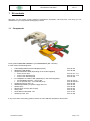
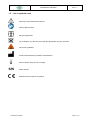
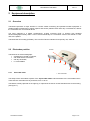
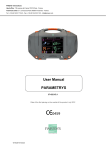
PARSYS Telemedicine Head office: 118, avenue de France 75013 Paris - France Technical center: 5-7, avenue de Paris 94300 Vincennes - France Tel.: + 33 (0)1 60 31 70 40 - Fax: + 33 (0)1 64 02 31 93 - [email protected] User Manual TELECARDIA 37-021 V4.0 Date of the first placing on the market of the product: 01/03/2007 10/15/2015 Version User Manual Telecardia Ver 4.0 SUMMARY 1 KIT CONTENTS........................................................................................................................................ 3 1.1 1.2 1.3 2 COMPONENTS......................................................................................................................................... 3 LIST OF SYMBOLS USED ........................................................................................................................... 4 W ARNINGS ............................................................................................................................................. 5 EQUIPMENT DESCRIPTION ................................................................................................................... 6 2.1 OVERVIEW .............................................................................................................................................. 6 2.2 ELECTRODES POSITION ........................................................................................................................... 6 2.2.1 Precordial leads ........................................................................................................................... 6 2.2.2 Peripheral leads ........................................................................................................................... 7 2.3 DEVICE CONTROL BUTTONS ..................................................................................................................... 9 2.4 CHARGING BASE ................................................................................................................................... 10 2.5 ECG READING ...................................................................................................................................... 11 3 INSTALLATION OF TELECARDIALYS PC SOFTWARE ..................................................................... 12 4 BLUETOOTH PAIRING PROCEDURE OF THE TELECARDIA TO A PC ........................................... 13 4.1 WINDOWS XP OPERATING SYSTEM ................................................................................................... 14 4.2 WINDOWS 7 OPERATING SYSTEM...................................................................................................... 25 4.2.1 Requirements ............................................................................................................................. 25 4.2.2 Pairing of Telecardia with a Windows 7 PC ............................................................................... 26 4.3 WINDOWS 8 / 8.1 OPERATING SYSTEM .............................................................................................. 37 4.3.1 Requirements ........................................................................................................................... 37 4.3.2 Pairing of Telecardia with a Windows 8 / 8.1 PC .................................................................. 38 5 USING TELECARDIALYS PC SOFTWARE .......................................................................................... 47 6 ECG CAPTURE ...................................................................................................................................... 48 6.1 6.2 2-LEAD PERIPHERAL PATIENT CABLE MODEL ........................................................................................... 48 3-LEAD PERIPHERAL PATIENT CABLE MODEL ........................................................................................... 54 7 UPDATING THE PC SOFTWARE / DEVICE FIRMWARE .................................................................... 60 8 TECHNICAL FEATURES ....................................................................................................................... 61 8.1 8.2 8.3 8.4 8.5 GENERAL FEATURES ............................................................................................................................. 61 MECHANICAL FEATURES ........................................................................................................................ 61 ELECTRICAL SPECIFICATIONS................................................................................................................. 61 FUNCTIONAL FEATURES ......................................................................................................................... 62 FUNCTIONAL FLOW CHART ..................................................................................................................... 63 9 ELECTROMAGNETIC EMISSIONS....................................................................................................... 64 10 MAINTENANCE...................................................................................................................................... 67 10.1 10.2 10.3 10.4 10.5 10.6 CLEANING / DISINFECTION ................................................................................................................. 67 PROCEDURE IN THE EVENT THAT THE INSTRUMENT IS DROPPED OR FALLS............................................ 67 RESET PROCEDURE .......................................................................................................................... 67 METROLOGICAL CHECKS ................................................................................................................... 68 DISCHARGED BATTERY...................................................................................................................... 68 PRODUCT SCRAP TREATMENT ........................................................................................................... 68 11 USERS’ TRAINING ................................................................................................................................ 69 12 FAULT OR FAILURE ............................................................................................................................. 70 12.1 12.2 12.3 12.4 12.5 13 THE TELECARDIA ECG DOES NOT SEND ANY TRACE ........................................................................... 70 THE ECG IS SUBJECT TO INTERFERENCE ........................................................................................... 70 THE TELECARDIA ECG IS NOT CHARGING .......................................................................................... 70 THE TELECARDIA ECG REMAINS BLOCKED......................................................................................... 71 THE TELECARDIA ECG HAS LOST IS TIME STAMPING ........................................................................... 71 PARSYS TELEMEDICINE WARRANTY AND AFTER-SALES SERVICE ........................................... 72 10/15/2015 Version Page 2 of 72 User Manual Telecardia Ver 4.0 1 Kit contents We thank you for having chosen PARSYS Telemedicine equipment. We hope that it will bring you full satisfaction in your daily electrocardiography practice. 1.1 Components Firstly, please check the contents of your Telecardia Kit (Ref: 100-004). It must contain the following items: 1 Telecardia portable electrocardiograph (ECG) 1 Bluetooth USB adapter 1 Peripheral Patient cable (depending on the model supplied): 2-lead 10 mm clips 2-lead 4 mm banana plugs 3-lead 4 mm banana plugs 2 or 3 Adapters for Patient cable (depending on the model supplied) : 2 expandable bracelets - 10 mm clips 2 or 3 arm limb clips - 4 mm banana plugs 1 Charging base DC 5V/1,1A 1 Medical (EN 60601) 5V power supply and cord 1 Water spray 1 Reset black cord (for device reset) 1 Carry case 1 User Manual Telecardia - EN 1 Warranty Card - EN Ref: 25-001 Ref: 36-002 Ref: 23-011 V1.1 Ref: 23-011 V1.2 Ref: 23-029 Ref: 33-010/11 Ref: 36-007/8/11 Ref: 25-002 Ref: 16-001 Ref: 36-006 Ref: 23-051 Ref: 34-003 Ref: 37-021 Ref: 37-003 If any of the items are missing, please contact us at the address specified in this manual. 10/15/2015 Version Page 3 of 72 User Manual Telecardia 1.2 Ver 4.0 List of symbols used Warning: consult attached documents Please read the notice BF type applied part Do not dispose of in the bin but through the appropriate recycling channels. Non-ionizing radiation Product manufactured by PARSYS Telemedecine Device climatic range of use or storage S/N Serial number Medical device European compliance 10/15/2015 Version Page 4 of 72 User Manual Telecardia 1.3 Ver 4.0 Warnings PARSYS Telemedicine draws the attention of the user on the following points regarding: The device must not be used simultaneously with an electric surgery tool. The device is not intended for cardiac direct use (reserved to CF class devices). The ECG capture must not be performed when the device is charging on its charging base. When the ECG is capturing, electrodes unplugged on the patient must not come into contact with the ground or other exposed metal parts. When the ECG is capturing, the device’s differentiator box must be in contact with the patient. In case of a simultaneous use of the device and another, it should take care that the sum of the patient leakage currents to the ground doesn’t exceed safety limits. In case of a simultaneous use of the device with a defibrillator, do not place the defibrillator’s electrodes into contact with the device’s electrodes. 10/15/2015 Version Page 5 of 72 User Manual Telecardia Ver 4.0 2 Equipment description 2.1 Overview Telecardia represents a major advance in remote cardiac monitoring and portable medical equipment. It enables health professionals to rapidly capture and send a patient's ECG under any circumstances, without the constraints of a conventional device. The trace captured is a digital, simultaneous 12-lead 12-tracing ECG, in keeping with standard electrocardiographs usually used. It can be sent automatically to a care watch centre or be viewed on a PC next to the patient. Telecardia has CE marking (CE0459). This is an ECG device intended for temporary use, class IIa. 2.2 Electrodes position Telecardia is an electrocardiograph: simultaneous 12-lead 12-channel, with fixed thoracic electrodes, with dry electrodes, no consumables. Neutral Neutra v6 v5 v4 v3 v2 2.2.1 Precordial leads v1 1. Precordial leads The shape of the unit enables capture of the 6 precordial leads collected thanks to the 2 articulated arms. These thoracic electrodes are dry and fixed, from V1 to V6. The Neutral, usually captured on the right leg, is captured in the thorax via the fixed electrode on the housing (see figure 1.). 10/15/2015 Version Page 6 of 72 User Manual Telecardia 2.2.2 Ver 4.0 Peripheral leads 2.2.2.1 2-lead peripheral Patient cable model With the 2-lead model, Telecardia contains: 1 rolling wire electrode, located under the device left arm for the AvF lead. 2. Dry wire electrode for AvF 3. Patient cable connecting 1 cable to plug on the Telecardia box right-side, capturing AvR and AvL with expandable bracelets or limb clips dry electrodes (see figure 4 and 5). AvL AvL AvR AvR AvR AvL 4. Cordon Patient AvR & AvL Patient cable 10/15/2015 Version 5. Expandable bracelets or limb clips dry electrodes Page 7 of 72 User Manual Telecardia 2.2.2.2 Ver 4.0 3-lead peripheral Patient cable model With the 3-lead model, Telecardia contains a Patient cable to plug into the ECG box right-side. It enables the capture of AvR, AvL and AvF with limb clips dry electrodes (see figure 6.). AvF AvL AvR 6. Peripherals cable AvR, AvL and AvF - Limb clips electrodes 7. Peripheral cable connection The insertion mark, a red point on the cord, must be facing the device’s top 10/15/2015 Version Page 8 of 72 User Manual Telecardia 2.3 Ver 4.0 Device control buttons To control the machine and start all the functions, Telecardia has 2 buttons: 1 button used to release the arms and switch the machine ON / OFF, located on the front of the machine and marked with a green circle crossed by a black line. 1 button used to access the machine's advanced functions, located under the top cover and marked "OUT". In addition, combinations of these buttons are used to select the requested functions. 4. Telecardia buttons 10/15/2015 Version Page 9 of 72 User Manual Telecardia 2.4 Ver 4.0 Charging base Telecardia is equipped with a separate power supply provided by a rechargeable Lithium/Polymer battery, allowing approximately 50 traces per charge. This battery is charged using the charging base, via 2 metal contacts integrated in the back of the machine unit. The charging base charges the machine completely in approximately 2.5 hours using a 220V/50Hz source, via the mains adapter supplied. ALWAYS USE THE MAINS ADAPTER SUPPLIED TO POWER THE BASE; OTHERWISE, IRREVERSIBLE DAMAGE NOT COVERED BY THE MACHINE WARRANTY IS LIABLE TO OCCUR. To charge Telecardia: Connect your charging base to 220V power supply Put Telecardia upon its charging base: CHECK LIGHT INDICATORS ON THE CHARGING BASE’S SIDE TO CONFIRM THE GOOD CONTACT OF THE DEVICE WITH CHARGING CONTACTS. Light indicators located on the side of the base indicate the machine charging status, and whether the machine is in contact with the support. The ON/OFF indicator flashes BLUE to indicate that the base power is on. Telecardia charging indicator The CHARGING INDICATOR does not light up when Telecardia is not correctly inserted in its slot, without contact with the charging contacts, or missing from the slot. The CHARGING INDICATOR remains RED as long as Telecardia is charging. On/Off indicator The CHARGING INDICATOR is GREEN when Telecardia is charged. Not charging Telecardia for more than 1 year means losing the instrument's internal realtime clock: we recommend to regularly charge Telecardia battery. 10/15/2015 Version Page 10 of 72 User Manual Telecardia 2.5 Ver 4.0 ECG reading Viewing and/or transmission of the trace on a PC Following capture, the data is sent to the PC automatically via the Bluetooth radio link which has a free field range of approximately 100 meters. This requires the presence of a Bluetooth USB adapter, supplied in the kit, connected to the PC used to operate Telecardia. On the operating PC, the Telecardialys software (See the User Manual Telecardialys Software - 37-063 V1.0) is used to: dialogue with the equipment via Bluetooth, display the captured ECGs, print the ECGs in several report modes, send the captured ECGs by e-mail, archive and view the captured ECGs. Capture Reading Transmission Interpretation Wireless Bluetooth transmission GSM Bluetooth phone Wireless Internet – GPRS Satellite Bluetooth transmission ECG captured with Télécardia ou Cardialys PC equipped with Bluetooth device Reading – Printing - Sending Marine Medical Consultation Centre PARSYS ECG reading centre Cardiologist or dedicated centre Wireless Bluetooth transmission Charging base 10/15/2015 Version Page 11 of 72 User Manual Telecardia Ver 4.0 3 Installation of Telecardialys PC Software See the User Manual Telecardialys Software - 37-063 V1.0 10/15/2015 Version Page 12 of 72 User Manual Telecardia Ver 4.0 4 Bluetooth pairing procedure of the Telecardia to a PC Windows XP Windows Vista Windows 7 and above External adapter External adapter Internal module External adapter Internal module Installation CD §xxx Installation CD §xxx Nothing to do Insert adapter + Internet Nothing to do The pairing procedure of the Telecardia ECG with a PC running Windows 7 and above is specific: it is essential to follow the appropriate procedure for the operating system of your PC. 10/15/2015 Version Page 13 of 72 User Manual Telecardia Ver 4.0 4.1 Windows XP Operating System Pairing of Telecardia with a Windows XP PC The Bluetooth USB adapter is pre-associated by us with your Telecardia. Use the following procedure in the following cases: a. you change your Bluetooth USB adapter, b. you do not use the supplied adapter to the benefit of an internal Bluetooth module, c. you use another Telecardia with the same adapter (potential After-Sales return). Insert the USB Bluetooth adapter into an USB port on the PC, then run the installation CD. If the CD does not run automatically, please run it manually in Windows Explorer. Do nothing until this window appears. Click on “Install Bluetooth© Device”. 10/15/2015 Version Page 14 of 72 User Manual Telecardia Ver 4.0 Click on “Next >”. Accept the agreement, then click on “Next >”. 10/15/2015 Version Page 15 of 72 User Manual Telecardia Ver 4.0 Click on “Next >”. Click on “Install”. 10/15/2015 Version Page 16 of 72 User Manual Telecardia Ver 4.0 Wait until the installation completes. Click on “Finish”. 10/15/2015 Version Page 17 of 72 User Manual Telecardia Ver 4.0 Make a “right click” on the Bluetooth icon at the bottom right of the screen. Click on “Quick Connect”, then, on “Bluetooth Serial Port”, then, on “Find Devices…”. 10/15/2015 Version Page 18 of 72 User Manual Telecardia Ver 4.0 Open the drop down menu: “Show devices” and select “Show all devices”. Open the Telecardia housing. Note the ID of the used device: Number starting with a T 10/15/2015 Version Page 19 of 72 User Manual Telecardia Ver 4.0 Make the connection. Simultaneously press the ON and OUT buttons until the device’s ignition. Select the device. In the list, select your Telecardia and click on “Next >”. If necessary, click on “Search Again”. 10/15/2015 Version Page 20 of 72 User Manual Telecardia Ver 4.0 Pairing. Pairing starts with Telecardia. Enter the pairing passkey: The installer asks for a passkey: Type the code: 02101124 and click on “Next >”. 10/15/2015 Version Page 21 of 72 User Manual Telecardia Ver 4.0 Click on “Finish”. Create shortcuts. Click on “Do not display this message again”, then on “OK”. To finalize the installation of the Bluetooth device, make a "right click" on the Bluetooth icon in the bottom right of the screen. Then, click on “Bluetooth Configuration”. 10/15/2015 Version Page 22 of 72 User Manual Telecardia Ver 4.0 Go to the “Local Services” tab. Click on “Bluetooth Serial Port”. Then, click on “Properties…”. Check “Start up automatically” and uncheck “Secure connection”. Click on “Apply”, then on “OK”. 10/15/2015 Version Page 23 of 72 User Manual Telecardia Ver 4.0 Go to the “Client Applications” tab. Click on “Bluetooth Serial Port”. Then, click on “Properties…”. Uncheck “Secure connection”. Click on “Apply”, then on “OK”. 10/15/2015 Version Page 24 of 72 User Manual Telecardia Ver 4.0 4.2 Windows 7 Operating System 4.2.1 Requirements 4.1.1.1 Check if the PC (fixed, portable PC, ultraportable, Tablet PC...) to pair with the ECG includes a preinstalled Bluetooth internal module. Note: In the case of a fixed PC, there is a good chance that there is no internal module; but, mobile computers often have a preinstalled Bluetooth internal module. 4.1.1.2 If no internal module is preinstalled, use the Bluetooth USB adapter supplied with your kit. It is fundamental that your computer has an active Internet connection. Just plug your Bluetooth USB adapter on a USB port, driver installation is automatic via the Internet. In this case, your computer must be connected to the Internet to install the Bluetooth USB adapter (driver updating). 4.1.1.3 If your computer is equipped with a preinstalled Bluetooth internal module, check the origin of its stack. Microsoft / WidComm stack: Pairing is automatic between Telecardia and the computer, you have no other manipulation to perform Another provider stack: We recommend you to communicate the name of the stack provider to the PARSYS Telemedicine After-Sales Service before any installation. In the latter case, we recommend not to try the installation before obtaining confirmation procedure by the PARSYS Telemedicine After-Sales Service. 10/15/2015 Version Page 25 of 72 User Manual Telecardia 4.2.2 Ver 4.0 Pairing of Telecardia with a Windows 7 PC Insert the USB Bluetooth adapter into an USB port on the PC, then run the installation CD. If the CD does not run automatically, please run it manually in Windows Explorer. Do nothing until this window appears. Click on “Install Bluetooth© Device”. 10/15/2015 Version Page 26 of 72 User Manual Telecardia Ver 4.0 Click on “Next >”. Accept the agreement, then click on “Next >”. Click on “Next >”. 10/15/2015 Version Page 27 of 72 User Manual Telecardia Ver 4.0 Click on “Install”. Wait until the installation completes. 10/15/2015 Version Page 28 of 72 User Manual Telecardia Ver 4.0 Click on “Finish”. Open the “Program Files” folder (32-bit processors) or “Program Files (x86)” (64-bit processors). Then, open the “Parsys” folder and start the “TCP.EXE” software. 10/15/2015 Version Page 29 of 72 User Manual Telecardia Ver 4.0 When the software is opened, set the device “Call (Client)” mode. Open the Telecardia housing. Note the ID of the used device: Number starting with a T 10/15/2015 Version Page 30 of 72 User Manual Telecardia Ver 4.0 Make the connection. Simultaneously press the ON and OUT buttons until the device’s ignition. The different connectable Bluetooth devices are recognized by the system. You can refine the search by type of equipment (Telecardia, Cardialys, etc.). 10/15/2015 Version Page 31 of 72 User Manual Telecardia Ver 4.0 If the search is unsuccessful you can click on “Refresh…”, which will start a new search. Once the desired device is visible, click its icon (although check the serial number). Then, click on “Choose”. 10/15/2015 Version Page 32 of 72 User Manual Telecardia Ver 4.0 The interface window with the medical device is then visible. Click on "Remote Mac Address”. Then, click on “Local Device”. The PC MAC address will be registered. 10/15/2015 Version Page 33 of 72 User Manual Telecardia Ver 4.0 Click on “Remote Mac Address”. Then, click on “Write” to save the new MAC address. In the field "Max Number of ECG" replace the number by "1", if you only want to do an ECG at a time. This is preferable to avoid any mistake in ECG / Patient assignments. 10/15/2015 Version Page 34 of 72 User Manual Telecardia Ver 4.0 Click on “Configuration”. Then, click on “Write” to save all the changes. Click on “Disconnect”. 10/15/2015 Version Page 35 of 72 User Manual Telecardia Ver 4.0 Back to the start window of the “TCP” software. Close the window to exit. 10/15/2015 Version Page 36 of 72 User Manual Telecardia Ver 4.0 4.3 Windows 8 / 8.1 Operating System 4.3.1 Requirements 4.3.1.1 Check if the PC (fixed, portable PC, ultraportable, Tablet PC...) to pair with the ECG includes a preinstalled Bluetooth internal module. Note: In the case of a fixed PC, there is a good chance that there is no internal module; but, mobile computers often have a preinstalled Bluetooth internal module. 4.3.1.2 If no internal module is preinstalled, use the Bluetooth USB adapter supplied with your kit. It is fundamental that your computer has an active Internet connection. Just plug your Bluetooth USB adapter on a USB port, driver installation is automatic via the Internet. In this case, your computer must be connected to the Internet to install the Bluetooth USB adapter (driver updating). 4.3.1.3 If your computer is equipped with a preinstalled Bluetooth internal module, check the origin of its stack. Microsoft / WidComm stack: Pairing is automatic between Telecardia and the computer, you have no other manipulation to perform Another provider stack: We recommend you to communicate the name of the stack provider to the PARSYS Telemedicine After-Sales Service before any installation. In the latter case, we recommend not to try the installation before obtaining confirmation procedure by the PARSYS Telemedicine After-Sales Service. 10/15/2015 Version Page 37 of 72 User Manual Telecardia 4.3.2 Ver 4.0 Pairing of Telecardia with a Windows 8 / 8.1 PC Insert the USB Bluetooth adapter into an USB port on the PC, then run the installation CD. If the CD does not run automatically, please run it manually in Windows Explorer. Do nothing until this window appears. Click on “Install Bluetooth© Device”. Click on “Agree and Install Bluetooth Software”. 10/15/2015 Version Page 38 of 72 User Manual Telecardia Ver 4.0 Wait until the installation completes. Click on “Finish”. 10/15/2015 Version Page 39 of 72 User Manual Telecardia Ver 4.0 Open the “Program Files” folder (32-bit processors) or “Program Files (x86)” (64-bit processors). Then, open the “Parsys” folder and start the “TCP.EXE” software. When the software is opened, set the device “Call (Client)” mode. 10/15/2015 Version Page 40 of 72 User Manual Telecardia Ver 4.0 Open the Telecardia housing. Note the ID of the used device: Number starting with a T Make the connection. Simultaneously press the ON and OUT buttons until the device’s ignition. 10/15/2015 Version Page 41 of 72 User Manual Telecardia Ver 4.0 The different connectable Bluetooth devices are recognized by the system. You can refine the search by type of equipment (Telecardia, Cardialys, etc.). If the search is unsuccessful you can click on “Refresh…”, which will start a new search. 10/15/2015 Version Page 42 of 72 User Manual Telecardia Ver 4.0 Once the desired device is visible, click its icon (although check the serial number). Then, click on “Choose”. The interface window with the medical device is then visible. 10/15/2015 Version Page 43 of 72 User Manual Telecardia Ver 4.0 Click on "Remote Mac Address”. Then, click on “Local Device”. The PC MAC address will be registered. Click on “Remote Mac Address”. Then, click on “Write” to save the new MAC address. 10/15/2015 Version Page 44 of 72 User Manual Telecardia Ver 4.0 In the field "Max Number of ECG" replace the number by "1", if you only want to do an ECG at a time. This is preferable to avoid any mistake in ECG / Patient assignments. Click on “Configuration”. Then, click on “Write” to save all the changes. 10/15/2015 Version Page 45 of 72 User Manual Telecardia Ver 4.0 Click on “Disconnect”. Back to the start window of the “TCP” software. Close the window to exit. 10/15/2015 Version Page 46 of 72 User Manual Telecardia Ver 4.0 5 Using Telecardialys PC Software See the User Manual Telecardialys Software - 37-063 V1.0 10/15/2015 Version Page 47 of 72 User Manual Telecardia Ver 4.0 6 ECG capture If you have the Telecardia ECG, please follow the following procedures to capture a simultaneous 12-lead ECG trace on the patient: Press the "Start Telecardia (ECG)" button on the software, the message "ECG waiting" appears. You can capture the ECG, the trace will be automatically transmitted to the PC. 6.1 2-lead peripheral Patient cable model 10/15/2015 Version Page 48 of 72 User Manual Telecardia 10/15/2015 Version Ver 4.0 Page 49 of 72 User Manual Telecardia 10/15/2015 Version Ver 4.0 Page 50 of 72 User Manual Telecardia 10/15/2015 Version Ver 4.0 Page 51 of 72 User Manual Telecardia 10/15/2015 Version Ver 4.0 Page 52 of 72 User Manual Telecardia 10/15/2015 Version Ver 4.0 Page 53 of 72 User Manual Telecardia Ver 4.0 6.2 3-lead peripheral Patient cable model 10/15/2015 Version Page 54 of 72 User Manual Telecardia 10/15/2015 Version Ver 4.0 Page 55 of 72 User Manual Telecardia 10/15/2015 Version Ver 4.0 Page 56 of 72 User Manual Telecardia 10/15/2015 Version Ver 4.0 Page 57 of 72 User Manual Telecardia 10/15/2015 Version Ver 4.0 Page 58 of 72 User Manual Telecardia 10/15/2015 Version Ver 4.0 Page 59 of 72 User Manual Telecardia Ver 4.0 7 Updating the PC software / device firmware We shall contact you periodically by e-mail concerning download of updated software / firmware versions. The updates are performed during maintenance. 10/15/2015 Version Page 60 of 72 User Manual Telecardia Ver 4.0 8 Technical features 8.1 General features Portable, event-driven, 12-lead temporary electrocardiograph. Radio data transmission (Bluetooth). Lithium polymer rechargeable battery power supply. 8.2 Mechanical features Material: Color: Surface condition: Electrode on unit: o chest on lower section VN - V1 - V2 - V3 - V4 - V5 - V6 (7/10µ chromium-plated brass) Electrodes with cable: o VR, VL and VF peripheral limb clips cable Connectors: o "female cylinder connectors with collar" under bushing cover for electrocardiograph connection - analogue trace output Protection index: IP20 Folded overall dimensions: 210 mm x 100 mm x 50 mm Weight: < 550 g two half-body unit + one hinged hatch made of flame-retardant ABS RAL 9002 white with marking 26 arbours 8.3 Electrical specifications Device intended for temporary use. Device not protected against defibrillation shocks. Device with internal electricity supply: rechargeable lithium polymer batteries Battery life: 50 peri-critical ECG captures and Bluetooth transmission in one battery charge Battery: Built-in Lithium Polymer battery 3,7V/1300mAh Battery life: 3 years life cycle Automatic power off after transmission. Internal protection using 500mA resettable fuse. Type B class 2A machine, diagnostic function. Measurement with internal electrodes, 9 simultaneous leads: VR, VL, VF, V1 - V2 - V3 - V4 - V5 V6 with reference to VN. Reproduction of 12 leads: D1, D2, D3, VR, VL, VF, V1, V2, V3, V4, V5, V6 Input impedance: 10 MΩ. Bandwidth: 0.16Hz to 70Hz at -3db (Adjustable to 30Hz by configuration) Measurement linearity: 0,01% Measurement sensitivity: 2264 pt/mV Sampling frequency: 271 pt/s Backup of 6 (peri-critical) 15-second ECGs (rotating or fixed list backup management with saving maintained even without stack). Saving of identification and configuration data in encrypted form. Real-time clock for ECG dating (autonomy of 1 year from full charging level under normal storage conditions). Displayed and/or voice task procedure or action messages. 10/15/2015 Version Page 61 of 72 User Manual Telecardia Ver 4.0 2-line, 16-character screen: Operating mode setting (computer configuration): o maximum number of ECGs o voice prompt o rotating stack/locking o connection type Bluetooth type interface for computer link and transmission base link: o Bluetooth version 2.0 (EDR) o Class 1 (100 mW) Average transmission speed: 115.2 Kb/s (depends on medium used) Operating conditions: o Temperature: o Relative humidity level: o Atmospheric pressure: +10°C to +35°C 30% to 75% 700 mb to 1060 mb. Storage and transport conditions: o Temperature: o Relative humidity level: o Atmospheric pressure: -10°C to +50°C 10% to 85% 500 mb to 1060 mb task procedure message display 8.4 Functional features Front panel: start-up button, configuration button (under housing cover), blue/green LED indicating: o steady green - machine power on o steady blue - Bluetooth transmission to PC or base 1 LCD 2 x 16-character line screen without backlighting. Curved lower section: 3 chromium-plated brass convex round electrodes Upper section: Hatch opening outwards and used to support the unit Upper section under hatch: 10 x 4 mm "female cylindrical" connectors with attachment collar between the two bodies 1 signal transfer control button to electrocardiograph (analogue output), or configuration Rear panel (back): Instruction label 2 charging contacts Edges: 1 folding articulated arm on either side, supporting electrodes V1, V2 and V5, V6. 2-lead model: o Under the left arm, 1 output of the wire VF electrode (iliac), with automatic winding system. o Under the right arm, 1 connecting socket for VR and VL cable. 3-lead model: o Under the right arm, 1 connecting socket for VR, VL and VF limb clips cable. 10/15/2015 Version Page 62 of 72 User Manual Telecardia Ver 4.0 8.5 Functional flow chart TELECARDIA menu and voice message flow chart NB: On Y On button AND ‘OUT ‘ button active? OUT button = Button 1 diagram ON button = Button 2 diagram The text marked in red represents the voice prompts or information played Stop Setting=1 Y No LCD dialogue? 2 clear 1s beeps 250 ms beep Technical problem please contact number on base Defective technical selftests …TELECARDIA… TECHNICAL PROB …TELECARDIA… ….goodbye. 3s PARSYS Santé….hello TELECARDIA ..PARSYS Telemed. 3s Battery low …. Charge immediately Y …TELECARDIA… BATTERY LOW Low Battery? 06/06/2007 17 : 15 3s Y Setting=1? Y "OUT" button enabled? 3s 1 x 250ms beep TELECARDIA Configuration Y Setting=1? N Transmission =0? Y 1 x 250ms beep Time without event > 4 min? Y No more space in memory? TELECARDIA Memory full! N Y ON button pressed for > 3s? Check that wired electrode is positioned correctly on skin Press machine against chest as in photo TELECARDIA …playback N N Start last ECG playback 1 x 250ms beep every second for 15s ECG transmission in progress? Y ECG transmission Position fingers as in photo Do not move during the 15 beeps Electrode test OK? N Start of capture 1 x 250ms beep every second for 15s Transmission=1 Put machine on base N Transmission complete? Transmission =1 Transmission=0 Transmission in progress TELECARDIA Connection Input completed 10/15/2015 Version Trace recording Page 63 of 72 3 s User Manual Telecardia Ver 4.0 9 Electromagnetic emissions Table 1: Directives and MANUFACTURER’S statement – ELECTROMAGNETIC EMISSIONS For all DEVICES and EM SYSTEMS Directives and manufacturer’s statement – electromagnetic emissions The device is made to be used in the electromagnetic environment specified below. The client or user of the device must ensure that the device is used in such environment. Emission trials Conformity RF Emissions CISPR 11 Group 1 RF Emissions CISPR 11 Harmonic Emissions CEI 61000-3-2 Pulse fluctuations/ Flicker CEI 61000-3-3 Electromagnetic environment – directives The device uses RF energy only through his internal functions. As a consequence, its RF emissions are very weak and are not likely to cause interferences in a nearby electronic device. Class B Non applicable The charging power box (catalogue product) must solely be used with the device in sleep mode, disconnected from the patient. Non applicable Table 2 – Directives and MANUFACTURER’S statement – electromagnetic IMMUNITY For all DEVICES and EM SYSTEMS Directives and manufacturer’s statement – electromagnetic immunity The device is made to be used in the electromagnetic environment specified below. The client or user of the device must ensure that the device is used in such environment. Immunity trials Trial level CEI 60601 Conformity level Electromagnetic environment – directives Electrostatic shocks (ES) +/- 6 kV in contact +/- 8 kV in the air Conforms 3 A/m Conforms CEI 61000-4-8 Floors must be made of wood, concrete or ceramics. If the floors are topped with synthetic materials, it is important that the relative humidity remains at 30% at least. Magnetic fields at the rate of the electric network must have the distinctive levels of a representative place located in a commercial or hospital environment. 10/15/2015 Version Page 64 of 72 CEI 61000-4-2 Magnetic field at the rate of the electric network (50/60 Hz) User Manual Telecardia Ver 4.0 Table 3 – Directives and MANUFACTURER’S statement – electromagnetic IMMUNITY For all DEVICES and EM SYSTEMS Directives and manufacturer’s statement – electromagnetic emissions The device is made to be used in the electromagnetic environment specified below. The client or user of the device must ensure that the device is used in such environment. Emission trials Trial level CEI 60601 Conformity level Electromagnetic environment – directives The portable and mobile RF communicating devices should be not used nearer of any part of the medical devices, including cables, than the recommended separation distance, calculated from the transmitter frequency applicable equation. Recommended separation distance d= 1,2√P RF conducted disturbances CEI 61000-4-6 3 Veff from 150kHz to 80MHz 3 Veff d= 1,2√P from 80MHz to 800MHz d= 2,3√P from 800MHz to 2,5GHz RF radiated disturbances CEI 61000-4-3 3 V/m from 80 to 2,5GHz 3 V/m where P is the maximum output power of the transmitter in watts (W) according to the transmitter manufacturer and d is the recommended separation distance in meters (m) of separation. It should that field strengths from fixed RF transmitters, as determined by an electromagnetic survey on site a , should be less than the compliance level in each frequency range b.. Interferences may occur in the vicinity of equipment marked with the following symbol: NOTE 1: to 80MHz and to 800MHz, the higher d range frequency applies. NOTE 2: These guidelines may not apply in all situations. Electromagnetic propagation is affected by absorption and reflection from structures, objects and people. a Field strengths from fixed transmitters, such as base stations for radio (cellular / cordless) telephones and land mobile radios, amateur radio, AM / FM radio and TV broadcast cannot be predicted theoretically with accuracy. To assess the electromagnetic environment due to fixed RF transmitters, it should be considered to proceed to an electromagnetic survey on site. If the measured field strength in the location where the medical device is used, exceeds the applicable RF compliance level above, it is necessary to observe the behavior of the medical device, to check that the operation is normal. If abnormal performances are observed, additional measures may be necessary, such as reorienting or repositioning of the medical device on its operation site. b In the frequency range of 150kHz to 80MHz, it is appropriate that the field strengths are smaller than 3 V/m. 10/15/2015 Version Page 65 of 72 User Manual Telecardia Ver 4.0 Recommended separation distances between portable and mobile RF communicating devices and the medical device. The medical device is intended for use in an electromagnetic environment where radiated RF disturbances are controlled. The customer or the user of the device can help to prevent electromagnetic interference by maintaining a minimum distance between portable and mobile RF communicating device (transmitter), and the medical device, as recommended below, according to the maximum power emission of the communication device. Transmitter maximum assigned power output (W) Separation distance according to the transmitter frequency (m) from 150kHz to 80MHz from 150kHz to 80MHz from 150kHz to 80MHz d= 1,2√P d= 1,2√P d= 2,3√P 0,01 0,12 0,12 0,23 0,1 0,38 0,38 0,73 1 1,2 1,2 2,3 10 3,8 3,8 7,3 100 12 12 23 For transmitters whose maximum assigned transmission power is not given above, the recommended separation distance d in meters (m) can be estimated by using the transmitter frequency applicable equation, where P is the characteristic of the transmitter maximum transmission power in watts (W) according to its manufacturer. NOTE 1: to 80MHz and to 800MHz, the higher d range frequency applies. NOTE 2: These guidelines may not apply in all situations. Electromagnetic propagation is affected by absorption and reflection from structures, objects and people. 10/15/2015 Version Page 66 of 72 User Manual Telecardia Ver 4.0 10 Maintenance 10.1 Cleaning / Disinfection The Telecardia machine can be cleaned and disinfected by wiping the electrodes in contact with the skin and the plastic unit, except on the self-adhesive label at the rear of the machine, with cotton wool or a wipe soaked in a product such as STERANIOS or equivalent (2% glutaraldehyde solution). Any other product would not ensure proper cleaning without damaging the Telecardia components. 10.2 Procedure in the event that the instrument is dropped or falls Mechanical damage to the instrument necessarily implies discontinuation of use of the machine and return to the PARSYS Telemedicine After-Sales Service. 10.3 Reset procedure If, when using the device, it blocks for more than 1 min: Use the reset cable or take a metal object (paper clip) and place it on the charging contacts for 1s, Place the equipment back on the charger and wait for the Charger indicator to come on, Establish radio connection with the PC in configuration mode in order to update the device's internal real-time clock: Open the cover as shown on the photo: press and hold the "OUT" button and press on the GREEN ON/OFF button at the same time. When the machine displays "PARSYS Santé", release both buttons. The machine then indicates the time and date, before displaying "en cours" (in progress) and "connexion BT" (BT connection). Restart the device. 10/15/2015 Version Page 67 of 72 User Manual Telecardia 10.4 Ver 4.0 Metrological checks The device shall undergo metrological checks after 1 year maximum. Checks should be carried out by the PARSYS Telemedicine technical department, it alone being able to guarantee maintenance of the device's metrological performance. 10.5 Discharged battery We recommend not to let Telecardia discharged for more than 1 year to keep the device's internal real-time clock. 10.6 Product scrap treatment According to the directive 2002/96/CE relating to DEEE electronic and electric devices, do not throw away in regular trash. Please bring waste to specialized collection points. 10/15/2015 Version Page 68 of 72 User Manual Telecardia Ver 4.0 11 Users’ Training Users of the Telecardia ECG must: have kind of medical knowledge of physician, nurse or first aider, hold the associate degree, have been trained on this medical device. 10/15/2015 Version Page 69 of 72 User Manual Telecardia Ver 4.0 12 Fault or failure 12.1 The Telecardia ECG does not send any trace After capturing the ECG, no trace is received by paired PC: the Bluetooth® connection is most certainly lost. We therefore advise you: NEVER ATTEMPT any direct manipulation on the PC; Contact the PARSYS Telemedicine After-Sales Service. 12.2 The ECG is subject to interference Check that the capture protocol described in section 6. has been followed, in particular: that the correct color code has been followed for the limb clips: red on the right arm, yellow on the left arm and green on the left leg, that the electrodes and the skin have been humidified: using the spray. The patient and the user must be as relaxed as possible in order to avoid any tense movements when capturing the ECG. 12.3 The Telecardia ECG is not charging Check that the protocol described in section 2.4 has been followed, in particular: that the Telecardia is in the correct position on its charging base, that the red LED on the charging base is on during charging, that the charging base is correctly plugged into the mains. Should you note a low battery level after 1 hour's charging, please contact the PARSYS Telemedicine AfterSales Service. 10/15/2015 Version Page 70 of 72 User Manual Telecardia 12.4 Ver 4.0 The Telecardia ECG remains blocked If, when using the device, it blocks for more than 1 min: Use the reset cable or take a metal object (paper clip) and place it on the charging contacts for 1s, Place the equipment back on the charger and wait for the Charger indicator to come on, Establish radio connection with the PC in configuration mode in order to update the device's internal real-time clock: Open the cover as shown on the photo: press and hold the "OUT" button and press on the GREEN ON/OFF button at the same time. When the machine displays "PARSYS Santé", release both buttons. The machine then indicates the time and date, before displaying "en cours" (in progress) and "connexion BT" (BT connection). 12.5 Restart the device. The Telecardia ECG has lost is time stamping If your Telecardia ECG has lost is time stamping: Establish radio connection with the PC in configuration mode in order to update the device's internal real-time clock: Open the cover as shown on the photo: press and hold the "OUT" button and press on the GREEN ON/OFF button at the same time. When the machine displays "PARSYS Santé", release both buttons. The machine then indicates the time and date, before displaying "en cours" (in progress) and "connexion BT" (BT connection). Restart the device. 10/15/2015 Version Page 71 of 72 User Manual Telecardia Ver 4.0 13 PARSYS Telemedicine Warranty and After-Sales Service The Customer agrees to comply with the Warranty Conditions listed on the Warranty Certificate accompanying the Equipment. The Equipment is supplied with a one-year (1) warranty during which period the Customer will be able to exchange Equipment found to have a latent defect and subject to the Customer having informed PARSYS Telemedicine thereof in writing and in detail. In the event of a functional fault or failure of the Equipment, the Customer may contact PARSYS Telemedicine: by sending an e-mail to [email protected], or by calling the PARSYS Telemedicine After-Sales Service: o Monday to Friday, 10 a.m. - 12.30 p.m. and 2 p.m. - 6p.m., except for bank holidays, o at +33 (0)1 60 31 51 71 or by sending a letter by recorded delivery with acknowledgement of receipt to: PARSYS Telemedicine - After-Sales Service 5-7, avenue de Paris 94300 Vincennes - FRANCE The PARSYS Telemedicine After-Sales Service identifies the nature of the fault or failure of the Equipment before carrying out any repairs or replacing the defective Equipment. Beyond the warranty period, the Customer has the possibility of subscribing to a maintenance contract with the PARSYS Telemedicine sales department. 10/15/2015 Version Page 72 of 72