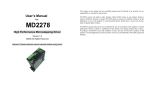
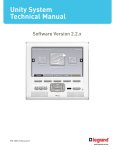
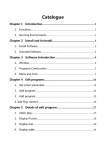
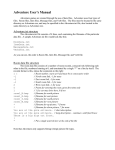
1
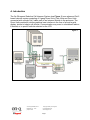
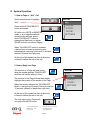
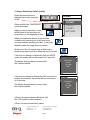
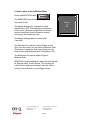
Selective Call Intercom
SYSTEM USER’S GUIDE
1308001 REV. C
301 Fulling Mill Road, Suite G
©Copyright 2008 by On-Q/Legrand,
Middletown, PA 17057
Inc All Rights Reserved.
(800)-321-2343
www.onqlegrand.com
Page i
TABLE OF CONTENTS
A. Introduction
1
B. System Components Overview
2
C. User Interface Overview
3
1. How to Navigate the User Interface
4
2. Pop-up Style Message Screens
5
D. System Operation
6
1. How to Page or “ALL” Call
6
2. How to Reply to a Page
6
3. How to Selectively Call a Location
7
4. How to Reply to a Selective Call
8
5. How to Mute a Unit
8
6. How to Place a Unit in Monitor Mode
9
7. How to Temporarily Disable a Patio Unit
10
8. How to Initiate a Door Call
12
9. How to Initiate a Door Release
13
10. How to Select a Door Chime Tone
14
E. System Personalization
16
1. Choosing Unit Names
16
2. Modifying Hands-Free Reply Time
18
3. Room Options
19
4. Door Options
21
5. Patio Options
23
301 Fulling Mill Road, Suite G
©Copyright 2008 by On-Q/Legrand,
Middletown, PA 17057
Inc All Rights Reserved.
(800)-321-2343
www.onqlegrand.com
Page ii
A. Introduction
The On-Q/Legrand Selective Call Intercom System (see Figure 1).is an advanced Cat 5
based intercom system consisting of 2-gang Room Units, Patio Units and Door Units
connected with a single Cat 5 cable each to an Intercom Module in the enclosure. The
Room Units contain an intuitive graphical user interface in the form of a liquid crystal
display, similar to today’s cell phones. Communication may occur in a broadcast fashion
if desired, or to specific units as selected on the LCD.
Figure 1
301 Fulling Mill Road, Suite G
©Copyright 2008 by On-Q/Legrand,
Middletown, PA 17057
Inc All Rights Reserved.
(800)-321-2343
www.onqlegrand.com
Page 1
B. System Components Overview
System Components
The following components (in addition to a suitable power supply) are typically utilized to make
up the Selective Call Intercom System (see Figure 2).
Figure 2
SCI Module
Room
Unit
Patio Unit
•
•
•
•
Door Unit
Video Door Unit
Selective Call Intercom Module: This module is typically installed in the On-Q
enclosure and is considered the System Command, Communication and Power Router of
the system. All Room Units, Patio Units and Door Units are connected directly to the Module
via “home run” style single Cat 5e cabling. The Intercom Module also supplies power to the
entire SCI System. Up to eight units of any combination are supported by each module and
modules may be cascaded three times, for a total system support of up to 32 units.
Selective Call Room Unit: Through the LCD display, this unit provides both basic
intercom communication functions such as talk, talk to door (if Door Unit is installed),
monitor, mute, and advanced functions such as dynamic sorting of users or monitoring
multiple rooms at the same time. Up to 8 Selective Call Room Units can be installed per
Selective Call Intercom Module, and up to 32 per system.
Selective Call Patio Unit: This unit also provides similar basic Room Unit functionality in
a weather resistant wall mounted package for your patio. For security reasons, it does not
support the door release function. There are no specific limits as to the mix of Room Units
and Patio Units up to the physical limitation of 8 per module and 32 per system.
Selective Call Door/Video Door Unit: This unit allows a visitor to the home to press the
door chime button on the unit to notify the occupants of their presence. The occupants can
then initiate a two-way communication with the visitor, see the visitor (Video Door Unit only)
and even open the door (requires electronic door release device, not included). Up to 20
different door tones can be selected as the door tone that is played when the door chime
button is pressed. There are no limits to the mix of Room, Patio and Door Units up to the
physical limit of 8 per Distribution Module and 32 per system.
301 Fulling Mill Road, Suite G
©Copyright 2008 by On-Q/Legrand,
Middletown, PA 17057
Inc All Rights Reserved.
(800)-321-2343
www.onqlegrand.com
Page 2
C. User Interface Overview
LCD
DISPLAY
ROOM1
ALL
ROOM2
PATIO1
DOOR1
SETTINGS
SPEAKER
NAVIGATION
BUTTONS
(ARROWS)
VOLUME
BUTTONS
MONITOR
BUTTON
TALK AND
SELECT
BUTTON
YOUR
LOCATION
OTHER
LOCATION
STATUS
ICONS
PRESS
DOWN
ARROW
FOR MORE
MUTE
BUTTON
STATUS
OF YOUR
LOCATION
ROOM1
ALL
ITEM
SELECTED
(USE ARROW
BUTTONS
TO MOVE)
ROOM2
PATIO1
DOOR1
SETTINGS
OTHER
LOCATION
NAMES
= MUTE
= MONITOR
= BUSY
301 Fulling Mill Road, Suite G
©Copyright 2008 by On-Q/Legrand,
Middletown, PA 17057
Inc All Rights Reserved.
(800)-321-2343
www.onqlegrand.com
Page 3
1. How to Navigate the User Interface:
ROOM1
ALL
Press Arrow Buttons
to move highlight to selection:
ROOM2
PATIO1
DOOR1
SETTINGS
Press TALK/SELECT Button
to see selection sub-menu:
SETTINGS
Unit Names
Reply Options
A down-arrow in the lower-left
corner means there are more
sub-menu items.
Room Options
Door Options
Patio Options
Press down-arrow to see all items:
At the end of the sub-menu items,
you will see BACK at the bottom
of the screen.
UNIT NAMES
Select Unit:
ROOM 2
Press the down-arrow button to
highlight BACK and:
Press TALK/SELECT to move
up one menu level (to the
SETTINGS screen in this example).
301 Fulling Mill Road, Suite G
BACK
©Copyright 2008 by On-Q/Legrand,
Middletown, PA 17057
Inc All Rights Reserved.
(800)-321-2343
www.onqlegrand.com
Page 4
2. Pop-up Style Message Screens:
ROOM1
ALL
Press either Volume Control
Button to see bar-graph
style screen:
ROOM2
Volume
Volume
PATIO1
DOOR1
SETTINGS
Use buttons to control volume:
Display changes back to
normal after 2 seconds of inactivity.
Press MUTE Button to place
Unit in MUTE Mode:
ROOM1
ALL
Mute
Mute is
is ON.
ON.
ROOM2
PATIO1
No
No other
other units
units
DOOR1
can
contact
can contact
SETTINGS
you!
you!
MUTE button is backlit red
While Unit is in MUTE Mode.
Display changes back to
normal after 2 seconds of inactivity.
Press MONITOR Button to place
Unit in MONITOR Mode:
ROOM1
ALL
ROOM2
Monitor
Monitor
PATIO1
Is
Is
ON.
ON.
DOOR1
SETTINGS
MONITOR button is backlit red
While Unit is in MONITOR Mode.
Display changes back to
normal after 2 seconds of inactivity.
301 Fulling Mill Road, Suite G
©Copyright 2008 by On-Q/Legrand,
Middletown, PA 17057
Inc All Rights Reserved.
(800)-321-2343
www.onqlegrand.com
Page 5
D. System Operation
1. How to Page or “ALL” Call
ROOM1
ALL
Press arrow buttons to highlight
“ALL”.
ROOM2
PATIO1
DOOR1
SETTINGS
Press and Hold TALK/SELECT
button and speak:
All Units not in MUTE or MONITOR
mode, or on a selective call with
someone else will hear a tone
when TALK/SELECT button is
pressed and then hear you speak:
(DOOR Units do not receive Pages).
When TALK/SELECT button is released,
a second tone is heard at receiving units,
indicating that receiving Units have 10 seconds
(default) of hands-free reply time.
At the end of this hands-free time a third tone
is heard to define the end of the call.
2. How to Reply to a Page
The receiver of a Page will hear a tone
when the sender presses TALK/SELECT
and then the sender talking to them.
The receiver of the Page will see their display
highlight the location of the sender of the Page.
When the sender releases the TALK/SELECT
Button, a second tone is heard. Receiver now has
10 seconds (default) of hands-free reply time.
At the end of this hands-free time a third tone
is heard to define the end of the call.
The only way to exit a Page early,
Is to press the MUTE button:
301 Fulling Mill Road, Suite G
©Copyright 2008 by On-Q/Legrand,
Middletown, PA 17057
Inc All Rights Reserved.
(800)-321-2343
www.onqlegrand.com
Page 6
ROOM2
ALL
ROOM1
PATIO1
DOOR1
SETTINGS
3. How to Selectively Call a Location
Press the arrow buttons to
highlight the location you want
to call.
ROOM1
ALL
Press and hold the TALK/SELECT
button and speak.
When you press the button, a tone
will be heard at the receiving unit
to tell them you are beginning to talk.
ROOM2
PATIO1
DOOR1
SETTINGS
When you release the button, a second tone
is heard at the receiving unit to let them know
you have finished speaking and their 10 seconds
(default) hands-free reply time has started.
At the end of this 10 second time, a third tone is
heard at the receiving Unit to define the end of the call.
If the Unit you attempt to Selectively Call is in MUTE
mode, the sender will see this screen for 2 seconds.
The display changes back to normal after
the 2 second period.
If the unit you attempt to Selectively Call is involved in
another conversation, the sender will see this screen
for 2 seconds.
The display changes back to normal after
the 2 second period.
A Patio Unit cannot initiate a Selective Call
(No LCD screen to select receiver).
A Door Unit may be selectively called.
301 Fulling Mill Road, Suite G
©Copyright 2008 by On-Q/Legrand,
Middletown, PA 17057
Inc All Rights Reserved.
(800)-321-2343
www.onqlegrand.com
Page 7
ROOM1
ALL
Destination
Destination
ROOM2
Muted
Muted
PATIO1
Try
Try again
again
later.
later.
DOOR1
SETTINGS
ROOM1
ALL
Destination
Destination
ROOM2
Busy
Busy
PATIO1
Try
Try again
again
later.
later.
DOOR1
SETTINGS
4. How to Reply to a Selective Call
The receiver of a Selective Call will hear a tone
when the sender presses TALK/SELECT
and then the sender talking to them.
The receiver of the Selective Call will see their
display highlight the location of the sender.
When the sender releases the TALK/SELECT
Button, a second tone is heard. Receiver now has
10 seconds (default) of hands-free reply time.
ROOM2
ALL
ROOM1
PATIO1
DOOR1
SETTINGS
At the end of this hands-free time a third tone
is heard to define the end of the call.
5. How to Mute a Unit
Press the MUTE button:
The MUTE button backlight changes from white to red.
The display changes for 2 seconds to show
that no other Units can contact you.
The display changes back to normal after
2 seconds.
The Muted Unit cannot initiate Pages or Selective Calls.
MUTE may be disabled at a particular Unit through
its Settings menu, Room Options. This is handy for
a child’s room where you wouldn’t want the child to
be able to Mute their room, and avoid contact.
301 Fulling Mill Road, Suite G
©Copyright 2008 by On-Q/Legrand,
Middletown, PA 17057
Inc All Rights Reserved.
(800)-321-2343
www.onqlegrand.com
Page 8
ROOM1
ALL
Mute
Mute is
is ON.
ON.
ROOM2
PATIO1
No
No other
other units
units
DOOR1
can
can contact
contact
SETTINGS
you!
you!
6. How to place a Unit in Monitor Mode
Press the MONITOR button:
The MONITOR button backlight changes
from white to red.
The display changes for 2 seconds to show
that Monitor is ON. This means the microphone
in the Unit is turned on and all other non-muted
and non-monitored Units will hear an sounds
occurring in the monitored room.
The display changes back to normal after
2 seconds.
The Monitored Unit will not receive Pages or hear
Door Unit door tones, but can receive Selective Calls.
This feature is handy for elder care where you can
Hear a noise and selectively ask if everything is OK.
The Monitored Unit cannot initiate Pages or
Selective Calls.
MONITOR may be disabled at a particular Unit through
its Settings menu, Room Options. This is handy for
a child’s room where you wouldn’t want the child to
put their Unit in Monitor to avoid Page contact.
301 Fulling Mill Road, Suite G
©Copyright 2008 by On-Q/Legrand,
Middletown, PA 17057
Inc All Rights Reserved.
(800)-321-2343
www.onqlegrand.com
Page 9
ROOM1
ALL
ROOM2
Monitor
Monitor
PATIO1
Is
Is
ON.
ON.
DOOR1
SETTINGS
7. How to Temporarily Disable a Patio Unit
From any Room Unit, press
the arrow buttons to highlight
the SETTINGS selection.
ROOM1
ALL
ROOM2
PATIO1
DOOR1
SETTINGS
Press the TALK/SELECT
button.
Press the arrow buttons to
highlight Patio Options.
SETTINGS
Unit Names
Reply Options
Press the TALK/SELECT
button.
Room Options
Door Options
Patio Options
Press the arrow buttons to
highlight the Patio Unit
that you wish to disable.
PATIO OPTIONS
Select Unit:
PATIO1
Press the TALK/SELECT
button.
BACK
Press the arrow buttons to
highlight the Status selection
and press the TALK/SELECT
button.
PATIO OPTIONS
Status:
ON
Volume:
Chime Volume:
Use the arrow buttons to select
OFF or ON.
301 Fulling Mill Road, Suite G
©Copyright 2008 by On-Q/Legrand,
Middletown, PA 17057
Inc All Rights Reserved.
(800)-321-2343
www.onqlegrand.com
Page 10
This screen can also be used to control the default
volume, chime volume, whether it can be reached by
an All Call (Page), whether it can be placed in Monitor
Mode and its default timeout before going into Sleep
Mode.
NOTE: You will need to turn this Patio Unit back
ON (following the same steps) before you can
utilize it at a later time.
301 Fulling Mill Road, Suite G
©Copyright 2008 by On-Q/Legrand,
Middletown, PA 17057
Inc All Rights Reserved.
(800)-321-2343
www.onqlegrand.com
Page 11
PATIO1
PATIO OPTIONS
Chime Volume:
All Call: YES
Monitor: NO
Time Out: 1 Min
BACK
8. How to initiate a Door Call
OFFICE
ALL
When a guest presses the Door
Chime button on a Door Unit, all
non-Muted non-Monitored Room
Units that are not involved in
another conversation will hear a
door tone at their unit, and their
unit will wake up if asleep and
display a pop-up screen for 2
seconds to tell you that the Door
Bell is ringing.
Front
Front Door
Door
ROOM2
PATIO1
Is
Is Ringing.
Ringing.
DOOR1
SETTINGS
The display then goes back to normal with
the Door Unit highlighted.
Family Room
Kids Room
Front Door
Release
The Door Unit will be highlighted
for 1 minute (default), during which
time any non-busy Unit can initiate
the Door Call by pressing and
holding the TALK/SELECT button
and speaking.
Patio Units can also initiate a Door
Call directly by pressing and
holding their Door button and
speaking.
Beyond the default timeout, Room
Units will need to use the arrow
buttons to highlight the Door Unit
before pressing and holding the
TALK/SELECT button to speak.
When done talking to the guest at
the Door Unit and the TALK/SELECT
button (or Patio Door button) is released,
a single tone will be heard at the Door Unit
to let the guest know they can reply.
The guest has a 10 second hands-free reply
time after the first tone is heard. At the end of that
time, a different tone is heard at each unit
to let them know that the hands-free reply time is over.
301 Fulling Mill Road, Suite G
Office
ALL
©Copyright 2008 by On-Q/Legrand,
Middletown, PA 17057
Inc All Rights Reserved.
(800)-321-2343
www.onqlegrand.com
Page 12
9. How to initiate a Door Release
If an electronic door release has
been installed and enabled (see
P/N 1308003 Installer Manual for
more information), the label “Release”
appears below the Door label.
To initiate a door release, use the
Arrow buttons to highlight “Release”
Office
ALL
Family Room
Kids Room
Front Door
Release
and
press the TALK/SELECT button.
All other Room Units will display a
message that the Door is being
Released
OFFICE
ALL
Front
Front Door
Door
ROOM2
PATIO1
Release
Release Activated.
Activated.
DOOR1
SETTINGS
and
an audible tone will
be generated.
301 Fulling Mill Road, Suite G
©Copyright 2008 by On-Q/Legrand,
Middletown, PA 17057
Inc All Rights Reserved.
(800)-321-2343
www.onqlegrand.com
Page 13
10. How to select a Door Chime Tone
One of 20 different Door Tones
may be associated with any Door
Unit’s Door Chime button.
ROOM1
ALL
ROOM2
PATIO1
DOOR1
SETTINGS
From any Room Unit, use the
arrow buttons to highlight the
Settings function and then press
the TALK/SELECT button.
From the Settings screen, use the
arrow buttons to highlight Door
Options and the press the
TALK/SELECT button.
SETTINGS
Unit Names
Reply Options
Room Options
Door Options
Patio Options
From the Door Options screen, use
the arrow buttons to select the
Door Unit you would like to
associate a tone with and press the
TALK/SELECT button. The Door
Unit name will flash. Press the
TALK/SELECT button again to
move to the next screen.
DOOR
PATIO OPTIONS
OPTIONS
Select Unit:
DOOR1
BACK
Use the arrow buttons to select the
Chime option and press the
TALK/SELECT button. The Chime
selection will flash. Use the arrow
buttons to select the Door Tone #
that you would like to use with that
Door Unit (each will play as you
select them) and press the
TALK/SELECT button to lock in the
Chime#. See Table 1 for a
complete list of Door Tones.
301 Fulling Mill Road, Suite G
DOOR
PATIO OPTIONS
OPTIONS
Chime: Chime 14
Volume:
Chime Volume:
BACK
©Copyright 2008 by On-Q/Legrand,
Middletown, PA 17057
Inc All Rights Reserved.
(800)-321-2343
www.onqlegrand.com
Page 14
Door Tone Chime List
#
1
2
3
4
5
6
7
8
9
10
11
12
13
14
15
16
17
18
19
20
Door Tone Name
On-Q Sound
On-Q Sound Alternate
Westminster Long
Westminster Short
Two Note (Ding Dong)
Two Note (Dong Ding)
Jetson’s Doorbell
Eastern Strings
Calypso Party
Für Elise
Beethoven’s 5th
Happy Birthday
Pomp & Circumstance
Wolf Howl
Jingle Bells
We Wish You a Merry Christmas
Auld Lang Syne
Oh Canada
America the Beautiful
On-Q Sound + Dog
Table 1
301 Fulling Mill Road, Suite G
©Copyright 2008 by On-Q/Legrand,
Middletown, PA 17057
Inc All Rights Reserved.
(800)-321-2343
www.onqlegrand.com
Page 15
Type
Chime
Chime
Chime
Chime
Chime
Chime
Chime
Ethnic
Ethnic
Classical
Classical
Celebration
Celebration
Holiday
Holiday
Holiday
Holiday
Patriotic
Patriotic
Security
E. System Personalization
The following section explains how to use any Selective Call
Room Unit to personalize both global options and local
settings of the Selective Call System using the Settings
selection from the Room Unit Main Menu.
1. Choosing Unit Names
ROOM1
ALL
ROOM2
PATIO1
DOOR1
SETTINGS
From any Room Unit in the house,.
use the arrow buttons to highlight
SETTINGS and press
TALK/SELECT.
From the SETTINGS screen, use
the arrow buttons to highlight Unit
Names and press TALK/SELECT.
SETTINGS
Unit Names
Reply Options
Room Options
Door Options
Patio Options
The UNIT NAMES screen will have
your current Unit Name highlighted.
UNIT NAMES
Select Unit:
ROOM 2
Press TALK/SELECT to select it (it
will flash and begin beeping at full
volume so that it is audible from
most places within the home) or
use the arrow keys to select
another location.
BACK
Press TALK/SELECT and the
screen will show your “old” Unit
Name with a New Unit Name area
highlighted.
UNIT NAMES
Old Name:
ROOM 2
New Name:
ROOM 2
Press TALK/SELECT again and
use the arrow buttons to select a
New Unit Name from the list in
Table 2 for Rooms or Patios and
Table 3 for Doors or Patios.
301 Fulling Mill Road, Suite G
BACK
©Copyright 2008 by On-Q/Legrand,
Middletown, PA 17057
Inc All Rights Reserved.
(800)-321-2343
www.onqlegrand.com
Page 16
When you have decided on a New
Unit Name, press TALK/SELECT
to lock in that Name. The New Unit
Name shown now becomes that
Unit’s name and all other Room
Units interfaces are populated with
the Unit’s New Name.
Attic
Baby’s Room
Balcony
Bar
Basement
Bath 1
Bath 2
Bath 3
Bedroom 1
Bedroom 2
Bedroom 3
Bedroom 4
Bonus Room
Break Room
Breakfast Rm
Casita
Closet
Computer Rm
Dad’s Room
Deck
Den
Dining Room
Dock
Entertain. Rm
Family Room
Foyer
Front Desk
Game Room
Garage
Gathering Rm
Grandma’s Rm
Grandpa’s Rm
Great Room
Guest House
Guest Bath
Guest Room
Guest Suite
Hallway 2
Hallway
Hobby Room
Home Office
Home Office 2
Home Theater
In-Law Suite
UNIT NAMES
Old Name:
ROOM 2
New Name:
Master Suite
BACK
Kid’s Room
Kids Room 2
Kids Room 3
Kids Room 4
Kitchen
Laundry Room
Laundry Rm 2
Library
Living Room
Lunch Room
Main Office
Master Bath
Master Closet
Master Deck
Master Suite
Media Room
Mom’s Room
Mud Room
Nook
Office
Office 2
Office 3
Office 4
Office 5
Office 6
Office 7
Office 8
Owner’s Suite
Parlor
Patio
Play Room
Pool
Porch
Powder Room
Reading Room
Rec Room
Sitting Area
Study
Sun Room
Utility Room
Veranda
Waiting Room
Wine Cellar
Workshop
Table 2
Back Door
Back Gate
Balcony
Balcony 2
Basement Door
Casita
Deck
Dock
Front Door
Front Entry
Front Gate
Front Porch
Garage
Guest House
Master Deck
Table 3
301 Fulling Mill Road, Suite G
©Copyright 2008 by On-Q/Legrand,
Middletown, PA 17057
Inc All Rights Reserved.
(800)-321-2343
www.onqlegrand.com
Page 17
Patio
Porch
Side Door
Veranda
2. Modifying Hands-Free Reply Time
This is a global option which affects all Room and Patio Units. It determines the
amount of time a receiving unit remains in hands free reply mode.
From any Room Unit in the home,
Use the arrow buttons to highlight
SETTINGS and press the TALK/
SELECT button.
ROOM1
ALL
ROOM2
PATIO1
DOOR1
SETTINGS
Use the arrow buttons to highlight
Reply Options and press the
TALK/SELECT button.
SETTINGS
Unit Names
Reply Options
Room Options
Door Options
Patio Options
REPLY OPTIONS
Hands-Free Reply:
The current Hands-Free Reply
Time will be highlighted.
10 sec
Press TALK/SELECT and the
current setting will flash. Use the
arrow buttons to make a new
selection.
BACK
The options are 60 seconds,
30 seconds, 15 seconds,
10 seconds (the default),
5 seconds, or disabled.
Press TALK/SELECT to lock in
that new global selection.
Door Reply times are separately
configured under Installer Setup.
301 Fulling Mill Road, Suite G
©Copyright 2008 by On-Q/Legrand,
Middletown, PA 17057
Inc All Rights Reserved.
(800)-321-2343
www.onqlegrand.com
Page 18
3. Room Options (Local Settings)
These options must be configured from the Room Unit in which the option is to be
applied.
Use the arrow buttons to highlight
SETTINGS and press the
TALK/SELECT button.
ROOM1
ALL
ROOM2
PATIO1
DOOR1
SETTINGS
Use the arrow buttons to highlight
Room Options and press the
TALK/SELECT button.
SETTINGS
Unit Names
Reply Options
Room Options
Door Options
Patio Options
Use the arrow buttons to highlight
a selection and press the
TALK/SELECT button. The selection
flashes and the arrow buttons are
used to make a new selection.
When you have decided on a new
selection, press TALK/SELECT to
lock in the new selection.
The first setting “LCD Brightness:”
determines how bright or dim that Room Unit operates.
“Chime Volume:” determines how loud or soft the door
chime will play when someone pushes a Door Unit button.
ROOM
PATIO OPTIONS
LCD Brightness:
Chime Volume:
Monitor: ON
Mute: ON
ROOM
PATIO OPTIONS
Monitor: ON
Mute: ON
Theme: Theme 4
Timeout: 1 Min
Sort: Dynamic
BACK
“Monitor” and “Mute” can be turned ON or OFF, meaning those button functions
may be disabled or enabled at that particular Room Unit.
You can also determine the period of time of inactivity (1 minute-default, 5 minutes
or 10 minutes) before a Room Unit goes into sleep mode (Timeout).
The “Sort” option determines whether you want the list of Units displayed on that
Room Unit alphanumerically (Alpha), or by usage. Dynamic, (the default) displays
the list with the most used Units at the top of their section of the display.
301 Fulling Mill Road, Suite G
©Copyright 2008 by On-Q/Legrand,
Middletown, PA 17057
Inc All Rights Reserved.
(800)-321-2343
www.onqlegrand.com
Page 19
The Theme option allows you to select one of four different color pallets for that
particular Room Unit’s display.
ROOM1
ALL
ROOM1
ALL
ROOM2
PATIO1
DOOR1
SETTINGS
ROOM2
PATIO1
DOOR1
SETTINGS
Theme 1
Theme 2
301 Fulling Mill Road, Suite G
ROOM1
ALL
ROOM2
PATIO1
DOOR1
SETTINGS
ROOM2
PATIO1
DOOR1
SETTINGS
Theme 3
Theme 4
©Copyright 2008 by On-Q/Legrand,
Middletown, PA 17057
Inc All Rights Reserved.
(800)-321-2343
www.onqlegrand.com
Page 20
ROOM1
ALL
4. Door Options (Local Settings)
The Door Options are specific only to the selected Door Unit.
Use the arrow buttons to highlight
SETTINGS and press the
TALK/SELECT button.
ROOM1
ALL
Use the arrow buttons to highlight
Door Options and press the
TALK/SELECT button.
SETTINGS
ROOM2
PATIO1
DOOR1
SETTINGS
Unit Names
Reply Options
Room Options
Door Options
Patio Options
Use the arrow buttons to highlight
the Door Unit selection and press the
TALK/SELECT button. The selection
flashes.
DOOR
PATIO OPTIONS
OPTIONS
Select Unit:
DOOR1
BACK
Press TALK/SELECT again to
see the available options.
DOOR
PATIO OPTIONS
OPTIONS
Chime: Chime 14
Volume:
Use the arrow buttons to highlight
a selection and press the TALK/
SELECT button. The selection
Flashes.
Chime Volume:
BACK
Use the arrow buttons to make a
new selection.
When you have decided on a new
selection, press TALK/SELECT to
lock in the new selection.
301 Fulling Mill Road, Suite G
©Copyright 2008 by On-Q/Legrand,
Middletown, PA 17057
Inc All Rights Reserved.
(800)-321-2343
www.onqlegrand.com
Page 21
The first setting “Chime:” determines which of the 20 optional door tones will be
associated with the door button on that particular Door Unit (see Table 1 for a
complete Door Chime Tone list).
The Volume and Chime Volume options allow you to set the default volume levels
for that particular Door Unit.
301 Fulling Mill Road, Suite G
©Copyright 2008 by On-Q/Legrand,
Middletown, PA 17057
Inc All Rights Reserved.
(800)-321-2343
www.onqlegrand.com
Page 22
5. Patio Options (Local Settings)
The Patio Options are specific only to the selected Patio Unit.
Use the arrow buttons to highlight
SETTINGS and press the
TALK/SELECT button.
ROOM1
ALL
ROOM2
PATIO1
DOOR1
SETTINGS
Use the arrow buttons to highlight
Patio Options and press the
TALK/SELECT button.
SETTINGS
Unit Names
Reply Options
Room Options
Door Options
Patio Options
Use the arrow buttons to highlight
the Patio Unit selection and press the
TALK/SELECT button. The selection
flashes.
PATIO OPTIONS
Select Unit:
PATIO1
BACK
Press TALK/SELECT again to
see the available options.
PATIO OPTIONS
Status:
ON
Volume:
Use the arrow buttons to highlight
a selection and press the TALK/
SELECT button. The selection
Flashes.
Chime Volume:
Use the arrow buttons to make a
new selection.
When you have decided on a new
selection, press TALK/SELECT to
lock in the new selection.
PATIO1
PATIO OPTIONS
Chime Volume:
The first setting “Status:” determines whether that Patio Unit
is enabled (ON) or disabled (OFF). This is a handy feature for
disabling the Patio Unit at night or while you are away.
301 Fulling Mill Road, Suite G
©Copyright 2008 by On-Q/Legrand,
Middletown, PA 17057
Inc All Rights Reserved.
(800)-321-2343
www.onqlegrand.com
Page 23
All Call: YES
Monitor: NO
Time Out: 1 Min
BACK
The “Volume:” option determines the default volume level at that particular Patio
Unit.
The “Chime Volume:” option determines the default volume level of Door
Chimes played at that particular Patio Unit when someone pushes the doorbell
button on a Door Unit.
The “All Call:” option enables (YES) or disables (NO) the broadcast Page ability
from that Patio Unit.
The “Monitor:” option enables (YES) or disables (NO) the Monitor button on that
particular Patio Unit.
The “Time Out:” option is used to determine how quickly the Patio Unit button
backlights goes to sleep after inactivity (1 minute – default, 5 minutes, or 10
minutes).
301 Fulling Mill Road, Suite G
©Copyright 2008 by On-Q/Legrand,
Middletown, PA 17057
Inc All Rights Reserved.
(800)-321-2343
www.onqlegrand.com
Page 24