1
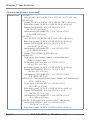
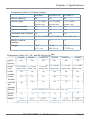
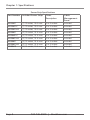
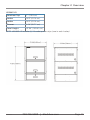
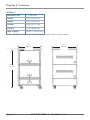
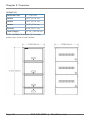
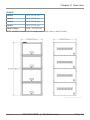
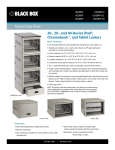
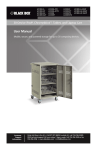
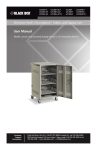
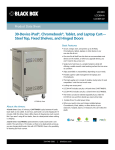
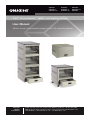
UD10KP UD20KP UD30KP UD10KP-C UD20KP-CUD30KP-LD UD10KP-LD UD20KP-LDUD40KP iPad®, Chromebook™, Tablet, and Laptop Lockers User Manual Mobile, secure, and powered storage for up to 40 computing devices. Customer Support Information Order toll-free in the U.S.: Call 877-877-BBOX (outside U.S. call 724-746-5500) FREE technical support 24 hours a day, 7 days a week: Call 724-746-5500 or fax 724-746-0746 • www.blackbox.com • [email protected] Important Safety Information/Electrical Precautions Important Safety Information WARNING! Death or serious injury may occur when children climb on the Cart. The cart can tip over onto the child. WARNING! Avoid uneven loading of equipment onto the cart. Uneven weight distribution could cause the cart to tip when the cart is moving. Ensure devices are distributed evenly within the cart. Excess weight on sides of cart could cause the cart to tip while in motion. • Only adults should move the cart. • Do not leave the cart unattended in areas where children have access. • Do not block the air vent openings. • The Cart can be very heavy when fully loaded with laptops and should be moved about by persons physically able to do so. • T he Cart should only be used for the storage and transport of tablets, laptops, and other similar devices. •M isuse, incorrect operation, or inadequate repair of the Cart will void the warranty. Electrical Precautions DANGER! Failure to observe the following electrical safety precautions can result in fire or death by electric shock. • The power switch must be in the “OFF” position before plugging the Cart into a wall receptacle. • The Cart must ONLY be connected to a 110–120-volt AC, 15-amp power supply. • The Cart must only be used by adults or with adult supervision. • Never pull the Cart by the power cord. • Do not plug the Cart in if the switch, receptacle(s), or power cord has been damaged. All electrical components on this product must be repaired by a qualified electrician. • Do not use an extension cord in conjunction with the Cart. Page 2 724-746-5500 | blackbox.com UD10KP Electrical Precautions • Do not use liquids in or around the Cart environment. • Inadequate repair or modifications can create significant hazards to users and is not covered by warranty. • F or your safety, we recommend that a qualified electrician test the circuit you will be plugging the Cart into. The circuit should be checked for ground integrity and appropriate branch circuit protection. • T he Cart ground prong must be present for safe operation. If the plug is damaged or if the ground prong has been removed, it should be replaced by a qualified electrician. • The use of the Cart, including plugging or unplugging laptops, plugging or unplugging the Cart, operating the control switch, and engaging or releasing the directional and locked casters, must be done with adult supervision. UD10KP 724-746-5500 | blackbox.com Page 3 Table of Contents Table of Contents 1. Specifications ....................................................................................................... 5 2. Overview.............................................................................................................. 9 2.1 Introduction.......................................................................................... 9 2.2 Features................................................................................................ 9 2.3 What‘s Included ................................................................................... 9 2.4 Hardware Description......................................................................... 13 3. Configuration and Setup ................................................................................... 20 3.1 Attaching the Drawer......................................................................... 20 3.2 Attaching the Casters......................................................................... 21 3.3 Stacking Multiple Lockers................................................................... 22 3.4 Attaching the Laminate Top................................................................ 23 3.5 Installing the Power Bricks and Routing the Cable............................... 23 3.6 Using the Top Cable Management Bar................................................ 25 3.7 Timer Information............................................................................... 26 4. Using Your iPad, Chromebook, Tablet, and Laptop Locker................................ 27 4.1 Charging Your Computers ................................................................. 27 4.2 Moving Your iPad, Chromebook, Tablet, and Laptop Locker ............ 27 Trademarks Used In This Manual Black Box and the Double Diamond logo are registered trademarks of BB Technologies, Inc. Any other trademarks mentioned in this manual are acknowledged to be the property of the trademark owners. Page 4 724-746-5500 | blackbox.com UD10KP Chapter 1: Specifications 1. Specifications Technical Specifications Approvals UL approved power strip Cable Access Each locker has a 1.5" diameter hole on each side Color Gray Construction Steel with vented sides Device Capacity UD10KP, UD10KP-C, UD10KP-LD: 10; UD20KP, UD20KP-C, UD20KP-LD: 20; UD30KP UD30KP-LD: 30; UD40KP: 40 Locking Yes, keyed; Locking front door and rear access panel for easy cable management; NOTE: Both door and panel are keyed the same. Slot Dimensions 10"H x 1.36"W x 15"D (25.4 x 3.45 x 38.1 cm) Power Input: 110–120 VAC, 50–60 Hz, Plug type: 5-15P, Outlet type: 5-15R; Outlet count: UD10KP, UD10KP-C, UD10KP-LD: (12) outlets via (1) 12-outlet power strip, 15 A max., ; UD20KP, UD20KP-C, UD20KP-LD: (24) outlets via (2) 12-outlet power strips, 15 A max., UD30KP, UD30KP-LD: (36) outlets via (3) 12-outlet power strips, 15 A max., UD40KP: (48) outltes via (4) 12-outlet power strips, 15 A max., On/Off switch: Yes UD10KP 724-746-5500 | blackbox.com Page 5 Chapter 1: Specifications Technical Specifications (continued) Dimensions Page 6 UD10KP: Unit (UD10K): 16.2"H x 22.5"W x 24"D (41.1 x 57.2 x 61 cm); UD10KP-LD: Overall: 25.38"H x 23.5"W x 25"D (64.46 x 59.7 x 63.5 cm), Rear access panel: 14.35"H x 19.25"W (36.4 x 48.9 cm), Drawer (UDDRAWER): 8.18"H x 22.5"W x 24"D (20.78 x 57.2 x 61 cm), Laminate top (UDLAMINATE): 1"H x 23.5"W x 25"D (2.5 x 59.9 x 63.5 cm); UD10KP-C: Unit: 29.25"H x 23.50"W x 25"D (74.3 x 59.7 x 63.5 cm), Rear access panel: 14.35"H x 19.25"W (36.4 x 48.9 cm); Drawer (UDDRAWER): 8.18"H x 22.5"W x 24"D (20.78 x 57.2 x 61 cm), Laminate top (UDLAMINATE): 1"H x 23.5"W x 25"D (2.5 x 59.9 x 63.5 cm); Casters (UDCASTERS): 3.75"H (9.5 cm; UD20KP-LD: Total height (two lockers, drawer, and laminate top): 41.58"H (105.61 cm); Locker body (UD10K): 16.2"H x 22.5"W x 24"D (41.14 x 57.2 x 61 cm); Rear access panel: 14.35"H x 19.25"W (36.4 x 48.9 cm); Drawer (UDDRAWER): 8.18"H x 22.5"W x 24"D (20.78 x 57.2 x 61 cm); Laminate top (UDLAMINATE): 1"H x 23.5"W x 25"D (2.5 x 59.9 x 63.5 cm); UD30KP-LD: Total height (three lockers, drawer, and laminate top): 57.78" (146.76 cm); Locker body (UD10K): 16.2"H x 22.5"W x 24"D (41.1 x 57.2 x 61 cm); Rear access panel: 14.35"H x 19.25"W (36.4 x 48.9 cm); Drawer (UDDRAWER): 8.18"H x 22.5"W x 24"D (20.78 x 57.2 x 61 cm); Laminate top (UDLAMINATE): 1"H x 23.5"W x 25"D (2.5 x 59.9 x 63.5 cm); UD40KP: Total height (four lockers): 64.8" (164.59 cm); Locker body (UD10K): 16.2"H x 22.5"W x 24"D (41.14 x 57.2 x 61 cm); Rear access panel: 14.35"H x 19.25"W (36.4 x 48.9 cm) 724-746-5500 | blackbox.com UD10KP Chapter 1: Specifications Comparison Chart: 10-Device Lockers UD10KP UD10KP-LD UD10KP-C Device capacity 10 10 10 Outlet strips (1) 12-outlet power strip (1) 12-outlet power strip (1) 12-outlet power strip Casters included No No Yes Drawer included No Yes Yes Laminate top included No Yes Yes Slot size 10"H x 1.36"W x 15"D (25.4 x 3.45 x 38.1 cm) Shelf or device dividers 11 11 11 Height 16.2" (41.1 cm) 25.38" (64.46 cm) 29.13" (73.99 cm) Comparison Chart: 20-, 30-, and 40-Device Lockers UD20KP UD20KP-C UD20KP-LD UD30KP UD30KP-LD UD40KP 20 20 20 30 30 40 Outlet (2) 12-outlet (2) 12-outlet (2) 12-outlet (3) 12-outlet (3) 12-outlet (4) 12-outlet strips power strips power strips power strips power strips power strips power strips No Device capacity Casters No Yes No No No No Yes Yes No Yes No No Yes Yes No Yes No included Drawer included Laminate top included 10"H x 1.36"W x 15"D (25.4 x 3.45 x 38.1 cm) Slot size Shelf or 22 33 33 44 22 22 32.4" (82.28 cm) 45.33" 41.58" 48.6" 57.78" 64.8" (115.1 cm) (105.61 cm) (123.42 cm) (146.76 cm) (164.59 cm) device Height UD10KP 724-746-5500 | blackbox.com Page 7 Chapter 1: Specifications Power Strip Specifications Part Number Included Power Strips Timer Description Cable Management Panel UD10KP (1) 12-outlet, 15 A max. 2 or 4 outlets Included UD10KP-C (1) 12-outlet, 15 A max. 2 or 4 outlets Included UD10KP-LD (1) 12-outlet, 15 A max. 2 or 4 outlets Included UD20KP (2) 12-outlet, 15 A max. 2 or 4 outlets Included UD20KP-C (2) 12-outlet, 15 A max. 2 or 4 outlets Included UD20KP-LD (2) 12-outlet, 15 A max. 2 or 4 outlets Included UD30KP (3) 12-outlet, 15 A max. 2 or 4 outlets Included UD30KP-LD (3) 12-outlet, 15 A max. 2 or 4 outlets Included UD40KP (4) 12-outlet, 15 A max. 2 or 4 outlets Included Page 8 724-746-5500 | blackbox.com UD10KP Chapter 2: Overview 2. Overview 2.1 Introduction The 10-, 20-, 30-, and 40-Device iPad, Chromebook, Tablet, and Laptop Locker is designed to store, charge, and transport tablets, e-readers, laptops, netbooks, and other similar devices. Part numbers include 1, 2, 3, or 4 lockers with 10 storage slots in each locker that hold devices. Each locker plugs into a typical 120-volt, 15-amp outlet. The locker has locking solid-steel doors. Other options include a drawer that can be used to store peripherals, thumb drives, extra cable and similar items; a lamintate top to use as a work surface; and/or casters. Please read these operating instructions carefully. They contain important advice concerning the use and safety of your cart. This Locker must only be used for its intended purpose in accordance with these operating instructions. 2.2 Features • Store and charge devices safely and securely. • Ideal for classrooms. • Has a locking removable rear access panel for easy cable management. • Each locker holds 10 devices. Dividers keep devices upright and protected from each other. • Warranties: Locker: Guaranteed for life! Power Strips: 3 Years 2.3 What‘s Included UD10KP: • (1) Locker with shelf and cable management panel • (1) 12-outlet PDU • (1) pair of keys for front and rear doors • (4) hex-head bolts • (1) manual UD10KP 724-746-5500 | blackbox.com Page 9 Chapter 2: Overview UD10KP-LD: • (1) Locker with shelf and cable management panel • (1) drawer • (1) laminate top • (1) 12-outlet PDU • (1) pair of keys for front and rear doors • (1) pair of keys for drawer • (6) mounting screws • (1) manual UD10KP-C: • (1) Locker with shelf and cable management panel • (1) drawer • (1) laminate top • (4) casters (2 swiveling/locking, 2 swiveling) • (1) pair of keys for front and rear doors • (1) pair of keys for drawer • (1) 12-outlet PDU • (6) mounting screws • (1) manual UD20KP • (2) Lockers with shelf and cable management panel • (2) 12-outlet PDUs • (2) pairs of keys for front and rear doors • (12) mounting screws • (1) manual Page 10 724-746-5500 | blackbox.com UD10KP Chapter 2: Overview UD20KP-LD: • (2) Lockers with shelf and cable management panel • (1) drawer • (1) laminate top • (2) 12-outlet PDUs • (2) pairs of keys for front and rear doors • (1) pair of keys for drawer • (12) mounting screws • (1) manual UD20KP-C: • (2) Lockers with shelf and cable management panel • (1) drawer • (1) laminate top • (4) casters (2 swiveling/locking, 2 swiveling) • (2) 12-outlet PDUs • (2) pairs of keys for front and rear doors • (1) pair of keys for drawer • (12) mounting screws • (1) manual UD30KP: • (3) Lockers with shelf and cable management panel • (3) 12-outlet PDUs • (3) pairs of keys for front and rear doors • (18) mounting screws • (1) manual UD10KP 724-746-5500 | blackbox.com Page 11 Chapter 2: Overview UD30KP-LD: • (3) Lockers with shelf and cable management panel • (1) drawer • (1) laminate top • (3) 12-outlet PDUs • (3) pairs of keys for front and rear doors • (1) pair of keys for drawer • (18) mounting screws • (1) manual UD40KP: • (4) Lockers with shelf and cable management panel • (4) 12-outlet PDUs • (4) pairs of keys for front and rear doors • (18) mounting screws • (1) manual To download this user manual from the Web site: 1. Go to www.blackbox.com 2. Enter the part number (for example, UD10KP or UD20KP) in the search box: 3. C lick on the “Resources” tab on the product page, and select the document you wish to download. If you have any trouble accessing the Black Box site to download the manual, you can contact our Technical Support at 724-746-5500 or [email protected]. Page 12 724-746-5500 | blackbox.com UD10KP Chapter 2: Overview 2.4 Hardware Description UD10KP Locker 16.2"(41.14 cm) Total Height 16.2"(41.14 cm) NOTE: UD10KP includes (1) 12-outlet power strip. UD10KP-LD Laminate Top 1" (2.54 cm) Locker 16.2"(41.14 cm) Drawer 8.18"(20.77 cm) Total Height 25.38" (64.46 cm) NOTE: UD10KP-LD includes (1) 12-outlet power strip in locker. UD10KP 724-746-5500 | blackbox.com Page 13 Chapter 2: Overview UD10KP-C Laminate Top 1" (2.54 cm) Locker 16.2"(41.14 cm) Drawer 8.18"(20.77 cm) Casters 3.75" (9.52 cm) Total Height 29.13" (73.99 cm) NOTE: UD10KP includes (1) 12-outlet power strip in locker. UD20KP Locker 16.2"(41.14 cm) Locker 16.2"(41.14 cm) Total Height 32.4" (82.28 cm) NOTE: UD20KP includes (2) 12-outlet power strips (one in each Locker). 32.4" (822.8 mm) Page 14 724-746-5500 | blackbox.com UD10KP Chapter 2: Overview UD20KP-LD Laminate Top 1" (2.54 cm) Locker 16.2"(41.14 cm) Locker 16.2"(41.14 cm) Drawer 8.18"(20.77 cm) Total Height 41.58" (105.61 cm) NOTE: UD20KP-LD includes (2) 12-outlet power strips (one in each Locker). UD10KP 724-746-5500 | blackbox.com Page 15 Chapter 2: Overview UD20KP-C Laminate Top 1" (2.54 cm) Locker 16.2"(41.14 cm) Locker 16.2"(41.14 cm) Drawer 8.18"(20.77 cm) Casters 3.75" (9.52 cm) Total Height 45.33" (115.14 cm) NOTE: UD20KP-C includes (2) 12-outlet power strips (one in each Locker). 23.62" (600 mm) 23.62" (600 mm) 45.33" (1151 mm) Page 16 724-746-5500 | blackbox.com UD10KP Chapter 2: Overview UD30KP Locker 16.2"(41.14 cm) Locker 16.2"(41.14 cm) Locker 16.2"(41.14 cm) Total Height 48.6" (123.42 cm) NOTE: UD30KP includes (3) 12-outlet power strips (one in each Locker). 48.6” (1234.2 mm) UD10KP 724-746-5500 | blackbox.com Page 17 Chapter 2: Overview UD30KP-LD Laminate Top 1" (2.54 cm) Locker 16.2"(41.14 cm) Locker 16.2"(41.14 cm) Locker 16.2"(41.14 cm) Drawer 8.18"(20.77 cm) Total Height 57.78" (146.76 cm) NOTE: UD30KP-LD includes (3) 12-outlet power strips (one in each Locker). Page 18 724-746-5500 | blackbox.com UD10KP Chapter 2: Overview UD40KP Locker 16.2"(41.14 cm) Locker 16.2"(41.14 cm) Locker 16.2"(41.14 cm) Locker 16.2"(41.14 cm) Total Height 64.8" (164.59 cm) NOTE: UD40KP includes (4) 12-outlet power strips (one in each Locker). UD10KP 724-746-5500 | blackbox.com Page 19 Chapter 3: Configuration and Setup 3. Configuration and Setup Remove and discard all packaging materials and then lock the lockable casters. Open and inspect the Locker to verify all doors, locks, and casters are working properly. Do not plug the Locker into a wall outlet until all configurations and setup are complete. 3.1 Attaching the Drawer Using the included bolts, attach the drawer to the bottom of the cabinet body. Figure 3-1. Attaching the Drawer. Page 20 724-746-5500 | blackbox.com UD10KP Chapter 3: Configuration and Setup 3.2 Attaching the Casters Using the included hex-head screws and a Phillips screwdriver, attach the casters to the bottom of the cabinet/drawer assembly. Figure 3-2. Attaching the Casters. UD10KP 724-746-5500 | blackbox.com Page 21 Chapter 3: Configuration and Setup 3.3 Stacking Multiple Lockers You can stack up to four lockers without casters or three lockers with casters, Figure 3-3. Stacking Multiple Lockers. Page 22 724-746-5500 | blackbox.com UD10KP Chapter 3: Configuration and Setup 3.4 Attaching the Laminate Top Position the laminate top on the top of the locker cart assembly, and secure with screws and bolts. Figure 3-4. Attaching the Laminate Top. 3.5 Installing the Power Management Bricks on the Removable Cable Management Panel 1. A ttach the wrapped cord and power brick to the back of the shelf using the hook and loop strap. Keep some extra cable unwrapped to plug into the power strip. 2. Loosen the two screws on the cable manager, pull up on the top section of the cable manager, and place the device side of the charging cable into one of the slots. (See Figure 3-5.) Figure 3-5. Attaching the power brick. 3. Replace the top section of the cable manager and tighten the screws. 4. R oute the device side of the charging cable to the front of the cart and repeat step 2 for the front cable manager (see Figure 3-6). UD10KP 724-746-5500 | blackbox.com Page 23 Chapter 3: Configuration and Setup 5. Plug the charger power plug into the power strip located below the shelf. Figure 3-6. Fastening the power brick and routing the cable. Page 24 724-746-5500 | blackbox.com UD10KP Chapter 3: Configuration and Setup 3.6 Using the Top Cable Management Bar Route the device cables through the top cable management bar slots. Figure 3-7. Using the Top Cable Management Bar. UD10KP 724-746-5500 | blackbox.com Page 25 Chapter 3: Configuration and Setup 3.7 Timer Information NOTE: Timer placement differs depending on configuration. Before using your timer: For your safety, we recommend that a qualified electrician test the circuit you will plug the cart into. The circuit should be checked for ground integrity and appropriate branch circuit protection. The cart's ground prong must be present for safe operation. If the plug is damaged or if the ground prong has been removed, the plug should be replaced by a qualified electrician. Using the cart, including plugging it in or unplugging it, plugging in or unplugging the laptop(s) or other electrical equipment, or operating the control switch must be done with adult supervision. The timer comes preset from the factory to alternate power between the power strips at 15-minute intervals. All power strips cannot charge simultaneously. By plugging the cart power cord into an approved outlet and turning on the red switches located on the timer and power strips, the cart will begin charging. To end charging, turn the red switch on the timer off and unplug the cart from the wall outlet. NOTE: The switches on the power strips can be left on. NOTE: A user manual for CARTTIMER1 or UCCTIMER2 is available on the Black Box Web site. To download from the Web site: 1. Go to www.blackbox.com 2. Enter the part number (for example, UCCTIMER2 or CARTTIMER) in the search box: 3. C lick on the “Resources” tab on the product page, and select the document you wish to download. If you have any trouble accessing the Black Box site to download the manual, you can contact our Technical Support at 724-746-5500 or [email protected]. Page 26 724-746-5500 | blackbox.com UD10KP Chapter 4: Using Your iPad, Chromebook, Tablet, and Laptop Locker 4. Using Your iPad, Chromebook, Tablet, and Laptop Locker 4.1 Charging Your Computers • After the devices have been loaded into the Locker, plug the power cord of the Locker into a suitable receptacle. • Locate the internal power switches on the timer and power strips of the Locker and push the switches to the ON position. 4.2 Moving Your iPad, Chromebook, Tablet, and Laptop Locker • Turn the timer power switch to the off position. • Remove the Locker plug from the wall receptacle and wrap the cord around the cord wrap or handle. • Close and secure sliding or solid-steel doors. • If your Locker is equipped with two fixed casters and two locking swivel casters (part numbers , unlock the casters before moving the Locker to a new location. • When you reach your desired destination, lock the casters to prevent the cart from moving and plug the Locker into a wall receptacle. UD10KP 724-746-5500 | blackbox.com Page 27 FCC and IC RFI Information FEDERAL COMMUNICATIONS COMMISSION AND INDUSTRY CANADA RADIO FREQUENCY INTERFERENCE STATEMENTS This equipment generates, uses, and can radiate radio-frequency energy, and if not installed and used properly, that is, in strict accordance with the manufacturer’s instructions, may cause interference to radio communication. It has been tested and found to comply with the limits for a Class A computing device in accordance with the specifications in Subpart B of Part 15 of FCC rules, which are designed to provide reasonable protection against such interference when the equipment is operated in a commercial environment. Operation of this equipment in a residential area is likely to cause interference, in which case the user at his own expense will be required to take whatever measures may be necessary to correct the interference. Changes or modifications not expressly approved by the party responsible for compliance could void the user’s authority to operate the equipment. This digital apparatus does not exceed the Class A limits for radio noise emission from digital apparatus set out in the Radio Interference Regulation of Industry Canada. Le présent appareil numérique n’émet pas de bruits radioélectriques dépassant les limites applicables aux appareils numériques de la classe A prescrites dans le Règlement sur le brouillage radioélectrique publié par Industrie Canada. Page 28 724-746-5500 | blackbox.com UD10KP NOM Statement Normas Oficiales Mexicanas (NOM) Electrical Safety Statement INSTRUCCIONES DE SEGURIDAD 1. Todas las instrucciones de seguridad y operación deberán ser leídas antes de que el aparato eléctrico sea operado. 2. Las instrucciones de seguridad y operación deberán ser guardadas para referencia futura. 3. Todas las advertencias en el aparato eléctrico y en sus instrucciones de operación deben ser respetadas. 4. Todas las instrucciones de operación y uso deben ser seguidas. 5. El aparato eléctrico no deberá ser usado cerca del agua—por ejemplo, cerca de la tina de baño, lavabo, sótano mojado o cerca de una alberca, etc. 6. El aparato eléctrico debe ser usado únicamente con carritos o pedestales que sean recomendados por el fabricante. 7. El aparato eléctrico debe ser montado a la pared o al techo sólo como sea recomendado por el fabricante. 8. Servicio—El usuario no debe intentar dar servicio al equipo eléctrico más allá lo descrito en las instrucciones de operación. Todo otro servicio deberá ser referido a personal de servicio calificado. 9. El aparato eléctrico debe ser situado de tal manera que su posición no interfiera su uso. La colocación del aparato eléctrico sobre una cama, sofá, alfombra o superficie similar puede bloquea la ventilación, no se debe colocar en libreros o gabinetes que impidan el flujo de aire por los orificios de ventilación. 10. El equipo eléctrico deber ser situado fuera del alcance de fuentes de calor como radiadores, registros de calor, estufas u otros aparatos (incluyendo amplificadores) que producen calor. 11. El aparato eléctrico deberá ser connectado a una fuente de poder sólo del tipo descrito en el instructivo de operación, o como se indique en el aparato. UD10KP 724-746-5500 | blackbox.com Page 29 NOM Statement 12. Precaución debe ser tomada de tal manera que la tierra fisica y la polarización del equipo no sea eliminada. 13. Los cables de la fuente de poder deben ser guiados de tal manera que no sean pisados ni pellizcados por objetos colocados sobre o contra ellos, poniendo particular atención a los contactos y receptáculos donde salen del aparato. 14. El equipo eléctrico debe ser limpiado únicamente de acuerdo a las recomendaciones del fabricante. 15. En caso de existir, una antena externa deberá ser localizada lejos de las lineas de energia. 16. El cable de corriente deberá ser desconectado del cuando el equipo no sea usado por un largo periodo de tiempo. 17. Cuidado debe ser tomado de tal manera que objectos liquidos no sean derramados sobre la cubierta u orificios de ventilación. 18. Servicio por personal calificado deberá ser provisto cuando: A: El cable de poder o el contacto ha sido dañado; u B: Objectos han caído o líquido ha sido derramado dentro del aparato; o C: El aparato ha sido expuesto a la lluvia; o D: El aparato parece no operar normalmente o muestra un cambio en su desempeño; o E: El aparato ha sido tirado o su cubierta ha sido dañada. Page 30 724-746-5500 | blackbox.com UD10KP NOTES UD10KP 724-746-5500 | blackbox.com Page 31 Black Box Tech Support: FREE! Live. 24/7. Tech support the way it should be. Great tech support is just 60 seconds away at 724-746-5500 or blackbox.com. About Black Box Black Box Network Services is your source for an extensive range of networking and infrastructure products. You’ll find everything from cabinets and racks and power and surge protection products to media converters and Ethernet switches all supported by free, live 24/7 Tech support available in 60 seconds or less. © Copyright 2015. Black Box Corporation. All rights reserved. UD10KP user manual, version 2 724-746-5500 | blackbox.com