1
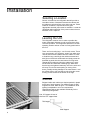
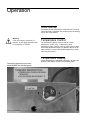
Flammable Materials Storage Refrigerator Model 50FREETSA LT1527X2 Rev. B Table of Contents Safety Information ..............................................................................................................................................3 Alert Signals..................................................................................................................................................3 Unpacking ..........................................................................................................................................................4 Visible Loss or Damage................................................................................................................................4 Concealed Loss or Damage ........................................................................................................................4 Performance Characteristics ..............................................................................................................................5 Temperature Ranges ....................................................................................................................................5 Electrical Requirements................................................................................................................................5 Installation ..........................................................................................................................................................6 Selecting a Location ....................................................................................................................................6 Leveling The Unit ..........................................................................................................................................6 Shelves ........................................................................................................................................................6 Electrical Connection ....................................................................................................................................7 Operation ............................................................................................................................................................8 Initial Startup ................................................................................................................................................8 Temperature Control ....................................................................................................................................8 Temperature Display ....................................................................................................................................8 Material Compatibility ..................................................................................................................................9 Troubleshooting ................................................................................................................................................10 Maintenance......................................................................................................................................................11 Cabinet Cleaning ........................................................................................................................................11 Condenser ..................................................................................................................................................11 Warranty ............................................................................................................................................................12 Safety Information Your satisfaction and safety are important to Thermo Scientific and a complete understanding of this unit is necessary to attain these objectives. As the ultimate user of this apparatus, it is your responsibility to understand its proper function and operational characteristics. This instruction manual should be thoroughly read and all operators given adequate training before attempting to place this unit in service. Awareness of the stated cautions and warnings, and compliance with recommended operating parameters – together with maintenance requirements – are important for safe and satisfactory operation. The unit should be used for its intended application; alterations or modifications will void the Warranty. This product is not intended, nor can it be used, as a sterile or patient connected device. In addition, this apparatus is not designed for use in Class I, II or III locations as defined by the US National Electrical Code, unless otherwise noted. Alert Signals ON OFF (No symbol) Safety Alert Important operating instructions. To reduce the risk of injury or poor performance of the unit. Read the user manual before putting the equipment into operation. WARNING Indicates an immediately hazardous situation, which if not avoided, will result in death or serious injury. CAUTION Indicates an immediately hazardous situation, which if not avoided, may result in minor to moderate injury. CAUTION (Without Safety Alert Symbol) indicates a situation that may result in property damage. Shock Hazard Frost bite/ Low Temperature Use of this equipment involves power supplies which convert line voltage to low voltage power. Do not modify or use power supplies other than OEM equipment. Connection of the power supply may require a properly grounded receptacle. Potential for electrical shock or equipment damage exists if precautions are not followed. Avoid contact with cold freezer surfaces potential for cold burns or skin sticking to cold surfaces. DANGER RISK OF CHILD ENTRAPMENT Before you throw away your old refrigerator or freezer: Take off doors Leave the shelves in the place so that children may not easily climb inside. If the equipment is used in a manner not specified by the manufacturer, the protection provided by the equipment may be impaired. 3 Unpacking Save all packing material if apparatus is received damaged. This merchandise was carefully packed and thoroughly inspected before leaving our factory. Responsibility for its safe delivery was assumed by the carrier upon acceptance of the shipment; therefore, claims for loss or damage sustained in transit must be made upon the carrier by the recipient as follows: Visible Loss or Damage Note any external evidence of loss or damage on the freight bill, or express receipt, and have it signed by the carrier’s agent. Failure to adequately describe such exter-nal evidence of loss or damage may result in the carrier’s refusing to honor your damage claim. The form required to file such a claim will be supplied by the carrier. Concealed Loss or Damage Concealed loss or damage refers to loss or damage, which does not become apparent until the merchandise has been unpacked and inspected. Should either occur, make a written request for the carrier’s agent within 15 days of the delivery date; then file a claim with the carrier since the damage is the carrier’s responsibility. If you follow the above instructions carefully, we will guarantee our full support of your claim to be compensated for loss from concealed damage. DO NOT – FOR ANY REASON – RETURN THIS UNIT WITHOUT FIRST OBTAINING AUTHORIZATION. 4 Performance Characteristics Temperature Ranges 1° to 12°C (34° to 53.6°F) Electrical Requirements 115 Volts ±10%, 60 Hz, 9.1 Amps 5 Installation Selecting a Location Choose a location for the refrigerator that will provide at least three inches of clearance between the cabinet and any adjacent vertical surface at the sides and rear. Twelve inches of clearance is required above the grille. Appropriate electrical power must be available. Locate the refrigerator within eight feet of the power outlet so that no extension cord is required. Leveling the Unit The refrigerator must be level in order to provide adequate condensate drainage as well as proper door alignment and operation. The refrigerator should be in its final operating location and set so that it is firmly positioned on the floor. There are four leveling legs – one for each corner. These legs are packed in the accessory carton from which they must be removed and installed onto the cabinet. In order to install the legs, carefully tip the cabinet rearward and add (4) two inch blocks underneath and simply screw the threaded leg studs into the case bottom front leg holes. Repeat this procedure by tilting the cabinet in the opposite direction and install the remaining legs. Make sure that the legs are tightened extremely well or the entire unit will sway or rock with each opening or closing of the doors, possibly causing damage to the case bottom. Level the cabinet front to rear and side-to-side using the corner leveling screws located at the bottom of the legs. Shelves Shipped inside each cabinet are shelves packed in plastic and a bag of shelf supports. Two different types of shelf supports are used. Refer to figure 1 for installation. Shelf spacing is adjustable to suit user requirements. Replacement shelves are available individually for the Laboratory Refrigerators. Use 1/4” support in front of shelf and 1/2” support here Tab Length Figure 1 6 Shelf Support INSTALLATION Electrical Connection Caution Be sure that the power supply is the same voltage that is specified on the refrigerator’s data plate. Warning For personal safety this unit must be properly grounded. Caution Do not use an extension cord. Use of an ungrounded cord or an overloaded circuit VOIDS the compressor warranty. Warning Do not under any circumstances cut or remove the third (ground) prong from the power cord. Determine the total amount of current presently being used by other apparatus connected to the circuit that will be used by this refrigerator. It is critical that this added current demand and other equipment on this circuit not exceed the rating of the fuse or circuit breaker in use. The frequency and nominal voltage requirements for the unit are specified on the data plate, which is located on the interiors upper left side. Only plug the unit into a power source that meets these requirements. Low line voltage is often the cause of service complaints. With the unit running, check that the line voltage is within ±10% of that specified on the data plate. The power cord of this instrument is equipped with a three prong (grounding) plug (NEMA 5-15P). This plug mates with a standard three prong (grounding) wall recep-tacle (NEMA 5-15R) to minimize the potential of an elec-trical shock hazard. The customer should have the wall receptacle and circuit checked by a qualified electrician to verify the receptacle is properly grounded and is connected to a minimum 15 amp service. Where a two-prong wall receptacle is encountered, it is the personal responsibility and obligation of the user to have it replaced with a properly grounded three-prong receptacle. Do not use a two-prong adapter plug. 7 Operation Initial Startup Turn power on and verify that the condenser fan is running. This model has a condenser fan located on the condensing unit on top of the cabinet. Warning If the unit is tilted in excess of 30 degrees, do not apply electrical power for a minimum of 12 hours. Temperature Control The thermostat is factory set to provide an interior temperature of 38°F (4°C). To adjust the interior temperature, there is a hole in the top of the case to allow access the adjustment screw. For operation above an altitude of 3000 ft., have the thermostat adjusted by a technician. See photo below. Temperature Display Interior temperature is indicated in degrees C by the solar powered LCD display mounted in the header panel. Temperature Adjustment InstructionsModel 50FREETSA FMS Refrigerator 8 OPERATION Material Compatibility The interior cabinet of this unit is constructed of anodized aluminum. Care must be exercised when determining which chemicals may be stored in the refrigerator and freezer sections and which type of storage materials should be employed. ABS Plastic deteriorates when exposed to, but not limited to, the following: Aliphatic Hydrocarbons; Aromatic Hydrocarbons; Fully and Partially Halogenated Hydrocarbons; Alcohols Monohydric; Phenols; Ketones; Esters; Ethers; Organic Acids (concentrates and dilute); and Concentrated Oxidizing Acids. This information is taken from Plastics Edition 8 Thermoplastics and Thermosets published by D.A.T.A. and The International Plastics Selector, Inc. Cordura Companies 9889 Willow Creek Road P.O. Box 26637 San Diego, California 92126 Aluminum Alloys are susceptible to corrosion when exposed to but not limited to most inorganic acids, bases and salts with a pH outside of their passive range of pH 4 to 9. It is also important to recognize that the compatibility of aluminum alloys with mixtures of organic compounds cannot always be predicted from their compatibility with each of the compounds. For example, some aluminum alloys are corroded severely in mixtures of carbon tetrachloride and methyl alcohol, even though they are resistant to each compound alone. This information is taken from Corrosion and Corrosion Protection Handbook Second Edition Published by Marcel Dekker, Inc. 270 Madison Ave. New York, NY 10016 9 Troubleshooting This table is intended to assist in resolving user-correctable Refrigerator problems by relating symptoms to their likely causes. If service beyond the scope of this table is required, contact Customer Service at 1-800-438-4851. Symptom Does Not Run Probable Cause Unit Unplugged Action Plug in Unit Blown fuse or tripped circuit breaker Check fuse or circuit breaker at breaker box Runs Continuously Frost buildup on refrigeration coils Defrost unit Clicking Sound The compressor is equipped with a thermal protector. This device shuts off the compressor when it becomes too hot. A clicking sound occurring about every 30 seconds indicates this protector is working Disconnect power and call for service. Insufficient Cooling Thermostat set too high Reduce thermostat setting Condenser coil dirty Clean condenser coil with a vacuum cleaner Unit frosted Defrost unit 10 Maintenance Warning When servicing the unit, disconnect from the electrical power source. Caution Do not use any type of abrasive such as steel wool, or fluids such as gasoline, Naphtha, and thinner. These materials could be harmful to aluminum, plastic materials, door gasket, and painted surfaces. Cabinet Cleaning The cabinet interior should be cleaned frequently. Any spilled liquid should be wiped off immediately. Stains resulting from some spills can be permanent if not quickly removed. The most convenient time to clean the interior is after defrosting. The cabinet exterior should be cleaned occasionally. A mild detergent and lukewarm water or a solution of bicarbonate of soda (1 tablespoon per gallon of water) is recommended for cleaning the interior and exterior of the cabinet. All surfaces should be rinsed and thoroughly dried. Condenser The condenser coil is located behind the header panel. This should be cleaned at least once a year. Disconnect the refrigerator’s electrical power. Remove the header panel and vacuum the condenser coil to remove any dirt build-up that may have accumulated there. 11 One Year Limited Warranty This Thermo Scientific product is warranted to be free of defects in materials and workmanship for one (1) year from the first to occur of (i) the date the product is sold by the manufacturer or (ii) the date the product is purchased by the original retail customer (the “Commencement Date”). Except as expressly stated above, the MANUFACTURER MAKES NO OTHER WARRANTY, EXPRESSED OR IMPLIED, WITH RESPECT TO THE PRODUCTS AND EXPRESSLY DISCLAIMS ANY AND ALL WARRANTIES, INCLUDING BUT NOT LIMITED TO, WARRANTIES OF DESIGN, MERCHANT ABILITY AND FITNESS FOR A PARTICULAR PURPOSE. An authorized representative of the manufacturer must perform all warranty inspections. In the event of a defect covered by the warranty, we shall, as our sole obligation and exclusive remedy, provide free replacement parts to remedy the defective product. In addition, for products sold within the continental United States or Canada, the manufacturer shall provide free labor to repair the products with the replacement parts, but only for a period of ninety (90) days from the Commencement Date. The warranty provided hereunder shall be null and void and without further force or effect if there is any (i) repair made to the product by a party other than the manufacturer or its duly authorized service representative, (ii) misuse (including use inconsistent with written operating instructions for the product), mishandling, contamination, overheating, modification or alteration of the product by any customer or third party or (iii) use of replacement parts that are obtained from a party who is not an authorized dealer of Thermo Scientific products. Heating elements, because of their susceptibility to overheating and contamination, must be returned to the factory and if, upon inspection, it is concluded that failure is due to factors other than excessive high temperature or contamination, the manufacturer will provide warranty replacement. As a condition to the return of any product, or any constituent part thereof, to the factory, it shall be sent prepaid and a prior written authorization from the manufacturer assigning a Return Materials Number to the product or part shall be obtained. IN NO EVENT SHALL THE MANUFACTURER BE LIABLE TO ANY PARTY FOR ANY DIRECT, INDIRECT, SPECIAL, INCIDENTAL, OR CONSEQUENTIAL DAMAGES, OR FOR ANY DAMAGES RESULTING FROM LOSS OF USE OR PROFITS, ANTICIPATED OR OTHERWISE, ARISING OUT OF OR IN CONNECTION WITH THE SALE, USE OR PERFORMANCE OF ANY PRODUCTS, WHETHER SUCH CLAIM IS BASED ON CONTRACT, TORT (INCLUDING NEGLIGENCE), ANY THEORY OF STRICT LIABILITY OR REGULATORY ACTION. Web: www.thermofisher.com