1
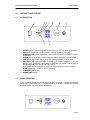
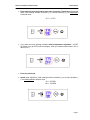
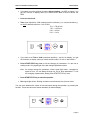
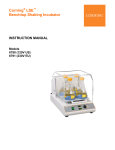
222DS Benchtop Shaking Incubator User Manual I-5222-DS I-5222-D-230V BENCHTOP SHAKING INCUBATOR 222DS USER'S MANUAL TABLE OF CONTENTS Page 1.0. GENERAL INFORMATION 1.1 DEFINITION 1.2 KEY FEATURES 3 3 3 2.0. TECHNICAL DESCRIPTION 2.1 CONSTRUCTION 3 3 3.0 INSTALLATION 3.1 UNPACKING 3.2 SELECTING THE RIGHT PLACE 3.3 ATTACHING POWER CORD 3.4 ATTACHING SHAKER PLATFORMS 3.5 STARTING UP 3.5.1 STARTING UP CHECK LIST 3.6 GENERAL SAFETY RECOMMENDATIONS 4 4 4 5 5 5 5 5 4.0 INSTRUCTION FOR USE 4.1 INTRODUCTION 4.2 BASIC OPERATIONS 4.3 CHANGING PARAMETERS DURING OPERATION 4.4 SHAKING WITHOUT HEATING 4.5 HEATING WITHOUT SHAKING 6 6 7 9 10 10 5.0 TROUBLESHOOTING 5.1 ERRORS 5.2 DESCRIPTION OF POSSIBLE ERRORS 10 10 11 6.0 TECHNICAL SPECIFICATION 6.1 TECHNICAL DATA 11 11 7.0 TEMPERATURE RE-ADJUSTMENT 12 8.0 MAINTENANCE AND CLEANING INSTRUCTIONS 8.1 CLEANING OF THE WORKING CHAMBER (PAINTED STEEL) 8.2 MAINTENANCE AND CLEANING OF THE PMMA (ACRYLIC) LID 12 12 12 9.0 POSITIONING OF ATTACHMENTS ON SHAKING PLATFORM 14 Page 2 BENCHTOP SHAKING INCUBATOR 222DS 1.0 GENERAL INFORMATION 1.1 DEFINITION USER'S MANUAL 222DS BENCHTOP SHAKING INCUBATOR is a combination product of a shaker and a temperature chamber, designed for shaking and heat treatment of sensitive samples. It replaces two devices, reduces time and space needed. It is very suitable for biochemistry, microbiology and medicine laboratories in which thermal and shaking treatment of samples is a daily used routine. 1.2 KEY FEATURES - High temperature working range. - Large environment temperature range - you can use device also in cold rooms. - Digital readout of all parameters - you can read temporary or preset RPM, temperature, time, acceleration, when device is running or when it is in stand-by mode. - You can change parameter values while the device is running (except timer). - Last parameter values reside in the memory even if the device was switched off. - Precisely adjusted and maintained temperature regulation within 0.5°C of absolute deviation from the set temperature in device working area. - Incorporated HOLD and STEP time function with 1 minute resolution. - Special parallel temperature protection for your safety. - Error number combined indication of possible errors. - Easy interchangeable platforms. - Lid sensor. 2.0 TECHNICAL DESCRIPTION 2.1 CONSTRUCTION The casing of BENCTOP SHAKING INCUBATOR is made of steel plate, varnished with high resistant polyurethane lacquer. Temperature chamber lid is made of PMMA, which is resistant to the temperatures up to 90°C. Basic equipment consists of independent shaking device and temperature chamber. Both sections are driven and regulated via microcontroller driven electronics, which also controls all necessary sensors for motor speed, temperature, lid, temperature safety fuse, time and self diagnostics error levels in variety of margin situations. Page 3 BENCHTOP SHAKING INCUBATOR 222DS 3.0 INSTALLATION 3.1 UNPACKING USER'S MANUAL Before starting the installation, carefully examine the delivery for possible damage or missing parts: - - - Open the box and lift the device, together with the shock absorbers, out of the box. Remove the shock absorbers and check that the machine has not been visibly damaged during the transportation. Keep the packing material until you are sure that the machine functions properly. Check the information on the name plate on the rear side of the machine: Type Serial number Article number Check that the mains cord has a pin configuration that fits into a wall socket according to the local standard. If any kind of damage occurred during transportation, immediately make a complaint to the carrier. Any incorrect delivery or missing parts should be reported to the distributor. 3.2 SELECTING THE RIGHT PLACE When selecting the right place for device, please consider the following: - - Put the device on a smooth, horizontal and stable place. Leave enough space on the back side of the device for normal air circulation. Leave enough space around the device, that you will easy control and maintain it. Don’t use the device in surroundings, where there are fast temperature and humidity changes. Please avoid also such places, which are under direct access of sunlight or places nearby heat producing devices. Avoid such places, where the possibility of shocks and vibrations exists. Do not use the device in inflammable or explosive atmosphere! Note: The equipment shall be placed so that it is not difficult to pull out a cord plug from mains receptacle. Page 4 BENCHTOP SHAKING INCUBATOR 222DS 3.3 USER'S MANUAL ATTACHING POWER CORD Fit the mains cord, which is included in the delivery, into the mains receptacle. Connect the other end of the cord to a grounded wall socket. 3.4 ATTACHING SHAKING PLATFORMS The SHAKING INCUBATOR has a variety of platforms available, to meet most of the shaking needs. These platforms mount to the shakers via four mounting platforms which easily plug into four rubber mounting points on the top of the shaking incubator. 3.5 STARTING UP 3.5.1 STARTING UP CHECK LIST - 3.6 Unpack and place the device as specified in previous paragraphs. Open the lid and fix shaking platform with test samples on the plate. Close the lid cover. Switch on the device by the ON/OFF switch on the front panel. Light in the switch indicates that the power is on. Check all the parameters and set new parameters values if necessary. Please refer to procedures described in next chapters. GENERAL SAFETY RECOMMENDATIONS Before any installation read this User’s Manual. - Before cleaning disconnect the device from mains power supply. Device could be cleaned with a soft, lightly wet cloth. Don’t use cleaners or liquids on aerosol basis. Do not use the device nearby water sources. Take care, that water will not drop in the device; especially by cleaning procedures. Do not use device in aggressive atmosphere. NOTE: In case that device is not functioning properly, even if you have exactly followed instructions described in User’s Manual, you are allowed to use only those commands and procedures, which are allowed by User’s Manual. Use of any other commands and procedure’s adjustments could result in device destruction or longer service repair time. If the equipment is used in a manner not specified by the manufacturer, the protection provided by the equipment may be impaired. Do not shake inflammable or explosive samples! Page 5 BENCHTOP SHAKING INCUBATOR 222DS 4.0 INSTRUCTIONS FOR USE 4.1 INTRODUCTION USER'S MANUAL POWER 1. POWER switch - switch ON (power switch shines) or OFF the shaking incubator. 2. RUN green signal light - shines when the shaking incubator is running. 3. TEMPERATURE yellow signal light - shines when the shaking incubator is set on temperature. 4. SPEED yellow signal light - shines when the shaking incubator is set on speed. 5. TIME yellow signal light - shines when the shaking incubator is set on time. 6. ENCODER - with rotating encoder clockwise (+) or counter-clockwise (-), you can change Time, Speed and Temperature on the shaking incubator. Push encoder to change between Time, Speed and Temperature. If you rotate encoder knob fast, the value on display goes up or down quickly. 7. START/STOP key - START or STOP operating. 8. TEMPERATURE display. 9. SPEED/TIME display. 4.2 BASIC OPERATION Press POWER switch on control panel. Shaking incubator automatically detects power supply frequency F50 or F60 and shows it on display. Likewise the shaking incubator is then set to last saved parameters. POWER Page 6 BENCHTOP SHAKING INCUBATOR 222DS USER'S MANUAL Press and hold encoder knob for more than 2 seconds. Temperature signal light blinks. With rotating encoder clockwise (+) or counter-clockwise (-), set temperature to desired value: 37.5 37.5°C POWER If you want to use the shaking incubator without temperature regulation - set OFF on display. You get OFF function on display, when you rotate encoder under 0.0°C or above 70.0°C. POWER Press encoder knob. Speed signal light blinks. With rotating encoder clockwise (+) or counter-clockwise (), set rotating speed to desired value: 34 34 RPM 120 120 RPM POWER Page 7 BENCHTOP SHAKING INCUBATOR 222DS USER'S MANUAL If you want to use the shaking incubator without shaking - set OFF on display. You get OFF function on display, when you rotate encoder under 20 RPM or above 300 RPM. Press encoder knob. Time signal light blinks. With rotating encoder clockwise (+) or counter-clockwise (-), set time to desired value from 1 min to 99 h: 70.3 70h 30 min 1.55 1h 55 min 0.43 43 min 0.01 1 min POWER If you want to set Time to hold (continued operation) - set HLd on display. You get HLd function on display, when you rotate encoder under 0.01 min or above 99.0 h. Press START/STOP key once to exit the changing of parameters. You are now in starting mode. Only signal light of the last changed parameter shines. Note: You always change the parameter, whose signal light blinks - temperature, speed or time. You can always change one, two or three parameters. To exit the changing of parameters, always press START/STOP key once. Press START/STOP key to start the operation. Run signal light shines. Shaking incubator counts down the time from set value. You can move between the values of time and speed during the operation, by pressing the encoder. These two values are shown alternately on bottom display. POWER Page 8 BENCHTOP SHAKING INCUBATOR 222DS 4.3 USER'S MANUAL CHANGING PARAMETERS DURING OPERATION Note: You can not modify time during operation. If you want to change Temperature during operation, press and hold encoder knob for more than 2 sec. Temperature signal light blinks. Rotate encoder clockwise (+) or counter-clockwise (-), to set the desired value. In the meantime, temperature signal light pulses. When you set the new value, press START/STOP key only ONCE. Shaking incubator goes back to working parameters. If you want to change Speed during operation, press and hold encoder knob for more than 2 sec. If shaking incubator is not set on speed (speed signal light is not blinking), press encoder - speed signal light must blink. Rotate encoder clockwise (+) or counter-clockwise (-), to set the desired value. In the meantime speed signal light pulses. When you set new value, press START/STOP key only ONCE. Shaking incubator goes back to working parameters. When time elapses or you press START/STOP key again, message End appears on display and Run signal light pulses. When shaking incubator completely stops, it places itself to last used values for Time, Speed and Temperature. If you lift the lid during operation, shaking incubator stops immediately and message Opn Lid appears on displays. When you close the lid again, shaking incubator starts operating automatically. If there is a power cut during operation, shaking incubator will restart automatically, as soon as the electricity returns. Display will be flashing (warning you that the power was cut). You can turn the flashing off, by pressing the encoder knob. 4.4 SHAKING WITHOUT HEATING 4.5 HEATING WITHOUT SHAKING 5.0 If you want to shake the samples without heating them, set Temperature to OFF. If you want to heat the samples without shaking them, set Speed to OFF. TROUBLESHOOTING 5.1 ERRORS Built-in self-checking procedures are constantly checking device’s vital functions that are necessary for safe and reliable operation. Error number appears on display when such error occurs. Sample of Error display: Page 9 BENCHTOP SHAKING INCUBATOR 222DS 5.2 USER'S MANUAL DESCRIPTION OF POSSIBLE ERRORS E 11: This error message appears, when something is wrong with motor regulation (PWM regulator, pulse generator, motor). Shaking incubator is automatically stopped. Call nearest service. E 12: This error appears, when the motor does not reach set speed in 30 seconds. Shaking incubator is automatically stopped. Call nearest service. E 13: This error appears, when set speed oscillates for more than 100 RPM in 2 seconds. Shaking incubator is automatically stopped. Call nearest service. E 21: Temperature sensor does not work properly regarding to heater. Shaking incubator is automatically stopped. Call nearest service. E 22: Temperature sensor notices 5°C higher temperature than set temperature. Shaking incubator is automatically stopped. Call nearest service. E 23: Set temperature is not reached in 2 hours. Shaking incubator is automatically stopped. Call nearest service. 6.0 TECHNICAL SPECIFICATIONS 6.1 TECHNICAL DATA Heater power Fan power Shaking motor power Fuse Environment temperature Relative humidity Speed RPM regulation Shaking orbit Temperature operating range Temperature sensor Temperature accuracy Temperature stability Timer Capacity Dimensions W x D x H Weight Overvoltage category 700 W 17 W 35 W 2 x 3.15A 250V 2 x 6.3A 115V 4°C to 65°C Up to 85%, non condensing Digital, load independent, from 20 to 300 RPM in 1 RPM steps 19 mm 5°C above room temperature to 70.0°C PT100 ±0.5°C ±0.5°C 1 min - 99 hours, timer HOLD function 16 x 125 ml, 9 x 250 ml, 5 x 500 ml, 4 x 1000 ml 370 mm x 530 mm x 400 mm 20.2 kg Installation category I Page 10 BENCHTOP SHAKING INCUBATOR 222DS 7.0 USER'S MANUAL TEMPERATURE RE-ADJUSTMENT Shaking incubator has a software for temperature re-adjustment. First you have to measure the temperature in the middle of the chamber, or even better in the sample, for minimum 2 hours. You have to measure the temperature with a calibrated digital temperature thermometer, with precision 0.1°C or more. After 2 hours or more, read the temperature on thermometer and compare it with the temperature on display of the shaking incubator. The difference between the temperatures on thermometer and display is the value, which you enter in the software. Example 1: Temp. on thermometer is 37.9°C, temp. on display is 37°C. Difference is 37.9 - 37 = 0.9. Value is 0.9 (which you enter in the software). Example 2: Temp. on thermometer is 36.2°C, temp. on display is 37°C. Difference is 36.2 - 37 = -0.8. Value is -0.8 (which you enter in the software). Procedure for temperature calibration: Press and hold encoder knob for more than 5 seconds - message Cor (correction) appears on display. Press encoder knob once to enter the value setting procedure and set the value with rotating encoder counter-clockwise or clockwise (see Example 1 or Example 2). Pay attention to the sign of the value (plus or minus). When you set the value, press encoder knob again. Press START/STOP key to finish the temperature re-adjustment. Note: Temperature re-adjustment procedure is only for qualified technical persons. 8.0 MAINTENANCE AND CLEANING INSTRUCTIONS 8.1 CLEANING OF THE WORKING CHAMBER (PAINTED STEEL) Working chamber should be cleaned regularly. Every spilt sample inside the chamber must be immediately wiped. You can only use mild cleaning solutions. Usage of aggressive or abrasive cleaners is not allowed. For decontamination use cleaners with neutral Ph. Stainless steel platform can be decontaminated with autoclave (120°C). 8.2 MAINTENANCE AND CLEANING OF THE PMMA (ACRYLIC) LID Maintenance: Acrylic glass is sensitive to scratching. For cleaning, use only non-aggressive liquid detergents and non-solids. Do not use the hard sponge, but only a soft cloth. Grease and oil can be cleaned with hexane, petroleum or other chemicals with the aromatic base. Page 11 BENCHTOP SHAKING INCUBATOR 222DS USER'S MANUAL Cleaning: • For cleaning the lid, do not use the cleaners, which could damage the surface! Do not use: acetone, benzene, paint thinner, carbon tetrachloride or other aggressive liquids, because they can damage the surface of acrylic lid. • Do not use detergents containing ketones, esters and aromatics. • Do not use cleaners with solid and abrasive particles. • Do not use polishes. • Never clean the surface with detergent for cleaning nail polish (containing acetone or other solvents) or with cleaning products for chemical cleaning, paint thinner, gasoline and similar. Avoid any contact with these chemicals. • Do not use detergents with high levels of alcohol. • It is the best to use 2% aqueous solution of non-aggressive cleaning products (dishwashing detergent). • Wipe the surface with a lightly damp soft cloth. • Remove dust and dirt with dry soft cloth. Take care when cleaning the device after operating, especially when you have used the device at temperatures higher than 60°C. In such condition never touch the platform, because it can be very hot. Before you begin cleaning the device, unplug mains cord from power supply socket. Before using any other cleaning or decontamination methods, except those recommended by the manufacturer, you should check with the manufacturer, that the proposed method would not damage the equipment. Page 12 BENCHTOP SHAKING INCUBATOR 222DS 9.0 USER'S MANUAL POSITIONING OF ATTACHMENTS ON SHAKING PLATFORM You can mount different attachments on shaking platform. Follow below diagram as a guideline for positioning different flasks and accessories. EQUIPMENT DISPOSAL This equipment is marked with the crossed out wheeled bin symbol to indicate that this equipment must not be disposed of with unsorted waste. Instead it’s your responsibility to correctly dispose of your equipment at lifecycle-end by handing it over to an authorized facility for separate collection and recycling. It’s also you responsibility to decontaminate the equipment in case of biological, chemical and/or radiological contamination, so as to protect from health hazards the persons involved in the disposal and recycling of the equipment. For more information about where you can drop off your waste equipment, please contact your local dealer from whom you originally purchased this equipment. By doing so, you will help to conserve natural and environmental resources and you will ensure that your equipment is recycled in a manner that protects human health. Thank you Page 13 Declaration of Conformity Number: CE 00701 Labnet International, Inc,., 31 Mayfield Ave., Edison, NJ 08837 USA Labnet International declares that the devices described below are in conformity with the EC directives listed. In the event of unauthorized modification of any of the devices listed below, this declaration becomes invalid. Device Name: Benchtop Shaking Incubator 222DS Device Models Numbers: I-5222-DS I-5222-DS-230V Relevant EC Directives: Low Voltage Directive 2006/95/EC Machinery Directive 2006/42/EC EMC Directive 2004/108/EC WEEE 2002/96/EC Harmonized Standards: Date: EN ISO 12100-2 EN 61010-1 EN 61010-2-010 EN 61010-2-051 EN 55011 EN 55014-1 EN 55014-2 EN55022 EN 61000-3-2 EN 61000-3-3 EN 61000-6-2 EN 61326-1 May 5, 2012 ______________________________ Ira Augenzucker Product Line Manager LIMITED WARRANTY Labnet International, Inc. warrants that this product will be free from defects in material and workmanship for a period of two (2) yeasr from date of purchase. This warranty is valid only if the product is used for its intended purpose and within the guidelines specified in the supplied instruction manual. Should this product require service, contact Labnet International, Inc.’s Service department at 732-417-0700 to receive a return authorization number and shipping instructions. Products received without proper authorization will be returned. All items returned for service should be sent postage prepaid in the original packaging or other suitable carton, padded to avoid damage. Labnet International, Inc. will not be responsible for damage incurred by improper packaging. Labnet International, Inc. may elect for onsite service for larger equipment. This warranty does not cover damage caused by accident, neglect, misuse, improper service, natural forces or other causes not arising from defects in original material or workmanship. This warranty does not cover motor brushes, fuses, light bulbs, batteries or damage to paint or finish. Claims for transit damage should be filed with the transportation carrier. ALL WARRANTIES INCLUDING THE IMPLIED WARRANTY OF MERCHANTABILITY AND FITNESS FOR A PARTICULAR PURPOSE ARE LIMITED IN DURATION OF 24 MONTHS FROM THE ORIGINAL DATE OF PURCHASE. LABNET INTERNATIONAL, INC.’S SOLE OBLIGATION UNDER THIS WARRANTY IS LIMITED TO THE REPAIR OR REPLACEMENT, AT LABNET INTERNATIONAL, INC. DISCRETION, OF A DEFECTIVE PRODUCT. LABNET INTERNATIONAL, INC. IS NOT LIABLE FOR INCIDENTAL OR CONSEQUENTIAL DAMAGE, COMMERCIAL LOSS OR ANY OTHER DAMAGES RESULTING FROM THE USE OF THIS PRODUCT. Some states do not allow limitation on the length of implied warranties or the exclusion or limitation of incidental or consequential damages. This warranty gives you specific legal rights. You may have other rights which vary from state to state. No individual may accept for, or on behalf of Labnet International, Inc., any other obligation of liability, or extend the period of this warranty. Mail Warranty Registration to : or Labnet International, Inc. 31 Mayfield Ave. Edison, NJ 08837 Register online at www.labnetinternational.com cut along the dotted line To validate the warranty, complete and return this card within 10 days. Model ____________________________________________________________________________ Serial No. ______________________________ Date Tested________________________________ Date Rec’d _____________________________ PO#______________________________________ Name/Title ________________________________________________________________________ Phone ___________________________________________________________________________ Institution _________________________________________________________________________ Address __________________________________________________________________________ City ______________ State _____ Zip/Postal Code ____________ Country __________________ Purchased from (distributor) __________________________________________________________ How would you rate the quality of this product? Excellent Good Fair Poor What feature(s) on this product made you purchase it? ____________________________________ What feature(s) would you change to improve the performance of this product? __________________ _________________________________________________________________________________ 31 Mayfield Avenue. Edison.NJ.08837 (p) 732.417.0700 (f) 732.417.1750)