1
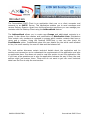
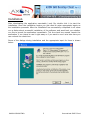
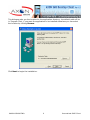
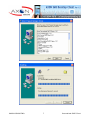
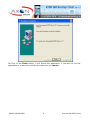
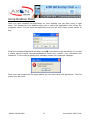
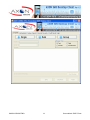
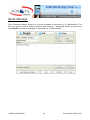
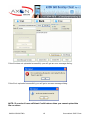
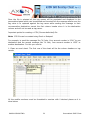
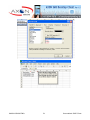
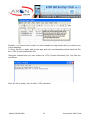
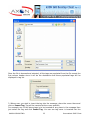
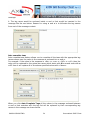
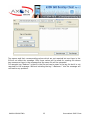
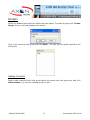
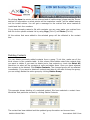
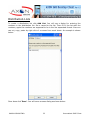
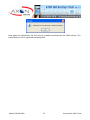
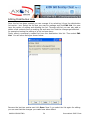
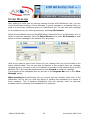
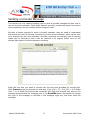
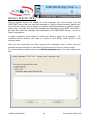
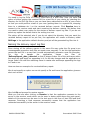
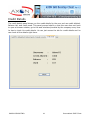
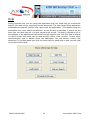
Axon Personalised SMPP Client
User Manual
Version: 1.0
Date: 16 – 09 - 2009
©AXON CONSULTING
1
Personalised SMPP Client
Table of Contents
Sr. No.
Topics
Page No.
1
Introduction
3
2
Requirements
4
3
Installation
5
4
Post – Installation
9
5
5.1
Using Desktop Client
Single Message
10
14
5.2
Quick Message
16
5.3
Bulk Message
17
5.4
Personalised Message
19
5.5
Address Book
26
5.5.1
Groups
27
5.5.2
Distribution Lists
32
5.6
Group Message
36
5.7
Sending a Unicode Message
37
5.8
Delivery Reports
38
5.9
Credit Details
41
Help
42
5.10
©AXON CONSULTING
2
Personalised SMPP Client
Introduction
The Personalised SMPP Client is an application that runs on a client computer and
connects to an SMPP* Server. This application enables you to send messages and
receive Delivery Reports. Apart from the send/receive provisions you can manage your
contacts with the Desktop Client using the AddressBook feature.
The AddressBook allows you to create new Groups and add/upload contacts to a
group. It also allows the creation and modification of Distribution Lists. Distribution
Lists contain only numbers as opposed to groups which contain contacts that have a
name and a number. Using the Desktop SMPPClient a user can also check his
CreditDetails online. CreditDetails show the user details like the initial credit allotted
to him, the credit used by the user till date and the balance left.
The next section discusses certain technical details about the application and its
working environment so as to understand the requirements of the application and also
to appreciate them. One does not need to read this section to use this application. But
if you have a few questions as to why the application behaves the way it does, the next
section might just answer them. Those who do not want to get into much technical
detail can feel free to skip the next section.
©AXON CONSULTING
3
Personalised SMPP Client
Requirements
Protocols and Network connection
The application works on the Short-Message-Peer-To-Peer (SMPP) Protocol. SMPP
Protocol allows an ESME (External Short Messaging Entity) to communicate with a
SMSC (Short Message Service Centre). The SMPP Protocol defines PDUs (Protocol Data
Units) for the entities to communicate with each other. The SMPPClient acting as an
ESME sends PDUs to the SMPP Server or SMSC to connect, send messages,
disconnect, receive delivery reports of send messages etc. During sending a batch of
messages the application needs to be connected to the server all the time. If it
disconnects in-between then the sending might stop immediately and to start again
the user might have to enter all the parameters again. The application even needs to
send and receive PDUs just to stay connected to the server. And a non-active Internet
connection, or a connection that keeps dropping, might pose problems in the proper
functioning of the application.
In such regard one of the core requirements for the application to work appropriately
is an active Internet connection at all times.
Operating Systems
Windows
The application runs on Microsoft Windows XP. (Other editions not tested).
Other Systems
The application also runs on Linux-based systems but is not thoroughly tested on such
systems. Also User Interface generated on such systems might be inappropriate. No
support or help would be available for running the application on such systems. Also
no guarantees and assurances about the proper working of the application on these
systems would be offered.
Runtime Environment
The application would require Java Runtime Environment 1.6.0. to be installed on your
system. But incase you don’t have this software installed on your system or have a
lower version of it; the application will download and install the software for you.
Note: For download and installation you would require an active network connection.
©AXON CONSULTING
4
Personalised SMPP Client
Installation
After downloading the application executable (.exe) file, double click it to start the
installation. Once the installation begins you just need to enter appropriate inputs as
the installation proceeds. After the installation has successfully completed it will show
you a dialog about successful installation of the software and would ask you whether
you like to launch the application immediately. Tick the check box named 'Launch the
application' if you intend to use it right away or if you want to use it at a later time you
can uncheck the check-box.
Some of the dialogs during installation and the appropriate input for them is shown
below:
©AXON CONSULTING
5
Personalised SMPP Client
This dialogue asks you the location for the application directory, the default path will be
in 'Program Files', if you want the application to be installed elsewhere you can select
the location by clicking Browse.
Click Next to begin the installation.
©AXON CONSULTING
6
Personalised SMPP Client
©AXON CONSULTING
7
Personalised SMPP Client
On Click of the Finish button, it will launch the application, if you wish to run the
application at a later time uncheck the check-box for Launch.
©AXON CONSULTING
8
Personalised SMPP Client
Post Installation
The installer will register short-cuts in three places on your desktop
1. Under the Programs Menu.
2. Top of Start Menu.
3. On your Desktop.
You can use any of these shortcuts to start the application at a later time.
First Run
When you run the application for the first time after installation, the application will
install the Java Runtime Environment (JRE) if you do not already have it and if you
have downloaded the JRE Embedded pack. As stated in the requirements section this
is one of the must requirements that the application cannot run without. The
application will inform you before installing the JRE through a dialog. If you have a
non-JRE Embedded pack it will redirect you to the page where you could find the
latest JRE.
©AXON CONSULTING
9
Personalised SMPP Client
Using Desktop Client
Once you have installed the application on your desktop you can start using it right
away. Just double-click the desktop short-cut or select the application from under the
programs menu. This will start the application and you will see a login screen similar to
this:
Enter the Username/Password and then click OK to proceed to the application. If you get
a dialog saying Invalid Username/Password check and re-enter your Username and
Password. If you continue getting this message contact your business manager.
Once you have entered all the login details you can start using the application. The first
screen you will see is
©AXON CONSULTING
10
Personalised SMPP Client
©AXON CONSULTING
11
Personalised SMPP Client
There is one main panel that allows you to access the different features of the
application. On the main panel you can see various tabs allowing you access to those
features of the application. The current selection or the default tab is for send messages.
©AXON CONSULTING
12
Personalised SMPP Client
SendSMS Panel
Here you can select whether to send a single, Bulk or a Group Message. To send
message through either of the message sending options click on the corresponding
button, and enter the parameters for that type of message. You can cut and paste text
in the message box. Once you have written a message but you wish to send the
message at any other time then you can save the message.
©AXON CONSULTING
13
Personalised SMPP Client
Single SMS
To send a single message click on the Single button and you can see the single options
as below:
Enter the details for the message according to the guidelines as shown below.
This panel allows you to set the type of the message. Set it to of your current message.
©AXON CONSULTING
14
Personalised SMPP Client
NOTE: The sender ID should not be longer than 11 characters if the sender is
alphanumeric.
If you wish to send the message any other time then you can just save the message
content in a (.txt) file by clicking the “Save Message” button which will open a save file
dialog to save the message into (.txt) file where ever you want to save the file and
import the same message from the file and use the content for sending.
Click Send to send the message.
You will get a success message if the message is sent successfully.
©AXON CONSULTING
15
Personalised SMPP Client
Quick Message
Quick Message feature allows you to send message to maximum of 10 destinations. For
this you need to write a mobile numbers with comma (,) separated. When you are done
click Send to send the messages to maximum of 10 destinations.
©AXON CONSULTING
16
Personalised SMPP Client
Bulk Message
Bulk Message feature allows you to send a message to multiple destinations. For this
you need to create a file containing all the destinations (mobile numbers) with each
destination on a new line. Once you have created such a file save it with a .txt (text)
extension (else the application won't allow you to select the file through the interface).
When you are done select the Bulk message option so you see the bulk messaging
options.
On the bulk message menu click the button to select file. It will open a file selecting
dialog, select the file that you saved and set the other parameters accordingly. Once
you have selected the file, click on the Check File button. Bulk Message dialog will
appear which displays the information regarding filename, Total Numbers, Valid
Numbers and Invalid Numbers.
Total Numbers: Total numbers displays the total number of destinations number.
Valid Numbers: Length of the number should be less than or equal to 14 digits and plus
(+) sign before the number is optional.
Invalid numbers: This will displays the total number of invalid numbers.
If you do not check the file then you cannot upload the file on server.
Finally click 'Upload & Send' which begins the file uploading process. In File Uploading
process the new Job is created for uploading the file. Once the new job is created the
file is uploaded on the Server and then job is updated. Progress bar will show the
progress of file uploading process.
©AXON CONSULTING
17
Personalised SMPP Client
If the file does not uploaded successfully you will get an error message dialog.
If the file is uploaded successfully you will get a success message dialog.
NOTE: If you don’t have sufficient Credit balance then you cannot upload the
file on server.
©AXON CONSULTING
18
Personalised SMPP Client
Personalised Message
Personalised Message allows you to send message with some of the contents in the
message to be different for different destinations (mobile) at the same time.
Please note that Personalised messages can be sent only in text or flash message and
not in Unicode and Unicode Flash, that is the reason whenever the personalised panel is
enabled Unicode and Unicode flash options are disabled.
To send personalised message you must select .CSV (Comma delimited) file which
contains the destinations and tag names.
Once the file is selected you can see the tag names are displayed into the tag list of
personalised panel as shown below.
©AXON CONSULTING
19
Personalised SMPP Client
Once the file is selected all the tag names will be populated and displayed in the
personalised panel which can be selected and inserted into the message where ever the
tag value is to replaced against the tag name while sending the message to their
corresponding destination except the first column header since it is the destination
column and will not be used as tag name.
Important points for creating a .CSV (Comma delimited) file.
Note: .CSV file can be created using Excel or Notepad.
For example, to send the message like “Hi John, Your account number is 1234” to one
destination and the second message like “Hi Jack, Your account number is 1235” to
another destination. For this you need to
1. Open an excel sheet. The first row of the sheet will be the column headers or tag
names.
All the mobile numbers must be formatted to number with 0 decimal places as it is
done below:
©AXON CONSULTING
20
Personalised SMPP Client
©AXON CONSULTING
21
Personalised SMPP Client
Similarly, you can set the number of column headers or tag names that you need to use
in the message.
2. Once, the file is ready with all the tags and their corresponding values save the file
as a .CSV (Comma delimited) file.
Using the notepad also you can create the .CSV (Comma delimited) file. Just like the
one below.
Once the file is ready, save it with a .CSV extension.
©AXON CONSULTING
22
Personalised SMPP Client
Once the file is browsed and selected, all the tags are populated from the file except the
first column header since it will be the destination and those populated tags will be
displayed in tag list.
3. Where ever you wish to insert the tag into the message, place the cursor there and
click on Insert Tag. Tag will be inserted at the cursor position.
For example, any of the above tags is to be inserted at any place in the message then
just select the tag and click Insert Tag. You can see tag name is inserted into the
©AXON CONSULTING
23
Personalised SMPP Client
message.
4. The tag name would be enclosed inside < and > that would be inserted in the
message like the one below. Reason for using < and > is to bifurcate the tag names
from rest of the message content.
Auto complete tags
Auto complete tags feature allows you to complete all the tags with the appropriate tag
names where ever the value in the message is enclosed into < and >.
For example, if the value in the message is <Ne> or <ne> or <NE> or <nE> then the
value will be replaced by the actual tag name which starts with N or n and ends with e
or E. Here it will replace all of the above specified values with <Name>.
When you click Auto Complete Tags all the values in the message enclosed between
< and > that matches with the tag list will be replaced by their corresponding tag
names in the message as shown below.
©AXON CONSULTING
24
Personalised SMPP Client
Tag names and their corresponding values which are not required but are there in the
file will not affect the message. Only those values will be used for creating file whose
tag names are there in the message and the same file will be uploaded.
For example tag “Balance” is there in the file and can be seen in the tag list but it is not
required for this message. Without including the tag “<Balance>” into the message will
not lead to any problem.
©AXON CONSULTING
25
Personalised SMPP Client
Address Book
The address book feature allows you to store and manage your contacts. You can
create Groups and Distribution Lists here. In a group you can store contacts whereas in
distribution lists you can store numbers.
A contact is a name-number pair for e.g. John 919829123456 etc. A number is just a
destination number and would allow you to store the name for the number.
This section guides you in creating Groups and Distribution lists. It would also guide you
in creating, managing and deleting contacts and numbers within them.
©AXON CONSULTING
26
Personalised SMPP Client
Groups
Select the address book tab from within the main panel. To create a group click ‘Create
Group’ and you will see a dialog such as this:
Type in the name for the group and click Save. You can see the group created in the
Group Box.
Adding Contacts
Now to add contacts within this group select the group from the group box and click
Add Contacts. You can see a dialog similar to this:
©AXON CONSULTING
27
Personalised SMPP Client
Enter the details for the contact and click Save. You can see the contact added to the
selected group in contact table.
©AXON CONSULTING
28
Personalised SMPP Client
Editing Contacts
You can edit previously added contacts from a group. To do this, make use of the
fourth column in the contacts table. In this column titled edit select the contacts that
you want to edit. Once you have selected the contact to be edited the Edit Contact
dialog will appear. Then Edit the contact and click on save. The Edited contact will be
reflected immediately.
©AXON CONSULTING
29
Personalised SMPP Client
Uploading contacts
This feature allows you to add multiple contacts to a group at once. Select a group that
you want to upload contacts to and click Upload contacts. Fill in the details for the
contacts in the specified format. The contact name and number should be mentioned on
one line separated by a comma (,) or space. One contact on one line.
When you are done click 'Save'.
©AXON CONSULTING
30
Personalised SMPP Client
On clicking Save the entries will be scanned and all valid entries (please see the 'Errors'
section for information on what entries will be treated as invalid.) will be added leaving
out the invalid entries. You will get a message for the entries that were treated as
invalid and their line numbers.
If you have already created a file with contacts you can copy paste your entries from
that file to the upload contacts list by using Copy (Ctrl+C) and Paste (Ctrl+V).
All the entries that were added to the selected group will be reflected in the contact
box.
Deleting Contacts
You can delete previously added contacts from a group. To do this, make use of the
third column in the contacts table. In this column titled delete select the contacts that
you want to delete if you want to delete just a few contacts or check the Select All
check-box to select all the contacts at once and delete them. Once you have selected
the contacts to be deleted. Click Delete Contacts. The changed group will be reflected
immediately. If you want to delete all contacts and also do not want to keep the group,
you can simply delete the entire group by clicking Delete Group.
This example shows deleting of a selected contact. We have selected a contact here.
We delete that particular contact by clicking Delete Contacts.
The contact has been deleted and the updated group formation can be seen here.
©AXON CONSULTING
31
Personalised SMPP Client
Distribution Lists
To create a distribution list click Add List. You will see a dialog for entering the
numbers in the distribution list. Set a name for the list. Then fill in the list with the
numbers, again the numbers are supposed to be in the line separated format. Also one
can cut, copy, paste by right click of a mouse from excel sheet. An example is shown
below:
Once done click 'Save'. You will see a success dialog as shown below:
©AXON CONSULTING
32
Personalised SMPP Client
Here again the distribution list will only be created containing all the valid entries. The
invalid entries will be reported and discarded.
©AXON CONSULTING
33
Personalised SMPP Client
Editing Distribution Lists
Once the list has been created you can manage it by selecting it from the distribution
list combo - box. Select the list that you want to manage and click Edit List. You now
have the option of editing and deleting the list. Through edit list you can also add or
delete a few contacts from an existing list and save it so that the changes get affected.
An example showing the editing of a list is shown here:
Firstly select a previously created list from the distribution lists list. Then select Edit
List. You will see a dialog as shown below:
Remove the last two entries and click Save. Now if you select the list again for editing
you can see that the changes you made have taken effect.
©AXON CONSULTING
34
Personalised SMPP Client
©AXON CONSULTING
35
Personalised SMPP Client
Group Message
After getting to know how to add and manage Groups and Distribution Lists, you can
move ahead with sending a Group Message. A group message is a message that you
send to a previously configured group or a distribution list. You can also send message
to all contacts from your entire group set by selecting All Contacts.
Select Group message from the SendSMS panel. Select the Group or Distribution list, to
which to send the message, from the Select Group list or select All Contacts as said
above to send a message to all contacts from all groups.
Here as you select a group from Group List, the contacts from the list are listed in the
select contacts table. You can opt here to deselect a few contacts from the message
recipient group if you want to do so. By default all contacts in the selected group will be
selected. Fill in the required parameters and click Connect to send the message.
The progress of the messages sent can be seen in the Progress Bar next to the ‘Clear
Message’ option.
When sending to a distribution list you cannot see the numbers that exist in the
distribution list nor can you have the option of sending the messages to a subset of
those numbers. This is because distribution lists are typically used for business
purposes where a message is broadcasted to all numbers.
©AXON CONSULTING
36
Personalised SMPP Client
Sending a Unicode Message
This section not only explains sending how to send a Unicode message but also how to
use the Unicode converter. Both these features are fairly simple and would not require
much explaining, but an example makes things all clear.
We take a simple example to send a Unicode message. Here we need to understand
that though we use the Unicode converter to convert a text message, which can be sent
in its original form as a text message, Unicode converters are typically used to convert
Arabic text to Unicode so that it can be received in its original Arabic form on cell
phones that support Unicode character encoding.
Enter the text that you need to convert into the text area provided for normal text.
Click Convert to get the Unicode for that text. Copy (Ctrl + C) / Cut (Ctrl + X) & Paste
(Ctrl + V) or Right-Click Mouse the converted text from the Unicode text area to the
message area provided for message text in the SendSMS panel. Remember to change
the type of the message to Unicode in the message type box, and then send the
message.
©AXON CONSULTING
37
Personalised SMPP Client
Delivery Reports (DLR)
Delivery Reports specify the details of a sent message. You receive these from the
SMSC/SMPP server that you sent the message to. Delivery Reports specify details such
as the delivery status, source address or sender, destination address or mobile number,
submit date the date time that the message was submitted to the SMSC, done date –
the date time that the message was forwarded by the SMSC/SMPP Server, any error
flags if required etc.
A report containing these details is called the delivery report for a message. For
receiving delivery reports you need to connect to the SMSC/ SMPP Server in the
receiver mode.
Once you are connected you keep receiving the messages until to either stop the
receiving process explicitly or disconnect from the server from the receiver mode.
To receive delivery reports move to the Delivery Reports panel. You see a dialog such
this:
©AXON CONSULTING
38
Personalised SMPP Client
You need to log the DLRs to a file to view them at a later time. Here you have the
option of either putting the received DLR to a text file of your choice by selecting the
directory for the DLR log files or you can have them redirected to an URL of your choice
so that you could perform a task of your own (putting them in a special file, dumping
them to a database etc.) on the received delivery reports. Click Receive here to
connect in the receive mode and start receiving the delivery reports. But before that
you need to select your option for the storing of delivery report log files. If you do not
select any option the default that is the writing to a text
File option will be selected, also if you do not select the directory that you want the
received delivery report to be put into, the application will create a directory called
DLRLogs in the application default directory and put all the generated log files into it.
Naming the delivery report log files
Since storing all the delivery reports in the same file may make the file grow to an
unmanageable proportion text files are made once everyday. To do this the application
names the text file in a way that it would automatically generate a new file everyday.
For
this
to
happen
the
application
names
the
files
as
'DeliveryReport_date_value.txt' so that it always finds a file of the said name within
the same day and keeps on appending to it. As the day changes and the application no
longer finds a file with the matching name it creates one and keeps appending the logs
to it and so on.
Here we show an example of a received delivery report:
We do not specify an option nor we do specify a file and hence the application gives an
alert such as this:
We click Ok and proceed to receive reports.
What you first see after clicking on Receive is that the application connects to the
server in the receiver mode which can be seen in status panel above the main panel,
details of this connect can be seen in the text area in the form of bind PDU and bind
response. Receiving a bind response successfully means that the application has
connected successfully to the server in the receiver mode.
©AXON CONSULTING
39
Personalised SMPP Client
You can see the details of the connection and report in the text area, this same report
is dumped in the log file for the delivery report.
Posting Delivery Reports on URL
To post the received delivery reports on to an URL user must take a note of the below
mentioned details:
1. The method used to send data on the URL is POST.
2. The data fields of the DLR are sent in the following sequence:
strmsgid, strmobile, strsender, submitdate, donedate, strstatus, slogDate.
The user needs to define the URL to accept the parameters in the same sequence as that
mentioned above. Any other sequence would cause jumbling of the data between various
fields. The user can put his own logic to handle the received DLR within this page. For
e.g. writing the DLR to a file, dumping the data into a database etc.
After the user implements the page (URL) for accepting data he needs to specify the
location of the page with the server name and other parameters in the ‘Send on a URL’
text field.
Example:
If the user develops a page named dumpDLR.php then the user specifies:
http://servername_or_IP/path_to_file/dumpDLR.php
If the user has the Web Server running on a port other than the default, even
the port number has to be mentioned.
http://servername_or_IP:port_number/path_to_file/dumpDLR.php
©AXON CONSULTING
40
Personalised SMPP Client
Credit Details
The credit details panel shows you the credit details for the user such as credit allotted,
Balance left, and credit used. This panel proves helpful so that the user does not have
to open a browser window, go to the web interface provided by the company every time
he has to check his credit details. He can just access the tab for credit details and he
can check all the details right there.
©AXON CONSULTING
41
Personalised SMPP Client
Help
During anytime that you are using the application and you need help on a particular
feature you need not go searching for this document. The Help Panel offers application
embedded and feature specific help right inside the application. This makes using the
application even more useful and efficient, as you do have to navigate or search for the
topic that you need help on in a user manual such as this. The help is offered on all of
the features of the application that would typically require help. Plus this help is offered
in a brief format and hence can be read typically within a few minutes. For any other
comprehensive help or details about the application you can always concern this
document. In the help panel just click the topic that you need help on and you can read
on the topic there itself.
©AXON CONSULTING
42
Personalised SMPP Client