1
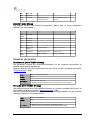
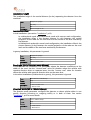
TMS-NET V10.0 user’s manual Permanent radar traffic counter Manual version: TMS-NET_Man_V04.06_En Icoms Detections S.A. Avenue Albert Einstein 11/e ▪ B-1348 Louvain-la-Neuve ▪ BELGIUM Tel.: +32 (0) 10 45 41 02 ▪ Fax: +32 (0) 10 45 04 61 [email protected] ▪ www.icomsdetections.com Table of contents TABLE OF CONTENTS ...........................................2 TABLE OF ILLUSTRATIONS .................................3 INTRODUCTION .....................................................4 About the manual ..........................................................................................................................................................................................................4 Usage according to regulations .................................................................................................................................................................................4 Label ...................................................................................................................................................................................................................................4 Safety instructions ..........................................................................................................................................................................................................4 Concept..............................................................................................................................................................................................................................5 Features .............................................................................................................................................................................................................................5 Technology .......................................................................................................................................................................................................................6 Precautions .......................................................................................................................................................................................................................6 Warranty ...........................................................................................................................................................................................................................6 Packaging ..........................................................................................................................................................................................................................6 RADAR UNIT............................................................7 Physical description ........................................................................................................................................................................................................7 Specifications ...................................................................................................................................................................................................................8 • Power supply................................................................................................................................................................................................8 • User output ..................................................................................................................................................................................................8 • Operating temperature ............................................................................................................................................................................8 • Sealing ............................................................................................................................................................................................................8 • Direction of detection ...............................................................................................................................................................................8 • Measurement accuracy .............................................................................................................................................................................8 • RS-232 interface ..........................................................................................................................................................................................8 • RS422 interface (optional)....................................................................................................................................................................... 9 • RS485 Point-to-point (optional) ............................................................................................................................................................. 9 HYPERTERMINAL COMMUNICATION (RS-232) 10 INSTALLATION..................................................... 12 Physically installing the unit ......................................................................................................................................................................................13 PARAMETERS DESCRIPTION ........................... 16 General parameters.................................................................................................................................................................................................16 Baud rate................................................................................................................................................................................................................16 TX&Dir bitmap ......................................................................................................................................................................................................16 Detector mode bitmap ......................................................................................................................................................................................17 Measures parameters .............................................................................................................................................................................................17 TX measures (bit in TX&Dir bitmap) .............................................................................................................................................................17 TX mode (bit in TX&Dir bitmap) ....................................................................................................................................................................17 Timestamp format (bit in Detector mode bitmap) ..................................................................................................................................18 Speed unit for Interactive mode.....................................................................................................................................................................18 Installation parameters ..........................................................................................................................................................................................18 Installation type (bit in Detector mode bitmap) .......................................................................................................................................18 Gantry angle..........................................................................................................................................................................................................18 Installation height ...............................................................................................................................................................................................19 Installation offset.................................................................................................................................................................................................19 Road type (bit in Detector mode bitmap)...................................................................................................................................................19 Direction mode (bit in TX&Dir bitmap) ........................................................................................................................................................19 Direction selection (bit in TX&Dir bitmap) ..................................................................................................................................................20 On-site tuning parameters ....................................................................................................................................................................................20 Speed fine-tuning (near lane)..........................................................................................................................................................................20 Speed fine-tuning (far lane) .............................................................................................................................................................................20 Length fine-tuning (near lane) ........................................................................................................................................................................20 Length fine-tuning (far lane) ...........................................................................................................................................................................21 COMMUNICATION............................................. 22 Serial interface ..........................................................................................................................................................................................................22 Interactive console (RS-232 only) ........................................................................................................................................................................23 Commands list ......................................................................................................................................................................................................23 2 Encoded mode ..........................................................................................................................................................................................................24 Transmission scheme (RS-232 only) ...............................................................................................................................................................24 Protocol structure (RS-232 only) .....................................................................................................................................................................24 Functions list..........................................................................................................................................................................................................26 Measures format ......................................................................................................................................................................................................38 Encoded message format .................................................................................................................................................................................38 ASCII format (RS-232 only) ...............................................................................................................................................................................38 Good practices ..........................................................................................................................................................................................................40 Firmware loader procedure ..................................................................................................................................................................................40 ADDITIONAL INFORMATION......................... 41 Legal notice ....................................................................................................................................................................................................................41 Issue records...................................................................................................................................................................................................................41 Contact details...............................................................................................................................................................................................................41 • Manufacturer:............................................................................................................................................................................................41 • Your distributor: .......................................................................................................................................................................................41 Table of illustrations Figure 1 : Rear plate ...................................................................................................................................................................................................... 7 Figure 2 :RS-232 .............................................................................................................................................................................................................. 8 Figure 3 : RS422 .............................................................................................................................................................................................................. 9 Diagram 1 : % error on speed measurement depending on vertical angle (tilt angle) ........................................................................ 12 Diagram 2 : % error on speed measurement depending on horizontal angle ........................................................................................ 12 Figure 4 : Gantry installation ....................................................................................................................................................................................13 Figure 5: Installation diagram ..................................................................................................................................................................................15 3 Introduction About the manual On the following pages you will learn how to install and operate the radar in an appropriate & safer way. We attach great importance to the safe, appropriate and effective handling of this detector. It is therefore important to read this manual thoroughly before using the device. In the manual you will find important instructions helping you to avoid danger and to prolong the reliability and durability of the device and the accessories. For your own safety you should read the safety instructions. Follow the instructions closely in order to avoid danger for yourself and others or damage to the device. If you have any questions about the TMS-NET, which are not answered in this manual, or if you have problems understanding the descriptions, please contact the company that provided you with our reliable solution for portable traffic data collection. Usage according to regulations The TMS-NET is solely suited for traffic data collection (detection of vehicles for counting, classification and speed measurement). Any further usage is not appropriate. Do not use the TMS-NET for any other purpose. Label The microwave detector TMS-NET is provided with a serial number. You will need this serial number for any communication when talking with the customer service. Safety instructions Read the following safety instructions thoroughly and observe them carefully. They are stated to ensure your own safety and the safety of others and to avoid damage to the device or accessories. Danger of electricity! Make sure that no liquid may get inside the device. If you notice any damage, e.g. broken or crushed cables, damaged plugs, enclosures etc., turn off the device at once and contact your TMS-NET provider. The device may only be installed, brought into service and repaired by an electrotechnical expert (Very ESD sensitive!!!). Inappropriate operation, improper maintenance or not observing the instructions in this manual can lead to danger. Any malfunction of the device which may limit the safety of its users or others must be removed immediately. All warning and safety labels on the device must be observed and kept complete and legible. 4 The appropriate usage must be observed by all means. For damage resulting from inappropriate usage the manufacturer will not undertake any liability. The device must not be used as a safety component in the sense of the European Directive 98/37/EC ("Machinery Directive”). In systems with high risk additional safety measures are necessary. The operator of the device must ensure that the chosen means of operation will not cause damage to material or danger to people and that all security and safety installations are present and functioning. Before installation and first operation please observe the instructions in the manual. The manual must be available at the site of usage at any time. It must be read thoroughly and applied appropriately by the person responsible for the operation, maintenance and service of the device. Our products are in a constant process of improvement and advancement. Because of this, read the current manual thoroughly before installation and first operation. Without prior consent of the manufacturer, no modifications, neither mechanical nor electrical, may be done. Only parts that have the consent of the manufacturer may be used for backfitting or as accessories. Any violations will lead to the termination of conformity and the manufacturer’s warranty. The user will subsequently bear the risk. During the installation, be really cautious while using a ladder to fix either the bracket on the pole, either the radar on the bracket. Ensure you that the ground is perfectly stable for the ladder (or any material used to reach the installation height of the radar bracket). You need also to take all the safety precautions while climbing and fixing the material. We also strongly advise the use of a padlock to secure the radar to its bracket. Concept The TMS-NET is a compact traffic analyser. It can be installed either at the roadside or “overhead” ; It is discreet ; It does not come directly in contact with the vehicles ; It is weather-proof ; It is silent ; It can be connected with integration to a network ; It can be equipped with wireless communication. Features Counting, speed measurement and classification of vehicles into 2 length classes, with time-stamping (showing the date and time when each vehicle was detected). 5 Technology Microwave Doppler radar. Speed enforcement radars basically use the same technology. Vehicle-by-vehicle data collection. Precautions This unit contains electronic components. Precautions must be taken when transporting and installing it. Please follow the recommendations below: Avoid impacts when transporting and handling the unit. Use only the cables, power supplies, chargers and other accessories supplied with the unit. When storing the unit do not place anything on top of it. Warranty The warranty, which is for a period of 2 (two) years from the date of delivery, covers any manufacturing defects and faulty parts provided that the unit is used normally. It does not cover the scratches or other damage caused by normal use of the unit. To retain your right to the warranty, please follow the instructions given in this user manual carefully. The warranty will be void, if the radar is not ship in its original packaging (confer hereunder). Packaging Please keep this box in case of return shipment to the manufacturer. If the radar is not shipped in this box, the warranty will not apply. If the radar is shipped in a equivalent packaging, a new one will be provided once the radar is ready to be shipped. The packaging value will be invoiced: 20,00 EUR. 6 Chapter 1 Radar unit Physical description Black plastic case containing: Plate fixed to the rear of the radar unit with 4 threaded rods for mounting Antenna and radar unit LED Connector for power supply Wire for telecom interface (RS-232/ RS-422/RS-485) and power supply. Accessories: Adjustable bracket Key to open casing User manual Case dimensions: Width: 182 mm Height: 228 mm Thickness: 92 mm, Total weight without bracket: approx. 2 kg Mechanical data: Rear plate Figure 1 : Rear plate 7 Specifications • Power supply o • Power supply : 10-60 VDC o • Power consumption : 90 mA @ 12V, 45 mA under 24 V (1.5 W max.) • User output o Standard RS-232 9600 to 115000 Bps 1 start, 1stop no parity o Optional RS-422/485 point to point 9600 to 115000 Bps 1 start, 1stop no parity o Visible led on bottom • Operating temperature The system can operate within a temperature range of from -40°C to 70°C • Sealing The system is waterproof (IP67). The case is protected by a door fitted with a seal. It may only be opened in a dry place by an approved technician or your distributor. To keep the unit properly sealed, please make sure that the case screws are fastened and the power/communication cable is properly connected. • Direction of detection By default, the radar unit measures the speed of vehicles travelling towards it (approaching vehicles – installation advised by Icoms). Under certain conditions, vehicles can be measured as they drive away (receding vehicles) or in both directions. !! Note however very heavy rainfall (sudden shower or flurry, combined with gusts of wind during a storm for example) can create false detections (parasitic measurements) in the receding direction (measurement of vehicles moving away) !! • Measurement accuracy Laboratory speed measurement is over 97% accurate. Counting accuracy is approximately 98% (When inter-lane is processed). Vehicle classification is approximately 90% accurate. These values are achieved under optimum installation conditions (see below), on a single traffic lane. The radar unit can measure speeds of from 10 to 255 km/h. • RS-232 interface Power BLUE: Power “–“ BROWN: Power “+” Cable : 2x0.5 + 6x0.15 YELLOW/GREEN: TX PC (DB9 n°3) YELLOW: RX PC (DB9 n°2) WHITE: RS232 ground Figure 2 :RS-232 8 Communication The communication between radar and PC is RS-232. The figure hereunder is a back view of a female DB9 to PC connector. Note that RX is radar side and must be interpreted as TX from PC (DB9 pin 3), while TX is RX on PC side (DB9 pin 2). Cable layout DB9 GND White RX PC or TX Yellow Radar TX PC or RX Green Radar 5 2 3 • RS422 interface (optional) Power BLUE: Power “–“ BROWN: Power “+” ~ Cable : 2x0.5 + 6x0.15 ~ YELLOW/GREEN: RXYELLOW: TX+ WHITE: RX+ GREY: COM ground PURPLE: TX- Figure 3 : RS422 • RS485 Point-to-point (optional) See add-on for RS485 protocol and wiring (TMS-NET_Man_MultipointsProtocol_V1.3_En). 9 Chapter 2 Hyperterminal communication (RS-232) Start Hyperterminal and configure the connection as below. II New Connections HyperTerminal I Start IV Communication port selection III Give connection V Communication properties port Transmission speed (baud) Data format = 8 Parity = No Stopbit = 1 Flow control = No VI HyperTerminal display control Command 10 I. II. III. IV. V. VI. Start menu New Connection Give connection name : TMS-NET 1 Port selection (the one the radar is connected to) Define the parameters (115Kbps, 8 bits data, no parity,1 stop bit, no flow control) When the radar is turned on, a message is displayed with radar’s header message. 11 Chapter 3 Installation The precision of the installation is really important and can influence the accuracy of the data. Please have a look on the following diagram, which explains the error margin in speed measurement depending on the installation angle error: % error on speed measurement regarding tilt angle (a) Angle 50° 25 Error (%) 20 Angle 30° 15 10 Angle 10° 5% 5 0 -10 -8 -6 -6° -4 -2 0 2 4 6 8 10 Angle variation (°) Diagram 1 : % error on speed measurement depending on vertical angle (tilt angle) % error on speed measurement regarding horizontal angle (f) 25 Error (%) 20 15 10 5% 5 0 -10 -8 -6 -4 -4° -2 0 2 4 6 8 10 Horizontal angle variation (°) Diagram 2 : % error on speed measurement depending on horizontal angle To get the best results, the counting has to be done on a single traffic lane. You also need to measure on a site where the cars should not brake or accelerate too much (avoid to measure close to an intersection, etc..). Places where you have a lot of traffic jam can also influence the results. 12 Physically installing the unit Be VERY careful during the installation to secure all elements on the gantry to avoid risk of losing elements on the road. The bracket can be installed separately from the unit on a gantry support (universal clamps for band are advised). Care must be taken to ensure that the bracket plate is installed above the middle the road. This part of the installation is very important and can influence the precision of the data recorded. Figure 4 : Gantry installation When the bracket is fixed, check again if the alignment is still correct as the bracket might have moved while fixing it. The radar can be installed on a pole on the side of the road or on a gantry / bridge above the lane. The two types are described hereunder. Gantry with approaching detection is the most recommended for length/speed precision. In side view installation, the characteristics (a.o. distance to road) of the installation must be sent to the radar. Detection direction (commands B, I and O) The unit can measure vehicles approaching OR driving away from the radar unit. It can also be set for bidirectional measurements. The command B toggles between uniand bidirectional detection. In bidirectional mode, the commands I and O applies to the nearest lane to the radar. The “I” or “O” are mandatory in side view installation for internal parameter topology (angle auto corrections) Gantry installation • Angles (command J) The advised vertical angle (_) value is 45° 13 Pay attention to the angle of installation: the 45° angle is compared to the road and not the horizontal. Example: if the road is inclined (-2° compared to the horizontal angle), the tilt angle will be in this case 47°. • Height of installation (command H) Recommended height of installation: • type GA1: 5-6m • type GA2: 7-8m Height setting can be parameter with the command “H”. Interlane For installations where several lanes are monitored (one TMS-NET by lane), it is important to understand that vehicles driving between two lanes can be detected by two TMS-NET simultaneously (as seen in figure TO DO) To achieve the best counting precision, it is necessary to take these “inter-lanes” cases into account at the node collecting the data of the detectors. It is possible to tune the importance of this phenomenon by adjusting the installation to change the detection zone width: installing the TMS-NET higher or with a tilt angle closer to the horizontal will widen the detection zone width and inversely lowering the installation height or setting the tilt angle closer to the vertical will reduce the detection zone width. These adjustments must be done carefully: if the detection zones widths are too narrow, small vehicles driving just between two zones could pass undetected. Side installation This installation type is not advised by Icoms as you cannot separate accurately different traffic lanes. • Distance (command D) 14 Distance between installation pole and the vehicles movement axis, for unidirectional detection. • Height of installation (command H) Recommended height of installation: • Type GA1: 5-6m • Type GA2: 7-8m Height setting can be parameter with the command “H”. • Angles Two angles determine the installation and the accuracy of the measurements (see Fig. 2: installation diagram). The horizontal angle (β), in relation to the vehicles’ axis of movement) is ALWAYS 45°. The vertical angle (φ) is determined by the software in function of the installation height (H) and the distance (D). To know it, send the installation distance and height to the radar (commands D and H), then ask for the radar status with the « ? » command. The angle will be displayed on screen. Figure 5: Installation diagram 15 Chapter 4 Parameters description This section presents the different parameters of the detector. Those parameters can be set either interactively with the interactive console (as described in section “Interactive console”, p23) or via encoded messages (as described in section “Encoded mode”, p24). Once they have been set, those parameters are written in the internal memory of the detector and are kept throughout detector's resets and power cycles. IMPORTANT: For machine to machine development, you are strongly advised to use the “Encoded mode” instead of the “Interactive mode”. The main reason is that the “encoded mode” in future versions of the TMS-NET will be backward compatible, which won’t be the case for the “Interactive mode”. General parameters Baud rate This parameter fixes the serial port baud rate of the detector. See section “Serial interface, p22” for more information on the serial port characteristics. Type unsigned int (1byte) Range [0,4] Default 4 Description 0 : 9600 bauds 1 : 19200 bauds 2 : 38400 bauds 3 : 57600 bauds 4 : 115200 bauds Notes The new baud rate is applied after the next detector reset. If an out-of-range value is given, the default baud rate of 9600 bauds is used. TX&Dir bitmap This bitmap contains the following parameters (Please look at those parameters definition for more details): Position Parameter Signification if 0 Signification if 1 Defaul t Bit 7 (MSB) TX measures Measures transmission OFF. Measures transmission ON. 1 Bit 6 Reserved Bit 5 Reserved Bit 4 Direction mode Unidirectional Bidirectional 0 Bit 3 Direction selection Incoming Outgoing 0 16 Bit 2 Reserved Bit 1 Reserved Bit 0 (LSB) TX mode Send measures in encoded format. Send measures in ASCII format. 0 Detector mode bitmap This bitmap contains the following parameters (Please look at those parameters definition for more details) : Position Parameter Signification if 0 Signification if 1 Defaul t Bit 7 (MSB) Reserved Bit 6 Reserved Bit 5 Reserved Bit 4 Reserved Bit 3 Reserved Bit 2 Timestamp format OUT timestamp IN & OUT timstamp 0 Bit 1 Road type Normal width road Narrow road 0 Bit 0 (LSB) Installation type Side installation Gantry installation 1 Measures parameters TX measures (bit in TX&Dir bitmap) This parameter controls the activation/deactivation of the measures transmission as vehicles are passing by the detector. Measures that are not sent are discarded, but the vehicle counter is updated (see section “Encoded format”, p38). Type Bit 7 in TX in TX & Dir bitmap Range [0,1] Default 1 Description 0 : No measures are sent. 1 : Measures are sent with the format specified by other parameters. TX mode (bit in TX&Dir bitmap) The measures can be sent in two different formats: As a human readable ASCII line or as an encoded message (see section “Measures format”, p38). The ASCII format is intended for interactive use. It is strongly advised to use the encoded messages format for non-interactive use. Type Bit 0 in TX & Dir bitmap Range [0,1] Default 1 Description 0 : Measures are sent as encoded messages (see p38). 1 : Measures are sent as human readable ASCII lines (see p38). 17 Timestamp format (bit in Detector mode bitmap) Each measure can be associated with one or two timestamps: you therefore have two possibilities: • • each measure is associated to the timestamp OUT each measure is associated to the timestamps IN & OUT. We advise to follow the first solution (only one timestamp) which is more accurate in terms of measure. Type Bit in Detector mode bitmap Range [0,1] Default 0 Description 0 : OUT Timestamp 1 : IN and OUT Timestamps Speed unit for Interactive mode This parameter set the unit used for speed measurement. The two available units are kilometers per hour (km/h) and miles per hour (mi/h). Please note that speed measurements sent in encoded mode are always in km/h. Type unsigned int (1byte) Range [0,1] Default 0 Description 0 : km/h 1 : mi/h Installation parameters Installation type (bit in Detector mode bitmap) This parameter specifies the type of installation of the detector. (See section “Installation”, p13). Type Bit in Detector mode bitmap Range [0,1] Default 1 Description 0 : Side installation 1 : Gantry installation Gantry angle In gantry installations, the gantry angle is the angle (in degrees) between the horizontal and the main direction of the antenna lobe (see section “Installation”, p13). In side mode this parameter is ignored. Type unsigned int (1byte) Range [30, 60] Default 45 Description Angle in degrees in gantry mode with respect to the horizontal. 18 Installation height The installation height is the vertical distance (in dm) separating the detector from the road level. Type unsigned int (1byte) Range [10, 120] Default 64 Description Detector height in dm. Installation offset In side installation: (see section “Installation”, p13) In unidirectional mode and bidirectional mode with narrow road configuration, the installation offset is the shortest distance (in dm) between the vertical projection of the radar on the road level and the centre of the lane covered by the detector. In bidirectional mode with normal road configuration, the installation offset is the shorter distance (in dm) between the vertical projection of the radar on the road level and de middle of the two lanes watched by the detector. In gantry installation, this parameter is ignored. Type unsigned int (1byte) Range [10, 120] Default 40 Description Detector offset in dm. Road type (bit in Detector mode bitmap) In bidirectional side installation, this parameter adapts the detector coefficients to the width of the road. Use the “normal road” value for situation where the vehicles with opposite direction drive on separate lanes. Use the “narrow road” value for situation where the vehicles with opposite direction drive on the same lane. In the other installations (unidirectional or gantry), this parameter is ignored. Type Bit in Detector mode bitmap Range [0,1] Default 0 Description 0 : Normal width road 1 : Narrow road Direction mode (bit in TX&Dir bitmap) The direction mode parameter configures the detector to detect vehicles either in one specific direction (incoming or outgoing traffic) or in both of them. See section “Installation”, p13 for more details. Type Bit 4 in TX&Dir bitmap Range [0,1] Default 0 Description 0 : Unidirectional 1 : Bidirectional 19 Direction selection (bit in TX&Dir bitmap) In unidirectional mode, the direction selection parameter selects the direction watched by the detector. In bidirectional side mode, the direction selection parameter selects the direction of the nearest lane to the detector. In bidirectional gantry mode, this parameter is ignored. Type Bit 3 in TX&Dir bitmap Range [0,1] Default 0 Description 0 : Incoming traffic 1 : Outgoing traffic On-site tuning parameters Those parameters are intended to fine-tune the detector for a specific installation. The corrections are added to the measured speed and length of each vehicle detected. The speed corrections are in a tenth of percent and the length corrections are in dm. In bidirectional mode, different corrections can be applied to each direction. The parameter “direction selection” associates a direction with a lane. In unidirectional mode the “far lane” corrections are ignored. Speed fine-tuning (near lane) Type unsigned int (1byte) (encoded messages) signed int (1byte) (interactive console) Range [28, 228] (encoded messages) [-100, 100] (interactive console) Default 128 meaning 0 (encoded messages) 0 (interactive console) Description Speed fine-tuning in 0,1 % added to the measured speed (for the near lane in bidirectional mode). Speed fine-tuning (far lane) Type unsigned int (1byte) (encoded messages) signed int (1byte) (interactive console) Range [28, 228] (encoded messages) [-100, 100] (interactive console) Default 128 meaning 0 (encoded messages) 0 (interactive console) Description Speed fine-tuning in 0,1 % added to the measured speed for the far lane in bidirectional mode. Length fine-tuning (near lane) Type unsigned int (1byte) (encoded messages) signed int (1byte) (interactive console) Range [28, 228] (encoded messages) [-100, 100] (interactive console) Default 128 meaning 0 (encoded messages) 0 (interactive console) Description Length correction in dm, added to the measured length (for the near lane in bidirectional mode). 20 Length fine-tuning (far lane) Type unsigned int (1byte) (encoded messages) signed int (1byte) (interactive console) Range [28, 228] (encoded messages) [-100, 100] (interactive console) Default 128 meaning 0 (encoded messages) 0 (interactive console) Description Length correction in dm, added to the measured length for the far lane in bidirectional mode. 21 Chapter 5 Communication The TMS-NET is designed to be directly connected to its controlling device through a serial interface (See section “Radar unit”, p10). The communication with the TMS-NET can be done through two different types of interfaces: An interactive console allowing the user to issue simple commands via a serial terminal (an example is given in “Chapter 2” for Hyperterminal under Microsoft Windows TM). An encoded protocol consisting in the exchange of fixed length messages between the detector and the controlling device. Those interfaces are simultaneously available. Serial interface The communication is done via serial binary link with the following characteristics: 1 start bit 8 data bits 1 stop bit No flow control Baud rate configurable from 9600 to 115200 bauds. The TMS-NET comes with: 3-wires RS-232 (standard) RS422 (in option) Note: The RX line is terminated by 100 ohms and neither line is biased. RS485 point-to-point (in option) Note: The line is terminated by 100 ohms but is not biased. 22 Interactive console (RS-232 only) Please note that it is recommended to use the encoded mode only for non interactive (machine to machine) operations. Commands list Command Action range default General C List the available commands. - ? Print the current detector configuration. - ! Reset the detector. - S Set the detector's serial port baud rate : 0 : 9600 bauds 1 : 19200 bauds 2 : 38400 bauds 3 : 57600 bauds 4 : 1152000 bauds. [0, 4] 4 Measures TX A Set the measures transmission as ASCII messages. - ASCII X Set the measures transmission as encoded messages. - ASCII U Set the speed unit for the interactive mode - Km/h B Toggle the detector between unidirectional and bidirectional mode. - UNIDIR D Set the detector offset (in dm). Note: This value is ignored in gantry mode. [10, 120] 40 G Toggle the detector between gantry and side mode. - GANTRY I Set the detector in incoming traffic mode. Note: In bidirectional mode, this means that the lane nearest to the detector has incoming traffic. - INCOMING J Set the gantry tilt angle with the respect to the horizontal. (in degrees) Note: This value is ignored in side mode. [30, 60] 45 N Toggle between normal and narrow road. Note: This value is ignored in gantry mode. - NORMAL O Set the detector in outgoing traffic mode. Note: In bidirectional mode, this means that the lane nearest to the detector has outgoing traffic. - INCOMING Installation On-site tuning s Set the speed correction(s). (in 1/10 %) [-100, 100] 0 l Set the length correction(s). (in dm) [-100, 100] 0 23 Encoded mode Transmission scheme (RS-232 only) 1. The controlling device must wait for the detector acknowledge message before issuing a new message. The detector acknowledge is issued between 5 and 350 ms after the end of the request message depending of the opcode and the state of the detector at the time of the request. Functions requiring a reset must take into account the detector startup time of 2 s. Please note that these timings don't include any interface or adapter that could add non negligible delays in the transmission. 2. The delay between two bytes of the same message must be less than 150 ms. 3. Upon detecting a communication error (lack of acknowledge, wrongly formatted frame) wait 1s and check the baud rate. Note: After a configuration session (containing as many messages as needed) it is necessary to reset the detector. Protocol structure (RS-232 only) The communication in encoded mode is done through fixed length messages. There are two types of messages: The messages initiated by the controlling device, that are acknowledged by the detector. The measures messages initiated by the detector, that are not acknowledged. Each message is composed of 19 bytes and follows this structure: START 1 byte FUNCTION 1 byte PAYLOAD 16 bytes END 1 byte Where: START = 0xFF END = 0x00 for messages sent by the controlling device END = 0x03 for messages sent by the detector The timings and rules to observe are described here above (See also section “Good practices”, p39). 24 For all versions : The different available functions are: FUNCTION Description Reference 0x3C Start firmware loader Page 39 0x44 Get status 0x46 Reset to factory settings 0x66 Get detector time 0x77 Set detector time 0xF9 Detector reset 0xAA Set basic parameters 0x2A Set installation parameters 0xE8 Set detector name 1 0xE4 Set detector name 2 0xE6 Set detector name 3 0xBB Get basic parameters 0x2B Get installation parameters 0xE9 Get detector name 1 0xE5 Get detector name 2 0xE7 Get detector name 3 A complete description of each function is provided on the next page. A specific communication scheme is needed to implement the flashing of a new detector firmware; this is described in section “Firmware loader procedure”, p39. 25 Functions list 0x3C - Start firmware loader This message starts the detector's firmware upload procedure.. See section “Firmware loader procedure”, p39 for a complete description. Please note that both the request and answer payloads contain no data. Request message: 0xFF 0x3C REQUEST PAYLOAD 0X00 Request payload: Position Description 1 0x00 ... 0x00 16 0x00 Range (default) Note Answer message: 0x02 0x3C ANSWER PAYLOAD Answer payload: The answer payload is the same as the request payload. 26 0X03 0x44 – Get status Request message: 0xFF 0x44 REQUEST PAYLOAD 0X00 Request payload: Position Description 1 0x00 ... 0x00 16 0x00 Range (default) Note Answer message: 0x02 0x44 ANSWER PAYLOAD 0X03 Answer payload: Position Description Range (default) 1 Version string ASCII 2 Version string ASCII 3 Version string ASCII 4 Version string ASCII 5 Version string ASCII 6 Version string ASCII 7 Version string ASCII 8 Version string ASCII 9 Version string ASCII 10 Version string ASCII 11 Version string ASCII 12 Version string ASCII 13 Version string ASCII 14 Version string ASCII 15 Version string ASCII 16 Version string ASCII 27 Note 0x46 – Reset to factory settings This function reset the detector immediately after its answer. Please take the 2 seconds of reset time into account before issuing new messages to the detector. Request message: 0xFF 0x46 REQUEST PAYLOAD 0X00 Request payload: Position Description 1 0x00 ... 0x00 16 0x00 Range (default) Note Answer message: 0x02 0x46 ANSWER PAYLOAD 0X03 Answer payload: The answer payload is the same as the request payload. Note: After a configuration session (containing as many messages as needed) it is necessary to reset the detector. 28 0x66 – Get detector time Request message: 0xFF 0x66 REQUEST PAYLOAD 0X00 Request payload: Position Description 1 0x00 ... 0x00 16 0x00 Range (default) Note Answer message: 0x02 0x66 ANSWER PAYLOAD 0X03 Answer payload: Position Description Range Note 1 ignored 0x00 2 Hundredth of second 0x00 - 0x99 BCD 3 Second 0x00 - 0x59 BCD 4 Minute 0x00 - 0x59 BCD 5 Hour (24h format) 0x00 - 0x24 BCD 6 Day 0x00 - 0x31 BCD 7 Month 0x01 - 0x12 BCD 8 ignored 0x00 9 ignored 0x00 10 ignored 0x00 11 ignored 0x00 12 ignored 0x00 13 ignored 0x00 14 ignored 0x00 15 Centrury (fixed to 0x20) 0x20 BCD 16 Year 0x00 - 0x99 BCD Note BCD means binary coded decimal. 29 0x77 – Set detector time Request message: 0xFF 0x77 REQUEST PAYLOAD 0X00 Request payload: Position Description Range Note 1 ignored 0x00 2 Hundredth of second 0x00 - 0x99 BCD 3 Second 0x00 - 0x59 BCD 4 Minute 0x00 - 0x59 BCD 5 Hour (24h format) 0x00 - 0x23 BCD 6 Day 0x00 - 0x31 BCD 7 Month 0x01 - 0x12 BCD 8 ignored 0x00 9 ignored 0x00 10 ignored 0x00 11 ignored 0x00 12 ignored 0x00 13 ignored 0x00 14 ignored 0x00 15 Century (fixed to 0x20) 0x20 BCD 16 Year 0x00 - 0x99 BCD Note BCD means binary coded decimal. Answer message: 0x02 0x77 ANSWER PAYLOAD 0X03 Answer payload: The answer payload is the same as the request payload. Note : this message is not a configuration message and doesn't require to reset the detector. 0xF9 – Detector reset This function reset the detector immediately after its answer. Please take the 2 seconds of reset time into account before issuing new messages to the detector. Request message: 0xFF 0xF9 REQUEST PAYLOAD 0X00 Request payload: Position Description 1 0x00 ... 0x00 16 0x00 Range (default) Note Answer message: 0x02 0xF9 ANSWER PAYLOAD Answer payload: The answer payload is the same as the request payload. 31 0X03 0xAA – Set basic parameters Request message: 0xFF 0xAA REQUEST PAYLOAD 0X00 Request payload: Position Description Range (default) Note 1 reserved 2 reserved 3 reserved 4 reserved 5 ignored 6 Gantry angle [30, 60] See section “Gantry angle” 7 Speed unit in the interactive mode [0, 1] See section “Speed unit in interactive mode” 8 reserved 9 Baud rate [0, 4] See section “Baud rate” 10 TX&Dir bitmap 11 reserved 12 reserved 13 reserved 14 reserved 15 reserved 16 reserved See section “TX&Dir” Answer message: 0x02 0xAA ANSWER PAYLOAD 0X03 Answer payload: The answer payload is the same as the request payload. Note: After a configuration session (containing as many messages as needed) it is necessary to reset the detector. 32 0x2A – Set installation parameters Request message: 0xFF 0x2A REQUEST PAYLOAD 0X00 Request payload: Position Description Range (default) Note 1 Installation height [10, 120] dm 2 Installation offset (in side mode) [10, 120] dm 3 Speed correction (near lane) [28, 228] 1/10 % 4 Speed correction far lane [28, 228] 1/10 % 5 Length correction (near lane) [28, 228] dm 6 Length correction far lane [28, 228] dm 7 reserved 8 reserved 9 reserved 10 reserved 11 reserved 12 Detector mode bitmap 13 reserved 14 reserved 15 reserved 16 reserved bitmap Answer message: 0x02 0x2A ANSWER PAYLOAD 0X03 Answer payload: The answer payload is the same as the request payload. Note: After a configuration session (containing as many messages as needed) it is necessary to reset the detector. 33 0xE8 – 0xE4 - 0xE6 – Set detector name 1, 2 & 3 Note : It is advised to use only printable ASCII between 0x20 and 0x7E Request message: 0xFF 0xE8|0xE4|0xE6 REQUEST PAYLOAD 0X00 Request payload: Position Description 1 0x00 ... 0x00 16 0x00 Range (default) Note Answer message: 0x02 0xE8|0xE4|0xE6 ANSWER PAYLOAD 0X03 Answer payload: Position Description Range (default) Note 1 Printable ASCII char 2 Printable ASCII char 3 Printable ASCII char 4 Printable ASCII char 5 Printable ASCII char 6 Printable ASCII char 7 Printable ASCII char 8 Printable ASCII char 9 Printable ASCII char 10 Printable ASCII char 11 Printable ASCII char 12 Printable ASCII char 13 Printable ASCII char 14 Printable ASCII char 15 Printable ASCII char 16 Printable ASCII char Note: After a configuration session (containing as many messages as needed) it is necessary to reset the detector. 34 0xBB – Get basic parameters Request message: 0xFF 0xBB REQUEST PAYLOAD 0X00 Request payload: Position Description 1 0x00 ... 0x00 16 0x00 Range (default) Note Answer message: 0x02 0xBB ANSWER PAYLOAD 0X03 Answer payload: Position Description Range (default) Note 1 reserved 2 reserved 3 reserved 4 reserved 5 Current tilt angle [0, 90] degrees 6 Gantry angle [30, 60] degrees 7 Speed unit in interactive mode [0, 1] [km/h, mi/h] 8 reserved 9 Baud rate [0, 4] - 10 TX&Dir bitmap 11 reserved 12 reserved 13 reserved 14 reserved 15 reserved 16 reserved bitmap 35 0x2B – Get installation parameters Request message: 0xFF 0x2B REQUEST PAYLOAD 0X00 Request payload: Position Description 1 0x00 ... 0x00 16 0x00 Range (default) Note Answer message: 0x02 0x2B ANSWER PAYLOAD 0X03 Answer payload: Position Description Range (default) Note 1 Installation height [10, 120] dm 2 Installation offset (in side mode) [10, 120] dm 3 Speed correction (near lane) [28, 228] 1/10 % 4 Speed correction far lane [28, 228] 1/10 % 5 Length correction (near lane) [28, 228] dm 6 Length correction far lane [28, 228] dm 7 reserved 8 reserved 9 reserved 10 reserved 11 reserved 12 Detector mode bitmap 13 reserved 14 reserved 15 reserved 16 reserved bitmap 36 0xE9 – 0xE5 - 0xE7 – Get detector name 1, 2 & 3 Request message: 0xFF 0xE9|0xE5|0xE7 REQUEST PAYLOAD 0X00 Request payload: Position Description 1 0x00 ... 0x00 16 0x00 Range (default) Note Answer message: 0x02 0xE9|0xE5|0xE7 ANSWER PAYLOAD 0X03 Answer payload: Position Description Range (default) Note 1 Printable ASCII char 2 Printable ASCII char 3 Printable ASCII char 4 Printable ASCII char 5 Printable ASCII char 6 Printable ASCII char 7 Printable ASCII char 8 Printable ASCII char 9 Printable ASCII char 10 Printable ASCII char 11 Printable ASCII char 12 Printable ASCII char 13 Printable ASCII char 14 Printable ASCII char 15 Printable ASCII char 16 Printable ASCII char 37 Measures format Encoded message format Measure message: 0x02 0x99 MEASURE PAYLOAD 0X03 Measure payload: Position Description Range (default) Note 1 Speed value In the current unit 2 Length dm 3 Vehicle exit time, hundredth of second 0x00 - 0x99 BCD 4 Vehicle exit time, second 0x00 - 0x59 BCD 5 Vehicle exit time, minute 0x00 - 0x59 BCD 6 Vehicle exit time, hour (24h format) 0x00 - 0x24 BCD 7 Vehicle exit time, day and direction byte 0x00 - 0x31 Cf. infra 8 Vehicle exit time, month 0x01 - 0x12 BCD 9 Vehicle counter LOW8 [0,255] 10 Vehicle counter MID8 [0,255] 11 Vehicle counter HIG8 [0,255] [0, 16M vehicles] 12 Vehicle entry time, hundredth of second 0x00 - 0x99 BCD 13 Vehicle entry time, second 0x00 - 0x59 BCD 14 Vehicle entry time, minute 0x00 - 0x59 BCD 15 Vehicle exit time, century 0x20 BCD 16 Vehicle exit time, year 0x00 - 0x99 BCD See further for details on byte 7 (Vehicle exit time, day and direction byte). Note: It is advised to ignore the entry time fields. If the entry time is necessary, the best is to recompute the entry time from the exit time, the speed and the length of the vehicle. Note: The vehicle counter loops on itself. Month and direction byte: Position Parameter Bit 7 (MSB) Direction Bit 6 Not used Bit 5 Not used Bit 4 Month ten 0 Bit 3 Month units 3 Bit 2 Month units 2 Bit 1 Month units 1 Bit 0 (LSB) Month units 0 Signification if 0 Signification if 1 Incoming direction Outgoing direction ASCII format (RS-232 only) Two examples (depends of timestamp(s), units): 38 • 26/06/2013 16:58:51:95 +009 km/h 01.0 m\r\n • 26/06/2013 16:58:51:97 +009 mi/h 04.0 m\r\n Note: \r and \n do not appear on the screen (correspond to carriage return and line feed) 39 Good practices 1. The modification of the detector parameters is best done by a read-modify-write procedure. This allows a better compatibility of the controlling device software with future versions of the detector firmware as reserved fields could come into use. 2. As a measure message can come at any time, the controlling device should check the function of each received message to discriminate an expected acknowledge message from a detector-initiated measure message. Firmware loader procedure This section describes the procedure to implement firmware upload in the controlling device. The new firmware is stored in an ASCII file (intelhex format). 1. The controlling device sends the encoded message 0x3C. 2. The detector answers with the appropriate encoded message. 3. The detector changes its baud rate to 9600 bauds. 4. The detector waits for the prompt char (“>”) for 12s. 5. If the detector gets the prompt char, it echoes it and waits for the first line of the new firmware file. 6. Once the first line has been transmitted, the detector processes it and then sends the prompt char again and waits the second line. 7. And so on until the last line is sent. 8. The detector recognizes the last line and sends the status of the upload (OK/error description) and the reboot in normal mode. In case of bad programming (e.g. power failure during upload), the detector stays in the step 4. 40 Chapter 6 Additional information Legal notice Hereby, Icoms Detections declares that this TMS-NET is in compliance with the essential requirements and other relevant provisions of Directive 1999/5/EC. A copy of the declaration can be asked per e-mail at [email protected]. Issue records 07/05/12: V.04.00: 28/11/12: V04.01: 07/03/13: V4.02: 19/07/13: V4.03: 20/01/14: V4.04: 01/04/14: V4.05: 01/04/14: V4.06: Contact details • logo update • • • cabling char. set to Frutiger Minor spelling corr. • • ASCII format details on p. 38 Minor spelling corr. • • Correction and clarification of encoded message structure. Light formatting modification. • • • • • Physical description (new housing) Specifications/Power supply RS485 : delete wiring, refer to add-on Correction clock hour range Table of content • • Info about rain Correction direction bit (see Encoded message format, p. 38) • • • • Name file change Version nr : 9 => 10 “Get version”, p. 27 Correction direction bit (see Encoded message format, p. 38) • Manufacturer: Icoms Detections S.A. Avenue Albert Einstein 11/e ▪ B-1348 Louvain-la-Neuve ▪ BELGIUM Tel.: +32 (0) 10 45 41 02 ▪ Fax: +32 (0) 10 45 04 61 [email protected] ▪ www.icomsdetections.com • Your distributor: 41