1
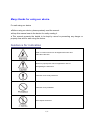
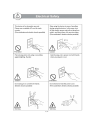
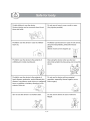
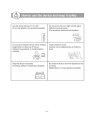
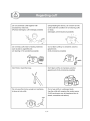
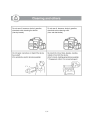
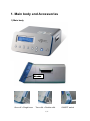
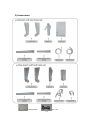
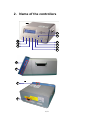
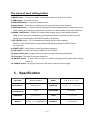
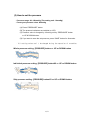
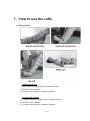
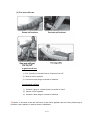
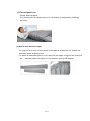
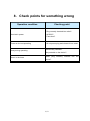
CODE 28450
Indication: This manual is for user's safety and preventing any property-loss.
Before using our device, please inevitably read this user manual.
1/21
Many thanks for using our device.
For safe using our device
● Before using our device, please precisely read the manual.
● Keep this manual near to the device for easily reading it.
● This manual presents the details to be kept by users for preventing any danger or
property-loss and for safe using the device.
Guidance for indication
Death or serious wound can be happened if users don't
follow the instruction.
Wound or property-loss can be happened in case of
disregarding the instruction.
Instruction to be surely observed.
Instruction to be prohibited.
Don't disjoint the device.
2/21
3/21
4/21
5/21
6/21
7/21
1. Main body and Accessories
1) Main body
Air socket
One cuff + Single hose
Two cuffs + Double cuffs
8/21
ON/OFF switch
2) Accessories
Safety Switch
AC cord
9/21
2. Name of the controllers
9
8
1
7
2
6
3
5
4
11
10
12
13
10/21
The name of each setting button
1) MODE button – It selects a suitable compression mode from A, B and C modes
2) TIME button – It sets the use time.
3) PRESSURE button – It sets the pressure value.
4) HOLD button – It sets the time holding the set pressure value of each chamber.
5) INTERVAL button – It sets the interval (resting) time before starting another compression cycle
after finishing one sequential compression cycle from the first chamber to the sixth chambers.
6) DOWN / SAVE button - DOWN: It increases each setting values of the setting programs.
SAVE: A user can save the settings by pressing this button for 3 seconds and call the saved
settings by turning off and on the ON/OFF switch of a machine.
7) UP / INITIAL button – UP: It increases each setting values of the programs.
INITIAL: a user call the factory recommended settings by pressing the INITIAL button
for 3 seconds.
8) START/STOP - It sets to start or stop the program operation.
9) LCD display – It shows all setting condition on LCD window.
10) Safety switch jack - A safety switch can be connected to this safety switch jack.
11) Air Socket - The hose plug can be inserted to
12) ON/OFF switch – it turns power off and on or calls the settings saved finally before turning
power on.
13) POWER socket – AC plug is inserted into the power socket for power supply.
3. Specification
VOLTAGE
AC220V 50/60Hz
MODE
A, B, C, D, E, F, G, H
ELECTRICITY
AC220V 0.2A
PRESSURE
0mmHg, 20 ~ 200mmHg
POWER
CONSUMPTION
30 W
TIME RANGE
10~90 MIN.
DIMENSION
394*264*202
HOLD
0 ~ 6 seconds
WEIGHT
11.5Kg ±10% (MAIN BODY)
INTERVAL
1 ~ 20 seconds
11/21
4. MK850L features
◆4 pressurization modes
- It has a unique program selecting one suitable mode from 4 compression modes
according to each patient's (user's) state.
- Please refer to the image of 4 compression modes.
◆ Air pressure sensor
- It controls the set pressure applied equally on each chamber regardless of a user’s
body size.
◆ HOLD time
- The set pressure is kept per each chamber for set hold time. .
◆ INTERVAL time control program
- It controls the breaking time after each sequential compression of whole chambers.
5. Use tips for a beginner
- In the case of a beginner of this application, don't set the pressure to a high value from
the initial use because the high pressure can give a burden to the beginner’s body according to a
user’s body state.
- Try to start from lowest pressure and then increase the pressure slowly according to a
user’s state under a doctor’s indications.
- We recommend that a user applies the compression therapy with lying down in the
condition that one’s body is relaxed to increase the effects of the therapy.
12/21
6. How to use the programs
(1) How to set the mode (Factory set mode: A mode)
(A) Press “MODE” button
(B) Set the suitable mode by pressing “MODE” button.
(C) If you want to save the selected MODE, press “SAVE” button for 3 seconds .
※ All setting values can’t be changed during the operation of a machine.
(2) How to set the use time
- Time range: 10 ~ 90 minutes (the setting unit: 5 minutes).
- The factory set time: 15 minutes
(A) Press “TIME” button.
Time is changed by 5 minutes by “TIME” button or “UP & DOWN” button.
(C) If you want to save the set time, press “SAVE” button for 3seconds.
※ All setting values can’t be changed during the operation of a machine.
13/21
(3) How to set the pressure
- Pressure range: 20~180mmHg (The setting unit: 10mmHg)
- Factory set pressure value: 60mmHg
(A) Press “PRESSURE” button
(B) The pressure indicators are twinkled on LCD
(C) Pressure value is changed by 10mmHg unit by “PRESSURE” button
or UP & DOWN button.
(D) If you want to save the set pressure, press “SAVE” button for 3seconds..
※ All setting values can’t be changed during the operation of a machine.
Whole pressure setting: [PRSSURE] button => UP or DOWN button
Individual pressure setting: [PRSSURE] buttonX2 => UP or DOWN button
Skip pressure setting: [PRSSURE] buttonX2 => UP or DOWN button
14/21
(4) How to set the HOLD time
- HOLD time range: 0~6 seconds (The setting unit: 1 second)
- Factory set HOLD time is 3 seconds
(A) Press the “HOLD” button
(B) The hold indicators are twinkled on LCD display.
(C) The hold time is increase by 1second with the “HOLD” button or UP & DOWN button.
(D) If you want to save the set HOLD time, press “SAVE” button for 3 seconds
※ All setting values can’t be changed during the operation of a machine.
(5) How to set the INTERVAL time
- INTERVAL time range: 1 ~ 20 seconds (The setting unit: 1 second)
- Factory set INTERVAL time is 5 seconds
(A) Please press the “INTERVAL” button.
(B) The “INTERVAL” are twinkled on LCD display.
(C) The Interval time is controlled by 1second with the “INTERVAL” button
or UP & DOWN button.
(D) If you want to save the set INTERVAL time, press “SAVE” button for 3 seconds
※ All setting values can’t be changed during the operation of a machine.
15/21
7. How to use the cuffs
(1) One cuff use
In general cuff use
1) Put 6 jacks of 1 single hose to 6 sockets of a cuff.
2) Wear a cuff to a patient.
3) Connect a hose plug to a socket of machine.
In one touch cuff use
1) Connect a plug of 1 single hose to a socket of a cuff.
2) Wear a cuff to a patient.
3) Connect a hose plug to a socket of machine.
16/21
(2) For two cuffs use
In general cuff use
1) Put 12 jacks of 1 double hose to 6 sockets of a cuff.
2) Wear a cuff to a patient.
3) Connect a hose plug to a socket of machine.
In one touch cuff use
1) Connect 2 plug of 1 double hose to a socket of a cuff.
2) Wear a cuff to a patient.
3) Connect a hose plug to a socket of machine.
※ Caution: In the case of two arm cuffs use, as arm cuff is applied near to a heart, please keep a
protector near a patient or under a doctor’s indications.
17/21
(3) For half pants use
- Please wear half pants.
- Put 12 hose jacks of a double hose to 12 cuff sockets on half pants by matching
the colors.
(4) How to use extension zipper
- As a leg cuff or an arm cuff is too small, a user want to enlarge the cuff, please use
extension zipper as above picture.
- To attach an extension zipper to a cuff, open fully the zipper of leg cuff and connect a
leg
extension zipper with zipper of a cuff and then close it with zippers.
18/21
8. Check points for something wrong
Operation condition
Checking point
- Plug correctly inserted into outlet?
No electric power
- AC220V?
- Fuse short?
Power on but not-operating
Noisy during operating
No air in the hose
Pull out power plug and reinsert it into outlet.
-Horizontally installed?
-Any material on the device?
-Hose plug correctly inserted into the
device?
19/21
20/21
DISPOSAL
The product must not be disposed of along with other domestic waste. The users must dispose of this
equipment by bringing it
to a specific recycling point for electric and electronic equipment. For further
information on recycling points contact the local authorities, the local recycling center or the shop where the
product was purchased. If the equipment is not disposed of correctly, fines or penalties may be applied in
accordance with the national legislation and regulations.
GIMA WARRANTY CONDITIONS
Congratulations for purchasing a GIMA product.
This product meets high qualitative standards both as regards the material and the production.
The warranty is valid for 12 months from the date of supply of GIMA.
During the period of validity of the warranty, GIMA will repair and/or replace free of charge all the defected
parts due to production reasons. Labor costs and personnel travelling expenses and packaging not included.
All components subject to wear are not included in the warranty.
The repair or replacement performed during the warranty period shall not extend the warranty.
The warranty is void in the following cases: repairs performed by unauthorized personnel or with
non-
original spare parts, defects caused by negligence or incorrect use.
GIMA cannot be held responsible for malfunctioning on electronic devices or software due to outside agents
such as: voltage changes, electro-magnetic fields, radio interferences, etc.
The warranty is void if the above regulations are not observed and if the serial code (if available) has been
removed, cancelled or changed.
The defected products must be returned only to the dealer the product was purchased from.
Products sent to GIMA will be rejected.
21/21