1
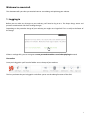
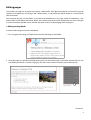
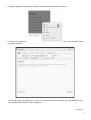
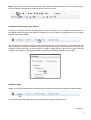
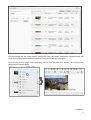
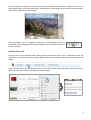
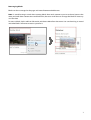
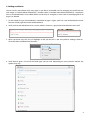
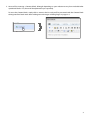
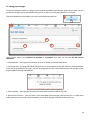
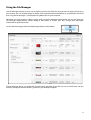
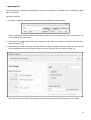
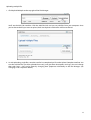
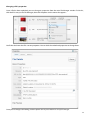
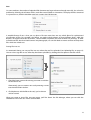
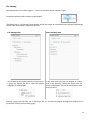
concrete5 editing cheat sheet
Welcome to concrete5.
This document tells you what you need to know to start editing and updating your website.
1. Logging in
Before you can make any changes to your website, you'll need to log in to it. This keeps things secure and
prevents unauthorised users from making changes.
Depending on the particular design of your website, you might see a login link. This is usually in the footer of
the design:
If there is no login link, you can navigate to www.yourwebsiteaddress.com/index.php/login instead.
The toolbar
Once you're logged in you'll see the Toolbar across the top of your website:
This lets you know that you're logged in and allows you to use the editing functions of the CMS.
1
Editing pages
The contents of pages are arranged into sections called 'blocks'. Each block corresponds to a particular type of
content, for example text and images (the Content block), a staff profile (the Person block) or a contact form
(the Form block).
You can generally add as many blocks as you like to the editable areas of a page, which are denoted by a red
outline when in Edit Mode (see below). Blocks are stacked vertically and once created they can be re-arranged
or even moved from editable area to another (for more on that, see Rearranging blocks on page 7).
i. Editing existing blocks
In order to edit a page it must be in Edit Mode.
1. First, navigate to the page you'd like to edit and click Edit Page in the Toolbar:
2. Once the page has reloaded into Edit Mode, you'll see red dashed boxes around the content that you can
edit. When you rollover a red box it'll go grey. This tells which section of content you're about to edit.
continued...
2
3. Clicking a greyed box will bring up a menu. Click Edit to change the block's contents.
4. In most cases you'll be changing text and images, so you'll be presented with a Content Block editor
when you click Edit:
You can type, select and delete text as easily as in a word processor. Giving text styles like bold and italic is
easy, and keyboard shortcuts work as expected.
continued...
3
Note if you'd like to paste in text from an email, a document or another website, it's best to use the 'Paste as
plain text' button. Once you have clicked it you can paste in your text.
Linking to another page on your website
In many cases you'll want to link to other pages on your site, to allow users to navigate to relevant areas of
the website without using the pre-defined navigation. This can be done by clicking the Insert Link to Page
link above the editing toolbar:
This will display the website's Sitemap, which displays the pages on the website in a hierarchical tree (for
more information see Using the Sitemap on page 16). Because the pages on your website are arranged into
categories, finding the page you want to link to is simple. Clicking the plus sign next to a page name will
display its 'child' pages, i.e. those pages within its category, and clicking a title will insert the link.
Adding an image
Images can easily be added to the Content block by clicking the Add Image link above the editing toolbar:
This displays the File Manager, where you can choose the image you'd like to insert.
continued...
4
The File Manager lets you search for files, upload new ones, edit images, change files' descriptive data and
much more. To find out more read the section on Using the File Manager on page 11.
To insert your chosen image, click it and select Choose from the menu that appears. This will insert the
image into the Content block.
continued...
5
Once the image is inserted, you can change its properties (dimensions, position in relation to text etc.) by
selecting the image. You'll know the image is selected when it shows eight white 'handles' around its border.
Click and drag these to resize the image:
Other parameters such as alignment, description, vertical/horizontal spacing
and border can be changed by clicking the image icon on the toolbar when the
image is selected.
Adding a link to a file
You may want to add a hyperlink which allows the user to download a file, such as a document or PDF. The
procedure is very similar to adding an image. When editing a Content block, click the Add File link above the
toolbar:
Again, you'll be shown the File Manager, where you can find the file you're looking for. Click Choose on its
menu and a link to it will be inserted into the Content block:
6
Rearranging blocks
Blocks can be re-arranged on the page and moved between editable areas.
Note it's worth bearing in mind when creating blocks how much content to put in each one, because the
more you break down content into sensible chunks, the easier it will be to re-arrange the blocks if necessary
at a later date.
To move a block, click it while in Edit mode and choose Move from the menu. You can then drag it around
and other blocks will move to create a space for it.
7
ii. Adding new blocks
You can stack as many blocks of as many types as you like in an editable area. For example, you could have text
and images (a Content block) followed by a Youtube video (a Youtube Video block) followed by a comments
form (a Guestbook block). Once added, blocks can be easily re-arranged (as we've seen in Rearranging blocks on
page 7) or deleted.
1. To add a block, first go into Edit Mode as described on page 2. Again, you'll see a red dashed border around
the areas of the page that can be edited/added to.
2. You'll see that each editable area has a name, which is shown in a grey-dashed box below the area itself:
3. When you hover over this area, it'll highlight to tell you that this is the area you'll be adding a block to.
Click and select Add Block from the menu:
4. You'll then be given a list of all the block types you can add. Depending on your particular website, the
options may vary.
8
5. Here we'll be inserting a Content block, although depending on your website we may have included other
specialised blocks. If so, those will be explained to you separately.
To insert the Content block, simply click its name in the list and you'll be presented with the Content block
editing interface. Read more about adding text and images at Editing Pages on pages 2-6.
9
iii. Saving your changes
Once you've edited or added to a page, it must be published before your changes appear on the web. You can
preview the changes you've made before they go live, to make sure everything appears as it should.
Click Exit Edit Mode on the Toolbar, and you'll see the following interface:
4
1
2
3
Here you can choose to (1) discard, (2) preview or (3) publish your edits. You can also (4) add version
comments.
1. Discard My Edits – the page reverts to the state it was in before you entered Edit Mode.
2. Preview My Edits – the page will reload and you'll see it as it will appear on the web when it is finally published.
Once you've reviewed your changes, you can click Approve Version in the notification on the top right of the
page to publish the page immediately.
3. Publish My Edits – the page goes live with your edits which are then visible on the web.
4. Add Version Comments – you can enter a short description of the changes you've made. This is useful when
looking over previous versions of the document, to see what changes have been made in the past.
10
Using the File Manager
The File Manager provides an easy way to organise and classify all the files that you want to display or link to on
your website. This can include images or photos, PDF or Word document downloads or spreadsheets. You'll find
that using the File Manager is a lot like browsing offline files on your computer.
Whenever you insert or link to a file in a page, you'll use the File Manager to find the file. You can also open the
File Manager independently, without being in Edit Mode, to browse your files, change their descriptive
information or upload new ones.
To view the File Manager, click the File Manager button on the Toolbar:
The File Manager shows a list of the files that have been uploaded to the CMS. You can search for files, and sort
them by clicking the column headers, just like on your desktop computer.
11
i. Uploading files
There are two main methods for uploading files. The one to use depends on whether you are uploading a single
file, or several files.
Uploading single files
1. To upload a single file, click the Browse button in the top-right of the File Manager:
You'll be presented with the ordinary file browsing interface for your operating system. Find the file you
want to upload, then click Open.
2. Click Upload to transfer the file from your computer to the CMS. The spinner is displayed while the file is
being transferred:
3. Once the file has been transferred, you'll be shown the Upload Complete interface, where you can give the
file some descriptive data and assign it to one or more sets (for more on sets, see Sets at page 15).
When you click Save, the file will be added to the File Manager along with the information you entered.
12
Uploading multiple files
1. Click Upload Multiple on the top-right of the File Manager:
You'll see the Add Files interface. Click the Add Files link and you can add files from your computer. Once
you've chosen the file you want to upload, click Start Uploads and the files will be transferred.
2. As with uploading single files, once the transfer has completed you'll see the Upload Complete interface. You
can then add the files you have uploaded into set(s), and give them descriptions and tags. You can't change
their titles here – that can be done by changing their properties individually in the File Manager (see
Changing a File's Properties below).
13
Changing a file's properties
Once a file has been uploaded, you can change its properties from the main File Manager window. To do this,
click the file's entry in the File Manager, then click Properties on the menu that appears:
You'll then be shown the file's current properties. You can click the underlined properties to change them:
Once you've changed something, click the pencil icon or press Return to save your changes.
14
Sets
On some websites, the number of uploaded files becomes too large to browse through manually. Sets solve this
problem by allowing classification of files, much like normal folders or directories. To display the files contained
in a particular set, click the checkbox next to its name in the File Manager:
A notable feature of sets is that you can place a file into more than one set, which allows for sophisticated
classification of files. For example, the Photos set might include photos of many different kinds, while the
Banners set might include lots of banners, some of which are photos and some of which are drawings. In order
to find those files which are both banners and photographs, we can click both set names to filter out only those
files which are in both sets.
Putting files into sets
As mentioned above, you can put files into sets when they are first uploaded (see Uploading files on page 12).
You can also assign files to sets after they have been uploaded, by clicking the Sets option in the file's menu:
1. Check the boxes next to the existing set names to add the
file into those sets.
Alternatively, you can create a new set by entering a name
into the Add to New Set box.
2. Click Update to add the file to the set(s) you've chosen
and/or created.
When you come to insert files into your pages you'll be shown the File Manager, where you can click the
checkboxes next to the sets' names to filter them.
15
The Sitemap
The Sitemap does as its name suggests – it shows an overview of your website's pages.
To open the Sitemap, click its button on the Toolbar:
The default view is 'Full Sitemap', which displays all the site's pages in a hierarchical tree structure. Alternatively,
you can view the Sitemap a single level at a time.
Full Sitemap view
One Level Only view
In Full Sitemap view, clicking the plus arrow next to
a page will expand the list to show that page's
subpages (or 'child pages'):
In the One Level Only view, to navigate to a lower
level in the hierarchy, clicking the page's icon will
show its child pages. The trail at the top shows what
level you are at.
Clicking a page's title will take you to that page. This is a fast way to navigate through your website and is
particularly useful if you have many pages.
16
©2010 Laurence Diver @ www.39stepsstudio.com
Licensed under a Creative Commons Attribution-ShareAlike 2.5 UK: Scotland License