1
64 Inputs and Encoders Configuration
Version 4.0.0
User Manual
Copyright © 2010 Ruscool Electronics Limited
Table of Contents
64 Inputs and Encoders Configuration
Encoder Setup
Save Configuration
Test Inputs
64 Inputs and Encoders Configuration
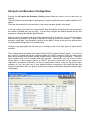
Running the 64 Inputs and Encoders Config program allows the user to set up each input as
desired.
The board has its inputs arranged in eight groups of eight to enable the use of readily available CAT5
cables.
There are also terminals for the connection of two rotary encoders directly to the board.
If you are running more than one 64 Inputs board, drop down Board Config from the menu and select
the number of boards that you are using. You can then configure the different boards through this
program by selecting the relevant 'Board Number' .
Banks 7 and 8 can also be used as encoders instead of inputs if required. If you need 4 encoders,
select Bank 8 as encoders by clicking on the Bank 8 button at the top of the screen. If you need 8
encoders, select Bank 7 as encoders by clicking on the Bank 7 button at the top of the screen which
will automatically change Bank 8 to encoders also.
Clicking on the appropriate tab will allow you to configure each of the eight banks of inputs and/or
encoders.
The 64 Inputs board will handle other items that the FSUIPC offset list doesn't handle. You can use
any of the FS Controls that can be configured within the FSUIPC module in Flight Sim and access
them directly through this program without assigning them inside the flight sim program. These are
65xxx numbers and a list is included within this program. Alternatively, you can use the 'Create
Mouse Macro' or 'Key Presses' options in FSUIPC, and use a mouse click on the screen to be
controlled by a keypress combination (ie Ctrl-y) to operate this function. Using our 64 Inputs Combo
software, you can now have one of your physical buttons (connected to the board) simulate this
keypress combination when you press it (or any other keypress combination assigned inside the flight
sim program).
Select the version of Flight Simulator that you are using, or manually type the full program name as
this is used for key emulation purposes.
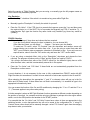
Key Emulation
• Tick the "Key?" checkbox if the switch is to emulate a key press within Flight Sim.
•
Manually type the "Description" to identify the switch for yourself.
•
Enter the "On Value". If the CTRL key is to precede the keypress, press the ^ key and then press
the required key(s) or + if the SHIFT key is to precede the keypress (eg CTRL-Y would be ^Y). If
using function keys type the function key name inside curly brackets (eg Home key would be
{HOME}).
FSUIPC Selection
• Click on the “Category” drop-down and choose the item required.
If you don’t know which category the item is related to, you can choose (All).
If the offset isn't listed, you can select " ...Custom..." and enter your own details.
To select an FS control, select "FS Controls" from the drop-down and another screen will
popup allowing you to select the action from a list. If you are using a control that ends with
"SET" you will need to enter a parameter, otherwise it will default to zero. If you only have one
required action, select it from the "ON" section only and leave the "OFF" section blank.
•
If you are using a standard offset, click on the “Description” drop-down and choose the item
required. The program will show you the “Offset” and the “Bytes” as used by FSUIPC.
You will also see above that some of the FSUIPC offsets (ie. the different Lights) have a suffix
after the offset value, and this is automatically catered for in this system.
•
Enter the "On Value" and "Off Value" if these fields are not automatically populated from the
Description or other screen.
In most situations, it is not necessary for the user to fully understand how FSUIPC works with MS
Flight Simulator, but sometimes it is useful to know what sort of values are required in the On and Off.
When selecting the description, the appropriate “1” and “0” or relevant values will pop up in the On
Value and Off Value boxes. If these boxes are not filled in automatically, it is essential to type in the
appropriate information by hand.
You can reverse the function of the On and Off conditions by changing the “1” to a “0” and the “0” to a
“1”. (The same applies to any other value pairing)
A further example is when an MS Flight Simulator function generates a different number depending on
the position of a switch. An example would be using two switches to perhaps drive the engine starter
switch, one for the GEN position and another for the START position.
It is essential that the “On Value” and “Off Value” boxes have values in them as appropriate to the
switching function, or else that particular line will not be saved in the configuration file. If using FS
Controls, these values should not be manaully changed - select "FS Controls" again from the category
drop-down to alter your selection.
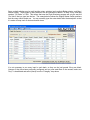
Some cockpit switches may be multi-position rotary switches (such as Auto-Brake selector, and Mag /
Starter switch). These types of rotary switches can be connected to Bank 1 or Bank 2 only, and they
need an "Off Value" of -999. This means that now the Flight Simulator program will only be sent the
"On Value" that you type into the box. The example below shows the Engine Starter Switch positions
that the rotary switch would use. You can manually type the extra details after the description so that
it is easier to keep track of what each switch does.
It is not necessary to use every input in each bank, so they can be just ignored if they are blank.
However if they have been previously configured and you now want them to be unused, make sure
"Key?" is deselected and select (None) from the "Category" drop-down.
Encoder Setup
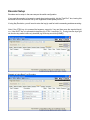
Encoders can be setup in the same way as the switch configuration.
If you want the encoder to increase in speed when turning quickly, tick the 'Fast Enc?' box, leaving this
box blank will turn the encoder one by one regardless of the speed you turn it.
If using Key Emulation, you will need to enter the key(s) used for both incrementing and decrementing.
Note: If the CTRL key is to preceed the keypress, press the ^ key and then press the required key(s)
or + if the SHIFT key is to preceed the keypress (eg CTRL-Y would be ^Y). If using function keys type
the function key name inside curly brackets (eg Home key would be {HOME}).
Example of using Bank 7 as Encoders:
Save Configuration
The system does not automatically save your changes, so it is necessary to press the “Save” button
in the top left-hand corner if you wish to save your changes before you exit the program.
Pressing the "Exit" button will shut down the 64 Inputs and Encoders Config program without saving
any changes.
Test Inputs
There is a 64 Inputs Test program that can be used to validate your switches/pushbuttons before
running the configuration program. This can be useful if the switches are already wired and you need
to figure out how you wish to configure them.
This program can be found either in the Program Menu under 'Ruscool Applications' or in the '64
Inputs and Encoders' directory in Windows Explorer.
While running this program you can operate switches and/or pushbuttons one at a time and see which
bank and switch number they are wired to. It is suggested that you operate the switch/pushbutton a
couple of times to ensure that the correct reading is shown. As some switches can already be ‘ON’
when this program is started, you can get misleading results the first time you try a switch on each
bank.