1
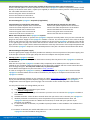
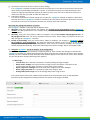
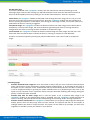
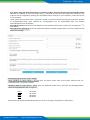
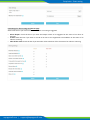
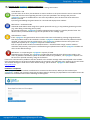
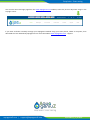
INSTALLATION INSTRUCTIONS AQUAGENIUZ Water control / monitoring system 1. Description: AquageniuZ is a fully automatic and autonomous water management system that sends reports and alerts in the event of leaks or water wastage. The AquageniuZ module can autonomously shut off the water supply using a special, motorized ball-type valve (AquageniuZ stopcock) in the event of major leaks. Smaller problems are reported, without shutting off the water supply. By fitting the AquageniuZ module, all pipes and devices using the water mains are protected against leaks, pipe ruptures and water wastage. 2. AquageniuZ models: Check which model you have purchased to better understand the steps required to fit it: AquageniuZ Starter: is only the module including a pulse cable for a standard clock water meter. AquageniuZ Standard: module + additional water meter module + stopcock AquageniuZ Premium: module including 2 water meters and 2 stopcocks (for example for rain and mains water). Note: the kits are supplied standard for a pipe diameter DN20 of ¾”. Check that you have ordered the correct kit before you start to fit the device. Optionally the AquageniuZ module can measure the pressure and/or temperature of the water in the pipes and send a report. The module will generate the necessary alarms, should the measured water pressure/temperature become too high or too low. Alarms are sent by e-mail and/or text message, so the user is immediately notified of any problems. 3. General installation guidelines: Always install the AquageniuZ module in a frost-free environment, a moisture-free area and in an easily accessible location. Install the module always at eye level so the LCD screen is easy to read and the controls are easy to operate. Make sure no water can drip or splash onto the AquageniuZ . If you have also purchased an AquageniuZ water meter and/or AquageniuZ stopcock, we recommend that you first fit these before continuing with the installation of the AquageniuZ module. Guidelines for the installation of the AquageniuZ water meter and the AquageniuZ stopcock are specified in the separate instructions provided: Mounting the AquageniuZ water meter and stopcock (Appendix 3). It is recommended that you always run the cabling between the AquageniuZ module and the AquageniuZ stopcock and water meter through a conduit. This to prevent damage to the wires and to stop any cable connections from detaching. Check that the pressure and temperature in the pipes corresponds to the specifications of the valve. The AquageniuZ is suitable for water up to 90°C and a maximum pressure of 10 Bar. Note: the AquageniuZ module can operate independently, however, you can only use all functions if you also have an Internet connection. The module can automatically connect to the Internet if you have a wireless network. You can also choose to work with a fixed cable between your Internet router and the AquageniuZ module. A special connector can be purchased for this purpose. See also point 4 Mounting the module. If you need to fit a water meter or stopcock to the pipes, make sure to do this before you fit the electronic AquageniuZ module. aquageniuZ.com | [email protected] Stop leaks - Start saving 4. Fitting the AquageniuZ module Start by fitting the water meter and valve in your pipes (see Appendix 3 ) Next fit the module. Place the paper drill template (Appendix 1 – Figure 1) in the location where the AquageniuZ module is placed and drill on the crosses in the four corners with a drill of 6 mm. Remove the drill template and insert the 4 plugs supplied into the holes. Carefully open the AquageniuZ by unscrewing the 4 screws. Insert the screws and mount the cabinet to the wall. If you want a fixed cable connection to your Internet router instead of using a wireless network, you can do so using a standard network cable. To manoeuvre the cable outside the cabinet, carefully uncover the recess (notch) available for the network cable on the right. Close the lid and tighten the 4 screws. 5. Diagram of the AquageniuZ module input and output terminals. Appendix 1 – illustration 2 is a diagram of the different input and output terminals of the AquageniuZ. It is of the utmost importance that this diagram is adhered to in order to guarantee that your AquageniuZ operates optimally. Connections 1 – 18 are input terminals. Connections 19 – 24 are output terminals. Terminals 25 - 26 are reserved for the power supply. 6. Connecting the different parts to the AquageniuZ 6.1 Installing the pulse cable to the existing water meters Follow the installation guidelines for the pulse cable the instructions provided in Appendix 2: Mounting pulse connection to water meter. 6.2 Water meter and stopcock (only if applicable) Follow the installation guidelines in the instructions provided in Appendix 3: Mounting the water meter + valve. 6.3 External control by intruder alarm system or remote switch There is the option to connect the AquageniuZ to an existing intruder alarm system or a remote switch. This makes it possible to shut off the water supply when the relay of the intruder alarm system, or the switch, is off. To establish this connection, a 2-wire cable is required between the intruder alarm system and the AquageniuZ module. The relay must be on when the intruder alarm system is not switched on and off when the system is enabled. Contact the engineer who fitted the intruder alarm system to check the options. To connect the AquageniuZto the intruder alarm or to connect a switch, please ensure you keep to the guidelines below: Connect the first wire from the alarm system or remote switch to terminal 9. Connect the second wire from the alarm system or remote switch to terminal 10. 6.4 Temperature sensor (Only available if you have ordered this option separately) Mount the temperature sensor against the water mains using a tensioning belt. Make sure the pipe and the sensor make contact. Connect the temperature sensor according to the instructions below: Connect the yellow wire from the temperature sensor to terminal 13. Connect the red wire from the temperature sensor to terminal 14. Connect the blue wire from the temperature sensor to terminal 15. 6.5 External leak sensors (Only available if this option has been ordered separately) External leaks in critical places are registered by the AquageniuZ module and an alarm is forwarded by e-mail and/or a text message is sent. It is also possible to shut off the AquageniuZ stopcock in order to stop the leak. Connect the first wire from the remote leak detection system to terminal 11. Connect the second wire from the remote leak detection system to terminal 12. aquageniuZ.com | [email protected] Stop leaks - Start saving 6.6 Connecting the pressure sensor (only available if this option has been ordered separately) There is also the option to connect a pressure sensor to the AquageniuZ module. This pressure sensor is fitted directly to the water mains with a T-piece (not supplied) to measure the mains pressure. The pressure sensor has a threaded connection of G1/2”. Connect the green wire to terminal 16. Connect the red wire to terminal 17. Connect the black wire to terminal 18. 6.7 Connecting the AquageniuZ stopcocks (if applicable) Stopcock No.1 for example for mains water Stopcock No.2 for example for rain water Connect the yellow stopcock wire to terminal 5. Connect the yellow stopcock wire to terminal 7. Connect the white stopcock wire to terminal 6. Connect the white stopcock wire to terminal 8. Connect the black wire to terminal 19. Connect the black wire to terminal 22. Connect the green wire to terminal 20. Connect the green wire to terminal 23. Connect the red wire to terminal 21. Connect the red wire to terminal 24. NOTE: manual operation of the AquageniuZ stopcock There is always the option to operate the AquageniuZ stopcock manually. Make sure you have removed the plug from the power supply so the AquageniuZ module is not live. The current position of the valve is always shown by the red line in the round transparent window on the top of the AquageniuZ stopcock. If the red line is at a right angle to the pipe, this means that the valve is closed. If the red line is in the same direction as the pipe, then the valve is open. Pull the white control button at the top of the motor of the stopcock upwards and turn until the AquageniuZ stopcock is in the desired position. Then push the white control button back down. 6.8 Connecting to the power supply Insert the green power supply terminals (numbers 25 and 26) in the correct position of the power supply. (This is the two pin connector on the right.) Only then insert the adapter into the power socket. 7. Starting up the AquageniuZ module Once all the AquageniuZ kit components have been mounted, then the power to the AquageniuZ module can be switched on. After the start-up of the AquageniuZ module is fully completed, the IP address (this is the address of this module on your computer network) will appear on the LCD screen, together with the current water flow that flows through the pipes. This may take a little time, so please be patient. The IP address that appears on your LCD screen is: http://10.0.0.1. In order to configure the AquageniuZ module, you must connect to the AquageniuZ Wi-Fi network of the AquageniuZ module. Refresh the list of Wi-Fi networks on your laptop or smartphone and connect to the AquageniuZ network. Now enter the following address on your computer or tablet: http://10.0.0.1/config (in the address bar in the top of your web browser) (Internet Explorer, Google Chrome, Firefox, Safari, etc.), and the AquageniuZ configuration screen will appear (see next page). The connection to the module may take a few seconds. You only need to enter the settings below just once: User settings a) Language: select the language of your choice. Network configuration a) LAN or wireless: select the type of connection you want to use to connect the AquageniuZ module to the Internet. b) Available networks: select the Wi-Fi network here that you want to use to connect your AquageniuZ. c) Wireless password or network key: enter the password of your selected network. Note: the AquageniuZ will only connect to a WPA2 secure network, so check with your operator if you encounter any problems. d) If a LAN connection is selected, it is possible to specify a DHCP or static IP address. For wireless this is simply DHCP If no network is selected, the module will build its own a Wi-Fi network with the network name AquageniuZ and the IP address http://10.0.0.1 aquageniuZ.com | [email protected] Stop leaks - Start saving 8. a) b) c) d) e) f) g) AquageniuZ configuration: Select whether one or two stopcocks are connected (no check = no stopcock). Select whether a temperature sensor and/or pressure sensor has been fitted. Pipe diameter: select the diameter of the pipe that your AquageniuZ water meter is connected to. The most common standard diameter for residential systems is DN20. Always measure the diameter of the water pipe. Litres per pulse: enter the number of litres of water per pulse that the water meter generates. The AquageniuZ water meter supplied with the AquageniuZ module always supplies 1 pulse per litre. Pipe pressure: enter the pipe pressure of the water. If in doubt, set it to 3 bar. If the optional pressure sensor has been fitted to the pipe, then the pipe pressure is automatically set in the AquageniuZ module. If a booster pump or pressurized water system is installed, enable this option. Even if the pressure in the pipes fluctuates greatly, then this option should be activated. If a second water meter is installed, this option should also be selected, with the settings to be set the same as for water meter 1. These settings will appear if this option is selected. If a second water meter has not been installed, then there is the option to set the AquageniuZ module to unlimited mode for a maximum of 24 hours, using a remote control. Do this by selecting 'External operation fitted for unlimited water use'. This relay, which is normally open, should be connected to terminals 3 and 4. aquageniuZ.com | [email protected] Stop leaks - Start saving g) Connection to external controls or alarm system settings . If an AquageniuZ stopcock has been mounted to the water pipe, it can then be shut off when the intruder alarm system of the building is enabled. To do this, a connection using a 2-wire cable between the two systems is required. The stopcock will shut off when this relay closes; connect to terminals 9 and 10. To activate this function you need to select the check box. h) Leak sensor settings If an external leak sensor has been fitted, this can alert the AquageniuZ module if it detects a water leak. The leak alarm in the AquageniuZ module is activated if this relay closes the external leak sensor. Connect to terminals 11 and 12. To activate this function you need to select the check box. Operating the AquageniuZ module: 3 options The AquageniuZ module can be operated in different ways: 1. Manually using the 4 push buttons: see Chapter 10 ‘Function of the push buttons of the AquageniuZ module’. The four push buttons in the module allow you to manually complete some of the basic settings and operations. 2. Remotely, using your smart phone, tablet or computer: see the User Manual ‘My.aquageniuz.com’. At My.aquageniuz.com users can find a complete summary of their water usage, any alarms and they can fully manage the AquageniuZ remotely. 3. Locally in the building, with your smart phone, tablet or computer: see Chapter 9 ‘AquageniuZ use via the IP address: local management’. By using the module's IP address, users can log in to the building locally to enter settings and/or make modifications. Even if there is no Internet available, the AquageniuZ module will operate faultlessly: stop water leaks and prevent water wastage. Alarms are audible locally. 9. Using the AquageniuZ via the IP address: local management After all the configuration steps have been completed, click on 'Save' and the new settings are saved in the AquageniuZ module. The module will automatically reboot with the new settings for the water meter and the network. Once the module has fully rebooted, the IP address appears on the LCD screen. Enter this IP address into the web browser and the following screen appears: 9.1 Data page • Current flow: this is the flow rate which is currently flowing through the pipes • Water meter reading: this is the total water usage since the installation. This value can be synchronized with the water company's current water meter reading. • Water usage since midnight: this is the total water usage in litres since midnight. • Water usage yesterday: this is yesterday's total water usage in litres. • Average daily water usage: this is the average daily water usage in litres If two water meters have been installed, then the data of the second water meter is also displayed. The values of the temperature and pipe pressure are shown on this page, if enabled. aquageniuZ.com | [email protected] Stop leaks - Start saving 9.2 Warnings page If an alarm is activated in the AquageniuZ module, then the web browser will automatically go to the 'Warnings' page. Under current warnings you will find the details of the alarm that has been activated. An alarm can be accepted by the user by clicking on one of the coloured buttons. There are 3 options: •False Alarm: The AquageniuZ module has detected a leak through the water usage, but it is not yet a real leak. This can happen during the first period of time, when the AquageniuZ module was first installed. If an alarm or warning is accepted as a 'False Alarm', then during the next usage of water, more water needs to be used before the alarm or warning is triggered. •Exceptional usage: The AquageniuZ module has detected a leak in the water usage, but the leak is due to exceptional, once-only water usage. The internal values for generating the alarm or warning will not be changed after this alarm or warning has been accepted as 'Exceptional usage'. •Leak resolved: The AquageniuZ module has detected a leak through the water usage, this leak was a real water leak. After the leak has been resolved, the alarm or warning is accepted as "Leak Resolved'. An alarm can also be accepted by pressing the yellow module button. This is then saved as 'Exceptional usage'. 9.3 Settings page • Activate unlimited water usage for: enter the number of hours that you want to allow unrestricted water usage. This function can be activated by pressing the blue module button, or by checking the box next to this option on your computer screen. Unlimited use will stop automatically after the set time is reached, or it can be stopped manually by pressing the yellow module button or by deselecting the box next to this option on your computer screen. Important: always save your data after modifying the settings. During this period, no leaks have been detected. • Activate daily limit for water usage: there is also the option to set a maximum daily usage in the AquageniuZ module. If the specified daily usage is exceeded, then the AquageniuZ module generates an alarm or warning, and the stopcock will shut off depending on the settings under 'warnings and alarms'. • Activate vacation volume limit: the AquageniuZ module allows you to specify a daily usage limit during the holiday period. Once the daily usage limit has been reached, the stopcock will shut off and reopen at midnight without the need to accept the alarm. This option can be useful if, for example, you want your neighbours to be able to water your flowers in your absence. aquageniuZ.com | [email protected] Stop leaks - Start saving • • • • If no water usage has been detected for an X amount of days, then the stopcock will automatically switch off: enter the number of days you will be away, i.e. the days that you want the stopcock to switch off. The stopcock can be reopened by pressing the red module button. Enter 0 on your computer, so that this option is not activated. These options will only work if the AquageniuZ module is connected to the Internet and you have an account at my.AquaGeniuz.com. (User Manual for my.aquageniuz can be downloaded from the website www.aquageniuz.com support) Send alarm e-mail to: enter the e-mail address for the recipient of the alarm e-mails. You can specify a 2nd email address. Send alarm text message to: enter the international phone number (without 00 or +) for the recipient of the alarm text message. 9.4 Settings page for water meter reading •Meter Reading for Water Meter 1 and 2: enter the water meter value of the water meter(s) that are connected to the AquageniuZ module. •Maximum flow for water meter 1 and 2: enter the maximum water flow in the pipe. The following default values are programmed in the AquageniuZ : DN15 DN20 DN25 DN32 20 lit/min 25 lit/min 30 lit/min 35 lit/min These values are adjusted automatically when an alarm or warning is accepted as a 'False Alarm'. aquageniuZ.com | [email protected] Stop leaks - Start saving 9.5 Settings for the warnings and alarms page Select what action you want activated if an alarm or warning is triggered. • • • Alarm beeper: check the box if you want the beeper alarm to be triggered in the event of an alarm or warning E-mail: check the box if you want an e-mail to be sent to the registered e-mail address in the event of an alarm or warning. Shut off the valve: check the box if you want the valve to be shut off in the event of an alarm or warning. aquageniuZ.com | [email protected] Stop leaks - Start saving 10. Function of the AquageniuZ module push buttons: Manual operation that allows you to perform some basic settings and actions: Green button = OK a) In the event of an alarm, the OK button is used to confirm to the system that the user is aware of the alarm and will take action regarding the leak. If you have specified in the settings that you want AquageniuZ to emit an audible alarm in the event of problems, then the alarm will cease when this button is pressed . b) Pressing and holding the green button for 5 seconds will display the IP address. Blue button = Unlimited mode Unlimited mode allows water usage for a specific period of time (e.g. 1 day) without generating an alert (e.g. when filling a swimming pool or pond). By pressing this button, AquageniuZ will allow unlimited water usage for a specific period of time. The duration of any unlimited water usage can be specified on the 'settings' page. Yellow button = Reset If the AquageniuZ has generated an alarm and the alarm was confirmed by pressing the green button, then the problem needs to be resolved. To let the AquageniuZ module know that the problem has been resolved, you need to press the yellow button. The AquageniuZ module will restart the system and reopen the stopcock (if an AquageniuZ stopcock has been fitted). Even if a special mode has been activated (blue button = unlimited water usage, vacation mode or maximum daily volume), the system is restarted using the yellow button and the AquageniuZ module will revert to the default settings. Red button = For operating the AquageniuZ stopcock, if fitted. Depending on the settings, the AquageniuZ module will automatically shut off the water supply in the event of problems. Should the system not be able to detect any problems, the AquageniuZ stopcock can be shut off or opened manually, using the red button. If there are communication problems with the network or the network settings need to be adjusted in the module. Press simultaneously on the green and yellow buttons for 3 seconds, until 'Network reset' appears on the LCD screen. The network settings are then reset to their default settings. (Wi-Fi network: AquageniuZ and IP Address: http://10.0.0.1). Installation completed: The A quageniu Z module has been installed and is connected to the Internet. When you first ordered your AquageniuZ module, you received a username and login code for the http://my.AquaGeniuz.com website. Enter this address into the web browser and the following screen appears: aquageniuZ.com | [email protected] Stop leaks - Start saving You can also access the login page from the www.aquageniuz.com website; to do this, click on 'My water usage' in the top right corner. If you want to further remotely manage your AquageniuZ module using your smart phone, tablet or computer, then download the 'User Manual My.aquageniuz.com' from the website www.aquageniuz.com - support. aquageniuZ.com | [email protected] AQUAGENIUZ_II_EN_21102014