1
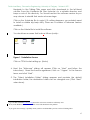
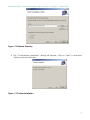
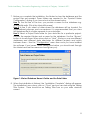
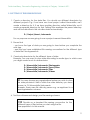
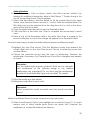
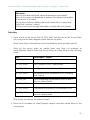
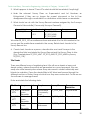
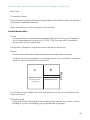
Dr Michael Barry, Geomatics Engineering, University of Calgary. 14 March 2011
TALKING TITLER MANUAL
Dr Michael Barry
Geomatics Engineering
University of Calgary
Software Update 14 February 2011
USING THE TALKING TITLER SYSTEM
1. Start by downloading the manual from the webpage. Read the INTRODUCTION thoroughly,
and browse through the TUTORIAL.
2. Install the software.
3. Download the tutorial data and work through aspects of the tutorial which are suited to your
needs. The tutorial is designed to work through some of the issues in creating land tenure
records in uncertain land tenure situations as well as provide instruction on using the software.
If you become a regular user, you should adapt this for your own needs and perhaps provide
your own data.
1
Dr Michael Barry, Geomatics Engineering, University of Calgary. 14 March 2011
Table of Contents
1. INTRODUCTION ................................................................................................................................ 4
1.1 MINIMUM SYSTEM REQUIREMENTS: .................................................................................... 5
1.2 INSTALLING THE SOFTWARE.................................................................................................. 5
1.3 SETTING UP THE RESOURCE FILES ....................................................................................... 9
1.4 DESIGN PROCEDURES ............................................................................................................. 11
2. TUTORIAL: TALKING TITLER OBJECT MANAGER ................................................................. 12
2.1 INTRODUCTION ........................................................................................................................ 12
2.2 CREATE DATA DIRECTORIES ................................................................................................ 13
2.3 SELECT THE DATA DIRECTORY ........................................................................................... 14
2.4 UNDERSTANDING DATA IN THE SYSTEM.......................................................................... 15
PART 1 BOUNDARY CONFLICT RESOLUTION ..................................................................... 15
PART 2 CENSUS AND EXPECTED PROPERTY RIGHTS ....................................................... 23
Part 3 Formalisation / Regularisation of Almondville .................................................................... 30
3 DESIGNING A PROJECT .................................................................................................................. 35
STEP 1: List Entities ........................................................................................................................... 35
STEP 2: DEVELOP QUESTIONS YOU MIGHT ASK OF THE SYSTEM .................................... 38
STEP 3: Develop Prefixes which uniquely define the entities ........................................................... 39
STEP 4: Document the Relationships between Entities ..................................................................... 39
STEP 5: DEVISE A SCHEME TO RELATE THE DIFFERENT ENTITIES AS PER THE TABLE
IN STEP 3 ........................................................................................................................................... 39
STEP 6: LIST THE ENTITIES IN THE LOOK UP TABLE OF REFERENCES AND MEDIA .... 39
STEP 7 PROTOTYPE THE SYSTEM............................................................................................... 40
STEP 8 DEVELOP SYSTEM BACK UP AND ARCHIVING PROCEDURES .............................. 40
4. HOW DO I…? .................................................................................................................................... 41
4.1 Procedures that applies to Configuration of a Project .................................................................. 41
4.1.1 Configuring the Project File Location .................................................................................. 41
4.1.2 Configuring the Database File Location ................................................................................ 41
4.1.3 Configuring the Lookup Tables ............................................................................................. 42
4.2 Procedures that apply to Person, Land Object, Reference Instrument, and Media records .......... 43
4.2.1 Add a New Record ................................................................................................................. 43
4.2.2 Modify or View Record Information ..................................................................................... 44
4.2.3 Delete a Record ...................................................................................................................... 44
4.2.4 Relate a Record with other Records ....................................................................................... 45
4.2.5 Display Related Records ........................................................................................................ 45
4.2.6 Modify or View Relations...................................................................................................... 46
4.2.7 Delete Relations ..................................................................................................................... 46
4.2.8 Search for a Record ................................................................................................................ 46
4.3 Procedures specific to Media Records .......................................................................................... 47
4.3.1 Show or Play Media Item ...................................................................................................... 47
4.3.2 Assign a LocationPoint to a Media Item................................................................................ 47
4.3.3 Access the Media Auxiliary Attributes Form ........................................................................ 47
4.3.4 Add Auxiliary Attributes for Media Items ............................................................................. 48
4.3.5 Update an Auxiliary Attribute for a Media Item.................................................................... 48
4.3.6 Delete an Auxiliary Attribute................................................................................................. 48
4.4 Procedures specific to Reference Instruments .............................................................................. 49
2
Dr Michael Barry, Geomatics Engineering, University of Calgary. 14 March 2011
4.4.1 Duplicate a Reference Instrument .......................................................................................... 49
4.4.2 Mark Reference Instruments as Closed ................................................................................. 49
4.5 Procedures specific to Land Objects ............................................................................................. 51
4.5.1 View Geometries of a Land Object........................................................................................ 51
4.6 Procedures specific to Geometry .................................................................................................. 51
4.6.1 Add Geometry ........................................................................................................................ 51
4.6.2 Delete Geometry .................................................................................................................... 51
4.6.3 Modify Geometry................................................................................................................... 51
4.7 Procedures specific to Spatial Points ............................................................................................ 52
4.7.1 Add the Spatial Points of a Geometry .................................................................................... 52
4.7.2 Modify the Spatial Points of a Geometry .............................................................................. 52
4.7.3 Delete the Last Point of a Geometry ...................................................................................... 53
5. FREQUENTLY ASKED QUESTIONS ............................................................................................. 54
Appendix A: KEY ENTITIES AND IDENTIFIERS ............................................................................ 55
3
Dr Michael Barry, Geomatics Engineering, University of Calgary. 14 March 2011
1. INTRODUCTION
Talking Titler is designed as a dynamic, scalable solution to land records, which allows
the management of data relating to land tenure such as land surveys and land
registration and communal land records. It has limited vector data storage
capabilities – it stores coordinates representing land objects and positions of media
items such as videos or photographs. In the long term it should be easy to
interchange data with various GIS packages.
Object manager is the simplest form of the Talking Titler system. It is Windows based
and has the minimum number of tables (entities). It is designed as a data
management system to handle data stored in the computer as digital files, in
database tables and analogue sources such as written documents, maps, diagrams,
video tapes, DVDs and CDs. In this form it is a good solution for a small survey
practice, a local level registration office or an NGO collecting data on land tenure. It
is also ideal as an education and training tool for land registration and other land
records systems. It is also very useful as a design and prototyping tool. A major feature
is the flexibility it allows in modelling relationships and this should allow potential users
to describe their needs and then try them out in a simple model and debate what’s
needed and what may be superfluous. The prototyping process should also indicate
the procedures and quality management functions that should go into a manual of
procedures.
Once you have tested the system, you need to write strict procedures on how it
should be used. You are strongly advised to work through the tutorial accompanying
the system before you start using it.
4
Dr Michael Barry, Geomatics Engineering, University of Calgary. 14 March 2011
1.1 MINIMUM SYSTEM REQUIREMENTS:
Computer and processor: 600 megahertz (MHz) processor or higher
Memory: 256 megabyte (MB) RAM or higher
Operating System: MS Windows XP or later
Prerequisite Software: to run the OM application, you need to have Microsoft .Net
Framework v2.0 (or higher) and MS-Access. The software installation process will install
this on your computer if it is not there already.
You might need to access and work with several multimedia files formats. Therefore
you need to have the appropriate multimedia applications to open these files, such
as:
Windows Media Player or
Real Player or
GOM player (free)
*.mp3, *.wav, *.jpeg, *.avi
MS Office
MS Word
MS Excel
MS Access
*.doc
*.xls
*.mdb
Image viewer software
*.jpg, *.gif
1.2 INSTALLING THE SOFTWARE
1. If you have Talking Titler on your computer, back up the existing database file
and all your data files to a different directory, preferably to an external drive.
You should do this regularly anyway.
2. Remove all previous versions of the software from your computer. Briefly browse
through section 1.3 Setting up the Resource Files before installing.
3. Download the setup file.
Go to Dr Mike Barry’s web page.
http://www.ucalgary.ca/mikebarry/
5
Dr Michael Barry, Geomatics Engineering, University of Calgary. 14 March 2011
Navigate to the Talking Titler page and click downloads in the left-hand
column. Save the tt-date.zip file (see footnote 1) to a suitable directory and
keep a note of this directory. You should archive the software version as you
may choose to reinstall that version at some stage.
Click on the tt.date.zip file to unzip it. (If nothing happens, you probably need
to install a suitable zip/unzip utility. There are a number of freeware versions
available.)
Click on the tt.date file to install the software
You should see a screen that looks as follows (note) 2:
Figure 1.1 Installation Screen
Click on TTOM to start setting up. (Note 3)
4. Next, the “Welcome” dialog will appear (Click on “Next” and follow the
instructions). Read the licence agreement, click on “I Agree” to the licence
terms, and click “Next”.
5. The “Select Installation Folder” dialog appears and provides the default
installation folder; the destination folder can be changed now (Click “Next”
when done).
1
2
3
e.g. a file that is named tt 11.02.14.1.zip means the version was created on 14 February 2011
If not, in the Window, select view and select icons. This should solve the problem.
If you get an error message, it probably means you have not deinstalled a previous version of Talking Titler.
6
Dr Michael Barry, Geomatics Engineering, University of Calgary. 14 March 2011
Figure 1.2 Software Directory
6. The “Confirmation Installation” dialog will appear. Click on “Next” to proceed
with the actual installation.
Figure 1.3 Confirm Installation
7
Dr Michael Barry, Geomatics Engineering, University of Calgary. 14 March 2011
7. Before you complete the installation, the folders to store the database and the
project files are needed. These folders are required in the “Special Folders
Configuration” dialog. If you have a look at the screen below.
Line 1In the first line of the box, you provide a name for the database e.g.
Almondville.mdb. (This is the tutorial file name)
Line 2: In line 2 you select a folder where the database will be located. For
organisational purposes and convenience it is recommended that you store
the database file in a folder separate to your data files.
Line 3: Select a Project Data folder for your data files for a particular project.
Provide the required folders and a name for the database. Use the “Browse”
button to locate them. When done click on “Next”. (Note you can use different
databases and different data directories for different projects and switch
between them – See the “Configuration” menu item once you have installed
the software. If you haven’t used Talking Titler before, you should work through
the tutorial and use the names we have given you).
Figure 1.4 Select Database Name & Folder and the Data Folder
8. When the installation is finished, the “Installation Complete” dialog will appear.
The installation is now done, click on “Close” and you can start using the Talking
Titler System. There should be an Talking Titler Icon on your main windows
screen.
8
Dr Michael Barry, Geomatics Engineering, University of Calgary. 14 March 2011
1.3 SETTING UP THE RESOURCE FILES
1. Create a directory for the data files. You should use different directories for
different projects. E.g. if we have one local project called Almondville, we’ll
create a directory for it. If we have another directory called Walnutville, we’d
create a separate directory for that. Talking Titler examines the parent directory
and will find data files in the sub-directories automatically.
D:\ Project_Name\ Instruments
For our purposes we are going to use a project named Almondville.
2. Ensure that
- you know the type of data you are going to store before you complete the
next step
- and that you have established file naming conventions for the different type
of data files. See Appendix A.
3. Create sub-directories for the different types of data.
Example: You may want to store data according to media type, in which case
you might create a set of subdirectories:
D:\Almondville\Instruments\Photographs
D:\Almondville\Instruments\Survey Plans
D:\Almondville\Instruments\Titles
D:\Almondville\Instruments\Videos
TIP You may choose any organisational system you wish to store
the data provided it falls is within the main directory you have
chosen i.e. D:\Almondville\Instruments.
Example: Some users file data by person e.g. an applicant in a
land regularization scheme.
4. Test the software and design your file naming schema.
! TIP
Decide on a standard file naming convention for the
different types of files before you start using the file.
See appendix A to this manual.
9
Dr Michael Barry, Geomatics Engineering, University of Calgary. 14 March 2011
5. Click on the Talking Titler icon on your main screen to run the software.
- In the top-most menu in Talking Titler, have a look at the Configuration menu.
-Look at configure look up tables;
-Work out how to add an item to the Look Up Tables to suit your specific needs.
The items entered in the Look Up Tables will appear in drop down menus in the
program.
- Look at Configure Project Folder Location.
- Look at Select Database File.
10
Dr Michael Barry, Geomatics Engineering, University of Calgary. 14 March 2011
1.4 DESIGN PROCEDURES
At the end of this section you may have the following protocols:
- Steps to access project
- Steps to enter data
- Standards for entry of data
- Backup protocols
1. Once you have familiarized yourself with the software, go and work through the
DESIGNING A PROJECT section.
Write down a formal set of steps for people to use the software. Ideally
personnel who enter data should have done the tutorial first. You need a
procedure to enter the data and create the relationships.
You also need to standardise the descriptions in each field. It is advisable to
create a MS-word document with a standard description. It is important that
the first line of the description should be a summary of the data entry. The
following is a standardised description suggested for Lagos State:
Line 1: RegularisationFileNo; Applicant name; Survey Plan Number; Date;
Media Type (the last item may be unique to each data entry).
Lines 2 onwards: Free form description of information relevant to the
application
2. Write down a procedure for backing up the software.
You should back up and archive the Almondville.mdb file, or the name you
have assigned to your database files, and your raw data files on a regular
basis. E.g. you should back up weekly and archive monthly. Can you recover
from a major disk crash or a virus infection on your computer? Have archives of
data and the database file (Almondville.mdb) for every month going back at
least a year, preferably two years. You should also back up and archive every
time you install a new software update.
11
Dr Michael Barry, Geomatics Engineering, University of Calgary. 14 March 2011
2. TUTORIAL: TALKING TITLER OBJECT MANAGER
2.1 INTRODUCTION
The following is a tutorial to help you understand the TTOM software and the
processes that it supports. It should be viewed as a means to develop a participatory
design approach to land records which can incorporate a range of tenure systems.
You should put all preconceived ideas of how a particular system works, or should
work, and all the instruments and the laws with which you are familiar behind you. The
objective is to examine how the software works, how we can document land tenure
and a range of other issues relating to land. Hopefully we may generate some new
ideas which may help in improving existing systems in your region.
Let’s start with a fictitious land titling project in Almondville. Note that photographs
and other media items have been taken in a variety of places and every effort has
been made to hide the identity of individuals.
The tutorial is best run in groups. Have marker pens, white boards and pieces of paper
available. Draw the relationships between the data items as you go along. Discuss
the relevant issues. Use the exercise to examine different alternative methods of
recording rights in land. What are the objectives of recording rights? How would you
see this contributing to social and political stability and perhaps economic
development?
You Need:
1. A computer with the System Requirements described in section 1. (see section
Minimum System Requirements).
2. Pieces of paper and different colour marker pens
3. Flip charts or white boards / chalk boards
12
Dr Michael Barry, Geomatics Engineering, University of Calgary. 14 March 2011
2.2 CREATE DATA DIRECTORIES
NOTE In the current software version, we can only run one
project at a time in a particular directory.
1. On your hard disk, create a directory TTOMTut (Talking Titler Object Manager
tutorial)
e.g.
D:\TTOMTut
2. Create a subdirectory called Media_Tut1. Let’s say we created your
subdirectory on the D: drive of your hard disk. Your directory tree should look as
follows:
D:\TTOMTut\Media_Tut1
3. Install the Talking Title software (see section 1.2 “Installing the Software” for
detailed instructions).
4. We have some data files for this tutorial in a file Media_Tut1.zip. Unzip the files
and extract them into the Media_Tut1 directory.
5. We are going to work with a fictitious project called Almondville. Create a
subdirectory of :\TTOMTut called Almondville and another called Almondville
Database. Your directory tree should look similar to the following:
D:\TTOMTut\Almondville
D:\TTOMTut\Almondville Database
6. Create the subdirectories of Almondville called Videos & Audios, Survey Plans,
Photographs, TitleDeeds, and Text Documents. Your Almondville Directory tree
should look as follows:
:\ TTOMTut\Almondville\Photographs
:\ TTOMTut\Almondville\Survey Plans
:\ TTOMTut\Almondville\Text Documents
:\ TTOMTut\Almondville\TitleDeeds
:\ TTOMTut\Almondville\Videos & Audios
13
Dr Michael Barry, Geomatics Engineering, University of Calgary. 14 March 2011
7. From the D:\TTOMTut\Media_Tut1directory:
a. Copy all the files prefixed with PH_ to the directory :\
TTOMTut\Almondville\Photographs
b. Copy all the files prefixed with SP_ to the directory :\
TTOMTut\Almondville\Survey Plans
c. Copy all the files prefixed with GEN_ to the directory :\
TTOMTut\Almondville\Text Documents
d. Copy all the files prefixed with a T_ to the directory :\
TTOMTut\Almondville\TitleDeeds
e. Copy all the files prefixed with a V_ and AU_ to the directory :\
TTOMTut\Almondville\Videos & Audios
You may delete the D:\TTOMTut\Media_Tut1 directory and all its data once this is
complete.
Note these videos, audio files and photographs are not to be distributed or passed on
to third parties.
2.3 SELECT THE DATA DIRECTORY
Identify where the project folder is located by doing the following:
1.
2.
3.
4.
Run the OM software
Click on the Configuration menu item on the top menu
Select Configure Database File Location
Navigate to :\TTOMTut\Almondville Database or the location where you have
stored the Almondville.mdb file
5. Next, click on Configure Project Folder Location
6. Navigate to the folder which includes the data files:
:\TTOMTut\Almondville
7. Select Save
Note the software will find the files in the sub-directories.
NOTE If the database has data in it already, we need to delete this for the tutorial.
Remember to backup this data if it is important data.
1. Close OM software
2. In the \The OM subdirectory, open the file OM.Mdb, the MS-Access file, by
clicking on it or opening it in MS-Access
3. Open the table relMediaMedia
14
Dr Michael Barry, Geomatics Engineering, University of Calgary. 14 March 2011
!
Click on Edit; select All Records, and then in the Edit sub-menu delete all
records
Do the same for all the tables prefixed with “rel”
4. Now delete the records in the table tblSpatialPoint (This table must be
deleted first). And then do the same for the rest of the other tables prefixed
with “tbl”
Do not delete the tables themselves.
Do not delete the data in the “lut” (look up) tables. You probably need them!
2.4 UNDERSTANDING DATA IN THE SYSTEM
DISCUSSION A: DATA ORGANISATION AND FILE NAMING CONVENTIONS
Open some of the data files and examine them. What have you noticed about the
directory structure and the file names? Is there a way we can improve this system?
DISCUSSION B: MENUS AND DATA ORGANISATION
Have a look at the top or main menu. What are the main objects or things we use in a
land records system? The menu items should give you a hint.
PART 1 BOUNDARY CONFLICT RESOLUTION
In the year 2006, the Almondville community becomes involved in a dispute with the
adjoining Cedarville community. The Land Tribunal Officer arranges to mediate the
dispute in the field. A large number of people gathers to participate in the process
and witness the proceedings. We go along to record the events. We use video to
capture as much as we can. However, we cannot record everything and so we ask
the mediator to use a digital audio recorder to record parts of the proceedings,
which would fill in any gaps that we have in the video record.
As the boundary line is agreed on, so members of the two communities cut the
agreed line. At points where the line changes direction, concrete conical
monuments are constructed. Surveyors from the Surveyor General’s office take
photographs of these monuments and record their positions using a hand held GPS.
We record the following in our notes about the audio and video files.
15
Dr Michael Barry, Geomatics Engineering, University of Calgary. 14 March 2011
Field Notes Page 1
Video and Audio File Field Notes
File name
Description
V_20060812
Date: 12 August 2006
Almondville_Cedarville File Type: Video
dispute
Camera Operator: Mike Barry
Interviewer: Mike Barry
Persons in Video:
Mr Ali Khan
Role: State Security Advisor
Mr John Doe
Role: Traditional Leader Almondville
Mr Sifiso Mbeti
Role: Traditional Leader Cedarville
(many more not mentioned as this is a tutorial)
Position Data:
Not recorded – see photographs of monuments.
Description of Content
Ali Khan mediates the dispute between the two
customary authorities. Mr John Doe leads testimony from
the Almondville representatives and Sifiso Mbeti from
Cedarville.
The discussion moves around from the parking lot to the
boundary line in dispute. Eventually the discussion group
reaches the point on the cut line where the boundary is
still in dispute. A long discussion follows about how to
proceed. Eventually there is an agreement on a give and
take line in a particular direction.
AU_2006_08_18
Date: 12 August 2006
Almondvillle_Cedarville File Type: MP3 audio file
dispute
Recorder Operator: Ali Khan
Interviewer: No formal interviews
Persons in Audio File:
Same as V_20060812 Almondville_Cedarville dispute
Position Data:
V_20060812 Almondville_Cedarville dispute
Description of Content
V_20060812 Almondville_Cedarville dispute
Note these videos, audio files and photographs are not to be distributed or passed on
to third parties.
16
Dr Michael Barry, Geomatics Engineering, University of Calgary. 14 March 2011
There are a number of people who provided evidence in the video. Normally we
would put all their names in the file. For the sake of brevity, we’ll only put three names
in the database. (This is only an exercise!).
Field Notes Page 2
Last
First
Name Name
Doe
John
Date of
National ID
Birth
1940/02/27 1940022705
Mbeti
Sifiso
1951/0315
Khan
Ali
1960/05/30 19600530538
M/F Relationships and other
Facts
M
Traditional Leader,
Almondville
19510315651 M
Traditional Leader
Cedarville
State Security Advisor
responsible for mediating
boundary conflicts
between customary
authorities.
Let’s enter our first data….
First we need to set out media types in the Look Up tables.
1. Run OM software.
Configuring Look Up Tables
2. Click on the Configuration menu item on the top menu.
3. Select Configure look up tables
4. Select Media Types
!
Delete any media types that should not be in this look up
table. You must do this now before you start using the table.
5. If these are not in the look up table, add Audio File, Digital Photograph,
Scanned Document, Survey Plan, Video and Written Document using the Add
New button. Save changes and exit.
Adding Video Records
6. Select Media in the tab menu (the menu just below the statement “Hint: right
click on a record for further functionality”)
17
Dr Michael Barry, Geomatics Engineering, University of Calgary. 14 March 2011
7. Delete any existing records
8. Select Add New Media
9. Select Video from the Media Type drop down list
10. Click on Get Media File and navigate to the file
V_20060812 Almondville_Cedarville dispute
and select it
11. Click on Show Media to make sure you have selected the correct file. (A video
of a group of Nigerian men in the field should display).
Add the Video Metadata
12. Use the date function and select 12 August 2006 in the Issue Date field
The Issue Date field requires some explanation. Click on
the field, then in the data input line, double click on the
year, and enter 2006. Then click on the month and enter
08 in the highlighted section. Note that the month is
changed to August.
Select the day of the month from the drop down calendar
list. Repeat this process for all the media files you enter in
the database.
13. Physical Location: We will not use this in this exercise, but in the case where the
video is not stored in the \Almondville\Video directory, it may be stored in a file
or in cabinet of video files. You would type the name where you have stored
the video in this section. Likewise you would do this for paper documents stored
in a file.
The Physical Location tells us where the data are stored.
For example, they may be stored on a hard disk, a
computer, an external hard disk drive or as a physical
paper file.
14. Provide URL: We will not use this in this exercise, but perhaps you have a video
stored on the internet or somewhere else on your computer other than the
project file. You can point to the video file (or any other type of digital file) by
using a URL.
15. Create a MS Word or similar word processor file of the description data in the
table above. (Better to create type up the field notes in word processor during
data capture or at the end of the day’s data collection!)
16. Copy the description data into the Description field
17. Click on Save this Record and Add More
18
Dr Michael Barry, Geomatics Engineering, University of Calgary. 14 March 2011
Adding Audio Records
18. Select Audio File from the Media Type drop down list.
19. Click on Get Media and navigate to the file
AU_20060812 Almondville_Cedarville dispute
and select it (note this audio file and the video file are actually from two different projects).
20. Repeat steps 11 – 15 for other media files.
21. Click on Save this Record and Close.
19
Dr Michael Barry, Geomatics Engineering, University of Calgary. 14 March 2011
Now let’s relate these two media files …..
Relating Media Files
21.Right click on the Video record V_20060812 Almondville_Cedarville dispute and
select Relate this Media with … and select Another Media.
22.Select the Audio File for AU_20060812 Almondville_Cedarville dispute
23. Type “Audio file augments the video record” in the Description field.
24. Copy the Description of Content from the V_20060812 Almondville_Cedarville
dispute below this
25. Select Relate and the system returns to the main screen.
Viewing Relations
26. In the main screen, on the top right of your screen, click Relations and on the
menu on the bottom split screen, select Media to Another Media File.
27. Select the video record in the top screen (Media Details). Examine the relation
in the top and bottom screen.
28. Now select the audio record in the top screen, and examine the relation.
29. Play with the top screen data; e.g. play the media files by right clicking on the
record and select Show/Play Media. Likewise, select a record on the bottom
half of the screen and select Show Media Item.
Now let’s enter the data relating to the people in the video
Adding Persons
30. On the tab menu, click on Person. Select Add New person at the top right of
the screen.
31. Enter the data relating to the three people above.
Adding Person – Media Relations
32. Now relate each of these three people to the video and the sound file.
Question: What should we put in the description field to describe the
relationship?
33. Select Relations (top right of the screen) and view the Person to Media
relationships for each person.
34. Select Media in the main menu, and view the Media to Person relationships
and the Media to Media relationships.
20
Dr Michael Barry, Geomatics Engineering, University of Calgary. 14 March 2011
Photographs and coordinates
A surveyor constructed boundary beacons and took photographs and GPS fixes as
the dispute was being resolved.
Let’s enter the data for the photographs described on Field Notes Page 3 and the
beacons of which they provide evidence.
Field Notes Page 3
Photograph
PH_20060812
Almondville_Cedarville
Beacon_17
PH_20060812
Almondville_Cedarville
beacon_19
Date
Description
2006.08.12 Object: Beacon 17
Almondville_Cedarville boundary
Concrete pyramid placed
Date: 2006.08.12
Surveyor / Photographer: Running Wolf
Hand Held GPS Fix Units D.M.S.
Latitude: 34.00.00.0000 North
Longitude 50.00.00.0000 West
2006.08.12 Object: Beacon 19
Almondville_Cedarville boundary
Concrete pyramid placed
Date: 2006.08.12
Surveyor / Photographer: Running Wolf
Hand Held GPS Fix Units D.M.S.
Latitude: 34.00.02.0000 North
Longitude 50.00.03.0000 West
Adding Photos
35. Select Media from the tab menu; select Add New Media
36. Add the details for the two photographs above
37. Now select Person and add Running Wolf as a person. Put “Surveyor General’s
office” in the address field. Add Photographer / Surveyor in his description field.
38. Relate Running Wolf to these two media using “Surveyor / Photographer:
Running Wolf” to describe the relationship.
Adding Land or Property Objects
21
Dr Michael Barry, Geomatics Engineering, University of Calgary. 14 March 2011
39. Select Configuration in the top menu. Select Configure Look Up Tables and
then Property Types. If Boundary Monument is not in the look up list, select Add
New and add this.
40. Now select Land\Property Object from the main menu. Select Add New
Property
41. Enter Beacon 17 as the first object. Enter the details for it. ID is Beacon 17.
Property type is Boundary Monument. Description is Concrete Pyramid. Select
Save This Record and Close on the data input form.
Ignore the following for the mean time.
42. Add it’s coordinates to the coordinate file. Right click on the Beacon 17 record.
Select Add/Modify Geometry.
43. In the Geometry Look Up Table, select Point.
44. Click on Add new Geometry.
45. Right Click on the Record and select Add/ModifyView Spatial Points.
46. For Ellipsoid type WGS84
47. For Origin type GRS 80
48. Under name specify Beacon 17.
49. For the X (Easting) Coordinate input: 50.00.00.0000 West
50. For the Y (Northing) Coordinate input: 34.00.00.0000 North
51. Click Save
52. Relate Beacon 17 to photograph PH_20060812 Almondville_Cedarville
Beacon_17.
53. Repeat steps 39 – 51 for Beacon 19
22
Dr Michael Barry, Geomatics Engineering, University of Calgary. 14 March 2011
PART 2 CENSUS AND EXPECTED PROPERTY RIGHTS
To reduce internal conflicts over land in the Almondville community, we need to
document existing rights and expected rights. We also need to ensure that we can
show the relationships between the people in Almondville and the land.
We first need to know how many people live in each house, what their relationships to
each other are and then their relationships to land objects e.g. houses, trees, fields.
House Number 72 and its People
We start off with a census type survey of the community. Who lives here? What are
the relationships between them? Do they have a right to live on the land? If so, how
does the land tenure system work? How does inheritance work here if a person dies
without a will? We limit our exercise to house number 72 and its occupants.
As a start we collect census data relating to five people and we photograph them in
front of house number 72.
The person at the forefront of the photo is John Doe. We record his details in Field
sheets 6.
At house number 72, on our census form we note the following:
Field Sheets 4 Property Object
Property ID
House Number 72
Address
Street Address: 72 Nutty Street, Almondville
Field Sheets 5 Photographs
File name
PH_2009_06_10 (1)
Description
John Doe, Gladys Brown,
Children Mavis, Ellen and Peter Brown in front of
house 72
PH_2009_06_10 (2)
House 72, rear view.
Ph_2009_06_10 (3)
Rice Field for the use of John Doe and family, or
perhaps for occupants of House 72. Details not
clear.
Ph_2009_02_02_Qkbrd Quickbird satellite image of Almondville
settlement.
23
Dr Michael Barry, Geomatics Engineering, University of Calgary. 14 March 2011
Field Sheets 6 People Living in the House
Last
Name
Doe
First
Name
John
Date of
National ID M/F Relationships and other facts
Birth
1940/02/27 1940022705 M
Traditional Leader,Almondville
Head of House and de facto
owner. Widower. Wife died two
years ago.
Brown
Gladys 1980/07/15 1980071509 F
Brown
Arthur
1978/06/21 Not known
M
Brown
Mavis
2006/11/11
F
Brown
Ellen
1999/12/26
F
Brown
Peter
1997/01/07
M
He has three children and 15
grandchildren.
He lives in house number 72
with his daughter, her husband
and her three children. The
daughter’s husband was away
at the time of the visit.
John Doe’s daughter. Married
to Arthur Brown. Expects to
inherit house from John Doe.
Absent. Married to Gladys
Brown. Employed in Manilla.
Returns to Almondville over
weekends. Comes from Coffee
town.
Daughter of Arthur and Gladys
Brown
Daughter of Arthur and Gladys
Brown
Son of Arthur and Gladys Brown
John Doe has appeared in two videos for us and we did an audio recording of him.
24
Dr Michael Barry, Geomatics Engineering, University of Calgary. 14 March 2011
Field Sheets 7 Video and Audio File Field Notes
Note these videos are not to be distributed or passed on to third parties.
File name
V_2009_06_10
JohnDoe (1)
Description
Date: 12 June 2009
File Type: Video
Camera Operator: Mike Barry
Interviewer: Mike Barry
Persons in Video:
Mr John Doe
Role: Traditional Leader Almondville
Position Data:
Not recorded
Description of Content
John Doe appears in front of his house and tells us his life
history, how he came to acquire the house through his
parents, and how they came to acquire it. He mentions an
elder brother David Doe who left the village some 35 years
ago and with whom people have had no contact since.
He tells us who he expects to inherit the house and what he
expects will happen to their siblings once this happens.
He also mentions that he has a personal loan, an IOU, with
Manie Slovo using house as guarantee. Manie Slovo has the
written piece of paper reflecting this, but we cannot trace
him. Somehow we need to show this as an encumbrance on
the property if we choose to title it in future. However, we
have no hard data. So later at the end of the day we decide
that we don’t have enough data in the video interview, so
rather than set up a further video – which will take up
unnecessary file space - we quickly get John Doe to give us
a detailed sound bite on this issue as we did not get the
compete picture on the video.
25
Dr Michael Barry, Geomatics Engineering, University of Calgary. 14 March 2011
V_2009_06_10
JohnDoe (2)
Date: 12 June 2009
File Type: Video
Camera Operator: Mike Barry
Interviewer: Mike Barry
Persons in Video:
Mr John Doe
Role: Traditional Leader Almondville
Position Data:
Not recorded
Description of Content
John Doe has a field where he grows subsistence crops. He
describes the boundaries and who has crops adjacent to his
fields.
AU_2009_06_10
JohnDoe(1)
Date: 12 June 2009
File Type: Audio
Camera Operator: Mike Barry
Interviewer: Mike Barry
Persons in Video:
Mr John Doe
Role: Traditional Leader Almondville
Position Data:
Not recorded
Description of Content
Sound file describing an IOU by John Doe to Manie Slovo
with details of the transaction. The house Number 72 is
encumbered by this debt as is John Doe in his personal
capacity.
26
Dr Michael Barry, Geomatics Engineering, University of Calgary. 14 March 2011
Let’s enter the data relating to the above:
1.
2.
3.
4.
5.
Adding Land or Property Object
Click on Land\Property Object on the tab menu.
Click Add New Property on the top right of the screen
Input 72 for the Property ID, and select House from the Property Type drop
down menu.
Add the Street Address in the Address field
Type “The Chief’s House” in the Description field.
Discussion:
Have a look at the “Extinguished” check box. Why would we
want to “extinguish” a property object?
We would close this record if the object no longer exists. For
example, a tree is cut down, a parcel is consolidated with
another parcel or is subdivided into a number of lots where there
is no remainder, a servitude is cancelled or a lease expires.
Can you think of any more examples where we might want to
close a record?
6. Click Save this Record and Close.
Viewing Records
7. Right click on the record in the table. Have a look at the various options. Click
on each of these options, examine what happens, and then close the option.
•
•
•
•
To what/whom can we relate the property object?
Try and relate House 72 to another object by clicking on one or more of
Person, Reference Item, Media or another Property Object. What
happens?
As you can see we can edit and delete the record; we cannot delete it
once a relationship has been created with another object though.
Click on the Add/Modify Geometry option. Have a look at what we
should do as part of entering coordinates to represent a property object.
8. Click on the Relations button. What happens?
9. Try to relate House 72 with another object. Can you do this?
We have now entered the basic data for House 72. As you can see, the drop down
menu also allows other type of Land\Property Object such as a Parcel. What other
objects do you think we could add in here?
27
Dr Michael Barry, Geomatics Engineering, University of Calgary. 14 March 2011
Adding Relations
10. On the tab menu, Click on Person. Select John Doe’s record. Modify it by
adding the additional description data in Field Sheets 7 “People Living in the
House” and putting House 72 as his address.
11. Select Add New person. Add the details for all the people listed in the table
above. Note that the fields in red with a * next to them are essential fields. The
Title field entry must be selected from the drop down list; i.e. click in the down
arrow at the end of the field.
12. Copy the relationship descriptions into the Description field.
13. Click Add New or Add New and Close to complete the record entry in each
case.
14. Have a look at the Description field in the table. Each time a change to the
record is effected, a note of the change will appear in the Description field.
Now let’s start trying to model the relationships between the different people.
15. Highlight the John Doe record. Click the Relations button and examine the
screen. Right click on the John Doe record. Choose to relate the record with
another person.
16. Choose the particular record and the type of relationship. Describe the
relationship if necessary. E.g. Gladys Brown is John Doe’s daughter and expects
to inherit.
Discussion:
Are the relationships properly created? What are the strengths
and weaknesses of the software design in the manner
relationships are managed? Do we have enough relationships
specified in the Relationship Type look-up table? Too many?
17. Enter the media and their details.
18. Relate the media files to each other.
Discussion:
Which media files should we relate and why should we relate
them?
Relate the different items to create a proper land records system.
19. Select Land/Property Object and highlight the record for House 72. To which
persons and to which media items should we relate this? Populate the
database (i.e. create the relations) and discuss.
28
Dr Michael Barry, Geomatics Engineering, University of Calgary. 14 March 2011
20. Select Person from the tab menu and create the relationships between people
and the media items. What do we do about Manie Slovo and John Doe’s debt
to him?
Discussion:
The primary things (objects) we have to store in the records are
people and land/property objects and the relationships between
them. Thus the media items “serve” these other two objects. In
which situations might the system we have used so far be useful?
What other objects might we want in the system and in what
situation?
29
Dr Michael Barry, Geomatics Engineering, University of Calgary. 14 March 2011
Part 3 Formalisation / Regularisation of Almondville
Several years and pass and the community decides they want to formalize their land.
The first item needed is a survey plan of the outside figure of the settlement. Lot
holders choose to survey their lots as and when they want to register their land.
A surveyor Jack Jacobs surveys the outside figure being Lot 1 Almondville as a land
grant and creates a survey plan SP_2015_4567.
Jacobs lodges his survey with the Surveyor General who assigns the above survey
plan number and stores the survey record as SR_2015_100.
This plan then gets registered under a 25 year lease / purchase by instalments
scheme as T_A_2015_4376 in the name of the Almondville Community Trust. (The
surveyor General endorses this number on the survey plan).
In the same survey, SR_2015_100, Jacobs creates lot 2 and lot 3, which are portions of
lot 1. Lot 2 is assigned Survey Plan number SP_2015_4568, and lot 3 SP_2015_4569.
These two subdivisions create a 10 metre wide road to the south of them.
The Surveyor General “sketches” the subdivisions on the parent Survey Plan of Lot 1
which is assigned an update number SP_2015_4567_1 to denote the changes made
as a consequence of the subdivisions made in the survey SR_2015_100.
Lot 2 is transferred to John Doe by deed T_A_2015_4377. Lot 2 includes House 72.
Lot 3 is transferred to Clare Habermas, John Doe’s sister, by deed T_A_2015_4378.
In 2017, Manie Slovo claims he owns the property, as John Doe did not repay his debt,
and we go to a community tribunal. We need to get all the evidence related to the
adjudication and titling of the property to assess the evidence.
In the same year, John Doe’s long lost brother challenges John Doe’s ownership.
In 2020, Clare Habermas dies and lot 3 becomes the property of John Doe’s family
through inheritance.
Land Surveyor Jack Jacobs prepares survey plan SP_2015_567 consolidating the two
lots.
Deed T_A_2020_111 transfers lot 3 to John Doe and family
Deed T_A_2020_112 consolidates lots 2 and 3 held by John Doe and family
30
Dr Michael Barry, Geomatics Engineering, University of Calgary. 14 March 2011
Discussion:
How do we deal with these various transactions and claims?
How do we query our database to extract the relevant information
in the event of a claim?
Do we have sufficient data to deal with Manie Slovo’s claim and
John Doe’s brother’s claim?
Can we ever have enough information to deal with such claims?
Data Entry
1. Have a look at the Survey Plan SP_2015_4567 and the rest of the Survey Plans
(you may use the term diagram rather than survey plan).
What is the chain of subdivisions and consolidations that has taken place?
Enter all the survey plans as media items and their Lot numbers as
Land\Property objects. Enter the Survey Plans as media items in the following
order:
Plan
SP_2015_4567
Lot Number / Object
Lot 1 Almondville, outside figure of settlement.
SP_2015_4568
Lot 2, portion of Lot 1, Almondville
SP_2015_4569
Lot 3, portion of Lot 1, Almondville
SP_2015_4567/1
Endorsed to show subdivision of lot 1 creating
lots 2 and 3
SP_2020_567
SP_2015_4568/1
Lot 4 comprising consolidation of lots 2 and 3
into lot 4 Almondville
Cancelled as included in consolidation Lot 4
SP_2015_4569/1
Cancelled as included in consolidation Lot 4
SP_2015_4567/2
Endorsed to show consolidation of lots 2 and 3
into lot 4 Almondville
Why should we choose this order of entry?
2. Enter the lot numbers as Land\Property objects and then relate them to the
survey plans.
31
Dr Michael Barry, Geomatics Engineering, University of Calgary. 14 March 2011
3. What happens to house 72 now? To what should this be related, if anything?
4. Mark the relevant Survey Plans as Superceded and Lot Numbers as
Extinguished if they are no longer the current document or the lot has
disappeared through consolidation or subdivisions which leave no remainder.
5. What should we do with the Survey Record numbers assigned by the Surveyor
General of Almondville (Community Surveyor General?).
Record Number
SR_2015_100
Lots Created
Creates Lots
1,2,3
Survey Plans
SP_2015_4567,
SP_2015_4568,
SP_2015_4569
Surveyors
Jack Jacobs
We enter SR_2015_100 as a reference item and relate it to the lots created in the
survey and the media items created in the survey. Relate Jack Jacobs to the
Survey Record too.
6. Create Jack Jacobs as a person, describe him as a Land Surveyor in the
description field, and relate the Survey Record and the Survey Plans to him.
(E.g. Created plans SP_2015_4567, SP_2015_4568, SP_2015_4569 by Survey
SR_2015_100).
Title Deeds
There are different ways of registering land. We will use a deeds or improved
deeds system, where documents are generated on a word processor. We can
easily use a title based system where every document is stored individually and
linked via a relation. Open the deeds/titles in MS-Word and browse through the
different sections of them. Have a look at how they are constructed. Could we use
the software to manage these?
Enter and relate the following data.
Title Deed Lawyer
Lots
People
Survey Plan
T_A_2015
_4376
1
Almondville
Community
Trust
John Doe
SP_2015_4567
Tenure /
Restriction
25 year lease
SP_2015_4568
25 year lease
Clare
Habermas
SP_2015_4569
25 year lease
T_A_2015
_4377
T_A_2015
_4378
Catherine
Joan
Renaulds
Catherine
Joan
Renaulds
Catherine
Joan
Renaulds
2
3
32
Dr Michael Barry, Geomatics Engineering, University of Calgary. 14 March 2011
7. Open Deed T_A_2015_4376 first and enter it as a new Reference File. Discuss
and then do the following: Cut and paste what you think is the relevant text in
the deed to the Description field. Repeat this for all the deeds.
8. Enter the person details for the lawyers.
9. If their details are not in the database already, enter the details of the people.
10. We do not need to enter the Tenure type as it is in the descriptions.
11. Link the reference instruments to the relevant people, land objects and survey
plans.
12. Once all the data are entered and you feel that the data are accurate, close
the Reference Instruments. Right click on the record and select Mark as Closed.
This is equivalent to registering them. They now cannot be altered.
13. Try to retrieve data which will give us information about the following:
In 2017, Manie Slovo claims he owns the property (lot 1 and house 72), as John Doe did
not repay his debt, and we go to a community tribunal. We need to get all the
evidence related to the adjudication and titling of the property to assess the evidence.
In the same year, John Doe’s long lost brother challenges John Doe’s ownership.
Discussion:
Did we enter either of these two claimants as people?
If we look at the relationships which we have entered
against John Doe, can we track the data which will get
us the necessary evidence?
What should we do in future?
What are the limitations of any land tenure information
system?
14. Enter the details relating to the following:
In 2020, Clare Habermas dies and lot 3 becomes the property of John
Doe’s family through inheritance.
Land Surveyor Jack Jacobs prepares survey plan SP_2020_567
consolidating the two lots.
Deed T_A_2020_111 transfers lot 3 to John Doe and family
Deed T_A_2020_112 consolidates lots 2 and 3 held by John Doe and
family
33
Dr Michael Barry, Geomatics Engineering, University of Calgary. 14 March 2011
Discussion:
1. How do we use the above exercises to design a land records system
that can include both customary land tenure data and surveyed and
registered land data? Discuss this is general terms, not your own local
situation.
2. How can you use this to develop an integrated Land information
System in your local situation?
3. Design a land information system and a tutorial for one of the following:
a. A land information system in a land professional’s office (your
own office)
b. A micro-finance system for housing
c. A mortgage system for housing
d. A local level surveyor general’s office
e. A land regularisation system
34
Dr Michael Barry, Geomatics Engineering, University of Calgary. 14 March 2011
3 DESIGNING A PROJECT
There are a range of applications and a mix of applications for which The Talking Titler
software can be used as an administrative tool. It is critical that you prepare a
rigorous design for the system and write down proper procedures for using the system.
The system allows a great deal of flexibility; flexibility which will allow you to create a
complete mess if you’re not careful! Therefore, it is vital that procedures and rules are
properly documented.
STEP 1: List Entities
Let’s first list the various references, or entities, we might be interested in such as the
following:
Persons
A person may be a client; more than one person may be the client
A person may be a landholder; more than one person may be the holder
A person may be claiming a right in land
A person may be a neighbour to one of the parcels being surveyed
A person may be a partial rights holder (e.g. mineral rights holder, mineral lease
holder, right-of-way holder, usufruct holder)
A person may be a company or a trust or similar business entity
A person may be a government department
A person may be the holder of partial rights in a parcel (e.g. servitude (easement)
or lease)
A person may be related to another person (e.g. parent – child, cousin etc, clan,
sub-clan, lineage group) which gives them a right in land
A person has an identity document, an address and possibly a photograph
(media)
A person may appear in many media items
Possible Reference Entities
You should choose one of the following as the reference entity. If the others in this list
appear in your database, they should be listed as media.
Underlying Titles and/or Deeds
Partial Rights (e.g. Servitudes, Easements, Right of Way, Lease, Usufruct, profit a
Prendre) and documents (e.g. title instrument) which define them
Property File
35
Dr Michael Barry, Geomatics Engineering, University of Calgary. 14 March 2011
Rent Card
Occupation Permit
Parcel Number (possible reference if parcel based information system as opposed
to property ownership reference)
Object Number (e.g. shack number, house number)
Possible Media Entities
Survey
A survey will have a survey record number; either from the Surveyor General or
an in house reference number e.g. SR_2009_1234. We may wish to break the
survey down into its components
Survey Plans / Diagrams – legal documents created in the survey
Parcels
Parcels may be those that are being surveyed or affected by a survey
A parcel can have a real right over another parcel. E.g. a servitude / easement
can be in favour of parcel A over parcel B.
A
B
Parc el A has a right
over parc el B
Servient Te ne me nt
Road
Easement / Servitude Right of Way
Dom ina nt Tenem ent
A 3-d Object of Land Rights such as a strata space, section or condominium unit,
house or a shack
Physical Feature
A physical feature will probably be something like a power line, a river, a tree, a
building or a part of a building (e.g. an apartment or garage).
36
Dr Michael Barry, Geomatics Engineering, University of Calgary. 14 March 2011
A physical feature may be represented on a Survey Plan / diagram or other
media form
Vegetable Garden
Maps e.g. 1:50,000 sheets incorporating the area under survey
Cadastral Information System Plan – government maps of cadastral boundaries
and other cadastral information
Geodetic Control Coordinate File
Satellite Images
Topographic Plan / DTM file of area under survey
Aerial Photographs
Survey Records from previous surveys which have a bearing on the current survey
Photographs of evidence which may be relevant to current survey and to other
surveys
Videos of evidence which may be relevant to current survey and to other surveys.
It may also be evidence relating to objects, persons and for general historical
evidence.
Audio / Sound File
SAR files
LIDAR files
Geophysical survey data
GIS Coverages
Cadastral Information System Plan – government maps of cadastral boundaries
and other cadastral information
Written documents
37
Dr Michael Barry, Geomatics Engineering, University of Calgary. 14 March 2011
STEP 2: DEVELOP QUESTIONS YOU MIGHT ASK OF THE SYSTEM
•
•
•
•
•
What is the Survey Record Number?
Is there a reference to a statutory consent (e.g. Subdivision Approval)
Which parcels are directly affected by this survey?
Which Cadastral Information Plans underlie the area of interest?
Which existing survey plans do I need to examine (e.g. neighbouring parcels,
partial rights)
• Which previous surveys (Survey Record Numbers) do I need to examine and
reference as part of the survey process (recursive relationship)
• Which topographic maps (e.g. 1:50,000 sheet) underlies this survey?
• Which Surveys are fall within the borders of a particular map sheet (How many of
the reference entities are contained in one of the media?)
•
•
•
•
•
•
•
Which people are affected by the survey?
Which people have registered or recorded rights over a parcel or object?
Which people are claiming a particular parcel?
Who are the clients?
Do they have representatives and sub-contractors?
What other relationships between people are relevant to the survey?
What are the interpersonal relationships in this population that may give rise to land
rights or expectations of land rights?
• Which people are affected by the process; who are the stakeholders and other
role players? What is their interest?
•
•
•
•
•
•
•
•
•
•
•
What are the Titles / Deeds affecting the survey?
What partial right titles / deeds affect the survey?
Which people lay claim to these?
What are the Survey Plans that are being generated by this survey?
What digital survey files (e.g. DTMs, Geodetic coordinate lists) affect the survey
Which multimedia files are relevant to the survey (including ones generated in
previous surveys and as part of this survey)?
Which parcels are featured in these multimedia files?
Where is the original evidence stored?
Which people feature in these multimedia files?
Which Physical features feature in these multimedia files?
What other multi-media files are related to each other (e.g. sound file and video
file recorded at same time, previous video is relevant to new one – different
witnesses or contradictory testimony)
38
Dr Michael Barry, Geomatics Engineering, University of Calgary. 14 March 2011
STEP 3: Develop Prefixes which uniquely define the entities
We want a prefix which defines a particular entity or reference. For example we
prefixed a survey Record by SR and the suffix is the year in which it was created
SR123/2009. It is preferable that each type of entity has a unique way of referencing
and identifying it. You should not use the same identifier for two different objects
either, even if they are of the same type. See Appendix C.
STEP 4: Document the Relationships between Entities
I suggest you draw a matrix on a large sheet of paper. List all the entities along the
side and along the top. Then in the square matching two entities, write the possible
relationships between them. Remember an entity can have a relationship with itself.
E.g. A dog fights other dogs. The following is a simple table to determine the
relationships between different entities.
Entities
Dog
Cat
License
Dog
fights other
chases
has
fights other
has
owns
purchases
Cat
Owner
License
Owner
owns
STEP 5: DEVISE A SCHEME TO RELATE THE DIFFERENT ENTITIES AS PER THE
TABLE IN STEP 3
How do these entities relate to each other? The table above should provide these.
Following this you should be able to determine if an entity is classed as Media or
Reference. Remember a video can be related to another video and each of them
can be related to a number of different people and parcels
STEP 6: LIST THE ENTITIES IN THE LOOK UP TABLE OF REFERENCES AND MEDIA
See appendix A to this manual
39
Dr Michael Barry, Geomatics Engineering, University of Calgary. 14 March 2011
STEP 7 PROTOTYPE THE SYSTEM
Enter data and relate them. Play with the system and see what sort of queries you will
require.
Then write down a rigorous set of data entry steps and methods of performing
specific types of queries. This step is essential if you want a working system. The
software allows a great deal of flexibility, which also means you can create a
spaghetti system if you are not careful – you can create meaningless relationships
between data objects.
You also need to write down an independent system of checking and quality
management. Sign off on a record when it checked and properly entered. Close a
record once no more editing should take place e.g. when a title is registered, the
record relating to it should be closed.
STEP 8 DEVELOP SYSTEM BACK UP AND ARCHIVING PROCEDURES
This is a new software system and it is easy to delete the database inadvertently.
Develop procedures to do monthly archives of the data and weekly back ups.
ALWAYS back up the database file OM.mdb before you install a software
update. You may lose your entire database otherwise.
EXAMPLE: LAND TENURE RECORDS
Land tenure records can be legally registered records or merely a record of claims to
rights. The latter are commonly referred to as regularization or adjudication records.
They may also be kept as a record of information for land claims. Video and audio
files can be organized in the system as oral (undocumented) evidence.
40
Dr Michael Barry, Geomatics Engineering, University of Calgary. 14 March 2011
4. HOW DO I…?
This section consists of easy-to-follow flow charts to show how the most
common procedures work.
4.1 Procedures that applies to Configuration of a Project
4.1.1 Configuring the Project File Location
4.1.2 Configuring the Database File Location
41
Dr Michael Barry, Geomatics Engineering, University of Calgary. 14 March 2011
4.1.3 Configuring the Lookup Tables
42
Dr Michael Barry, Geomatics Engineering, University of Calgary. 14 March 2011
4.2 Procedures that apply to Person, Land Object, Reference Instrument, and Media
records
4.2.1 Add a New Record
43
Dr Michael Barry, Geomatics Engineering, University of Calgary. 14 March 2011
4.2.2 Modify or View Record Information
4.2.3 Delete a Record
44
Dr Michael Barry, Geomatics Engineering, University of Calgary. 14 March 2011
4.2.4 Relate a Record with other Records
4.2.5 Display Related Records
45
Dr Michael Barry, Geomatics Engineering, University of Calgary. 14 March 2011
4.2.6 Modify or View Relations
4.2.7 Delete Relations
4.2.8 Search for a Record
46
Dr Michael Barry, Geomatics Engineering, University of Calgary. 14 March 2011
4.3 Procedures specific to Media Records
4.3.1 Show or Play Media Item
4.3.2 Assign a LocationPoint to a Media Item
4.3.3 Access the Media Auxiliary Attributes Form
47
Dr Michael Barry, Geomatics Engineering, University of Calgary. 14 March 2011
4.3.4 Add Auxiliary Attributes for Media Items
4.3.5 Update an Auxiliary Attribute for a Media Item
4.3.6 Delete an Auxiliary Attribute
48
Dr Michael Barry, Geomatics Engineering, University of Calgary. 14 March 2011
4.4 Procedures specific to Reference Instruments
4.4.1 Duplicate a Reference Instrument
4.4.2 Mark Reference Instruments as Closed
49
Dr Michael Barry, Geomatics Engineering, University of Calgary. 14 March 2011
50
Dr Michael Barry, Geomatics Engineering, University of Calgary. 14 March 2011
4.5 Procedures specific to Land Objects
4.5.1 View Geometries of a Land Object
4.6 Procedures specific to Geometry
4.6.1 Add Geometry
4.6.2 Delete Geometry
4.6.3 Modify Geometry
51
Dr Michael Barry, Geomatics Engineering, University of Calgary. 14 March 2011
4.7 Procedures specific to Spatial Points
4.7.1 Add the Spatial Points of a Geometry
4.7.2 Modify the Spatial Points of a Geometry
52
Dr Michael Barry, Geomatics Engineering, University of Calgary. 14 March 2011
4.7.3 Delete the Last Point of a Geometry
53
Dr Michael Barry, Geomatics Engineering, University of Calgary. 14 March 2011
5. FREQUENTLY ASKED QUESTIONS
My system won’t play the media files?
Before you enter data: In the Object manager, from the top menu, select
Configuration and select Configure Data Sources. Set the path. You MUST do this
before you start to enter media items, otherwise you will have to create these paths
for each media item.
I’ve entered the data and my system won’t play the media files?
Basically you have to set the path properly for each media item. To set the path
correctly:
(1) Set the path of the project folder: Select Configuration >> Configure Data
Sources click on Set the path button. Choose your project folder.
(2) For each media item, Right-click on the media item record >> select Modify &
View Media Info >> click Get Media File button. Navigate to the media file and
select it. Note the changes in the path field after this process.
In the Object manager, from the top menu, select Configuration and select
Configure Data Sources. Set the path.
I want to add an item to a Look Up Table
In the Object manager, from the top menu, select Configuration and select
Configure Data Sources. Select the type of LUT you require and select Add New and
type in the new item.
54
Dr Michael Barry, Geomatics Engineering, University of Calgary. 14 March 2011
Appendix A: KEY ENTITIES AND IDENTIFIERS
Dr Michael Barry,
Geomatics Engineering, University of Calgary
14 March 2011
The following is a list of suggested identifiers. Adapt them as you see fit. It may be an
idea to examine Open GIS Consortium (OGC) and ISO documents for standard
features, identifiers and codes.
Primary Identifiers for Registration
Name
Suggested
Identifier or
Prefix Form
Title or Deed
T_A_09_4_123
Explanation
Jurisdiction
Whether one calls this instrument
title or deed or transfer is not that
important. Change the first letter
to D to reflect a deed if you wish.
T_A_09_4_123 may refer to the
123 rd title registered in 2009. The
T indicates that the instrument is
the Title and it Transfers rights in
the entire parcel e.g. ownership
of the parcel or a long-term
lease. The “A” may refer to the
office or region in which the title
is registered. The _4 may refer to
the 4th change in rights on the
parcel since the title was first
registered. For example there
may have been a servitude, a
lease, a restrictive condition and
a caveat (a kind of notice or
warning) registered on the title
since it was first registered. In this
way one can check that any
copies of the title match the
current, up-to-date one.
55
Dr Michael Barry, Geomatics Engineering, University of Calgary. 14 March 2011
Name
Suggested
Identifier
or Prefix
Form
Partial Rights T_A_09_123
e.g.
Servitudes
C_A_07_123
(easements,
right-of-way, L_A_09_45
profit a’
prendre),
Leases,
contracts,
licences
Explanation
Jurisdiction
Instruments that may be
registered on a title tend to be
partial rights; we don’t necessarily
need to distinguish these from a
title/deed in the database – we
can still prefix this with a T.
Otherwise a single-letter prefix
may be used for all of these to
indicate that they are partial
rights; or the prefix may describe
the type of rights which the
instrument documents - e.g. one
could have L_A_09_45 to uniquely
identify a lease, S_A_08_52 to
uniquely identify a servitude,
C_A_09_345 to indicate a caveat
(warning), etc. and perhaps add
/1 etc. to indicate any
amendments or endorsements to
these instruments (e.g.
C_A_09_345_1. Alternatively, one
can use a single prefix such as
C_A_07_123 to indicate some
form of partial right or contractual
relationship. One can choose to
change the Title number if the
land is sold or passed on to an heir
or retain the same title number for
numerous transactions. One
merely changes the name of the
legal person on the title and
keeps a list on the front page to
show the history of different
owners. It may be safer to change
the number each time a change
of owner takes place though.
56
Dr Michael Barry, Geomatics Engineering, University of Calgary. 14 March 2011
Other Identifiers
Name
Audio File
Suggested
Identifier or
Prefix Form
Explanation
AU_2009_456
Cadastral
Information
Plan
CIP_2009_123
Cadastral Information
System Plan – government
maps of cadastral
boundaries and other
cadastral information.
Drawing
Dwg_2009_123
Drawing File
Dwel_2009_567
Can be a number assigned
to a dwelling, such as a
shack.
Fea_2009_123
Physical feature such as a
tree, river, power line
captured in 2009. Note that
a physical feature may be
defined by a title/deed
instrument or a survey plan or
both – the definition depends
on the application.
Field Sheet
Interview
IN_2009_10
Could be a questionnaire
sheet or a written interview
with a witness, duly signed as
being a fair representation of
what was said.
Photograph
PH_2009_789
Dwelling
Feature
Physical
Survey Plan or
Diagram
Jurisdiction
SP_2009_345
Survey Record SR_2009_1234
Can be an internally
assigned plan number or an
identifier assigned by the
Surveyor General or Registry.
Survey Record number 1234
of 2009
57
Dr Michael Barry, Geomatics Engineering, University of Calgary. 14 March 2011
Name
Suggested
Identifier or
Prefix Form
Explanation
??
Relevant to aboriginal rights
and land claims. Determine
a set of these as per the
specific case.
Video File
V_2009_123
Video may be stored or tape
on some other rewriteable or
no rewriteable media (e.g.
DVD or CD). What may be
important is some form of
code should be incorporated
in the identifier to show if the
video is the original data, an
edited version ad/ or a copy
of the original data – it’s not
shown at the moment.
Application
Form
AF
Trap Line
Jurisdiction
Lagos
58