1
HiTi Card Printer
CardDésirée CS
&
DB Maker
User Manual
-1-
V.2007.10
www.hi-ti.com
CardDésirée CS & DB Maker User Manual
Table of Contents
Chapter 1 Software Interface --------------------------------------------------------------4
1.1
1.2
1.3
1.4
Main Interface --------------------------------------------------------------------------4
Menu Bar --------------------------------------------------------------------------------4
Select Printer Model & Card Type ---------------------------------------------------6
Tool Bar ---------------------------------------------------------------------------------8
1.5 ID Photo Insertion Area ---------------------------------------------------------------8
1.6 Layer Archive ---------------------------------------------------------------------------9
1.7 Preview & Edit Area -------------------------------------------------------------------9
Chapter 2 Card Editing----------------------------------------------------------------------10
2.1 Add Colored Text ----------------------------------------------------------------------10
2.2 Add ID Frame ---------------------------------------------------------------------------11
2.3 Import Background ------------------------------------------------------------------16
2.4 Import Bar code ---------------------------------------------------------------------17
2.5 Add Resin Text -------------------------------------------------------------------------17
2.6 Open Existing Template ---------------------------------------------------------------18
2.7 Add images ------------------------------------------------------------------------------18
2.8 Open a “*.mds” file---------------------------------------------------------------------19
2.9 2D Barcode ---------------------------------------------------------------------------19
2.10 Layer Archive Printing Card --------------------------------------------------------20
2.11 Printing Card --------------------------------------------------------------------------21
Chapter 3 Encoding Functions-------------------------------------------------------------23
3.1 Contact Smart Card Encoding Function---------------------------------------------23
3.2 Magnetic Card Encoding Function---------------------------------------24
3.3 Chip Magnetic Card Encoding Function ---------------------------------------25
Chapter 4 Database--------------------------------------------------------------------------26
____________________________________________________________________
-2-
www.hi-ti.com
4.1 Database Function Introduction-------------------------------------------------------26
4.2 How to connect to an existing database file? ---------------------------------------27
4.3 How to search / query certain data into your database? --------------------------40
4.4 How to build up a “print information database”? --------------------------------- 45
4.5 About “Append Print Info.” Function------------------------------------------------50
4.6 Dynamic Mode--------------------------------------------------------------------------52
Chapter 5 DB Maker Interface-------------------------------------------------------------53
5.1 Main Interface--------------------------------------------------------------53
5.2 Menu Bar--------------------------------------------------------------------------------53
5.3 Tool Bar----------------------------------------------------------------------------------56
Chapter 6 Edit the Database with DB Maker--------------------------------------------57
6.1 Create a New Database File -----------------------------------------------------------57
6.2 Open an Existing Database File ------------------------------------------------------61
6.3 Edit a Table of the Database ----------------------------------------------------------61
6.4 Settings for Images Preview ------------------------------------------------------64
____________________________________________________________________
-3-
www.hi-ti.com
Chapter 1 Software Interface
1.1 Main Interface
Tool Bar
Menu Bar
Tool Bar
ID
Frame
Layer
Preview
Edit Region
1.2 Menu bar
1) File
The “File” menu option includes:
Open (open a saved template)
Close (close the template)
Save (save template)
Save As (save as a new template)
Exit (exit CardDésirée CS)
____________________________________________________________________
-4-
www.hi-ti.com
2) Edit
The “Edit” menu includes:
Cut
Copy
Duplicate
Paste
Delete
Push layer to top
Push layer to bottom
Bring Forward
Send Backward
Layer positioning (Define the position and the layer)
z
Unit : pixel or 1/10mm
z
x: Define horizontal position
z
y: Define vertical position
z
Width: Define the width of a layer
z
Height: Define the height of a layer
z
Alignment : There are 9 buttons for the alignment : Top left ,Top Center, Top
Right, Center left, Center, Center right, Bottom left, Bottom center and Bottom
right.
3) View
The “View” menu option includes:
Rulers (show/hide rules)
Grid line (show/hide grid lines)
____________________________________________________________________
-5-
www.hi-ti.com
4) Add
Background (import a background)
Color Text (add a color text)
Resin Text (add a Resin text)
Bar Code (import a bar code)
ID Frame (add an ID frame)
Image (add an image)
Line (add a line)
Graphic (add a figure)
E-frame (add an e-frame)
5) Encoding
Conact Smart Card
Magnetic Card
Contactless Smart Card
6) Database
The “Database” menu option includes:
Connect Database
Record (browse each data)
Record list (show the database list)
Dynamic Mode (See Chapter 4.5)
Layer Mapping (map the data source of each layer)
7) Help
“Help" file & “About CardDésirée CS"
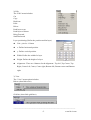
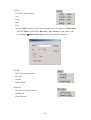
1.3 Select Printer Model, Card Type & Orientation
Select Card Printer Model, Card Type
1) Select printer
____________________________________________________________________
-6-
www.hi-ti.com
CardDésirée CS supports HiTi CS-300, HiTi CS310, HiTi CS320, HiTi 640DLAmphi, HiTi Amphi II
[Warning!!]: Please choose the right printer before you edit. Due to the difference
in resolution, the transfer of formats between two models would not be consistent.
2) Select card type
z The card type CS Series supports so far are:
A. Blank Card
B. 6-pin Smart Chip Card
C. 8-pin Smart Chip Card
D. Magnetic Stripe Card
E. Chip/Magnetic Stripe Card
F. Adhesive Card
z The card type of 640DL-Amphi supports so far are:
A. CR-80(A+B): Reserve two different templates for two CR-80 size cards.
B. CR-80(A+A): Reserve one template for two CR-80 size cards.
C. CR-90
D. CR-100
E. Full page
z Amphi II supports:PVC Full Page (Border), Full Page (Borderless)
3) Side selection
Front, back or dual side
4) Orientation
Portrait or landscape
____________________________________________________________________
-7-
www.hi-ti.com
1.4 Commonly used toolbar
The tool options include:
Add Color Text
Add ID frame
Add image
Import background
Import bar code
Add Resin Text
Add Line
Add Figure
Add e-frame
Open
“*.mds” Files
Add 2D Barcode
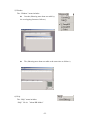
1.5 ID Photo Insertion Area
____________________________________________________________________
-8-
www.hi-ti.com
1.6 Layer Archive
1.7 Preview & Edit areas
Landscape
Portrait
____________________________________________________________________
-9-
www.hi-ti.com
Chapter 2 Card Editing
2.1 Add Color Text
Click
, a color text layer will immediately be created in the edit area. A user may
make the following adjustments:
Type-in text: A user may type the text content in this area
Alignment: top-left, top-center, top-right, center-left, center-center, center-right,
down-left, down-center, down-right
Font: font type, size, interval, bold, italic, underline, vertical, right to left
Font Color:
Background Color:
____________________________________________________________________
-10-
www.hi-ti.com
Advanced text setting:
Art word
Shadow
Non Text Art
Non Shadow
Straight 1~6
Left-Top
Concave
Left-Down
Bulge
Right-Top
Up-Arc 1,2
Right-Down
Down-Arc1,2
Right
Up-Arch
Top
Up-Arch
Inner Shrink
Expansion
Wave 1~6
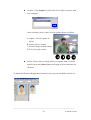
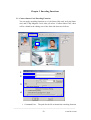
2.2 Add ID frame
1) Click
, to create an ID frame and click
to choose the source to load ID
images.
____________________________________________________________________
-11-
www.hi-ti.com
1. Loading images from files: Directly loading ID images from files.
2. Loading images from webcam: Loading ID images captured by a webcam.
z
z
z
z
z
z
z
Capture Device : The webcam you are using
Filter : The setting for a webcam
Live Video Preview : The live video is shown in this area.
Captured Bitmap : The image captured by a webcam is
shown in this area
Captured Directory : Select the destination to save the
image you captured
Snap Still : Click to capture the image
File Name : The name of the image captured by a webcam
3. Loading images from WIA (for Windows XP/ME) : Using a webcam to capture an
image through WIA.
4. Loading images from TWAIN (for Win98/2000) : Using a webcam to capture an
image through TWAIN.
____________________________________________________________________
-12-
www.hi-ti.com
z
Acquire : Click Acquire to select a device in order to connect with
your computer.
After selecting a device, there are four options shown as follows.
A:Capture: Click to capture an
picture.
B: Source: Device setting.
C: Format: Images format setting.
D: Exit: Close this section.
A
z
B
C
D
Select : Please select an image which you capture from a webcam
and then press the [Select] button, the image will be loaded into an
ID frame.
2) Adjust the ID photo through the red frame for the area you would like to focus on.
____________________________________________________________________
-13-
www.hi-ti.com
3) Adjust the orientation of the ID photo
4) Click
to insert the ID photo into the ID frame in the edit area after the size
and the location adjustment of the ID photo have been finished.
However, if you are
not connected to a database file, please save the adjustment via Menu
Bar→File→Save. If you are already connected to a database file, please open Print
Info (Print Information Database) before you adjust the ID photo to save the
adjustment to the Print Information Database automatically. Please refer to the
section 4.4: Building up a “print information database” in Chapter 4.
5) Color Adjustment and Image Management
1. If you are not connected to a database file,
after you have finished adjusting the properties
of the color, please record the result through
Menu Bar→File→ Save.
2. If you are already connected to a database, please open Print Info (Print
Information Database) before you adjust the color properties.
After you have
finished adjusting the color properties, please press “Save post-processing
image” in “Image Management” to save the result.
You can press “Reload
original photo” to return to undo the change.
Bright/Contrast
Hue/Saturation
Color Balance
Skin MiraBella (choose your favorite from 9 fine skin types)
” Save post processing image” and ” Reload original
photo” buttons in Image Management are available only
after you have connected to a database file, opened Print
Info (Print Information Database), and adjusted color
properties. However, the “Confirm image existence”
button is available after you have connected to a database file and opened Print Info
(Print Information Database.)
____________________________________________________________________
-14-
www.hi-ti.com
Save post-processing image
Reload original photo
Confirm image existence. ※Please refer to the following
description.
※ When you click “Confirm image existence”,
the computer will examine the images and the
data you have marked in the “Printing
Information database”.
If an image does not exist in the path, a dialogue
box will be shown as the right figure. After you click “OK”, the data without any
image will not be marked in the “Printing Information
database”. After you mark □Skip printing of all data without images, all of the
data without any images will not be marked in the “Printing Information database”.
※Remark: Image Management is available only after connecting the database file
and launching “Printing Information database” and processing images.
Please refer to section 4.4: How to build up a “print information database”
in Chapter 4.
z Change image shape:
The shape of the ID photo frame is not limited to a regular square. Click on the
button and select your favorite shape.
You could also adjust the shape by using the cursor of the mouse to drag the 8
adjustable points
____________________________________________________________________
-15-
www.hi-ti.com
2.3 Import background
1) Click
to display the file selection dialogue box. Choose a background
picture
2) Property settings
Rotate 90° counterclockwise
Rotate 90° clockwise
Rotate 180°
Mirror
Fit to Width
Fit to Height
Fit to Card
Bright/Contrast
Hue/Saturation
Card Balance
Advanced Settings
z Advanced Settings: Choose a different ribbon type to print. Using Resin K
ribbon means to make use of the K layer of YMCKO ribbon to print the
background in a black and white image. You could also adjust the printing
result through the “Threshold bar” and preview it directly.
____________________________________________________________________
-16-
www.hi-ti.com
2.4 Import bar code
Click
to create a bar code.
Adjustment properties:
Content
Format
Show Text
Text Height
Text Font
Prefix
Angle
Transparency
Using different ribbon to print
2.5 Add Resin Text
Click
to create a resin text layer immediately in the edit area. The user may
make the following adjustments:
Type-in text: The user may enter the text in this area.
Alignment: top-left, top-center, top-right, center-left, center-center, center-right,
down-left, down-center, down-right.
Font: font type, size, interval, bold, italic, underline, vertical, right to left
____________________________________________________________________
-17-
www.hi-ti.com
Background color:
2.6 Add Line and Figure
A. Add Line
Click
, a diagonal line will appear in the edit area. Click
and hold the left-
mouse button to display the option list as
shown.
B. Add Figure
Click
and a solid figure will appear in the edit area. Click
and hold the left-
hand mouse button to display the options list as shown.
C. Color setting for Line and Figure
You can choose the color for Line and Figure by
entering figures in the blanks under R/G/B, or
click the color board. Also, you can also choose
a different width for Line, Rectangle and Circle
which is not filled up.
2.7 Add images
Click
to add an image from the assigned source. The added image will not
be defined like an ID photo, so the properties would be similar as a background.
____________________________________________________________________
-18-
www.hi-ti.com
2.8 Open a “*.mds” file
Click
to display the template file selection dialog. Choose an existing
template file which you will use. ("*.mds " is CardDésirée CS template format).
The template you open will be shown immediately in the editing area for your
edition.
2.9 Add 2D Barcode
Click
to add 2D Barcode :
Select 2D barcode type
Insert the data for encoding
Decide the resolution by the horizontal and vertical intervals
Insert Parameters: Numbers of Rows / Columns and ECC
Level (ECC Level: Error Correction Control Level : The
bigger index you select, the higher readability you get
when 2D barcode is damaged; meanwhile, the more
space the file needs.)
By selecting this option, the right hand side of the
barcode will be removed or " truncated". It can keep
more efficient area than unchecked PDF417.
Select the type of the ribbon to print this 2D barcode
____________________________________________________________________
-19-
www.hi-ti.com
2.10 Layer Archive
1)
All layers are shown in the archive (They may include Color Text, Resin Text,
Background, Barcode and perhaps even an ID frame photo) , you can focus
on one of them and click the right button of the mouse to adjust it:
Mouse right-click function keys
Delete
Rename
Hide(/Display)
Lock/Unlock
Up
Down
Push layer to top
Push layer to bottom
2) In the editing area, you can focus the layer by clicking the mouse button. If there is
a focused layer, then the menu below will pop up:
Right-click Mouse function keys:
or it will show the following options:
Cut (Ctrl+’X’)
Copy (Ctrl+’C’)
Duplicate (Ctrl+’L’)
Paste (Ctrl+’V’)
Paste (Ctrl+’V’)
Delete(Del)
Push layer to top
Push layer to bottom
Bring Forward
Send Backward
Right-click Mouse function keys:
Rulers
Gridlines
Paste (Ctrl+’V’)
____________________________________________________________________
-20-
www.hi-ti.com
2.11 Printing card
to print the cards.
After the editing is finished, click
A
B
C
H
D
I
E
J
F
G
A: Select printer: Hiti CS-300/310/320, 640DL-Amphi or Amphi II for your
options.
____________________________________________________________________
-21-
www.hi-ti.com
B: Ribbon options: YMCKO, YMCKOK, YMCKO, K or KO ribbon for your options.
C: Lamination: This function is available for lamination module only. There are
four options: No Lamination, Front Side, Back Side, Dual Side.
D: Printing Setting: Print current job or selected job.
E: Rotation setting: You could rotate the image 180 degrees while printing.
F: The limitation of print jobs in the print queue: From 3 to 10 and unlimited jobs.
G: Uncheck the “Print?” column after sending the print jobs to the print queue.
H: Operation: four operation function available for your options: Print, Magnetic
Encode, Contact Smart Card Encode, Contactless Card Encode.
I: Resin Dither: Using an algorithm to transfer the color image to black and white.
J: Number of copies & Total number of prints.
K: While printing, you can click “Cancel” to stop printing.
※Remark:
1. When you click the “Cancel” button, the print job, which has already been sent
to the print spool, will STILL be printed out.
2. However, when you click on the “Cancel” button, the print job, which has NOT
been sent to the print spool, will be cancelled.
____________________________________________________________________
-22-
www.hi-ti.com
Chapter 3 Encoding Functions
3.1 Contact Smart Card Encoding Function
You can apply encoding functions to a 6-pin Smart Chip card, an 8-pin Smart
card, and a Chip Magnetic Card. After you select “Contact Smart Card”, there
will be a blank in the editing area of the front side shown as follows.
1
2
3
4
1. Command Line:
The path for the file to launch the encoding function
____________________________________________________________________
-23-
www.hi-ti.com
2. Arguments: Parameters for encoding.
3. Data to Encode: Data Source for encoding. You can input encoding
data directly. Or you can select Counter Source, Date/Time Source,
Concatenation Source or ODBC Source as your data source. Please
refer to Chapter 4 for the details of the properties setting.
□ Insert Quote Character: You can enter a quotation mark once
you mark this item.
4. Options for Continuous Printing:
z
Confirm before printing.
z
Check the file before printing (“Yes” to print): After checking the
file, faulty contact smart cards will not be printed and only perfect
contact smart cards will be printed.
3.2 Magnetic Card Encoding Function
Select “Magnetic” to enter Magnetic Encoding Data.
____________________________________________________________________
-24-
www.hi-ti.com
Select tracks you would like to encode
and decide the data source:
z
No Mapping: Input data directly;
z
Counter Source, Date/Time Source,
Concatenation Source or ODBC
Source as your data source. Please refer to Chapter 4 for the details
of the properties setting.
3.3 Chip Magnetic Card Encoding Function
Please review 3.1 and 3.2 for Chip encoding and Magnetic encoding, respectively
for a Chip Magnetic Card.
____________________________________________________________________
-25-
www.hi-ti.com
Chapter 4 Database
4.1 Database Function Introduction:
This function is to help you connect the variable data, which is set in a template
of your own design, with the target database to perform batch printing. After
you build up a database, you could connect the components in the template, such
as the ID photo, the text content, the bar code, and even the background image
with data in different columns of the database through the “Database” function in
CardDésirée CS.
When you click on the “print” icon, HiTi CS-300 will automatically print the
data item by item.
※Remark: ODBC is the connecting interface between CardDésirée CS and the
database file, but ODBC does not support Unicode. Thus, some characters may
not be displayed while connecting the database file through ODBC, even if you
edit your database file with Unicode.
____________________________________________________________________
-26-
www.hi-ti.com
4.2 How to connect to an existing database file?
z Open the template
1. Run [CardDésirée CS]
2. Please refer to the second chapter to make a template. If you already have a
template, then please open it through [file] → [open].
3. After you load the template, you can start connecting it to the database.
____________________________________________________________________
www.hi-ti.com
-27-
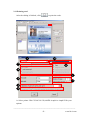
z Connect to a database for the first time
A user can use Access (*.mdb) or Excel (*.xls) to edit a file as a database respectively.
The following example will display how to save an Excel file as a database.
1. After entering all the data, please block all of the contents, which you need as a
table:
2. Please select Insert → Name → Define to define the name of the table shown
as follows.
____________________________________________________________________
www.hi-ti.com
-28-
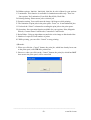
3. Please enter the name of this table and press “OK”. The name of this table
will be on the list for your option during the process when you connect the
database.
4. Please save this file before you close Excel.
After completing the above procedure, please follow this process to connect the
database shown as follows.
1.
Click [Database] on the tool bar and choose [Connect Database].
____________________________________________________________________
www.hi-ti.com
-29-
2.
If you haven’t built up a data source, please click on the [Add] button after
you enter [ODBC Administrator] to establish a data source.
3.
Select a driver for the data source. (It should be a “*.mdb" or a “*.xls”
file in general). Then press Finish.
4.
Input a name and description for the data source, and then press Select.
Sampled by an Access file :
Sampled by an Excel file :
____________________________________________________________________
www.hi-ti.com
-30-
5.
Browse and select a database, and then press OK.
Sampled by an Access file :
Sampled by an Excel file :
6.
The data source, which you have just added would be displayed in the list.
Sampled by an Access file :
Sampled by an Excel file :
7.
After clicking on [OK], it will return to the “Available Data Sources”
dialogue box, click on [Refresh] and the just-added data source would
appear in the list.
Sampled by an Access file :
Sampled by an Excel file :
____________________________________________________________________
www.hi-ti.com
-31-
8.
Select the target data source and click on [Next].
Sampled by an Access file :
Sampled by an Excel file :
9.
Select a target table. When you have more than one table in a database file,
you can assign the target one in this dialogue box, and then click on [Finish].
Sampled by an Access file :
Sampled by an Excel file :
10. After the connection is completed, [Record] & [Record list] in [Database]
will be enabled.
____________________________________________________________________
www.hi-ti.com
-32-
Disconnect the Database.
Record: Browse each data.
Record list: Review the data list.※Remark.
Layer Mapping: To assign the layers in the template with the database.
※Remark: Please refer to Section 4.4: How to build up a “print information
database” in Chapter 4.
Also, please refer to the following sections for information regarding [Record],
[Record list], and the [Layer Mapping] function.
11. After the settings are completed, please remember to save the file. The
layer mapping will be stored in the “*.mds” file and remain available when
you open the template the next time.
____________________________________________________________________
www.hi-ti.com
-33-
z How to perform “Layer Mapping”?
1. After choosing [Layer Mapping], the layer name and its mapping status will
be displayed in the source data dialogue. If you have not made any
settings, it will display “No Mapping” in the “Source” column.
2.
Choose the target Layer. If you choose the ID or the Background layer, then
there will be six different kinds of sources shown in the drop-down list.
____________________________________________________________________
www.hi-ti.com
-34-
No mapping: No need to set any source for the target layer.
Event Source: To assign an event source to the layer. Need to work
with HiTi Event Desiree software. Please contact HiTi FAE.
Webcam Source: To assign a webcam source to the layer.
WIA Source: To assign a WIA source to the layer.
TWAIN Source: To assign a TWAIN source to the layer.
ODBC Source: To assign an ODBC source to the layer.
If you choose the text or bar code layer, there will be five different kinds of
sources shown in the drop-down list.
No mapping: No need to set any source for the target layer.
Counter Source: To assign a counter source to the layer.
Date/Time Source: To assign a date or time source to the layer.
Concatenation Source: To assign a concatenation source to the layer.
ODBC Source: To assign an ODBC source to the layer.
____________________________________________________________________
www.hi-ti.com
-35-
3.
After you finish the settings of the data source, press [Apply].
4.
After setting all the layers, the source column will show all the results. Press
the [OK] button to complete the layer mapping.
____________________________________________________________________
www.hi-ti.com
-36-
z Data source properties introduction.
1. Counter Source
Function: To assign a counter source to the layer.
1
2
3
4
5
6
2.
1. Preview: To preview the outcome.
2. No. of fixed digits: To set the number
digits for the counter.
3. Keep zero ahead.
4. Initial value: To set the initial value.
5. Increment by: To set the increment.
6. Press [Apply] after finishing the
settings.
Ex: Input 3 in “No. of fixed digits”, check
the box of “Keep zero ahead”, input 5 as
the initial value, 2 as the increment, and
then a series of numbers like 005, 007,
009, 011… will be shown in the preview
section。
Date/Time Source
Function: To assign a date/time source to the layer.
1.
2.
3.
4.
5.
6.
7.
1
2
3
4
5
6
7
Preview: To preview the result.
Date Source.
Time Source
Style: To set date/time display type.
Separator: To set the separation.
Keep zero ahead.
Press [Apply] after finishing the
setting.
Ex: check the date source, choose “mm dd
yyyy” as the display source, ”/” as the
separation, tick the box of “Keep zero
ahead”, and if the date of the system is
2006.2.22, the preview would display it as
02/22/2006。
____________________________________________________________________
www.hi-ti.com
-37-
3.
Concatenation Source
Function: To assign a date/time source to the layer.
1. Preview: To preview the result.
2. Prefix: To set the fixed precedent
digits.
3. Source 1: Choose counter or date or
time or concatenation as the first
source.
4. Separator: To set the separation.
5. Source 2: Choose counter or date or
time or concatenation as the first
source.
6. Suffix: To set the fixed post-position
1
2
3
4
5
7
6
4.
digits.
7. Properties: To set the properties of the
data source.
ODBC Source
Function: To assign an ODBC source to the layer.
1
2
3
1. Preview: To preview the outcome.
2. Prefix: To set the fixed precedent
digits.
3. Select a column: To point to a certain
column in the database. The drop-down
list will include all the columns inside.
4. Suffix: To set the fixed post-position
digits.
4
____________________________________________________________________
www.hi-ti.com
-38-
z To link a layer with the database: Once you select Webcam Source, WIA
Source, or TWAIN Source as your ID image source, a dialogue will pop up
to ask you to capture images from your device while printing. Please refer to
Chapter 2 section 2.2 for the further details.
However, if you select ODBC as your ID image source, please follow the
instruction as follows.
First, you need to save all the images files you want in the same folder, and type
all the file names sequentially into a certain column of the database. For example,
if you put all the image files in the subfolder ”PM”, which is in the folder
“CStest” on disc D, and you also key in all the image file names into a column
called “Photofield” in your database. Please enter “D:\CStest\PM\” in the blank
of [Prefix], and enter “.jpg” in the blank of [Suffix].
Then, choose
“Photofield” in the drop-down list of [Select a column], press [Apply] button to
finish the settings.
____________________________________________________________________
www.hi-ti.com
-39-
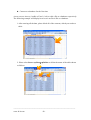
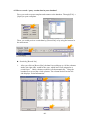
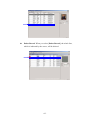
4.3 How to search / query certain data in your database?
First, you need to open a template and connect to the database. Through [File] →
[Open] to open a template.
Then, you could preview certain data by [Record list] or by using the buttons in
the main menu.
z Search by [Record list]
1.
After you click on [Record list], the data list would pop up. All the columns
inside (the right side) would be the ones, which have been assigned to a
certain layer. Other columns would be veiled automatically. Drag the
boundaries to reveal the veiled columns. The column blocked on the left
side displays “Print Information”.
-40-
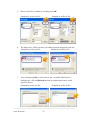
2.
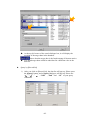
Click on the [Search] button, and the search dialogue will pop up.
3.
Select a field to search: choose the target column you want to search.
Search Data: Input the condition of the search.
Match whole word only: The search should match with the exact word
type in the blank of “Search data”.
Match case: The search is now case sensitive
Check the selected data: The check box of the found data which you
search would be ticked. This function is for the convenience of specific
data printing.
If more data would be found, press then [Next] to display the next data.
-41-
z
At the top left corner of the search dialogue box, it will display the
position of the target data in the database.
shows that the target data is the fourth among all sixteen entries.
The found target data would be underlined in a different color in the
data list.
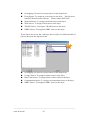
Query by [Record list]
1) After you click on [Record list], the data list will pop up. Please press
the [Query] button, and a [Query] dialogue will pop up. Please use
“>",”<","=", “None", “And"and “Or"as your query
conditions.
-42-
After entering these conditions and pressing [OK], the data list will display the
results shown as follows: Data (1/3) shows that total 3 data match your
conditions and that the target data is the first data.
※ You can keep the latest conditions for the [Query], so that when you open this
template another time, you can directly acquire [Query] results from the database
through these previously entered conditions. Please follow up these steps: Menu
Bar→ File →Press [Save], a dialogue box will pop up: “Do you want to save the
query condition to file?” It also shows the latest conditions you entered for your
reference, for example: Dep =”sales”. You can press [Yes] to save these
conditions.
When you open this template the next time, a dialogue would appear to remind you
which [Query] condition has been saved with this template; for example,
Dep=”sales”
After opening this template, the data shown in the Data List are the results queried
through these conditions you saved last time.
If you need all of the original data, just press [Query] to leave the condition blank and
then press [OK]
-43-
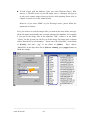
z Preview and query by using the tool bar of the main menu
1
1.
2.
3.
4.
5.
6.
2
3
4
5
6
Preview option: Unmark the flag, you can preview all the data in the
“Printing Information” database; however, after marking the flag, you
can preview only the data which you marked in the “Printing
Information” database.
Preview the first data
Preview the previous data
Preview the next data
Preview the latest data
Search (Same as the “Search by [Record list]”)
z Printing preview of certain data
1.
Click on the [Record list]. When choosing the target data from the
“Data List”, you will see the preview of that data in the main menu.
Press the “Print” button to print it out.
2.
When the “Print” dialogue box pops up, check [Current Job] to print
the data you are previewing.
-44-
4.4 Build up a “Printing Information” database
z
What is a “Print Information Database”?
After a user processes ID images, these setting parameters, such as size,
location and color properties, will be added into “Print Information”. In
addition, “Print Information” displays which data will be printed; printed
quantities of each data and when data were printed. Thus, the “Print
Information” reveals the following information for each data:
1. Print ?: Print or not?
2. Printed: Printed quantities
3. Printing Time: The latest printing time of the data.
4. Total Prints: The total print quantities of each data.
z
Build up a “Print Information Database”
1.
Open Data List through Record List
※After connecting to a database and layer mapping, the Data List will
appear through the Record List. The display of each layer mapping
corresponding to the original database you edited, will be shown on the
right side. Other columns will hide automatically and only appear when
the mouse curser will be dragged over them. Print Information will be
displayed on the left including Print?, Printed, Printing Time, Total Prints.
-45-
The area in grey color on the left indicates that the Print Information
Database has not been created or opened. Before you open the Print
Information Database, all the adjustments for the ID photo; including size,
location and color properties, can not be recorded.
If you have created a Print Information Database, please press [Print Info.]
to open your Print Information Database (Please refer to the next section:
Print Information Database connection / open in this chapter). If not,
please refer to the following steps to create a Print Information Database
and then you will be able to save the adjustments including size, location,
and color properties for the ID photo through Print Information Database.
2. Please press 【Print Info】to build up a “Print Information Database”.
Then a dialogue box will pop up. If you have never built up a “Print
Information” database, please enter a file name to build up your first
“Print Information Database”, and then press “Open”.
※Remark: Please Do Not Open your original database, and it is not
your “Print Information Database”, please pay attention to it.
3. Before you build up the first “Print Information Database”, this file “Print
Information Database” will not exist in your folder. Thus, while you are
building up the first “Print Information Database”, a dialogue box will pop
up to remind you and ask you if you would like to create this file or not.
Please click “OK” to continue to build up the “Print Information
Database”.
-46-
4. The computer system will ask you to select a field as an index key in order
to connect to the original database. Please select one field involving
different data without repeating it as an index key.
5. Then there would be a warning dialogue clarifying “The field can be Null”,
please press “OK” to complete building up “Print Information Database”.
After completing this process, the Data List will display the following information:
The left side will display “Print Information Database” and would be bright. The
bright color means that the Print Information Database is open. Also, all data
will be selected when a new Print Information Database has been created for the
first time.
-47-
[Description]:
1. Print? : You can select which data you are interested in printing or
previewing.
2.
Printed: Printed quantities for each data.
3.
Print Time: The latest printing time of each data.
4.
Total Prints: The total print quantities of each data.
5.
Select All: You can use this function to check or uncheck all the data.
6.
Disable: Close “Pint Information” database.
7.
Print Job Control: Include Check/ Uncheck settings and Clear the record.
z
Print Job Control:
1. Check/ Uncheck settings: You could set the rules for each column to
decide which data should be checked or unchecked.
2. Clear the record: You could reset the “Printed” or “Print_Time” column.
-48-
z Print Information Database connection / open: After you create a Print
Information Database, this database will be saved in your computer. Please
open a Print Information Database using the following procedures.
1. Please select Database→ Record list to open a database list.
2. Please express【Print Info】to open the Print Information Database.
3. Select the Print Information Database you have created and press [Open], and
then the Print Information Database will be opened.
-49-
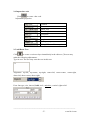
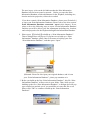
4.5About “Append Print Info.” Function
What is “Append Print Info.”?
Compared with an independent “Print Information Database”
mentioned above, to “Append print info.” means to append the
print information to the users own database. In other words, this
function combined the users’ database and print information into
one *.mdb file rather than save the print information as another
*.mdb file. Users who used to save the database on their server
would prefer to save the print information like this way.
How to “append print info.”?
1. First, you have to create some specific columns and set their
properties in your database file. Please refer to the following
table as the guide to create and do the settings.
Column name
Type
Size
Initial Value
HiTi_Print
Boolean(Y/N)
--
--
HiTi_Print_Count
Long integer
--
0
HiTi_Print_Time
Date/Time
--
--
HiTi_Total_Print
Long integer
--
0
HiTi_ID1_Rect
Text(varchar)
255
--
HiTi_ID2_Rect
Text(varchar)
255
--
HiTi_ID1_Image
OLE object
--
--
HiTi_ID2_Image
OLE object
--
--
Remark: “—“ means no need to set.
2. Execute CardDesiree CS, open the template and connect with
the database. Click “Append Print Info.” button in the page of
“Data list”. Then the “print info.” will be enabled as below.
-50-
3. After you activate the “Append Print Info.” function, the
“Pint Info.” function which is at the left down side of the
same page would be disabled. That means you either could
choose to append the print information to the same database
or save as another database file.
4. If you don’t create the specific columns before clicking the
“Append Print Info.” button, there will be an error message
pup out as below.
-51-
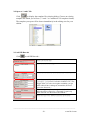
4.6Dynamic Mode
What is Dynamic Mode?
For the ease of instant card issuing cases, “Dynamic Mode”
provides users to add new records into the database and preview
the layout in the same window page simultaneously. Users could
type the information in the established columns and save into the
database. In the scenarios like conferences, exhibitions or the
counter of coffee shops, it could facilitate the attendants issuing a
membership card easily and quickly.
How to use it?
1. Please select “Database”→ “Dynamic Mode” in the main page
of CardDesiree CS to open the operation window.
2. Input the data into the established columns. Remember to
click on “Update” to save.
z
New: Build a new record.
z
Update: Save the update information into the database.
z
Refresh: If there are more than two clients accessing to
the same database, click on “Refresh” to make other
clients could see the updates.
z
First/Last/Next/Previous: Function buttons for preview.
z
Close: Close this operation window.
-52-
Chapter 5 DB Maker Interface
5.1 Main Interface
Menu Bar
The Edit Region
Tool Bar
5.2 Menu Bar
1) File
The “File” menu option includes:
New (create a new database file)
Open (open an existing database file)
Close (close a database file)
Save (save a database file)
Save As (save as a new database file)
Exit (exit DBMaker)
-53-
Images Preview
2) Edit:
The “Edit” menu includes:
Cut
Copy
Paste
Find
*For the “Find” function, please enter the characters in the blank area [Find what],
select the Field, and decide the Direction – Up or Down for your search. Also
you can mark □Match whole field to search the matching characters.
3) Field
The “Field” menu includes:
Descend
Ascend
Modify Field
4) Record
The “Record” menu includes:
Add Record
Delete Record
-54-
5) Window
The “Window” menu includes:
z
Cascade (Showing more than one table by
the overlapping format as follows.)
z
Tile (Showing more than one table at the same time as follows.)
6) Help
The “Help” menu includes:
“Help"file & “About DB Maker”
-55-
5.3 Tool Bar
1)
Create a new database file
2)
Open an existing database file
3)
Cut
4)
Copy
5)
Paste
6)
Help
-56-
Chapter 6 Edit the Database by DB Maker
6.1 Create a New Database File
in the Tool bar. Then press [Browse].
1) Menu BarÆFileÆNew, or press
2) Enter the name of the new database file, and press [Save] to create a new
database file. (Remark: If you input an existing file name or select an existence
database file, the original content in this the existing file will be replaced.)
3) The dialogue shows the path of the new database. Press [Next].
-57-
4) Enter the name of the new table.
5) Now you can select A. Auto Create Based on Existing Template or B.
manual Creation.
A
B
A. Auto Create Based on Existing Template
It means DB Maker will create a new database the fields of which are based
on the layers of an existing ‘*.mds’ template which you created in the
software – CardDésirée CS. (Remark: ‘*.mds’ is a CardDésirée CS template
format.)
If you select A. Auto Create Based on Existing Template and press [Next],
please follow the procedures indicated here below.
-58-
1. Press [Browse] for the Template Path.
2. Select a ‘*.mds’ template and press [Open].
3. Press [Finish]
-59-
4. The fields of this new database file will be based on the layers of the template
which you selected.
The layers of the template in CardDésirée CS
The fields of the new database file
5. Enter your data into this table. The process is completed.
B. Manual Create
1. If you select [Manual Create], the following dialogue box will pop up. Please
press [New] to create the necessary fields.
2. Enter the Field Name and press [OK].
-60-
3. After setting the names of all the necessary fields you need, press [Finish] to
complete this process.
4. Now you can enter your data into this database file.
6.2 Open an Existing Database File
The default format of database files for DB Maker is the ‘*.mdb’ format. You can
open existing database files, edited by Access. Please open the ‘*.mdb’ files from
Menu Bar: FileÆOpen or open files from Tool Bar:
.
6.3 Edit a table of the database
After you create a new database file or after you open an existing database file, you
can start to edit your table in the database file.
-61-
1) Modify Field
Please start from Menu Bar: FieldÆModify Field. A dialogue box will pop up, and
you can press [New] to add a new field or press [Delete] to delete a field.
Also, you can directly right-click the button of the mouse on the field you would like
to modify and you will have the following options: Descent Sort, Ascent Sort,
Delete Field, Cut, Copy, Paste, and Primary Key setting.
2) Add/Delete Record
Please select Menu Bar: RecordÆAdd Record or Delete Record
z
Add Record: Once you select [Add Record], the cursor will
automatically move to the last line of the table and the user can enter
the data.
-62-
z
Delete Record: When you select [Delete Record], the whole line,
which is indicated by the arrow, will be deleted.
-63-
6.4 Settings for Images Preview
1.
First, you need to save all the images files, which you need in the same folder
(The user can browse the folder path or directly input the path of the folder in
the blank of [File Folder] shown as A in the following illustration).
2.
Type all the file names sequentially into a certain field of the database
(shown as B in the following illustration). For example, if you put all the
image files in the subfolder ”PM” which is in the folder “CStest” in disc D,
and you also key in all the image file names into a field call “Photofield” in
your database. Please input “D:\CStest\PM\” in the blank of [File Folder]
or press [Browse] for the folder of the images files path.
3.
Select Field Name in the drop-down list of [File Name] (shown as C in the
following illustration) and select “.jpg” in the blank of [File Extend] (shown
as D in the following illustration). Then, the image which the arrow (shown
as E in the following illustration) locates will be shown in the preview area.
B
E
A
C
D
-64-