1
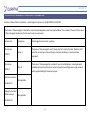
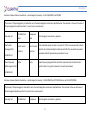
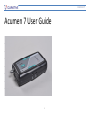
Acumen 7 Acumen 7 User Guide 1 Acumen 7 Attention: It is necessary to read the user manual carefully before first use the device, Keep the manual in a safe place so that you can refer to it whenever necessary. MANUFACTURER EU AGENCY Curative Medical Technology Inc Curative medical devices GmbH No 9, PeiYuan Road, New District, Suzhou, 215163 P.R. China Blasewitzer Str. 41, 01307 Dresden, Germany Telephone: +86-0512-69217308 Fax: +86-0512-69217338 E-mail: [email protected] Phone: +49-351-450 4500 Fax: +49-351-450 4511 2 Acumen 7 CONTENTS SYMBOLS 6 SYSTEM INTRODUCTION 7 USAGE SCOPE OF APPLICATION CONTRAINDICATIONS CAUTIONS WARNINGS 7 7 7 8 9 PRODUCT COMPONENTS AND DESCRIPTION 11 PRODUCT COMPONENTS PRODUCT AND ACCESSORIES 11 12 SPECIFICATION OF DEVICE 13 SAFETY INSTRUCTIONS AND CLAIMS 14 HOW TO USE SAFELY LIABILTY 14 15 CLEANING AND MAINTENANCE 15 CLEANING THE ACUMEN7 3 15 Acumen 7 MAINTENANCE DISPOSAL 15 16 QUALITY WARRANTY ERROR! BOOKMARK NOT DEFINED. SYSTEM INSTALLATION AND USAGE 17 SYSTEM CONNECTION ACCESSORIES CHEST AND ABDOMEN EFFORT SENSORS OXIMETER PROBE NASAL CANNULAR 17 18 18 18 18 USAGE OF ACUMEN7 19 SLEEP DATA COLLECTION DATA DOWNLOAD LED DISPLAY FUNCTION DESCRIPTION 19 19 20 COMMON PROBLEMS ANALYSIS AND TROUBLESHOOTING 21 AIRFLOW SIGNAL (NASAL CANNULA) SNORING SIGNAL (SNORE MICROPHONE IN RECORDER BOX) CHEST AND ABDOMEN EFFORT SIGNAL (CHEST AND ABDOMEN EFFORT SENSORS) SPO2 AND PULSE SIGNAL (OXIMETER PROBE) CONNECTION PROBLEM (USB CABLE) DOWNLOAD DATA (USB CABLE) 21 21 22 22 24 24 4 Acumen 7 APPENDIX A TERM DEFINITION ERROR! BOOKMARK NOT DEFINED. APPENDIX B ELECTROMAGNETIC COMPATIBILITY INFORMATION 26 5 Acumen 7 SYMBOLS CE Marked indicating conformance to EC Directive No. 93/42/EEC concerning medical devices Attention! Consult accompanying documents Serial Manufacturer Date of manufacture number (printed under the back cover) 6 Type BF applied part Class II Double insulated The device, accessories and the packaging have to be disposed correctly at the end of the usage. Please follow Local Laws or Regulations for disposal DC Power Acumen 7 SYSTEM INTRODUCTION USAGE It is designed to be used with a 32-bit Microsoft operating systems including Windows 2000 SP3, Windows XP SP1 and above. It is not compatible with 64-bit operating systems. The software has case management capabilities and can be used to store and analyze the information of more than one patient. The Acumen 7 can collect store and analyze 8 parameters of Polysomnographic data including; Chest effort, Abdomen effort, Nasal airflow, Snore, SpO2, body position, pulse rate and CPAP pressure. (When used with a Curative CPAP device) SCOPE OF APPLICATION The device can be used in the home or in medical units for clinical monitoring, analysis and diagnosis of relevant physiological signals including the thoracic and diaphragmatic respiration, nasal airflow, snoring, SpO2 and sleeping positions. The device is used in clinical sleep laboratories to assist in the diagnosis of sleep disorders by gathering, storing and analyzing data across 7 parameters of physiological events during sleep. This equipment can only be used under the directions of a qualified sleep clinician. CONTRAINDICATIONS There are no absolute contraindications to polysomnograph when indications are clearly established. However, risk-benefit ratios should be assessed if medically unstable inpatients are to be transferred from the clinical setting to a sleep laboratory for overnight polysomnography. Explosion Hazard: Do not use the Acumen7 in an explosive atmosphere or in the presence of flammable anesthetics or gases. 7 Acumen 7 CAUTIONS The PSG Acumen7 analyses overnight sleep information acquired from the raw data of the recorder. Any loss of raw data due to interferences caused by loss of power, incorrect use of the sensors and device, strong electromagnetic fields or human factors can all result in incorrect raw data and consequently incorrect analysis. It is important that the device is corrected calibrated as a device that is not correctly calibrated will not provide accurate data. No SpO2 or pulse rate alarm is provided. Operation of the device may be adversely affected by o Electromagnetic fields exceeding the level of 1V/m in the test conditions of EN 60601-1-2 o The operation of high frequency (diathermy) equipment o Defibrillators, or short wave therapy equipment o Radiation (e.g., x-ray, CT) o Magnetic fields (e.g., MRI). o Avoid using this device in an MRI environment or proximity to a high EMI emission source. Do not submerge the device in water. Do not place liquids on or near the device. Do not use the device if you are wearing a nasal or full face mask for CPAP or bi-level therapy. This will affect the accuracy of the device. Do not use the device if you are wearing a cannula for therapy. This will affect the accuracy of the device. If any unexplained change in the performance of this device occurs, if the device is dropped or mishandled, if water is spilled into the enclosure, or if the enclosure is broken discontinue use and contact our service center. If any part of the device is broken, please stop using the device. Use only our supplied sensors and accessories. Use of other accessories could cause the device to malfunction. The device must be repaired or checked by qualified personnel. Do not open the device and change any part yourself. This equipment complies with International Standard EN 60601-1-2: 2007 for electromagnetic compatibility for medical electrical equipment and/or systems. This standard is designed to provide reasonable protection against harmful interference in a typical medical installation. However, because of the proliferation of radio-frequency transmitting equipment and other sources of electrical noise in healthcare and other 8 Acumen 7 environments, it is possible that high levels of such interference due to close proximity or strength of a source might disrupt the performance of this device. Cardiogreen and other intravascular dyes may affect the accuracy of SpO2 measurements. The oximeter sensor might not work in cold extremities due to reduced circulation. Warm or rub the finger to increase circulation or reposition the sensor. Some nail polish colors or artificial nails can reduce light transmission and affect SpO2 accuracy. Before using any sensor, read the User Directions carefully. They contain the specific application duration for each sensor. Check the pulse oximeter sensor application site frequently to determine the positioning of the sensor, the circulation and skin sensitivity of the patient. A patient’s sensitivity to sensors may vary due to medical status or skin condition. Acumen7should not be gas sterilized or autoclaved. The Acumen 7 uses size AA 1.5VX2 batteries. The batteries should only be replaced by professionals (instrument operators rather than the patient), Replace the cover after changing the batteries. Batteries should be used and disposed of appropriately to avoid leaks or explosions. Follow local government guidance and recycling instructions regarding the disposal or recycling of the device and its components, including batteries. Use only Size AA 1.5VX2 batteries. If the Acumen7 is not used for 30 days remove batteries. A functional teater cannot be used to assess the accuracy of a pulse oximeter probe or a pulse oximeter monitor. WARNINGS This equipment can’t be used as a monitor of apnea, because it has no audible or visual apnea warning system. Skin irritation may occur as a result of the cannula or belt used by the patient. Discontinue using the device it if skin reddening or inflammation appears The evaluation of the PSG Acumen7 electrical isolation must be conducted by a certified engineering or biomedical personnel who are qualified to make such an assessment. Patients with parasomnias or seizures may be at risk of injury that may occur due to movements during sleep. 9 Acumen 7 Institution-specific policies and guidelines describing personnel responsibilities and appropriate responses should be developed. Do not smoke while wearing the Nasal Cannula. Avoid exposure to sources of direct airflow such as fans during the operation of the device. Do not allow the cables to become tangled, coiled, crossed, or wrapped around the neck, arms, or legs. This could result in strangulation. Do not operate the device in the presence of flammable substances such as anesthetics or cleaning agents. The device is not to be used for life support The device is not suitable for sporting activities. The device must be used under the instructions of doctor. The device must be used with CE-marked parts or our supplied parts. The use of other parts or materials may impact upon the safety of the device. A rechargeable Lithium Button Battery is used for the clock inside the device. Danger of explosion and fire may occur if battery is replaced incorrectly. Replace only with the same type of RTC battery. Model: TS621FE, 3.0 V, 3 mAh. Oximeter readings of the Acumen7 may be affected by the use of an electrosurgical unit (ESU). Use only pulse oximeter sensors that are provided with the Acumen7 as these are manufactured to meet the accuracy specifications for the Acumen7 system. Using other manufacturers’ sensors can result in improper pulse oximeter performance. Do not use damaged sensors. 10 Acumen 7 PRODUCT COMPONENTS AND DESCRIPTION PRODUCT COMPONENTS 1 Recorder box 1 Chest effort Sensor with Belt, One Abdomen effort Sensor with Belt, One Oximeter Probe 1 Recorder Pouch 1 Acumen7 software CD 1 Nasal Cannula* 1 USB or RS232 cable* Note: items with * can be supplied by the manufacturer or purchased from other vendors that are CE-marked. Attention! The data transmission interface is only used for transmitting data in hospital and connects to RS232 or the USB of a PC. Attention! Equipment connected to the analog or digital interfaces must comply with the respective IEC standards (e.g. IEC 950 for data processing equipment and IEC 60601-1 for medical equipment). All configurations shall comply with the current standard version for SYSTEMS IEC 601-1-1. If you have any doubt, consult the technical service department or your local representative. Attention! The sensor interfaces should be connected with correctly matched sensors. Attention! The MIC Sensor interface should not be filled with anything. 11 Acumen 7 PRODUCT AND ACCESSORIES Carefully unpack the Acumen7 and the accessories checking each item ageist the product component list. If there are any defects or missing accessories please contact the suppliers or the manufacturer. Recorder Box Chest and Abdomen Effort Sensor Belt USB Cable Pulse Oximeter Probe Nasal Cannula RS232 Cable 12 Acumen 7 SPECIFICATION OF DEVICE Body position whilst sleeping The supine position The left recumbent position The right recumbent position Prone Oximeter Oxygen Saturation Range (%SpO2) 70% to 100% Pulse Rate Range 20 to 255 pulses per minute Accuracy: SpO2 Saturation (%SpO2) 70-100% ±2% Accuracy: Pulse Rate ±3bpm Device Dimensions Height - 4.94” (125mm) Material Recyclable ABS thermoplastic Weight 150g: without battery and sensors Data and Data Communication Analogue to Digital converter (A/D) 10 Bit Memory 64Mb Communication Ports USB/RS232 Battery Size AA 1.5VX2 (DC 3V); Continuous Operating Time 30 Hours Power supply Width - 2.75″ (70mm) Height - 0.94″ (24mm) Battery Level Indication (what does this mean?) Classifications per IEC 60601-1 Type of Protection: Internally powered (battery powered) 13 Acumen 7 Operation Transport or storage Degree of Protection: Type BF-Applied Part Enclosure Degree of Ingress Protection: IPX0 Mode of Operation: Continuous Temperature +5°C - +40°C Relative humidity 10% - 90% (non-condensing) Atmosphere pressure 700hPa - 1060hPa Temperature -20°C - +55°C Relative humidity 10% - 93% (non-condensing) Atmosphere pressure 500hPa - 1060hPa SAFETY INSTRUCTIONS AND CLAIMS HOW TO USE SAFELY Before using the device, read the safety instructions carefully to avoid possible dangers: The device must be used by you exclusively under the instructions of your physician. The device should only be used with CE-marked parts provided or recommended by your authorized dealer. When your device doesn’t work properly, contact your dealer immediately. For electric safety, read the following carefully: o Do not switch on the device if casing or cables are damaged. o In case of its failure, contact your authorized dealer. Do not open the device yourself. o Keep the device dry at all times. o Do not use the device in a damp room or a bathroom. o Do not place containers or glasses filled with liquid on the device or place the device near water e.g. bathtubs. 14 Acumen 7 o Take the batteries out of the device before cleaning. LIABILTY The manufacturer shall not be held liable for any damages in case of: Tampering, modifying, adding expansion features or repair by persons who have not been authorized by the manufacturer. Using accessory or spare parts that are not recommended by us, or not officially registered. Using the device in a way that was not instructed in the manual. CLEANING AND MAINTENANCE CLEANING THE ACUMEN7 Clean the enclosure of the Acumen7 recording box with a soft cloth dampened with isopropyl alcohol. Do not pour or spray any liquids onto the Acumen7, and do not allow any liquid to enter any openings of the device. Allow the unit to dry thoroughly before reusing it. IMPORTANT! Do not immerse the Acumen7 in liquid, and do not use corrosive or abrasive cleaning agents on the Acumen7. Clean the Acumen7 and the sensors separately. For instructions regarding the cleaning of the Pulse Oximeter sensor and the Nasal Cannula refer to the appropriate product guides. MAINTENANCE The advanced digital circuitry within the pulse oximeter of the Acumen7 requires no calibration or periodic maintenance. Field repair of the Acumen7 circuitry is not possible. Do not attempt to open the Acumen7 recorder box or repair the electronics. Opening the case will damage the Acumen7 and void the warranty. If the Acumen7 is not functioning properly, see “Troubleshooting.” 15 Acumen 7 In the case of any product issues contact our service center. Service of the Acumen7 should only conducted by persons authorized by our company. Proper use and maintenance of the Acumen7 will extend the working life of the equipment. (see safety and cleaning instructions) Before maintenance ensure that the device is disconnected from any power source. The Acumen7 equipment should be managed by a specially assigned person. The Acumen7 and its accessories should be kept in a dry storage environment to prevent the device from damp and corrosion. The device should also be kept away from sources of strong electromagnetic fields that may cause interference. The Acumen7 has been accurately assembled by the manufacturer (Curative Medical Technology) and users should not disassemble or adjust the system randomly. When abnormal conditions occur or this system cannot operate normally please contact our company or local maintenance department. DISPOSAL This device, its accessories and its packaging have to be disposed correctly at the end of the usage. Please follow Local Laws or Regulations for disposal. 16 Acumen 7 SYSTEM INSTALLATION AND USAGE SYSTEM CONNECTION 17 Acumen 7 ACCESSORIES CHEST AND ABDOMEN EFFORT SENSORS OXIMETER PROBE NASAL CANNULAR The chest and abdomen effort sensors are attached to the chest and abdomen belts. The Oximeter Probe can be clamped onto any finger. Use adhesive tape to secure the probe to the finger as to avoid the patient subconsciously removing the probe The Nasal Cannula is placed onto the nose of the patient. It uses pressure conduction mode to sense and respond to the pressure inside the nose and mouth. The chest and abdomen belts should be adjusted so they transmit the data effectively. If the belt is worn too loosely the signals received from the sensors may not be stung enough to transmit accurate data. Be careful not to let fluid enter into the cannula. 18 Acumen 7 Note: Before turning the device on, all equipment must be connected properly and be worn by the patient. USAGE OF ACUMEN7 SLEEP DATA COLLECTION Open the battery compartment, and install two AA batteries. Ensure that all the sensors are connected properly. To use the sleep data collection mode of the Acumen7 press the On/Off button for 2 seconds until both the green power light and the orange status light turn on. The system will automatically detect readings of SpO2 from the pulse oximeter within 5-10 seconds. When SpO2 readings are detected, the orange status indicator light will flicker slowly with an interval time of 1 second. To switch the Acumen7 off when the device is not in use press the On/Off button for 2 seconds until the status light and the power light are off. DATA DOWNLOAD Connect the USB data cable or the RS232 cable to the appropriate PC port and Acumen7 port. To enter the data download mode of the Acumen7 press the On/Off button for 1 second until the green power light is switched on. (If the orange status light is also switched on the device is in data collection mode.) 19 Acumen 7 LED DISPLAY FUNCTION DESCRIPTION Function Switch Power LED Status LED Power off Press 2s No display No display Power on Press 1s Display in green No display Data collection mode Press 1s Display in green Display in orange Display in green Flashing in orange when Pulse Oximeter is detected. Display in orange when the Pulse Oximeter is not detected. Recording data 20 Acumen 7 COMMON PROBLEMS ANALYSIS AND TROUBLESHOOTING AIRFLOW SIGNAL (NASAL CANNULA) Problem Possible Cause Possible Solution Unable to obtain a nasal The cannula is not properly Adjust the cannula so the nasal prongs rest just inside the nostrils and re-check cannula signal display on the positioned. the display. bar graph. The cannula is not tightly Make sure the cannula is firmly attached to the main device by turning the connected to the main device. connector in a clockwise direction The cannula is pinched/ kinked. Replace cannula. Contact medical provider for replacement. Consistent invalid or The cannula is not secure on the Ensure the clear slide is against the chin to secure the cannula. incomplete measurements head. with ERR being displayed. The patient is a restless sleeper Use small pieces of tape to secure the cannula prongs to the cheekbones. DO and the nasal prongs are becoming NOT PLACE TAPE OVER THE MOUTH OR NOSTRILS displaced. SNORING SIGNAL (SNORE MICROPHONE IN RECORDER BOX) Problem Possible Cause Possible Solution No snoring waveform Snore Microphone may fail Contact Acumen7 Customer Support. 21 Acumen 7 CHEST AND ABDOMEN EFFORT SIGNAL (CHEST AND ABDOMEN EFFORT SENSORS) Problem Possible Cause Possible Solution The chest and abdomen The chest and abdomen belts are Adjust the chest and abdominal belts waveforms are too small or is too tight Adjust the chest and abdominal belts a line The chest and abdomen belts are Contact Acumen7 Customer Support. too loose The chest and abdomen effort sensors have broken SPO2 AND PULSE SIGNAL (OXIMETER PROBE) Problem Possible Cause Possible Solution Unable to obtain a green The patient pulse strength is low. Reposition the finger or insert a different finger, and keep the sensor pulse display on the bar motionless for at least 10 seconds. graph. Warm the patient’s finger by rubbing or covering with a blanket. Position the sensor at a different site (e.g., earlobe). Circulation is reduced because of Allow the hand to rest comfortably without squeezing or pressing the Note: In some occasions, excess pressure on the sensor sensor on a hard surface. patient perfusion may be (between the sensor and a hard inadequate for pulse surface) after inserting finger. 22 Acumen 7 detection. The finger is cold. Warm the patient’s finger by rubbing or covering with a blanket. Position the sensor at a different site (e.g. earlobe). Unable to obtain a green The sensor is applied incorrectly. Apply the sensor correctly. pulse displayed on the bar There is possible interference from Reduce or eliminate any interference. Make sure that the sensor is not graph. one of the following sources: placed on the same position being used for other patient therapies or • arterial catheter diagnostics (e.g., blood pressure cuff). • blood pressure cuff • electrosurgical procedure • infusion line The red LED is not illuminated in Ensure that the sensor is securely attached to the Acumen7. the finger insertion area. Check the sensor for any visible signs of deterioration Contact Acumen7 Customer Support. Frequent or steady pulse There is excessive ambient light. Shield the sensor from the light source. quality indication. The Acumen7 is applied to a Apply the sensor to a finger with no artificial or polished nails. polished or artificial fingernail. Position the sensor at a different site (e.g. earlobe). The red LED is not illuminated in Ensure that the sensor is safely attached to the Acumen7. the finger insertion area. Check the sensor for any visible signs of deterioration. Contact Acumen7 Customer Support. A dash (-) appears in the Patient motion is excessive. Reduce patient motion. A poor signal from the finger is Reposition the finger or insert a different finger and keep the sensor 23 Acumen 7 %SpO2 display. being detected. motionless for at least 10 seconds. Position the sensor at a different site (e.g. earlobe). The finger was removed from the Reinsert the finger and keep the sensor motionless for at least 10 seconds. sensor. The Acumen7 is not functioning. Turn the unit off, check all connections, and retry. Contact Acumen7 Customer Support. CONNECTION PROBLEM (USB CABLE) Problem Possible Cause Possible Solution Unable to connect to device Used error USB cable. Check the cable; make sure that it is a USB cable. Unknown device USB driver is not installed. Install the USB driver. Communication error. Please The cable and device loose Please fix the connection between cable and device. check the device side and USB connection. cable connection is good. DOWNLOAD DATA (USB CABLE) Problem Possible Cause Possible Solution Communication error. Please The cable and device loose Please fix the connection between cable and device. check the device side and USB connection. 24 Acumen 7 cable connection is good. Can not read device records. Device connection error. Please connect to PC again with USB cable, and click “Refresh” button to get records list. 25 Acumen 7 APPENDIX B ELECTROMAGNETIC COMPATIBILITY INFORMATION Guidance and manufacture’s declaration – electromagnetic emissions- for all EQUIPMENT and SYSTEMS The Acumen 7 Polysomnograph is intended for use in the electromagnetic environment specified below. The customer of the user of the Acumen 7 Polysomnograph should assure that it is used in such an environment. Emission test Compliance Electromagnetic environment – guidance Group 1 The Acumen 7 Polysomnograph uses RF energy only for its internal function. Therefore, its RF emissions are very low and are not likely to cause any interference in nearby electronic equipment. Class B The Acumen 7 Polysomnographic is suitable for use in all establishments, including domestic establishments and those directly connected to the public low-voltage power supply network which supplies buildings for domestic purpose. RF emissions CISPR 11 RF emission CISPR 11 Harmonic emissions IEC 61000-3-2 Voltage fluctuations/ flicker emissions Not applicable Not applicable IEC 61000-3-3 26 Acumen 7 Guidance and manufacture’s declaration – electromagnetic immunity – for all EQUIPMENT and SYSTEMS The Acumen 7 Polysomnographic is intended for use in the electromagnetic environment specified below. The customer or the user of Acumen 7 Polysomnographic should assure that it is used in such an environment. Immunity test Electrostatic discharge (ESD) IEC 60601 test level Compliance level 6 kV contact 6 kV contact 8 kV air 8 kV air 3A/m 3A/m IEC 61000-4-2 Power frequency (50Hz) magnetic field Electromagnetic environment - guidance Floors should be wood, concrete or ceramic tile. If floor are covered with synthetic material, the relative humidity should be at least 30%. The manufacturer needs to recommend the ESD precautionary procedures to user. Power frequency magnetic fields should be same levels with characteristic of a typical location in a typical commercial or hospital environment. IEC 61000-4-8 Guidance and manufacture’s declaration – electromagnetic immunity – for EQUIPMENT and SYSTEMS that are not LIFE-SUPPORTING The Acumen 7 Polysomnograph is intended for use in the electromagnetic environment specified below. The customer or the user of Acumen 7 Polysomnograph should assure that it is used in such an environment. Immunity test IEC 60601 test Compliance Electromagnetic environment - guidance 27 Acumen 7 level Conducted RF 3 Vrms IEC 61000-4-6 150 kHz to 80 MHz level 1 Vrms Portable and mobile RF communications equipment should be used no closer to any part of the Acumen 7 Polysomnograph, including cables, than the recommended separation distance calculated from the equation applicable to the frequency of the transmitter. Recommended separation distance Radiated RF 3 V/m IEC 61000-4-3 80 MHz to 2.5 GHz 3 V/m 3.5 d P E1 80 MHz to 800 MHz 7 d P E1 800 MHz to 2.5 GHz Where P is the maximum output power rating of the transmitter in watts (W) according to the transmitter manufacturer and d is the recommended separation distance in meters (m). Field strengths from fixed RF transmitters, as determined by an electromagnetic site survey, a should be less than the compliance level in each frequency range.b Interference may occur in the vicinity of equipment marked with the following symbol: 28 Acumen 7 NOTE 1 At 80 MHz and 800 MHz, the higher frequency range applies. NOTE 2 These guidelines may not apply in all situations. Electromagnetic propagation is affected by absorption and reflection from structures, objects and people. A) Field strengths from fixed transmitters, such as base stations for radio (cellular/cordless) telephones and land mobile radios, amateur radio, AM and FM radio broadcast and TV broadcast cannot be predicted theoretically with accuracy. To assess the electromagnetic environment due to fixed RF transmitters, an electromagnetic site survey should be considered. If the measured field strength in the location in which the Acumen 7 Polysomnograph is used exceeds the applicable RF compliance level above, the Acumen 7 Polysomnograph should be observed to verify normal operation. If abnormal performance is observed, additional measures may be necessary, such as reorienting or relocating the Acumen 7 Polysomnograph. B) Over the frequency range 150 kHz to 80 MHz, field strengths should be less than 1 V/m. stitched 29 Acumen 7 Recommended separation distances between portable and mobile RF communications equipment and the EQUIPMENT or SYSTEM – for EQUIPMENT or SYSTEM that are not LIFE-SUPPORTING The Acumen 7 Polysomnograph is intended for use in an electromagnetic environment in which radiated RF disturbances are controlled. The customer or the user of the Acumen 7 Polysomnograph can help prevent electromagnetic interference by maintaining a minimum distance between portable and mobile RF communications equipment (transmitters) and the Acumen 7 Polysomnograph as recommended below, according to the maximum output power of the communications equipment. Separation distance according to frequency of transmitter Rated maximum output power of transmitter (W) (m) 150 kHz to 80 MHz 80 MHz to 800 MHz 800 MHz to 2.5 GHz 3.5 d P V1 3.5 d P E1 7 d P E1 0.01 0.35 0.12 0.23 0.1 1.11 0.37 0.74 1 3.5 1.17 2.33 10 11.1 3.69 7.38 30 Acumen 7 100 35 11.67 23.33 For transmitters rated at a maximum output power not listed above, the recommended separation distance d in meters (m) can be estimated using the equation applicable to the frequency of the transmitter, where P is the maximum output power rating of the transmitter in watts (W) according to the transmitter manufacturer. NOTE 1 At 80 MHz and 800 MHz, the separation distance for the higher frequency range applies. NOTE 2 These guidelines may not apply in all situations. Electromagnetic propagation is affected by absorption and reflection from structures, objects and people. 31 Acumen 7 ACUMEN 7 SOFTWARE 32 Acumen 7 COMPUTER SPECIFICATI ONS Minimal configurations Recommended configurations Processor Pentium 4 1.6 GHz Pentium 4 2.0 GHz Memory 256M 512M Cache memory 128K 512K Hard disk 5G 80G Power supply 220× (1±10%) Va.c 50×(1±2%)Hz 32 bit Windows 2000, Windows XP…………. 220× (1±10%) Va.c 50×(1±2%)Hz Operation system 33 Acumen 7 SOFTWARE INSTALLATION PROCEDURE Insert Acumen7 disk to your disk drive. The installation programs will automatically startup within 60 seconds. If it doesn’t startup, the executable program Setup.exe inside the installation catalogue on the disk can be operated to start installation. Install the software as per the indication on the screen (The software does not startup automatically) Step 1: Double click the Setup.exe file to run the installation program. Step 2: Click “next” to continue the installation. 34 Acumen 7 Step 3: select the installation pathway and click next. Step 4: After having setting up the pathway, click “Install” to continue installation of software. 35 Acumen 7 Step 5: wait for installation to complete. Step 6: Click “Finish” to complete installation. Now there will be a shortcut on the program menu column of the system and a shortcut icon on the desktop. 36 Acumen 7 INSTALL USB DRIVER AUTOMATICALLY Step 1: Insert Acumen7 disk to your disk driver. Copy the file “Acumen7 _USBDriver _EN.rar” to your PC and extract it. Double click the Setup.exe file with the mouse to run the installation program Step 2: Click “next” to continue the installatio n. 37 Acumen 7 Step 3: Click “next” to continue the installation. Step 4: Wait for files to copy Step 5: Click “Finish” to complete the installation. 38 Acumen 7 INSTALL USB DRIVER MANUALLY Step 1: Connect the device to the PC using the USB or RS262 cable. When the computer finds the hardware, the “Found New Hardware” window will pop up. Select the first item: “Locate and install driver software (recommended) .” Step 2: Windows will search driver software automatically 39 Acumen 7 Step 3: If windows can not find the driver software for your device, it will ask you to locate and install driver software manually. Please select the second item “Browse my computer for driver software (advanced).” Step 4: Click “Browse…” button to locate the driver software on your computer, find the Acumen7 software and click “next”. 40 Acumen 7 Step 5: Windows security will ask you to install the driver software. Please select the second item “Install this driver software anyway”; Step 6: windows will begin to install the software. 41 Acumen 7 Step 7: If the driver software can be successfully installed windows will prompt that “Windows has successfully updated your driver software”. 42 Acumen 7 INSTALL USB DRIVER IS DRIVER SOFTWARE CANNOT BE SUCCESSFULLY INSTALLED Step 1: If the driver software cannot be successfully installed windows will prompt that “Windows encountered a problem installing the driver software for your device”. Step 2: Device driver software was not successfully installed. 43 Acumen 7 Step 3: Open “Computer Management” by right clicking ion “my computer’ on your desktop. Right click “Other devices” right click “Unknown device” item and select “Update Device software…” menu. This section is not explained well and I cannot follow the instruction easily and some options are not available. 44 Acumen 7 Step 4: Please select the second item “Browse my computer for driver software (advanced)”; Step 5: Click “Browse…” to locate the driver software on your computer. Step 6: Windows will start to install the software. Step 7: Windows security will ask if you want to install the driver software. Select “Install this driver 45 Acumen 7 software anyway”; Step 8: If the driver software can be successfully installed, windows will prompt that “Windows has successfully updated your driver software”. 46 Acumen 7 Step 9: If the driver software has successfully installed you will find “Curative Medical Acumen7” in Computer management > Device Manager > Universal Serial Bus controllers 47 Acumen 7 Step 10: Open “Control Panel” > “Programs and features”, we can find “Acumen7_USBDriver” item in the list such as the follow picture. 48 Acumen 7 INTRODUCTION TO THE ACUMEN 7 SOFTWARE The Acumen 7 software is used to: Download data from the device. Analyse and display data across the 7 channels. Create plots to compare and diagnose sleep conditions. Produce Respiratory Event Summary and SpO2 Scored Summary Reports. Add any other functionalities START UP To start the Acumen 7 software either select the shortcut on your desktop or, if Acumen 7 does not have a shortcut on the desktop select: Start menu > Programs> Curative Medical > Acumen 7. MAIN TOOLBAR The main toolbar provides instant access to the most commonly used functions of the software New Record Show Video Time Periods Sleep stage Open Record View a Multi Trend Plot Navigation keys Jump to Event 49 Acumen 7 Print Scan File Light on and Light off. EVENT SCROLL BAR The event scroll bar can be used to scroll from one event to the next. You can scroll between apnea events, hypopnea events and desaturation events. STATUS BAR The status bar at the bottom if the screen displays the recorded time and the period of time. SETTING THE PERIOD LENGTH There are 5 different time period lengths that you can view the data in 30 seconds, 60 seconds 2minutes, 5minutes and 10minutes. You can adjust this on the toolbar. LIGHT ON AND LIGHT OFF The Light on and Light off function on the toolbar is used to indicate the time that the patient was asleep during the data collection. By using Lights on and Lights off you can eliminate data that was collected when the patient was awake. 50 Acumen 7 CREATE A NEW RECORD Step 1: Select “New Record” from File tab. Step 2: Select “Browse” and then select where you would like to store your data. Attention! Ensure that you know the location of the file. You can also see the available disk space in this window and the amount of recording time available. 51 Acumen 7 Note: the remaining time displayed on the above plot is based on the current hard disk partition. If the remaining hard disk space is less than 500M, it should be noted to collect spatial processing. What does this mean? Appropriate measures should be adopted, for example: changing the storage pathway, backing up files, and deleting useless files to clean the adequate hard disk space for usage in the next data acquisition. Step 3: Select, “Next” to input the next item of information. Step 4: Input Contact Information Select “Next” Important! A Patient ID must be entered. 52 Acumen 7 Step 5: Input correct data of department information Select “Next” Step 6: Input correct data of medical history Click “Finish” button to collect Real-time data. ??????? 53 Acumen 7 Step 6: When the patient inofrmation has been completed you will be taken to the main screen of the Acumen 7 software. The main screen is used to display data that has been downloaded from the Acumen 7 device or imported from a file. 54 Acumen 7 OPENING A RECORD Step 1: Select “Open Record” from File tab. Step 2: Select the record you want to open. 55 Acumen 7 Step 3: Click “OK” to open record. 56 Acumen 7 IMPORTING DATA FROM FILE LOCATION Step 1: Select “Import Data from File Location” from File tab. Step 2: Browse to find a location where the data can be saved. Click “Next” 57 Acumen 7 Step 3: Input patient information as directed in Create a New Patient. Step 4: Browse to find the source file that holds the data you are importing. Important: imported file must be in *.Rawdat, or *.DAT format. 58 Acumen 7 Step 5: Select the data you want to import and click “Open” Step 6: Once you have selected your data to import click “Read” to import the data. 59 Acumen 7 DOWNLOADING DATA FROM THE DEVICE Step 1: Select “Download data from Device” from File tab Step 2: The next screen will show the records from the Acumen 7 Select the record that you want to download. 60 Acumen 7 Step 3: Choose the location that you want to download the data to Step 4: Click “Download ” to begin the data download. Fill in any missing information. Click “done” 61 Acumen 7 Step 5: Wait for data to download. Step 6: Select the record and click “Open File” When the download has finished click OK. 62 Acumen 7 Step 7: Once the file is open you will be asked if you want to scan the file. Step 8: Final screen showing progress on scanning files. When scanning is complete you can see that data in the chart formats. Select “Yes” and scan the file to process the data. 63 Acumen 7 ERASE CHIP DATA NEW TITLE NEEDED Step 1: Select “Erase Chip data” from File tab Step 2: Click “Erase”. Note: The device can store 49 records. When the amount of records exceeds 49, new records will be saved over the oldest records. Step 3: Check that you do want to erase the data. 64 Acumen 7 SCANNING FILES Step 1: Select “Scan File” from File tab Step 2: If file already scanned you will be asked whether you want to scan the file again. Select “Yes” or “No” 65 Acumen 7 Step 3: Scanning the file. 66 Acumen 7 FILE MANAGEMENT Step 1: Select “File management” from File tab Step 2: Select Files to delete or backup from File list or Database list. You can browse different directories to find files. 67 Acumen 7 PRINTING Step 1: For a quick print select “Print” To view the document before printing select “Print Preview” Step 2: The “Print Preview” can zoomed in and out and be saved as a picture before printing 68 Acumen 7 Step 3: View of document zoomed out. Step 4: Use the “Print Setup” to change printer or adjust any print settings. 69 Acumen 7 HOSPITAL INFORMATION AND TIME SYNCHRONIZATION Step 1: Hospital Information and Sync. Time can be found in Option tab. Step 2: Enter the hospital information so that it can be shown on the cover of the report. Step 3: To sync the time of the device with the computer clock click “Sync Time” Attention: please connect the device to PC with USB cable; synchronize the device time before you use this device. Make sure that the PC time is correct. To save parameter data click “Save Parameter Data” 70 Acumen 7 DATA PLAYBACK SCAN FILE FUNCTION The scan file function processes the raw sleep data and uses it to create waveform graphs that enable the user to easily analyze the Polysomnographic data. It takes 2 to 5 minutes to scan an 8-hour file depending on the computer. SCANNING FILES Step 1: Select “Open Record” from File tab Step 2: Now you have access to the stored records. Select a file and click “OK” 71 Acumen 7 Step 3: If the file has not been scanned previously then you will asked whether you want to scan the file Step 4: If the file has already been scanned you will be reminded that it has. You will then be asked whether you would like to scan the file again. 72 Acumen 7 73 Acumen 7 REVIEWING RECORDED DATA To review recorded data, select the file that you wish to review in the open record function or select a recently opened file from the File tab. If the file hasn’t been scanned, there will be no reports or trend plots. To scan files refer to the previous section. This is the view of a scanned file. It displays the following channels: Chest Respiratory Effort Abdomen Respiratory Effort Air Flow Snore Body Position Battery Voltage SpO2 Pulse Rate 74 Acumen 7 EDITING EVENTS After the software has identified the sleep events, the user is then able to access the properties of each event, to mark the status of that event. The event can be marked in 5 different ways 1. No Validation so far (No status) 2. Accepted (Event is confirmed) 3. Doubtful (Event is unconfirmed) 4. Manual (Event can be edited manually) 5. Rejected (Event is deleted) 75 Acumen 7 EDITING FLOW EVENTS A textbox will automatically pop-up to display detailed information of these events. MARKING AN EVENT When reviewing the recorded data using the Acumen7 software you can log sleep events and mark these on the waveform graphs. The channels that can be marked are: Airflow Snore Power SpO2 All events across all channels can be marked by clicking on the beginning of the event on the waveform graph and dragging the mouse to the point where the event ends. The details of each event can also be access by single clicking the left mouse button. The event shown here is an Obstructive Apnea (OSA) event, however all events marked across all channels will display the event information in this format when you single click the left mouse button 76 Acumen 7 on the event. AIRFLOW EVENTS Color Key Airflow events can be marked as: Obstructive Apnea Central Apnea Mixed Apnea Obstructive Hypopnea Central Hypopnea Obstructive Apnea Central Apnea Mixed Apnea Obstructive Hypopnea Central Hypopnea Each type of airflow event uses a different color, as shown in the color key. 77 Acumen 7 This is an example of the Airflow waveform graph been marked with different events. SNORE EVENTS This is an example of a SNORE waveform graph been marked with an event As there is only 1 type of SNORE event there is no need to use different colors so these events are displayed in Red as standard. 78 Acumen 7 To delete an event single click on the right mouse button and select “Delete Event” POWER EVENTS This is an example the power waveform graph been marked with an event. As there is only 1 type of power event there is no need to use different colors so these events are 79 Acumen 7 displayed using blue. To delete an event single click on the right mouse button and select “Delete Event” OXYGEN DESATURATION EVENTS 80 Acumen 7 This is an example of a SpO2 waveform graph been marked with events As there is only 1 type of oxygen desaturation event there is no need to use different colors so these events are displayed in yellow as standard. To delete an event single click on the right mouse button and select “Delete Event” 81 Acumen 7 VIEWING AND UNDERSTANDING TREND PLOTS VIEWING TREND PLOTS There are two different types of trend plots that can be viewed using the Acumen 7 software. There are Multi-trend plots and single trend plots. VIEWING MULTI TREND PLOTS AND SINGLE PLOTS Step 1: To view MultiTrend Plots. Step 2: To view Single Plots. Select “Single Plots” from View tab. Select “MultiTrend Plots” from View tab. Choose between “Multi-Trend Plot” or “Multi-Trend Plot 2” Multi-Trend Plot Multi-Trend Plot 2 Choose from the list of Single Plots available 82 Single Plots Apnea-Hyponea Event Duration Plot Apnea-Hyponea Event Type Plot Oxygen Saturation Plot Desaturation Hi/Lo Plot Desaturation Event Duration Plot Snoring Waveform Plot Body Position Plot CPAP Pressure Plot Acumen 7 UNDERSTANDING THE DIFFERENT PLOTS AND WHAT THEY MEAN Apnea-Hyponea Event Duration Plot This plot displays the frequency and length of apnea and hyponea events during sleep. The vertical axis shows the length of the apnea or hyponea event in seconds and the horizantal axis displays the length of time the patient has been asleep in hours. The different colours of the bars denote the type of apnea or hyponea event. Apnea-Hyponea Event Type Plot This plot displays the distribution of apnea or hyponea events during sleep. The vertical axis shows the different types of apnea or hyponea and the horizontal axis disays the length of time the patient has been asleep. 83 Acumen 7 Oxygen Saturation Plot This plot displays the oxygen saturation level in the blood during sleep. Need to check base level setting The vertical axis shows the % level of oxygen saturation in the blood. The horizontal axis displays the length of time the patient has been asleep. When the oxygen saturation level is below 95% it is displayed in green. Desaturation Hi/Lo Plot This plot displays the High and Low points of the oxygen saturation level in the blood during sleep. The vertical access shows the % level of oxgen saturation in the blood. The horizontal axis displays the length of time the patient 84 Acumen 7 has been alseep. Need explanation Desaturation Event Duration Plot This plot displays the duration of the oxygen desaturation events during sleep The vertical axis shows the length of the event in seconds and the horizantal axis displays the length of time the patient has been asleep in hours. Snoring Waveform Plot This plot displays the frequency and decibel level of snoring events during sleep. The vertical axis shows the decibal level of the snoring event and the horizantal axis displays the length of time the patient has been asleep in hours. 85 Acumen 7 Body Position Plot This plot displays the body position of the patient during sleep. The vertical axis shows the body postion of the patient: S=supine position L=left recumbent position P=prone position R=right recumbent position The horizantal axis displays the length of time the patient has been asleep in hours. 86 Acumen 7 VIEWING DIFFERENT PERIODS OF THE DATA When viewing the Multi-Trend plot or Single plots there is a black vertical index line on the left hand side that indicates the time period of data you are viewing on the plot. The time period the plot shows depends on the time period you view the data in before viewing the plot. For example; if you view the data in 2 minute periods then the interval periods on the plot will be 2 minutes. To move the index line you can use your mouse, either using point and click or the scroll. Alternatively you can use the arrow keys on your keyboard. 87 Acumen 7 VIEWING AND EDITING PATIENT DATA Step 1: Select “Patient Information” from View tab Step 2: There are 5 tabs that are requires completion. Patient Information Department Information Medical History Contact Information Picture Fields which can be edited are displayed in white. Fields that cannot be edited are displayed in grey. 88 Acumen 7 REPORTS Reports can be generated using the Acumen 7 software to provide detailed analysis of a patients sleep data. The reports that the Acumen 7 produces are: Respiratory Event Summary Report SpO2 Scored Summary Report 89 Acumen 7 VIEWING REPORTS LOADING REPORTS Reports can be generated as a Microsoft Word documents. Step 1: Select “Respiratory Event Summary Report” or “SpO2 Scored Summary Report” from the Reports tab. Step 2: The reports will automatically open into a Microsoft Word document. 90 Acumen 7 RESPIRATORY EVENT SUMMARY REPORT Step 3: View Respiratory Event Summary Report The respiratory summary report provides analysis on: The respiratory event trend plot, respiratory event distributing plot, body position trend plot, apnea, hypopnea and the longest apnea time during sleep, the average apnea time, the total time and total number of apneas, apnea index and disorder index. 91 Acumen 7 SPO2 SCORED SUMMARY REPORT Step 4: View SpO2 Scored Summary Report The SpO2 summary provides analysis on: report The SaO2 Trends, SaO2 Distribution, O2 distribution and a SaO2 scorecard. 92 Acumen 7 SAVING AND PRINTING REPORTS Reports can be saved and printed using Microsoft Word. It is important when saving reports to ensure they are saved to a known location such as My Documents. SLEEP DISORDER ANALYSIS The sleep disorder analysis plots allow you to look at related sleep data to help with the diagnosis of sleep disorders. There are 3 Sleep Disorder Analysis plots: Respiration Event Analysis Oxygen Saturation Analysis Snoring Analysis VIEWING SLEEP DISORDER ANALYSIS PLOTS Step 1. Select “Sleep Disorder Analysis” from View tab Step 2. Choose between the 3 Analysis shown. 93 Acumen 7 RESPIRATION EVENT ANALYSIS Respiration Event Analysis displays apnea length and apnea body position and also hypopnea length and body position. This analysis helps to see if there is a correlation between the body position when asleep and the occurrence of apnea or hypopnea. OXYGEN SATURATION ANALYSIS Oxygen Saturation Analysis displays the frequency as a percentage the SpO2 levels over time and the Desaturation levels of oxygen as a percentage in the blood. 94 Acumen 7 SNORING ANALYSIS The Snoring Analysis plot displays the sound level (dB) of the snoring and the percentage of snoring that was at that sound level. Snoring analysis also displays the percentage of snoring that was experienced in different sleeping positions. EVENT LISTS There are two types of event list: Respiration Event List Desaturation Event List 95 Acumen 7 RESPIRATORY EVENTS The Respiration Event List displays each respiration event that has been marked and shows the data that is relevant to that event: It displays the page of all respiratory events, start time, duration, type, sleep stage, body position, the max and min SpO2, and the max and min heart rate. OXYGEN DESATURATION EVENTS The Desaturation Event List displays each respiration event that has been marked and shows the data that is relevant to that event: It displays the page of all desaturation events, start time, duration, type, sleep stage, body position, the max and min SpO2, and the max and min heart rate. 96 Acumen 7 APPENDIX A TERM DEFINITION REPORT ANALYSIS CONTENT Report content is between Light-out and Light-on SLEEP PARAMETERS Light-out: the clock time of the first page of the stage Light-on: the clock time of the last page of the stage RESPIRATORY PARAMETERS Sum total of apneas: the total number of obstructive (OBS), central (CEN) and mixed (MIX) apneas occurring during total sleep time (TST) Sub total of apneas*: the total number (count) of obstructive, central and mixed apneas between Light-out and Light-on. Respiratory distress index (RDI): respiratory distress index is defined as apneas and hypopneas divided by the total sleep time (events per hour). [apneas and hypopneas (count) /TST (minutes) ]×60. Average sleep incubation period: The first sleep phase from Light-out. Average REM incubation period: The first REM phase from the beginning of sleep. Number of REM phase (there is only one REM phase in each phase of sleep): including the total number of phases of sleep containing REM. Average all phases of sleep results to calculate the average value. OXYGEN DESATURATION PARAMETERS Based on the transducer parameters set for the user, arterial SpO2 saturation degree is lower than the total sum (#) % (count). ACUMEN 7 report view program displays the following SpO2 saturation degree percentage: <90%, <80%, <70%, <60%, <50%, <40% and <30%. The longest respiratory events and min correlated SpO2 value (occurring within 30 seconds after the respiratory events). 97 Acumen 7 Min SpO2 in PSG report displays min SpO2 and the duration of correlated respiratory events. Min SpO2: Min SpO2 reading occurs during oxygen desaturation stage. The average of electrocardiograms within 30 seconds: ACUMEN 7 calculates the dynamic average of heart rates within the last 30 seconds. The average heart rate is the reciprocal of the average of QRS wave within the last 30 seconds. The average heart rate is the reciprocal of the average of wave within the QRS clip; period of excessive noise is not calculated. The maximum and minimum values of electrocardiogram: the maximum and minimum heart rates calculated based on the average within 30 seconds in each QRS wave time. The period of excessive noise is not included in calculation, and the heart beat intervals in which the difference compared with the current average is more than 50% are also not included in calculation. Tachycardia: the average heart rate with continuous two or more than two QRS waves within 30 seconds exceed 100 beats/minutes. Bradycardia: the average heart rate with continuous two or more than two QRS waves within 30 seconds is lower than 60 beats/minutes. SUMMARY REPORT The maximum and minimum heart rates: these values are based on the maximal and minimum values within the whole recording clip. Individual calculation is used for sleep clip and awaking clip. Average heart rate: the average of the maximum and minimum values within each clip (the average of maximal plus min/2) is taken to calculate this value; the clip with the maximum or minimum value of zero is not counted. Trend plot (heart rate): heart rate trend plot is based on the average of the maximum and minimum values within 30 seconds of each clip. The clips with the minimum value of zero and clips with no data are not included. Patient information: the first part of the report consists of the patient information, medical history and remarks. These fields are generated with entered information during recording. The demographic data of the patients should be entered in a consistent form, because this information will be used to generate normalized results and intersect the patients’ statistical data. Other fields are used to store the detailed information of the laboratory. RESPIRATORY INFORMATION 98 Acumen 7 This part lists the summary information of respiratory events, including apneas and hypopneas. Apnea table lists the total number of apneas listed according to event types: obstructive, mixed and central apnea. This table will be further classified according to body positions, Rapid Eye Movement and Non Rapid Eye Movement. If there is no body position information in the file or body position is not defined. For example the sitting position, this body position will be listed as unknown. Hypopnea table will list the central and obstructive hypopneas according to body positions, Rapid Eye Movement and Non Rapid Eye Movement. Respiratory distress index (RDI) table will list apnea and hypopnea indexes according to body positions and event types. The overall respiratory distress index displays under the table. DATA BACKUP /DELETION Managing the database is a necessary task. After some time of database operation, there tends to be some generated fragment which will cause the database become large and slow; systemizing the database will remove all irrelevant data and make it simple and smooth. 99 Acumen 7 PSG Acumen7 User manual No. 00 version Curative Medical Technology Inc 100