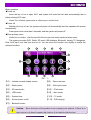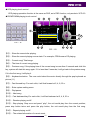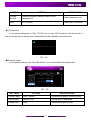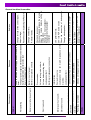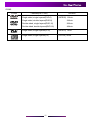
1
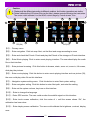
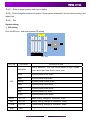
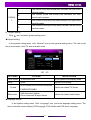
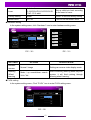
Double DIN Car DVD Navigation
Multimedia System
Users Manual
Thanks for you to use our product. We hope you can understand operating method of this
product clearly with this Users Manual. Please read this Manual carefully before usage for safe
usage and obtaining better entertainment.
Special announcement:
1. Product appearance presented in this Manual may differ from the real product, and the real
product prevails.
2. The detailed information of our product can be found in this Users Manual. Our company persists
in seeking continuous improvement and continues to enhance product performance. Thus, if
product appearance, color and function presented in this Manual differ from those of real product,
the real product prevails. Our Company is entitled to make product modification without any notice,
and our Company reserves the final right to interpret.
Function profile
■
Navigation multimedia entertainment system, standard installation size
■
High definitions digital screen
■
Fashionable and concise interface, humanity and simple operation
■
Built-in DVD player, car-used movement
■
Built-in smart GPS navigation system (optional)
■
Built-in Bluetooth , support hands free function
■
Fully automatic upender setting or fixed panel , various types for reference
■
iPod access technology , SD and USB interface, Aux In assistant equipment input , enjoy
all kinds of video entertainment
■
Built-in FM/AM high sennsitive Radio tuner with optional RDS function
■
Built-in 45Wx4 amplifier output , 4.1 sound track line output
■
Full Function Direct touch control and operation
■
Built-in analog TV (optional)
■
Backing rear view function, help to monitor rear images (need extral camera)
■
Convenient and useful function of one touch lock extends the playing time of battery and
avoids affecting driving at night.
Caution: Please read all of the following instructions carefully before installation,
and it is recommended that this device shall be installed by special auto audio dealer.
This device is applicable to vehicle 12V power system (with ground wire).
Do not directly install this device to 24V truck or bus. Otherwise, this device
will be damaged.
Please use genuine discs, do not use non-standard discs or discs with
inferior quality. Otherwise, it may cause device failure or affect service life.
Without guidance of technicians, it is not allowed to replace fuse of power
supply. Usage of improper fuse will damage device or cause fire alarm.
On the road, please don’t operate this machine, or it may affect safety drive
and make traffic accident. The driver is not allowed to watch program and
operate this device in driving to avoid occurrence of unnecessary traffic
accident (except that the passenger watch with the rear display).
For safety purpose and ensure normal usage, please let the technicians from
dealers of this project to install. It is not allowed to dismantle or repair this
device by yourself to avoid damage of this device and accident. For further
information, please consult local auto audio dealers.
Don’t place this product in humid environment and water to avoid electric
shock, unnecessary loss and fire alarm caused by short-circuit.
Mechanical drive components of display of this device are fully-automatic
precision transmission components. Do not push, pull and rotate this device
and impact TFT display with great force to avoid product damage.
Please don’t touch display with tough things to avoid being damaged.
Caution:
disconnect
To prevent short-circuit, please remember to turn off ignition and
ACC from B+ before installation.
Content
Content
Basic Operation…………………………………………………………………………………………3
Power on…………………………………………………………………………………………………3
Power off…………………………………………………………………………………………………3
Enter primary menu…………………………………………………………………………………3
Function mode option……………………………………………………………………………………4
Volume & sonic modulation……………………………………………………………………………4
Operating area of touch screen…………………………………………………………………………4
System setting………………………………………………………………………………………4
S ystem resetting…………………………………………………………………………………4
Panel Key operation introduction ………………………………………………………………………4
Remote control operation introduction ………………………………………………………………6
Function Operation……………………………………………………………………………………7
1、Disc playing function operation………………………………………………………………7
Enter disc…………………………………………………………………………………7
Eject disc………………………………………………………………………………………7
Restart disc loading…………………………………………………………………………7
DVD playing touch control……………………………………………………………………7
DVD playing information………………………………………………………………………8
Search & Play………………………………………………………………………………9
JPEG file playing………………………………………………………………………………9
VCD playing touch control…………………………………………………………………10
CD/MP3/WMA disc playing touch control…………………………………………10
2、Radio function operation………………………………………………………………11
R D S f u n c t i o n … … … … … … … … … … … … … … … … … … … … … … … … … … … … 11
3、SD/USB playing function operation……………………………………………………………12
4、iPod playing function operation……………………………………………………………………13
5、TV function operation…………………………………………………………………………14
6、AUX function operation…………………………………………………………………………15
1
7、Camera function operation……………………………………………………………………15
8、Bluetooth function operatio………………………………………………………………………16
Pairing……………………………………………………………………………………18
Calling…………………………………………………………………………………18
Answe the phone…………………………………………………………………………………18
Mobile music playing…………………………………………………………………………18
9、Navi function operation……………………………………………………………………………18
System Setting………………………………………………………………………………………20
1、 EQ Setting………………………………………………………………………………20
2、System Setting………………………………………………………………………………21
General setting……………………………………………………………………………21
Language setting………………………………………………………………………………21
Audio setting………………………………………………………………………………22
RDS setting…………………………………………………………………………………22
Rating setting………………………………………………………………………………22
Hardware setting……………………………………………………………………………23
P.VOL setting………………………………………………………………………………23
TS Cal setting………………………………………………………………………………24
Bluetooth setting…………………………………………………………………………24
General faults & trouble shooting……………………………………………………………………25
System Parameter…………………………………………………………………………………27
Disc identification…………………………………………………………………………………28
2
BASIC OPERATION
Basic operation
◆Power on
Insert the key of car to open ACC, and system will enter the last state automatically that is
before closing ACC state
Under Turn off state, press mute or other keys in a short time.
◆Power off
Withdraw the key of car, the system will power off automatically and the upender will recover
automatically.
Press panel mute more than 2 seconds, and the system will power off.
◆Enter primary menu
Under turn on status , click the top left of the screen and enter system primary menu.
This system provides DVD, Radio, SD card, USB interface, Bluetooth, Analog TV, Navigation,
iPod, AUX input, rear view lens and so on. You can touch the function icon slightly to realize the
relevant functions.
1
2
4
3
5
6
7
13
8
12
11
10
PIC(1)
9
【1】…Indicate currentt display source;
【8】…Rear view lens;
【2】…Radio mode;
【9】…AUX input mode;
【3】…SD card mode;
【10】…iPod mode;
【4】…USB mode;
【11】…Navi mode;
【5】…System time;
【12】…TV mode;
【6】…Screen power on/off;
【13】…DVD playing;
【7】…Bluetooth mode;
Caution:
Some functions of the product in our company are optional. If there is no
input source or it doesn’t support this function, it is invalid to click the icon.
3
BASIC OPERATION
◆Function Mode option
Enter primary menu, click the function icon to realize the relevant functions.
◆Volume & snoic modulation
/
You can adjust volume through
or Volume knob. The adjustment scope is 0-40. The
initialization setting of factory is 10. Under the status of audio playing, click EQ, and the menu of
audio adjustment will show up. You can directly choose rock, rap, dance, Latin, rave, city ,voice ,
individual audio due to their favors.
◆Operating area of touch screen
Under mode of DVD playing, touch area is shown as following:
Area A: Enter primary menu of system.
A
B
F
C
D
E
Area B: Display of play information.
Area C: Select previous chapter (title).
Area D: Enter function and state control key.
Area E: Select next chapter(title).
Area F:Turn off display, and the screen will turn
on by any positin clicking
PIC(2)
◆System setting
Under audio mode, click key
and enter System setting interface. At this interface, you can
set up each item.
◆System Resetting
When system halts and other unusual situations show up, you can use a thin sharp thing but
round head to click
, system will recover normal state.
◆Panel Key operation introduction
12
13
1
2
3
4
5
6
7
14
8 9 10 11
PIC(3)
PIC(4)
4
BASIC OPERATION
【1】…IR Received window for remote control.
【2】…
On/Off/Mute key.
Under the state of standby, press the key for a short time to turn on the system.
Under turn-on status, press and hold the key to turn off the system.
Under turn-on status, press the key for a short time to turn off/on volume.
【3】…
Volume decreasing key.
【4】…MIC Bluetooth& Mic window.
【5】…
Volume increasing key.
【6】…
Navi key.
Press the key for a short time to switch between current playing state and navigation.
Press the key for a long time to open or close other source’s audio output under the state of
navigation.
【7】…
Key for ejecting / suctioning disc
【8】…RES Reset key
【9】…
The key to turn up the flip-down screen
Press the key for a short time , the flip-down screen will turn up gradually.
Press and hold the key , the flip-down screen will turn to the top.
【10】…
The key to turn down the flip-down screen
Press the key for a short time , the flip-down screen will turn down gradually
Press and hold the key, the flip-down screen will turn to the bottom.
【11】…USB port
【12】… /VOL Volume adjustment knob
Under standby status, press the key for a short time to power on the system
Under turn-on status, press and hold the key to power off the system
Under turn-on status, press the key for a short time to turn off/on volume
Under turn-on status, rotate this knob in clockwise and anticlockwise direction to increase and
decrease volume
【13】…MMC Multimedia card
【14】…AUX IN socket hole
5
SYSTEM SETTING
Remote control operation introduction
Caution:
1. Service life of battery is about 6 months under normal conditions. If the remote
controller cannot be operated normally, battery shall be replaced in time. If the remote
controller is out of service for a long time, the battery shall be taken out to prevent liquid
leakage that can damage the remote controller.
2. Prevent falling the remote controller to avoid damage.
3. Do not dismantle the battery, or put battery into fire or place with other metal articles.
Place the battery of remote controller in a safe place to prevent the children from
swallowing the battery.
Key name
MODE
PIC(5)
Function
Mode switch
EJECT
Key for ejecting/suctioning disc
OPEN
upender turns out and recovers
Power on/off
1.2.3.4.5.6.7.8.9.0
VOL+ VOL-
Numeric key
Increase/decrease volume
MUTE
Turn on/off sound
UP DN
Screen angle adjusting
SETUP
Enter system setting menu
INFO
DVD information display, Navi shortcut keys
Repeat a signal song or file
MENU
RAN
SCAN
OK
Enter primary menu of the system
Random playing
Scan playing
Selecting &confirming key for left/right/up/down
SRCH
Search and play
ZOOM
Image zoom out 1:4
SLOW
Slow speed 1/2-1/7
/
Play/pause
Stop
ANGLE
PIC
Various angles playing ( supported by disc)
Adjust brightness ,contrast, saturation; use with direction key
SUB-T
Subtitle selection
AUDIO
Language selection
6
SYSTEM SETTING
Function operation
1、Disc playing function operation
This system supports DVD/VCD/CD/MP3/WMA/JPEG/MPEG etc.,but only 12 cm standard disc.
After insecting the disc, the system will automatically read the disc and play.
◆Enter
Under the state of having a disc ,click the top left of the screen ,and click DVD icon of primary
menu.
When other sources are playing, insert a disc, except backing a car.
Under the state of having a disc, press MODE key of remote controller.
◆Exit
Choose other function mode or eject the disc.
◆Insect disc
Insect the disc into the disc mouth, the disc will be suck into the device automatically.
◆Eject disc
Press panel
or remote control EJECT key to eject the disc.
◆Restart disc loading
When you insert a disc or read a disc, the system doesn’t work. Please press
more than 3
seconds. The system will eject the disc and recover normal operation.
Caution:
1. Please use standard and genuine discs, and keep discs clean. Proper usage can
assure normal service life of this system.
2.If child lock is been activated, the system will require you to input code again.
3.Never turn off the power and insect the disc . Before inserting a disc, please make
sure no disc is in it.
◆DVD
playing touch control
When you play DVD and click area D of screen, the playing control key will pop out.
PIC(6)
【
PIC(7)
】…Play/pause
7
SYSTEM SETTING
【 】…Stop .Click once for stop at breakpoint with memory, click again to stop completely
【
】…Fast forward .For each click, it will fast forward at 2, 4, 8 and 20x.
【
】…Fast backward .For each click, it will fast backward at 2, 4, 8 and 20x.
【
】…Previous chapter
【
】…Next chapter
【
】…Optional chapter
【
】…Angle switch (supported by disc)
【
】…Exit key interface
【
】…Back to the root menu of the disc
【
】…Page turning
【
】…Enter EQ setting
【
】…Enter system setting
【
【
【
】…Language selection
】…Repeat play .Repeat chapter, title or close playing repeat .
】…Repeat and play section from point A to point B
【
】…Subtitle selection
【
】…Back to the disk title menu
【
】…Page turning
【
】…Display current playing information
◆DVD playing information
Click OSD, the upper of the screen shows the DVD playing information
DVD
T:
3/5
C:
1/8
00:09:28
PIC(8)
【DVD】…Show the current playing source
8
... 1/4
ENG
SYSTEM SETTING
【T:】…Show the title, 3/5 means that there are 5 titles and the current playing one is 3.
【C:】…Show chapter, 1/8 means that there are 8 chapters and the current playing one is 1.
【00:09:28】…Disc playing time
【 …
ENG】…Current subtitle.3/4 means that there are 4 kinds of subtitles and the current one is
3.It is English.
◆ Search & Play
Click GOTO , it will show options of searching and playing.
PIC(9)
【Chapter】…Chapter , input the chapter at this position
【
】…Switch between chapters and titles
【TITLE】…Title , input the title at this position
【Exit】…Exit
【Clear】…Clear up input content
【
】…Confirm
【1.2.3.4.5.6.7.8.9.0】…Numeric key
◆JPEG file playing
PIC(10)
【
】…The picture will turn 90 angle in clockwise direction by every clicking
【
】…Zoom out / zoom in. The picture will zoom out 4/3、3/2、2、3 times every clicking ,zoom
in 1/2、3/4 times.
9
SYSTEM SETTING
◆VCD playing touch control
VCD playing operation function is the same as DVD, as to PBC function, only works to VCD 2.0
◆CD/MP3/WMA playing touch control
6
1
3
2
DISC CDDA
17
PIC(11)
1
2
3
4
5
6
♬
♬
♬
♬
♬
♬
4
5
7 8
08:15
4/18
00:01:58
waka waka
Numb
I Love You Forever
poker face
Never say Never
Change
9
10
11
Artist:Lady GaGa
14
16 15
13
12
PIC(12)
【1】…Show the current disc playing.
【2】…Show the current playing source state. For example, CDDA means CD playing.
【3】…Current song/ Total songs.
【4】…The time of current song playing.
【5】…Previous song. If the playing time of the current song is more than 5 seconds and click this
key, system will start this song again. If it is less than 5 seconds, it will go back to the preview song.
If it is the first song, it still play it.
【6】…Keyboard selection. The user could select the music directly through the pop keyboard as
picture (11)
【7】…Fast forward key. For each click, it will fast forward at 2, 4, 8, 20 x.
【8】…Enter system setting menu.
【9】…Play/pause.
【10】…Next song.
【11】…Fast backward key.For each click, it will fast backward at 2, 4, 8, 20 x.
【12】…Random playing on/off.
【13】…Stop playing. Stop once and press” play”, the unit would play from the current position;
press stop button twice and press the play button, the unit would play from the first song.
【14】…Repeat playing on/off.
【15】…The related information of current music
10
SYSTEM SETTING
【16】…Music title list.
【17】…Enter EQ setting menu.
2、Radio function operation
When enter radio function, the system will auto replay the station which has been final played
last time, the user could also seclect the preset station. Each function operated as picture (13)
◆Enter
Click the up left of the screen, and click Radio icon of primary menu.
Press mode key of remote controller to enter.
◆Exit
Choose or auto enter other mode playing.
◆RDS function
The system has been set up to default RDS opening. The user could close the RDS function
through system menu. When RDS function has been turn off, the message filed shows “RDS OFF”.
At this time, the RDS icon doesn’t work even the user press the AF/TA icon
1
2
3 4
FM-1
RADIO
P1
P2
P5
●ST
●LOC
08:15
103.60MHz
●PTY
●AF
●TA
●TP
93.6 MHz
95.3 MHz
P3
97.4 MHz
P4
100.0 MHz
P5
103.6 MHz
P6
107.3 MHz
12 11
MEM
10
PIC(13)
13 14 15
FM-1
●ST
1
2
News
Affairs
3
Info
4
Sport
5
Educate
6
Drama
P5
●LOC
8
9
08:15
103.60MHz
●PTY
●AF
PIC(14)
17
16 18
●TA
●TP
PIC(15)
AF PTY TA
PIC(15)
22
19
LOC
PS
23
6
7
BAND
RADIO
5
AS
21
20
【1】…Stereo indicating lamp. When the station signal has been lighten up for stereo, slight touch
11
SYSTEM SETTING
doesn’t work.
【2】…LOC/DX indicating lamp. Slight touch doesn’t work.
【3】…Half auto-search from frequency’s lower side and stop to play till next station.
【4】…Tuning in high side frequency by single step
【5】…Auto-search station and store them as preset station from low to high frequency
【6】…Half auto-search from high side frequency and stop to play till next station
【7】…Tuning in low side frequency by single step.
【8】…Save the current station as the preset station. Click to pop out the menu as picture (14), and
please click the preset No., the current frequency was saved as the preset station
【9】…Page turning, click to enter next page
【10】…Change the radio bands; it could switch among FM-1/FM-2/FM-3/AM-1/AM-2
【11】…Show current operation and radio information.
【12】…Preset the station frequency, click to play the related broadcast.
【13】…Current playing radio.
【14】…Show the PTY state, slight touch doesn’t work
【15】…Show the AF state, slight touch doesn’t work
【16】…Show the TA state, slight touch doesn’t work
【17】…AF function switch. Click to open /close AF function. While AF function has been opened,
the system will optimization the current frequency. While one frequency point has been cut or
symbol is weaker, the system will auto change to the better frequency point of the same broadcast
【18】…Show TP function state, and slight touch doesn’t
work
【19】…TA function switch. Click to turn/off it. When TA function has been opened, the system will
switch to current radio channel under any mode if the system has checked the traffic urgent news
【20】…LOC/DX switch. Slight touch to open LOC,when 【2】has been lighten , only the station
with strong signal could be played
【21】…Page turning. Click to enter the last page.
【22】…Browse and play.
【23】…Types of programs, click it to enter the relevant types of programs.
3、SD/USB playing function operation
This system supports U disc playing and WMA, MP3, JPEG etc. playing of SD card. When it
plays MP3, WMA, the operation interface is similar to CD/MP3/MWA discs. When it plays JPEG ,
12
SYSTEM SETTING
operation menu is similar to JPEG. When it plays MPEG, operation interface and function are similar
to DVD discs.
◆Enter
Touch the up left of the screen, click SD or USB icons of primary menu.
Press MODE of remote controller.
Insert multimedia SD card or U disk.
◆Exit
Select or auto enter other playing mode
1
1
2
3
4
5
6
08:25
(Root)
USB
MP3
♬
♬
♬
♬
♬
♬
4/258
00:01:58
waka waka
Numb
I Love You Forever
poker face
Never say Never
Change
Artist:Lady GaGa
PIC(16)
DIR-
DIR+
3
2
【1】…Current file folder . Root means under root directory.
【2】…Open the file folder.
【3】…Back to the last catalogue.
4、iPod playing function operation
This system supports iPod audio and image playing.
◆Enter
Touch the up left of the screen, Click iPod of primary menu.
Press the mode button of remote control, after the iPod has been connected .
Insert iPod card.
◆Exit
Select or auto enter other playing mode .
【1】…Current playing state.
【2】…Current music name.
13
SYSTEM SETTING
【3】…Enter keyboard to select the playing file directly, the unit would pop out picture (18)
【4】…Back to the last catalogue. The function is the same as menu button of iPod
【5】…Confirm key, the same as the Enter button of the iPod
【6】…Current playing program source types.
▲
iPod
0001
0002
0003
0004
0005
0006
3 4
2
1
09:15
NO.1
3:46
1/20
NO.1
One
kiss
Love Song
Believe
You And Me
MENU
5
Enter
Artist:2 am
6
PIC(17)
PIC(18)
5、TV function operation
This system supports optional analog TV function, also supports TV PAL/NTSC received
◆Enter
Slight touch the up left of the screen , click TV icon of primary menu.
Press MODE of the remote controller.
◆Exit
Select or auto enter other playing mode.
Caution: When there is no TV signal, the screen is blue. At this time slight touch to
pop out the TV operation menu
UP
DN
AS
PS
EQ
SETUP
PIC(19)
【UP】…Half-auto search the station. Slight touch this button, the system will half-auto search from
14
SYSTEM SETTING
high side frequency until the TV signal has been searched.
【DN】…Half-auto search the station. Slight touch this button, the system will half-auto search from
low side frequency until the TV signal has been searched.
【AS】…Auto preset the TV station. Slight touch this key, and the system will scan from low to high
and store the front 10 channels.
【PS】…Browse and play. The system will browse each TV station which single is strong. Every
station will play 10 seconds
【EQ】…Enter EQ setting interface.
【SETUP】…Enter system setting interface.
Caution: Under TV program playing state , slight touch area D ,it will show a menu; slight
touch area A, it goes back to primary menu; slight touch area C, it will play last prestore
station; slight touch area E, it will play next prestore station; slight touch area F, it will turn
off the screen.
6、AUX function operation
This system disposes two roads audio and one road video AUX input. Extra Multimedia
playing source could plug into the unit to play, such as camera, video game, extra Navi box. While
there is no video signal input, the interface would show as picture (20). Slight touch area A under
AUX IN, the unit will go back to primary menu; slight touch area F, the unit would turn off; slight
touch area D, the unit would show the system setting and EQ setting menu.
◆Enter
Slight touch the up left of the screen , click AUX icon of primary menu.
Press MODE of remote controller.
AUX IN
09:10
◆Exit
Select or auto enter other playing
mode
No Video Signal
7、Camera function operation
PIC(20)
When you use rear view lens function, the camera has to be connected into camera video input
joggle. Please confirm and set the reverse display mode in order to avoid the picture reversal and
lead to misjudge by the driver
15
SYSTEM SETTING
◆Enter
Slight touch the up left of the screen , click Camera icon of primary menu
Press MODE of remote controller.
Car engages a gear and system REVERSE line is connected.
◆Exit
Select or auto enter other playing mode.
Exit backing gear.
8、Bluetooth function operation
This system supports BT hands-free build-in. It can connect with your mobile which has
Bluetooth function. It can achieve calling, answering, playing mobile music, etc. on the screen of this
system.
Caution:
1. The unit plays music only when the BT mobile phone suppors A2DP.
2. The system will auto switch into BT hands-free mode under any mode while the phone
call .
◆Enter
Slight touch the up left of the screen, click BT icon of primary menu.
Press MODE of remote controller.
Mobile is connected with the system, and there is a call.
◆Exit
Select or auto enter other playing mode.
Hang up the phone.
2
1
3
BT
4
●
●
7
09:15
Disconnected
BT
●
1 Missed Calls
2 Received Calls
3 Dialed Calls
8
Disconnected
●
●
09:15
●
1 Missed Calls
2 Received Calls
MENU
3 Dialed Calls
MENU
9
10
Menu List
PIC(21) 6
Menu List
5
PIC(22)13 12 11
16
SYSTEM SETTING
14
15
16
17
PIC(23)
【1】…Current BT connected state, slight touch doesn’t work .
【2】…A2DP connected state, slight touch doesn’t work
【3】…Equipment name of current connected .
【4】…Switch between telephone and Bluetooth music. Touch it slightly it can change from phone
interface to music interface.
【5】…Pairing .When telephone and this system are not connected , slight touch it and you can
open pairing function. At this time phone can search this system and connect. when they are
connected ,slight touch it and it will disconnect.
【6】…Connect control , Click to connect / cut off the connection
【7】…Microphone is mute. When microphone works well, the icon is yellow. When microphone
function has been closed, the icon is blue .
【8】…Dial board. Touch it slightly and enter dial board showed as picture (23).
【9】…Back to the last menu.
【10】…Turn on/off microphone. Click this button to close the microphone function; the icon will turn
to blue. Click this button again could recover normal communication
【11】…Hang up. Click to release the current communication
【12】…Sound track switch. Slight touch could switch language between ceil phone and system
【13】…Dialing. Click this button, the unit would auto dial the final dialed number. The user also
could enter calls missed / calls received/ Calls dialed list to select the related No. to call.
【14】…Exit dial board.
【15】…Delect.
【16】…Hang up.
17
SYSTEM SETTING
【17】…Dial.
◆Pairing
Enter Bluetooth interface, click【5】key, show phone pairing. Open BT at the same time, the
phone could pair with the unit when it searches the signal. The ceil phone will ask for pairing code
(the code is 0000). The BT function works well while the code has been right input, the icon will be
illumed. If the icon still dark, please repeat the operation above.
◆Make a call
Input the phone No. through BT dial board, the user could dial the phone No. by slight touch the
dial button. The user could also dial the No. from calls missed/ calls received / calls dialed list
◆Answer a call
If the unit is pairing with the phone well, the phone call from outside will switch to BT hand-free
interface under every state. If the system has been set as auto answering, the system will answer
the phone automatically. If the system has been set as manual answer, the user has to refuse
/answer the phone by sight touch the dial board. The user could hang up the phone any time by
slight touch the hang up button.
◆Play phone music
BT menu switch to Music interface, slight touch each button could play and control the music
saved in the phone
Caution:
1. The mobile phone must support A2DP .
2.Because of the difference of BT function itself, some units have to select music playing
through mobile phone, some of them could play by press play button directly
9、Navi function operation
◆Enter
Touch the up left of the screen , click Navi icon of primary menu.
Press MODE of remote controller.
Press panel Navi shortcut key
◆Exit
Select or auto enter other mode
Touch panel Navi shortcut key to switch to other source.
18
SYSTEM SETTING
Caution:
1. Displays will be different according to different modules, but function operations are similar
2. Please calibrate the LCD when first use the Navi, please operate following the instruction.
The users could calibrate it on the NAVI control stage by “touch screen” icon
2
4
9
5
10
11
16
1
8
3
6
12
7
PIC(24)
13
14
PIC(25)
15
【1】…Primary menu.
【2】…Enter navigation. Click into map Navi, set the Navi and usage according to users
【3】…Enter and check the E-book. Check and play the E-book of the storage on E-book interface.
【4】…Enter Music playing. Click to enter music playing interface. The user should play the audio
file on that interface.
【5】…Enter pictures browsing. Click this button to browse, rotate, zoom out, zoom in, full screen,
slide play the pictures.
【6】…Enter movie playing. Click this button to enter movie playing interface such as picture (29),
the user could play video file on this interface.
【7】…Navigation system setting menu. Click this button to enter Navi system setting
【8】…Enter navigation setting. Click this button to enter Navi path, auto-start the setting
【9】…Enter set the system volume, key tone on this interface.
【10】…Enter to change the language
【11】…Enter GPS monitor. The user could monitor the satellite signal on this interface
【12】…Enter touch screen calibration, click the center of + until the screen shows “Ok”, the
calibration has been done.
【13】…Enter display screen calibration. The user could calibrate the brightness ,contrast, display
zone
19
SYSTEM SETTING
【14】…Enter to adjust position and size of display
【15】…Enter navigation system information. Show system information, recover factory setting, and
repair files
【16】…Exit
System setting
1、EQ setting
Click the EQ icon , and enter system EQ setting.
EQ
User
FAD-BAL
+14-
0-
0-
-
-14-
-14BASS
User
MID TREB
F
R
L
R
SUB
PIC (26)
SETTIN
OPTIONS
SPECIFICATION
User’s definition. The user could adjust to high ,middle ,
Individual
Rock
EQ
lower and super bass due to users’ favor
System preset Rock audio
Rap
System preset Rap audio
Dance
System preset Dance audio
Latin
System preset Latin audio
Rave
System preset Rave audio
City
System preset City audio
Voice
System preset Voice audio
-14~+14
Bass setting, change at “Individual” audio
MID
-14~+14
Middle setting, change at “Individual” audio
TREB
-14~+14
Treble setting, change at “Individual” audio
-14~0
Super bass setting
BASS
SUB
20
SYSTEM SETTING
The volumn of the front sound track increase, the rear sound
F
track decrease.
The volumn of the rear sound track decrease, the front
R
FAD-BA
sound track increase.
L
The volumn of the left sound track increase, the right sound
L
track decrease.
The volumn of the right sound track increase, the left sound
R
track decrease.
2、System setting
Click
icon and enter system setting menu.
◆General setting
In the system setting menu, click “General” icon to enter general setting menu. The user could
set up clock mode, clock,TV area and radio zone
00:51
RADIO
00 43
Clock
Tuner
Region
Clock Mode
General
RDS
24Hr
Clock Mode
12Hr
24Hr
00 43
Clock
PALDK
TV Region
Tuner Region
China
PIC(27)
SETTINGS
OPTIONS
SPECIFICATION
Clock mode
12 hours/24 hours
Enter system time display mode.
Clock
00:00
System time setting.
NTSC/PALBG/PALI/PALDK/PALMN/SE
TV area
Select the related TV format
CAMDK/SECAMBG
Radio zone
USA /America1/ Arabia/
China /America2 /Europe/ Korea
Select the related radio format
◆Language setting
In the system setting menu, Click “Language” icon ,and enter language setting menu. The
user could enter screen display, DVD language, DVD subtitle and DVD menu language
21
SYSTEM SETTING
00:51
RADIO
Language
RDS
English
OSD
DVD Audio
English
DVD Subtitle
DVD menu
中文
English
off
English
PIC(28)
SETTINGS
OPTIONS
SPECIFICATION
Screen Display
Chinese/ English
Change the menu language
DVD Language
English/Chinese
Set DVD language according to the need of user
DVD Subtitle
DVD menu
English/Chinese/auto/off
English/Chinese
Set DVD subtitle according to the need of user
Set DVD menu language according to the need
◆Audio setting
In the system setting menu, Click “Audio” icon to enter audio setting . You can open or close
woofer.
◆RDS setting
In the system setting menu, Click “RDS” icon to enter RDS setting. You can open or close RDS
and CT functions.
◆Rating setting
In the system setting menu, Click “Rating” icon to enter Rating setting menu.
00:51
RADIO
RDS
Rating
Set Password
---Rating 8.Adult
Load Factory
Reset
Beep
On
PIC(29)
SETTINGS
OPTIONS
SPECIFICATION
Cold setting
22
SYSTEM SETTING
Lever
1. kids safe
/2.G/3.PG/4.PG-13/5.PG-R/6.R/
7.NC-17/ 8. adult
Set up child lock level according
to the need of users.
Factory setting
Button voice
Reset
On / off
Click it to recover factory setting.
Turn on /off the button voice
◆Hardware setting
In the system setting menu, click “Hardware” icon to enter hardware setting menu
00:51
RADIO
OVER
SRC
Camera In
Hardware
Normal
Wheel
No
RDS
TRACK+
OVER
Mirror
Normal
TRACK-
OVER
VOL+
OVER
VOL-
OVER
PIC(30)
SETTINGS
Reverse
camera
Steering
Wheel
learning
EXIT
PIC(31)
OPTIONS
SPECIFICATION
Normal / image
Setting car reverse video display mode
Mode / up search/down search
/Vol+/ Vol-
After connecting steering wheel key with
system, it will finish pairing through
steering wheel learning .
◆P.VOL setting
In the system setting menu, Click “P.VOL” icon to enter P.VOL setting menu.
00:51
RADIO
RDS
Radio
Source
P.VOL
3
Level
PIC(32)
23
SYSTEM SETTING
SETTINGS
OPTIONS
SPECIFICATION
Playing
Source
Radio/Disc/USB/SD card/AUX input 1/iPod/
Navigation/TV
Select playing source
level
0/1/2/3/4/5/6
Select the P.VOL level
◆TS Cal setting
In the system setting menu, Click “TS Cal” icon to enter TS Cal setting. Click the center of 十,
the unit will go back to setting menu automatically if the calibration has been done.
Please press point A at upper left corner.
PIC(33)
◆Bluetooth setting
In the system setting menu, Click “Bluetooth” icon to enter Bluetooth setting menu.
00:51
RADIO
RDS
Auto
Connect
Auto Answer Manual
Pairing Code
Pairing Code ---BLUETOOTH
PIC(34)
SETTINGS
OPTIONS
SPECIFICATION
Connect ways
Auto / manual
Set Bluetooth phone connecting way
Auto Answer
Manual/ Auto
Set the way of answering
Pairing cold
0000
Set Bluetooth pairing code
24
25
Display
Panel keys no function
Machine reset by itself when it is
shut down
Touch screen does not work
normally
Distortion of sound
Inferior quality of sound;
No or low sound
Remote controller doesn’t work
Not operating
Normal
Phenomenon
Solutions
One key on the panel can’t work
Touch screen isn’t adjusted
Connection of ACC and B+ is not correct.
Loudspeaker fault.
machine;
Loudspeaker does not match impedance of the
Poor audio source
Inferior discs
Earthing in loudspeaker connection
Loudspeaker fault;
Volume balance setting bias;
Volume setting is low volume;
Disconnection;
Battery is out of power;
Battery is not placed correctly
Enter system menu to adjust it as hint
on the screen
Check keys on the panel (dealt by
dealers if necessary)
Check and reconnect ACC and B+
Change a loudspeaker;
Check the connection of loudspeaker.
Don’t use PDF audio source
Use genuine discs;
Check and reconnect
Check setting and increase the volume;
Adjust the volume balance setting to
middle place;
Change for a new loudspeaker;
Keep insulation of loudspeaker
connection
Reinstall battery
Change new battery;
Fuse of machine power supply and auto vehicle is
Change for fuse of the correct types;
burnt,
Voltage of power supply is overloaded or underloaded Adjust voltage;
Automatic protection system avoids fault
Reset the system by pressing the Reset key
due to illegal operation
Reasons
General troubles & remedies
General troubles & remedies
Solutions
Unstable output of
26
Recopy the disk or check if it is complete
Clean or replace the disk;
Close LOC function.
Panasonic、Apacer etc;
SD card format is wrong.
unreadable by the device
The format of SD is FAT
card brands: SanDisk、KingMAX、kingston、
Compatibility reasons of SD card brand,
The present system mainly support the following SD
The disk level surpasses the level setting of Adjust the level setting of Lock feature;
lock function;
Use a compatible disk;
The area code of the disc is not compatible
Documents or records are damaged
Disc is stained or scratched;
LOC function is under working state
SD card readable by PC but
The device Disc does not play
Break-down during playing
Disc/Card Reading
Less radios, weak signal
Auto antenna does not reach out completely Connect auto antenna line correctly;
information.
on the panel
Radio
The screen cannot display all the
Wrong information is shown
images
Not brake state
The system does not correspond with rear
Adjust monitor video mode;
monitor video output setting;
Video signal line is bad or not connected
Check and change video signal wire.
correctly.
information
Connect brake wire and make sure it connects with
earthing at brake state
Keep brake state after car is placed safe.
Connection of brake wire is not correct;
Reasons
No image, show alarm
Phenomenon
Disc identification
Disc identification
Specifications
Working voltage: direct current 12V
Working voltage range: 10.8V~16V
Maximum working electronic current: 10A
Installation size: 150*178*100mm
Installation angle: less than 30 degree tilted
the frontside and backside.
FM radio
Frequency modulation: 87.5MHz~108.0MHz(China,
Europe)
Flexibility (-30dB): 10dBu
SNR (-50dB): 15dBu
Frequent sound range: 30Hz~15kHz(±3dB)
DVD/CD PLAYER
Compatible
formats:
DVD-R,
DVD-RW,
AM radio
Frequency range: 531KHZ~1629KHZ(China)
Sensitivity (SN=20dB):20dBu
Image rejection: 60dB
Frequency Response: 50HZ~2KHZ(±3dB)
DVD+R, DVD+RW, CD-R, CD-RW, CD-DA,
MP3, WMA, HDVD, SVCD, VCD, MPEG,
JPEG
Audio SNR: 85dBA
Dynamic range: 95dB
Frequency response: 50HZ~2kHz(±3dB)
Display
Digital audio sample: 24bit
Screen size: 7”/6.2”
Electronic Stablity Program (ESP):
Screen type: TFT
DVD
Response time: up=30 millisecond, down=50
2-3 seconds
CD-DA
MP3
10 seconds
millisecond
100 seconds
WMA
Mechanical
Display panel pixel: 384,000 pixel
200 seconds
aseismatic:
Angle range: depression angle=65°,elevation
10 ~ 200Hz,
angle=40°
X/Y/Z:1.0G
Power output: 45W×4
left vision=65°
right vision=65°
impedance 4ohm
SNR: 70dBA
Environment temperature
Operating temperature: -20~+70℃
Maintenance temperature: -30~+80℃
Operating humidity: 45%~+80%
(relative humidity)
Maintenance humidity: 30%~90%
(relative humidity)
Video
Standards: NTSC, PAL (Auto recognition)
Output: 1Vp-p (75ohm)
Input: 1Vp-p (75ohm)
27
Disc identification
ICONS
ICONS
Features(Dia.:12cm)
Single-sided, single-layered(DVD-5)
Duration
(MPEG2) 133min.
Single-sided, double-layered(DVD-9)
242min.
Double-sided, single-layered(DVD-10)
266min.
Double-sided, double-layered(DVD-18)
484min.
Single-sided, single-layered(VCD)
(MPEG1) 74min
Single-sided, single-layered(CD)
(CD-DA) 74min.
28
27