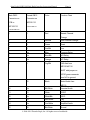
1
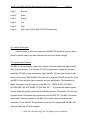
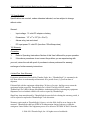
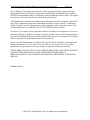
MRI-100™ Multi-Radio Interface
12/25/09
Instruction Manual
123456789101112-
Product Description
Power Supply (12VDC, Wall Transformer, UPS)
Wiring Connections
Menu Settings
DTMF and ASCII remote control codes
COS input
EAS/SAME Match from the WE110 into the MRI-100
MRI-100 logic outputs to the WE110
Location of Decoder
Upload New Firmware
Specifications
Warranty
1) Product Description:
The MRI-100™ is a versatile, easy to use, logic and audio interface between the
Weather Eagle® 105/110 and the customer’s two-way radio systems. The MRI-100™
has three separately controlled audio/press to talk (PTT) channels. The audio level on
each channel is separately settable in the MRI-100. The audio from the WE105/110 is
distributed to each of the MRI-100 channels using high impedance op amps. Each MRI100 channel can be either the live weather audio from the WE105/110 or beeps only,
settable by a jumper and a menu setting.
© 2004-2006 Thunder Eagle, Inc. All rights reserved worldwide.
Alert Eagle® MRI-100 Multi-Radio Interface Instruction Manual
Page-2-
The firmware in the MRI-100 is field flashable with an optional programmer.
LED’s show the status of each logic input and output.
Switches control each channel, the menu, reset and test modes.
The MRI-100 sends logic pulses (active high) to the WE105/110 for live, reset,
play last alert, manual channel change and scan for strongest channel. These features
are remotely controllable by both audio DTMF (radio or Voip) and ASCII serial
characters through the internet.
The MRI-100 has three double pole, double throw relays. One pole of each relay
(channel) is for the audio (or beeps) and the other pole is for press to talk (PTT). The
PTT can be set to either +5 or ground for each channel by a jumper setting in the MRI100.
The MRI-100 will sense an active high +5 COS from a transceiver for channel 1
activation. If the COS is continuous for a time set in the MRI-100 menu (default 3
seconds, settable 1-99 seconds) the MRI-100 will key channel 1 for a period of time set
in the menu for 1-240 seconds (default 60 seconds). This will give live audio to channel
1 for this time period. At the end of this time period the MRI-100 will reset the
WE105/110 and will unkey the transceiver.
The user supplies the transceivers for use with the MRI-100. These may be any
combination of digital and analog systems having a PTT and a line level audio input.
On a weather alert ‘match’ (event and location), a relay will close in the Alert
Eagle® 120 (or the Weather Eagle® 105/110) for a preset (menu setting) time. This
relay contact closure will be sensed by the MRI-100. Channels 1, 2 and 3 will be active
until the earlier of either the relay on the WE105/110/ AE120 opening, or the MRI-100
menu-settable timer timing out, at which time the three channels will automatically reset.
When a channel in the MRI-100 is set in beep mode, and the jumper is set for beeps, on
an alert 10 beeps will be issued on that channel and the channel will then reset and
unkey the transmitter.
© 2006-2010 Thunder Eagle, Inc. All rights reserved worldwide.
Alert Eagle® MRI-100 Multi-Radio Interface Instruction Manual
Page-3-
A usual configuration is channel 1 as a weather talkgroup. This channel will
activate on weather alerts, and on activation by COS, DTMF or ASCII serial characters.
Channel 2 is usually the weather alert talk group. This channel will only automatically
activate for weather alerts so it can be placed on emergency dispatch consoles and on
widely monitored radio channels that do not want to be disturbed when other users bring
up the weather manually on channel 1. Channel 3 is normally beeps only for interface
with other alerting systems.
2) POWER SUPPLY:
The MRI-100 is powered by 12 volts DC. The unit draws less than 150 milliamps.
Plug the wall transformer into 120-volt AC 60 Hz and plug the 2.1 mm plug, center
positive connector into the rear panel of the unit.
Where the MRI-100 is connected to the WE110, 12VDC is supplied to the MRI100 through the connection cable and the separate external power supply is NOT
required.
Where available, it is recommended that the MRI-100 be plugged into an
uninterruptable power system to provide service during power failures. A computer UPS
of 500VA should power the MRI-100 for 24 to 36 hours and will also provide power
surge protection for the unit. The MRI-100 is operational as soon as it receives power.
There is NO on/off switch. A power led will indicate that the unit is powered up.
The unit may also be operated from any 12 volt DC, negative ground system in a
car, boat or other vehicle. Vehicle connections should be protected by a 1-amp fast
blow fuse. An optional fused cigarette lighter adapter is available from Thunder Eagle,
Inc.
3) Wiring Connections:
Connections are made on the rear panel.
© 2006-2010 Thunder Eagle, Inc. All rights reserved worldwide.
Alert Eagle® MRI-100 Multi-Radio Interface Instruction Manual
Page-4-
12VDC is supplied to the MRI-100 through a center positive 2.1mm barrel
connector or through a pin on the db15 from the WE110.
DTMF IN (line level) for remote control of the MRI-100 is supplied through a RCA
connector labeled DTMF IN. A DTMF led will light each time a valid DTMF signal is
decoded.
There are three db connectors on the rear panel. A female db9 for serial control
and menu access is labeled Comm1; a male db15 for connections to the WE105/110;
and a female db15 for connection to user supplied transceivers. The connectors into the
above db connections will have the opposite polarity.
Comm 1 only uses pins 2, 3 and 5. Pins 2 and 3 are transmit and receive and pin
5 is ground. 9600 baud, 8, 1, None, 1 stop bit, and no flow control is used. The transmit
and receive pins can be reversed by opening the MRI-100 and switching the jumpers
RX1 and TX1 from pins 1-2 to pins 2-3 of J79 and J83 to pins 2-3 to pins 1-2 of J79 and
J83. These jumpers function as a null modem cable.
© 2006-2010 Thunder Eagle, Inc. All rights reserved worldwide.
Alert Eagle® MRI-100 Multi-Radio Interface Instruction Manual
Male DB15
Female DB15
Connector on
Connector on
PCB to
WE105/110
WE105/110
**ON the WE110
Page-5-
Color
Function Chart
Red
Manual Channel
**ON the MRI-100
1
1
Change
2
2
Red/Blk
Scan Channel Change
3
3
Green
Reset
4
4
Grn/Blk
Live
5
n/c
Blue
Common Relay
6
n/c
Blue/Blk
N/O Relay
7
n/c
Orange
N/C Relay
8
5
Org/Blk
EAS Alert from
WE105/WE110
MUST add jumper on
AE120 green connector
from N/O to ground.
9
10
Black
Muted Audio from
WE110
10
n/c
Blk/White
Unmuted Audio
11
11
White
12VDC
12
n/c
White/Blk
5VDC
13
13
Red/White
Play
14
n/c
Grn/White
Amplified Audio
15
15
Blu/White
Ground
© 2006-2010 Thunder Eagle, Inc. All rights reserved worldwide.
Alert Eagle® MRI-100 Multi-Radio Interface Instruction Manual
Page-6-
© 2006-2010 Thunder Eagle, Inc. All rights reserved worldwide.
Alert Eagle® MRI-100 Multi-Radio Interface Instruction Manual
Female DB15
Function
Page-7-
Transceiver
Connector on
Connection
PCB to
For Motorola Astro
Transceivers
(for example)
1
COS active high from Ch1
13 Ch activity
transceiver
2
DTMF Audio IN
21 Rcv Filtered
Audio
3
n/c
n/c
n/c
n/c
5
Audio to Receiver CH1
23 Aux Mike
6
PTT CH1
16 PTT
7
Audio to Receiver CH2
23 Aux Mike
8
PTT CH 2
16 PTT
9
Audio to Receiver CH3
23 Aux Mike
10
PTT CH 3
16 PTT
11
n/c
n/c
12
n/c
n/c
13
Ground CH1
1 Ground
14
Ground CH2
1 Ground
15
Ground CH3
1 Ground
4
© 2006-2010 Thunder Eagle, Inc. All rights reserved worldwide.
Alert Eagle® MRI-100 Multi-Radio Interface Instruction Manual
Page-8-
Notes for Transceiver Connections:
1) In Astro, ground and emergency pins 14-15 must be connected for proper
operation.
2) COS- Inside MRI-100 insert jumper J88 for 0.1uF cap filter (to ground) and an
active high COS.
3) Set the PTT (ground or +5) for each channel using jumpers J90, J91 and J92.
4) Set the audio level for each channel using pots R7, R8 and R11.
5) Set beeps or audio for each channel using J1, J2 and J5. Also make the menu
setting for each channel (beeps or audio).
6) On the Astro, Pin 25 must be pulled to +14 VDC for radio to operate.
7) In MRI-100, add wires to ground from J56 and J57 for grounds for CH2 and CH3.
**ÎA schematic for connection of the MRI-100 to Motorola Astro, Motorola CP200
and GM300, with comments, are attached.
© 2006-2010 Thunder Eagle, Inc. All rights reserved worldwide.
Alert Eagle® MRI-100 Multi-Radio Interface Instruction Manual
Page-9-
4) Menu Settings:
a) Connect the MRI-100 to your workstation's comm port using a straight db9 serial
cable.
b) Open a Hyperterminal session
(start/programs/accessories/communications/Hyperterminal). Create and save a new
connection with the following parameters (9600 baud, 8, N, 1 NO flow control). In the
ASCII settings click local character echo and add cr/lf to incoming lines.
c) Hold in the Menu on the MRI-100 while you power up the unit and the menu should
appear on Hyperterminal. On purpose, to prevent entering into menu mode by accident,
you need to hold the menu button in for about 5 seconds after power up to enter the
menu mode. When in menu mode the first 6 leds on the MRI-100 should light. If the
menu does not appear on your workstation, open the MRI-100 and reverse the TX1 and
RX1 jumpers as set out above. Then unplug, and replug in the MRI-100 while holding in
the menu button and the menu should appear.
d) Something similar to the following menu should appear:
MRI-100 SetUp Menu
Firmware Version: 1.000
Choose a menu item.
C- Current settings.
1 - Seconds of COS required to activate live audio.
2 - Seconds of live audio after COS activation.
3 - Ch1 Voice or Beep.
4 - Ch2 Voice or Beep.
5 - Ch3 Voice or Beep.
© 2006-2010 Thunder Eagle, Inc. All rights reserved worldwide.
Alert Eagle® MRI-100 Multi-Radio Interface Instruction Manual
Page-10-
6 - Set 3 digit DTMF code.
E - End menu setup routine.
Pressing C will display the current menu settings.
Pressing 1 will bring up the menu to select the number of seconds of continuous COS
required to activate channel 1 (0-99 seconds) (default is 3 seconds).
Pressing 2 will bring up the menu to select the number of seconds to have channel 1
active based on the COS input.
Menus 3, 4 and 5 select beep or voice on channels 1, 2 and 3. Make sure you ALSO set
the jumper in the MRI-100 (J1, J2 and J5) for beep or audio.
Pressing 6 brings up the menu to add a 3 digit code that must be entered BEFORE the
DTMF or ASCII code. The default code is ***, which means that NO code needs be
entered before the DTMF or ASCII codes to remotely activate the MRI-100.
Pressing E exits the menu mode.
5) DTMF and ASCII remote control codes:
All of the functions of the MRI-100 can be activated by pressing the buttons on the front
of the MRI-100, or by sending DTMF or ASCII serial characters to the MRI-100 for
remote activation. The functions are described below.
The DTMF led will light each time a valid DTMF character is interpreted by the MRI-100.
This acts as a diagnostic for the MRI-100 DTMF function. Also, the MRI-100 will respond
through the db9 serial port with an acknowledgement of which command was
successfully received and executed by the MRI-100. Each decoded DTMF command
will be output on the serial port for diagnostic purposes. The serial port connection
should be set to 9600, 8, 1, N and no flow control. Local character echo and add cr/lf to
incoming lines should be selected and saved for future quick access.
© 2006-2010 Thunder Eagle, Inc. All rights reserved worldwide.
Alert Eagle® MRI-100 Multi-Radio Interface Instruction Manual
Page-11-
There are two groups of codes which work on BOTH the DTMF and the ASCII remote
control functions.
They are:
Commands for the MRI-100:
1*
Channel1 ON. This keys channel 1 and places the WE110 in live mode. It times
out after the menu set time for live.
2*
Channel2 ON. This turns on channel 2.
3*
Channel3 ON. This turns on channel 3.
5*
Test. This tests all leds on the MRI-100 front panel and then keys each channel
and automatically resets in about one minute. The reset button is not active in the test
mode.
6*
Reset. This reset the MRI-100 and the WE110.
Notes:
These commands correspond to the 6 buttons on the MRI-100 front panel.
The menu (button 4) is NOT remotely accessible to prevent the user from accidentally
disabling the MRI-100 by putting the unit into menu mode.
If a three digit code (other than the default of ***) is set in the menu, the three digit code
must precede the above and below standard codes to activate the MRI-100. For
example, if the three digit code of 123 is added to the menu, 1231* would be required to
turn on channel 1 of the MRI-100.
Commands for the WE105/110:
11*
WE Live. Places the WE110 in live mode and keys channel 1 for the menu set
live time (default 60 seconds).
12*
WE Reset. Places the WE110 in reset mode and unkeys channel 1.
© 2006-2010 Thunder Eagle, Inc. All rights reserved worldwide.
Alert Eagle® MRI-100 Multi-Radio Interface Instruction Manual
13*
WE Play.
Page-12-
Places the WE110 in play mode (plays the last warning) and keys
up channel 1. The record time is 4 minutes. The reset command is active in the play
mode.
14*
WE Manual. Places the WE110 in live mode, keys up channel 1 and changes the
WE110 one channel. If you select ‘beep the channel number’ in the WE110 menu, the
selected channel number will beep on channel 1 of the MRI-100 (i.e. 1 beep for channel
1 and 7 beeps for channel 7, etc.)
15*
WE Scan. Places the WE110 in scan mode in which the WE110 will select the
strongest of the 7 NWR channels. If you select ‘beep the channel number’ in the WE110
menu, the selected channel number will beep on channel 1 of the MRI-100 (i.e. 1 beep
for channel 1 and 7 beeps for channel 7, etc.)
**ÎDTMF Remote Deactivate Alert Feature of MRI-100
The default on power up of the MRI-100 is to activate the retransmission of matched
(event and location) weather alert messages.
99* on channel 1 places the MRI-100 in alert retransmission mode. The front leds are in
normal operation. The unit will beep twice when this command is successfully received.
98* on channel 1 places the MRI-100 in NO alert retransmission mode. LEDS 4 and 5
are lit constantly. The unit will beep twice when this command is successfully received.
6) COS input:
The COS input is active high + 5 volts. Adding jumper J88 adds a 0.1uf filter capacitor to
the circuit to prevent RF falsing. The COS led will light when valid COS is being detected
by the MRI-100.
7) EAS/SAME Match from the WE110 into the MRI-100:
The EAS/SAME match to activate the MRI-100 alert sequence is active low. The MRI100 has a 10K pull-up resistor. The logic input on the MRI-100 is brought low by a
© 2006-2010 Thunder Eagle, Inc. All rights reserved worldwide.
Alert Eagle® MRI-100 Multi-Radio Interface Instruction Manual
Page-13-
connection from pin 8 of the db15 male connector on the MRI-100 to Pin 5 of the db15
on the WE110. This pin is connected to the relay common pins on the WE110 and,
through an internal ribbon cable, to the AE120 relay common pin. On the rear of the
AE120 a jumper needs to be added to the green connector from the N/O pin to ground.
The alert circuit is activated by a SAME/EAS code matching in the AE120. The AE120
relay will close and bring the logic input into the MRI-100 low. Logic led 6 on the MRI100 will light while the relay in the AE120 is closed during the alert routine. The MRI-100
will go into alert mode. This places the alert on all three channels of the MRI-100 for the
time period set in the MRI-100 menu. At the end of this time period, the MRI-100 resets.
Note, if any channel has been set for beep in the menu, AND the jumper for that channel
has been set to beep in the MRI-100, on an alert, that channel will key long enough for
about 10 beeps to be transmitted and then it will unkey. This is designed to place beeps
only on a high priority dispatch channel in a manner to alert, without disrupting,
operations on that channel. Personnel can hear the beeps and switch to the lower
priority channel to listen to the alert live. Make sure the menu AND the jumpers are set
for either beeps or voice on each channel 1, 2 and 3. Pressing the test button on the
AE120 will test and activate the alert sequence on the MRI-100. You may reset the
AE120 and the MRI-100 by pressing the reset buttons depending on the various timer
settings.
8)
MRI-100 logic outputs to the WE110:
The WE105/110 is controlled by logic high (+5 VDC active high) outputs from the MRI100. Logic leds on the MRI-100 will light for about ½ second to show which logic
command has been sent from the MRI-100 to the WE110.
© 2006-2010 Thunder Eagle, Inc. All rights reserved worldwide.
Alert Eagle® MRI-100 Multi-Radio Interface Instruction Manual
Logic 1
Manual
Logic 2
Scan
Logic 3
Reset
Logic 4
Live
Logic 5
Play
Logic 6
Alert Logic IN from WE110/AE120 (active low).
Page-14-
9) Location of Decoder:
Like any piece of electronic equipment, the MRI-100 should be kept in a warm
and dry location, away from direct heat sources and out of direct sunlight.
10) Upload New Firmware:
The MRI-100 is operated by a powerful computer (microcontroller) with electronically
flash program memory. You need the ICD-40S programmer to update the firmware.
Install the ICD-40S on your workstation. Open the MRI-100 case (two screws on the
bottom of the case). With the MRI-100 powered on, plug the ICD-40S into the RJ-45 on
the MRI-100 and plug the serial connector into your workstation. Click download to
target. Navigate to the file to upload to the MRI-100. **MAKE SURE YOU ONLY
UPLOAD MRI-100 SOFTWARE TO THE MRI-100. *** A progress bar should appear
and the download and file verification should take less than 30 seconds. Click the Run
Program button. Disconnect the programmer from the MRI-100. The MRI-100 should
come to life. Press the buttons on the MRI-100 to make sure the download was
successful. Press the MRI-100 test button to test the unit. Reassemble the MRI-100
case and close the ICD-40S software.
© 2006-2010 Thunder Eagle, Inc. All rights reserved worldwide.
Alert Eagle® MRI-100 Multi-Radio Interface Instruction Manual
Page-15-
11) Specifications
Specifications are nominal, unless otherwise indicated, and are subject to change
without notice.
General:
-
Input voltage: 12 volts DC adapter or battery
-
Dimensions: 1.5" x 7" x 5.5" (H x W x D)
-
Alarms relay, text and visual
-
DC input power 12 volts DC (less than 150 milliamp draw)
12) Warranty:
Procedure
1.
Refer to Operating Instructions Section of this User's Manual for proper operation.
2.
If the above procedures do not correct the problem you are experiencing with
your unit, return the unit with proof of purchase to where purchased for warranty
exchange or further warranty instructions.
Limited One Year Warranty:
Equipment manufactured and sold by Thunder Eagle, Inc. (“ThunderEagle”) is warranted to be
free from defects in workmanship and materials for a period of one (1) year from date of
shipment.
If dissatisfied with the equipment within thirty (30) days of receipt , the Buyer may return the
equipment freight pre-paid to ThunderEagle for a refund. The Buyer MUST contact
ThunderEagle for a RMA (Return Merchandise Authorization) before returning any equipment.
Shipments received without a RMA will not be accepted by ThunderEagle.
Should any item manufactured by ThunderEagle become defective during the warranty period, it
will be repaired or replaced at ThunderEagle’s sole discretion.
Warranty repairs made at ThunderEagle’s factory, or in the field, shall be at no charge to the
customer. ThunderEagle shall pay SURFACE transportation charges both ways within the
contiguous United States if the equipment proves to be defective WITHIN 30 DAYS from the
© 2006-2010 Thunder Eagle, Inc. All rights reserved worldwide.
Alert Eagle® MRI-100 Multi-Radio Interface Instruction Manual
Page-16-
date of shipment. Throughout the remainder of the warranty period, the customer shall pay
transportation charges to return the equipment to ThunderEagle, and ThunderEagle shall pay
SURFACE transportation charges to return the repaired equipment to the customer. All requests
for warranty service must be received within the warranty period.
All ThunderEagle warranties are contingent upon the proper use of the equipment, and will not
apply if the equipment is subjected to unusual physical stress, neglect, misuse, or inadequate
storage. Damage caused by electrical power surge, lightning, water, temperature and/or other
environmental causes are SPECIFICALLY EXCLUDED from this warranty.
The Buyer, by acceptance of the equipment, assumes all liability for consequences of its use or
misuses by the Buyer, the Buyer’s employees, and/or all others. No amount of engineering will
guarantee that ThunderEagle products will perform flawlessly in all circumstances. If the Buyer
cannot accept this risk, the products should not be purchased.
In no event shall ThunderEagle be liable for any special, indirect, incidental, or consequential
damages arising out of, or as a result of, the sale, delivery, servicing, or loss of use of the
equipment or any part thereof, or for any charges or expenses of any nature incurred.
THIS WARRANTY IS IN LIEU OF ALL OTHER WARRANTIES, INCLUDING WITHOUT
LIMITING THE GENERALITY OF THE FOREGOING WARRANTIES OF
MERCHANTABILITY AND FITNESS FOR A PARTICULAR PURPOSE, EXPRESS OR
IMPLIED.
Printed in U.S.A.
© 2006-2010 Thunder Eagle, Inc. All rights reserved worldwide.
Female
DB15
Connector
on MRI100
1
2
3
4
5
6
7
8
9
10
11
12
13
14
15
Motorola Astro
Connection Table
Function
COS In from
Astro1
DTMF Audio IN
J61 on MRI-100
J60 on MRI-100
Audio to Astro
CH1
PTT CH1
Audio to Astro
CH2
PTT CH2
Audio to Astro
CH3
PTT CH3
J59
J58
Ground3 (*needs
wire jumper in
MRI-100 from J57
to Ground)
Ground2 (*needs
jumper in MRI-100
from J56 to
Ground)
Ground
Motorola Astro
Accessory
Connector
Wire Color
13 Channel
Activity CH1
Repeater monitor
receiver CH1
Org/Blk
23 Aux Mike CH1
Orange
16 PTT CH1
23 Aux Mike CH2
Red
Orange
16 PTT CH2
Red
1 Ground CH2
Black
1 Ground CH1
Black
Notes:
1) Must connect Pin 25 Ignition Sense to +14 to activate
Astro.
2) 20 and 26 must be connected to speaker.
D
C
B
A
16
17
5
1
9
2
10
3
11
4
12
5
13
6
14
7
15
8
12VDCExt
Vcc-Out
WE110 Female on PCB
N/O
N/C
AmpAudio
Busy-Input
4
Manual
UnMuted Audio From WE110
Scan
Muted Audio From WE110
Reset
Live
Play
Ground
4
3
3
2
Ground
Play
Live
Reset
Manual
Muted Audio From WE110
Scan
Title
Size
A
Date:
MRI-100 -- WE110 Interface
Document Number
<Doc>
2
Monday, July 10, 2006
1
1
1
1
1
1
Male on MRI-100 PCB to WE110
1
1
1
9
2
10
3
11
4
12
5
13
6
14
7
15
8
1
2 Common
3 N/O
4 Ground
2
1
of
2
16
17
Rev
A
Green Connector on AE120
SAME Match Alert Active Low
Sheet
(c) 2005-2006 Thunder Eagle, Inc. All rights reserved worldwide.
EAS Alert...MUST also add jumper on AE120 Green Connector from N/O to
Gnd AND on AE120 pcb, add jumper J45 to J50.
Need to use muted audio to get access the the play back recorded last weather alert
Add ground connector pins 3-4 on Green Connector for alert active low.
5
D
C
B
A
D
C
B
A
Motorola Astro Rear Accessory Header Jack
Motorola Astro Rear Accessory Header Jack
5
5
Ground
BUS+
BUSTXD
RXD
USBUSB+
RESET
BUSY
CTS
RTS
USB POWER
CHAN ACT
GROUND
EMERGENCY
PTT
ONE WIRE
VIP OUT 1
VIP OUT 2
SPKR+
RX FLT AUDIO
MONITOR
AUX MIKE
SWB+
IGNITION
SPKR-
4
Ground
Ground2
PTT CH2
AudioToReceiver CH2
3
3
Ground2 J56
1
PTT CH3
2
PTT CH2
Ground
AudioToReceiver CH2
1
PTT CH1
AudioToReceiver CH1
J61
J60
1
1
J59
J58
1
1
Sheet
MRI-100 -Motorola Astro Radio Interface
Document Number
<Doc>
2
Friday, June 23, 2006
1
8
15
7
14
6
13
5
12
4
11
3
10
2
9
1
1
of
2
Rev
A
External Radio Connector on MRI-100
DB15-Female on PCB
DTMF-AudioIn
AudioToReceiver CH3
COS from Channel1 receiver
Title
Size
A
Date:
1
(c) 2005-2006 Thunder Eagle, Inc. All rights reserved worldwide.
Must ground emergency pin (14-15) for proper operation,
COS- Inside MRI-100 Add J88 jumper for 0.1uF pull down cap filter for active high COS.
PTT Ch1 J90 jumper either groud or +5 pullup through relay K1. (J190-192)
Audio and PTT for each channel goes through a DPDT relay.
Each channel has its own audio level volume pot in the MRI-100. (R7, R8, R11)
Each channel has a jumper for beeps or audio in the MRI-100.(J1, J2, J5)
On Astro - Pin 25 - Ignition Sense must be pulled to +14VDC for radio to operate.
On MRI-100 pcb add wires from J56 and J57 to Ground.
J57
Ground3
AudioToReceiver CH1
PTT CH1
Channel 1 - Weather Talk Group with Alerts Out and COS In
1
2
3
4
5
6
7
8
9
10
11
12
13
14
15
16
17
18
19
20
21
22
23
24
25
26
Ground
BUS+
BUSTXD
RXD
USBUSB+
RESET
BUSY
CTS
RTS
USB POWER
CHAN ACT
GROUND
EMERGENCY
PTT
ONE WIRE
VIP OUT 1
VIP OUT 2
SPKR+
RX FLT AUDIO
MONITOR
AUX MIKE
SWB+
IGNITION
SPKR-
Channel 2 - Weather Alert - Main Dispatch Channel Voice or Beeps
1
2
3
4
5
6
7
8
9
10
11
12
13
14
15
16
17
18
19
20
21
22
23
24
25
26
4
D
C
B
A
5
4
3
2
1
Motorola GM300 Base Station Interface - Theory of Interface - All connections go through the RJ45
mic connector. 5 Connections are used (DTMF Receive Audio, Ground, PTT, Mic transmit audio, Radio
ground). **The PTT is active by connecting the PTT to the floating ground. THE GROUND MUST BE
FLOATING WHEN NOT ACTIVE! Need to add a jumper in the MRI-100 J56-J55 and use pin 14 of DB15 for
floating ground from radio. Remove Jumper J90 so N/O relay is floating (neither VCC or GND).
D
D
Motorola CP200 Portable Interface - Theory of Interface - The audio from the MRI-100
goes to the high end of the 100 ohm resistor. The audio ground goes to the low end of the
resistor. The press to talk function is accomplished by pulling the low end of the
resistor low. The PTT switch is the dry contact relay closure.
P1
J6
1
9
2
10
3
11
4
12
5
13
6
14
7
15
8
C
R3 Audio
DTMF Receive Audio
R3 Relay Common
1
2
3
4
5
Port2 Audio Out
Ground
R2
100
C
Motorola CP200 Portable Interface
CP200 Connector
MicAudioIn
PTT GM300
Floating Radio Ground
J7
Ground
Port2 PTT In
MRI-100
**Set =>
(Common Relay)
1
2
3
4
5
Ground
Port2 PTT N/O Jumper J91 Pin1-2 to Ground
CP200 Connector
R3 Audio
B
B
R1
100
**Set =>
Port3 PTT N/O Jumper J92 Pin1-2 to Ground
R3 Relay Common
J8
1
Brown
Blue - N/C
Yellow
Green
Red
Black
Orange-N/C
Grey-N/C
DTMF Receive Audio
Floating Radio Ground
MicAudioIn
PTT GM300
Ground
1
1
1
2
3
4
5
6
7
8
PTT-Red-4 - to Yellow-Gnd-2 to activate PTT ==>MUST be floating to prevent keying all the time.
Mic Audio Out ==>ONLY Green - 3 (Do NOT connect Audio Ground)
Receive Audio-Brown-1 (Do NOT connect ground)
**Set => Port1 PTT REMOVE Jumper J90 so the PTT ground floats. Connect Jumper J55-J56 and connect to
floating ground on pin 14 DB15.
A
A
Title
Motorola CP200 GM300 Interface MRI-100
Ribbon CAble / RJ45 to GM300
Size
A
Date:
5
4
3
Document Number
(C) 2009 Thunder Eagle, Inc.
Friday, December 25, 2009
2
Rev
A
Sheet
1
of
1
1