1
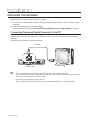
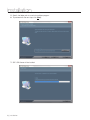
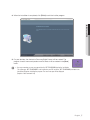
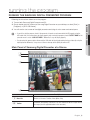
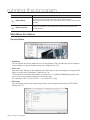
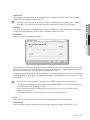
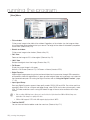
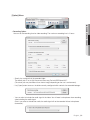
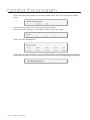
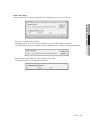
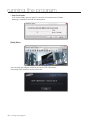
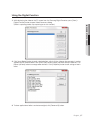
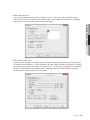
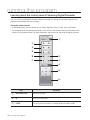
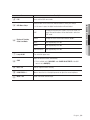
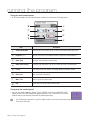
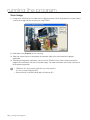
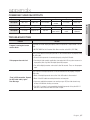
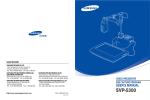
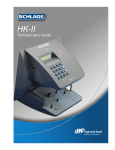
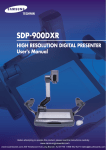
Digital Presenter Software User Manual (For Windows) SDP USB Viewer CONTENTS installation 3 running the program 9 3 9 appendix 27 3 4 Installing Samsung Digital Presenter installer program System Requirements Installing the program Running the Samsung Digital Presenter program 27 Commonly Used Shortcuts 27Troubleshooting installation Installing Samsung Digital Presenter installer program With Samsung Digital Presenter, you can connect it to the PC and save the video image incoming from the lens of the camera in a picture format or in a video format. MM `` Design and specifications are subject to change without prior notice. System Requirements •• CPU: Pentium 4 or higher (recommendation: Core 2 Duo or higher) •• Windows XP Service Pack3 or later -- Windows OS compatibility: Windows XP(Service Pack 3)/Windows Vista(Service Pack 1)/Windows 7 •• RAM: 512MB or more (more than 2GB recommended) •• USB 2.0 Port •• Graphic adaptor supporting XGA (1024x768) in more than 65,536 colors -- Video RAM 512MB or more -- SXGA or higher recommended •• CD-ROM Drive which a PCI/PCMCIA-type USB 2.0 card is inserted may not exert USB 2.0 communication performance MM `` Aof PCtheinto digital presenter properly. `` If you use a specific theme supported in Windows 7, the USB viewer may not perform the display functions properly. It is recommended to use the default Windows 7 theme. `` For Windows 7 users, it is recommended to specify at least 5.0 for the Windows Experience Index (WEI). `` Selecting a certain aspect ratio of Windows display option may cause problem with displaying options window. Windows 7 : If set to 125% in [Personalize] – [Display] (Recommended to use 100%) Windows XP :If set to 120 dpi in [Display Properties] – [Settings] – [Advanced] – [General] tab. (Recommended to use 96 dpi) JJ `` The Windows 7 64 bit edition may not support the viewer in some languages excluding English and Korean. English _3 ● Installation Use the provided USB cable to connect the digital presenter to the PC. Install the Samsung Digital Presenter program on your PC, which is contained in the provided CD. installation Installing the program Following the instructions below to install the program. 1. Use the USB cable to connect between Samsung Digital Presenter and PC. Then, turn on the digital presenter. 2. Install the Samsung Digital Presenter program. For more information, refer to “Installing Samsung Digital Presenter installer program”. (page 5) Connecting Samsung Digital Presenter to the PC Connect one end of the USB cable to the USB port of the PC, and the other end to that of the digital presenter. Plug the power cable and turn on the presenter. USB Cable USB RS-232C USB C-VIDEO VGA OUT DC 5V IN Digital Presenter PC It is recommended to connect the USB cable to the USB port on the main board of your PC. JJ `` (Using an extension front port or the bus-power USB hub may cause a problem, depending on the manufacturer.) Use only the USB cable of less than 4.0m in length. `` Use the USB cable provided by Samsung Techwin. (Using a cable from different manufacturer may cause problem depending on the cable specifications.) 4_ installation Installing Samsung Digital Presenter installer program 1. Before connecting the digital presenter to the PC, you must install the provided installer software on your PC before making USB connection so that the presenter can display video properly. ● Installation 2. Insert the CD, and select Install Viewer from the autorun screen to begin installation. 3. From the start screen of the Wizard, click [Next]. 4. The end-user license agreement will be displayed. Click [Yes]. English _5 installation 5. Specify the folder path to save the installation program. 6. To proceed with the next step, click [Next]. 7. SDP USB Viewer will be installed. 6_ installation 8. When the installation is completed, click [Finish] to exit the installer program. ● Installation 9. On your desktop, the shortcut to Samsung Digital Present will be created. The program shortcut menu and product manual shortcut will be created in the [Start] menu. may encounter an error message related to .NET FRAMEWORK during the installation. JJ `` You This is because .NET FRAMEWORK is not installed on your PC. Install the .NET FRAMEWORK provided in the installation CD before installing the program. The error message will be displayed. (Requires .Net Framework 2.0) English _7 installation Questions & Answers How can I check that my computer supports USB protocols? 1. Select [Control Panel] ; [System] ; [Device Manager]. 2. If you can see the USB Universal Host Controller and USB root hub as shown below, your PC has installed and is running the USB protocols properly. 3. USB 2.0 protocol is supported on your PC if the USB Enhance Host Controller item is displayed as shown. How can I uninstall the USB driver and Samsung Presenter Program? Select [Control Panel] ; [Add/Delete Programs]. Select SDP USB Viewer from the list and click [Add/ Delete] to start uninstalling or restoring the program to your preference. Follow the on-screen instructions to uninstall the program. Digital Presenter does not require you to install/uninstall the USB driver. MM `` Samsung Unlike other conventional models, the presenter that supports UVC protocols can be connected directly to your PC via USB cable without the installation process. you want to use the TWAIN feature, install the TWAIN driver provided in the installation CD. You can use the JJ `` Iffeatures of Viewer and TWAIN. However, if you do not want to use TWAIN, it is recommended not to install the TWAIN driver. And use the product with no other UVC driver than the default. (If using TWAIN driver, it may limit frame rate and other performance.) 8_ installation running the program Running the Samsung Digital Presenter program Following the instructions below to run the program. 1. Turn on both Samsung Digital Presenter and PC. 3. You will see the start screen of the digital presenter consisting of: main screen and control pane. fail to start the program, check if the presenter is turned on and connected to the PC properly using the JJ `` IfUSByoucable. And, if the screen does not display properly after running the program, check if OUTPUT MODE of the presenter menu is set to <USB OUT MODE>. Otherwise, it may not display properly. `` Do not unplug the power cable or disconnect the USB cable while playing/capturing/saving a video clip using the digital presenter. Otherwise, it may cause a failure or damage to the digital presenter or PC. Main Panel of Samsung Digital Presenter at a Glance a b c d Item Description a Menu Bar Consists of 4 menus: Function, View, Option, Help. b Toolbar A collection of frequently used menus. You can hide the tool bar for a larger view of the image. (Use the applicable button in the menu bar.) English _9 ● Running the program 2. Simply double-click the shortcut to Samsung Digital Presenter on your desktop, or select [Start] ; [Programs] ; [SDP USB Viewer]. running the program Item Description c Video Playback The display area of the image from the lens of the digital presenter. You can move to the preview screen that enables you to save the image or record the video. d Video Saving Path Display the saving path of the current video. (You can change the path in the recording options.) Main Menu At a Glance [Function] Menu •• Clip board You can capture the current video and save it to the clipboard. Then, the video clip can be inserted in various programs using the Windows paste menu. (Shortcut Key: F12) •• Quick save Save the current video clip to the specified path in JPEG format. You can change the saving path and quality using the Quick Save options. (Shortcut Key: F6) The file name will be created automatically in the format of: YYYYMMDDHHMMSS.jpg based on the current time, and you cannot change the name at your own. (Ex: captured at 19:27:12 April 04, 2012 -> 20120404192712.jpg) •• Still image You can capture and save the current image. Specify the saving path and file format (JPEG, BMP). (Shortcut Key: F7) 10_ running the program •• Capture AVI Start recording the current video in the defined settings. For more information, refer to the recording section later in this manual. (Shortcut Key: F8) •• Stop AVI This will be activated when video recording is started. If you press the Stop Record button, recording will end and the recording file will be saved in a safe path. (Shortcut Key: F9) •• Time Lapse Select this to display the following window. Frame Record will record one frame of the currently being recorded video at a specified time. If you set the time to 5 seconds, one frame for every 5 seconds will be recorded. The video recorded by Frame Record can be played as in the high-speed cinematography effect. You can specify the recording time to your preference. The recording quality will be set as you specified in the record options. (Playback of the video clip recorded by Frame Record will be limited to 15 frames per second.) JJ `` If the video clip is not played properly, upgrade the player’s CODEC with the latest version and try again. `` The video clip recorded by the presenter is compressed using MJPG CODEC. It is recommended to upgrade the player with the latest CODEC supporting MJPEG. `` In case of fixed frame recording, recording time must last longer than the minimum of specified interval to produce a proper video file. If recorded for shorter than the specified interval, the file will not play back normally. •• Print Print out the current image. You can print out the current image using a selected printer. •• Control Panel You can show or hide the control panel in the top right corner of the viewer. (Shortcut Key: F10) English _11 ● Running the program the program terminates abnormally while in recording, the produced video file may not be normal. (Abnormal JJ `` Iftermination: Disconnected USB cable, device power off, changing output mode:USB ; VGA out mode) running the program [View] Menu •• Fit to window Fit the current image to the width of the window. Regardless of the window size, the image or video clip will be displayed according to the input source. The height of the video will extended in proportion to the width. (Shortcut Key: F3) •• Stretch to window Fit the current image to the window. (Shortcut Key: F4) •• 50% View Zoom out the image to 50% of the original. (Shortcut Key: F1) •• 100% View Restore the original size of the image. (Shortcut Key: F2) •• Full Screen Display the current image in full screen. Normal ; Full Screen (shortcut: F5), Full Screen ; Normal (shortcut: ESC) •• Digital Function Applies digital image processing to the transferred video from the presenter through USB connection, and produces video with digital effects. It does not affect original video, only implements such effect on the connected computer. For setting the Digital Function, refer to “Using the Digital Function”. (page 17~20) •• Input signal Setup Samsung Digital Presenter supports three quality modes: SXGA, XGA and VGA. For a faster real-time recording, select VGA; for a sharper and bigger image, select SXGA; for the best picture quality, select XGA. The video resolution used in saving the video or image will be set to the resolution of the input source. recording of VGA input source allows you to save the video in a higher frame than SXGA or XGA but it may cause MM `` Video deterioration of the sharpness or quality of the video. `` SXGA or XGA supports 15FPS while VGA supports playing video in 30FPS. •• Tool Bar ON/OFF You can show or hide the toolbar under the menu bar. (Shortcut Key: F11) 12_ running the program [Option] Menu -- Specify the saving path of the recorded video. The default path is set to “My Documents\Samsung Techwin\SDPViewer\AVI”. (The actual path may be different than shown image, depending on the user’s environment.) -- Use [Open] button to access the folder currently configured which contains the recorded footages. -- You can select to include the audio signal in the video. You will need a microphone when recording video including the audio signal. (Even if you select to include the audio, the audio signal will not be recorded without microphone connection.) English _13 ● Running the program •• Recording Option You can set the recording time for video recording. The maximum recording time is 2 hours. running the program -- Specify the quality of the video that you want to record. “High” quality will cost you more storage space. -- Specify the frame rate/sec of the video that you want to record. However, the frame rate of 30 is not available in SXGA or XGA input mode. -- Specify the video recording time. -- If you use the functions of ZOOM, FOCUS and BRIGHTNESS, the applicable gauge indicator will be displayed on the screen. Select this option if you want to hide the OSD gauge during the recording. 14_ running the program •• Quick save Option You can specify the saving path and quality of the video that you want to save quickly. -- Use [Open] button to access the folder currently configured which contains the recorded footages. -- Select a quality of the video that will be saved by Quick Save. The better the quality is, the greater the file size is. English _15 ● Running the program -- Specify the saving path of the video. The default path is set to “My Documents\Samsung Techwin\SDPViewer\QuickSave”. running the program •• Hide Panel Option In full screen mode, you can specify the time the mini control panel is hidden. Selecting 0 second will not hide the control panel. [Help] Menu You can check the program version of the current SDP USB Viewer. Click [About SDP Viewer] to display the version. 16_ running the program Using the Digital Function 2. Click [Insert Before] button to apply a desired effect, which will play video on the computer’s monitor applied with the selected effect. Click [Insert After] button to apply the effect to other video files. Use [Move Up/Down] button to arrange order of effects. Click [Properties] button to edit settings of each effect. 3. To clear application of effects and restore original, click [Remove All] button. English _17 ● Running the program 1. While displaying the video on the PC screen from the Samsung Digital Presenter, press [View] > [Digital Function] button to open Video Processors dialog. (When in capturing mode, stop capturing to run this function.) running the program more digital effects may slower program’s performance or cause more frame droppings when in JJ `` Applying recording. `` For Digital Function processors, there may be more processors including 4 basic filters of LEAD Video Color Filter, LEAD Video Crop Filter, LEAD Video Emboss Filter and LEAD Video Mosaic Filter depending on software environment of the installed computer. Other than those 4 basic LEAD filters provided, it is not guaranteed to be stable with applying. Digital Effects •• LEAD Video Color Filter Used to change color settings of selected area of the current video. At least 1x1 cells of the video should be applied. Controls 4 color settings of Hue, Saturation, Brightness and Contrast. 18_ running the program •• LEAD Video Crop Filter Crops off the selected area of the current video. At least 1x1 cells of the video should be applied. The “Automatically stop the graph when needed” option stops video graph automatically if changed capturing size, and then frames selected area automatically. ● Running the program •• LEAD Video Emboss Filter It applies embossing effect like engraving which produces embossed video display on the View Panel. To produce embossed effect, it utilizes 3 properties of [Light Angle], [Elevation] and [Depth]. To restore the original, click [R] button on the right. Use mouse or [], [] keys on the keyboard to set to desired settings. The [Bumpmap] button enables color mapping of embossed video, and allows applying mosaic effect on a partial area of the current video. English _19 running the program •• LEAD Video Mosaic Filter It applies mosaic effect on the current video’s playback. Set between 1 ~ 64, where bigger the number increases mosaic size. By default, it is set to 1. Use mouse or [], [] keys on the keyboard to set to the desired setting. It allows to apply mosaic effect on a partial area of the current video. 20_ running the program Toolbar A collection of frequently used buttons is located under the menu bar. ● Running the program Input signal selection button. (SXGA, XGA, VGA) Change the view mode. (50%, 100%, fixed ratio, fit the window) Full screen mode. Saving options: Quick Save, Still Image, and Quick Save options. From the left, Save video, Stop Recording and Record options. You can show or hide the control panel in the top right corner. Press this to hide the tool bar under the menu bar. For more information, refer to the Menu Bar section in this manual. (page 12) Status Display Information of the current video will be displayed including resolution, frame rate and recording time. If recording is yet to start, the status bar displays 30FPS for VGA, and 15FPS for SXGA or XGA. The recording time displayed is the last recording time. (The default is set to 00:00:00.) When the recording gets started, the current frame rate and recording time will be displayed. English _21 running the program Learning about the control panel of Samsung Digital Presenter You can use Samsung Digital Presenter program to change the settings of the video image from the presenter and configure the menu settings. Using the control panel •• In the control panel, you can perform or set: Zoom, Brightness, Focus, Color, lamp, and Freeze. •• The configuration of the control panel buttons is the same as the control panel of the presenter or the buttons on the remote control. For more information, refer to the user manual of the digital presenter. a k j i h b g c d e f Item Description a Hide Control Panel Hide the control panel. b AF Fit the focus automatically. c FREEZE Each time you press this button, it will toggle between Freeze On and Off. 22_ running the program Item ESC e OSD Menu Setup f Display of Function, Status and Mode Use to exit the OSD menu mode. Select an OSD menu and use the direction buttons to make your settings. `` If this menu is open, the digital function buttons will be disabled. LIVE Displayed if the presenter’s mode is set to LIVE mode. The upper 10 function buttons will be deactivated in other than LIVE mode. Freeze Display the status of the freeze function: ON/OFF. Micro Not supported by SDP-760 Macro Not supported by SDP-760 Internal/External Not supported by SDP-760 g Lamp On/Off h AWB i Near / Far You can adjust the focus manually. j BRIGHTNESS +/- Open or close the iris of the digital presenter to adjust the screen brightness. k Wide / Tele Zoom in or out the current image. Turn on/off the upper lamp. Adjust or correct the colors automatically. `` This is available only if WB MODE under IMAGE ADJUSTMENT of the OSD menu is set to AWB(KEY). English _23 ● Running the program d Description running the program Using the mini control panel •• In full screen mode, the mini control panel smaller than the normal will be displayed. h a g b f e c d Item Description a Show/Hide Window Show or hide the mini control panel, or switch to the normal control panel view. b Brightness + / - Open or close the iris of the digital presenter to adjust the screen brightness. c Video Setup Record or stop recording a selected video. d Video Status Display Show the video information such as the current frame rate or recording time. e Freeze Each time you press this button, it will toggle between Freeze On and Off. f Quick save Save the current video quickly. g Wide / Tele Zoom in or out the current image. h ESC Switch from Full Screen mode to normal mode. Using only the control panel •• You can use other programs (Skype, Twain, AMCAP) than the provided SDP USB Viewer to view the USB video of the digital presenter. If this is the case, click the SDP Control icon on your desktop to launch the control panel only. SDP Control program will run only if the digital presenter is turned on and connected to the JJ `` The PC using the USB cable. 24_ running the program Using the TWAIN driver of the digital presenter 2. Select the TWAIN driver in the graphic application program. 1) For Adobe Photoshop Move to [File] ; [Import] and select Samsung Digital Presenter. 2) For Microsoft Office Word 2003 Select [Insert] ; [Picture] ; [Insert Picture from Scanner or Camera]. Select Samsung Digital Presenter, and press [Custom Insert]. 3) For other applications supporting the TWAIN driver, refer to the user manual of the applicable application program. English _25 ● Running the program 1. If you want to use the TWAIN driver of the digital presenter, the following system requirements should be met: •• Install the driver specific to the digital presenter TWAIN (provided in the installation CD) •• Graphic application program in compliance with TWAIN (ex: Photoshop, ACDSEE, MS Office, etc) •• Device Menu: CONFIGURATION ; USB TWAIN ; ENABLED `` If USB TWAIN is not set to ENABLED, the video will not be played properly. If you install the TWAIN Driver, be sure to set the USB TWAIN option to ENABLED. running the program Scan Image 1. Owing to the TWAIN driver, the video from the digital presenter will be displayed on the screen. Select a size of the image that you want to scan using TWAIN. 2. When done, click [Capture] to start scanning. 3. When the screen capture is completed, the captured video will be transferred to the graphic application. 4. According to the graphic application, you can exit the TWAIN Driver or select to keep running the program for a continuous transfer of scanned images. For more information, refer to the user manual of the graphic application. driver of a certain graphics application may not be supported. JJ `` TWAIN (ex: Does not support Photoshop CS5) `` Recommended to use MS Office Word 2003 and Photoshop CS3. 26_ running the program appendix Commonly Used Shortcuts Shortcuts F2 F3 50% View 100% View Fit to window Shortcuts F7 F8 F9 Still image Capture AVI Stop AVI Description Troubleshooting Problem Program is running, but screen remains black. F4 Stretch to window F5 F6 Full Screen Quick save F10 F11 Turn the control Turn the toolbar panel on/off on/off F12 Save to clipboard Solution The video will not be displayed properly unless the presenter’s output mode is set to USB. yy OUTPUT MODE of the Presenter Main Menu must be set to USB. (SDP-760) This is mainly because the digital presenter is not connected to the PC properly using the USB cable. If the program does not start: yy Ensure that the presenter is connected properly using the USB cable. yy Terminate all other graphic applications (occupying the USB or system resources in large portion) that may affect the digital presenter program. yy Turn off the digital presenter and restart it after 10 seconds. Then, run the program again. This is because the digital presenter is not connected to the PC properly using the USB cable. yy Check if the digital presenter turns off or if the USB cable is disconnected. “Error in USB connection. Connect yy Check if the USB cable connecting the device and computer. the USB cable and try again.” yy If too many application programs are running on your PC, the video transfer may Error Message fail due to insufficient memory or resource. yy The USB 1.1 protocol is not supported by the digital presenter. Using the USB 1.1 port will fail to transfer the video. Use USB 2.0 port. English _27 ● appendix Description F1 appendix Problem “The program is already running.” Error Message If the device is not recognized “Cannot record. Check save path or storage’s available space.” Error Message Solution This is the case that you simply run the program again that is currently running. yy If you re-run the currently running program, it does not open another instance of the program. You will just see an error message. yy Wait for the program running; Disconnect the USB cable and connect again if terminated abnormally, or force terminate SDP USB Viewer processor in Task Manager and run the program again. yy If the digital presenter is not recognized by the system, reboot your system and try again. yy In Windows Vista or Windows 7, you may have limited access to the file depending on the user permission. Try again with the administrator account, or save the file in the folder (normally, C:\~) that you have access to. yy The same message appears if available storage space is insufficient. Check the storage device’s remaining free space. You will see the error message in the following cases: “Fail to save the image.” Error Messa The video playback is too slow. yy You have specified the Quick Save or image saving path to an unavailable folder such as CD-ROM drive, or try to save a write-protection removable disk. Change it to an internal HDD path and try again. yy The library required to save the image is deleted or damaged. Uninstall the digital presenter and install it again. yy The USB device uses CPU resources for data transfer. If your PC has a low specification or you are running background applications that occupy much of the system resources, the USB viewer may be deteriorated in performance. It is recommended to run the USB Viewer of the digital presenter alone if possible. yy If you are using an integrated graphic adapter of DVMT (Dynamic Video Memory Technology) type, the low-specification graphic adapter has a limit to process the image, causing deteriorated performance or unintended overlap of images. yy USB Viewer program uses Windows Media Video Decoder. If installed other codecs on the computer, it may cause degraded performance. The video is not played properly. If the USB cable was removed while in running the program, it cannot be properly terminated. 28_ appendix yy If the video clip is not played properly, upgrade the player’s CODEC with the latest version and try again. yy The video clip recorded by the presenter is compressed using MJPG CODEC. It is recommended to upgrade the player with the latest CODEC supporting MJPEG. yy Depending on conditions of the user’s computer, the program may not terminate properly. Terminate the SDP USB Viewer in Task Manager to exit the program. SALES NETWORK SAMSUNG TECHWIN CO., LTD. Samsungtechwin R&D Center, 701, Sampyeong-dong, Bundang-gu, Seongnam-si, Gyeonggi-do, Korea, 463-400 TEL : +82-70-7147-8740~60 FAX : +82-31-8018-3745 SAMSUNG TECHWIN AMERICA Inc. 100 Challenger Rd. Suite 700 Ridgefield Park, NJ 07660 Toll Free : +1-877-213-1222 Direct : +1-201-325-6920 Fax : +1-201-373-0124 1480 Charles Willard St, Carson, CA 90746, UNITED STATES Toll Free : +1-877-213-1222 FAX : +1-310-632-2195 www.samsungpresenterusa.com www.samsungtechwin.com www.samsungpresenter.com SAMSUNG TECHWIN EUROPE LTD. Samsung House, 1000 Hillswood Drive, Hillswood Business Park Chertsey, Surrey, UNITED KINGDOM KT16 OPS TEL : +44-1932-45-5300 FAX : +44-1932-45-5325