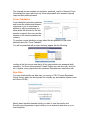
1
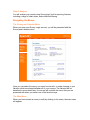
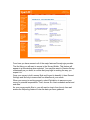
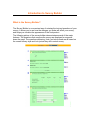
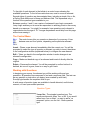
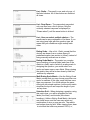
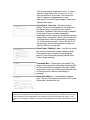
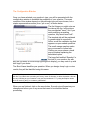
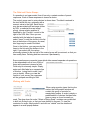
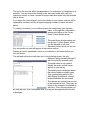
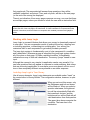
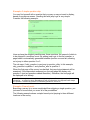
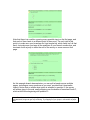
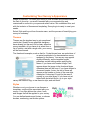
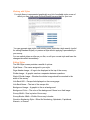
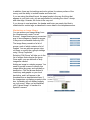
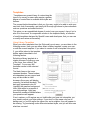
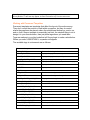
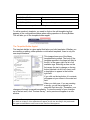
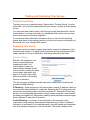
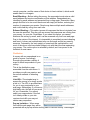
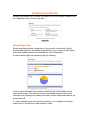
User’s Manual
SurveyLogix provides the
flexibility and power to manage the
entire survey process, from design
and data collection to analysis and
results presentation.
Copyright 2002, Sparklit Networks
Table of Contents
Introduction to SurveyLogix ..............................................................................5
What is SurveyLogix? ____________________________________________ 5
How can SurveyLogix help me? ____________________________________ 5
What features does SurveyLogix provide? ____________________________ 6
Visual Survey Development...........................................................................6
Graphical Design ...........................................................................................6
Customization and Image ..............................................................................6
Contact and Distribution ................................................................................6
Deployment and Storage ...............................................................................6
Reporting .......................................................................................................6
What are the differences between service levels? ______________________ 6
Bronze ...........................................................................................................6
Silver..............................................................................................................7
Gold ...............................................................................................................7
Getting Started ....................................................................................................8
About this Manual _______________________________________________ 8
This is a users manual. Your experience in using the manual and any
suggestions for improving it will be very helpful and appreciated by other
users..............................................................................................................8
Steps in Creating and Deploying a Survey ____________________________ 8
Step 1: Design ...............................................................................................8
Step 2: Construction ......................................................................................8
Step 3: Configuration .....................................................................................8
Step 4: Deployment .......................................................................................8
Step 5: Announcement ..................................................................................8
Step 6: Analysis .............................................................................................9
Navigating the Menus ____________________________________________ 9
The Survey and Libraries Menu.....................................................................9
The Main Menu..............................................................................................9
Introduction to Survey Builder ........................................................................11
What is the Survey Builder? ______________________________________ 11
The Control Menu ______________________________________________ 12
Working with Questions _________________________________________ 12
Question Types............................................................................................12
The Configuration Window...........................................................................15
The Field and Choice Groups ......................................................................16
Working with Scales ....................................................................................16
The Validation Window ................................................................................18
Working with Instructions, Headings and Page Breaks _________________ 18
Heading and Instructions .............................................................................18
Page Breaks ................................................................................................18
Working with Jump Logic ________________________________________ 19
Including Jump Logic in Your Survey...........................................................19
Example: A simple question skip. ................................................................20
Example: A branch point..............................................................................20
Advanced Concepts ____________________________________________ 22
Customizing Your Survey’s Appearance ........................................................23
Themes ______________________________________________________ 23
Styles _______________________________________________________ 23
Working with Styles .....................................................................................24
Editing Styles ...............................................................................................24
Maintaining an Image Library.......................................................................25
Templates ____________________________________________________ 26
Using Library Templates..............................................................................26
Working with Document Templates .............................................................27
Working with Question Templates ...............................................................28
The Template-Builder Applet .......................................................................29
Testing and Deploying Your Survey ...............................................................30
Testing Your Survey ____________________________________________ 30
Deploying Your Survey __________________________________________ 30
Security Settings..........................................................................................30
Distribution...................................................................................................31
Deployment..................................................................................................32
Analyzing Your Results....................................................................................33
Simple Reporting ______________________________________________ 33
Filtered Reporting ______________________________________________ 34
Cross Tabulation_______________________________________________ 35
Raw Data ____________________________________________________ 35
Glossary ............................................................................................................36
Introduction to SurveyLogix
What is SurveyLogix?
SurveyLogix is the most powerful and user friendly internet survey application on
the web today. It enables you to simply and efficiently design surveys using only
your regular web browser. There is no special software to download, and no
confusing interfaces.
How can SurveyLogix help me?
Your goal is to get your survey online with the minimal fuss and as fast as
possible. You know the features you need, and are looking for a solution to turn
your concept into a reality with minimum effort… SurveyLogix is the tool you
have been looking for.
SurveyLogix system gets you off the ground and running in an instant. No need
to download software, no complications getting your survey from your hard drive
to the web, our completely web-based solution works with your current browser,
and our robust and reliable servers handle all the behind-the-scenes networking
and data storage that you would rather not worry about.
A simple, intuitive interface assists you with the construction of your survey,
showing you, visually, how the changes you make affect the appearance of the
end product. Our wide range of question types give you the flexibility to be as
closed or open-ended as you desire. A number of professional themes beautify
your survey with a single click, while our two-tiered template/style system affords
unparalleled control over details of layout and appearance for those with
particular needs.
SurveyLogix will help you get your survey to your target audience. It will serve
the surveys without your intervention. It will track and record the results. When it
comes time to analyze the data it will provide you with clean, comprehensible
graphs, filter on conditions you specify, or simply provide csv (explain) data for
your favorite spreadsheet.
In short, SurveyLogix takes all of the load off your shoulders except the one
decision no one can make for you… what questions to ask!
What features does SurveyLogix provide?
Statistics is a science, not an art, and our clients are very particular about having
their surveys look and act just exactly the way they want them to. As a result,
SurveyLogix provides a wealth of functionality protected by clever defaults. Most
of the time, things will simply happen the way you want them to, but if you should
find yourself with some special need, chances are there is a way to handle it.
Some of the obvious, and important features SurveyLogix provides:
Visual Survey Development
Watch your survey grow as you develop it. See the changes you make take
effect. Preview and test without affecting the final results.
Graphical Design
Take advantage of the graphical design we have done for you. Select from a
library of themes and format your survey with a single click.
Customization and Image
Put your corporate brand on your survey. Match it to your site’s unique style.
Control layout, style and color with unparalleled flexibility.
Contact and Distribution
Target your audience, and get the results you want. Announce your survey by
link, pop-up, or emailed invitation.
Deployment and Storage
Distance yourself from the details of maintaining and administering database and
network servers. No need to worry about stability and storage requirements. Get
results without effort.
Reporting
View the results of your survey graphically. Run powerful filters to analyze the
marginals. Export CSV data to your favorite spreadsheet.
What are the differences between service levels?
Bronze
The SurveyLogix package for users who need a basic, affordable survey
solution. Includes thirty days of results storage on our servers plus access to all
the question types, styles, and themes. Does not include advanced
customization, reporting, or distribution features.
Silver
For users who need a little more flexibility, the silver level package adds multipage surveys, cross-tabulation and conditional reporting. In addition you get all of
the distribution options and 45 days of results storage.
Gold
Our full service option for clients in need of more advanced features. Gold level
service adds Jump Logic (branching), custom templating, email blocking, and
raw data access (CSV format). In addition, you may store your results on our
servers up to 120 days!
Getting Started
About this Manual
This is a users manual. Your experience in using the manual and any
suggestions for improving it will be very helpful and appreciated by other
users.
Steps in Creating and Deploying a Survey
Before reading any further it will be helpful to understand the basic steps involved
in creating and deploying a SurveyLogix survey.
Step 1: Design
Well before you begin to develop your survey with SurveyLogix, you should have
a clear goal in mind. You might want to prototype your survey on paper or in your
favorite editor, and have colleagues give you feedback on wording and range of
options. The entire process will be smoother if you know exactly what it is you
want to build.
Step 2: Construction
Using the Survey Builder, you will enter your questions, headings and
instructions, choose page breaks, and design jump logic as necessary.
At the end of this step your survey will be fully operational in preview mode, and
you will be able to test and make changes as necessary.
Step 3: Configuration
You will select a style or theme for your survey, or customize your own using the
template and style library options. You will select security settings to prevent
cheating on your survey.
At the end of this step, your survey will look crisp and glossy, ready for the web.
Step 4: Deployment
You will schedule your survey to go live, selecting a start and end date. Your
survey will automatically become operational at the beginning of this period, and
stop accepting responses at the end.
Step 5: Announcement
You will attract users to your survey through emailed invitations, pop-up surveys,
or web page links.
Step 6: Analysis
You will analyze your results using SurveyLogix’ built in reporting features,
including a range of chart styles, and conditional filtering.
Navigating the Menus
The Survey and Libraries Menu
When you enter your Survey Logix account, you will be presented with the
Survey and Libraries menu.
Here you can select the survey you want to work with, or make changes to your
libraries, which are shared between all of your surveys. The libraries will be
described in more detail later, for now we will consider the menu that you are
presented with when you select one of the listed surveys.
The Main Menu
When you have chosen a survey to edit (by clicking on its name), the main menu
will appear.
From here you have access to all of the major features SurveyLogix provides.
The first thing you will want to access is the Survey Builder. This feature will
appear in a new window when selected. You may also want to Preview Survey
occasionally as you build, to confirm that jump logic is working the way you
expect it to.
Once your survey is built, access Style and Layout to beautify it, then General
Settings and Security to ensure that our defaults suit your needs.
When your survey is working properly, select Distribution to announce your
survey to potential respondents. Then, choose Go Live to schedule a start and
end date.
As your survey results filter in, you will want to stop in from time to time and
access the Reporting feature to view the data you have gathered.
Introduction to Survey Builder
What is the Survey Builder?
The Survey Builder is a convenient way of entering the text and questions of your
survey. It allows you to see how the changes you make will affect your survey,
and helps you visualize the appearance of the final product.
The following picture of the survey builder demonstrates several of the major
features. The questions that compose the survey are displayed in sequence
down the page. The question numbering, fonts, and colors used are all based on
the current survey style and look just as they will in actual survey.
To the right of each element in the builder is a control menu showing the
available operations. To the left are vertical arrows, used to move an element.
Several styles of question are demonstrated here, including a simple Yes or No,
a Rating Scale Matrix and a Name and Address field. This represents only a
fraction of the question types available to you.
Between question 1 and 2, are a series of advanced Jump Logic commands.
Jump Logic enables you to move the respondent to arbitrary points in the survey
based on a response. You might, for example, have questions only relevant to
respondents over the age of 19. Younger respondents would skip over this page
without ever seeing it.
The Control Menu
The control menu lets you operate on elements of your survey. It has
between one and four options, depending on the particular element.
Insert – Places a new element immediately after the current one. You will be
prompted to select the type of question or element you wish to insert, then taken
to the configuration window (explained below) to configure the new element.
Edit – Takes you back to the configuration window to make changes to an
element’s configuration.
Copy – Makes an identical copy of an element and inserts it directly after the
original.
Delete – Removes the element. You will be prompted to confirm before it is
deleted, but once it is gone, there is no way to get it back.
Working with Questions
In designing your survey, the element you will be working with most are
questions. All questions are composed of text and a response field. The text can
be any question or instruction you desire (even marked up with html).
SurveyLogix handles the response field for you.
A wide range of question types are available to handle binomial, multi-choice,
numeric, or even open-ended questions.
Question Types
Yes or No – The simplest question type. The
results are binomial, either Yes, or No. If you would
rather have “true or false”, or want to add a “no
response” option, use the List - Radio question
type.
List - Radio – The result is one, and only one, of
the listed choices. All of the choices are visible at
all times.
List - Drop Down – The respondent may select
only one item from a list of options. Only the
currently selected response is displayed (or
“Please select”) until the arrow button is clicked.
List - User can select multiple choices – The
results can be any combination of list items. If you
are using jump logic with this question type, be
aware that your conditions might overlap each
other.
Rating Scale – Like a List - Radio, except that the
choices are drawn from a custom library of
predefined scales (see section to follow), instead of
being manually entered one at a time.
Rating Scale Matrix – The matrix is a complex
type consisting of several fields (each line of the
matrix is a field), each of which is a rating scale. In
designing the question, you would select one
scale, and name one or more fields. When viewing
the results, they will be broken down by field first,
and then by response.
Multi Rating Scale Matrix – Like the Rating Scale
Matrix, except that you may choose more than one
scale. In matrices of this type, each field has more
than one response. You could achieve the same
effect with two simple matrices, but the multi matrix
simplifies the layout and keeps the length of your
survey down.
Selection Grid – When designing a question using
this matrix type, you will be prompted for field
labels (the rows), and choices (the column
headings). Unlike a Rating Scale Matrix, the inputs
are check boxes, and the user may select any
combination of zero or more per row. The results
are broken down by field. When viewing them, bear
in mind that the totals may exceed 100% (i.e.,
70% of respondents might select row 1, column 1,
and 50% might select row 2, column 2). If you
view the results as a pie chart, you will see the
ratio of frequency of appearance of each
field::choice, but not the percentage of users who
selected that option.
Open Ended - One Line – Results are open
ended. The size of the response is not restricted,
but the text box is a single line only, without
scrollbars. Validations (see below) may be applied
to this type of input to ensure meaningful
responses, and the results are available for answer
piping. When viewing the results, you will see a list
of all responses, without reformatting or grouping
(ie, if two users answered 3.19 you will see 3.19
on two lines). Open ended questions cannot be
used for filtering or jump logic.
Open Ended - Multiple Lines – Just like the single
line version, except with multiple (labeled) fields.
This question type is useful for simplifying the
layout of your survey and grouping similar items
under a single heading.
Comments Box – Results are open ended. The
length of the response is effectively unlimited (64k)
and no constraints are applied to the input. When
viewing the results, you will be presented with a list
of every response, without reformatting or
grouping.
Name and Address – A standardized address
form. The list of countries is preloaded, with United
States and Canada at the top.
SparkTip – The standard behavior of radio buttons is that once a button in a group has been
selected, the respondent cannot deselect it without selecting another, or clearing the entire form.
This is a property of the respondent’s own browser, and not of the SurveyLogix engine. If you
require a “no response” condition, you might consider adding it as an option at the bottom of your
list.
The Configuration Window
Once you have selected your question’s type, you will be presented with the
configuration window to establish the properties of your question. The exact
contents of this window depend on the particular type you have chosen, but a
simple representative version (from “yes or no”) is shown below.
The first things you might note are
the tabs at the top. In the picture
they are labeled “insert”, but if you
were modifying an existing
question, they would read “edit”.
The template tab will be explained
in greater detail in a section to
follow, as will the validation tag that
appears on open-ended questions.
The small orange question marks
are your access to online help.
Clicking on one produces a small
pop-up window explaining the
associated option.
The large field entitled “Question” is
the text of your question. As with
any text you enter for the SurveyLogix engine to display, you may mark it up with
html tags if you desire.
The Short Name identifies your question. When you design Jump Logic or view
results, they will be identified using this name.
SparkTip – Many users have a tendency to name their questions “Question 1”, “Question 2” and
the like. If you later have to reorder your survey, insert an element, or delete a question, this can
be very confusing as your Question 2 may now be numbered 17. Try using descriptive names
such as “service_rating” or “customer_satisfaction”.
When you are finished, click on the save button. SurveyLogix will examine your
changes and inform you of any errors that need to be corrected before
proceeding.
The Field and Choice Groups
If a question is not open ended, then it has only a certain number of preset
responses. Each of these responses is termed a choice.
The control group used to enter choices is shown here. The label is entered in
the text field at the top, optionally with a
numeric value to the right. Each choice
may be associated with an image (either
by URL, or selected from an image
group), whose relative position is
specified by the “Position” control to the
right of the URL field. Once you are
satisfied with the label as it appears,
select “Insert” to add the choice to the listbox at the bottom of the group. As usual,
html tags may be used in the label.
Once in the list box, you may reorder the
items in the list using the buttons to the
right. If you select edit, the values
previously entered in the top half of the control group will be restored, so that you
can modify them. Deleting and item removes it permanently.
Some questions are composite types which allow several separate sub-questions
to be responded to all at once. Each of
these sub questions is termed a field.
Field entry is extremely simple. Simply
enter each field label on a separate line
of this box (using html to mark it up if
you so desire). When you view the
results of your survey, the responses
will be grouped according to field.
Working with Scales
When using question types that involve
scales, the configuration window will
contain this group of controls for
manipulating scales. A scale is simply a
predefined set of choices that has been
given a name so it can be easily reused. The drop down list under “Select a Rating Scale” contains every scale that
is built into SurveyLogix, or that you have defined in the past. To view the
contents of a scale, simply select it and click on “details” and the details will
appear in a small popup window.
The rest of the controls affect the appearance of a scale when it is displayed in a
question. You can reverse the sorting order, start each scale with a null (no
response) column, or have it render as a drop-down box where only the selected
item is shown.
If you select the “show legend” option, the labels on your scale’s columns will be
replaced by numbers, and the a legend mapping numbers to labels included
above.
To modify your scales, you can either access the scale library from the main
menu, or through the configuration
window by clicking on the “scale
library” button shown above.
The scale library divides scales into
two groups: Custom Scales, which
you are allowed to edit, and
Standard Scales, which you are not.
Any new scales you add will appear in the custom section.
Deleting a scale is permanent—there is no undelete, so be certain before you
click the button.
The add and edit buttons both take you to the following screen, the only
difference being that edit preloads it
with the currently selected scale.
The scale name is only used to
identify the scale, and will never
appear on your survey.
The heading text is displayed above
the column labels on matrix types.
This is particularly useful for the
Multi Rating Scale Matrix, where it
helps differentiate the two scales.
The choices are entered one per line
in the bottommost box. They may, as
shown in the example, be marked up
with html. This is the only place you
will see that html code, everywhere else, the tags will be applied before the text
is displayed.
The Validation Window
Validations are used to ensure that the response to a question satisfies some
criteria. The validation screen is accessible from the configuration window by
clicking on the “edit validation” tab, and appears as follows:
This particular question already has one validation, which appears at the bottom
of the window. A new validation could be created by filling out the fields in the
first table and selecting “add validation”. When you are satisfied with the
validation as it appears, you may click “save validation” to be taken back to the
Survey Builder, or on one of the other tabs.
Currently, SurveyLogix does not support validations that depend on the values of
multiple questions.
Working with Instructions, Headings and Page Breaks
Surveys can contain elements other than questions. Some of these elements are
visible on the actual survey, and others only have effect.
Heading and Instructions
Headings and instructions are the simplest of element types. Each consists
simply of a single field of text (as always, judicious html is acceptable) .
The primary distinction between a heading and an instruction, is that headers are
rendered in bold while instructions are rendered in italics, by default.
Page Breaks
Without page breaks, your survey will load in its entirety on a single web page.
When the survey first loads, every question will be displayed in order, with reset
and submit buttons at the very bottom.
You may choose to split the survey into logical pages by adding a page break.
When the survey first loads, SurveyLogix will display each question up until the
first page break. The respondent will answer these questions, they will be
validated, submitted, and stored. Then, and only then, will the on the next page
(or the end of the survey) be displayed.
There is no indication of how many pages compose a survey, nor even that there
are multiple pages, unless you choose to inform the user with an instruction field.
SparkTip – If you have a long survey, or a lot of graphics, use frequent page breaks. Page breaks
reduce the size of the web page to be transferred, so it will load faster on computers with slow
network connections, and scroll faster on computers with outdated processors and graphics
cards.
Working with Jump Logic
Jump Logic is a powerful feature that allows your survey to dynamically respond
to user input. You can use question results to redirect the survey, skipping over
or including questions, or branching into multiple paths. Your survey can
customize itself to each respondent to get exactly the data you need!
The jump logic system is fundamentally a set of rules composed of a condition
and a destination. Whenever a page is submitted, the jump logic system checks
all of the rules on that page. If it finds a satisfied condition, it immediately
redirects the survey to that rule’s destination. The survey “jumps” based on user
input.
Although the concept is very simple, its application can be very powerful. You
can have questions that only appear in response to certain answers, hide others
that are obviously inapplicable, or even have your survey branch off into one of
two or three completely different surveys based on an earlier response.
Including Jump Logic in Your Survey
Like all survey elements, Jump Logic statements are available under “Insert” on
the control menu in Survey Builder. The configuration window, however, is quite
different.
When you arrive at this screen, only
the Shortname and is/is-not boxes
will be filled out. When you select a
question shortname, the rightmost
box will be automatically filled with
that question’s choices, and the
bottommost box will be filled with all
valid destinations from that question.
The upper three boxes comprise the
condition. The lower box is the
destination.
Example: A simple question skip.
You may find yourself with a question that you may or may not want to display,
based on a previous answer. Handling this with jump logic is very simple.
Consider the following example:
Here we have the simplest possible case: three questions, the second of which is
to be skipped if a condition is met. By adding jump logic to the first question, a
page break is automatically generated between question one and two, allowing
us to jump to either question 2 or 3.
The rule says: if skip_question is yes jump to question_after. In this example,
skip_question is question 1 and question_after is question 3.
When the first page of the survey is submitted, the jump logic statement will be
examined. If the respondent answered yes, the next page will display only
question 3 (and any questions added thereafter). Otherwise, the next page will
be displayed in its entirety.
SparkTip – You might be concerned that all this jumping about will mess up your question
numbering… no cause for alarm. Regardless of how you skip about, the respondent will always
see question 1 followed by question 2, followed by question 3, and so on.
Example: A branch point.
Branching a survey is no more complicated than skipping a single question, you
just need to be sure that you cover all of the possibilities.
The following example shows a simple branch point jumping to three different
locations in the survey.
Note that there is a condition covering every possible input on the first page, and
that each of them leads to a different point in the survey. The only trick at this
point is to make sure your branches don’t get tangled up, which really isn’t all that
hard. Just make sure you keep all the questions in your branch consecutive, and
terminate it with a jump to either the end of the survey or some common final
page.
As this example branch demonstrates, you can split a branch across multiple
pages, including as many questions as you want, provided that it terminates
cleanly. Notice that no matter what option is selected in question 2, the survey
will always jump to the end, neatly skipping over the bodies of branches B and C,
which would follow beginning with question 3.
SparkTip – If you use a lot of jump logic, and wind up with jumps and branches within your jumps
and branches, things can get very confusing. Try mapping out your jumps in a flowchart on paper
first.
Advanced Concepts
Answer Piping
Pre-defined User Data
Customizing Your Survey’s Appearance
Image is important. You want your survey to look as clean and professional as
the rest of your site-- you want it branded with your corporate logo and
customized to conform to your personal artistic vision. We understand this, and
with the inclusion of themes and templating, SurveyLogix is ready to meet your
needs.
Select Style and Layout from the main menu, and the process of beautifying your
survey is underway.
Themes
Themes are the simplest way to get exceptional
results fast. Sparklit’s own graphical designers
have already put the work into a clean, attractive
survey template, all you have do is select from a
list of options, and with a single click, your survey
will be transformed.
The thumbnail examples, such as that for Crystal shown here, are reductions of
an actual screenshot of a demonstration survey
rendered in the theme. Your survey may appear
slightly differently, as the template engine
preserves certain settings when applying the
theme. If you have set a header image, it will
appear where the image in the thumbnail does,
otherwise there will be none. If you have defined a
document header, footer, the text of these will
appear as the header or footer of the new style,
created as Customized Crystal (in the case of
crystal) in your style library. If you have not set
these fields but would like to, go to your style
library and create a copy of the theme’s style, and add them.
Styles
Whether or not you choose to use themes or
templates, a style will be associated with your
survey. Your style defines the colors, fonts,
and images that will be applied to your survey.
You can define headers and footers, or choose
borders, numbering, and divider options.
Working with Styles
You style library is represented graphically as a list of available styles, some of
which you own, and some of which Sparklit has provided for your use.
You can generate new styles, edit existing ones, duplicate a style exactly (useful
for editing Standard Styles), or preview a style without applying it permanently to
your survey.
You can switch styles as often as you like, or edit your current style and have the
changes take effect immediately.
Editing Styles
The Edit Style screen provides a wealth of options:
Style Name – The name assigned to your style.
Page Header Image – A logo to be displayed at the top of the survey.
Divider Image – A graphic used as a separator between questions.
Stretch Divider Image – Whether the divider image should be rescaled to the
width of the survey.
Link Back URL – Escape link displayed on the survey page.
Link Back Name – The text of the escape link.
Background Image – A graphic to tile as a background.
Background Color – The color of the background if there is no tiled image.
Survey Width – Size in pixels of the survey.
Survey Border Width – Width of the survey’s border.
Question Numbering Style – Either No Numbering, Alphabetic, Capitalized,
Numeric, or Roman.
In addition, there are font settings and color options for various portions of the
survey, and the ability to include header and footer text.
If you are using the default layout, the page header is the very first thing that
appears in your html code, you are responsible for including the <html> <body>
and other tags. Likewise, the footer is the very end.
If you choose to use templates, the header and footer are merely html that is
substituted for certain tags, as described in more detail in the templates section.
Maintaining an Image Library
You can access your image library from
the Libraries menu under “List all
Surveys”. Image libraries are a convenient
way to store images on Sparklit’s servers,
if they are not accessible online by URL.
The image library consists of a list of
groups, each of which contains a list of
images. You can add new groups, drop
old ones, or modify the a groups settings
using “Group Properties”.
Selecting “Edit Group” will take you to the
list of images that comprise the group.
Once again, you can add edit or drop
images as needed.
Adding an image is a simple process. You
need to provide a name to identify this
image within the group, and optionally a
description. Click the browse button to
locate any web-graphic on your local
hard-drive, and it will appear in the
thumbnail box as demonstrated here. If
the image does not display properly in this
box, it probably will not display properly
on your survey. When you are satisfied,
click “Upload Image” to transfer it to
Sparklit’s servers.
Templates
Templates are a powerful way of customizing the
layout of a survey for users who require a greater
degree of control than is available with styles and
themes.
The concept behind templates is that you, the user, ought to be able to write your
own html code if necessary, and simply tell SurveyLogix where to place elements
such as questions and submit buttons.
This gives you an unparalleled degree of control over your survey’s layout, but is
also a lot more work. A compromise solution is the template library, a collection
of useful templates designed by Sparklit’s own web developers, that you can use
or modify and revise as necessary.
Using Library Templates
When you select templates form the Style and Layout menu, you are taken to the
following screen. Here you can either select a library template, create your own,
or edit the current template. If you select to create or edit a template from option
3, you will be taken to the template
builder applet described in the
following section.
Selecting a library template is a
simple process of clicking on one
of the icons, then clicking “Set
Template”. Your survey will
thereafter render in the selected
format.
The black lines on the icons
represent borders. These borders
are dependent on css support and
may not be visible in older
browsers (the survey will display
correctly, just without borders). The
dark gray represents color fill
(typically the question background
color) that refers to an aspect of
your style settings. Light gray
boxes with numbers indicate where
your questions will appear.
If text, numbers, or fill regions are not visible after you have set a template, you
may need to adjust your style settings. If your text is of the same color as its
background, or your fill region the same color as its neighbor, they will appear to
be missing. Try previewing under different standard styles, and you will soon see
what has occurred.
SparkTip – Changes you make to your survey’s template don’t appear in the current version of
Survey Builder. To see how they appear, choose “Preview Survey” from the main menu.
Working with Document Templates
Document templates are templates that affect the layout of the entire survey.
They don’t control the position of field within a question, but they do control
where the questions are placed, where the submit/reset buttons go, and so on,
and so forth. Since a template is essentially just html, the simplest thing to do is
design it in your favorite editor, then just place tags where you need them.
Tags are markers in your html code that tell SurveyLogix to make a substitution.
Where you write %QUESTION%, a question will appear.
The available tags in a document are as follows:
Document Components
%LINK_BACK%
Creates a link using the link back name and url.
%PAGE_FOOTER%
Displays the page footer, at this point.
%PAGE_HEADER%
Displays the page header, at this point.
%PAGE_HEADER_IMAGE%
Displays the page header image.
%QUESTION%
Displays the next undisplayed question on the page.
%SUBMIT%
Displays the submit button.
%RESET%
Displays the clear and reset button.
Style Parameters
%BG_COLOR%
The document background color.
%BG_IMAGE%
The document background image url.
%PAGE_HEADER_IMAGE_SRC%
The page header image’s url.
%LINK_BACK_NAME%
The name given to the link back.
%LINK_BACK_URL%
The url of the link back.
%ANSWER_FONT_COLOR%
The font color in hex.
%ANSWER_FONT_FACE%
The font name, or comma separated list of names.
%ANSWER_FONT_SIZE%
The font point size.
%NUMBER_BG_COLOR%
The color of the fill the font is written on.
%NUMBER_FONT_COLOR%
The font color in hex.
%NUMBER_FONT_FACE%
The font name, or comma separated list of names.
%NUMBER_FONT_SIZE%
The font point size.
%QUESTION_BG_COLOR%
The color of the fill the font is written on.
%QUESTION _FONT_COLOR%
The font color in hex.
%QUESTION _FONT_FACE%
The font name, or comma separated list of names.
%QUESTION _FONT_SIZE%
The font point size.
Control Tags
%COUNT%
1 the first time encountered, 2 the next, 3 the next…
%FOREACH_BEGIN%
Repeatedly displays everything up to the next
%FOREACH_END%, while more questions remain to
be displayed.
%FOREACH_END%
Terminates a foreach loop.
SurveyLogix builds portions of the page before displaying your template. You
don’t need to worry about the details, but it might be useful to think of a survey
page as the following:
<html><head></head><body bgcolor=”%BG_COLOR%”><form …>
-- Your Template Goes Here -</form></body></html>
Accordingly, you should not attempt to use html tags such as <body>,
<frameset>, <form>, or <input> in your template.
SparkTip – Template tags are case-sensitive. Remember to write %QUESTION% and not
%question%.
Working with Question Templates
Question templates are similar to document templates, but instead of controlling
the layout of an entire survey, they only control the layout of one question. A
question template tells SurveyLogix what to write when a %QUESTION% tag is
encountered (if you are not satisfied with the default behavior). If you are not
using a document template, question templates will have no effect.
The primary difference between question and document templates is the list of
available tags:
Document Components
%QUESTION_TEXT%
The question’s question.
%QUESTION_NUM%
The question number.
%QUESTION_FIELD%
The response field(s) for this question.
Style Parameters – as per Document Templates.
To edit a question’s template, you need to click on the edit template tag that
appears in the configuration window when editing questions in Survey Builder.
This will take you to the template builder applet.
The Template-Builder Applet
The template builder is a java applet that helps you build templates. Whether you
are creating or editing, either question or document templates, there is only the
one simple interface.
This image shows one of the library
templates being edited. The body of the
template appears in the large text field to
the left. In the upper right is a list of all
available tags. Selecting an item on the
list causes the text to change on the tag
button (labeled %QUESTION% here), and
a description to appear in the bottomright field.
If you click on the tag button, it’s contents
will appear at your cursor in the main text
field.
When you click save, if you are creating
a survey, you will be prompted for a
name the first time only. Thereafter, your
changes will simply be saved immediately. To view the results of your changes
up to the last save, click “Preview Survey”, and a preview will appear in a new
window.
SparkTip – The survey builder applet uses java swing components that may not be available if
you have an old plug-in. If the applet doesn’t appear, click on the Java Plug-in link just beneath
the applet to download the most recent version from Sun Microsystems.
Testing and Deploying Your Survey
Testing Your Survey
Testing your survey is simple process. Simply select “Preview Survey” from the
main menu, and you will be presented with your survey—exactly as it will appear
on line.
You may enter and submit results, and SurveyLogix will treat them like it would
actual results. Your jump logic and your validations will be active, and you may
ensure that they are working as expected.
Your answers will be tallied and recorded so that you can view the resulting
graphs and charts in the reporting section, but when your survey is deployed, all
the results from your testing will be erased.
Deploying Your Survey
When your survey has been properly tested and is ready to be deployed, only a
few brief steps remain. You need to ensure that the security settings meet your
needs, decide on a form of distribution, and finally schedule a start date.
Security Settings
Security, with regards to your
survey, means preventing
cheating and fraud. It is
unfortunately common for
respondents to attempt to bias
survey results by taking the same
survey again, and again, and
again. As a result, we provide
several methods of preventing
this sort of behavior.
The security page, available from the main menu, details the four options we
provide to inhibit cheating.
IP Blocking— Each computer on the internet has a unique IP address, which no
two share and which identifies it completely. Selecting the IP blocking option will
prevent the survey being taken twice from the same IP. Downsides: There may
be two or more legitimate respondents using the same computer, some internet
providers use dynamic IP assignment, meaning that a particular computer might
have a different IP each time it connects.
Cookie Blocking— A cookie is a record stored on the computer of the
respondent noting that they have already taken the survey. Unlike IP address,
this option is user-specific, not machine-specific, and will enable each legitimate
user of a particular computer to vote. Downsides: The cookie resides on the
remote computer, and the owner of that device is free to delete it, which would
enable them to vote again.
Email Blocking— Before taking the survey, the respondent must enter a valid
email address and receive confirmation at that address. Respondents are
identified by email address and prevented from voting again. Downsides: Many
people find this to be too much hassle and will simply not bother, reducing the
number of responses you receive. People may have multiple email addresses,
and could cheat by voting from each one.
Referrer Blocking— This option ignores all responses that do not originate from
the one site specified. This way you can ensure that responses are coming from
your survey, on your site. Downsides: If you select this option, you cannot
distribute the survey by email, and it can be accessed only from one web page.
Due to the nature of the internet, it is impossible to completely prevent cheating
and fraud. A clever and sophisticated user can find ways around any security
measure. Fortunately, the vast majority of users lack this sophistication, and
most of the clever ones have better things to do with their time than spamming
your survey. The cookie option is selected by default, as it has proven to be
sufficient in most cases.
Distribution
A survey with no respondents is no
good to anyone. Accordingly,
SurveyLogix provides a variety of
ways to attract respondents to your
survey.
This is the distribution page,
accessible from the main menu. It
provides you with one passive, and
two active methods of attracting
users.
Link URL—The simplest way to
access the survey is to simply create
a link to it. The URL is provided here
for you to copy and paste to your
web page. Advantages: If you have a
high-traffic site, this will do your work
for you. Downsides: You cannot
select your respondents, if the link
isn’t clearly visible or your site
receives low traffic you may not
obtain many responses.
Pop-up Invitation— When users
first load the web page, they will be
presented with a pop-up window inviting them to take the survey. Advantages:
Much higher visibility than the link alone with a resulting increase in hits.
Downsides: Still dependent on site traffic, and may irritate some users who have
come looking for something in particular (pop-ups in general are not popular with
surfers).
Email Invitation— An email will be sent to addresses on a list you enter, inviting
them to take the survey. Advantages: The ability to target particular respondents,
not dependent on site-traffic. Downsides: Unless you regularly send email to the
members of this list, they may ignore your messages as spam.
Deployment
At last your survey is ready to be deployed. All that remains is to select “Go Live”
from the main menu and set a start date.
Until this date, your survey will not be accessible to respondents, who will be
turned away with a brief message. Once the start date is reached, the survey will
automatically become accessible, and start accepting responses until it
completes. After completion, no more results will be accepted, and your data will
be frozen.
Analyzing Your Results
SurveyLogix enables you to handle your data in one of four ways, available from
the “Reporting” option on the main menu.
Simple Reporting
Simple reporting provides a breakdown of your results, without any filtering.
Close-ended questions are displayed graphically using a variety of chart styles,
while open-ended questions are available as a list of responses.
A simple report might look something like the following:
Here we have the report from a survey containing two close-ended and one
open-ended survey. The results from the close-ended questions are in their
summary form, showing only charts of the data, and the open-ended data is not
presented at all.
To view a detailed report on a particular question, or to change its chart type,
simply click on the title bar of that question’s chart.
The detailed screen shows a larger version of the graph, and a table containing
the actual data (in number of responses and exact percentage). The complexity
of this table depends on the question type.
At the bottom is a drop-down box that allows you to select the chart style
displayed.
The detailed report for an open-ended question displays all of the responses
given.
Filtered Reporting
The filtered reporting option allows you to produce reports filtered on those
results for which a certain condition holds. For example, you could view a report
on only those respondents over the age of fifty, or on those who were
“dissatisfied” with service, etc.
Filtering can only be done on close-ended questions, but can be arbitrarily
complex, for example, all
respondents with blonde hair, who
use shampoo and conditioner, but
not mousse, is a valid rule.
The rule building screen is similar to
that for jump logic.
When you select a question in the
leftmost box, it’s fields will appear in
the rightmost. You construct a rule
by highlighting a question name, is
or is not, and the result for that field
or answered (true if there was any
response).
The example shown contains one condition: preferred_cereal is Oatmeal Crisps.
Generating this report will show only those respondents who selected oatmeal
crisps as their preferred cereal.
Cross Tabulation
Cross tabulation takes two questions
and shows the relationship between
responses in one to responses in
another by tallying responses in a
table where the choices for the first
question comprise the rows, and the
choices for the second question the
columns.
To produce a cross tabulation, simply select the two questions to be cross
tabulated and click “Cross Tabulate”.
You will be presented with a report that may appear like the following:
Looking at the first row we see that of all the respondents who answered both
questions, 2 of those who preferred Frosted Flakes also use skim milk, and 3 do
not. Likewise, every respondent who preferred Shreddies also used skim milk.
Raw Data
You may download the raw data from you survey in CSV (Comma Separated
Value) format, which can be imported into virtually any spreadsheet system (such
as Excel or SPSS).
Merely enter the dates between which you wish to view the results, and
SurveyLogix will generate a report which you can download and store on your
local computer.
Glossary
Choice
In any response field which is not open ended, a choice is one of the discrete
possible responses. For example, “yes” and “no” are choices.
Element
Any result of an “insert” operation in Survey Builder. Elements include Questions,
Headers, Instructions, Page Breaks, and Jump Logic Statements.
Jump Logic Statement
An element consisting of a condition and a destination. When a page is
submitted, the condition all Jump Logic Statements on that page are checked,
and the user is taken to the destination of the first one that holds, or to the next
page.
Page Break
An element indicating that all subsequent elements should appear only after the
current page has been submitted.
Question
An element composed of interrogative text and one or more response fields.
Respondent
Anyone taking the survey. Each respondents results are stored under a unique
key to allow conditional filtering of results.
Response Field
The user entry portion of a question, consisting of one or more html input objects,
generated for you by SurveyLogix.
Scale
A collection of choices that has been given a name and saved in a scale library
for ease of re-use.
Style
A collection of font, color, and option settings that affect the appearance of your
survey.
Tag
Imbedded text that is meant for the software to process and not seen by the user.
Html tags appear as <tag>, template tags as %TAG%.
Template
A document/question layout system using html code with embedded template
tags.
Theme
A combination of predefined question templates, document template, and style.
User
You, the operator of SurveyLogix.
Validation
A rule which must be satisfied before the system will accept a result.