1
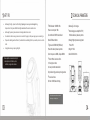
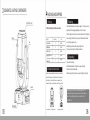
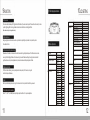
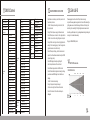
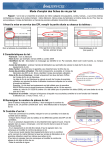
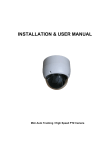
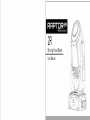
2R Moving He a d Beam User Manual FOREWORD CONTENTS Thank you for choosing the ROKHARV LED RAPTOR 2R moving head beam light. This moving lighting fixture is conceived from our very own research and development to ensure high quality. The RAPTOR 2R is in full compliance with CE standards and supports the worldwide DMX 512 control capability. The Raptor 2R uses the latest OSRAM Sirius HRI 132W light source to give a strong, clear and high quality light output. The mechanics of the motors ensure a high speed, smooth pan and tilt with precise movement. The applications of the RAPTOR 2R are endless giving versatility of use. Main features include an Aluminium Gobo Wheel with 14 gobos plus open, One frost wheel and a 13 colour plus white color wheel, as well as an 8 facet prism with rotation effect. The RAPTOR 2R is small, rapid and compact but packs a heavyweight punch.. . 01 1 SAFETY TIPS 3 2 TECHNICAL PARAMETERS 4 3 SCHEMATIC LIGHTING COMPONENTS 5 4 PACKING AND SHIPPING 6 5 INSTALLATION STANDARDS 7 6 INSTALLATION 8 7 AC POWER 9 8 LAMP 9 9 FUNCTION 10-11 10 LCD SETTING 12 11 DMX512 Channel List 13 12 FAILURE SCOREBOARD AND SOLUTIONS 14 13 CLEAN LIGHTS 14 14 RAPTOR 2R PHOTOMETRICS INFORMATION 14 02 2 TECHNICAL PARAMETERS 1 SAFETY TIPS ◇DMX Channels: 16 DMX512 CHs ◇Beam ◇Power ◇Strobe: Before using t h e lights,please check that t he light package is n ot u nw ra p p e d or damaged during transportation. If it is, please do NOT use th e lights and contact t he d e a l e r or ma n u fa ct u re r. Before using t he product, please m a ke sure the v ol t a ge and Hertz are correct . To avoid electic shock ensure a ground wire is c onnected in the plug and the po wer supply you are connecting to. ◇Control The s p a c e for installing must be s u ffi ci e nt , th e shortest dista nce of each light is 5 0 cm, e n sure they d o n o t t o u c h e a c h ◇Blue o t h e r. ◇Light Unplug b e fore mov i n g or repairing th e lights. ◇Pan Please read t Please ready this user manual in its entirity as it contains important information, such as installation, using a n d m a i nte n a nc e . consumption: 150w Model: DMX512/Auto/Sound LED Screen+Button source: OSRAM 132W ( 2R Beam ) & tilt silence 2 phase step motors ◇Color te mperature 8300K, Life span 2000Hs ◇13Color+White. ◇14 angle: 0-3.2 d e g r e e Single p i e c e strobe(0.5-9F.P.S) 16 bit ultra silence 2-phase step motors. ◇Housing: High tempera tur e alloy plastic IP rate: IP20 ◇Weight: 11.3KG ◇Size: 337x231x403 mm Dual color effec t. fixed gob os +w h it e prism with rotation effect. ◇8- fac et ◇O ptic al ◇Focus: lens: high-precision o pt ic al g lue d lens. Linear focus ◇Dimmer: 0-100% linear dimming. Extended features are available on the manual Menu display on the lighting fixture.. 03 04 3 SCHEMATIC LIGHTING COMPONENTS 4 PACKING AND SHIPPING light h e a d cover 4.1 Packing 4.3 Packing The Raptor 2R is packaged with the below accessories: front cover Quantity Unit User manual 1 piece Safety Rope 1 piece Clamp Hook Hanging Bracket 1 piece 1 piece Power lead 1 piece Name arm 4.2 Transport p rote ct io n locks In order to transport and to p rotect the lamp, the b od y has two locks (XY axes e a c h a lock), X-axis has four lock position, Y-axis triple lock, lock locked in the center position in the transport a n d light a vertical position with the arm member. hand le 05 1.Turn off lamp then disconnect the power supply so that the lamp to cool completely before packagi n g /moving for at least 15 minutes. 2.Close the light protection locks, when clean the surface of the light dust 3.Cover the light , hold the fixture using both side aluminum handles to rotate and package into box. 4.A d d lighting accessories after placing the light in box. 5.Up to two crates stacked prohibited upside down . 4.4 Unpacking 1.Open the box a n d bag 2.Hold the fixture handles, lifting a n d carrying away the light from the box .Rotate to stand on base. 3.Before turing on the light,ensure you open the light protecting lock Note: Upo On receipt of lamps, please c heck if there is damage to the fold closure caused by transport, where there is transportation d a m a g e , please d o not use this fixture,an d as soon as possible c o n t a c t R O K H A RV LE D LED display Pan protection lock Tilt protection lock Lock position sketch m a p 06 5 INSTALLATION STANDARDS 6 INSTALLATION Users should ensure th at light a n d installation materials are c hec k ed for regular safety. Unprofessional incorrect installation c a n be dangerous. This Lighting fixture must be operated by professionals. Optimum temperatures for operation are 15-35 Degrees Celcius. When installing, dismantling or servicing the light, do not stand directly beneath the light. We advise that installed lights are serviced at least once a year and safety checks are carried out every 6 months. NOTE: Lights must have at least 50cm in between each light as Below. Your controller connects to the nearest input XLR, then from Output of the fixture connect to the input of the next one and so on. For long throws of DMX cable please connect a signal ender to the last fixtures out connection. 5.1 Installating/Rigging RAPTOR 2R b e a m moving h e a d lights ca n be p l a c e d on the stage or on a stand in any direction. Quick lock system enables The fixture to be installed/removed using the lighting hooks provided . Note: must use two clamps on fixtures, a n d are 1/4 buckle fastening jig, only fully rotated 90 degrees clockwise to lock fastener. 900mm 900mm fift 2 Please use the shielded twisted-pair cable, standard microphone c a bl e c a n not b e reliably controlled long-distance d a t a . 5.2 Fixed equipment 1. Before installing fixtures ensure rigging equipment is not damaged and can bare at least 10 times the total weight of the lig ht, fixtures And accessories. 2. Insert the lock hook fastener into the base mounting holes horizontally, turn 90 degrees to lock. To unlock reverse this p rocedure. 3. Alwaysuse the safety rope when installing/rigging lig hting to mounts or truss points Do not use two separate out connections. If the connecting amplifier connects in series as above. NOTE: Add safety rope to the fixture base when installing, not the handles. 07 3XLR plug 1.Grounding 2.Signal3.Signal+ Terminal plug connect with XLR plug second or third by a 0.25w 120ohm resistor, then connect the resistor into last light's DMX output jack Please use shielded DMX Cable. 08 8 LAMP 7 AC POWER 7.Fuse Power supply a n d fuse configured as shown in the following table. Power :100-240v~ Fuse: 5A main fuse Raptor 2R moving h e a d b e a m light uses an Osram 2R lamp. Single-ended lamp is short arc point light source,and its color temperature is 8000K a nd very stable,CRI>90.Life span is over 2000 hours(according the using situation) Attention 7.2 Power Co nn ec ti o n If the external flexible c a b l e or c o rd of this light is d a m a g e d , the line is up to the manufacturer or its service a g e n t or a similar qualified person to replace, in order to avoid danger. T o c onnec t the power supply personnel must have the ap propri ate qualifications before proceedi ng, you must make sure you are using the po we r supply volta g e matches the voltage identified a n d have overload or leakage protection. Directly c o n n e c t the dev ic e to the po wer supply, d o not c o n n e c t to the silicon box dimming system, otherwise damage to the fixture is possible . Note: 1 Do not install other similar bulbs, as this may cause safety hazards or equipment damage. 2.To reduce the risk of damage to the light, replace the lamp before life is over 3.Do not use a bulb if it appears damaged. 09 8.3 Correction bulbs 8.1 Lamp Description 8.2 Cha ngi ng l a mp 1.Disconnect the power, so that the lamp can cool, the arm of the lamp body lock locked in a horizontal position. 2. Use a Phillips screwdriver to remove three screws which are n a m e d on the cover ABC 3.With the appropriate force pushing down lamp,taking up the bulbwhen its c u p e d ge over the Stainless steel section. 4.Install the bulb in reverse order of the above. Note: when repl acing a light lamp do not t ouch the bulb with bare hands at the ball, avoi d oil stained hands on the ball. 2 When you install the l amp into the hol der gently Put it in, D o not let the bulb hit hard objects around it to prevent damage to the bulbs. The Lamp has been t est ed bef ore s el li ng. If there i s a an error and t he l amp does not s t ri k e please t ry re -s etti ng the li ght or l amp usi ng the Buil t in menu. I F probl ems st ill pers is t t hen pleas e c ont act RO KH ARV LE D . 9 FUNCTION 9.1Gobo wheel Metal gobo wheel with 14 gobos plus open, and 13 colurs plus white. G o bo wheel: Last Gobo Color wheel: Cool color Open/first Gobo red Rosered brown Neon color Fuchsia light yellow Blue Dark yellow Bluegreen green Yellowgreen Brownyellow 10 9 FUNCTION 10 LCD SETTING 10.1 The display presentation 9.2 Colour wheel Lamp The colour wheel is made up of 14 high standard fixed colours, the user ca n easily select their own favorite colour, to create a perfect lighting effect.Use the go b o wheel at same time to transform a colorful go b o effect. Information (Gobo colurs are subject to change without notice) 9.3 Optical lens focus Using t wo high-precision double-screw motor synchronization, adjusting the optical lens to c om pl et e the pattern Focus with definition. 9.4 Prism wheel a n d the prism enlarge Prism wheel with a 8 facets, clockwise a n d counterclockwise rotating with adjustable speed .The Prism wheel c a n c reat e a variety of brilliant lighting effects with color wheel a n d g o b o wheel. Prism wheel through t wo high-precision ultra-fast eight-hea d screw motor spot size adjustment cut prisms,and creates wonderful prism dy namic effects. 9.5 Dimming a n d strobe 0-100% m ec h an ic al dimmer, you c a n instantly switch strobe speed up to 12 times / sec, along with rand om strobe special features. 9.6 Frost Frost is a p i e c e of atomizing lens, a c c o rd i n g to the a ct ual control to c om pl et e the frost ef f ect as your want . 9.7 horizontal and vertical scanning Pan:540°,Tilt 270°,With 16BIT precise positioning capabilities.Pan an d Tilt speed is adjustable. 11 Motors CPU time Motors CPU version Motors CPU t emperature Lamp holder t emperature Pan 10.2Manu O peration DMX Address Pan Positive an d negative Tilt Positive an d negativ e Mode Manual Control On Off Show CPU time Show CPU version Show CPU temperature Signal 0-512 negativ e Positive negativ e Positive DMX512 Auto Master-slave Channel 1 Channel 2 Channel 3 Channel 4 Channel 5 Channel 6 Channel 7 Channel 8 Channel 9 Channel 10 Channel 11 Channel 12 Channel 13 Channel 14 Channel 15 Channel 16 Tilt Gobo Color Reset 0-255 0-255 0-255 0-255 0-255 0-255 0-255 0-255 0-255 0-255 0-255 0-255 0-255 0-255 0-255 0-255 Correction Pan Tilt Gobo Color Focus Dimmer Prism Frost Restore fac tory settings pa n tilt gobo colour dimmer prism frost focus _pan _tilt Correct Error Correct Error Correct Error Correct Error Correct Error Confirmed by 10S 0-255 0-255 0-255 0-255 0-255 0-255 0-255 0-255 0-255 0-255 12 11 DMX512 Channels 12 Channel 1:Pan 0-255 0-4 Open Channel 2:Pan fine Channel 3:Tilt 0-255 0-255 5-9 Gobo1 Channel 4:Pan fine Channel 5:Pan&tilt speed adjust 0-255 0-255: Speed from fast to slow. Channel 10: Prism 0-127 No prism effect Channel 11: Prism rotation 10-91 Prism clockwise rotation 92-173 Prism counterclockwise rotation 0-6: White / Open 15-19 Gobo 3 20-24 Gobo 4 25-29 Gobo 5 30-34 Gobo 6 Chanel12: Fucos 174-255 Prism rotating back and forth 0-255: Focus Adjust 7-13: White / Red 35-39 Gobo 7 Channel13: Frost 0-255: Frost Adjust 14-20: Red 21-27: Red / Pink 28-34 Pink 35-41 Pink / Fuschia 42-48 Fuschia 40-44 Gobo 8 45-49 Gobo 9 Channel 14: Auto mode 0-127 DMX control 50-54 Gobo 10 55-59 Gobo 11 60-64 Gobo 12 Channel 15: Reset 50-70 Pan reset 71-90 Tilt reset 91-255 System reset 65-69 Gobo 13 70-74 Gobo 14 Channel 16: Lamp function 40 -100 Lamp OFF 100-255 Lamp ON 49-55 Fuschia / Light Yellow 55-61 Light Yellow 62-68 Light Yellow/ Dark Yellow 69-75 Dark Yellow Channels 6: Color 10-14 Gobo 2 Channels7: Gobo 75-83 Gobo 14 Shake 84-92 Gobo13 Shake 76-82 Dark Yellow / Bronze 83-89 Bronze 90-96 Bronze / Light Green 93-101 Gobo 12 Shake 102-110 Gobo 11 Shake 111-119 Gobo 10 Shake 97-103 Light Green 104-110 Light Green / Green 120-128 Gobo 9 Shake 129-137 Gobo 8 Shake 111-117 Green 118-124 Green / Dark Green 125-131 Dark Green 138-146 Gobo 7 Shake 132-138 Dark Green / Blue 165-173 Gobo 4 Shake 139-145 Blue 174-182 Gobo 3 Shake 146-152 Blue / Neon 153-159 Neon 182-190 Gobo 2 Shake 191-199 Gobo 1 Shake 160-166 Neon / Brown 167-173 Brown 174-180 Brown / Cool Colour 200-225 Gobo clockwise rotation 226-255 Gobo counterclockwise rotation 0-9 Closed Shutter 181-187 Cool Colour 188-194 Cool color / white 195-225 Colour Clockwise 226-255 Colour Anticlockwise 147-155 Gobo 6 Shake 156-164 Gobo 5 Shake Channel 8: Strobe 10-127 Strobe from slow to fast 128-249 Random slow to fast 250-255 Open Channel 9: Dimmer 0 -255: Open shutter 128-255 With prism effect 0-9 Prism stationary 128-255 DMX auto control FAILURE SCOREBOARD AND SOLUTIONS Listed below is a c om m on a p pro ac h in the operation of a few c om m on problems. ◇F ault A: The lamp is not working, the bulb is not lit, the fan does not work Solving 1: Check the power supply or the fuse is burned Solve 2: The main power c onnect or on the voltage det ect or ◇F ault B: c on nec t control units, lighting does not respond Solving 1: After c onnect ing control units, lighting should b e working. If it is not working properly, c heck the signal c a bl e plugs a n d wires are c o n n e c t ed correctly. Solve 2: If the lamp is lit display, but the channel does not respond, c heck the address code is set correctly an d DMX output voltage polarity. Solve 3: DMX signal problems if your lighting is off, c heck the input terminal a nd the circuit b o a r d Solve 4: Please c h an ge another one DMX controller Solve 5: Check whether the signal c ab l e near high voltage power lines caused DMX display b o a r d inside the wire damage. ◇F ault C: A channel is not working Solving 1: stepper motor may b e d a m a g e d , or the line c onnect i ng the mot herboard burned out Solve 2: IC driver b o a r d on the motherboard may b e damaged 13 CLEAN LIGHTS Please regularly clean the outside of the optical lens removing any dust. Please use glass cleaning solution on the lens. When cleaning the lighting please ensure to check for damage to the fixture. Do not put liquid inside the light or near the light. This lighting fixture must be serviced and cleaned by a qualified person only. Any damaged caused during cleaning and servicing is not covered under warranty. Enjoy your ROKHARV LED product. 14 RAPTOR 2R Photometrics data PHOTOMETRICS DIAGRAM 210000 52000 5 34 10 70 23000 15 104 12000 50 140 14