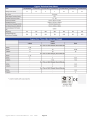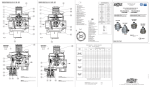
1
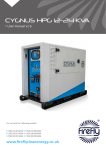
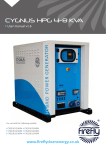
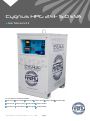
Cygnus HPG 2.4- 5.0 kVA
User Manual v3.2
For use with the following models:
CYG/2.4/6 CYG/2.4/6/S CYG/2.4/12
CYG/2.4/12/S
CYG/2.4/18
CYG/3.5/12
CYG/3.5/12/S
CYG/3.5/18
CYG/3.5/18/S
CYG/5.0/12
CYG/5.0/12/S
CYG/5.0/18
CYG/5.0/18/S
Cygnus HPG 2.4—5 kVA User Manual - v3.2
2014
Page 1
CYG/2.4/18/S
Table of Contents
1.
Introduction .................................................................................................................................................. 4
1.1 Foreword ................................................................................................................................................. 4
1.2 Conventions ............................................................................................................................................ 4
1.2.1 Terminology ...................................................................................................................................... 4
1.2.2 Warnings .......................................................................................................................................... 4
1.3 Standards & Regulations ......................................................................................................................... 5
1.4 Disposal & Recycling ............................................................................................................................... 5
1.5 Firefly Solar Contact Details .................................................................................................................... 5
1.6 About Firefly Solar ................................................................................................................................... 5
2.
Getting Started ............................................................................................................................................. 6
2.1 Storage .................................................................................................................................................... 6
2.2 Transportation, Loading/Unloading & Positioning.................................................................................. 6
2.2.1 Transportation .................................................................................................................................. 6
2.2.2 Loading/Unloading ........................................................................................................................... 6
2.2.3 Positioning ........................................................................................................................................ 6
2.3 Understanding the Cygnus Control Panel ............................................................................................... 7
2.3.1 Diagram of the Cygnus Control Panel ............................................................................................... 7
2.3.2 Explanation of the Cygnus Control Panel ......................................................................................... 7
2.4 Connecting the Cygnus Portable Solar Generator .................................................................................. 8
2.4.1 Earth Attachment: Installing the Optional Earth Rod ....................................................................... 8
2.4.2 Connect the Inputs ........................................................................................................................... 8
2.4.3 Connect the Output Power Cables ................................................................................................... 9
3.
General Operation ...................................................................................................................................... 10
3.1 Turning the Power On ........................................................................................................................... 10
3.2 Monitoring the Power ........................................................................................................................... 11
3.3 Emergency Stop Button ........................................................................................................................ 12
3.4 Turning Off Cygnus ................................................................................................................................ 12
3.5 Disconnecting Cygnus ........................................................................................................................... 12
3.6 Understanding the RCC-03 .................................................................................................................... 13
3.6.1 Explanation of the Information Shown on the RCC-03................................................................... 13
3.7 Charging Methods ................................................................................................................................. 14
3.7.1 Charging with Firefly’s Portable Folding Solar Array (Fold-Array) .................................................. 14
3.7.1.1 Connecting ............................................................................................................................... 14
3.7.1.2 Disconnecting........................................................................................................................... 14
3.7.2 Charging with Kinectrics Equipment .............................................................................................. 15
3.7.2.1 Connecting ............................................................................................................................... 15
3.7.2.2 Disconnecting........................................................................................................................... 15
3.7.3 Charging with AC Grid Supply or Secondary Power System ........................................................... 15
4.
Connecting Multiple Cygnus Portable Solar Generators ........................................................................ 16
4.1 Introduction ....................................................................................................................................... 16
4.2 Connecting Two Units in Parallel ....................................................................................................... 16
4.3 Turning Off the Units ......................................................................................................................... 16
4.4 Disconnecting Data Interlink Cables .................................................................................................. 16
Cygnus HPG 2.4—5 kVA User Manual - v3.2
2014
Page 2
Table of Contents (Continued)
5.
Care and Maintenance.......................................................................................................................... 17
5.1 General Cleaning ................................................................................................................................... 17
5.2 Washing Cygnus with a High Pressure Cleaner or Hosepipe ................................................................ 17
5.3 Paintwork Repair ................................................................................................................................... 17
5.4 Testing ................................................................................................................................................... 17
5.5 Caring for the Battery Bank ................................................................................................................... 17
6.
Appendices ........................................................................................................................................... 18
6.1 Appendix 1 - Additional RCC-03 Settings............................................................................................... 18
6.1.1 Boosting the Voltage Over Distance ............................................................................................... 18
6.1.2 Setting the RCC-03 Language.......................................................................................................... 18
6.2 Appendix 2 - Auxiliary Connector (Fuel Powered Generator Control) .................................................. 18
6.2.1 Description of the Auxiliary Cable Accessory ................................................................................. 18
6.3 Appendix 3 - 24 V DC SPEC Pak Input/Output....................................................................................... 19
6.3.1 Connecting ..................................................................................................................................... 19
6.3.2 Disconnecting ................................................................................................................................. 19
6.4 Appendix 4 - Example Configurations ................................................................................................... 18
6.4.1 On or Off Grid UPS .......................................................................................................................... 20
6.4.2 Single Cygnus Portable Solar Generator ......................................................................................... 21
6.4.3 Two Unit Parallel Cygnus System ................................................................................................... 22
6.4.4 Kinectrics PedGen Connected to Single Cygnus ............................................................................. 23
6.5 Appendix 5 - Troubleshooting Guide .................................................................................................... 24
6.6 Appendix 6 - Technical Data .................................................................................................................. 25
6.7 Appendix 7 - Further Reading ............................................................................................................... 27
Figures
Fig. 1 - Cygnus Control Panel Component Reference ..................................................................................... 7
Fig. 2 - RCC03, Unit On.................................................................................................................................. 10
Fig. 3 - RCC03, Battery Monitor .................................................................................................................... 11
Fig. 4 - The RCC 03 ........................................................................................................................................ 13
Fig. 5 - 24V 80 A DC SPEC Pak Connector ..................................................................................................... 19
Fig. 6 - Example Showing a Single Unit Connected to an AC Feed and Powering Consumers ..................... 20
Fig. 7 - Example Showing Arrays Directly Connected to the Unit’s Solar Inputs .......................................... 21
Fig. 8 - Example Showing the use of a Junction Box to Allow The Use of More Than Two Arrays ............... 21
Fig. 9 - Example Showing the use of Two Units to Provide a Higher Output ................................................ 22
Fig. 10 - Example Showing the use of Two Kinectrics units to Charge Cygnus ............................................. 23
Fig. 11 - Example Showing the use of Eight Kinectrics Units to Charge Cygnus .......................................... 23
Cygnus HPG 2.4—5 kVA User Manual - v3.2
2014
Page 3
1. Introduction
1.1
Foreword
Firefly takes this opportunity to congratulate you on the purchase of your new Cygnus Hybrid Power Generator.
Designed and manufactured within the United Kingdom using only the finest European sourced electrical components,
your new Cygnus Hybrid Power Generator offers sustainable power generation with the reliability that you demand.
The purpose of this manual is to introduce you to the Cygnus Hybrid Power Generator and provide you with a guide to
the processes of setting up and operating your new product. This manual describes how your Cygnus Hybrid Power Generator works, will help you with fault finding and examines what each component is doing and why.
1.2
Conventions
Throughout this user manual the following symbols are used:
WARNING
This symbol warns of the presence of a dangerous voltage which could cause harm to the operator.
This symbol indicates the potential of damage to the unit or connected devices.
This symbol indicates important or useful information.
1.2.1 Terminology
The following terms are used in this manual to provide greater clarity:
Firefly Solar Generators Ltd. will be referred to as “The manufacturer”.
The Cygnus Hybrid Power Generator will be referred to as ‘Cygnus’ or ‘Unit’.
Any items that consume power will be referred to as ‘Consumers’.
State of Charge of the battery bank will be referred to as ‘SOC’.
1.2.2 Warnings
This user manual is an important part of the Cygnus Hybrid Power Generator. It must be made
available to all operators and kept close to the unit so that it can be referred to at any time.
WARNING
When the unit is operating it generates potentially lethal voltages. Work must only be performed on
the unit by the manufacturer or a qualified service engineer approved by the manufacturer.
Under no circumstances should operators open the unit’s enclosure.
All items connected to the unit including distribution cables and boxes should be regularly checked
and adhere to the same local regulations and standards as a regular grid-tied mains installation.
Cygnus HPG 2.4—5 kVA User Manual - v3.2
2014
Page 4
1.3
Standards & Regulations
The Cygnus Hybrid Power Generator conforms to the following standards and regulations:
Manufactured in compliance with ISO 9001:2008
LVD 2006/95/EC: EN 50178:1997, EN 62040-1:2008
EMC Directive 2004/108/EC: EN 61000-6-2:2005,
EN 61000-6-3:2007, EN 61000-3-2:2006,
EN 61000-3-12:2005, EN 62040-2:2006
IP23
WEEE Directive
1.4
Disposal & Recycling
The Cygnus HPG comprises of components that must be disposed of responsibly. For the sake of the environment many
of the components within the unit can be recycled or reused. Firefly will ensure the safe decommissioning and recycling
of the unit at no charge if the unit is returned to the manufacturer. Otherwise, please contact the manufacturer for
more information on safe and proper decommissioning of your Cygnus Hybrid Power Generator.
1.5
Firefly Contact Details
Firefly Solar Generators Ltd
Unit 20 Cliffe Industrial Estate
South Street
Lewes
East Sussex
BN8 6JL
United Kingdom
1.6
Tel: +44 (0)1273 40 95 95
Fax: +44 (0)1273 40 95 96
E-mail: [email protected]
Web: www.fireflysolar.net
About Firefly
Firefly is the market leading expert in the design and manufacture of off-grid, portable Hybrid Power Solutions for temporary and permanent power applications. Firefly has built its highly regarded reputation within the industry, based on
excellent customer service and product reliability. Founded in 2007 the Company continues to develop innovative solutions to cater to the needs of its ever growing customer sectors.
The Company offers green energy products and services that meet the needs of environmentally concerned individuals
and organisations internationally, that are looking to reduce their carbon emissions caused by the use of fossil fuels and
diesel powered equipment. The unique range of renewable technology solutions produce zero emissions, are truly silent
running and eliminate the need for fuel.
The systems are manufactured in the UK, under an ISO 9001:2008 approved quality control system. Component suppliers are carefully selected to ensure high levels of reliability and performance of the final product. Installation and stringent testing is carried out to ensure compliance with EU and local legislation where applicable.
Cygnus HPG 2.4—5 kVA User Manual - v3.2
2014
Page 5
2. Getting Started
2.1
2.2
Storage
1.
Cygnus is designed to be used and stored outside. However, to prevent unnecessary weathering it is recommended that the unit is stored inside when possible.
2.
It is recommended that the battery bank is charged regularly while in storage. Refer to Chapter 4, Section 5 for
further information.
3.
Cygnus should be switched off when in storage and not being charged to prevent unnecessary discharge of the
battery bank.
Transportation, Loading/Unloading & Positioning
2.2.1 Transportation
1.
2.
3.
Cygnus can be transported using a suitable trailer, light or heavy goods vehicle with adequate available
payload. Check the relevant transportation documentation for suitability.
The gross weight of the unit can be found on the rating plate positioned on the left hand side of
the unit. Please note that different models have different weights.
It is recommended that the unit is secured using suitable straps when in transit to prevent it from moving.
Always check the rating plate to ascertain the gross weight of the specific unit in question.
The unit must remain upright at all times.
2.2.2 Loading/Unloading
1.
Cygnus must be loaded or unloaded using the correct equipment operated by suitably trained personnel.
2.
Using the lifting ring; Cygnus can be lifted onto or off from transportation. The lifting ring is suitable for lifting
all models of Cygnus regardless of the unit’s gross weight.
3.
Using the fork pockets; Cygnus can be loaded or unloaded with a suitable fork-lift truck.
Refer to the fork-lift truck operation manual for lifting capacity and manufacturer’s operating instructions.
2.2.3 Positioning
1.
The unit must be positioned upright on a flat, solid surface. Ensure that the unit is not at risk from being submersed in water above the fork pockets.
2.
The unit should be positioned as close as possible to the chosen charging system (e.g. fuel powered generator,
solar array, Kinectrics equipment, wind turbine) and close to its earth point.
Cygnus HPG 2.4—5 kVA User Manual - v3.2
2014
Page 6
2.3
Understanding the Cygnus Control Panel
2.3.1 Diagram of the Cygnus Control Panel
Fig. 1 - Cygnus Control Panel Component Reference
2.3.2 Explanation of the Cygnus Control Panel
A1 Solar Array 1 Isolator Switch– Switch off to isolate the Solar Array 1 circuit, on to enable it
A2 Solar Array 2 Isolator Switch– Switch off to isolate the Solar Array 2 circuit, on to enable it
A3 Solar Array 1 Inputs– 24 V MC3 inputs for Solar Array 1
A4 Solar Array 2 Inputs– 24 V MC3 inputs for Solar Array 2
B1
240 V AC Parallel Out MCB– Overload protection for parallel AC output (Miniature Circuit Breaker)
B2
240 V AC Out MCB– Overload protection for main AC output (Miniature Circuit Breaker)
B3
240 V AC Out RCD– Earth leakage protection for main AC output (Residual Current Device)
C1
RCC-03– Displays real-time information on battery bank, inputs and outputs, also allows system adjustments
C2
Open / Terminate Switch– Used when multiple Cygnus Portable Solar Generators are linked together
C3
Power On / Off Switch– Enable or disable AC output
C4
Earth Connection– For earth rod (ground) connection
C5
Emergency Stop Button– Disconnects all circuits in an emergency
D1 Data 1 Connector– For connecting data cable in from another Cygnus when multiple units are used
D2 Data 2 Connector– For connecting data cable out to another Cygnus when multiple units are used
D3 Auxiliary Connector– Allows connection to auxiliary equipment, for example controlling an attached fuel powered generator
E1
240V AC Output– Output for connection to junction box when using two units in parallel for higher output & longer runtime
E2
240V AC Input– For charging the unit from the national grid or secondary power system
E3
240V AC Output– Main output for powering consumers
F1
24V DC SPEC Pak Input / Output– For charging from wind or Kinectrics devices. Also gives 2 x 24V DC 40 A output
Cygnus HPG 2.4—5 kVA User Manual - v3.2
2014
Page 7
2.4
Connecting the Cygnus Portable Solar Generator
2.4.1 Earth attachment: Installing the Optional Earth Rod:
1.
Find a suitable place to drive the earth rod into the ground. The earth rod should be driven down at least
600 mm into the ground using a mallet and placed as near to the unit as possible.
2.
Check the earth cable is securely clamped to the rod. The clamp may need retightening after driving the earth
rod down.
3.
On the control panel, locate the earth bolt (Fig. 1, C4) undo the earth bolt wing nut and remove one of the
washers. Then slide the ring terminal at the end of the earth cable onto the earth bolt. Replace the washer and
tighten the wing nut.
2.4.2 Connect the Inputs:
WARNING
A protective earth must be connected to the unit in compliance with applicable local standards and
regulations. This can be done either by connecting to a suitable existing electrical earth, or by using an
optional earth rod supplied by the manufacturer.
There are a number of means available to charge the unit. Instructions on how to connect charging inputs (e.g. solar PV,
wind turbines, Kinectrics equipment) are available as appendices to this manual or included with those products at the
point of purchase. All user manuals can also be downloaded from the manufacturer’s website at www.fireflysolar.net
It is also possible to operate the unit only using the internal battery bank, without external inputs connected.
WARNING
Care must be taken to ensure that the correct connections are made to avoid the risk of electrocution
or possible damage to the unit’s internal components.
WARNING
Ensure that the cumulative power of connected consumers does not exceed the maximum power output of your unit– refer to the rating plate to ascertain the unit’s maximum power output.
WARNING
All connected consumers must be fit for purpose– refer to their rating plates and manuals to ascertain
the required input.
When Cygnus is connected to an external AC supply, the output voltage is transferred from its input.
In this case the unit will not modify the AC output: Consumers will be supplied with an output
identical to the source.
Cygnus HPG 2.4—5 kVA User Manual - v3.2
2014
Page 8
2.4.3 Connect the Output Power Cables:
Cygnus is supplied with a 32 A industrial CEE Form socket for the connection of AC power out to consumers requiring
(Fig. 1, E2).
1.
Before any power connections are made, ensure that both the RCD (Fig. 1, B3) and MCB (Fig. 1, B2) are switched
Off.
2.
Plug in the electrical consumers to the AC Out (Fig. 1, E3) socket on the control panel using a 32 A CEE Form
industrial plug.
Cygnus HPG 2.4—5 kVA User Manual - v3.2
2014
Page 9
3. General Operation
3.1
Turning the Power On
Once all the above connections are complete, the unit is ready to be switched on.
1.
Ensure that the emergency stop button is not engaged by rotating clockwise.
2.
Switch on the MCB and RCD switches (Fig. 1, B2 & B3).
3.
Switch on the unit using the Power On/Off Switch (Fig. 1, C3).
4.
As the unit is switched on, a loud beep will be heard and the RCC-03 (Fig. 1, C1) backlight will illuminate.
5.
The unit is now on.
6.
The following should be displayed:
Fig. 2 - RCC-03, Unit on
7.
The unit is now on and ready to supply power to connected consumers.
Cygnus HPG 2.4—5 kVA User Manual - v3.2
2014
Page 10
3.2
Monitoring the Power
Cygnus’ control panel includes a battery monitoring system which displays the state of charge and voltage of its battery bank.
Monitoring the state of charge (SoC) of the battery bank allows the user to ascertain the remaining battery capacity.
The status of the unit’s internal battery bank is monitored using the RCC 03’s controls. To access the controls
1.
Locate the RCC-03 on the control panel (Fig. 1, C1)
2.
The RCC 03 will initially be in standby mode. Pressing any button will illuminate the display and ready it for input
3.
Press the down arrow once to access the main Battery Monitor screen
4.
See "Fig. 8 - The RCC 03 Battery Monitor Screen" on page 20 for a description of the available information.
Fig. 3 - RCC-03, Battery Monitor
1
SoC quick overview
2
Arrows indicate direction of current:
Up = charging
Down = discharging
3
Voltage of internal battery bank
4
During Discharge: Power being consumed
During charging: Power being used to charge the battery bank
5
SoC Percentage value
6
During charge: Estimated time to 100% SoC
During discharge: Estimated runtime at present power draw
To ensure the longevity of the battery bank, it is recommended that the SoC does not reach any lower
than 30%.
Cygnus HPG 2.4—5 kVA User Manual - v3.2
2014
Page 11
3.3
Emergency Stop Button
If there is an emergency and it is necessary to stop the power from and all functions of the unit, :
3.4
1.
Depress the Emergency Stop Button (Fig. 1, C5) on the Control Panel.
2.
The unit will then shut down. Cygnus can not be switched on again until the Emergency Stop Button is
released by twisting the red part of the button clockwise.
3.
Follow the instructions in Section 3.1 to switch the power back on.
Turning Off Cygnus
Instructions for fully shutting down the unit:
3.5
1.
Turn off the MCB and RCD switches (Fig. 1, B2 & B3).
2.
Press the On/Off Button (Fig. 1, C3) on the control panel.
3.
The RCC-03 (Fig. 1, C1) screen will then turn off.
4.
Switch off all solar isolator switches (Fig. 1, A1 & A2)
Disconnecting Cygnus
1.
Ensure that the steps in Section 4 “Turning Off Cygnus” have been followed.
2.
Disconnect the input cable(s).
3.
Disconnect the output cable(s)
4.
Remove the earth cable by unscrewing the wing nut and replace the washer and wing nut onto the earth bolt.
Cygnus HPG 2.4—5 kVA User Manual - v3.2
2014
Page 12
3.6 Understanding the RCC-03
The RCC-03 gives a real-time indication of the power draw of your consumers, the AC charge facility, DC volts and Amps being
discharged and the present state of the system as a whole.
The following diagram indicates the information available from the RCC-03:
Fig. 4 - The RCC-03, main display
3.6.1 Explanation of the information shown on the RCC-03:
A1
AC Input Volts– indicates the voltage being received by the unit from the AC source. This value is automatically transferred to
the AC output. Any excess current not being used by the connected consumers is used to charge the battery bank.
A2
AC Input Amps- Indicates the current in Amps being drawn from the AC source by Cygnus.
A3
AC Input Connection- Indication of whether the AC source is acceptable for Cygnus to use. When the switch symbol is shown
closed, the current is flowing to the AC Output and/ or charging the battery bank.
B1
Aux Relay 1– Factory set for use with auto control of an attached fuel powered generator. A suitable cable is available from
the manufacturer as an accessory.
B2
Not used in the standard models. The relays can activate external alarms and automatic start relays for secondary power
systems and can be added as an optional extra. Please contact the manufacturer for further information.
C1
AC Output Volts- Indicates voltage being supplied at the AC output.
C2
AC Output Amps- Indicates the current in Amps being drawn from the AC output by the connected consumers.
D1
Standby ON/OFF- Indicates whether Cygnus is in standby mode.
E1
Battery Bank Volts- Indicates the real-time voltage of the battery bank.
E2
Battery Bank Amps- Indicates the current in Amps being drawn from the battery bank.
F1
Phase Indicator- Indicates the phase of the unit. Used when multiple units are connected in series (3 phase).
F2
Cygnus Number- Identifies the unit’s number. Used for series (3 phase) or parallel linked systems.
G1
Battery Bank Connection- Indicates the battery bank usage i.e. charging or discharging.
Cygnus HPG 2.4—5 kVA User Manual - v3.2
2014
Page 13
3.7
Charging Methods
Cygnus can be charged using a number of methods including Firefly’s portable folding solar arrays (Fold-Array), Firefly’s range
of Kinectrics equipment and an external AC grid supply or secondary power system. In addition to these charging methods it is
also possible to charge Cygnus using wind turbines or alternative solar arrays. Contact the manufacturer for a list of approved
products and further details on connection.
3.7.1 Charging with Firefly’s Portable Folding Solar Array (Fold-Array)
3.7.1.1 Connecting
Up to five 540 Wp Firefly Portable Solar Folding Arrays can be connected to one unit using suitable
parallel junction boxes supplied by the manufacturer. They must not be connected in series.
See Appendix 3 (6.3.2), for an example of connecting more than two arrays to a unit.
1.
Once the arrays have been positioned suitably, any junction boxes connected and the extension cables safely run
back to Cygnus, the arrays can be connected to the unit.
2.
Before connecting the solar extension cables to Cygnus, ensure that the Solar Isolator Switches (Fig. 1, A1 & A2)
are turned off.
3.
Connect your first array to the Solar Array 1 connectors (Fig. 1, A3) on the control panel. If using a Fold Array parallel junction box to connect multiple arrays, connect its output to the Solar Array 1 connectors.
4.
If a second array is to be used, connect this to the Solar Array 2 connectors (Fig. 1, A4) on the control panel. If
using a second Fold Array parallel junction box to connect multiple arrays, connect its output to the Solar Array 2
connectors.
5.
Ensure that the connectors are fully engaged to avoid the risk of them pulling out easily and possible
electrocution.
It is possible to connect alternate solar arrays up to a combined output of 2.5 kWp and 145V.
Contact the manufacturer before connecting arrays from an alternate supplier.
6.
Once the Solar Connectors are all safely connected, switch on the solar isolator switches (Fig. 1, A1 & A2) on the
left hand side of the control panel.
7.
A gradual rise in voltage should be displayed on the battery monitor. It may take up to 2 minutes before any significant change as the power regulation circuits optimise their use of the power from the sun’s rays. (This is dependant on the panels receiving sufficient light).
3.7.1.2 Disconnecting
1.
To disconnect the solar array from Cygnus, switch off the relevant Solar Isolator switch(es) (Fig. 1, A1/A2) on the
control panel.
2.
Pull the Solar extension cables out from the control panel connectors (Fig. 1, A3/A4).
Cygnus HPG 2.4—5 kVA User Manual - v3.2
2014
Page 14
3.7.2 Charging with Kinectrics Equipment
3.7.2.1 Connecting
1.
The equipment requires the use of a SPEC Pak adapter for connecting to the DC input socket on the unit’s control
panel (Fig. 1, F1).
2.
When connecting one to two Kinectrics units a SPEC Pak to 2 x 50 A Anderson connectors adapter can be used to
connect the Kinectrics equipment directly to a Cygnus with suitable extension cables. These are available from
the manufacturer. Refer to Appendix 3 (6.3.5) for an example setup.
3.
Up to eight Kinectrics units can be connected to a single unit. A junction box is required when connecting between three and four Kinectrics units.
4.
Two junction boxes are required when connecting between five and eight Kinectrics units.
5.
Once the Kinectrics equipment has been positioned suitably, the extension cables connected and safely run back
to Cygnus, the equipment can be connected.
6.
Connect the SPEC Pak connector to the unit. Refer to Appendix 2 (6.2.1) for further information on using the
SPEC Pak connector.
3.7.2.2 Disconnecting
1.
Remove the SPEC Pak connector from the unit. Refer to Appendix 2 (6.2.2) for further information on using the
SPEC Pak connector.
2.
Disconnect the remaining cables and any junction boxes.
3.7.3 Charging with AC Grid Supply or Secondary Power System
The unit can be charged via a 220 - 240V AC supply from either the AC grid supply or a secondary power system. To connect an AC supply to Cygnus:
1.
Connect the 220 - 240V AC supply lead to the AC In socket (Fig. 1, E2) on the control panel.
2.
The RCC-03 (Fig. 1, C1) will display a message to confirm that the AC supply has been connected successfully.
3.
Press SET to clear the message.
4.
The RCC-03 input voltage (Fig. 3, A1) will display the external voltage being applied to the charge facility of the
unit.
5.
The unit charges its battery bank automatically, regulating the charge cycle and ensuring that the
batteries are not over charged.
6.
Once the unit is fully charged the RCC-03 battery monitor (Fig. 3, 5) will indicate that it is 100% full.
WARNING
Cygnus requires a minimum 13 A supply for AC charging. Ensure that your power supply and any interconnecting cables and fuses have this minimum available current rating.
It is recommended that the unit charges for a further 2 hours once it has reached 100%. This allows
the battery bank to fully absorb the charge.
Cygnus HPG 2.4—5 kVA User Manual - v3.2
2014
Page 15
4.
Connecting Multiple Cygnus Portable Solar Generators
4.1 Introduction
It is possible to connect multiple Cygnus units together using RJ45 data interlink cables and AC junction boxes. There are two
possible configurations:
Cygnus in Parallel
Two units can be connected in parallel, doubling the peak output and battery bank capacity whilst maintaining a single phase
230 V AC output.
Connecting multiple units will multiply the current available at the output. For example: connecting 2 CYG/5.0/18 units with a
peak capacity of 5.0 kVA provides a total system output of 10.0 kVA.
4.2
Connecting Two Units in Parallel
A parallel junction box (available separately from the manufacturer) is required to connect the AC outputs of each unit.
1.
Two units may be used together.
2.
Turn off the power on both units using the Power On/Off switch (Fig. 1, C3).
3.
Starting with Cygnus 1, unscrew the protective cover from D2 (Fig. 1, D2) on the control panel and connect the
data interlink cable. Ensure that as the connector is plugged in, the connector’s retaining ring is screwed clockwise into the receptacle on the panel connector. This ensures that water integrity is maintained.
4.
Run a Neutrick extension cable from the Parallel Output (Fig. 1, E1) of each Cygnus into the corresponding numbered inlet of the parallel junction box.
5.
Run a 32 A cable from output connector of the junction box to your designated power distribution unit or directly
to your consumer(s).
6.
Switch on the Parallel MCBs (Fig. 1, B1) on both units.
7.
Turn on Cygnus 1 using the Power On/Off Switch (Fig. 1, C4). You will hear a long ‘beep’ and the panel backlight
will illuminate. Cygnus 1 should be left in Standby Mode at this point.
8.
Turn on the Power On/Off Switch (Fig. 1, C4) on Cygnus 2 and if used, Cygnus 3 so that all 3 are in Standby
Mode.
9.
On the RCC-03 (Fig. 1, C2) of Cygnus 1. Press Up, then Down to access the Parallel display.
10.
Turn on Cygnus 1 using its RCC-03 (Fig. 1, C2). All connected units should turn on simultaneously.
11.
If Parallel display is not enabled: push up, then down to retry.
12.
Once in parallel mode, ensure all junction box red indicators are illuminated. This shows that all units are on and
operating in parallel mode. Check that all the RCDs and MCBs (Fig. 1, B1 & B2) are still in the ‘On’ position and
none of them have tripped out.
4.3 Turning Off The Units
1.
Using the RCC-03 (Fig. 1, C1) of Cygnus 1. Press Up, then Down to wake up the control panel.
2.
Press the Esc button to choose to power off the screen “Turn off the system?” will be displayed, press the Set
button to confirm.
4.4 Disconnecting Data Interlink Cables:
1.
Ensure that all units are turned off before any data disconnections are made.
2.
Unscrew the data interlink cable(s) retaining rings anti-clockwise and replace the weatherproofing caps onto
the unit by screwing them back on clockwise.
Cygnus HPG 2.4—5 kVA User Manual - v3.2
2014
Page 16
5. Care and Maintenance
5.1
General cleaning
Minor cleaning should be performed using a damp microfiber cloth. Detergents or chemicals should not be used.
5.2
Washing Cygnus with a High Pressure Cleaner or Hosepipe
When cleaning Cygnus with a high pressure cleaner or hosepipe, always follow the operating instructions for the equipment. Ensure that the stream of water is always directed downwards at an angle of no more than 60°. This is to prevent
unwanted water ingress to the unit via the airflow vents which could cause electrical failure. If you believe that water
has entered the unit, under no circumstances should the unit be powered on. Contact the manufacturer before use.
The control panel should only be cleaned with a damp microfibre cloth.
Ensure that the system is switched off before cleaning.
WARNING
Under no circumstances should the control panel be cleaned using a pressure washer or hosepipe.
Detergents must not be used.
WARNING
Under no circumstances should the unit be used to power any cleaning equipment being used to clean
the unit.
5.3 - Paintwork Repair
Minor damage to the paint such as scratches or stone chips should be touched up without delay before the metal starts
to corrode. Suitable touch up brushes or sprays for Cygnus can be obtained from the manufacturer.
5.4 - Testing
It is recommend that the unit should be tested annually for safety by a qualified electrician.
Local regulations may require more frequent testing. Please refer to local regulations for further details.
If Cygnus does not pass the relevant tests, do not use or open the unit. It must only be opened by a qualified service
engineer.
It is recommended that a full service is performed every two years in order to ascertain the condition of your system.
Please contact the manufacturer for further information.
WARNING
Opening the unit may cause electrocution
Opening the unit will invalidate the warranty
5.5
Caring for the Battery Bank
Cygnus uses sealed, maintenance free batteries. The only routine care necessary is to ensure that when not in use, the
unit is charged at least once a month to keep the battery bank topped up.
Leaving the batteries in a state of discharge for extended periods will seriously affect their performance.
Cygnus HPG 2.4—5 kVA User Manual - v3.2
2014
Page 17
6.1
Appendix 1 - Additional RCC-03 Settings
The RCC-03 provides control over a number of Cygnus’ settings. Two useful settings including boosting the voltage over distance and the language used in the display.
6.1.1 Boosting the Voltage Over Distance
If the cable run between the unit and the AC consumers is more than 50m, a drop in voltage can occur. Failure to boost
the voltage can result in the consumers not receiving the required voltage.
To boost the voltage:
1.
Use the RCC-03 arrow keys (Fig. 1, C1) to navigate down to ‘Basic Settings’.
2.
Press SET to enter this sub-menu.
3.
Use the arrow keys to navigate down to ‘AC Voltage’. Press SET to adjust the setting.
4.
Use the arrow keys to input the required voltage. A maximum of 245 V is available. Press SET to accept.
5.
Press ESC to navigate back to the main menu and the arrow keys to return to the main screen.
When using the unit with cable runs of less than 50m after boosting the voltage, be sure to return the
unit to its default voltage setting. Repeat the above steps and return the voltage to 230 V in step 4.
6.1.2 Setting the RCC-03 Language
6.2
1.
Press the down RCC-03 arrow key (Fig. 1, C1) to navigate to ‘Remote Controller Settings’.
2.
Press the SET key to enter the Remote Control Settings.
3.
The language choices menu is displayed.
4.
Press the SET key to modify the current language.
5.
Use the upwards and downwards arrow keys to select the required language.
6.
Confirm the selection by means of the SET key (OK).
7.
Press ESC to leave the settings for the remote control.
Appendix 2 - Auxiliary Connector (Fuel Powered Generator Control)
Auxiliary connections are provided which allows the automatic control of a fuel powered generator. These
allow Cygnus HPG to control the start up and shut down of the attached generator under preprogrammed conditions using the RCC-03.
6.2.1 Description of the Auxiliary Cable Accessory
An auxiliary connection is provided on the unit’s control panel. This provides 2 auxiliary channels which
can be programmed for various functions. Channel 1 is programmed at the factory for the remote control
of a fuel powered generator. Contact the manufacturer for further information on reprogramming channel one or for instructions on using channel 2.
An auxiliary cable is available from the manufacturer as an accessory. The following connections are used
for channel 1:
Wire Colour
Connection
Green
Normally Open
Yellow
Common
Cygnus HPG 2.4—5 kVA User Manual - v3.2
2014
Page 18
6.3
Appendix 3 - 24V DC SPEC Pak Input/Output
The Spec Pak socket (Fig. 1, F1) is a 24 V 2 x 40A input and output connector.
The socket can be used to connect Kinectrics equipment (refer to Appendix 3, (6.3.5)) or a wind turbine for charging the
unit. Only Firefly Solar approved equipment should be plugged into this connector. Contact the manufacturer for a list
of approved wind turbines.
This can be used as an unregulated 24 V (2 x max. 40 A) output. Contact the manufacturer for more information about
suitable adapters and appliances.
6.3.1 Connecting the SPEC Pak Plug
1.
The SPEC Pak socket is fitted with a waterproof cover (Fig. 5, Step 1).
2.
Remove the cover by hinging up the retaining clip and pulling out (Fig. 5, Step 2).
3.
Insert the connector, hinge down the retaining clip to secure (Fig. 5, Step 3).
6.3.2 Disconnecting the SPEC Pak Plug
1.
Disconnect the plug by hinging up the retaining clip and pulling out the plug (Fig. 5, Step 2).
2.
Replace the weatherproofing cover
3.
Hinge down the retaining clip to secure (Fig. 5, Step 1).
Fig. 5 - 24V 80 A DC SPEC Pak Connector
The weatherproofing cover must always be replaced when the SPEC Pak socket is not in use. Failure to
do so may cause water ingression damage to the unit and invalidate the warranty.
Cygnus HPG 2.4—5 kVA User Manual - v3.2
2014
Page 19
6.4
Appendix 4 - Example Configurations
6.4.1 On or Off-Grid UPS
Grid or secondary power system supplied AC power is connected to the AC Input plug. The consumers are connected to
the AC output socket.
The batteries are kept at full capacity and are only used if there is a break in input voltage.
It is possible for Cygnus to auto-start a secondary power system when the battery bank capacity approaches its lower limit. Contact the manufacturer for further information on this optional extra.
Fig. 6 - Example Showing A Single Unit Connected To An AC Feed and Powering Consumers
Cygnus HPG 2.4—5 kVA User Manual - v3.2
2014
Page 20
6.4.2 Single Cygnus Portable Solar Generator
One or more solar arrays are connected to the Solar Input(s). The consumers are connected to the AC output socket.
The solar arrays power the consumers and any surplus power keeps the batteries topped up. Battery power is used
when the consumers require more power than the solar arrays are generating.
Fig. 7 Example Showing Arrays Directly Connected to the Unit’s Solar Inputs
When using more than two panels it is necessary to use an optional junction box, available from the manufacturer.
Fig. 8 - Example Showing the Use of a Junction Box to Allow the use of More Than Two Arrays
Cygnus HPG 2.4—5 kVA User Manual - v3.2
2014
Page 21
6.4.3 Two Unit Parallel Cygnus System
Two units are connected by means of a data interlink cable and a parallel junction box (available separately).
Fig. 9 - Example Showing the use of Two Units to Provide a Higher Output
Cygnus HPG 2.4—5 kVA User Manual - v3.2
2014
Page 22
6.4.4 Kinectrics PedGen Connected to Single Cygnus
Fig. 10 - Example Showing the use of Two Kinectrics Units to Charge Cygnus
Fig. 11 - Example Showing the use of Eight Kinectrics Units to Charge Cygnus
Cygnus HPG 2.4—5 kVA User Manual - v3.2
2014
Page 23
6.5
Appendix 5 - Troubleshooting Guide
Issue
Possible Cause(s)
Suggestions
Power is on at the Cygnus but the The MCBs or RCDs may not be
consumers are not receiving any switched on
power
Check the MCBs and RCDs (Fig.1, B1 & B2) are
pushed up to the on position.
The emergency switch may be
depressed
Twist the emergency switch clockwise to release.
Voltage is lower than 220V over
distance
Voltage drop over long cable
distances
If the distance between the unit and the consumers is more than 50m the voltage can drop too low.
The voltage can be boosted by following the instructions in Appendix 1, (6.1.1)
Message on RCC-03: “Battery
Voltage Too Low”
This indicates that the voltage has
reached its lower limit in the battery
bank
Charge Cygnus from your chosen renewable power
source or from an AC grid or secondary power systems.
The RCD repeatedly trips
There is an electrical fault with the
consumers connected to the AC
output
Check the electrical integrity of the consumers
being connected to the unit.
The MCB repeatedly trips
The consumers being connected draw Refer to the maximum output rating on the unit’s
too much power for the rated output rating plate and reduce the total power draw acof the unit
cordingly.
All units in series or parallel connection do not enable
Data connection was unsuccessful
Turn off the units using the Cygnus 1 RCC-03 (Fig.
1, C2), check the integrity of all connections and
that they have been made correctly. Attempt to
restart the units.
WARNING
If the unit shuts down due to low voltage or overload it will restart automatically when the issue has
been resolved.
Cygnus HPG 2.4—5 kVA User Manual - v3.2
2014
Page 24
6.6
Appendix 6 - Technical Data
The following table provides information on the Cygnus HPG. To find the relevant information for your unit, please refer to the
model number on its rating plate at the bottom of the left hand panel, or the main graphics on each side of the unit.
The model number is configured as follows: CYG/inverter peak output (kVA)/battery bank capacity (kWh). The /S suffix signifies
that the unit includes the optional solar prep. kit.
Cygnus HPG 2.4—5 kVA User Manual - v3.2
2014
Page 25
Cygnus HPG 2.4—5 kVA User Manual - v3.2
2014
Page 26
6.7
Appendix 7 - Further Reading
This document contains all information required for day to day running of Cygnus. If you would like further information
about the internal components, please see the following manuals on the manufacturers’ websites.
WARNING
Do not change any settings which are not outlined in this Cygnus Portable Solar Generator user manual. Failure to comply with this notice will invalidate the unit’s warranty.
Xtender Inverter
English
http://www.studer-innotec.com/upload/temp/Xtender%20series%20User%20manual.pdf
French
http://www.studer-innotec.com/upload/temp/Manuel%20utilisateur%20s%C3%A9rie%20Xtender.pdf
German
http://www.studer-innotec.com/upload/temp/Benutzerhandbuch%20Xtender%20Serie.pdf
Spanish
http://www.studer-innotec.com/upload/temp/Manual%20usuario%20gama%20Xtender.pdf
Italian
http://www.studer-innotec.com/upload/temp/Manuale%20d'uso%20Xtender%20serie%20(It).pdf
RCC-03
English
http://www.studer-innotec.com/upload/temp/RCC-02-03%20User%20manual.pdf
French
http://www.studer-innotec.com/upload/temp/Manuel%20utilisateur%20RCC-02-03.pdf
German
http://www.studer-innotec.com/upload/temp/Benutzerhandbuch%20RCC-02-03.pdf
Spanish
http://www.studer-innotec.com/upload/temp/Manual%20usuario%20RCC-02-03.pdf
Italian
http://www.studer-innotec.com/upload/temp/Manuale%20d'uso%20RCC-02-03%20(It).pdf
Cygnus HPG 2.4—5 kVA User Manual - v3.2
2014
Page 27