1
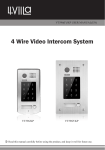
Anleitung für DT596KP
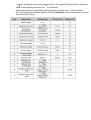
DT596/KP
•
•
•
•
•
Color CCD
Touch sensor
Stainless steel
panel
Code access
185*90*28mm
DT596F/KP
•
•
•
•
•
DT596F/ID
Touch sensor
•
•
Stainless steel
panel
•
Code access
•
•
Color CCD
220*119*52mm
Color CCD
Touch sensor &
RFID
Stainless steel
panel
Flush mounted
220*119*52mm
ManualDT69SD/TDXXSerie-DE/Schick2010
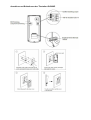
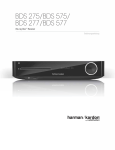
Anschluss und Befestigung der Türstation Dt596KP
Abmessung der DT596 KP
Einstellung des Kamerawinkels (nur leicht lockern nicht abschrauben) und
Basisverbindung
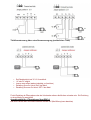
Verbindung Türöffner mit Versorgung über interne Stromversorgung der Anlage
•
•
•
max 12V DC 250 mA Leistungsaufnahme des Türöffner ( interne Spannung 12 V DC / keine
Schnarrgeräusch (Wechselstromgeräusch)
o
bei mehr als zwei Monitoren Versorgung über PS4 nicht mehr ausreichend / PS5 verwenden
Öffnungsparameter über Monitor SET 0 (Unlock Mode /Power to Unlock)
der mögliche zusätzliche Taster (siehe Zeichnung) ist unabhängig von der Steuerung über den Monitor
Türöffnersteuerung über extra Stromversorgung (zusätzlichen Trafo)
•
•
•
•
•
Der Relaiskontakt ist auf 24 V 3 A beschränkt
AC oder DC möglich
Jumper muss entfernt werden (unbedingt vor Anschluss)
Einstellung Strom für Unlock /Set 0 über Menü
Einstellung Strom aus für Unlock / SET 1 über Menü
Für die Einstellung der Öffnungsdauer oder des Unlockmodes müssen alle Monitore verbunden sein . Die Einrichtung
an einem Monitor ist ausreichend!
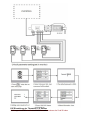
Anschlussbild für 4 Türstationen über DBC-4
Bild rechts: Monitor Menü zum Modus einstellen Standart ist 0 (Menüführung kann abweichen)
DIP Einstellung der Türstation 1-4. Station
Abbildung rechts DIP Codes Monitor 00-15 /Master 1 muss immer den Code 00 haben
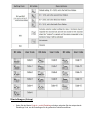
Einstellungen (Setup)
•
Geben Sie den Master-Code ein , um die Einstellung zu ändern und geben Sie den entsprechende
Einstellungs Code, um die Einstellungen für die gewünschte Funktion auszuführen.
•
Nachdem Einstellungen vorgenommen wurden, geben Sie die folgende Einstellung Codes ein und drücken
•
•
Sie um die Einstellung zu beenden.oder um abzubrechen
jede Eingabe muss mit # bestätigt werden falls nicht beendet das System nach 10 s den Prog Modus
um in den Setup Modus zu gelangen geben Sie 1 2 3 4 # (veränderbar) ein die Anzeige wechselt von rot auf
blau und es ertönt 2x Beep
#
*
Einstellungscodes
•
•
•
•
•
•
Temporäre Passwörter sind zur einmaligen Verwendung (z.B. Briefträger ,o.ä.) gedacht und werden nach
einmaliger Verwendung nach 60 s automatisch vom System gelöscht .
Es kann ein Temporäres Passwort 1 für Schloss 1 und Temp PW 2 für Schloss 2 gespeichert werden max.
Länge der Codes 1-12 Ziffern .
Der Temporäre Code kann nicht der gleiche wie Master Code sein .
Benutzergruppe 1 und 2 wie bei Temp PW 1 und 2 für Türöffner 1 und 2 /max 1-12 Ziffern muss anders als
Mastercode sein
max 40 Codes pro Gruppe möglich
Wenn der Benutzer-Zugangscode eingegeben wurde über die Tastatur (1 ~ 12 Stellen), die LED-Anzeige (Gruppe 1:
rot, Gruppe 2: blau) leuchtet auf, der Summer ertönt, und der elektrische Türöffner entriegelt
•
•
•
•
•
•
•
•
Lock-Stromversorgung: 12Vdc, 300mA (Internal Power)
Leistungsaufnahme: 2W im Standby 8W in Arbeit
NO COM dry Kontakt: max. 48V DC 1,5 A
Kamerawinkel: max. 72 º
Anzahl der Relais-Schaltungen: 2
Montage: Aufputz
Abmessungen: 176 (H) X90 (L) X23 (D) mm
Betriebstemperatur: -15 º C ~ 45 ° C
Gefahrhinweise
Achtung:
Arbeiten am 230V Stromnetz dürfen nur von Fachleuten durchgeführt werden bitte beauftragen Sie einen
Elektrofachmann mit dem Anschluss des Hustschienennetzadapters . Es besteht Lebensgefahr !
Beachten Sie bitte:
Entsorgen sie das Produkt am Ende seiner Lebensdauer, gemäß den geltenden gesetzlichen Vorschriften. Sie
können das Produkt an jeder Kommunalen Sammelstelle für Altgeräte unentgeltlich zur Umwelt und Fachgerechten
abgeben .
Hinweise nach der Batterieverordnung
Im Zusammenhang mit dem Vertrieb von Batterien oder Akkus oder mit der Lieferung von Geräten, die Batterien oder
Akkus enthalten, ist der Verkäufer verpflichtet, Sie gemäß der Batterieverordnung auf folgendes hinzuweisen:
Batterien dürfen nicht in den Hausmüll gegeben werden. Sie sind zur Rückgabe gebrauchter Batterien als
Endverbraucher gesetzlich verpflichtet. Sie können Batterien nach Gebrauch in der Verkaufsstelle oder in Ihrer
unmittelbaren Nähe (z.B. in Kommunalen Sammelstellen oder im Handel) unentgeltlich zurückgeben. Weiter können
Sie Batterien auch per Post an den Verkäufer zurücksenden.
Der Verkäufer erstattet Ihnen auf jeden Fall das Briefporto für den Rückversand Ihrer Altbatterie.
Batterien oder Akkus, die Schadstoffe enthalten, sind mit dem Symbol einer durchgekreuzten Mülltonne wie folgt
gekennzeichnet:
Pb = Batterie enthält Blei
Cd = Batterie enthält Cadmium
Hg = Batterie enthält Quecksilber
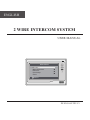
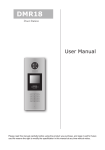
ENGLISH
2 WIRE INTERCOM SYSTEM
USER MANUAL
Main Menu
Monitor ...
Manual Monitor
Intercom
User Setup
Close
CALL
UNLOCK
TALK/MON
IN-USE
i About
DT-ENG-692TD7-V1
1
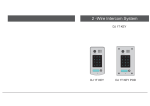
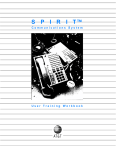
1. Parts and Functions
LCD Touch Screen
Microphone
Main Menu
Monitor ...
Manual Monitor
Intercom
User Setup
Close
CALL
UNLOCK
TALK/MON
IN-USE
CALL button
UNLOCK button
TALK/MON button
LED indicator
i About
Speaker
Ventilation Vent
Mounting Hook
BT1
BT2
EH
GND
VD
DIPS
ON
123456
L1
L2
Connection Port
Mounting Hook
145~160 cm
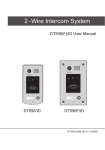
2. Monitor Mounting
1. Use the screws to fix the Mounting Bracket on the mounting box.(fitting accesories
includes a Bracket (Two pieces of 4X25 screws are needed for fastening the
Mounting Bracket), Special 2 wire cables to connect with Monitor)
2. Wire the system correctly(see the later connection chapter) then hang the Monitor
on the Mounting Bracket firmly.
2
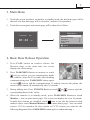
3. Main Menu
1. Touch the screen anywhere on monitor in standby mode, the date/time page will be
showed. (the date/time page will be closed in 1 minute if no operation)
2. Touch the screen again, main menu page will be showed as follows.
12/28/2010
06 : 44
Thu.
AM
Main Menu
Monitor ...
Manual Monitor
Intercom
User Setup
Close
i About
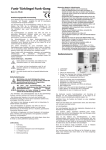
4. Basic Door Release Operation
1. Press CALL button on outdoor station, the
Monitor rings, at the same time, the screen
displays the visitor image.
DS-1
00:23
2. Press TALK/MON Button on monitor or touch
icon on screen, you can communicate hands
free with the visitor for 90 seconds.After finishing
communication,press TALK/MON button again
or touch
icon to end the communication. If nobody answers the phone, the
screen will be turned off automatically after 30 seconds.
3. During talking state, Press UNLOCK Button or touch
corresponding door for the visitor.
or
icon to open the
4. When the monitor is in standby mode, press TALK/MON Button(or touch
Monitor ... item on main menu page), The screen can display the view of outside.
If multi door stations are installed, touch
icon to get into the camera switch
mode(or direct touch Manual Monitor item on main menu page). You can touch
camera 1/2/3/4 to monitor the door station or CCTV camera you want.See the
following diagrams.(Press TALK/MON button again to end monitoring.)
3
DS-1
00:23
Monitor Select
Camera 1 ...
Camera 2 ...
Camera 3 ...
Camera 4 ...
Monitor Time Set ...
Exit
Home
5. Intercom Function
When the monitor is in standby mode, press CALL
Button to enter Intercom Function page(or direct touch
Intercom item on main menu page).
1. Intercom Call : User in one apartment can call
other apartments in the system. the namelist will
be created automatically by the system. Touch a
name you want on the screen, then touch
icon
or press CALL Button on monitor to dial.(Note:1.
touch
icon or press CALL button again to
redial. 2. Press TALK/MON button to cancel the
call.
3.The DIP switches code of each monitor
must set different.)
Intercom
Intercom Call ...
Inner Call ...
Direct Call Guard Unit ...
Exit
Home
Intercom Call
[ 00 ]
[ 01 ]
[ 02 ]
[ 03 ]
[ 04 ]
[ 05 ]
Exit
Jim. Zhang
Calo. Liu
Jacko. Zhang
Philips. Chen
Hebe. Zhang
Tony. Li
Calling
Next Page
2. Inner Call: If multi Monitors are installed in the same apartment, select Inner Call,
all the other Monitors will ring at the same time, whichever Monitor answers the
call, conversation is started.and the other monitors will stop ringing at the same
time.(note:the DIP switches setting of all monitors must be same. )
3. Direct Dial Guard unit: A Monitor can be assigned as Guard Unit Monitor; when
the Guard Unit Monitor answers the call, conversation with the guard person is
started..
4
6. Basic Setup Instructions
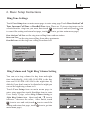
Ring Tone Settings
Touch User Setup item on main menu page to enter setup page.Touch Door Station Call
Tone, Inercom Call Tone or DoorBell Tone item, There are 12 pieces ring tones can be
selected.touch a ring tone you want, then touch
icon to save and exit.(touch icon
to cancel the setting and return last page, touch
icon to get into main menu page)
Door Station Call Tone :set the ring tone calling from outdoor station.
Intercom Tone :set the ring tone calling from other apartments.
DoorBell tone :set the ring tone calling from door bell.
User Setup (1)
Door Station Call Tone ...
Intercom Call Tone ...
DoorBell Tone ...
Clock ...
Next Page
Exit
Home
Door Station Call Tone
Selected:
1 Carmen
2 Ding Dong
3 Rain
4 For Alice
Cancel
06
5 Sonatine
9 Do Re Me
6 Edelweiss
10 Happy Birthday
7 Going Home
11 Jingle Bells
8 Congratulation 12 Telephone Ring
Home
Save&Exit
Ring Volume and Night Ring Volume Setting
You can set a ring volume for day time and night
time individually, 6:00 AM~18:00 PM is the day
time and 18:00 PM~6:00 AM is the night time by
default,if you don't want to be disturbed at night,you
can set the night ring volume to 0.
Touch User Setup item on main menu page to
enter setup page,then touch Next Page item to enter
User Setup 2 page, select Ring Volume Setting or
Night Ring Volume item. then touch ▲ / ▼ icon to
increase / decrease the value; After finish, touch
icon to save and exit.(touch icon to cancel the
setting and return last page, touch
icon to get into
main menu page)
User Setup (2)
Ring Volume ...
Night Ring Volume ...
TPC Configure ...
Restore to default ...
Last Page
Exit
Home
Ring Volume
Current :
Cancel
Home
05
Save&Exit
5
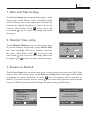
7. Date and Time Setting
Touch User Setup item on main menu page to enter
setup page, touch Clock... item. a digital keypad
will be showed on screen, input date and time by
touching the digital keypad,use * icon to move the
location. After finish, touch
icon to save and
exit.(touch
icon to cancel the setting and return
last page.)
Clock
2010 - 12 - 28
1 2
4 5
7 8
0
*
Cancel
15 : 00
3
6
9
#
Save&Exit
8. Monitor Time settig
Touch Manual Monitor item on main menu page
to get into camera switch mode, select Monitor Time
Set... item. touch ▲ / ▼ icon to increase / decrease
the value; After finish, touch
icon to save and
exit.(touch
icon to cancel the setting and return
last page, touch
icon to get into main menu page)
Monitor Time Select
Current :
Cancel
01min
Home
Save&Exit
9. Restore to Default
Touch User Setup item on main menu page to enter setup page,then touch Next Page
item to enter User Setup 2 page, touch Restore to default item ,a message will be asked
to confirm the restore operation. If touch
icon ,All settings will be restored to
default, if you don't want to restore, touch icon to cancel the operation.(Note that the
restore to default operation will not change the time setting and the datas.)
User Setup (2)
Ring Volume ...
Night Ring Volume ...
TPC Configure ...
Restore to default ...
Last Page
Exit
Home
Restore to Default
Are you sure to
Restore all to default?
Cancel
OK
6
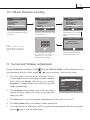
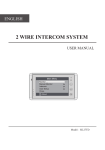
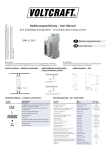
10. Unlock Parameter Setting
User Setup (1)
Main Menu
Monitor ...
Manual Monitor
Intercom
User Setup
Close
i About
1.Touch User Setup item on main
menu page.
User Setup (2)
Ring Volume ...
Night Ring Volume ...
TPC Configure ...
Restore to default ...
Last Page
Door Station Call Tone ...
Intercom Call Tone ...
DoorBell Tone ...
Clock ...
Next Page
Exit
Home
2.Touch Next Page item to enter
next page menu.
Exit
3.Touch Restore to default
item, a message will be
asked.
Restore to Default
Input Code Number:[- - - -]
Note:
8010 is used to set the
unlock mode to 0. 8011 is
used to set the unlock mode
to 1.
1
4
7
Exit
*
2
5
8
0
3
6
9
#
Are you sure to
Restore all to default?
Home
5.Input 4 digits code number
by touching the digital
keypad.("*":cancel the
input,"#":save the setting)
Home
Cancel
OK
4.Press the UNLOCK button
on monitor and hold for 2s.
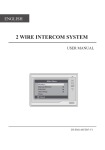
11. Screen and Volume Adjustment
During monitoring or talking, touch
the adjustment item you want; touch
icon,the ADJUST MENU will be displayed.select
/
icon to decrease / increase the value.
1. The first item is Scene mode selection: Total 4
screen modes can be selected in sequence: Normal,
User, Soft and Bright. Whenever you modify
Brightness or colour, Scene item will be set to User
mode automatically.
2. The Brightness and Colour item is for the image
quality setting, adjust the value to get the best
image you like.
Scene
Bright
Color
Ratio
Talk Volume
Exit
Normal
6
6
16:9
2
Dec
Inc
3. The Ratio item is for screen display adjustment,you can set to 16:9 or 4:3.
4. The Talk Volume item is for talking volume adjustment.
5. Note that all the modifications will be performed immediately after the operation.
Touch
icon to exit the adjust page.
7
12. Specification
●● Power supply for indoor monitor: DC 24V
●● Power consumption: Standby 1.5W; Working status 10W
●● Monitor screen:
7 Inch digital color LCD
●● Display Resolutions:
800*3(R, G, B) x 480 pixels
●● Video signal:
1Vp-p, 75Ω, CCIR standard
●● Wiring:
2 wires, non-polarity
●● Dimension:
155(H)×225(W)×28(D)mm
DT-ENG-692TD7-V1
The design and specifications can be changed without notice to the user. Right to
interpret and copyright of this manual are preserved.