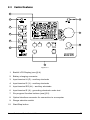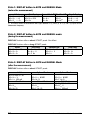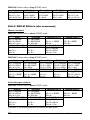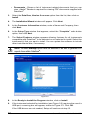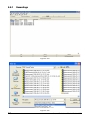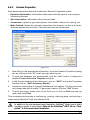
1
DIGITAL GROUND RESISTANCE AND SOIL RESISTIVITY TESTER ENGLISH User Manual 6470 Statement of Compliance Chauvin Arnoux®, Inc. d.b.a. AEMC® Instruments certifies that this instrument has been calibrated using standards and instruments traceable to international standards. We guarantee that at the time of shipping your instrument has met its published specifications. An NIST traceable certificate may be requested at the time of purchase, or obtained by returning the instrument to our repair and calibration facility, for a nominal charge. The recommended calibration interval for this instrument is 12 months and begins on the date of receipt by the customer. For recalibration, please use our calibration services. Refer to our repair and calibration section at www.aemc.com. Serial #: _ ________________________________ Catalog #: _______________________________ Model #: 6470 Please fill in the appropriate date as indicated: Date Received: __________________________________ Date Calibration Due: ________________________ Chauvin Arnoux®, Inc. d.b.a AEMC® Instruments www.aemc.com READ CAREFULLY BEFORE USING FOR THE FIRST TIME Your instrument is equipped with a NiMH battery. This technology offers several advantages: • Long battery charge life for a limited volume and weight. • Possibility of quickly recharging your battery. • Significantly reduced memory effect: you can recharge your battery even if it is not fully discharged. • Respect for the environment: no pollutant materials such as lead or cadmium, in compliance with the applicable regulations. After prolonged storage, the battery may be completely discharged. If so, it must be completely recharged. Your instrument may not function during part of this recharging operation. Full recharging of a completely discharged battery may take several hours. NOTE: In this case, at least 5 charge/discharge cycles will be necessary for your battery to recover 95% of its capacity. To make the best possible use of your battery and extend its effective service life: • Only use the charger supplied with your instrument. Use of another charger may be dangerous. • Only charge your instrument at temperatures between 0° and 40°C. • Comply with the conditions of use defined in the operating manual. • Comply with the storage conditions specified in the operating manual. NiMH technology allows a limited number of charge/discharge cycles depending significantly on: • The conditions of use. • The charging conditions. Please refer to § 6 for correct replacement of the battery. Do not dispose of the battery pack with other solid waste. Used batteries must be entrusted to a qualified recycling company or to a company specialized in processing hazardous materials. Table of Contents 1. INTRODUCTION................................................................................ 4 1.1 1.2 1.3 1.4 International Electrical Symbols............................................................5 Definition of Measurement Categories..................................................5 Receiving Your Shipment......................................................................5 Ordering Information.............................................................................5 1.4.1 Kits, Accessories and Replacement Parts...............................6 2. PRODUCT FEATURES....................................................................... 7 2.1 2.2 2.3 2.4 2.5 Description............................................................................................7 Main Features.......................................................................................8 Control Features...................................................................................9 Display................................................................................................10 Button Functions.................................................................................12 2.5.1 START/STOP Button.............................................................12 2.5.2 Button...............................................................................12 2.5.3 2.5.4 2.5.5 2.5.6 2.5.7 (SELECT) Button...............................................................12 (CHANGE) Button..............................................................13 MEM /MR Button....................................................................13 DISPLAY / SMOOTH Button..................................................14 Hz / OPTIONS / DISTANCE Button...........................................14 3. SPECIFICATIONS........................................................................... 16 3.1 Reference Conditions.........................................................................16 3.2 Electrical..............................................................................................16 3.2.1 Voltage Measurement............................................................16 3.2.2 Frequency Measurement.......................................................16 3.2.3 Bond Resistance / Continuity Measurement..........................17 3.2.4 Ground/Earth Measurement - 3-Pole - Fall of Potential.........17 3.2.5 Soil Resistivity 4-Pole Measurement.................................... 19 3.2.6 Data Storage..........................................................................21 3.2.7 Power.....................................................................................21 3.3 Mechanical..........................................................................................21 3.4 Environmental.....................................................................................22 3.5 Safety..................................................................................................22 4. OPERATION................................................................................... 23 4.1 Instrument Configuration (SET-UP mode)..........................................23 4.2 Operation Mode..................................................................................24 4.2.1 Voltage Check........................................................................25 4.3 General Operating Rules....................................................................26 4.4 Bond Resistance/Continuity Measurement (mW position)..................28 4.4.1 Configuration Settings...........................................................28 4.5 4.6 4.7 4.8 4.9 4.10 4.4.2 Lead Compensation Measurement (2-Wire Mode Only).......29 4.4.3 Measurement and Results.....................................................29 Ground Resistance Measurement - 3-Pole (3-Point)..........................34 4.5.1 Measuring Ground Resistance .............................................35 4.5.2 AUTO and MANUAL Modes..................................................36 4.5.3 Measurement Results............................................................36 Earth Coupling Measurement - 3-Pole (3-Point).................................39 4.6.1 Measurement.........................................................................39 4.6.2 Measurement Results............................................................42 Soil Resistivity Measurements (ρ Position).........................................45 4.7.1 Advantages/Disadvantages of Wenner and Schlumberger...46 4.7.2 Measuring Soil Resistivity - 4-Pole (4-Point).........................47 4.7.3 Measurement Results............................................................49 4.7.4 DISTANCE Button Results.....................................................51 Saving Measurements into Memory...................................................52 Recalling Measurements from Memory..............................................53 Erasing Measurements from Memory.................................................53 4.10.1 Erasing All Measurements.....................................................53 4.10.2 Erasing Selected Measurements...........................................54 5. DATAVIEW® SOFTWARE................................................................. 55 5.1 5.2 5.3 5.4 5.5 5.6 5.7 Introduction.........................................................................................55 Features..............................................................................................56 Installing DataView®............................................................................56 Installing the USB Drivers for Each Instrument...................................60 Connecting the Model 6470 to your Computer...................................60 Starting DataView®. ............................................................................61 Configuring the Instrument..................................................................62 5.7.1 Configuration Functions.........................................................63 5.7.2 DC Continuity Test.................................................................63 5.7.3 3-Pole Ground Resistance Test.............................................64 5.7.4 4-Pole Soil Resistivity............................................................64 5.8 Downloading Data to Database..........................................................65 5.8.1 Recordings.............................................................................66 5.8.2 Session Properties.................................................................67 6. MAINTENANCE.............................................................................. 68 6.1 Maintenance.......................................................................................68 6.2 Power Supply and Recharging...........................................................68 APPENDIX A: ERROR LISTINGS........................................................... 70 Repair and Calibration.........................................................................................71 Technical and Sales Assistance..........................................................................71 Limited Warranty.................................................................................................72 Warranty Repairs.................................................................................................72 CHAPTER 1 INTRODUCTION WARNING “It should be impressed on all personnel that a lethal potential can exist between the station ground and a remote ground if a system fault involving the station ground occurs while tests are being made. Since one of the objects of tests on a station ground is the establishment of the location of an effectively remote point for both current and potential electrodes, the leads to the electrodes must be treated as though a possible potential could exist between these test leads and any point on the station ground grid.” - excerpted from IEEE Std. 81-1962 These safety warnings are provided to ensure the safety of personnel and proper operation of the instrument. 4 • Safety is the responsibility of the operator. • All metal objects or wires connected to the electrical system should be assumed to be lethal until tested. Grounding systems are no exception. • Comply with the conditions for use: temperature, humidity, altitude, pollution level and place of use. • This instrument can be used on Category IV installations for maximum differential voltages of 50Vrms across terminals and across the various terminals and earth (see EN 61010-1 and IEC 61557). • Use only connection accessories with overvoltage and working voltage category greater than or equal to that of the measurement instrument. Use only accessories complying with safety standards (EN 61010-2-031). • Set the switch to the OFF position when the instrument is not being used. • Check that no terminal is connected and the switch is set to OFF before opening the device. • Troubleshooting and metrological verification procedures must only be performed by qualified, approved personnel, or the factory. Ground Resistance Tester Model 6470 1.1 International Electrical Symbols Signifies that the instrument is protected by double or reinforced insulation. This symbol on the instrument indicates a WARNING and that the operator must refer to the user manual for instructions before operating the instrument. In this manual, the symbol preceding instructions indicates that if the instructions are not followed, bodily injury, installation/sample and/or product damage may result. Risk of electric shock. The voltage at the parts marked with this symbol may be dangerous. In conformity with WEEE 2002/96/EC 1.2 Definition of Measurement Categories Cat. I: For measurements on circuits not directly connected to the AC supply wall outlet such as protected secondaries, signal level, and limited energy circuits. Cat. II: For measurements performed on circuits directly connected to the electrical distribution system. Examples are measurements on household appliances or portable tools. Cat. III: For measurements performed in the building installation at the distribution level such as on hardwired equipment in fixed installation and circuit breakers. Cat. IV:For measurements performed at the primary electrical supply (<1000V) such as on primary overcurrent protection devices, ripple control units, or meters. 1.3 Receiving Your Shipment Upon receiving your shipment, make sure that the contents are consistent with the packing list. Notify your distributor of any missing items. If the equipment appears to be damaged, file a claim immediately with the carrier and notify your distributor at once, giving a detailed description of any damage. Save the damaged packing container to substantiate your claim. 1.4 Ordering Information Ground Resistance Tester Model 6470..........................................Cat. #2135.01 Includes rechargeable NiMH batteries, optical USB cable, power adapter 110/240V with power cord 115V US, DataView® software, ground tester workbook CD, carrying bag for meter, product warranty and registration card, and user manual. Ground Resistance Tester Model 6470 Kit (150 ft).......................Cat. #2135.02 Includes meter, rechargeable NiMH batteries, optical USB cable, power adapter 110/240V with power cord 115V US, two 150 ft color-coded leads on spools (red/blue), one 30 ft lead (green), two T-shaped auxiliary ground electrodes, set of five spaded lugs, one 100 ft AEMC® tape measure, DataView® software, ground tester workbook CD, carrying bag for meter, carrying bag for kit, product warranty and registration card, and user manual. Ground Resistance Tester Model 6470 5 Ground Resistance Tester Model 6470 Kit (300 ft).......................Cat. #2135.03 Includes meter, rechargeable NiMH batteries, optical USB cable, power adapter 110/240V with power cord 115V US, two 300 ft color-coded leads on spools (red/blue), two 100 ft colorcoded leads (hand-tied, green/black), four T-shaped auxiliary ground electrodes, set of five spaded lugs, one 100 ft AEMC® tape measure, DataView® software, ground tester workbook CD, carrying bag for meter, carrying bag for kit, product warranty and registration card, and user manual. Ground Resistance Tester Model 6470 Kit (500 ft).......................Cat. #2135.04 Includes meter, rechargeable NiMH batteries, optical USB cable, power adapter 110/240V with power cord 115V US, two 500 ft color-coded leads on spools (red/blue), two 100 ft colorcoded leads (hand-tied, green/black), one 30 ft lead (green), four T-shaped auxiliary ground electrodes, set of five spaded lugs, one 100 ft AEMC® tape measure, DataView® software, ground tester workbook CD, carrying bag for meter, carrying bag for kit, product warranty and registration card, and user manual. 1.4.1 Kits, Accessories and Replacement Parts Test Kit for 3-Pole (3-Point) Testing (150 ft)..................................Cat. #2135.35 Includes two 150 ft color-coded leads on spools (red/blue), one 30 ft lead (green), two Tshaped auxiliary ground electrodes, set of five spaded lugs, one 100 ft AEMC® tape measure, carrying bag. Test Kit for 4-Pole (4-Point) Testing (300 ft)..................................Cat. #2135.36 Includes two 300 ft color-coded leads on spools (red/blue), two 100 ft color-coded leads (hand-tied, green/black), four T-shaped auxiliary ground electrodes, set of five spaded lugs, one 100 ft AEMC® tape measure, carrying bag. Test Kit for 4-Pole (4-Point) Testing (500 ft)..................................Cat. #2135.37 Includes two 500 ft color-coded leads on spools (red/blue), two 100 ft color-coded leads (hand-tied, green/black), one 30 ft lead (green), four T-shaped auxiliary ground electrodes, set of five spaded lugs, one 100 ft AEMC® tape measure, carrying bag. Test Kit for 3-Pole (3-Point) Testing (Supplemental for 4-Pole (4-Point) Testing)..............................................Cat. #2135.38 Includes two 100 ft color-coded leads (hand-tied, green/black), one 30 ft lead (green), two Tshaped auxiliary ground electrodes, set of five spaded lugs, one 100 ft AEMC® tape measure, carrying bag. Carrying Bag - Replacement for Ground Kits.................................... Cat. #2119.82 Tape Measure - AEMC® (100 ft)........................................................Cat. #2130.60 Ground Tester DVD/Workbook Set....................................................Cat. #2130.64 Set of two, 14.5" T-shaped Auxiliary Ground Electrodes...................Cat. #2135.39 Carrying Bag - Replacement for Meter..............................................Cat. #2135.40 Optical USB Cable............................................................................Cat. #2135.41 12V Battery Adapter (for vehicle use)..................................................Cat. #2135.42 Rechargeable NiMH 9.6V Battery Pack............................................Cat. #2960.21 Order Accessories and Replacement Parts Directly Online Check our Storefront at www.aemc.com/store for availability 6 Ground Resistance Tester Model 6470 CHAPTER 2 PRODUCT FEATURES 2.1 Description The Digital Ground Resistance Tester Model 6470 is a portable measurement instrument designed to measure Ground Resistance, Soil Resistivity (two methods – Wenner and Schlumberger), Bonding Resistance (DC Resistance 2-Wire and 4-Wire Kelvin sensing) and Earth Coupling resistance. This direct reading tester measures from 0.01 to 99.99kΩ and is auto-ranging, automatically seeking out the optimum measurement range and test current. Easy-to-use – simply connect the leads, select the test mode, press Start and read the results. Up to 512 test results can be stored in internal memory for later recall to the display or downloaded to a PC via DataView® software. The large LCD is easy-to-read and indicates ground electrode resistance, test voltage, current and frequency as well as individual electrode resistance, battery status and more. The Model 6470 is Cat IV rated to 50V and is over voltage protected to more than 250VAC against accidental connection to live circuits. The voltage is also displayed on screen. In the event of a system fault, the Model 6470 can withstand 250VAC. Additional features of the Model 6470 include a heavy-duty field case sealed against dust and water when closed (the test button is also sealed against the elements); manual and automatic test frequency selection from 40 to 513Hz; user selectable 3-Pole (3-Point) Fall of Potential or 4-Pole (4-Point) Soil Resistivity test methods and user selectable 2-Wire or 4-Wire Bond Resistance test method. The Model 6470 is powered by 9.6V, 3.5 Ah NiMH rechargeable batteries. An external recharger powered from 120/230V 50/60Hz is included and provides for testing while recharging. The Model 6470 can also be vehicle powered from an optional 12V battery adapter. The Ground Resistance Tester Model 6470 is rugged, easy-to-use and ideal for maintenance crews performing numerous tests. It exceeds mechanical and safety specifications for shock, vibration and drop tests per IEC standards. The adjustable test frequency provides for rejection of high levels of interference, allowing it to be used under difficult conditions such as high stray currents that normally affect accuracy. Ground Resistance Tester Model 6470 7 2.2 Main Features • 2- and 4-Wire Bond Resistance/Continuity Measurement (DC Resistance) with automatic polarity reversal • 3-Pole (3-Point) Fall-of-Potential measurement with manual or automatic frequency selection • 4-Pole (4-Point) soil resistivity measurement with automatic calculation of Rho (r) and user selection of the Wenner or Schlumberger test method • 3-Pole (3-Point) earth coupling measurement • Manual and automatic frequency scan from 40 to 513Hz for optimum test accuracy in electrically noisy environments • Selectable test voltage of 16 or 32V up to 250mA of test current • Auto-off power management • Automatic recognition of all electrode connections and their resistance value • Stores up to 512 complete test results in internal memory • Optically isolated USB communication • Remote set up and operation of all measurements using DataView® software supplied • Automatic report generation • Rechargeable NiMH batteries from wall charger or vehicle power • Rugged dustproof and rainproof field case – IP54 rated in closed position • Grounding standards IEC 61557 parts 4 and 5 compliant • Includes DataView® software for data storage, real-time display, analysis, report generation and system configuration 8 Ground Resistance Tester Model 6470 2.3 Control Features 1 2 8 3 9 4 5 10 6 7 Figure 2-1 1. Backlit LCD Display (see §2.4) 2. Battery charging connector 3. Input terminal H (Z) - auxiliary electrode 4. Input terminal S (Y) - auxiliary electrode 5. Input terminal ES (Xv) - auxiliary electrode 6. Input terminal E (X) - grounding electrode under test 7. Six program / function buttons (see §2.5) 8. Optical interface connector for connection to a computer 9. Range selection switch 10. Start/Stop button Ground Resistance Tester Model 6470 9 2.4 Display The Model 6470’s display is a custom 256 segment multi-line backlit LCD. NOTE: External voltages will be displayed only on the small displays (A2 and A3) without the view of the main display (A1). This helps to rapidly recognize that these are measurements of external voltages. Backlight: The backlight turns ON automatically when entering a function and turns OFF after the function is complete. Press the DISPLAY button to turn it back on. NOTE: In the Set-up mode (Instrument Configuration § 4.1) pressing the DISPLAY button also selects the next configurable parameter. The symbols that can appear are shown in Figure 2-2 and are detailed here. A1 A2 A3 Figure 2-2 A1 Top main display A2 Middle small display A3 Bottom small display Warning buzzer is activated Communication port active Indicates the battery charge condition; the segments represent the energy Indicates that the secondary function of a button will be used External voltage present - this symbol is activated when the instrument measures voltages above 60Vp 10 Ground Resistance Tester Model 6470 Indicates that the measurement is running in State 2 (see § 2.5.6) or instrument is working MANUAL Indicates MANUAL mode - the user has to stop the measurement, otherwise the measurement keeps on running AUTO Indicates AUTO mode - measurement stops immediately after all results are available. In AUTO mode, the measurement frequency is automatically adjusted to the best available disturbance voltage rejection. Symbol not used in Model 6470 Indicates the 2-Wire DC resistance; calculates the offset of the cable resistance into the result (5Ω max for offset value) Symbol not used in Model 6470 Symbol not used in Model 6470 Symbol not used in Model 6470 Symbolizes the soil resistivity value (Rho): W or S indicates respectively that Wenner or Schlumberger method is used for the measurement (changed by the Hz/OPTIONS button) ALARM Indicates the alarm is activated. An audible alarm will sound if the value measured is above the limit defined in the SET-UP mode. REMOTE Indicates the instrument is controlled remotely by the RS-232/USB interface. In this mode, all of the buttons and the rotary switch are inactive, except switching to the OFF position. MEM Indicates that there is recorded data in memory MR Memory recall - displayed as long as this state is active NOISE If blinking, indicates the measurement had a disturbance at the moment the measurement was started. The measurement results can still be read in State 3 (see § 2.5.6). DISTANCE If blinking, indicates the value is ready to be overwritten with a new value or that a new value will be entered instead of “- - -”. If more than one value has to be entered, the SELECT button moves to the next one. CONFIG Indicates that the blinking value of AUTO/MANUAL mode, frequency, voltage or DC current direction can be changed. SMOOTH Optional with a push on the 2nd button - sets a digital filter active SWEEP Symbol not used in Model 6470 FREQUENCY Indicates the test frequency OBJ:TEST Memory address Ground Resistance Tester Model 6470 11 2.5 Button Functions 2.5.1 START/STOP Button This button starts a measurement and depending on the selected mode (manual or automatic), the instrument stops the measurement automatically or the user must stop the measurement by a second push of this button. A short push (<2s) enables a faster measurement because there is no measurement of the auxiliary rod resistances. The chain of all displayed results is therefore shorter than after a long START push. A long push (>2s) (until the second beep occurs) enables the measurement of all auxiliary rod resistances. If the voltage conditions (< 60Vp) on the inputs are met and the connections are good, the instrument immediately starts the measurement. If an external voltage/frequency appears on the inputs that influences the measurement value significantly, a warning is given with the NOISE symbol on the display. After the measurement is stopped, the detected disturbance voltage applied with frequency can be seen using the DISPLAY button. No access to disturbance voltages is possible during measurement. When the START/STOP button is pushed, the display returns to the initial screen. For DC 2-Wire resistance measurement and the AC 2-Wire measurement in the coupling function, this button has a second function which allows measurement of lead resistances for compensation. 2.5.2 Button Selects the second function (highlighted in yellow) on the buttons. The symbol appears. This symbol disappears upon pressing the function button chosen, except if the button is activated. In this case, it only disappears when the button is pressed again, or if other function buttons are pressed. This allows you to rapidly decrease parameters with the button, without having to press the button every time. 2.5.3 (SELECT) Button - Increases the value of the flashing parameter displayed or selects the next parameter up. Press the button for a longer time to increase the change of value speed at a faster rate. - Decreases the value of the flashing parameter displayed or selects the next parameter down. Press the button for a longer time to increase the change of value speed at a faster rate. 12 Ground Resistance Tester Model 6470 2.5.4 (CHANGE) Button Selects the parameter to be modified to the right or moves the cursor to the right. 2.5.5 MEM/MR Button MEM (Memory) The MEM button is used to store measurements into memory to an address identified by an object number (OBJ) and a test number (TEST). The instrument has a memory capacity of 64kB which represents 512 records whatever the function chosen. A single object (OBJ) can contain 99 tests. Two presses on this button are required: • First Press: to select the location (use the ▲ and ► buttons to change the location) • Second Press: to store the measurement The resistivity and earth coupling functions have an extended location with DISTANCE values or measurements, 1 to 4 in coupling function. Several tests with the same OBJ:TEST number, but with different distances (1 to 4 in coupling), can be stored. MR (Memory Recall) The MR button is used to retrieve stored data. Hold down the press the MR button to access this function. button, then In the SET-UP position, all recorded data of all measurement functions are accessible. When the MR button is pushed, the display shows the highest available stored OBJ:TEST address together with the main result in the big display. The OBJ:TEST address in A2 (see § 2.4) can be modified with the arrow buttons. NOTE: The following functions have special requirements: MR for Resistivity Measurement: If more than one measurement belongs to an OBJ:TEST number, it is possible to modify the DISTANCE to select each measurement. The stored records with different distances are selected with the arrow buttons. DISPLAY scrolls through all results. MR for Earth Coupling Measurement: If MR shows a coupling record measurement under OBJ:TEST address, then it is the 4th record of that measurement that represents the earth coupling value. Other results can be obtained with the selection of 1, 2, 3 or 4 by using the arrow buttons. To exit, move the main switch or press the MR button. Ground Resistance Tester Model 6470 13 2.5.6 DISPLAY / SMOOTH Button DISPLAY The DISPLAY function switches between accessible results depending on the main rotary switch position. The information displayed depends on the state of the instrument: State 1: before a measurement starts State 2: during a functional measurement State 3: after a functional measurement In all Functions except SET-UP: External voltage measurement is possible in State 1 and 3. The external voltage measurement runs permanently if the DISPLAY button is pushed. The values are always indicated in the small numeric displays (A2 and A3, see § 2.4) while the main numeric display is empty. SMOOTH To get a more stable display result, it is possible to smooth the measurement by pushing and holding down the button, then the SMOOTH button during a measurement. Display results last until the SMOOTH button is pressed again. 2.5.7 Hz /OPTIONS / DISTANCE Button Hz /OPTIONS This button enables selection of parameters that are used in different functions. Depending on the state (see § 2.5.6 above) of the instrument, this button option has different functions. In State 1 and 3: • AUTO / MANUAL mode • Test frequency • Test voltage • Current direction (polarity) in Bond Resistance/Continuity Measurement Pushing this button causes the associated symbol to blink. Modifications can be performed with the arrow buttons. Previously measured results are lost if any parameter that influences the measurement result is altered. In State 2: During the measurement in MANUAL mode, the Hz/OPTIONS button directly enables the modification of frequency (in 3-Pole and Resistivity Measurements), or the current direction (polarity) in Bond Resistance/Continuity Measurement. 14 Ground Resistance Tester Model 6470 The display automatically shows a screen where the actual measurement frequency and the measurement voltage is shown (current direction for resistance measurement). When the Hz/OPTIONS button is active, the CONFIG symbol is displayed. After finishing the queue, the symbol disappears. Exit from CONFIG mode occurs: • By pushing the DISPLAY button • At the end of queue in the CONFIG menu • By starting a measurement with START button • By turning the main rotary switch DISTANCE This function is only available for soil resistivity measurements. It allows the setting of values of distances used for Rho (ρ) calculation. It is accessible in States 1 and 3 only (see § 2.5.6). Ground Resistance Tester Model 6470 15 CHAPTER 3 SPECIFICATIONS 3.1 Reference Conditions Influencing Parameters Temperature Relative Humidity Supply Voltage Frequency Range Capacitance Parallel to Input Resistance Electric Field Magnetic Field Reference Values 23°C ± 3°K 45 to 55% RH 10V ± 0.3V DC and 15.3 to 450Hz 0 uF <1 V/m < 40 A/m 3.2 Electrical NOTE: Accuracy is stated in two fashions to comply with recent IEC mandates. • Nominal: corresponds to the instrument accuracy as calibrated at the factory and within a calibration environment. • Field: corresponds to a “worse-case” in the field as the instrument is subjected to environment and/or settings. 3.2.1 Voltage Measurement External Voltage Measurement: Range Resolution 0.10 to 9.99V 0.01V 10.0 to 65V 0.1V Accuracy Nominal: 2% of Reading ± 3cts Field: 5% of Reading ± 5cts Impedance Frequency 1MW DC and 15 to 450Hz Auto recognition of AC above 0.1 Veff 3.2.2 Frequency Measurement Measurement Range Resolution Signal Range 16 to 450Hz 1Hz 0.1 to 65V 16 Accuracy Nominal: 1% of Reading ± 2cts Field: 1% of Reading ± 2cts Ground Resistance Tester Model 6470 3.2.3 Bond Resistance / Continuity Measurement (mW postition) DC Resistance Test Voltage: 16VDC Maximum Current: ≤ 200mADC with load resistance < 20W Permanent Overvoltage: Veff = 50VAC max (protection against power supply voltage until 250V) Inductive Load: 2 Henry max Auto-ranging Time: 5 s approx Measuring Duration: 8 s in automatic polarity change 3 s in manual mode Calculation with R comp: R displayed = R measured – R comp Test Lead Resistance Compensation Limit: 0 < R comp. < 5Ω Disturbance Voltage: 60V peak 42Veff AC sin. max Alarm Setting: “>”or “<” 1 to 999Ω on 3 digits 2-Wire: Range 0.01 to 9.99Ω 10.0 to 99.9Ω 100 to 999Ω 1.00 to 9.99kΩ 10.0 to 99.9kΩ Resolution 0.01Ω 0.1Ω 1Ω 10Ω 100Ω Accuracy Nominal: 2% of Reading ± 2cts Field: 5% of Reading ± 3cts 4-Wire (Kelvin Sensing): Range 0.001 to 9.999Ω 10.00 to 99.99Ω 100.0 to 999.9Ω 1.000 to 9.999kΩ 10.00 to 99.99kΩ Resolution 0.001Ω 0.01Ω 0.1Ω 1Ω 10Ω Accuracy Nominal: 2% of Reading ± 3cts Field: 5% of Reading ± 5cts 3.2.4 Ground/Earth Measurement - 3-Pole (3-Point) - Fall of Potential Test Voltage: 16Vrms or 32Vrms Test Frequency: See chart Test Current: ≤250mA Noise Rejection:> 80 dB (16 2/3, 50, 60 and 400Hz) if the measurement frequency is 20% above or below the disturbance frequency Ground Resistance Tester Model 6470 17 Overload Voltage: Vrms=250V max Measuring Time: Short START push: 8s for the first value of RE at 128Hz, then 3 readings per second Long START push: 15s for the first value of RE at 128Hz, then 3 readings per second Probe Resistance RH, RS: 100kΩ max Measuring Error of Auxiliary Rods RH and RS: ± (10% + 2cts) at 128Hz Automatic range switching and resolution changes are dependency of RH and measurement voltage. Ground/Earth Resistance RE: Range 0.01 to 9.99Ω 10.0 to 99.9Ω 100.0 to 999.9Ω 1.00 to 9.99kΩ 10.00 to 99.9kΩ Resolution 0.01Ω 0.1Ω 1Ω 10Ω 100Ω Accuracy Nominal: 2% of Reading ± 1ct Field: See following chart With the following reference conditions: frequency measurement 128Hz, voltage measurement 32V, RH = RS = 0Ω, no voltage disturbance. • • • • • Operating Conditions RH and/or RS ≤ 20kΩ RH/RE and/or RS/RE ≤ 5000 Test frequency: 41 to 300Hz No disturbance voltage or Disturbance voltage ≤ 60V peak with (f meas.- f dist.)/f meas. > 0.2 • • • • • RH and/or RS ≤ 100kΩ RH/RE and/or RS/RE ≤ 20,000 Test frequency: 41 to 150Hz No disturbance voltage or Disturbance voltage ≤ 60V peak with (f meas.- f dist.)/f meas. > 0.2 ± ( 20% of Reading + 3ct ) • • • • • RH and/or RS ≤ 20kΩ RH/RE and/or RS/RE ≤ 1000 Test frequency: 300 to 500Hz No disturbance voltage or Disturbance voltage ≤ 60V peak with (f meas.- f dist.)/f meas. > 0.2 ± ( 10% of Reading + 1ct ) 18 Accuracy on RE ± ( 5% of Reading + 2ct ) Ground Resistance Tester Model 6470 Auxiliary Ground Electrodes/Rods Resistances RH and RS: Range 0.01 to 9.99W 10.0 to 99.9W 100 to 999W 1.00 to 9.99W 10.0 to 99.9W Resolution 0.01Ω 0.1Ω 1Ω 10Ω 100Ω Accuracy Field: 10% of Reading ± 2cts at 128Hz Test Frequency Selection Table: 41 101 201 317 403 43 110 220 330 439 46 119 238 342 476 49 122 244 366 488 Frequency Table / Hz for 6470 3-Pole (3-Point) 50 57 60 61 64 67 69 73 79 82 128 134 137 146 159 165 171 183 195 256 269 275 293 391 513 85 92 98 3.2.5 Soil Resistivity 4-Pole (4-Point) Measurement (Wenner and Schlumberger Methods) Measuring Method: AC voltage and current measurement per EN61557 part 5 Test Voltage: 16Vrms or 32Vrms Test Current: ≤ 250mA Noise rejection: > 80 dB (16 2/3, 50, 60 and 400Hz) Overload: 250Vrms max Measuring time: Short START push: 8s for the first value of RS-ES at 128Hz, then 3 readings per second Long START push: 20s for the first value of RS-ES at 128Hz, then 3 readings per second Resistance of Auxiliary Ground Electrode RH, RS, RES, RE: 100kΩ max Accuracy of Ground Electrode Resistance RH, RS, RES, RE: ± (10% +2cts) at 128Hz Calculation for Wenner Method: ρW = 2 x Π x d x RS-ES RH RS RS-ES d d d RE Calculation for Schlumberger Method: ρS = (Π x (d2-A2/4)/A) x RS-ES RH RS d RS-ES A Ground Resistance Tester Model 6470 RE d 19 Range 0.01 to 9.99Ω 10.0 to 99.9Ω 100.0 to 999.9Ω 1.00 to 9.99kΩ 10.00 to 99.9kΩ Resolution 0.01Ω 0.1Ω 1Ω 10Ω 100Ω Accuracy Nominal: 2% of Reading ± 1ct Field: See following table With the following reference conditions: frequency measurement 128Hz, voltage measurement 32V, RH = RS = RES = RE 0Ω, no voltage disturbance, automatic range switching in dependency of RH, RS, RES, RE and measurement voltage. Operating conditions Operating error on RS-ES • • • • • Auxiliary ground rod ≤ 100kΩ Auxiliary ground rod resistance/RS-ES ≤ 2000 Measurement frequency: 41 to 128Hz No disturbance voltage or Disturbance voltage ≤ 60V peak with (f meas.- f dist.)/f meas. > 0.2 ± ( 7% + 2cts ) • • • • • Auxiliary ground rod ≤ 50kΩ Auxiliary ground rod resistance/RS-ES ≤ 10,000 Measurement frequency: 41 to 128Hz No disturbance voltage or Disturbance voltage ≤ 60V peak with (f meas.- f dist.)/f meas. > 0.2 ± ( 15% + 3cts ) • • • • • Auxiliary ground rod ≤ 10kΩ Auxiliary ground rod resistance/RS-ES ≤ 20,000 Measurement frequency: 41 to 128Hz No disturbance voltage or Disturbance voltage ≤ 60V peak with (f meas.- f dist.)/f meas. > 0.2 ± ( 20% + 1ct ) Auxiliary Ground Rod Resistances RH, RS, RES, RE: Range 0.01 to 9.99Ω 10.0 to 99.9Ω 100 to 999Ω 1.00 to 9.99kΩ 10.0 to 99.9kΩ Resolution 0.01Ω 0.1Ω 1Ω 10Ω 100Ω Accuracy Field: 10% of Reading ± 2cts at 128Hz Test Frequency Selection Table: Frequency Table / Hz for 6470 4-Pole (4-Point) 41 43 46 49 50 57 60 61 64 67 69 73 79 101 110 119 122 128 20 82 85 92 98 Ground Resistance Tester Model 6470 3.2.6 Data Storage Memory Capacity: 512 test results (64kB) Communication: Optically isolated USB 3.2.7 Power Power Source: Rechargeable NiMH 9.6V Battery Pack Battery Life: Function Instrument on Standby Ground Voltage Measurement Bond/Continuity Measurement (2) Ground Resistance Measurement (3) Soil Resistivity Measurement (4) Power consumption 0.7 mW 1.65 W 6W 3.5 W 3.2 W Number of measurements (1) none 2500 1500 1000 1200 (1) With 5 sec (or the time defined by the instrument) measurement and 25 sec pause at normal load. (2) With R = 1Ω (3) With RE = 10Ω and RH = RS = 1kΩ (4) With RS-ES = 100Ω and RpH = RpS = RpE = RpES = 1kΩ Power Supply: 110/220, 50/60Hz external charger with 18VDC, 1.9A output or 12VDC vehicle power Fuse: 0.63A, 250V, 5x20mm, 1.5kA 3.3 Mechanical Dimensions: 10.7 x 9.76 x 5.12” (272 , 248 x 130mm) Weight: 7.5 lbs (3.4kg) Case Material: ULV0 Polypropylene Terminals: 4mm recessed banana jacks Case Protection: EN 60529 - IP53 (cover closed) Mechanical Shock: Per EN 61557 Drop Test: Per EN 61010-1 Vibration Test: Per EN 61557-1 Dielectric Test: 3kV, 50/60Hz Ground Resistance Tester Model 6470 21 3.4 Environmental Operating Temperature: 14° to 131°F (-10° to 55°C); 0 to 75% RH Operating Temperature When Charging: 14° to 104°F (-10° to 40°C) Storage Temperature: -40° to 158°F (-40° to 70°C); 0 to 90% RH 3.5 Safety EN 61010-1 / EN61326-1 and IEC 61557-1-4-5 50V Cat IV, Pollution Degree 2 *All specifications are subject to change without notice 22 Ground Resistance Tester Model 6470 CHAPTER 4 OPERATION 4.1 Instrument Configuration (SET-UP mode) This function is used to change the instrument’s configuration by direct access to the parameters to be modified (either directly from the instrument or by using DataView® software). To configure the Model 6470 parameters directly from the instrument’s display, turn the rotary switch to the SET-UP position: • All the segments on the display are activated for 1 second and then the “PUSH button” message appears on the display. • The various parameters are accessible by pressing the corresponding button (see table below). • The number or symbol which can be modified flashes. These are changed using the arrow buttons ▲▼► (which are also referred to as SELECT [▲▼] and CHANGE [►] buttons throughout the manual). • To move to another parameter to configure, press either the DISPLAY, Hz/OPTIONS or MEM button (see table below). • To exit the set-up configuration, turn the rotary switch to another position. • All of the parameters that are modified are permanently saved until a new instrument configuration is performed. Parameter to be modified Distance unit Alarm (for mΩ and 2-wire measurements only) Button DISPLAY (1st press) DISPLAY (2nd press) Buzzer Modbus address Date Time Baud Default configuration Memory used DISPLAY (3rd press) DISPLAY (4th press) Hz/OPTIONS (1st press) Hz/OPTIONS (2nd press) Hz/OPTIONS (3rd press) Hz/OPTIONS (4th press) MEM (1st press) Possible values m (meter) or ft (feet) ON / OFF direction (< or >) value (1 to 999Ω) ON / OFF 1 to 247 yyyy.mm.dd* hh : mm* 9.6k / 19.2k / 38.4k yes / no 000 to 512 (total number of locations) Default values m OFF > 2Ω ON 1 Current date* Current time* 9.6 k bits yes 000 on 512 *International format date and time only Ground Resistance Tester Model 6470 23 Checking the Display: To freeze all of the display segments to check that the display is operating correctly, press and hold the DISPLAY button while you rotate the switch to SET-UP. The information will remain on the display until the DISPLAY button is pressed again. The display will then enter SET-UP mode (see previous page). Checking the ID Number and Software Version: To display the instrument ID number and software version number, press and hold the Hz/OPTIONS button while you rotate the switch to SET-UP. The information will remain on the display until the DISPLAY button is pressed. The display will then enter SET-UP mode (see previous page). 4.2 Operation Mode AUTO-MANUAL mode possibilities: Function AUTO mode Bond Resistance/ Continuity Measurement • Automatic polarity change • Automatic end of measurement 3-Pole (3-Point) Fall of Potential Measurement • Automatic measurement frequency adjustment • Automatic end of measurement Earth Coupling Calculation • Not allowed 4-Pole (4-Point) Soil Resistivity Measurement • Not allowed MANUAL mode • Manual polarity selection with Hz/OPTIONS button • Manual end of measurement (Press on the START/STOP button) • Manual measurement frequency adjustment • Manual end of measurement (Press on the START/STOP button) • Manual measurement frequency adjustment for first measurement only • Manual end of measurement (Press on the START/STOP button) • Automatic earth coupling calculation • Manual measurement frequency adjustment • Manual end of measurement (Press on the START/STOP button) • Automatic calculation by setting of distances of the rods Frequency settings have a default value in each function after rotary switch changes. 24 Ground Resistance Tester Model 6470 4.2.1 Voltage Check An external voltage check occurs at the beginning of each measurement. This voltage is sensed through: • Terminals E (X) and H (Z) for Bond and Continuity testing in mW • Terminals E (X) and S (Y) for Ground Resistance testing (and Earth Coupling testing) 3 Pole (3-Point) • Terminals E (x) and ES (Xv) for Soil resistivity testing 4 Pole (4-Point) To view the external voltage and it’s associated frequency, press the DISPLAY button. The external voltage is displayed on the middle display (A2) and its frequency on the lower display (A3). When looking at the external voltage, the main display (A1) remains blank. However, the test voltage generated by the instrument for the measurements is displayed on the upper larger display. mW U H-E (U Z-X) 12.30V 60.03Hz 3-Pole (3-Point) U S-E (U Y-X) 15.70V 60.01Hz 4-Pole (4-Point) U S-ES (U Y-Xv) 22.50V 60.02Hz • If a detected voltage exceeds the value level > 60V peak, the measurement is not allowed and the display switches to external voltage indication with blinking attention symbol. • After the voltage check, the instrument checks the connected leads and cancels the measurement if a missing connection is detected. The instrument turns to the initial screen and the input symbols in the display blink for faulty or missing leads. • If an external voltage exists and it influences the stability, the NOISE symbol blinks to signal the condition. • In 3-Pole (3-Point) and resistivity measurements, the auxiliary rod resistances will now be measured together with the earth / ground resistance if the START button has been pressed for more than 2s. (Note that this test takes a longer time). • If the START button is pressed shortly (<2s), then the functional measurement omits the rod resistance measurement. Ground Resistance Tester Model 6470 25 4.3 General Operating Rules NOTE: For detailed information regarding ground resistance testing, see the Un derstanding Ground Resistance Testing Workbook CD that was included with the instrument. Select the desired function using the main rotary switch. There are 3 distinguished active states: State 1: Before a functional measurement (e.g. after the power is turned on, the switch position is changed, or when there is a modification to the settings). State 2: During a functional measurement. State 3: After a functional measurement ends with results. In State 1 the initial display state presents the main measurement parameters with “---” bars instead of digits. External voltages, when existing, are selected by the DISPLAY button. The difference between State 1 and 3 are the available measurement results. The length of the chain accessed by the DISPLAY button depends on the function and the duration of the START/STOP button. NOTE: In State 1 and 3, the Hz/OPTIONS button is active. If any result exists in State 3, it will be erased if modifications of the settings are made. Press the MEM button to save the last test. Therefore if there are modifications to a parameter made while in State 3, a push on the Hz/OPTIONS button changes the instrument into State 1. The same result occurs if the main rotary switch is moved. Pressing the START/STOP button causes the instrument to enter State 2, starting a new measurement. In State 2 the frequency function of the Hz/OPTIONS button is active. It provides a display of the actual frequency, which blinks, indicating that modifications are possible. If a change is made to the used frequency by pushing the SELECT button, the instrument changes to MANUAL mode for all Earth/Ground resistance functions and accepts the manual selection of a frequency. Identical to the AC resistance meaning of the Hz/OPTIONS button in Bond Resistance/Continuity Measurement in State 2, the Hz/OPTIONS button causes to change the polarity of the current. In the AUTO mode, 3-Pole (3-Point) measurement selects the best frequency and if a disturbance occurs, stops the measurement automatically. This means that an FFT analysis of a disturbance voltage searches the best available test frequency for a stable measurement. This automatic selected frequency is at least ±20% out of the detected disturbance frequency value. If no suitable frequency 26 Ground Resistance Tester Model 6470 is found by the instrument, the blinking NOISE symbol appears together with the measurement results. In the MANUAL mode, the blinking NOISE symbol appears after the measurement has been started or if the measurement frequency is too close to the detected disturbance frequency. The user may now choose another frequency that is out of the previously measured disturbance spectrum. If the new measurement frequency provides a disturbance free measurement, the NOISE symbol disappears. The external voltages are not shown on the display during the measurement (State 2) but only before a measurement starts (State 1) and after the measurement ends (State 3), unless the DISPLAY button is pushed during the measurement. In State 1 there is no NOISE recognition. Pushing the START/STOP button sets the measurement into action and switches the display to the initial screen, depending on the function. The main procedure is as follows: • U disturbance check before the functional measurement. No measurement if the measured voltage U H-E, or U S-E or U S-ES is higher than 60Vp. • Connection check. • A long press (>2s) on the START/STOP button; measurement of the ground electrodes resistances. • Start of the functional measurement. STOP is only active in MANUAL mode and when the measurement is running. If no main measurement result has occurred and the START/STOP button is pressed, the instrument returns to the initial screen and State 1. The Model 6470 can be operated via the USB interface (complete remote mode) in all measurement functions except the SET-UP position. In the SET-UP position there is no interface communication allowed. NOTE: In the following sections A1, A2 and A3 refer to the following: A1 = Top Display A2 = Middle Display A3 = Bottom Display A1 A2 A3 Figure 4-1 Ground Resistance Tester Model 6470 27 The following sections describe the types of measurements and the different possible selections and screens which are available using the DISPLAY button, depending on the configuration and the State (1, 2 or 3) of the instrument. 4.4 Bond Resistance/Continuity Measurement (mW position) The instrument is designed to measure resistances up to 100kW. The DC measurement is at 16V and the test current is ≥ 200mA up to 20W (complies to IEC standard 61557-4) and less above 20W. This function is used to measure bonding resistance and/or continuity of grounds and bonds. There are two set-ups: • 2-Pole or 2-Wire measurement: This functions as a typical ohmmeter. The terminals E (X) and H (Z) are used. The test lead resistance may be manually removed. • 4-Pole or 4-Wire measurement: This is also referred to as the Kelvin Sensing method. It uses 4 test leads and the test lead resistance is automatically “eliminated” from the measurement. Users concerned by the lead resistance (and don’t want it in the measurement) use this method. All four terminals are used. 2-Pole/Wire Connection 4-Pole/Wire Connection H (Z) R R H (Z) S (Y) ES (Xv) E (X) E (X) Figure 4-2 4.4.1 Configuration Settings By default, the instrument is in MANUAL mode and will perform a 2-Pole measurement. To change the configuration before making the measurement, use the Hz/OPTIONS and ► buttons to: • Select the measurement mode (MANUAL or AUTO). • Select the number of wires for the measurement (2- or 4-Wire). • In MANUAL mode, select the measurement current polarity. 28 Ground Resistance Tester Model 6470 4.4.2 Lead Compensation Measurement (2-Wire Mode Only) Compensation mode is used to compensate the leads resistance in 2-Wire measurement and is possible in MANUAL or AUTO mode. In State 2 (during a measurement), lead compensation is not possible. • Short-circuit the measurement leads. • Start the measurement by pressing the 2nd button and then the START button. • This measurement stops after having received a stable result. The symbol appears on the display after the compensation value has been measured. All subsequent measurements with 2-Wire will then use this compensation (2-Wire DC, 2-Wire AC in earth coupling). Compensation is used until the instrument is switched off or the compensation value is erased. NOTE: If the compensation resistance is > 5W, or in the event that the leads are not shorted when starting the measurement, the value of compensation will be canceled and the symbol will disappear. 4.4.3 Measurement and Results At the start of the measurement: • The instrument measures UH-E (2-Wire measurement) or US-ES and UH-E (4-Wire measurement). • The instrument will perform a voltage check (see § 4.2.1). • If an AC or DC voltage >42Vrms is detected at the terminals, the measurement is stopped. During the measurement: • In MANUAL mode only, the Hz/OPTIONS button is used to change the polarity of the measurement current. NOTE: If the measurement is unstable or if the measurement results are incon sistent, trigger the measurement again to check that the problem is not a faulty connection. Ground Resistance Tester Model 6470 29 On completion of the measurement, the following quantities can be displayed and saved using the MEM button: State 1: AUTO Mode (before the measurement) DISPLAY button 2-Wire without compensation: Initial A1= R --- Ω +/-DC A2= R+ --- Ω A3= R - --- Ω First push Second push A1= R --- Ω +/-DC A2= R+ --- Ω A3= R - --- Ω A2= U H-E A3= Hz DISPLAY button 2-Wire with compensation: Initial A1= R --- Ω +/-DC A2= R+ --- Ω A3= R - --- Ω First push A1= R --- Ω +/-DC A2= R∆0 (0 to 5Ω) Second push A2= U H-E A3= Hz Third push A1= R --- Ω +/-DC A2= R+ --- Ω A3= R - --- Ω DISPLAY button 4-Wire: Initial A1= R --- Ω +/-DC A2= R+ --- Ω A3= R - --- Ω First push A2= U S-ES A3= Hz Second push A2= U H-E A3= Hz Third push A1= R --- Ω +/-DC A2= R+ --- Ω A3= R - --- Ω The DISPLAY button switches between R --- Ω state and external voltage measurements. In 2-Wire mode, compensation is accomplished with the 2nd and START buttons. If the leads are shorted and the measured resistance value is between 0 to 5W, the symbol for compensation appears and the value is stored until the instrument is switched off. If the resistance is higher than 5W, compensation is cancelled. The START button is always active. State 1: MANUAL Mode (before the measurement) Hz/OPTIONS and SELECT buttons DISPLAY button 2-Wire + or - direction without compensation: Initial A1= R --- Ω +DC or -DC A2= U --- V DC A3= I --- mA 30 First push A2= U H-E A3= Hz Second push A1= R --- Ω +DC or -DC A2= U --- V DC A3= I --- mA Ground Resistance Tester Model 6470 DISPLAY button 2-Wire + or - direction with compensation: Initial First push Second push Third push A1= R --- Ω +DC or -DC A1= R --- Ω +DC or -DC A2= U --- V DC A2= U H-E A2= R∆ Ω (0 to 5Ω) A3= I --- mA A3= Hz A1= R --- Ω +DC or -DC A2= U --- V DC A3= I --- mA DISPLAY button 4-Wire: Initial A1= R --- Ω +DC or -DC A2= A2= U --- V DC A3= I --- mA First push A2= U S-ES A3= Hz Second push A2= U H-E A3= Hz Third push A1= R --- Ω +DC or -DC A2= U --- V DC A3= I --- mA State 2: AUTO Mode (during the measurement) The STOP button is inactive. The only way to stop the measurement is to turn the rotary switch to another position. DISPLAY button 2-Wire with and without compensation: No effect. DISPLAY button 4-Wire: No effect. State 2: MANUAL Mode (during the measurement) Hz/OPTIONS button Switch between 2-Wire + and - direction and 4-Wire + and – direction indicated with the input connection and the +/- symbols: Initial A1= R XXX Ω +DC A2= U XXX V DC A3= I XXX mA First push A1= R XXX Ω -DC A2= U XXX V DC A3= I XXX mA Second push A1= R XXX Ω +DC A2= U XXX V DC A3= I XXX mA DISPLAY button 2-Wire without compensation: No effect. DISPLAY button 2-Wire with compensation: No effect. DISPLAY button 4-Wire: No effect. Ground Resistance Tester Model 6470 31 State 3: AUTO Mode (after the measurement) Hz/OPTIONS and SELECT button Any change in configuration settings will erase the results and return to State 1. DISPLAY button 2-Wire without compensation: Initial First push Second push Third push Fourth push A1= R XXX Ω ±DC A1= R XXX Ω ±DC A1= R XXX Ω +DC A1= R XXX Ω -DC A2= R+ XXX Ω A2= R+ XXX Ω A2= U XXX V DC A2= U XXX V DC A2= U H-E A3= Hz (1) A3= R - XXX Ω A3= R - XXX Ω A3= I XXX mA A3= I XXX mA Note: example with +/-DC direction DISPLAY button 2-Wire with compensation: Initial A1= R XXX Ω ±DC A2= R+ XXX Ω A3= R - XXX Ω Fourth push A2= U H-E A3= Hz (1) First push Second push Third push A1= R XXX Ω +DC A1= +R XXX Ω +DC A1= R XXX Ω -DC A2= R∆0 (0 to 5Ω) A2= U XXX V DC A2= U XXX V DC A3= I XXX mA A3= I XXX mA Fifth push A1= R XXX Ω ±DC A2= R+ XXX Ω A3= R - XXX Ω Note: example with +/-DC direction (1) external voltage measurement. DISPLAY button 4-Wire: Initial A1= R XXX Ω ±DC A2= R+ XXX Ω A3= R - XXX Ω Fourth push A2= U H-E A3= Hz (1) First push A1= +R XXX Ω +DC A2= U S-ESXXX V DC A3= I H-E XXX mA Fifth push A1= R XXX Ω ±DC A2= R+ XXX Ω A3= R - XXX Ω Second push A1= -R XXX Ω -DC A2= U S-ES XXX V DC A3=I H-E XXX mA Third push A2= U S-ES A3= Hz (1) Note: example with +DC direction (1) external voltage measurement. 32 Ground Resistance Tester Model 6470 State 3: MANUAL Mode (after the measurement) Hz/OPTIONS button Any change in configuration settings will erase the results and return to State 1. DISPLAY button 2-Wire without compensation: Initial A1= R XXX Ω +DC or -DC A2= U XXX V DC A3= I XXX mA First push Second push A1= R XXX Ω +DC or -DC A2= U XXX V DC A3= I XXX mA A2= U H-E A3= Hz (1) DISPLAY button 2-Wire with compensation: Initial A1= R XXX Ω +DC or -DC A2= U XXX V DC A3= I XXX mA First push A1= R XXX Ω A2= R∆0 (0 to 5Ω) Second push A2= U H-E A3= Hz (1) Third push A1= R XXX Ω +DC or -DC A2= U XXX V DC A3= IXXX mA DISPLAY button 4-Wire: Initial First push A1= RXXX Ω +DC or -DC A2= U S-ES A2= U S-ES XXX V DC A3= I H-E XXX mA A3= Hz (1) Second push A2= U H-E A3= Hz (1) Third push A1= RXXX Ω +DC or -DC A2= U S-ES XXX V DC A3= I H-E XXX mA (1) external voltage measurement. NOTE: In 4-Wire measurement there is no compensation allowed. NOTE: In both MANUAL and AUTO mode, if there is a DC disturbance voltage or an AC voltage > 42V eff, the measurement is cancelled. A compensation measurement erases previous measurement results. The START button is always active. Ground Resistance Tester Model 6470 33 4.5 Ground Resistance Measurement - 3-Pole (3-Point) The Model 6470 measures the ground resistance of an electrical installation. One terminal, E (X), is connected to the ground under test. Two other terminals, S (Y) and H (Z), are connected to two auxiliary rods some distance away. NOTE: It is important that the auxiliary rods be sufficiently far away to not inter fere in the measurement. If the rods are too close, the reading will be too low. If the rods are too far away, the readings will be too high. The actual resistance of the auxiliary rods also may affect the measurements if they are too high. High resistance actually comes from poor or very dry soil. To have a good measurement, the instrument needs to “punch” through and provide enough signal strength. The Model 6470 provides two test voltages 16V and 32V associated with a higher test current than other instruments on the market (>200mA max). The test voltage is set to 32V when it leaves the factory and may be lowered to 16V by the user. The Model 6470 can also measure the resistance of the auxiliary rods. The nominal test frequency is 128Hz (Square Wave) which is typical for ground testers. In certain cases measurements, at nominal test frequency may be affected by stray signals in the ground. The Model 6470 automatically scans the stray voltage noise and internally selects the best test frequency between 41Hz, 55Hz, 92Hz, 110Hz, 119Hz, 128Hz, 476Hz for the optimum measurement. For advanced users, the test frequency can be manually selected between 41Hz and 513Hz. Details on ground resistance measurements and rod distances are available in the AEMC® Understanding Ground Resistance Testing Workbook CD that was included with the instrument. Please note that the AEMC® ground kits include color-coded leads which match the terminals to facilitate connections and to ensure that adequate test lead lengths are provided. 34 Ground Resistance Tester Model 6470 4.5.1 Measuring Ground Resistance H (Z) S (Y) E (X) RS (Y) RH (Z) >30m RE (X) >30m Figure 4-3 • Connect the test leads to the terminals (color-coded). • Turn the rotary switch to 3-Pole. AUTO or MANUAL will be displayed at the bottom of the LCD. • To change the configuration, use the Hz/OPTIONS and ► buttons, otherwise proceed with the test. Configurable parameters are: test voltage, measurement test frequency and access to Earth Coupling (§ 4.6) test function. • The instrument automatically measures the ground voltage and noise (between S and E: US-E and between H and E: UH-E, and the associated frequencies). • The instrument will perform a voltage check (see § 4.2.1). • Press the START/STOP button to measure. Short Push: pressed briefly, the START/STOP button triggers the earth resis tance measurement RE (RX) only. (7 second measurement approx) Long Push: pressed and held (2 seconds), the START/STOP button triggers the earth resistance measurement RE and the resistance measurement on the auxiliary rods RS (RZ) and RH (RY). (15 second measurement approx) • In AUTO mode the measurement stops automatically. In MANUAL mode, the measurement continues until the START/STOP button is pressed. • If, during the measurement, the ground noise is too high and affecting the measurement accuracy, NOISE will be displayed and blinking. If a stray voltage >60Vpeak appears the measurement will stop. • If the measurement is unstable or seems not coherent, check the connections and measure again. • The Ground Resistance value is displayed at the top of the display (e.g. RE = 16.60W). NOTE: The actual test time is dependant on the test conditions and longer when the Model 6470 searches for the optimum test frequency. Ground Resistance Tester Model 6470 35 4.5.2 AUTO and MANUAL Modes The principal difference of the behavior of the instrument during a measurement between AUTO or MANUAL mode is: • In AUTO mode, in case of a detected disturbance, the instrument selects a measurement frequency that reduces the influence of a disturbance to a minimum and stops the measurement by itself after a stable result. If no suitable frequency is found, the instrument signalizes NOISE and stores the corresponding voltage with its basic frequency. • In MANUAL mode, the instrument keeps on measuring with a fixed selected frequency no matter how big the influence of an external disturbance voltage is (assumption: the external voltage does not exceed the maximum input voltage). If the instrument detects a voltage that exceeds 60V peak the measurement is cancelled and the disturbance voltage will be displayed. 4.5.3 Measurement Results This section shows the different possible selections and the different screens which are reachable with the DISPLAY button depending of the configuration and the state (1, 2 or 3) of the instrument. State 1 and State 3: Hz/OPTIONS and SELECT Button AUTO-MANUAL Mode (before and after functional measurement) When pushing the Hz/OPTION button, the display shows the CONFIG symbol and the parameter that is configurable will blink. The Hz/OPTIONS button selects the parameter, that can be modified. Validation of a parameter is made: • By pushing the Hz/OPTIONS button to the next step • By starting a measurement pushing the START button (short push or long (>2s) push - see § 4.5.1) • By turning the rotary switch • By pushing DISPLAY For measurement frequency selection in MANUAL mode, the SELECT enables the modification of the numerical value (blinking number). button The CHANGE button ► only modifies the user defined frequencies using the table contained in the instrument. 36 Ground Resistance Tester Model 6470 Hz/OPTIONS and SELECT buttons (State 1 and State 3) 1st Push 2nd Push 3rd Push MANUAL AUTO 32V 16V earth with 128Hz EXIT earth coupling with 128Hz XXX... modified with CHANGE button 41, 55, 92, 110, 119, 128, 476Hz, USrXXX Hz 4th Push 32V 5th Push 16V EXIT Figure 4-4 - Hz/OPTIONS and SELECT buttons in state 1 or 3 in AC 3-Pole function. Usr means variable frequency selection by the User. State 2: Hz/OPTIONS and SELECT Button (during the measurement) In AUTO mode: Enables frequency changing which sets the instrument into MANUAL mode. The default frequency is 128Hz. In MANUAL mode: First push on Hz/OPTIONS button switches the display to the following panel with frequency blinking. button for predefined values, Frequency can be changed using the SELECT and also in the case of a user frequency (Usr) change, with the CHANGE ► button for any value out of a table in XXX Hz. First push AC A1= R E Ω A2= U H-E XXX V A3= XXX Hz modification with edit keys Second push A1= R E Ω AC A2= U H-E XXX V A3= XXX Hz Second push on Hz/OPTIONS button: the display does not change but the blinking frequency is then stable. Pushing the DISPLAY button stores the last frequency value and moves the display indication to the initial state. Ground Resistance Tester Model 6470 37 State 1: DISPLAY button in AUTO and MANUAL Mode (before the measurement) Initial First Push A1= R E --- Ω AC A1= R E --- Ω AC A2= R H --- Ω A2= U OUT 32 V A3= R S --- Ω A3= Hz Second Push (1) Third Push (1) A2= U S-E A3= Hz A2= U H-E A3= Hz Fourth Push A1= R E --- Ω AC A2= R H --- Ω A3= R S --- Ω (1) A2 and A3 shows the disturbance RMS signal between H (Z) and E (X) or S (Y) and E (X) inputs and its fundamental frequency. State 2: DISPLAY button in AUTO and MANUAL mode (during the measurement) DISPLAY button after a short START push: No effect DISPLAY button after a long START push: Initial A1= R E Ω AC A2= R H Ω A3= R S Ω First Push A1= R E Ω AC A2= U H-E V A3= F Hz Second Push A1= R E Ω AC A2= U S-E V A3= I H-E Third Push A1= R E Ω AC A2= R H Ω A3= R S Ω State 3: DISPLAY Button in AUTO and MANUAL Mode (after the measurement) DISPLAY button after a short START push: Initial A1= R E XXX Ω AC A2= U S-E V A3= I H-E XXX mA First Push A2= U S-E NOISE A3= Hz (1) Second Push A2= U S-E A3= Hz (2) A2= U H-E A3= F Hz (2) 38 Optional Push Optional Push A2= U H-E NOISE A3= F Hz (1) Third Push A1= R E XXX Ω AC A2= U S-E V A3= I H-E XXX mA Ground Resistance Tester Model 6470 DISPLAY button after a long START push: Initial A1= R E XXXΩ AC A2= R H XXX Ω A3= R S XXX Ω Optional Push First Push A1= R E XXX Ω AC A2= U H-E XXX V A3= XXX Hz Third Push Second Push A1= R E XXX Ω AC A2= U S-E V A3= I H-E XXX mA Fourth Push A2= U H-E NOISE A3= F Hz (1) A2= U S-E A3= Hz (2) A2= U H-E A3= F Hz (2) Optional Push A2= U S-E NOISE A3= Hz (1) Fifth Push A1= R E XXXΩ AC A2= R H XXX Ω A3= R S XXX Ω (1) If NOISE was blinking during the measurement, in State 3 NOISE is stable and the values that had been measured during the measurement, are shown. (2) Display shows actual readings of the external voltage and frequency. 4.6 Earth Coupling Measurement - 3-Pole (3-Point) 4.6.1 Measurement HV LV RH RL Y Z Figure 4-5 Coupling Coefficient: k = (RH + RL - RHL) / 2RH Ground Resistance Tester Model 6470 39 HV RH LV HV LV RH RL RL Y Z Figure 4-6 Earth coupling is a measurement done by certain utilities. This test measures the coupling of two grounds through the earth. This measurement is performed and accessed in the 3-Pole MANUAL mode only. To configure: • Turn rotary switch to the 3-Pole position. • Use the Hz/OPTION button to select MANUAL mode, then EARTH COUPLING. • Press the Hz/OPTION button again to change the measurement frequency or the voltage applied, if desired. The earth coupling calculation requires three successive ground resistance measurements to be performed and stored one-by-one. First measurement: 3-Pole (3-Point) earth measurement that will give R1 = Ra + Rc with: R1 = first ground earth resistance Rc = coupling resistance between R1 and R2 Second measurement: 3-Pole (3-Point) earth measurement that will give R2 = Rb + Rc with: R2 = second ground earth resistance Rc = coupling resistance between R1 and R2 40 Ground Resistance Tester Model 6470 Third measurement: 2-Pole (2-Point) earth measurement that will give R1-2 = Ra + Rb. For this measurement, it is possible to compensate the resistance of the cables. Fourth record: Contains all coupling results calculated from measurement #1 to #3. This is done automatically after storage from third measurement. From R1, R2, R1-2, the instrument will calculate Ra, Rb, Rc (coupling resistor) and C (coupling factor) with C1 = Rc/R1 and C2 = Rc/ R2. NOTE: Each result has to be stored before the start of the next measurement takes place. After each measurement, MEM is shown and blinking on the display indicating that the user has to store the results before going to the next step. The results are stored under the same OBJ-TEST number that has been selected after the first measurement; no selection is possible after storage of the first measurement. The three different measurements are distinguished by the sample number (1, 2 and 3 indicated on the display). When the results of measurement #1 have been stored, #2 is blinking on the display and so on. After the START of the first measurement, no change is possible with the Hz/OPTION button until the 3rd measurement has been stored. The measurements, before reaching the final calculation, can only be stopped by switching of the main function switch. The arrangement of the auxiliary H (Z) and probe S (Y) electrode should not be removed during the three measurements. Frequency change, if needed, is only possible for the first measurement; the same measurement frequency is used for all 3 measurements. After the results of the third measurement have been stored, the instrument calculates all coupling results and stores them into extended location 4 automatically and displays RC, C1 and C2. Each result can be recalled using the MR button. Ground Resistance Tester Model 6470 41 4.6.2 Measurement Results The following paragraphs show the different possible selections and the different screens which are reachable with the DISPLAY button, depending of the configuration and the State (1, 2 or 3) of the instrument. For this function, short and long START pushes (see § 4.5.1) are allowed for measurements #1 and 2. Only a short push is possible for measurement #3 as no auxiliary rod is connected. State 1: Hz/OPTIONS and SELECT Button (before measurement) The display shows EARTH COUPLING 1 (1 = blinking as long as the first measurement takes place and is stable after the measurement has been stopped. After storing the results, the next number 2 appears. Functionality for measurement #2 and 3 is analog to measurement #1). During subsequent measurements #2 and #3, there is no Hz/OPTION button setting possible. Hz/OPTION and SELECT been started. button has no effect after the first measurement has State 1: DISPLAY Button (before 3-Pole (3-Point) measurements #1 and #2) The display shows EARTH COUPLING X (X = blinking = 1 or 2) and the corresponding suffix X on A1. Initial A1= R X --- Ω AC A2= R H --- Ω A3= R S--- Ω First Push A1= R X --- Ω AC A2= U OUT 32V A3= 96 Hz Second Push (1) A2= U S-E A3= Hz Third Push (1) A2= U H-E A3= Hz Fourth Push A1= R X --- Ω AC A2= R H --- Ω A3= R S--- Ω (1) A2 and A3 shows the disturbance RMS signal between H (Z) and E (X) or S (Y) and E (X) inputs and its fundamental frequency State 1: DISPLAY Button (before 2-Point measurement #3) The display shows EARTH COUPLING 3 ( 3 = blinking ) Without compensation: Initial A1= R 1-2--- Ω AC A2= U OUT 32V A3= 96 Hz 42 First Push A2= U H-E A3= Hz Second Push (1) A1= R 1-2--- Ω AC A2= U OUT 32V A3= 96 Hz Ground Resistance Tester Model 6470 With compensation: Initial A1= R 1-2--- Ω AC A2= U OUT 32V A3= 96 Hz First Push A1= R 1-2---Ω AC A2= R∆0 XXX Ω (0..5Ω) Second Push (1) A2= U H-E A3= Hz Third Push A1= R 1-2--- Ω AC A2= U OUT 32V A3= 96 Hz (1) A2 shows the disturbance RMS signal between H (Z) and E (X) inputs and its fundamental frequency State 2: DISPLAY Button (during measurements #1 and #2) DISPLAY button after a short START push: No effect DISPLAY button after a long START push: Initial A1= R X XXXΩ A2= R H XXXΩ A3= R S XXXΩ AC First Push A1= R X XXXΩ AC A2= U H-E XXX V A3= F 96 Hz Second Push A1= R X XXX AC A2= U S-E XXX V A3= I H-E XXXmA Third Push A1= R X XXXΩ AC A2= R H XXXΩ A3= R S XXXΩ State 2: DISPLAY Button (during measurement #3) With or without compensation. DISPLAY button after a short START push: No effect DISPLAY button after a long START push: Initial A1= R 1-2 XXX Ω AC A2= U H-E XXX V A3= F 96 Hz First Push A1= R 1-2 XXX Ω AC A2= U H-E XXX V A3= I H-E XXX mA Second Push A1= R 1-2 XXX Ω AC A2= U H-E XXX V A3= F 96 Hz State 3: DISPLAY Button (after measurements #1 and #2) DISPLAY button after a short START push: Initial A1= R X XXX Ω AC A2= U S-E XXX V A3= I H-E XXX mA Second Push A2= U H-E A3= Hz Optional Push (1) A2= U S-E NOISE A3= Hz Third Push A1= R X XXX Ω AC A2= U S-E XXX V A3= I H-E XXX mA Ground Resistance Tester Model 6470 Optional Push (2) A2= U H-E NOISE A3= Hz First Push A2= U S-E A3= Hz 43 DISPLAY button after a long START push: Initial A1= R X XXXΩ AC A2= R H XXXΩ A3= R S XXXΩ Optional Push (2) First Push A1= R X XXX Ω AC A2= U H-E XXX V A3= F 96 Hz Third Push A2= U H-E NOISE A3= Hz A2= U S-E A3= Hz Second Push A1= R X XXX Ω AC A2= U S-E XXX V A3= I H-E XXX mA Fourth Push A2= U H-E A3= Hz Optional Push (1) A2= U S-E NOISE A3= Hz Fifth Push A1= R X XXXΩ AC A2= R H XXXΩ A3= R S XXXΩ (1) A2 and A3 shows the disturbance RMS signal between H (Z) and E (X) or S (Y) and E (X) inputs and its fundamental frequency that had been detected during the functional measurement. (2) A2 and A3 shows the current disturbance RMS signal between H (Z) and E (X) or S (Y) and E (X) inputs and its fundamental frequency State 3: DISPLAY Button (after measurement #3) With compensation (optional) or without. Initial A1= R 1-2 XXX Ω AC A2= U H-E XXX V A3= F 96 Hz Second Push A2= U H-E A3= Hz Optional Push (with compensation) A1= R 1-2 XXX Ω AC A2= R∆0 (0 to 5Ω) First Push A1= R 1-2 XXX Ω AC A2= U H-E XXX V A3= I H-E XXX mA Optional Push (1) A2= U H-E NOISE A3= Hz Second Push A1= R 1-2 XXX Ω AC A2= U H-E XXX V A3= F 96 Hz (1) : A2 and A3 shows the disturbance RMS signal between H (Z) and E (X) or S (Y) and E (X) inputs and its fundamental frequency that had been detected during the functional measurement. State 3: DISPLAY Button (after measurement #3 has been stored) If MEM is pushed after the third measurement the display queue changes to the coupling information: Initial A1= R c XXX Ω A2= C1 XXX A3= C2 XXX 44 First Push A1= R c XXX Ω A2= R a XXX Ω A3= R b XXX Ω Second Push A1= R c XXX Ω A2= U OUT V A3= F 96 Hz Third Push (1) A1= R c XXX Ω A2= C1 XXX A3= C2 XXX Ground Resistance Tester Model 6470 4.7 Soil Resistivity Measurements (ρ Position) Soil Resistivity is measured using the resistance measurement RS-ES and distances between the measurement rods. Two measurement methods are possible: • Wenner method • Schlumberger method To plot the resistivity profile as a function of the depth of the earth, the Schlumberger method is easier to implement as only the two center rods need to be moved. With the Wenner method, the four rods need to be moved and are equally spaced. This is the more common method used for measuring soil resistivity before installing grounds. Schlumberger, which is also a good method, also uses 4 rods but only the two center rods are moved. NOTE: That the two center auxiliary rods are the current electrodes, and their spacing corresponds to the depth of the resistivity measured. A four-electrode piece of equipment, which can be made available in the physics laboratory, was designed and fabricated for measuring current and potential values so as to obtain the resistivity values. Readings taken from our chosen location using both Wenner and Schlumberger arrays were analyzed. In the resistivity method, the Wenner configuration discriminates between resistivities of different geoelectric lateral layers, while the Schlumberger configuration is used for the ‘depth sounding’. The theory behind the resistivity method was introduced with some degree of sophistication. Experimentally determined values of depth to surface were correlated with the values determined from the excavated site and this gave a good correlation. It was observed that the resistivity value in the chosen location increases with the depth and the Schlumberger method was seen to have a greater penetration than the Wenner. Ground Resistance Tester Model 6470 45 4.7.1 Advantages and Disadvantages of Wenner and Schlumberger Schlumberger Advantage Disadvantage Wenner Advantage Need to move the two potential electrodes ES (Xv) and S (Y) only for most readings. This can significantly decrease the time required to acquire a sounding Disadvantage All four electrodes, the two current E (x) and H (z) and the two potential ES (Xv) and S (Y) must be moved equally to acquire each reading. Because the potential electrode spacing is small compared to the current electrode soakings, higher meter sensitivity is required. Potential electrode spacing increases as current electrode spacing increases. Less sensitive meters may be used. Because all electrodes are moved for each reading, this method can be more susceptible to near-surface, lateral, and variations in resistivity. These near surface lateral variations could potentially be misinterpreted in terms of depth variations in resistivity. Because the potential electrodes remain in fixed locations, the effects of the near surface lateral variations in resistivity are reduced. In general, interpretations based on DC soundings will be limited to simple, horizontal; layered structures In general, interpretations based on DC soundings will be limited to simple, horizontal; layered structure. Source: DC Resistivity - T. Boyd 46 Ground Resistance Tester Model 6470 4.7.2 Measuring Soil Resistivity - 4-Pole (4-Point) Resistivity measurement can only be performed in MANUAL mode. The instrument configurations that can be set for this measurement are the test method, voltage and frequency: 1st Push W (ENNER) S (CHLUMBERGER) XXX... modified with CHANGE button 2nd Push 128, 119, 110, 92, 55Hz UsrXXX (128Hz per default) 3rd Push 32V 4th Push 16V EXIT Figure 4-6 Wenner Method: ρW = 2 x Π x d x RS-ES RH RS d RS-ES d d RE Schlumberger Method: ρS = (Π x (d2-A2/4)/A) x RS-ES RH RS d RS-ES A Ground Resistance Tester Model 6470 RE d 47 • Turn the rotary switch to 4-Pole. MANUAL will be displayed at the bottom of the LCD. • Press the Hz/OPTIONS button and select either rS or rW with the ► button. • Select the measurement frequency and voltage applied. • Press the START/STOP button to measure. Fast measurement: pressed briefly, the START/STOP button triggers the resis tance measurement RSES only. Expert measurement: pressed and held (2 seconds), the START/STOP button triggers the resistance measurement RS-ES and the resistance measurements on the auxiliary rods RPH, RPS, RPE and RPES. • The distances required for the r calculation are programmed using the DISTANCE button: - one distance only ,”d”, for the Wenner method, - two distances, “A” and “d”, for the Schlumberger method. • The values are chosen using the ► ▲ ▼, before or after the measurement. NOTE: The distances “A” and “d” cannot be modified during the measurement. During the measurement, you can use the Hz/OPTIONS and ► buttons to modify the measurement frequency, between 41 and 128 Hz only. If the measurement is unstable and results are inconsistent, trigger the measurement again to check that the problem is not a faulty connection. Any change to the “A” or “d” distance parameters after the measurement will automatically result in a new resistivity calculation by the instrument. Several measurements can be saved for different distances in a single OBJ:TEST test location. In this way, the resistivity can be determined as a function of the distance, and therefore of the depth of the measurement location. 48 Ground Resistance Tester Model 6470 4.7.3 Measurement Results State 1: DISPLAY Button (before measurement) Initial A1= ρW --- Ωm A2= RS-ES --- Ω A3= d = 1.0 m First Push A1= ρW --- Ωm A2= UOUT 32 V A3= 94 Hz Second Push A2= U S-ES A3= Hz Third Push A2= U H-E A3= Hz Fourth Push A1= ρW --- Ωm A2= RS-ES --- Ω A3= d = 1.0 m The indication rule for all resistivity measurements is: if there is no valid distance typed in, the ρ value remains with “----”. Initial A1= ρS --- Ωm A2= A= 1.0 m A3= d= 20.0m Fourth Push A2= U H-E A3= Hz First Push A1= ρS --- Ωm A2= RS-ES --- Ω A3= d= 20.0 m Fifth Push A1= ρS --- Ωm A2= A= 1,0 m A3= d= 20.0m Second Push A1= ρS --- Ωm A2= UOUT 32 V A3= 94 Hz Third Push A2= U S-ES A3= Hz State 2: DISPLAY Button (during measurement) Wenner method: DISPLAY button after a short START push: Initial A1= ρWXXXΩm A2=RS-ES XXX Ω A3= d= 1.0 m First Push A1= ρW XXXΩm A2= US-ES XXX V A3= I H-E mA Second Push A1= ρWXXXΩm A2=RS-ES XXX Ω A3= d= 1.0 m DISPLAY button after a long START push: Initial A1= ρWXXXΩm A2=RS-ES XXX Ω A3= d= 1.0 m First Push A1= ρWXXXΩm A2= UH-E XXX V A3= 94 Hz Second Push A1= ρW XXXΩm A2= US-ES XXX V A3= I H-E mA Third Push A3= d= 1.0 m Schlumberger method: DISPLAY button after a short START push: Initial A1= ρS XXXΩm A2=RS-ES XXX Ω A3= d= 1.0 m First Push A1= ρS XXXΩm A2= US-ES XXX V A3= I H-E mA Ground Resistance Tester Model 6470 Second Push A1= ρS XXXΩm A2=RS-ES XXX Ω A3= d= 1.0 m 49 DISPLAY button after a long START push: Initial A1= ρS XXXΩm A2= A= 1.0 m A3= d= 20.0 m First Push A1= ρS XXXΩm A2=RS-ESXXXΩ A3= d= 20.0 m Second Push A1= ρS XXXΩm A2=UH-EXXXV A3= 94 Hz Third Push A1= ρS XXXΩm A2=US-ESXXXV A3= IH-E mA Fourth Push A1= ρS XXXΩm A2= A= 1.0 m A3= d= 20.0 m State 3: DISPLAY Button in (after measurement) Wenner method: DISPLAY button after a short START push: Initial A1= ρW XXXΩm A2= RS-ESXXX Ω A3= d= 1.0 m Second Push (2) First Push A1= rW XXXWm A2= US-ES XXXV A3= IH-E mA Third Push (2) A2= U S-ES A3= Hz A2= U H-E A3= Hz Optional Push (1) A2= U S-ES NOISE A3= Hz Fourth Push A1= ρW XXXΩm A2= RS-ESXXX Ω A3= d= 1.0 m Optional Push (1) A2= U H-E NOISE A3= Hz DISPLAY button after a long START push: Initial A1= ρW XXXΩm A2= RS-ESXXX Ω A3= d= 1.0 m Optional Push (1) First Push Second Push A1= rW XXXWm A1= ρW XXXΩm A2= UH-E XXXV A2= RP-E XXXΩ A3= 94 Hz A3= RP-H XXXΩ Optional Push (1) Fifth Push (2) A2= U S-ES NOISE A3= Hz A2= U H-E NOISE A3= Hz A2= U S-ES A3= Hz Third Push Fourth Push A1= ρW XXXΩm A1= ρW XXXΩm A2= RP-ES XXXΩ A2= US-ES XXXV A3= RP-S XXXΩ A3= IH-E mA Sixth Push (2) Seventh Push A1= ρW XXXΩm A2= U H-E A2= RS-ESXXX Ω A3= Hz A3= d= 1.0 m Schlumberger method: DISPLAY button after a short START push: Initial (1) A1= ρS XXXΩm A2= RS-ESXXX Ω A3= d= 1.0 m Second Push (3) First Push A1= rS XXXWm A2= US-ES XXXV A3= IH-E mA Third Push (3) A2= U S-ES A3= Hz A2= U H-E A3= Hz Optional Push (2) A2= U S-ES NOISE A3= Hz Fourth Push A1= ρS XXXΩm A2= RS-ESXXX Ω A3= d= 1.0 m Optional Push (2) A2= U H-E NOISE A3= Hz (1) distance “A” can be seen instead of RS-ES using the DISTANCE button 50 Ground Resistance Tester Model 6470 DISPLAY button after a long START push: Initial A1= ρSXXXΩm A2= A= 1.0 m A3= d= 20.0m Fourth Push A1= ρSXXXΩm A2= RP-ES Ω A3= RP-S Ω Sixth Push (3) First Push A1= ρSXXXΩm A2= RS-ES XΩ A3= d= 20,0m Fifth Push A1= ρSXXXΩm A2= US-ES XXXV A3= IH-E mA Seventh Push (3) A2= U S-ES A3= Hz A2= U H-E A3= Hz Second Push A1= ρSXXXΩm A2= UH-E XXXV A3= 94 Hz Optional Push (2) Third Push A1= ρSXXXΩm A2= RP-E Ω A3= RP-H Ω Optional Push (2) A2= U S-ES NOISE A3= Hz Eighth Push A1= ρS XXXΩm A2= A= 1.0 m A3= d= 20.0 m A2= U H-E NOISE A3= Hz (2) if NOISE was blinking during the measurement, in State 3 NOISE is stable and the values that had been measured during the measurement, are shown. (3) display shows actual readings of the external voltage and frequency. 4.7.4 DISTANCE Button Results The distances in W(enner) (d) and S(chlumberger) (d, A) function are entered by pushing the DISTANCE button. These parameters can be set before and after the measurement (States 1 and 3) but are not accessible during the measurement (State 2). If there was already a measurement result, the new value entered modifies the displayed result for Rho (r). Pushing the DISTANCE button, the highest digit blinks. Press the ► button to modify the number. Press the▲▼ button to change digit. If there is no distance set, the value of Rho is “----“, and the RS-ES indicates the measured value. Storing several measurements with the same OBJ:TEST (in Schlumberger method additionally distance A) number but with different DISTANCES of “d” are assumed to belong together. The application software will collect the records and document the results in a graph. Resistivity as a function of distance “d”. When the DISTANCE button is pressed the display shows: WENNER method First Push A1= ρW --- Ωm A2= RS-ES --- Ω A3= d= 001.0 m blinking of the most significant digit SELECT Second Push A1= ρW --- Ωm A2= RS-ES --- Ω A3= d = 001.0 m stops blinking Third Push A1= ρW --- Ωm A2= RS-ES --- Ω A3= d = 001.0 m blinking of the most significant digit moves the blinking digit, the last two digits are accessed together. CHANGE ► moves the value up and down. Ground Resistance Tester Model 6470 51 SCHLUMBERGER method First Push A1= ρ --- Ωm A2= A= 001.0 m blinking of the most significant digit A3= d= 020.0 m SELECT Second Push A1= ρ --- Ωm A2= A= 001.0 m stops blinking A3= d= 020.0 m blinking of the most significant digit Third Push A1= ρ --- Ωm A2= A= 001.0 m stops blinking A3= d= 020.0 m stops blinking Fourth Push A1= ρ --- Ωm A2= A= 001.0 m blinking of the most significant digit A3= d= 020.0 m moves the blinking digit, the last two digits are accessed together. CHANGE ► moves the value up and down. Any changes of distances in State 3 causes the instrument to recalculate the Rho values as soon as the new values are entered. 4.8 Saving Measurements into Memory This function is available in State 3. Each record gets the date and time information from the internal clock at the moment the measurement is started. After pushing MEM, the instrument presents the next OBJ:TEST free number. The user can now store or modify this address, using the arrow buttons. If the address is already occupied, the A2 display shows OCC. To overwrite the record the MEM button must be pushed. In case of an earth coupling function, the three measurements are stored under one OBJ:TEST number with the extension 1, 2 and 3. Together with the third measurement a fourth storage place is generated automatically, to memorize all calculated results of the coupling. In case of a resistivity measurement with several measurements (different positions of the earth rods) a third number (distance d) provides the memorization together with one OBJ:TEST number. All samples of one OBJ:TEST can be transferred to a PC for post processing. There are some conditions that influences the operation: Frequency and voltage and distance A (Schlumberger method) must be kept for all measurements belonging to the same OBJ:TEST number. The setting of the distance A of the sense electrodes and distance “d” of the source electrodes in Schlumberger method, or distance “d” of all electrodes in Wenner method influences the displayed value of ρ. If no distance is set, R S-ES is displayed. If the distance is set, the variable distance value is another storage parameter and all subsequent measurements use the same voltage and frequency except the distance. Therefore, the Hz/OPTIONS button is locked after the first stored measurement. A new distance is set with the DISTANCE and arrow buttons. Each distance is combined with the available measurement results. When storing, the instrument always takes the last measurement into account, and overwrites previous measured records with the same distance. 52 Ground Resistance Tester Model 6470 The memory capacity of the instrument is 64kB which allows 512 records to be stored independent of the function. 4.9 Recalling Measurements from Memory All records contain date and time information. • Pushing the recall MR button (2nd + MEM), causes the instrument to display the highest available OBJ. and TEST number in A2 together with the main result in A1 and frequency in A3. • Use the arrow buttons to modify the OBJ:TEST number to select the desired record. • A second push to MR exits the recall mode. In functions like earth coupling or resistivity where more than one record belong together, the highest used OBJ:TEST and DISTANCE or record number (4 in earth coupling) will always be accessed by pushing the MR button. Once a record is recalled into the display, the DISPLAY button selects all available data. For resistivity measurement, if several distances have been used and stored under the same OBJ:TEST, the different results can be recalled using the DISTANCE button in a rolling mode. If earth coupling results are shown when recalled (4 blinking), the corresponding intermediate measurements can be seen on the display using the 2 or 3 blinking respectively) in a rolling mode. button (with 1, In the DISPLAY queue the recording time and date is shown right after the first screen. Another OBJ:TEST and DISTANCE (record number in earth coupling) can be recalled by modifying the OBJ:TEST and DISTANCE values. 4.10 Erasing Measurements from Memory 4.10.1 Erasing All Measurements • Push once on the MEM button. • The A2 display will show the number of free records. The A3 display will show the number of available records. • Push a second time on the MEM button. • The display will show “dELete ALL” records. Select either NO or YES with the ► button. NOTE: If YES is selected, all saved measurements will be deleted. Ground Resistance Tester Model 6470 53 4.10.2 Erasing Selected Measurements button, then press the MR button. • Hold down the • The A1 display will show the main result, in A2 the OBJ:TEST number, and if necessary, in A3 the DISTANCE “d”. In this state, the DISPLAY button steps through the rest of the records result. This queue is extended by the time and date information which is shown by the first DISPLAY push. • When the desired measurement to erase is displayed, press a second time on the MR button. Use the ► button to change the blinking NO into YES. • A final push on the MR button erases the selected record. • To exit this mode, press the MEM button. 54 Ground Resistance Tester Model 6470 CHAPTER 5 DATAVIEW® SOFTWARE 5.1 Introduction The DataView® graphing and analysis program is a full function Windows® based application software package. It provides you the ability to configure and run any test or recording from the computer as you can from the instrument itself. Additionally, it enhances the information captured for snapshots as it captures all the information to display and report data in real time. DataView® includes several pre-defined templates for displaying and printing reports, as well as the ability to totally customize the reports to meet your exact needs. This chapter will give you the information you need to know to use this program. More extensive information on specific functions available in DataView® is available in the online help system included with the software. The DataView® software supplied with the Model 6470 provides four main functions: 1. The ability to configure the 6470 from the computer. 2. The ability to initiate a recording test from the computer. 3. The ability to store test results and print out reports of any test. 4. The ability to view and store real-time data. DataView® software is a copyright of Chauvin Arnoux®, Inc. d.b.a. AEMC® Instruments Ground Resistance Tester Model 6470 55 5.2 Features DataView® has a simple, easy-to-use interface for configuring and running tests, as well as printing reports of the test results. There are many features that are available through this program. A few of the most popular are listed below. Key Features: • Runs tests from your computer with a simple click and execute process • Views and captures data in real time • Retrieves data from the instrument’s memory • Plots graphs of recorded information that has been downloaded • Presents reports, including your analysis in the comments section • Stores a library of setups on your PC for different applications • Provides consistency in testing, regardless of who performs the test NOTE: For additional help on using the software, use DataView’s “Help” Menu, which is located on the menu bar. 5.3 Installing DataView® INSTALL DATAVIEW® BEFORE INSTALLING THE USB DRIVERS AND BEFORE CONNECTING THE INSTRUMENT TO THE COMPUTER. Minimum Computer Requirements: • • • Windows® 2000/XP/Vista with a CD-ROM drive 128MB of RAM for Windows® 2000 (256MB recommended) 256MB of RAM for Windows® XP 512MB of RAM for Windows® Vista 80MB of hard disk space (200MB recommended) INSTALLATION NOTE: When installing on a Windows® 2000, XP or Vista system the user must have Administrative access rights during the installation. User’s access rights can be changed after the installation is complete. The user does not need administrative rights when using DataView. For Vista, there is a single operation option (Privilege Elevation of User Account Control) available to the Administrator. The Administrator types the password and permits the installation. This process will not work since the templates will not be installed. The user must be given full rights as the Administrator before the installation. DataView® must be reinstalled for each user in a multi-user system (e.g. Windows® 2000, XP and Vista). 56 Ground Resistance Tester Model 6470 1. Insert the DataView® CD into your CD-ROM drive. If auto-run is enabled, the Setup program will start automatically. If auto-run is not enabled, select Run from the Start menu and type in D:\SETUP (if your CD-ROM drive is drive D. If this is not the case, substitute the appropriate drive letter). NOTE: If installing onto a Vista based computer the User Account Control dialog box will be displayed. Select the Allow option to proceed. 2. A Set-up window, similar to the one below, will appear. Figure 5-1 There are several different options to choose from. Some options(*) require an internet connection. • DataView, Version 2.xx.xxxx - Installs DataView® onto the PC. • *Adobe Reader - Links to the Adobe® website to download the most recent version of Adobe® Reader to the computer. Adobe® Reader is required for viewing PDF documents supplied with DataView® that are accessible from the Help menu. • MetaViewer - The MetaViewer utility program allows a user to view and print .dmf or .emf files generated by DataView® without having DataView® software installed. • *Software Updates - Links to the AEMC® Software Update website to check for new software version releases. • *Firmware Upgrades - Links to the AEMC® Firmware Upgrade website to check for new firmware version releases. Ground Resistance Tester Model 6470 57 • Documents - Shows a list of instrument related documents that you can view. Adobe® Reader is required for viewing PDF documents supplied with DataView®. 3. Select the DataView, Version 2.xx.xxxx option from the list, then click on Install. 4. The Installation Wizard window will appear. Click Next. 5. In the Customer Information window, enter a Name and Company, then click Next. 6. In the Setup Type window that appears, select the “Complete” radio button option, then click Next. 7. The Select Features window appears allowing features for all instruments compatible with DataView® to be selected or not selected to install. Select the instrument(s) that you want to install. You can update the software to include other instruments later, if necessary. NOTE: The PDF-XChange option must be selected to be able to generate PDF reports from within DataView®. Figure 5-2 8. In the Ready to Install the Program window, click on Install. 9. If the instrument selected for installation (see Figure 5-2) requires the use of a USB port, a warning box will appear, similar to Figure 5-3. Click OK. 58 If the USB drivers are not needed, Setup will continue at step 12. Ground Resistance Tester Model 6470 Figure 5-3 10. The Install Driver dialog box will appear. Click on Install. Figure 5-4 NOTE: The installation of the drivers may take a few moments. Windows may even indicate that it is not responding, however it is running. Please wait for it to finish. 11. When the drivers are finished installing, the Installation Successful dialog box will appear. Click on OK. 12. Next, the Installation Wizard Complete window will appear. Click on Finish. 13. A Question dialog box appears next. Click Yes to read the procedure for connecting the instrument to the USB port on the computer. 14. Restart your computer before connecting the instrument to the USB port on the computer. NOTE: The Set-up window should still be open. You may now select another option to download (e.g. Adobe® Reader), or you may close the window. Shortcuts for DataView® and each instrument selected during the installation process have been added to your desktop. Ground Resistance Tester Model 6470 59 5.4 Installing the USB Drivers for Each Instrument INSTALL DATAVIEW® SOFTWARE AS SHOWN IN THE PREVIOUS SECTION BE FORE CONNECTING THE INSTRUMENT TO THE COMPUTER. The USB driver operates at two levels. • First Level: This level is for communication between the instrument and the USB port. This is done automatically during DataView’s installation. • Second Level: This level is for communication between the DataView application and the USB port. This is done when the instrument is connected to the computer. Upon the Second Level installation, the Found New Hardware dialog box will be displayed. Windows will complete the driver installation process automatically. NOTE: If you connected your instrument to the computer before installing the software and drivers, you may need to use the Add/Remove Hardware utility to remove the instrument driver before repeating the process. 5.5 Connecting the Model 6470 to your Computer The Model 6470 is supplied with an optically isolated USB interface cable required for connecting the instrument to the computer. This cable (Cat. #2135.41) is equipped with a USB type A on one end, and an optical connector on the other end. To connect the Model 6470 to your computer: 1. Connect the optical connector end of the cable to the serial port on the front panel of the Model 6470 (see § 2.3, Item #8). 2. Connect the USB type A end of the cable, to an available USB port on your computer. You are now ready to use the DataView® software with the 6470. 60 Ground Resistance Tester Model 6470 5.6 Starting DataView® Once the connection between the computer and instrument has been completed, start DataView®. There are two ways to open and use DataView®: Using the Ground Tester Icon • Double-click the Ground Tester Icon that was created during installation, located on the desktop. • The Ground Tester Control Panel will open and the Connection window will appear (Fig 5-6). Using the DataView Icon • Double-click the DataView Icon that was created during installation, located on the desktop. • DataView® will open and display the Quick Start window (Fig. 5-5). • Click the Configure Instrument button and the Connection window will appear (Fig. 5-6). Figure 5-5 • Configure Instrument: Opens the Configure Instrument dialog box that allows you to modify the configuration of the 6470. • Real-time Display: Opens the control panel providing real-time display of measurement data. • Download Data: Opens the control panel and begins the download of recorded data. • Open Data File: Allows you to open an existing database. Ground Resistance Tester Model 6470 61 5.7 Configuring the Instrument To configure the instrument, perform the following steps. 1. Click the Configure Instrument button from within DataView®, or click the Configure option from the Instrument menu of the Control Panel. If no connection was previously established, the Communication dialog box will appear allowing you to select the Communication Rate (baud rate) and Port for communicating with the 6470. Figure 5-6 2. Make sure that the communication port displayed in the dialog box matches the port that the serial cable is plugged into. 3. Once the proper communication parameters have been specified, click on OK. NOTE: The communication rate needs to be the same as the instrument. Select Set-up from the rotary switch to check the rate. When a communication link is established, DataView® will automatically identify the instrument that it is connected to. Figure 5-7 62 Ground Resistance Tester Model 6470 A status screen will then appear showing: • A toolbar at the top of the screen with the range selection and start/stop buttons. • The status of the instrument on the left-hand side. • If DataView® is connected to the instrument. • The communications port and speed of the connection. • The model number, serial number, and firmware version. • Date and time from the clock. • The Configuration window, which shows all of the parameters available for modification. This window defaults to the instrument range that is selected. If the indicated items are not shown on the screen, select Restore Default Layout from the Window menu. 5.7.1 Configuration Functions The buttons described below appear on several DataView® Setup Screens. • Load from File: Retrieves a saved file from the computer’s disk drive to be used in programming the instrument. • Save to File: Saves the current configuration. This file will reside on the computer’s disk drive. Saving different configuration setups can be useful for future functions and tests. • OK: Closes the dialog boxes and brings up the control panel. • Cancel: Exits without saving configuration. • Buzzer Enabled: When selected, buzzer is ON. • Set Instrument Clock: Updates the clock to the PC clock. • Drop-down Indicators: Indicates the configuration available for each measurement range. 5.7.2 DC Continuity Test When DC Continuity is selected from the tool bar, you can: • Select a 2- or 4-Wire test • Select a current test (positive, negative or Auto +/-) • Enter and activate an alarm from 1 to 999W (2-Wire only), if desired. For very low resistance measurement, a lead compensation value (see § 4.4.2) may be entered. Input noise status at the input of the meter is always displayed. Ground Resistance Tester Model 6470 63 5.7.3 3-Pole Ground Resistance Test When 3-Pole Ground Resistance is selected from the tool bar, you can select: • With or without Auxiliary Rod Resistance • Test voltage of 16 or 32VAC • Auto frequency - selects the optimum frequency (from 40 to 513Hz), usually 128Hz, or select manually from the drop-down frequency list Selecting a sweep frequency test from the drop-down list will bring you to the sweep table selection, available only with the meter connected to a PC. Figure 5-8 5.7.4 4-Pole Soil Resistivity When 4-Pole Test Resistivity is selected from the tool bar, you can select: • With or without Auxiliary Rod Resistance • Test voltage 16 or 32VAC • Test frequency from the drop-down list (selecting this will bring you to the sweep table selection, available only with the meter connected to a PC) • Test Method - Wenner or Schlumberger The distance “d” (for Wenner test method) or “d” and “a” (for Schlumberger test method), between the test electrodes, needs to be entered for resistivity calculation to read out directly in Rho. 64 Ground Resistance Tester Model 6470 Figure 5-9 The values are written immediately into the instrument. Press the START/STOP button to begin a test. Press it again when the data is available on the screen. 5.8 Downloading Data to Database From the Instrument menu, select “Recorded Data” to download the recorded data. 1. Select the data you want to download by clicking on the file name (see Figure 5-10a). 2. Select “Save”. 3. Type a name for the downloaded file. In the Save as type drop-down menu (see Figure 5-10b), select either .dvb (saves it as a database to be viewed in DataView), .xls (saves it as an Excel spreadsheet file), or .csv (saves it as a comma delimited file), then and click “Save”. 4. Alternatively, select “View”. After the download is complete, a window will appear with a graph of the data, and some viewing or channel options. In that window, you can select “Save”, or “Print”. 5. Also, from the Instrument tree view, expand the sections under “Recorded Data from the instrument”, then click on a line that describes the recorded data. It will bring up a window with a graph of the data. Ground Resistance Tester Model 6470 65 5.8.1 Recordings Figure 5-10a Figure 5-10b 66 Ground Resistance Tester Model 6470 5.8.2 Session Properties After downloading the data that is selected, Session Properties opens: • Operator Information: Information associated with the person and company conducting the test. • Site Information: Information about the site itself. • Comments: A place to type descriptions, test results, reasons for testing, etc. • Make Default: Saves the operator information into memory so that it will automatically appear the next time. This will save time on future tests. Figure 5-11 1. After filling in the appropriate information, close the Session Properties dialog box by clicking on the “X” at the top right hand corner. 2. To open the database just downloaded, click the “Yes” button. A dialog box labeled Create View from Template will open. 3. In the Groups window of this dialog box, click on “6470” and in the Templates window click on “6470 Summary Report”. 4. A window named Step 2: Specify Database(s) will appear. The file just saved and named should be visible. To generate a report, click the “OK” button. 5. To print this report, either click on the Print icon or click on File from the top menu and then Print. This completes the process of configuring, running, retrieving data, and printing a report using DataView® with your Model 6470. In addition to the pre-designed report templates, DataView® allows you to totally configure reports to your needs. Refer to the DataView® HELP file on “Templates” to learn more about templates. Ground Resistance Tester Model 6470 67 CHAPTER 6 MAINTENANCE 6.1 Maintenance Please make sure that you have already read and fully understand the WARNING section on page 3. • To avoid electrical shock, do not attempt to perform any servicing unless you are qualified to do so. • To avoid electrical shock and/or damage to the instrument, do not get water or other foreign agents into the case. • Turn the instrument OFF and disconnect the unit from all circuits before opening the case. • Use specified spare parts only. 6.2 Power Supply and Recharging The instrument is shipped with an internal rechargeable NiMH battery pack. The battery can be internally recharged in two fashions: • AC Line Voltage: 100V/240V AC, 50/60Hz with a power supply adapter (18V/1.5ADC) • DC Source - vehicle powered: (9/13VDC power supply adapter 18V/1.5ADC) The instrument can measure when charging from the AC Line Voltage, as the adapter provides a double insulation for 240V Cat II. NOTE: Do not use the Model 6470 when charging on a DC source. This can result in an incorrect measurement under certain conditions. Low Battery: • When the battery is fully discharged, no battery indication is given on the screen at power-up, • When the battery level is low, the battery symbol indicates the battery charge level and the “Bat. Low” message is displayed. 68 Ground Resistance Tester Model 6470 Battery Charging: The Model 6470 has two charging modes: • Fast Charging Mode: battery recovers 90% of its capacity in approximately 3 hours. • Slow Charging Mode: this mode is initiated if the battery is at a very low state. The charge is made first with a low current before going to the quick charge. The charging mode (Fast or Slow) is determined by the Model 6470 and based upon the remaining battery charge and the ambient temperature. When the battery is completely charged, the charging unit assures a trickle charge. When the instrument is used while charging the battery, current and charging time depend on the power consumption of the instrument somewhere between quick charge and trickle charge. If the rotary switch is set to the “OFF” position while the battery is being charged, the “Bat. chrg” message is displayed if the unit is performing a fast charge and the battery level symbol flashes. The “Bat. Full” message is displayed once the battery is fully recharged. The number of charging cycles is at least 500 before it is necessary to change the battery (see § 3.2.7 for battery life specifications). New battery packs (Cat. #2960.21) can be purchased directly on the AEMC® Storefront (www.aemc.com). When replacing the battery, the following safety instructions must be respected: • Never cause a short-circuit between the batteries positive and negative pole • Do not disassemble pack and cells • Do not incinerate or overheat • Do not clean with water or corrosive agents • Never use a leaking or externally damaged pack • Collect used packs for recycling to protect environment NOTE: If the instrument is not used for long periods of time (more than 6 months), it is recommended, in order to recover the initial capacity of the battery, to make several charge-discharge cycles (3 to 5 times). Discharge cycle (15 H) can be made with the instrument in MANUAL mode, DC 2-Pole (2-Point) resistance measurement and a short-circuit between H (Z) and E (X) plugs. Ground Resistance Tester Model 6470 69 APPENDIX A: TROUBLESHOOTING ERROR LISTINGS There are some tests made when the instrument is switched on. Generally if an error occurs which can be removed by overwriting default values it is done automatically and an error code is given to the user. This message lasts until the rotary switch is moved. If an error occurs that means service support is necessary, the error stays on the display and the instrument is out of order. Three types of errors are managed on the instrument: • Fatal error: Error state until power off; service is needed at once if the failure does not disappear. • Recoverable error: Error state until rotary switch change; instrument can be used, but unit should be serviced if the failure occurs repeatedly. • Harmless error: Error message displayed for 1 sec; only for information, but unit should be serviced if the failure occurs repeatedly. Error # 00 01 02 03 04 06 07 08 11 12 13 14 15 16 18 19 21 30 31 32 33 Error type Fatal Harmless Harmless Fatal Harmless Fatal Fatal Recoverable Fatal Fatal Fatal/recoverable Recoverable Fatal Recoverable Recoverable Recoverable Recoverable Error description Microcontroller ROM check sum Hardware error tbd Hardware error tbd Hardware error tbd Hardware error: unexpected interrupt Watchdog autoreset Stack overflow RTC communication FlashROM: options checksum FlashROM: constants checksum FlashROM: calibration factors checksum FlashROM: modbus base registers checksum FlashROM: frequency list checksum FlashROM: DSP programs checksum FlashROM: battery constants checksum FlashROM: data records sectors* Accu zero calibration Measurement stop: NMI Measurement stop: high voltage on inputs Measurement stop: voltage overrange Measurement stop: current overrange *Deleting the user memory (stored data records) in Set-up should help. 70 Ground Resistance Tester Model 6470 Repair and Calibration To ensure that your instrument meets factory specifications, we recommend that it be scheduled back to our factory Service Center at one-year intervals for recalibration, or as required by other standards or internal procedures. For instrument repair and calibration: You must contact our Service Center for a Customer Service Authorization Number (CSA#). This will ensure that when your instrument arrives, it will be tracked and processed promptly. Please write the CSA# on the outside of the shipping container. If the instrument is returned for calibration, we need to know if you want a standard calibration, or a calibration traceable to N.I.S.T. (Includes calibration certificate plus recorded calibration data). Ship To: Chauvin Arnoux®, Inc. d.b.a. AEMC® Instruments 15 Faraday Drive Dover, NH 03820 USA Phone:(800) 945-2362 (Ext. 360) (603) 749-6434 (Ext. 360) Fax: (603) 742-2346 or (603) 749-6309 E-mail:[email protected] (Or contact your authorized distributor) Costs for repair, standard calibration, and calibration traceable to N.I.S.T. are available. NOTE: You must obtain a CSA# before returning any instrument. Technical and Sales Assistance If you are experiencing any technical problems, or require any assistance with the proper operation or application of your instrument, please call, mail, fax or e-mail our technical support team: Chauvin Arnoux®, Inc. d.b.a. AEMC® Instruments 200 Foxborough Boulevard Foxborough, MA 02035 USA Phone:(800) 343-1391 (508) 698-2115 Fax: (508) 698-2118 E-mail:[email protected] www.aemc.com NOTE: Do not ship Instruments to our Foxborough, MA address. Ground Resistance Tester Model 6470 71 Limited Warranty The Ground Tester Model 6470 is warranted to the owner for a period of one year from the date of original purchase against defects in manufacture. This limited warranty is given by AEMC® Instruments, not by the distributor from whom it was purchased. This warranty is void if the unit has been tampered with, abused or if the defect is related to service not performed by AEMC® Instruments. For full and detailed warranty coverage, please read the Warranty Coverage Information, which is attached to the Warranty Registration Card (if enclosed) or is available at www.aemc.com. Please keep the Warranty Coverage Information with your records. What AEMC® Instruments will do: If a malfunction occurs within the one-year period, you may return the instrument to us for repair, provided we have your warranty registration information on file or a proof of purchase. AEMC® Instruments will, at its option, repair or replace the faulty material. REGISTER ONLINE AT: www.aemc.com Warranty Repairs What you must do to return an Instrument for Warranty Repair: First, request a Customer Service Authorization Number (CSA#) by phone or by fax from our Service Department (see address below), then return the instrument along with the signed CSA Form. Please write the CSA# on the outside of the shipping container. Return the instrument, postage or shipment pre-paid to: Ship To: Chauvin Arnoux®, Inc. d.b.a. AEMC® Instruments 15 Faraday Drive • Dover, NH 03820 USA Phone:(800) 945-2362 (Ext. 360) (603) 749-6434 (Ext. 360) Fax: (603) 742-2346 or (603) 749-6309 E-mail:[email protected] Caution: To protect yourself against in-transit loss, we recommend you insure your returned material. NOTE: You must obtain a CSA# before returning any instrument. 72 Ground Resistance Tester Model 6470 08/08 99-MAN 100298 v10 Chauvin Arnoux®, Inc. d.b.a. AEMC® Instruments 15 Faraday Drive • Dover, NH 03820 USA • Phone: (603) 749-6434 • Fax: (603) 742-2346 www.aemc.com