1
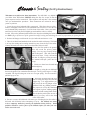
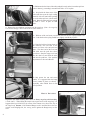
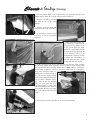
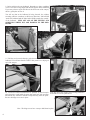
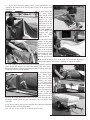
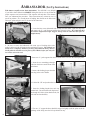
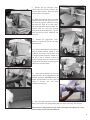
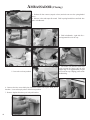
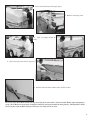
Set-Up Instructions
Ambassador • Classic • Sentry
Does the camper have to be staked down with guidelines? It is impossible to assure how a camper will always
react in all storms. If there is concern about strong winds,
additional stability can be given to your camper by running
guidelines from the top of the camper – and staked to the
ground.
Aspen CAmpers
The following comments are in answer to a few
“often asked” questions:
Do I have to ‘seal’ the tent? The camper’s tenting
material is urethane-backed and ‘sealing tape’ is used in
seams to assist in sealing the stitching/thread during the
sewing process. However, new tents may require a good
‘soaking’ to assist in ‘swelling’ the stitching. It is suggested
that before first use, your camper be set up, and with a
garden hose, thoroughly soak all seams (do not ‘blast’ the
seams). Do this twice, allowing the tent to dry thoroughly
between soakings. Finally, if any points along the seam
show any signs of persistent moisture, a seam sealer may
be used at these points. If a sealer is used, it is suggested
that the ‘Applicator’ type be used rather than a spray.
Sealer is not required on the tenting fabric, but on needle
seams only.
What if I feel a ‘shake’ in the bike when I get my trailer
up to speed? Wheel balance is a subject that should
be addressed. All tires are shipped to the trailer manufacturer ‘by-the-pallet-load’ – already mounted on the wheels
and ready for delivery to the customer. An occasional check
of proper balancing by the customer is a good practice for
any vehicle traveling at highway speeds. Improper wheel
balance is the first place to look if any ‘trailer chatter’ is
observed or felt at the handle bars.
What do I use to clean my camper? The exterior finish of
the Ambassador camper body and lid is sealed in a transparent film (called Korad) to protect the ABS material from
UV rays. DO NOT use abrasive cleaners or any alkaline
solvents on this surface. Treat the finish as you would any
clear-coated paint or fiberglass finish. For best cleaning
results, it is suggested that a spray of hot water be first
applied to penetrate the dirt, grease and road grime, then
followed with a strong concentrated soap solution (a hot
soap solution will work best). For ‘rubbing’ during cleaning,
use a sponge, soft rag, Teflon pad, etc. – DO NOT use steel
wool or any abrasive wipe. DO NOT use any solvents on
the tenting materials.
IMPORTANT NOTICE about folding your camper:
Because it is possible to close your camper quickly, it is also
possible to fold the unit TOO quickly! VERY IMPORTANT...
immediately after folding-in the last (top) bedboard, be
certain to cover the two leg hinges on the bedboard with any
padding material. This will keep the aluminum bed support
leg from rubbing against the tent roof and causing black
marks. Then, after the camper has been folded and just
before installing the final cover, take a few moments to walk
around the camper and be certain that no fabric or
screening is ‘pinched’ between any tubes or hardware.
Remember... just a-bit of attention to the details in ‘folding’
will prevent abnormal fabric wear or pin holes from
occurring due to improperly folded fabric under travel cover
pressure and road vibration.
ASPEN WIRING CHART
LOOKING HEAD ON AT TRAILER PLUG
Do I need or want electric brakes on my trailer? Do they
work? Are they safe? Electric brakes have been used on
cycle trailers for many years, and more than 50% of our
‘camper’ customers ask for brakes to be installed. However,
with the business climate being what it is today (legalities,
etc.), it is important that we draw your attention to
Product Bulletin #260 from Dexter Axle Company (see back
page). This bulletin positions the customer as being the
responsible party for proper control, adjustment and
maintenance.
How often should I pack the bearings? Use only enough
grease to fill each bearing. Filling the whole bearing
compartment in the hub with grease will almost always blow
past the seal and cause brake failure. Use marine trailer
wheel bearing grease if possible... it is waterproof. Check
the bearings annually.
BLUE - A (Auxiliary)
WHITE - GD (Ground)
YELLOW - LT (Left Turn)
GREEN - RT (Right Turn)
RED - S (Brake Lights)
BROWN - TM (Running Lights)
WHITE
(Ground)
BLUE (Aux)
(Electric Brakes)
YELLOW
(Left Turn)
BROWN
(Running Lights)
RED
(Brake Lights)
GREEN
(Right Turn)
GROUND MUST BE CONNECTED FOR THIS TO WORK.
2
Classic & Sentry (Set-Up Instructions)
Take time to carefully review these instructions. You will find it very helpful if
you follow these instructions SLOWLY during the first few set-ups so that the
proper sequence can be memorized. This sequence will only take a few minutes
once you understand the procedure. These instructions are written for one (1)
person to perform.
1. Lower the two front jackstands fully compressed. This allows the rear of the
trailer to tilt higher so that the two rear jackstands can be lowered. Lower the two
rear jackstands fully compressed. Go to the front of the trailer. Place your hand
under the lip of the body and lift slightly upward until the trailer is visually
leveled. Step on the jackstand pedal and the foot drops down holding the trailer level. Repeat on rear of trailer. *NOTE: You
are NOT trying to lift the tires off the ground but simply leveling and stabilizing the trailer in preparation for opening the tent.
2. Release the Bungee cord from the six (6) wind hooks and remove cover.
3. There is an elastic band attached at both ends of the trailer with snaps. This band
is to keep the tenting and screening material up away from the lip of the trailer.
Unsnap the band (one side at a time) from the trailer and set it aside.
4. Lower the floor panel to the ground.
This will reveal the privacy panel/
canopy. It is very easy to unzip, roll up
and tie this panel. This will reveal the
front screen door. Unzip, roll and tie
this door. It will give you easy access to
the internal telescopic poles later in
set-up.
5. Lift the two front bows forward and
hold straight up.
6. While holding the two front telescopic bows straight up, swing the rear bedboard
down to the ground. Be certain that the telescopic ‘bed-to-ground support’ is fully
extended. The leg will swing out on its own via a gas spring. You do not need to
pull the leg up or out.
7. The trailer was delivered with vinyl
pads covering the hinges and the bed
support leg. It is suggested that you
pad (cover) the two leg hinges on the
bedboard with any padding material.
The purpose is to keep the aluminum
bed support leg from rubbing against
the tent roof and causing black marks.
This is also the perfect place to store a
carpet if you carry one for the front
room of the trailer.
8. Be sure to secure the bedboards with some type of locking device (the trailer is
delivered with S-Hooks) before attempting to set-up. The S-Hooks are meant
to be a temporary method of securing the bedboards during delivery. Small
padlocks should be used in place of the S-Hooks before you take your new
trailer out on the road.
3
9. Walk around to the front of the trailer and pull evenly on the front telescopic bow
(above doorway), extending it out until both sides ‘click’ in place.
10. Step inside the front room of the
trailer and raise up on the vinyl roofing
material with one hand while pushing
up on the telescopic bow with the other
hand. Raise the telescopic bow straight
up until it ‘clicks’ in place on both
sides.
11. Remove the two aluminum roof struts from the cargo bay. (Note: the cargo bay
is accessible through a door underneath the front mattress.)
12. With one of the roof struts, reach back and raise the rear ‘spring-loaded’ roof
bow. Push back on the spring-loaded bow slightly until firmly in place.
13. Place the bed bow (laying loose on
the mattress) into one end of the
shorter roof strut, raise and push into
place. The other end of the roof strut
will slide onto the peak bow above
your head. Snap the longer roof strut
into the door bow and slide the other
end onto the peak bow. Now push the
top mattress to the rear bedboard.
To help protect the tent and screen
panels, it is suggested that the hinge
covers remain in place (as shown) especially when folded down in the
travel position.
That’s it! You’re done!
Important note about entering the Classic or Sentry cargo bay while traveling
(‘on the road’)... When lifting the camper unit to gain access to the cargo bay, it is
suggested that you lift all four (4) corners of the tonneau cover above the ‘lip’ of
the cargo body. Reason: if the hemmed Bungee cord is not lifted above the two
corners on the hinging side, the ‘sawing action’ against the Bungee may cut the
cord.
4
Classic & Sentry (Closing)
1. Close all window flaps. Leave approximately a 6” opening at the top of the
window flaps to allow air to escape when the tent is folded up.
2. Bring the rear mattress forward
and stack on top of the front
mattress.
3. Remove both roof struts and
place them back in the cargo bay.
4. Lay the bed bow (2nd bow from
rear) down on top of the stacked
mattresses.
5. While inside the trailer, once
again release the weight from the
telescopic poles by pushing up on
the vinyl roof with one hand.
Release the ‘snap-button’ on each
side of the peak bow, allowing the
bow to compress (close) to its
lowest position. Then step outside
and release the ‘snap-button’ on
each side of the door bow (inside
the tent) and slide bow inward.
6. Walk to the back of the camper and close the rear roof bow. Note: because
the vinyl roof applies much ‘gripping pressure’ to the two upper corners of this
bow, care must be taken in seeing that this bow is NOT closed by ‘pushing-in’
on the center of the bow– otherwise this bow could bend. It is possible to
easily lower this bow simply by
grabbing the two outer corners of
the vinyl roof and slowly pulling
down while pushing inward on the
bow to release it from the vinyl’s
grip. After the bow has released
from the roof, push the bow
down/closed until it ‘snaps’ into
both side clamps on the inside of
the bedboard. Be sure not to catch
any of the tenting material in the
clamps.
7. Release the two Velcro flaps that cover each side main hinge.
5
8. Raise and close the rear bedboard. Remember to place a padding
or cover over the two leg hinges and the bed support on the bedboard.
If you carry a throw rug for the floor of the front room of the camper,
this is a good place to store it.
You will see that as the bedboard is being lowered, the window
screening will have a tendency to fall in two directions... half will fall
‘under’ the bedboard and the other half will fall towards the ‘outside’
of the bedboard. PULL OUT ALL OF THE TENTING AND
SCREENING WHILE YOU ARE FOLDING UP THE BEDBOARD.
9. Fold the two forward telescopic poles down and over the closed
bedboard. You will note that the ‘OPEN’ door panel is now laying on
top of the camper.
10. You do not want tent material to be ‘pinched’ by the telescopic
poles, therefore, reach inside the open door panel (one side at a time)
and smooth any ‘bunched’ material evenly and away from the poles.
Be sure the hinge covers are in place.
Note how all of the tenting and screening material is
PULLED OUT in the photo above.
Note: The hinge covers have a snap to hold them in place.
6
11. Zip the door and screen panels closed. Leave approximately a 6”
opening at the bottom of the screen panel to allow air to escape when
folding the tent.
12. After zipping the
door and screen
panels closed, while
standing at the front
(tongue)
or
rear
(bumper) side of the
camper, lift up on the
velcro strip in front of
you to form a ‘pocket’
and neatly TUCK all
of the tenting and
screening that you
pulled out when
folding in Step #8.
13. Grab the two outer
corners of the floor
and raise the floor up
and over the closed
bedboard to the back
edge of the bedboard
(not over the backside
of the bedboard). Fold
the remaining floor
material up as far as it will go.
Walk around the camper for a visual check to be certain that all tenting is
neatly folded and any unnecessary ‘bundling’ of material is avoided.
14. After tucking in all of the tenting and screening material, attach the
elastic strap to the snaps on each end of the camper. This elastic strap is
designed to hold the tenting and screening UP ABOVE the lip of the trailer when the tonneau cover is installed.
15. Install the tonneau
cover. Before ‘tightening’ the cover (to
avoid wear on tenting
material), feel under
the cover and push-up
on any tenting material
that may be hanging
downward over the top
of the fiberglass body.
Be sure to pull the
Bungee corded hem
down below the lip of
the trailer all around. Reach under the hem and feel for the exposed area of
the Bungee cord and attach it to the wind hooks (1 on each end and 2 on
each side).
If you have a pocket in the cover, the zippered flap of the pocket should be
positioned on the curb side of the trailer.
Note: Be sure to raise all four (4) jackstands before leaving.
7
AmbASSAdor (Set-Up Instructions)
Take time to carefully review these instructions. You will find it very helpful
if you follow these instructions SLOWLY during the first few set-ups so that the
proper sequence can be memorized. This sequence will only take a few minutes
once you understand the procedure. These instructions are written for one (1)
person to perform. IF a second person is helping, then the lid can be lifted onto
telescopic poles and poles can be elevated at the same time.
1. Lower the four corner jackstands and visually level the trailer. Open the cargo bay
and remove the “L” pole supports and the four telescopic poles. (It is important that
the smaller components be kept “bagged” during travel to reduce the risk of loss or
misplacement).
2. Be sure to secure the bedboards with some type of locking device (the
trailer is delivered with S-Hooks) before attempting to set-up. The S-Hooks are
meant to be a temporary method of securing the bedboards during delivery.
Small padlocks should be used in place of the S-Hooks before you take your
new trailer out on the road.
3. Insert two “L” pole supports into the rear main frame to receive the telescopic poles.
4. Insert the two remaining telescopic
poles into the sleeves on the front of the
main frame.
5. Remove the locking faspins from the
parts bag in the cooler basket.
6. Lift the lid “UP” and position the two molded cup sections onto the telescopic poles.
7. Insert the locking faspins into each top
bracket hole. Be certain that each faspin travels through all 3 holes (front bracket hole, lid
hole and rear bracket hole).
8. The rear “L” support brackets should be tapped in lightly (until the poles touch the
lip/flange of the body) once the lid is positioned on top.
8
9. Release the top telescopic ‘snapbuttons’ and raise the rear of the lid into
the next upper position. Then raise front
of lid to same level position.
10. While the telescopic poles are in this
position, remove the four (4) corner hitchpins from the support stabilizers located
just below the body lip at each corner.
Swivel the stabilizers and lock them into
position with the hitch-pins running
through all corresponding holes. Do the
same with all four corner stabilizers and
hitch-pins.
11. Release the appropriate ‘snapbuttons’ to elevate the lid into the final
raised position.
12. Fold out each bedboard (left side first).
Pull the tenting material inside of each
bedboard and make certain that each
‘U-shaped’ ground support is folded out a
full 90º so that it properly reaches the
ground. Ground stakes have been provided
to help assure that these two bed supports
remain in a vertical position.
13. After both bedboards are lowered,
‘snap and Velcro’ the tenting material to the
full body perimeter. DO NOT elevate the
interior spring-loaded tent bows until all
tenting is secured (this will assure
maximum tent tension).
14. After all tenting material is fastened to each bedboard, reach through the open
doorway and release each spring-loaded tent bow which will ‘snap’ into position.
Walk around the full perimeter of the trailer and inspect all adjustments. Lower
interior mattresses from lid onto bedboards.
9
AmbASSAdor (Closing)
1. Release all four corners (snaps & velcro) and raise tent over the spring-loaded
bows.
2. Release velcro and snaps all around. Fold in spring-loaded bows and lock into
place on bedboards.
3. Fold in bedboards - right side first moving material out of the way.
5. Lower the roof one position.
6. Remove the four corner hitch pins, fold back brackets and replace hitch pins in
brackets. Lower telescopic poles to their lowest position.
7. Remove faspins from the top of each pole bracket.
10
4. The trailer was delivered with vinyl
pads covering the hinges and the bed
support legs. It is suggested that you pad
(cover) the two top ‘hinging’ points of the
bedboard leg.
8. Lower roof from top of telescopic poles.
9. Remove telescopic poles.
10. Tuck in tenting around all
sides.
11. Place telescopic poles back in cargo bay.
12. Replace locks and fasten rubber straps on all four sides.
Be sure to secure the bedboards with some type of locking device (the trailer is delivered with S-Hooks) before attempting to
set-up. The S-Hooks are meant to be a temporary method of securing the bedboards during delivery. Small padlocks should
be used in place of the S-Hooks before you take your new trailer out on the road.
11
When Aspen Campers decided to begin offering electric brakes
on their lightweight campers, research into various braking
systems led to Dexter Axle’s ‘Torflex - with electric brakes’.
CAUTIONS, HELPFUL HINTS
& SPECIAL MENTIONS
• If your Aspen camper has been ordered with electric
brakes, the final wiring hook-up is to be completed by the customer to assure verification of the proper connection. Aspen is
manufactured with a 6-wire system to provide for an auxiliary
run of any options. The BLUE wire is usually provided for this
purpose, and a common practice is to connect the electric brake
controller to this lead.
But, because the manufacturer
cannot be aware of final connections on every tow vehicle,
final connection is left to the customer.
• Check lug nuts often, especially with a new trailer. Coat the
threads of the lug studs with anti seize. This will aid in the
removal of lug nuts. Do not tighten lug nuts with an impact
gun. Run tires at rated air pressure for ease of pulling and for
long life.
• Coat the inside of the hitch “coupler” with grease or chain
lube. Do not pull trailer with a dry hitch ball.
• Tie safety chains as close to hitch as possible while allowing
enough slack to make sharp turns. Short chains won’t drag.
Long chains are dangerous.
• Trailers need tongue weight in order to pull properly. A
good rule of thumb... 10% of total trailer weight on the tongue.
If the trailer weaves back & forth, STOP! Re-load with more
tongue weight.
• Tow vehicle hitch: The hitch ‘ball’ should be installed as
close as possible to the tow vehicle’s rear axle in order to minimize any possibility of developing an effect similar to the ‘tail
wagging the dog!’
• The two (2) U-shaped stakes that are included with your
camper go over the bed support leg when the camper is set-up.
• It is advised to wrap any pointed objects when storing in the
lower ‘basement level’ of the Aspen camper. Continual road
vibrations could create body damage from unprotected sharp
objects.
• On the Aspen Ambassador, be certain that all four (4)
rubber draw-straps are gripping lid in closed position during
travel.
• After unhooking Aspen from tow vehicle, you may find it
easier at times to move trailer around by standing at rear of unit
and ‘pushing’ with a downward pressure. This method of
movement is often much easier than ‘lifting and pulling’ by
trailer tongue.
• The jackstands are spring-loaded. For the front - grab the
shaft of the stand and pull toward the rear of the trailer and
lower. For the rear - grab the shaft of the stand and pull
Prior to November 2000, anyone from the general public could
purchase stock Dexter brakes to install on any trailer. It is our
understanding that the bulletin referenced below was generated after Dexter’s "stock" (lightest rated) electric braking system (1000# rating) was being installed by end-users (not factory installed) on small, lightweight cargo trailers. Problems
developed due to the mismatch between light weight trailers
and Dexter’s "stock/1000#" brakes. Consequently, Dexter
Axle issued the following bulletin.
PRODUCT BULLETIN #260
November 13, 2000
Safety Alert
Subject: Use of brakes on trailers towed by motorcycles
Dexter Axle does not recommend the use of brakes on small
touring trailers designed to be pulled by motorcycles. It has
come to our attention that some manufacturers are specifying
Dexter’s light capacity #8 Torflex axles and brakes for use on this
type of trailer. We strongly recommend that this practice be discontinued. Proper control of the brakes on these vehicles can
be very difficult. Even a slight imbalance of the trailer brakes
may cause the rider to lose control.
A secondary issue is spontaneous and unexpected actuation of
the brakes. This can occur when a Torflex axle is not fully
loaded. Under this condition, the torsion arm is not rotated to its
normal position, which put the brake assembly out of level. If the
axle is fitted with electric brakes, this out of level condition can
result in unexpected brake actuation when the trailer encounters
large bumps. The reason that this can occur is because the
magnet inside the brake has sufficient mass to move the
actuating lever during extreme bounce situations.
Dexter Axle will continue to be responsive to the needs of the
trailer designers and manufacturers to ensure proper fit and
function of all trailer components that make up the vehicle and to
provide safe, roadworthy products to the marketplace.
LeRoy Crain
Marketing Support Manager
Dexter Axle Company • Elkhart, IN 46516
This braking system has been in use on lightweight pop-ups for
over 20 years. Aspen Campers has been offering electric
brakes for their line of lightweight pop-ups since 1997. These
brakes are matched to the weight of the campers. It has been
our experience that as long as the proper brake adjustments are
maintained by the customer (as illustrated in the Dexter
Maintenance Service Manual), this system is a proper option to
our Aspen trailers. This suspension system is purchased "with
or without brakes" directly from Dexter Axle Co. Electric
brake components are not separately installed by Aspen
Campers.
toward the center of the trailer.
12