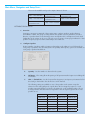
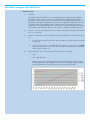
1
EVOLUTION 707 OWNER’S REFERENCE
Evolution 707 Reference Surround Sound Preamp / Processor
THERE ARE NO USER-SERVICEABLE PARTS INSIDE ANY KRELL PRODUCT.
Please contact your authorized dealer, distributor, or Krell if you have any questions not addressed in
this reference manual.
WARNING: Do not place the component where it could be exposed to dirt or excessive moisture.
The ventilation grids on the top and bottom of the Evolution 707 must be unobstructed at all times.
Do not place flammable material on top of or beneath the component.
When making connections to this or any other component, make sure all components are off. Turn
off all system power before connecting the Evolution 707 to any other component. Make sure all
cable terminations are of the highest quality, free from frayed ends, short circuits or cold solder
joints.
CONTACT INFORMATION: Krell Industries, LLC
45 Connair Road
Orange, CT 06477-3650 USA
TEL 203-799-9954
FAX 203-891-2028
E-MAIL [email protected]
WEBSITE http://www.krellonline.com
Krell® is a registered trademark of Krell Industries LLC., and is restricted for use by Krell Industries LLC., its subsidiaries, and authorized agents. Krell Current Mode™
is a trademark of Krell Industries, LLC. All other trademarks and trade names are registered to their respective companies.
Manufactured under license under U.S. Patent Nos: 5,956,674; 5,974,380; 6,226,616; 6,487,535; 7,212,872; 7,333,929; 7,392,195; 7,272,567 & other U.S.
and worldwide patents issued & pending. DTS-HD, the Symbol, & DTS-HD and the Symbol together are registered trademarks & DTS-HD Master Audio is a
trademark of DTS, Inc. Product includes software. © DTS, Inc. All Rights Reserved.
Manufactored under license from Dolby Laboratories. Dolby, Pro Logic, and the doulbe-D symbol are trademarks of Dolby Laboratories.
Table of Contents
Introduction (9)
Features and Functions (9)
Specifications (10)
Getting Started (13)
UNPACKING AND PLACEMENT (13)
1. Accessories included
AC Power guidelines (13)
Back Panel Description (Diagram) (14)
Front Panel and Remote Control Function (Diagram) (15)
Initial Setup (16)
OSD (On Screen Display) (16)
1. Connection and Operation of the OSD (16)
2. AC Power cord connection (16)
3. Video output Connection (16)
5. Power Button (16)
6. Menu Button (16)
Main Menu, Navigation and Setup (17)
CONFIGURE VIDEO OUTPUT (17)
1. Overview (17)
2. Analog Video Scaler (17)
A.
Setting maximum Video output resolution (17)
B.
Setting Zone 2 video output resolution (17)
LISTENING ROOM SETUP (18)
1. Overview (18)
2. Configure Speakers (18)
A.
Quantity (18)
B.
Full Range (18)
C.
LIM (?) Hz (18)
D.
Front (19)
E.
Center (19)
F.
Surround (19)
G.
Back (19)
Table of Contents Cont...
H.
5.1 Surround (19)
I.
Subwoofer (20)
3. Speaker Distance (21)
A.
Left, Right (21)
B.
Center, Center2 (21)
C.
L Surr, R Surr (21)
D.
L Back, R Back (21)
E.
Sub1, Sub2, Sub3, Sub4 (21)
4. Calibrate Room Setup (22)
A.
Auto Noise Sequence (22)
B.
Manual Noise Sequence (22)
C.
Program Material (22)
CONFIGURE DEVICES (23)
1. Overview (23)
A.
Defining inputs and outputs for audio and video sources (23)
B.
Video input and output connections (23)
1.
Digital Video Options (23)
a. HDMI
2.
Analog Video Options (23)
a. Component Video
b. S-Video
c. Composite Video
C.
Audio Input and Output connections (24)
1.
Digital Audio Options (24)
a. HDMI
b. Optical S/PDIF
c. Coaxial S/PDIF
2.
Analog Audio Options (24)
a. CAST
b. Balanced
c. Single-Ended
d. Multi-Channel
Table of Contents Cont...
2. Changing default input presets. (26)
3. Configure Video (26)
A.
Assigning Video Inputs (26)
1.
Setting the Main Video Input (26)
2.
Setting the Zone 2 Video input (26)
4. Configure Audio (27)
A.
B.
Assigning Audio Inputs (27)
1.
Analog (28)
2.
Digital (28)
3.
Lip Sync (28)
4.
EQ Memory (28)
Setting the Analog audio Input (28)
1.
Analog (28)
2.
Digital (28)
C.
Choosing an Analog Decode Preference (28)
D.
Auto Migration (29)
E.
Choosing a Digital Decode Preference (29)
F.
Assign Lip Sync Delay (31)
G.
Assign EQ Memory (31)
5. Configure Trigger (32)
A.
Overview (32)
B.
Configure Trigger (32)
C.
Delay (32)
Table of Contents Cont...
CONFIGURE LEVEL ADJUSTMENT (33)
1. Overview (33)
2. Device Trim (33)
3. Analog Input Trim (33)
A.
Anti-Clip
B.
Input Gain
4. Music Mode Sub Trim (33)
5. DTS Control Trim (33)
6. PLII Control Trim (34)
7. Maximum Volume Limit (34)
8. Zone 2 Level (34)
OPERATION (35)
1. Overview (35)
2. OSD Operation (35)
A.
OSD On Time (35)
B.
Line Number (35)
C.
Menu Back ground (35)
D.
1.
Transparent
2.
Solid
LCD Contrast (35)
3. Audio Operation (35)
A.
Mute Mode (35)
B.
Dolby Hold Mode (35)
C.
DTS Mode Hold (35)
D.
EX Auto Switching (35)
E.
Dynamic Range (35)
4. 5.1 Input Setup (36)
5. Program Remote (36)
6. System Information (36)
Table of Contents Cont...
7. Room EQ Setup (37)
A.
Overview (37)
B.
Memory (37)
C.
Channel (37)
D.
Filter Parameters (37)
1.
Type (37)
a. HPF (37)
b. LPF (38)
c. Notch (38)
d. Lshlf (39)
e. Hshlf (39)
f. Pking (39-40)
E.
2.
Frequency (40)
3.
Shape (40)
4.
Level (40)
Apply (40)
Basic Operation of the Evolution 707 (41)
1. Power On/ Off and Stand-By (41)
2. Volume Control (41)
3. Quick level adjustment buttons (41)
A.
Center
B.
Surr
C.
Back
D.
Sub
E.
Bal
F.
EQ assignment
4. Zone 2 Output (41)
5. Tape/ VCR inputs and outputs (42)
6. Button Mode Presets (42)
7. Save and Recall (42)
8. Factory Reset (42)
Table of Contents Cont...
Evolution 707 Future Upgrades and Firmware (43)
1. ABCD Mode Options (43)
2. Mic Input (43)
RS-232 Control (44)
RS-232 Code Set
1. Preparing for RS-232 Connectiviity (44)
2. Settings (44)
3. Notes (44)
4. Code (Diagram) (44)
RS-232 Feedback (48)
RC-5 Control (58)
RC-5 Code Set (58)
1. Preparing for RC-5 Connectivity (58)
2. Settings (58)
3. Notes (58)
4. Code (Diagram) (59)
Questions and Answers (61)
Warranty (62)
Service (63)
Introduction to the KRELL Evolution 707
Thank you for your purchase of the Evolution 707 Surround Sound Preamplifier/ Processor. Coupling
legendary KRELL preamplifier technology, state of the art digital processing, and the latest in HDMI
1.3 surround formats, the Evolution 707 is an uncompromising centerpiece for a reference music and
home theater system. Housed in a chassis normally reserved for Krell amplifiers, each critical sub
circuit is given unrestricted space for maximum circuit density. Designed to take full advantage of the
lossless Dolby and DTS Master Audio sound tracks found on Blu-ray discs, the Evolution boasts the
most advanced circuitry ever employed in a surround sound preamplifier/ processor. The Evolution
707 begins as a reference preamplifier utilizing discrete current based Class A, direct coupled circuitry
for enhanced speed and ultra high signal bandwidth. All twelve Evolution 707 analog output stages
are built to the same exacting standard and support Krell CAST, balanced and single-ended cable
connections. At the heart of the Evolution 707 digital signal processing is a pair of dual core 32 bit
Crystal CS497004 DSP’s performing 1.8 giga operations per second. Video signals are treated with
equal care and are afforded isolated circuitry for broadcast quality transmission of signals up to
1080p/60Hz. A massive toroidal transformer, larger than in many amplifiers, insures precise voltages
for the individual audio, video, processing, and control stages. These advanced technologies pair
elegantly to an interface configurable to a user’s preferences.
Features and Functions
The Evolution 707 includes 8.4 channels of audio output. In addition to the standard 7.1 channels
available in conventional surround sound processors, the Evolution 707 includes a second center
channel for positioning above and below screen applications and three additional subwoofer
outputs. Subwoofer options include multiple left/right, front/ back, and Low Frequency Effects
(LFE) options. Individual crossover settings for each speaker provide seamless integration between
subwoofer and main speakers. A powerful 1/3 octave digital equalizer completes the fine tuning by
tailoring individual speaker performance to listening environments that are less than ideal.
The Evolution 707 video circuitry is fully HDMI 1.3 compliant, supports 24 bit Deep Color content, and
is equipped with an onboard video scaler. With stunning clarity, this scaler up-converts incoming
analog video signals to a maximum of 1080p/60Hz over HDMI output or 1080p/30Hz via component
video output. A second video zone enables viewing of another video source simultaneously.
Evolution 707 software based core is readily updatable via a standard RS-232 computer connection if
improvements become available. One future update is room correction. Included with the Evolution
707 is a sensitive calibration microphone that will gather information from the listening environment
and suggest a set of calibrations for optimal performance. Once the software is completed, this will
be made available to all Evolution 707 end users at no charge.
The Evolution 707 is a sophisticated product with many operational options. This manual is divided
into several parts, detailing the various configurations and settings available in the Evolution 707.
Specifications
SIGNAL-TO-NOISE RATIO
“A” Weighted
96 dB
TOTAL HARMONIC DISTORTION (THD)
Unweighted
20 Hz-20 kHz, +0, -.5 dB
INPUTS
ANALOG AUDIO
(2) Pair CAST via CAST connectors
(1) Pair Balanced via XLR connectors
(5) Pairs Single-ended via RCA connectors
(1) Discrete 7.1 via RCA connectors
(1) Tape in via RCA connectors
(1) VCR audio in via RCA connectors
DIGITAL AUDIO
(4) HDMI via HDMI connectors
(4) EIAJ optical via Toslink connectors
(4) Coaxial via RCA connectors
DIGITAL VIDEO
(4) HDMI via HDMI connectors
ANALOG VIDEO
(3) Component Video via RCA connectors
(4) S-video via DIN connectors
(3) Composite Video via RCA connectors
OUTPUTS
ANALOG AUDIO
(12) CAST via CAST Connectors
R, L, C1, C2, SR, SL, SBR, SBL, S1, S2, S3, S4
(12) Balanced via XLR Connectors
R, L, C1, C2, SR, SL, SBR, SBL, S1, S2, S3, S4
(12) Single-ended via RCA Connectors
R, L, C1, C2, SR, SL, SBR, SBL, S1, S2, S3, S4
(1) Tape out via RCA connectors
(1) VCR audio out via RCA connectors
(1) Zone 2 out via RCA connectors
DIGITAL AUDIO
(1) EIAJ optical via TosLink connector
(1) Coaxial via RCA connector
DIGITAL VIDEO
(1) HDMI via HDMI connector
ANALOG VIDEO
(1) Component Video via RCA connectors
(1) Zone 2 Component Video via RCA connectors
(1) S-video via DIN connectors
(1) Zone 2 S-video via DIN connector
(1) Composite Video via RCA connector
(1) Zone 2 Composite Video via RCA connector
Specifications Cont...
CONTROL
(1) IR Receiver for Remote Control
(1) RS-232 via DB9 Female Connector Straight Wired
(1) RC-5 via 1/8” stereo “trs” Receptacle
(1) 12vdc Remote Trigger Input via 1/8” Mono receptacle
(4) 12vdc Remote Trigger Outputs via 1/8 Mono
receptacles
(2) Proprietary KRELL CAN ports via RJ-45 Connectors
DIGITAL DECODING MODES
Dolby TrueHD
Dolby Digital Plus
Dolby Digital
Dolby Digital EX
Dolby Pro Logic IIx
DTS-HD Master Audio™
DTS-HD High Resolution Audio™
DTS Digital Surround | ES | Neo:6 | 96/24™
PCM 5.1
PCM 7.1
PREAMP (Direct Analog Only)
PREAMP 5.1 (Direct Analog Only)
SURROUND ENHANCEMENT MODES
General Admission
Front Row
On Stage
Enhanced Stereo
Orchestra
Mezzanine
Full Range + Sub
Monophonic
Party
RS-232 DB9 Pin Out
1. Data Carrier Detect
2. Received Data
3. Transmitted Data
4. Data Terminal Ready
5. Signal Ground
6. Data Set Ready
7. Request To Send
8. Clear To Send
9. Ring Indicator
Specifications Cont...
RC-5 pin out
Tip = RC-5 data, Ring = +5 V, Sleeve = GND
XLR Pin Out
Pin 1 (ground) Pin 2 (non-inverting “Hot”) Pin 3 (Inverting)
Maximum Input
Balanced 8.2 Vrms
Single Ended 4.1 Vrms
Maximum Output
Balanced 17.8 Vrms
Single Ended 8.9 Vrms
Audio Input Impedance
Balanced 475 KΩ
Single Ended 47 KΩ
Audio Output Impedance
Balanced 150 Ω
Single Ended 150 Ω
Power Consumption
Stand-by 178W
Operation 196W
DIMENSIONS
Inches (L) 21.22 x (W) 17.25 x (H) 8.75
Centimeters (L) 53.90 x (W) 43.82 x (H) 22.23
WEIGHT
52lbs Unit only
23.59kg Unit only
64lbs Shipping Weight
29.03kg Shipping weight
All operational features, functions and specifications are subject to change without notification.
Getting Started
UNPACKING AND PLACEMENT
The Evolution 707 is a precision instrument and should be handled with the utmost care when deciding where
it is to be placed and while it is being unpacked and finally installed. Because of its physical size and weight, it is
recommended that two people unpack and place the unit. Makes sure the installation location is dry and level,
and able to provide adequate ventilation. The Evolution 707 runs warm to the touch and requires the bottom
and top of the unit be free from obstruction with good circulation of air. Allow a minimum of 3 inches above the
unit for proper ventilation. Additional ventilation may be required when the unit occupies the same space with
other electronics that generate heat like power amplifiers. Please consult an authorized KRELL dealer or KRELL
industries to insure proper installation guidelines.
1.
Accessories included
A.
1 AC Power cord
B.
1 Handheld Remote control
C.
1 Trigger cable
D.
1 Owner’s reference
E.
1 Quick start guide
F.
1 Warranty registration card
G.
2 AAA Batteries
H.
1 T-10 torx wrench
AC Power Guidelines
The Evolution 707 is designed to work all over the world. The operating voltage is determined at the factory and
is specifically set to operate in the country of final destination. The Evolution 707 requires good clean power and
doesn’t require additional filtration. Make sure the AC line voltage is within plus or minus 10% of the specified AC
line voltage setting for proper operation.
NOTE: The Evolution 707 may not operate correctly when AC regeneration or voltage conversion devices are
utilized.
1
2
3
4
5
6
7
8
9
10
11
12
Balanced analog inputs
CAST inputs
Single-ended analog inputs
Multichannel analog input
Tape input
Tape output
Zone 2 analog audio outputs
VCR audio input
VCR audio output
Component video inputs
HDMI 1.3 Inputs
Component video output
13
14
15
16
17
18
19
20
21
22
23
24
Zone 2 Component video output
S-video inputs
Composite video inputs
HDMI output
Composite video output
Zone 2 Composite video output
S-video output
Zone 2 S-video output
12v Trigger input
RS-232 control port
RC-5 control port
12v Trigger outputs
25
26
27
28
29
30
31
32
33
34
35
36
KRELL can link
AC power cord receptacle
Main Power Switch
Auxiliary dock interface
Coaxial digital output
EIAJ optical digital output
Auxiliary digital interface
Coaxial digital inputs
EIAJ optical digital inputs
Balanced audio outputs
Single-ended audio outputs
CAST audio outputs
Getting Started
Back Panel Description
Getting Started
Front Panel and Remote Control Function
1
Display window
15
Navigate right adjustment
2
Volume Up/ Down adjustment
16
Enter button
3
Quick center channel adjust
17
Previous screen adjustment
4
Quick Surround channel adjust
18
Activate OSD Menu button
5
Quick Preamp Mode Button
19
Mute audio select
6
Quick Stereo Mode Button
20
Setup memory recall
7
Quick Mode 1 Button
21
Save system setup
8
Quick Mode 2 Button
22
Zone 2 PWR button
9
Quick Dolby Pro Logic Button
23
Microphone Input
10
Quick Surr Back channel adjust
24
IR receive window
11
Quick Sub channel adjust
25
Power Standby button
12
Balance adjust
26
Device input select
13
Navigate left adjustment
27
Main Zone Select
14
A, B, C, D Quick Select
Initial Setup
OSD (On Screen Display)
1. Connection and Operation of the OSD
The OSD (On Screen Display) connection of the Evolution 707 to a video display is the single most
important connection to the setup of this processor. The entire configuration and setup of the
Evolution 707 is performed while viewing the OSD.
Note: Do not connect any inputs at this time.
2. Attach the AC power cord to the receptacle on the back of the Evolution 707.
3. Plug the Power cord into an AC receptacle and turn on the rear power switch.
The Evolution 707 will go through an initialization process and display the current software revision
installed. Wait for the initialization to complete before proceeding.
4. Connect the Video Output of the Evolution 707 to a Video Monitor
The OSD can be displayed from any video output. HDMI, component, s-video and composite video
are all supported. Care should be taken in selecting which video format to use. Older monitors,
projectors and televisions do not have the ability to display some of the latest video output formats.
Use composite video if you are uncertain as to the video display’s capabilities.
NOTE: When using the HDMI output for OSD do not connect an HDMI input at this time. It can make
initial setup more difficult as the Evolution 707 will be communicating with the source before the
setup of inputs and outputs has occurred.
5. Press the Power button on the front panel.
Within a few seconds the video display will show a blue screen with white text.
NOTE: If you are using an analog output such as component or composite video, press cd on the
front panel, this will go to an analog defaulted video setting and expedite your setup.
NOTE: If a blue screen with text does not occur, check the following:
A.
Video connections
B.
Input of the video display
C.
Evolution 707 is in operation mode
If a problem still persists, turn the Evolution 707 off via the rear panel switch and turn it back
on.
6. Press the Menu Button
Now that a video connection has been established, press the Menu button, the set-up menu will
appear on the video display. It is now possible to navigate the set-up menu using a combination of
the up, down, left, right, enter, and previous buttons. These can be accessed via the Front panel of
the Evolution 707 or the remote control.
Main Menu, Navigation and Setup
CONFIGURE VIDEO OUTPUT
1.
Overview
Configure video output sets the analog video scaler to an appropriate video output resolution.
Analog video can be up-scaled up to 1080P 60Hz allowing video parity for all video sources Once
this has been set all analog video sources will be up-scaled and output to this resolution. HDMI
inputs are NOT affected by this setting.
NOTE: Make sure your video display is capable of displaying the output resolution selected, a series
of error messages requiring user response will appear if the output resolution is set incorrectly.
2.
Analog Video Scaler
A.
Setting maximum Video output resolution
These are the available analog scaler output formats
480i - 720 x 480 60Hz
720p - 1280 x 720 60Hz
1080p - 1920 x 1080 30Hz
480p - 720 x 480 60Hz
1080i - 1920 x 1080 50Hz
(Outside the USA)
1080p - 1920 x 1080 50Hz
(Outside the USA)
1080i - 1920 x 1080 60Hz
1080p - 1920 x 1080 60Hz
576i - 720 x 576 50Hz
(Outside the USA)
576p - 720 x 576 50Hz
(Outside the USA)
720p - 1280 x 720 50Hz
(Outside the USA)
B.
1080p - 1920 x 1080 24Hz
1080p- 1920 x 1080 25Hz
(Outside the USA)
Setting Zone 2 video output resolution
The Evolution 707 has a separate set of video outputs available specifically to operate a
second video system or zone. These signals can be routed to an entirely different system
and operated separately from the main zone system. The second zone video can be output
over component, s-video or composite video terminations.
NOTE: The zone two video can only utilize analog video sources, HDMI inputs cannot output
zone 2 video, however any component, s-video or composite video can be output to zone 2
video.
Main Menu, Navigation and Setup Cont...
These are the available analog scaler output formats for Zone 2
480i - 720 x 480 60Hz
480p - 720 x 480 60Hz
576i - 720 x 576 50Hz
(Outside the USA)
576p - 720 x 576 50Hz
(Outside the USA)
720p - 1280 x 720 50Hz
(Outside the USA)
1080i - 1920 x 1080 50Hz
(Outside the USA)
1080i - 1920 x 1080 60Hz
720p - 1280 x 720 60Hz
LISTENING ROOM SETUP
1. Overview
Listening room setup is comprised of three major parts; configure speakers, speaker distance
and calibrate volume. This group of settings defines the speaker crossover parameters as well as
distance of speaker relative to the listening position and speaker SPL (sound pressure levels). Each
loudspeaker in the system can be set to a specific crossover point to insure proper utilization of that
speaker’s frequency response and its relationship to the subwoofer.
2.
Configure Speakers
Defines number of speakers and the frequency relationship to the subwoofer or LFE channels for
each group of speakers in the surround system. The quantity and frequency options are available for
each group of speakers listed below.
A.
Quantity - Sets the number of channels in the system.
B.
Full Range – This setting allows the passing of full spectrum audio frequencies including LFE
information.
C.
LIM ( ? ) (limited) Hz – Sets the low pass filter frequency. Low frequency information below
this setting is channeled to the sub woofers or LFE channels.
The following settings are available to any of the speakers in the system except the
subwoofer. This setting will specify a point where the low frequency response of each
speaker respectively will be re-routed to the subwoofer or LFE enabled speakers. Choose
a setting from the chart below that corresponds to the low frequency specification of the
speakers in use.
LIM 40 Hz
LIM 75 Hz
LIM 120 Hz
LIM 190 Hz
LIM 45 Hz
LIM 80 Hz
LIM 130 Hz
LIM 200 Hz
LIM 50 Hz
LIM 85 Hz
LIM 140 Hz
LIM 210 Hz
LIM 55 Hz
LIM 90 Hz
LIM 150 Hz
LIM 220 Hz
LIM 60 Hz
LIM 95 Hz
LIM 160 Hz
LIM 230 Hz
LIM 65 Hz
LIM 100 Hz
LIM 170 Hz
LIM 240 Hz
LIM 70 Hz
LIM 110 Hz
LIM 180 Hz
LIM 250 Hz
Main Menu, Navigation and Setup Cont...
D.
Front - Speaker channels positioned front Left and front Right respective to the listening
position.
1.
Quantity – N/A
NOTE: Left and Right front speakers are a minimum requirement for surround or two
channel music play back. The quantity value cannot be changed.
1.
E.
Crossover - Full, LIM (?) Hz
Center - Speaker channels positioned front Center respective to the listening position.
1.
Quantity - NO, 1 and 2
2.
Crossover - Full, LIM (?) Hz
NOTE: The Evolution 707 allows the use of an additional center channel speaker. The
settings for the center channels are exactly the same and they are configured as if
there were one. Typically a second center channel is used in very large rooms where a
higher output level is required.
F.
G.
H.
Surround - Speaker channels positioned to the Left and Right midway into the room
respective to the listening position.
1.
Quantity - NO, 1 and 2
2.
Crossover - Full, LIM (?) Hz
Back – Speaker channels positioned to the Left and Right behind the listening position
respectively.
1.
Quantity - NO, 1 and 2
2.
Crossover - Full, LIM (?) Hz
5.1 Surround – This setting allows the steering of surround information to be routed
additionally to the rear speakers, surround speakers or both during 5.1 channel playback in
a 7.1 system.
NOTE: This function is to utilize the rear speakers for 5.1 source material only. 7.1 material
generates the rear channel information.
The options are:
1.
Both - Routes Surround information to both the Surround speakers and the Back
speakers.
2.
Back - Routes Surround information to the Back speakers.
3.
Surround - Routes Surround information to the Surround speakers.
Main Menu, Navigation and Setup Cont...
I.
Subwoofer – A speaker channel (s) specifically utilized for LFE (Low Frequency Effects)
information and low frequency information to surround speakers set to limited.
1.
Quantity – NO, 1, 2, 3, and 4
NOTE: The Evolution 707 allows the use of up to three additional subwoofers. The
settings for each of the SW channels originate from the original LFE channel but are
configured individually to perform specific or similar functions. Subwoofer options
are based on quantity used. The combinations are:
• SMALL + LFE – LFE and Subwoofer functions are enabled. All low frequency from
speakers set to limited as well as the LFE effects are sent to the subwoofer(s).
• FRONT + LFE - LFE and Subwoofer functions are enabled. All low frequency from
speakers in the FRONT set to limited as well as the LFE effects are sent to the
subwoofer(s).
• BACK + LFE - LFE and Subwoofer functions are enabled. All low frequency from
speakers in the BACK set to limited as well as the LFE effects are sent to the
subwoofer(s).
• LEFT + LFE - LFE and Subwoofer functions are enabled, all low frequency from
speakers on the LEFT side set to limited as well as the LFE effects are enabled.
• RIGHT + LFE- LFE and Subwoofer functions are enabled. All low frequency from
speakers on the RIGHT side set to limited as well as the LFE effects are sent to the
subwoofer(s).
The combination of subwoofer modes are selected only via the first line of text to
the right of the “SUB1” label. Set the quantity of sub channels, then navigate to
this text, press the enter key and scroll through the available options for that quantity
combination. The Chart below describes various subwoofer combinations.
SUB 1
1 SUB
SMALL + LFE
2 SUBS
SMALL + LFE
LEFT + LFE
FRONT + LFE
3 SUBS
SMALL + LFE
LEFT + LFE
FRONT + LFE
4 SUBS
SMALL + LFE
LEFT + LFE
FRONT + LFE
SUB 2
N/A
SMALL + LFE
SMALL + LFE
SMALL + LFE
RIGHT + LFE
BACK + LFE
RIGHT + LFE
BACK + LFE
RIGHT + LFE
BACK + LFE
N/A
SMALL + LFE
SMALL + LFE
LFE
LEFT + LFE
SUB 3
N/A
FRONT + LFE
SUB 4
N/A
N/A
N/A
SMALL + LFE
RIGHT + LFE
BACK + LFE
Main Menu, Navigation and Setup Cont...
3. Speaker Distance – Defines the distance to each speaker in the surround sound system from the
listening position. Each Speaker can be adjusted from 0 feet to 30 feet in .5 foot increments for
proper arrival of sound information to the listening position. The default values are set to 0.0 feet,
speakers labeled N/A have not been enabled in the listening room setup and are inactive.
A.
LEFT, RIGHT - Speaker channels positioned front Left and front Right respective to the
listening position. Left and right are required for a 5.1 or 7.1 surround system.
B.
CENTER1, CENTER2 - Speaker channels positioned front Center respective to the listening
position. For large rooms 2 center channels can be utilized. Typically a center channel is
positioned above or below the video screen. For really large rooms with large screens,
centers can also be placed side by side to increase the center image width and increase
output. They also are placed above and below for additional output in large rooms. The
center channel is required for a 5.1 or 7.1 surround system.
C.
L SURR, R SURR - Speaker channels positioned to the Left and Right midway into the
room respective to the listening position. They can also be placed further back or behind
the listening position in 5.1 systems. Surround channels are required for a 5.1 or 7.1
surround system.
D.
L BACK, R BACK - Speaker channels positioned to the Left and Right behind the listening
position respectively. Rear Surround channels are required for a 7.1 surround system.
E.
SUB1, SUB2, SUB3, SUB4 - Speaker channel (s) specifically utilized for LFE (Low
Frequency Effects) information. The Evolution 707 can accommodate up to 4 separate
subwoofers. This can be very effective in the creation of life like surround presentation.
subwoofers are the .1 in a 5.1 or 7.1 surround system. The LFE channel is specifically
developed to carry Low frequency energy and effects in this frequency range. In a
traditional surround system the .1 or LFE channel will not have a lot of musical information.
The 707 can route low frequency musical information to the subwoofers as well as the LFE
information. With multiple subwoofers the signal can have a dedicated LFE channel and a
dedicated low frequency speaker.
Main Menu, Navigation and Setup Cont...
4. Calibrate Room Setup
Calibrate volume is where a relative output level for each speaker is set. Level matching for each
of the speakers is measured from the listening position utilizing a SPL meter. The level for each
speaker is to be set to 75dB according to the Dolby standard. This is widely accepted as the standard,
however a higher or lower level can be utilized as long as all speakers are set to the same level for
an accurate point of reference. The Evolution 707 outputs a constant pink noise tone for each of
the channels so the calibration can take place. Set the level meter for a slow response time and Cweighting. The goal is to have all of the levels be as close to 75dB as possible. Each level can be tuned
from -15dB to +15dB in 1dB Increments.
A.
Auto Noise Sequence – Once auto is selected the automatic noise sequence begins. Starting
from the Left channel the digits indicating dB level directly below the label (LEFT) will flash.
To change the level setting press the enter key. The digits indicating dB level directly below
the label (LEFT) will stop flashing, now using the up and down arrows you can select the
required dB level. Once that level has been set press the enter button again and the auto
setup program will move to the next speaker (CENTER). The auto setup program will stay
on each speaker channel for approximately 3 seconds and then move to the next speaker
channel. Once finished to exit from the auto noise sequence menu press the previous
button or the menu button.
B.
Manual Noise Sequence – The manual noise sequence works similarly to the Auto Noise
sequence, the major difference being that the automatic portion has been removed. In
manual mode, navigation to each of the speaker components is done using the arrow
keys. Using the arrow keys, navigate to the speaker you want to change, press the enter
button and the digits indicating dB level directly below the label will begin to flash while
the audible pink noise tone will begin. Once the adjustment is completed press the enter
button again, now navigate to the next speaker in need of adjustment.
C.
Program Material – Program material allows the level adjustment utilizing the movie sound
track or any multi-channel audio from a selected source to be used instead of the pink noise
tone. This mode can be helpful to fine tune the overall sound field while an actual sound or
musical event is being played back. Navigation to each of the speaker components is done
using the arrow keys. Using the arrow keys, navigate to the speaker you want to change,
press the enter button and the digits indicating dB level directly below the label will begin
to flash while selected source audio begins. Once the adjustment is completed press the
enter button again, navigate to the next speaker in need of adjustment.
Main Menu, Navigation and Setup Cont...
CONFIGURE DEVICES
1. Overview
A.
Defining inputs and outputs for audio and video sources
The surround sound processor is at the heart of any home theater system. The Evolution
707 is very flexible in regards to integrating audio and video sources. It is recommended to
define and map out how each source component will be connected to the processor, how
the Evolution 707 outputs will be connected to various amplifier channels and eventually
amplifier channels be connected to speakers. Any of the push button presets on the
front panel or remote control can be changed to accommodate different audio or video
assignments.
Here are the default input presets for audio and video devices.
B.
Button Preset
DVD
DVDR
SAT
VCR
Video
HDMI1
HDMI2
COMPONENT 1
COMPONENT 2
TV
HDMI3
Dig Audio
HDMI A
OPT2
OPTICAL 1
COAX 2
HDMI A
Analog Audio
CAST1
S2
S1
VCR
S3
Button Preset
CD
TUNER
DVR
GAME
TAPE/VCR2
Video
COMPOSITE 1
COMPOSITE 2
COMPONENT 3
HDMI4
COMPOSITE 3
Dig Audio
DIG DISABLED
DIG DISABLED
DIG DISABLED
HDMI A
DIG DISABLED
Analog Audio
B1
S5
5.1 PREAMP
S4
TAPE MONITOR
Video Input and output connections
1.
Digital Video Options
a. HDMI – (High-Definition Multimedia Interface) is an audio/video connection or
interface for sending and receiving uncompressed audio and video data. HDMI
supports video from HDMI is also the exclusive carrier for Dolby TrueHD and DTS-HD
Master Audio Formats. There are (4) HDMI inputs and (1) Output on the Evolution
707. The Evolution 707 uses HDMI connections for HDMI audio and video.
1.
Analog Video Options
a. Component Video – A High-definition video connection standard featuring three
dedicated signal paths for Red, Blue and Green. This video standard also supports
uncompressed video but does not carry audio data and would require the use
of an audio interface to be used in conjunction. There are (3) Component video
inputs (1) output and (1) zone 2 output. The Evolution 707 uses RCA connections for
component video.
b. S-video – (Separate Video) A standard definition connection featuring a data path for
brightness and one for color. A step up from composite video in resolution that also
does not carry audio data and would require the use of an audio interface to be used
in conjunction. There are (4) S-video inputs (1) output and (1) zone 2 output. The
Evolution 707 uses 4 Pin S-video connections for S-video.
c. Composite Video - A low definition connection combining sync information,
brightness and color over one conductor. Composite video does not carry audio data
and would require the use of an audio interface to be used in conjunction. There are
(4) composite inputs (1) output and (1) zone 2 output. The Evolution 707 uses RCA
connections for composite video.
Main Menu, Navigation and Setup Cont...
C.
Audio Input and output connections
1. Digital Audio Options
a. HDMI – The new reference standard for uncompressed digital audio formats. The
source and processor must both operate HDMI version 1.3 or better to accommodate
the full spectrum of uncompressed audio. The Evolution 707 is one of the first HDMI
1.3 compliant products introduced to the marketplace. The Evolution 707 can decode
all of the standard Dolby Digital and DTS 2-channel and multi-channels formats
including:
• 8 channels of 24/96 (24bit 96Khz) in Dolby TrueHD or DTS-HD
• 6 channels of 24/192 (24bit 192Khz) in Dolby TrueHD or DTS-HD
• 8 channels of 24/192 (24bit 192Khz) in LPCM
There are (4) HDMI inputs (1) output. The Evolution 707 uses HDMI connections for
HDMI audio.
b. Optical S/PDIF - (EIAJ Optical or TOSLINK) An industry standard digital audio
connection designed to support Dolby digital, DTS and PCM standards. S/PDIF can
decode A Maximum of 2-channel 24/96 (24bit 96Khz) data or 8 channels of 24/48
(24bit 48Khz). Optical connections use light to transmit data are not physically
grounded making them not susceptible to ground loops or external RFI interference.
There are (4) optical inputs and (1) output. The Evolution 707 uses TOSLINK
connections for S/PDIF optical digital audio.
c. Coaxial S/PDIF – An industry standard digital audio connection designed to support
Dolby digital, DTS and PCM standards. S/PDIF can decode A Maximum of 2-channel
24/96 (24bit 96Khz) data or 8 channels of 24/48 (24bit 48Khz). There is no difference
in the signal transmission between coaxial and optical, data is carried over a 75ohm
coaxial cable instead of being optically transferred. There are (4) coaxial inputs and
(1) output. The Evolution 707 uses RCA connections for S/PDIF coaxial digital audio.
2.
Analog Audio Options
a. CAST – (Current Audio Signal Transmission) is a proprietary technology by Krell
that effectively combines the signal gain stages of components connected in CAST
into one gain block. CAST technology virtually eliminates the noise and distortions
created from the use of multiple voltage gain stages. A Krell system connected
in CAST transfers the signal in the current domain, throughout the signal path to
the amplifier output stage where only one current to voltage conversion (I-to-V)
takes place. CAST enabled products include a transmitter and receiver circuitry
that transfers current from an extremely high output impedance (source) to a lowimpedance input (load), minimizing the cable’s effect on signal transmission.
CAST technology expands the usable audio signal bandwidth well over 2 MHz;
ensuring harmonic reflections are virtually immeasurable in the audible frequency
range. CAST allows signal transmission over extended lengths of interconnect cable,
allowing flexible placement for your components, without signal degradation. There
are (2) CAST inputs and (12) outputs. The Evolution 707 uses 4-pin Lemo connectors
for CAST.
Main Menu, Navigation and Setup Cont...
b. Balanced – A standard audio connection technology based on impedance balanced
signal transfer. Balanced termination consists of three discrete conductors; Positive
(+) or non-inverting, Negative ( - ) or inverting and ground. Balanced cables offer
quiet performance even over long cable lengths. A true differential circuit with
balanced terminations offers a gain boost of +6dB over standard single-ended
formats. Balanced is the preferred connection standard for the Evolution 707 when
CAST is not available. There is (1) balanced inputs and (12) outputs. The Evolution 707
uses XLR connections for balanced audio.
c. Single-Ended – The original standard for transferring audio signals using a single
conductor and ground termination. Single-ended connections do not have the same
performance benefits as Balanced or CAST terminations. There are (5) single-ended
inputs, (1) Tape input, (1) VCR input, (12) outputs, (1) Tape output, (1) VCR output and
(1) Zone 2 output. The Evolution 707 uses RCA connections for single-ended audio.
d. Multi-Channel – The Evolution 707 has a direct analog 5.1 multi-channel input.
Designed specifically to take advantage of Blu-Ray, DVD-A, HD-DVD or SACD multichannel analog output stages, this input has a direct path to the volume control and
out to the complimentary class “A” output stages. There is (1) Multi-Channel input
connected via RCA connectors.
Main Menu, Navigation and Setup Cont...
2. Changing default input presets.
There are (10) preset buttons on the Evolution 707 labeled: DVD, DVDR, SAT, VCR, TV, CD, TUNER,
DVR, GAME and TAPE. All the assigned inputs can be tailored to accommodate audio and video
combinations from multiple sources. Every Input has a selectable video, audio and trigger
component that can be arranged to accommodate any number of source combinations. Refer to the
default setting chart on page 23 for quick connection information.
3. Configure Video
A.
Assigning Video Inputs – There are two settings available for each button, A main or primary
video input and a Zone 2 video input. The second zone video is designed for analog video
only. If a second zone video output is required, select a second zone video input in addition
to the Main video input. The Evolution 707 cannot pass HDMI information to the analog
video outputs. When Zone 2 video is required a second analog video input connection is
necessary.
1.
Setting the Main Video Input
Using the arrow keys navigate to the text below the “device” label. Press the enter
button to make the text flash, while flashing and using the up and down arrows,
select the device input to be changed by pressing the enter button. Navigate to the
text below the “Main Video Input” label and press Enter, this will make the text flash
and allow scrolling to the required input type.
Main video input device options are:
a. HDMI 1, HDMI 2, HDMI 3, HDMI 4
b. COMPONENT 1, COMPONENT 1, COMPONENT 3
c. SVIDEO 1, SVIDEO 2, SVIDEO 3, SVIDEO 4
d. COMPOSITE 1, COMPOSITE 2, COMPOSITE 3
e. PREVIOUS - Displays the last active video input selected.
f. MENU ONLY - Displays only the OSD and menu, no other video will be passed.
g. DISABLED - No OSD or video will be passed.
2.
Setting the Zone 2 Video input
Using the arrow keys navigate to the text below the device label “Zone 2 video input”.
Press the enter button to make the text flash, while flashing and using the up and
down arrows, select the device input to be changed by pressing the enter button.
Main Menu, Navigation and Setup Cont...
Zone 2 Video Input device options are:
a. COMPONENT 1- COMPONENT 3
b. SVIDEO 1- SVIDEO 4
c. COMPOSITE 1- COMPOSITE 3
d. DISABLED
e. PREVIOUS
f. SAME AS MAIN - Mimics your Main video input setting.
NOTE: This is only for analog video sources and will not function with HDMI input
selected.
4.
Configure Audio
A.
Assigning Audio Inputs – There are potentially four audio related settings available for each
preset button, A main or primary analog audio input, A main digital audio input, A lip sync
delay setting and an EQ memory setting.
1.
Analog - Sets analog audio option for each button
2.
Digital – Sets Digital audio option for each button
3.
Lip Sync – Changes the delay time between viewing a person’s lips moving on the
screen and the sound leaving their mouth. Normally this synchronization will be
correct but in systems where multiple video connections are made or extreme
distances are required, a delay can be present. The lip Sync setting can increase the
audio delay in milliseconds to match video presentation.
4.
EQ Memory – Sets the room equalization mode configured in the operation menu.
There are up to 4 different EQ settings that can be utilized for any button.
SEE: Operation – Room EQ Setup
B.
Setting the Analog audio Input
Using the arrow keys navigate to the text to the right of the for “device” label. Press the enter
button to make the text flash, while flashing and using the up and down arrows, select the
device input to be changed by pressing the enter button. Navigate to the text to the right of
the “analog Input is” label and press Enter, this will make the text flash and allow scrolling to
the required input type.
Main Menu, Navigation and Setup Cont...
Main Audio input device options are:
1.
Analog
a. CAST – C1, C2
b. Balanced – B1
c. Single-ended – S1, S2, S3, S4, S5
d. Tape – Tape Fixed Single-ended Input
e. VCR – Dedicated VCR Single-ended input
f. 5.1 PRE – Dedicated direct 5.1 channel analog input
2.
Digital
a. HDMI A – Auto Signal detection.
HDMI A is used when the source component utilizes the I2S protocol. I2S (Integrated
Interchip Sound) is the carrier for all of the new uncompressed formats ie TrueHD,
DTS-HD Master audio etc… HDMI A should be the default HDMI setting for use with
uncompressed PCM or Bitstream sources.
NOTE: In order to receive uncompressed formats the video output of the source
device must be set to 720p or higher.
b. HDMI S – S/PDIF Signal mode.
Decodes from the standard HDMI audio transport known as S/PDIF typically used for
earlier sources that have audio over HDMI in an S/PDIF format. For this type of source
use the HDMI S option. These source units may not transfer audio on the advanced
HDMI audio transport. NOTE: HDMI audio inputs are defined by the Video selection.
c. S/PDIF Optical (TOSLINK) – OPT 1, OPT 2, OPT 3, OPT 4
d. S/PDIF Coaxial – COAX 1, COAX 2, COAX 3, COAX 4
e. Disabled - No audio input selected, no audio will pass.
f. Previous - Outputs the last active audio input selected.
C.
Choose an Analog Decode Preference
The Analog decode preference is a processor mode that can be triggered when the analog
input signal is sent to the processor. The Preamp mode is a direct connection to the Volume
control and does not use and signal processing designed for best analog performance.
The analog decode modes are:
STANDARD DECODE MODES
1.
Dolby PLIIx Movie
2.
Dolby PLIIx Music
3.
DTS NEO: 6 Cinema™
4.
DTS NEO: 6 Music™
Main Menu, Navigation and Setup Cont...
KRELL MUSIC MODES
The Krell Music Surround Modes simulate different sound field experiences while listening
to music.
The table below lists the modes and the speakers that operate within each mode:
1.
Party
L/R/C/S/SB
2.
General Admission
L/R/S/SB
3.
Front Row
L/R/S/SB
4.
On Stage
L/R/C/S/SB
5.
Enhanced Stereo
L/R/C/S
6.
Orchestra
L/R/C/S/SB
7.
Mezzanine
L/R/C/S/SB
8.
Full Range + Sub
L/R/S
9.
Preamp
L/R
10. Stereo
D.
L/R
Auto-Migration
Auto migration is a utility that allows you to connect an active analog and digital input to
the same button preset. If the Processor senses a digital signal it will default to that format
for sound, if it does not sense the digital signal it will switch to the analog input allowing
analog signal to pass. The options for Auto Migration are OFF and ON.
NOTE: If both sets of inputs are not used simultaneously for any given button preset it is
recommended to keep Auto-Migration OFF.
E.
Choose a Digital Decode Preference
The Digital decode preference is a decoding mode that can be triggered when the digital
input signal is sent to the processor. Not all modes are applicable to all incoming signals, the
chart below describes which modes are available for specific incoming signals.
The digital decode modes are:
Dolby D 5.1
1.
Dolby D 5.1
2.
Dolby D 5.1 / SurEX
3.
Dolby D 5.1 / PLIIx Movie
4.
Dolby D 5.1 / PLIIx Music
Main Menu, Navigation and Setup Cont...
DTS 5.1
1.
DTS 5.1 Movie
2.
DTS 5.1 Music
Dolby 2.0
1.
Dolby D / PLIIx Movie
2.
Dolby D / PLIIx Music
3.
Dolby D 2.0
PCM
1.
Dolby PLIIx Movie (44.1, 48, 96, 192 kHz)
2.
Dolby PLIIx Music (44.1, 48, 96, 192 kHz)
3.
DTS NEO: 6 Cinema™ (44.1, 48, 96 kHz)
4.
DTS NEO: 6 Music™ (44.1, 48, 96 kHz)
5.
Party (44.1, 48, 96, 192 kHz)
6.
General Admission (44.1, 48, 96, 192 kHz)
7.
Front Row (44.1, 48, 96, 192 kHz)
8.
On Stage (44.1, 48, 96, 192 kHz)
9.
Enhanced Stereo (44.1, 48, 96, 192 kHz)
10. Orchestra (44.1, 48, 96, 192 kHz)
11. Mezzanine (44.1, 48, 96, 192 kHz)
12. Full Range + Sub (44.1, 48, 96, 192 kHz)
13. Monophonic (44.1, 48, 96, 192 kHz)
14. Stereo (44.1, 48, 96, 192 kHz)
Main Menu, Navigation and Setup Cont...
F.
Assign Lip Sync Delay
To adjust the Lip Sync options, Use the arrow keys to navigate to the text to the right of the
“device” label. Press the enter button to make the text flash, while flashing and using the
up and down arrows, select the device input to be changed by pressing the enter button.
Navigate to the text to the right of the “Delay” label press enter and change the Lip Sync
delay. The delay can be adjusted from 0 - 200ms.
G.
Assign EQ Memory
To adjust the EQ Memory options, Use the arrow keys to navigate to the text to the right of
the “device” label. Press the enter button to make the text flash, while flashing and using the
up and down arrows, select the device input to be changed by pressing the enter button.
Navigate to the text to the right of the “EQ” label press enter and change EQ assignment. The
EQ options are 1, 2, 3, 4 and OFF.
SEE: Operation – Room EQ Setup
Main Menu, Navigation and Setup Cont...
5. Configure Trigger
A.
Overview
A trigger is an industry standard interface where a wire is connected between components
enabling control the power on or off sequence simultaneously or with a delay. The Evolution
707 uses standard 12v DC Triggers. KRELL components use a constant 12v for a power
ON state and 0 volts for the power OFF state. Connect a 12v trigger cable to one of the 4
trigger outputs on the Evolution 707. Connect the other end of the trigger cable to the
Trigger input of a multi-channel amplifier for example. Triggers can also be utilized to turn
on certain components associated with specific inputs while turning off others. 12v trigger
cables are terminated with 1/8” phone jacks.
B.
Configure Trigger
1.
Select a button preset device to configure.
2.
Choose whether one or all the triggers will be configured at once. The options are:
Selective or All triggers. If the all triggers option is selected then the Mode and
delay will be configured for all (4) trigger outputs for that selected button preset.
If Selective is used then each trigger can be configured individually for that button
preset. The selective options are Trigger 1, Trigger 2, Trigger 3 and Trigger 4.
NOTE: Trigger 1 is enabled for all button presets by default.
C.
3.
Mode sets the behavior of each specified trigger the options are:
4.
Main Only – Trigger output is active for the Main zone only for the selected device.
5.
Main and Zone 2 – Trigger output is active for both the Main zone and Zone 2 for the
selected device.
6.
Always Off –Trigger output is OFF for Main and Zone 2 for the selected device.
7.
Zone 2 Only - Trigger output is active for the Zone 2 only for the selected device.
Delay - sets the time delay between when the device button is selected and the 12v signal is
sent. This is an added feature to allow the staggering of when components turn on, this can
be critical when big power amplifiers are in use. The delay setting is between 1 Second and
30 Seconds.
Main Menu, Navigation and Setup Cont...
CONFIGURE LEVEL ADJUSTMENT
1. Overview
This section of the menu is dedicated to the fine tuning of different signal levels routed through or
processed by the Evolution 707. This menu is broken into several sections focusing on specific signal
requirements or decoding modes.
2. Device Trim
Device trim is a master level adjustment for all of the incoming audio signals. This tool is useful when
trying to balance the overall level from input to input while switching preset buttons. The device trim
range is from -15dB to +15dB in 1dB increments.
3. Analog Input Trim
An adjustment of analog input signals utilizing a clip indicator to display and adjust the incoming
signal level for fine tuning. Often there are analog signals that have exceptionally high output that
may overload or clip the Evolution 707’s input stage. This would require the input trim or even the
Anti-clip circuit.
NOTE: A Device with an analog source configured needs to be selected first in order to enable the
Analog input trim function. Select the device button preset and proceed to the OSD Menu.
A.
Anti-Clip - The anti-clip function measures the signal level and prevents the input signal
from overloading (clipping) the analog-to-digital converters. The Anti-clip option is ON or
OFF.
B.
Input Gain – Increase or decreases the analog input signal for optimum performance. The
input gain range is from -6dB to +6dB in 1dB increments. To maximize your system’s signalto-noise ratio without clipping, increase the input gain value applied to the signal until
you see the clip indicator Labeled “LEFT and RIGHT” illuminate on the screen; then back the
input gain value off 1 dB.
4. Music Mode Sub Trim
The music mode sub trim allows a subwoofer level adjustment for use with the custom Krell music
surround or DTS surround modes. This is a permanent fine adjustment made at the device level
as opposed to the main subwoofer levels set in speaker setup. These adjustments do not change
the main settings. The music mode sub trim adjustment range is from -10 dB to +10dB in 1dB
increments.
5. DTS Control Trim
DTS NEO surround modes take a 2 channel audio input and create 5.1 surround channels. DTS
control trim allows a permanent fine adjustment of the center channel gain, as opposed to the main
center levels set in speaker setup. These adjustments do not change the main settings. The DTS
control trim adjustment range is from 0 dB to +5dB in 1dB increments.
Main Menu, Navigation and Setup Cont...
6. PLII Control Trim
Dolby Pro Logic surround modes take a 2 channel audio input and create 5.1 surround channels.
PLII control trim allows a permanent fine adjustment of center channel spread to the left and right
speakers and also the amount of fade from front speaker to surround speakers. The two available
adjustments are Center Width and Dimension.
Center Width - Adjust how much of the center output signal is dispersed to the left and right channel
outputs. The adjustment range is from 0 (lowest) to 7 (highest, effectively mutes the center channel)
in 1 dB increments.
Dimension - Adjust the fade balance between the front or rear loudspeakers, to customize the
balance from all loudspeakers. The adjustment range is from 0 (Maximum surround) to 6 (Maximum
front). The default setting is 4 (neutral) and adjustable in 1 dB increments.
7. Maximum Volume Limit
Adjusts the maximum system volume control limit. The maximum volume setting range is from 10 to
152. NOTE: The default maximum volume limit setting is 100.
8. Zone 2 Level
Adjusts the Zone 2 audio output for fixed or variable operation. “Variable” controls volume for the
main zone as well as a second or Zone 2 audio system. “Fixed” disables volume control adjustment to
the Zone 2 audio system.
Main Menu, Navigation and Setup Cont...
OPERATION
1. Overview
The operation menu is a selection of advanced parameters to adjust the unit operation and user
interface in the Evolution 707.
2. OSD Operation
A.
OSD On Time - Adjusts the amount of time the OSD stays on the active screen after a button
is pushed. The OSD on time can be adjusted from 0 to 10 seconds in 1 second increments.
B.
Line Number – Adjusts the starting position of the OSD text. Every video display has
variances in where displayed images are placed respectively to the viewable area. When the
OSD is active it may be necessary to change where the text starts on the screen. The line
number can be adjusted from 1 to 12 lines down in 1 line increments.
C.
Menu Bkgnd – Adjusts the way OSD is displayed on the video display. The options are
Transparent and Solid.
D.
1.
Transparent – Displays only white text over whatever image that is currently on the
video display.
2.
Solid – Displays a blue screen with white letters masking the image on the video
display.
LCD Contrast – Adjusts the Contrast of the Evolution 707’s front panel display. Adjust the
value up or down until the display text is clearly visible from the main viewing angle. The
LCD contrast can be adjusted from 1 to 32.
3. Audio Operation - Adjusts advanced Evolution 707 audio related functions.
A.
Mute Mode – Adjusts the level of attenuation used when the Mute button is depressed. The
options are “Full” for complete silence when pressed and “-20dB” that will drop the level by
20 decibels passing a significantly reduced audio signal.
B.
Dolby Hold Mode – Adjusts the amount of time the Evolution 707 hangs onto a Dolby
Digital signal when the bitstream is interrupted. This would be commonly used in respect
to older style cable boxes to eliminate excessive noise while switching channels. Dolby hold
can be adjusted from 0 to 30 seconds in 1 second intervals.
C.
DTS Mode Hold - Adjusts the amount of time the Evolution 707 hangs onto a DTS Digital
signal when the bitstream is interrupted. This would be commonly used in respect to older
style DVD players to eliminate excessive noise while advancing tracks. DTS hold can be
adjusted from 0 to 30 seconds in 1 second intervals.
D.
EX Auto Switching – Adjusts whether the Evolution 707 recognizes Dolby EX encoded
material. The options are Enable or disable.
Main Menu, Navigation and Setup Cont...
E.
Dynamic Range – Limits the dynamic content by compressing the audio signal. This setting
limits the lfe and bass information in particular allowing higher playback levels with less
dynamic contrast. This function is most helpful when used at night making it easier not to
disturb people in other rooms. The settings are “Max” No compression, “Normal” 11dB of
compression and “Night” 22 dB of compression. NOTE: The OSD will display a DYN label next
to the volume setting when Dynamic Range compression is in use.
4. 5.1 Input Setup – Adjusts the number of active channels used in the discrete 5.1 analog input. This
reduces the amount of noise being introduced into the Evolution 707 insuring the best possible
performance. The 5.1 Input setup options are:
A.
Active Inputs – (L R),( L C R), (L R SL SR), and (L C R SL SR)
B.
Active SW – Yes or No.
5. Program Remote - A function designed to help set up a learning universal remote. It is of particular
use in adding a function that is not on the Evolution 707’s remote control. Follow the instructions
below to begin and end the program remote function.
A.
To begin, turn the volume control to select a command. The command appears on the front
panel display window.
B.
Place the programmable remote in program mode (see the learning remote user manual).
C.
Place the infrared sensor of the programmable remote so that it faces the infrared emitter
on the Evolution 707 front panel.
D.
Press and hold the save button on the Evolution 707 front panel until the programmable
remote has learned the code (see the learning remote user manual for information on the
actions required to learn code).
E.
Select and save as many commands as required.
F.
Press the recall button on the front panel to return to the Program Remote Screen and exit
from the Program remote mode.
6. System Information – Displays system information about the Evolution 707. The following
information is displayed:
A.
AC Line frequency – Displays which line voltage frequency is configured.
B.
Software version – Displays the currently Installed firmware version
C.
EE Prom version – Displays the currently installed hardware control software.
Main Menu, Navigation and Setup Cont...
7. Room EQ Setup
A.
Overview
The Evolution 707 has a built in 1/3 octave digital parametric equalizer. The equalizer is
provided mostly to correct for errors in sonic presentation typically caused by speaker
placement or room variables. All of the Room EQ filters use a digital implementation of the
biquad filter algorithm. The biquad transfer function was digitized to implement the filters
using bilinear transform, with BLT frequency warping. This scheme maintains accurate
center frequencies and bandwidth. There are 24 of these filters that make up the Room EQ.
Each channel in the Evolution 707 has 3 of these filters, cascaded and labeled I, II or III.
B.
Memory – There are (4) memory locations for advanced EQ filters. The options for Memory
are 1, 2, 3, 4 and Off.
C.
Channel – An EQ filter can be saved and set for any individual channel. The channel options
are:
D.
1.
All - All of the channels are filtered in the same manner as specified in the Room EQ
Setup Menu.
2.
L, R, C, LS, RS, LB, RB or S – An Individual channel filter for a specific channel. NOTE:
Make sure Channel is not set to “ALL” when exiting the Room EQ Menu, individual
channel options will be lost.
Filter Parameters - There are 4 parameters that can be set for each filter:
1.
Type
a. HPF – High Pass Filter
Below is a graph of the HPF. The graph also shows what happens when you change
the FREQ parameter of the HPF filter. Notice how the -3 dB point changes frequency.
The FREQ parameter is the only parameter you can change on the HPF.
Main Menu, Navigation and Setup Cont...
b. LPF – Low Pass Filter
Below is a graph of the LPF. The graph also shows what happens when you change
the FREQ parameter of the LPF filter. Notice how the -3 dB point changes frequency.
The FREQ parameter is the only parameter you can change on the HPF.
c. Notch – Notch Filter
Below is a graph of the Notch Filter. The graph also shows what happens when you
change the Shape parameter of the Notch filter. Notice how the width of the notch
changes. The Frequency parameter of the notch filter moves the notch across the
frequency band.
Main Menu, Navigation and Setup Cont...
d. Lshlf – Low Shelf Filter
The Low Shelf filter is the same as the High Shelf Filter except the LEVEL parameter
changes the level of the frequencies below, instead of above, the crossover point
specified by the FREQ parameter.
e. Hshlf – High Shelf Filter
Below is a graph of the High Shelf Filter. The High Shelf Filter has two parameters
that vary. The FREQ parameter changes where the crossover happens. The LEVEL
parameter changes the level of the frequencies above the crossover point specified
by the FREQ parameter.
f. Pking – Peaking Filter
Below are two graphs of the peaking filter. The peaking filter is similar to the notch,
but the peaking filter has the ability to vary the depth of the notch using the LEVEL
parameter. The depth can be changed to the point that it offers boost instead of cut.
The first graph shows what happens when you change the Shape parameter of the
Peaking filter with the LEVEL parameter set at +6. Notice how the width of the peak
changes, if the LEVEL parameter was set negative there would be a notch instead of
a peak. The Frequency parameter of the peaking filter moves the peak/notch across
the frequency band.
Main Menu, Navigation and Setup Cont...
The next graph of the Peaking filter shows what happens when you change the
LEVEL parameter, the SHAPE is fixed at .4 for this graph. Notice how the LEVEL can be
changed to add boost or cut.
2.
Frequency - The Center/Cutoff Frequency can be specified for all of the filters. Thirty
frequencies, up to 16K, which are the standard ISO 1/3 octave center frequencies are
used as the Center/Cutoff Frequency Settings.
3.
Shape – The shape parameter used with the Notch and Peaking Filter, controls the
bandwidth of the filter. The Shape parameter can be adjusted from 0.4 to 9.0.
4.
Level - The Peaking, High Shelf and Low Shelf filters require a level adjustment. The
input level to the filter is reduced allowing the filter to pass full scale input at the
filter’s peak level without clipping the signal. The level difference is made up in the
volume control so the peak of the filter is really above/below the un-filtered level and
the un-filtered levels are the same as they were before filtering. Level can be adjusted
from –12dB to +6dB in 1 dB increments.
Note: The Shape field is disabled for filter types HPF, LPF, LSHLF, and HSHLF.
Level field is disabled for filter types HPF, LPF, and NOTCH.
E.
ehT
Apply – Saves the EQ parameters defined above. NOTE: Apply must be selected to make the
EQ filters active. The EQ filter can be heard immediately one Apply is selected.
Basic Operation of the Evolution 707
1. Power On/ Off and Stand-by
The Evolution 707 utilizes a Stand-by mode. Stand-by effectively shuts off all input and output
activity, but keeps the critical circuits operational to maximize system performance. Pressing the
Power button on the front panel or the remote control toggles between the Stand-by mode and On.
Main power to the unit itself is controlled by the switch located on the back panel. When the back
panel switch is used this is referred to as a hard reset.
2. Volume control
The volume knob on the Evolution 707 has numerous functions. It is first and foremost a volume
control, turning the knob clockwise will raise the listening level. At the 90 mark there is an “R” located
to the right of the digits, this signifies a 1 volt reference level as defined by Dolby. This setting is
defined for testing purposes, however there is no harm using this setting nor does it perform any
differently. The volume control knob can also be used to navigate menus while utilizing the OSD
Menu and is the fasted way to set menu items like speaker distance that can require several clicks of
the up or down buttons.
3. Quick level adjustment buttons
Located on the front panel or the remote control are six quick adjustment buttons. These settings are
for quick level or balance trim while listening and are not permanent. Pressing the power button will
reset these parameters to the default values.
A.
Center - Adjusts the center channel level up or down -10dB to +10dB in 1dB increments.
Additionally, if the Center button is pressed twice it will enable a Phantom Center mode.
1.
Phantom center is designed to route center channel information to the Left and Right
speakers, creating a center channel when there is in affect no center channel speaker.
B.
Surr - Adjusts the left and right surround channel output levels -10dB to +10dB in 1dB
increments.
C.
Back - Adjusts the left and right back channel output levels -10dB to +10dB in 1dB
increments.
D.
Sub - Adjusts the subwoofer channel(s) level -10dB to +10dB in 1dB increments.
E.
Bal - Adjusts the balance between left and right channels -6dB to +6dB in .5dB increments.
F.
EQ assignment - Pressing the “right arrow button” as a stand-alone button, enables the room
EQ function and quick selection of the “4” available EQ presets.
4. Zone 2 Output
The Zone 2 output is a discrete second set of outputs to control a separate audio/ video system. To
turn on the Second zone, while the unit is in Stand-by press the Zone button on the front panel or
remote control. The Green LED will appear under the Zone button indicating you have turned on
Zone 2. Once initialized all of the features and functions are operated as usual but specifically for the
Second zone.
To turn off the Second zone, press the Power button.
When Zone 2 is active, pressing the Zone button again will toggle between the Main zone, indicated
on the button presets and the Zone indicator with a “Red” LED and Zone 2 indicated with a “Green”
LED. Pressing the Power button while in Zone 2 will turn it off and revert back to the Main zone only.
NOTE: Different inputs can be used for the Main zone and Zone 2 simultaneously.
Basic Operation of the Evolution 707 Cont...
5. Tape / VCR inputs and outputs
The TAPE and VCR inputs and outputs are specifically provided to allow recording and playback of
analog audio and video sources. When the Tape or VCR input is selected, the Tape or VCR outputs are
shuts off so as not to allow feedback. The Tape or VCR inputs will accept the analog audio or video
signals from any active and selected device.
6. Button Mode presets
The Evolution 707 front panel has a row of buttons for quick access to Surround decoding modes.
The Modes Are:
A.
Pre Amp - Direct analog connection with no processing of the incoming signal.
B.
Stereo - Default mode for PCM digital input or 2-channel analog audio with processing.
C.
Mode 1 - Default mode as defined in the decode method preference. (P28, C)
D.
Mode 2 - Direct access to all available decode modes.
E.
Dolby Pro Logic - Direct access to the available Dolby Pro Logic IIx Modes.
7. Save and Recall
The configuration parameters and settings defined in the set-up menu can be saved to a default
layout. Once a layout has been saved it can be recalled at anytime restoring back to the last saved
working presets.
To Save a layout:
Press and Hold the Save button on the Front panel. The front panel display will show “Saving Setup”
and return to its last activity.
To Recall a layout:
Press and Hold the Recall button on the Front panel. The front panel display will show “Recall Setup”,
the Initialization splash screen will pop up and the unit will go into Stand-by. Press the Power button,
the last saved version of the layout will now be active.
8. Factory reset
The Evolution 707 has a full factory reset sequence, this will adjust all settings and parameters back
to the original factory specification. To activate a factory reset:
While the unit is powered on and in the operation state, press and HOLD the Recall button on the
front panel, and while holding the Recall button press the Power button on the front panel and then
release.
The front panel display on the Evolution 707 will go black, the unit will turn off, and about 2 seconds
later the unit will re-initialize displaying current firmware version number. All of the settings are now
back to the factory defaults.
Evolution 707 Future Upgrades and Firmware
Firmware Updates
1. The Evolution 707 utilizes a software based engine. This enables firmware updates to be
accomplished in the field rather than being returned to the factory. Firmware updates are sent via
the RS-232 port located on the back panel.
NOTE: Firmware upgrades are to be installed by an Authorized Krell Dealer or Distributor. Special
loading software and instructions are required to perform said updates. Please contact an authorized
Krell Dealer, Distributor or the Factory for information regarding firmware updates.
Future Upgrades
1. A B C D modes options (Not available at this time)
There are (4) buttons on the Remote control and also the front panel under the front panel display.
They will be enabled as quick access modes in the near future. These updates will be available via a
firmware update. Please consult Krell industries for details.
2. Mic Input (Not available at this time)
There is a mic input on the Evolution 707 front panel used to connect the supplied instrumentation
microphone. When enabled this will allow an auto setup option and basic room EQ. This update will
be available via a firmware update in the near future. Please consult Krell industries for details.
RS-232 Control
RS-232 Code Set
1. Preparing for RS-232 Connectivity
The Evolution 707 can be controlled remotely via an RS-232 connection. All of the features and
functions of the unit can be accessed via RS-232 command strings.
NOTE: The Evolution 707 can only recognize the “1pwrz” command while in stand-by mode. This
insures that the unit is energized and ready to accept command strings. Once the unit is active, then
commands can be sent. Feedback can be received when the unit is in stand-by mode.
A.
The Evolution 707 and All Krell components require a straight non-nulling RS-232 cable.
2. Settings
The RS-232 protocol settings for status and control are as follows:
9600 Baud, 8 Data Bits, 1 Stop Bit, No Parity
3. DB-9 Pin-out
A.
Data Carrier Detect
B.
Received Data
C.
Transmitted Data
D.
Data Terminal Ready
E.
Signal Ground
F.
Data Set Ready
G.
Request To Send
H.
Clear To Send
I.
Ring Indicator
A.
The decode preferences are dependant on the source data, not all formats are available to
every input stream.
Notes
RS-232 Control Cont...
COMMAND
RS-232
COMMAND
Menu Commands
Back speaker trim (000 - 020, sets -10 to +10 dB)
XXXBVLZ
Subwoofer #1 trim (000 - 020, sets -10 to +10 dB)
XXXSVLZ
Up
UPZ
Subwoofer #2 trim (000 - 020, sets -10 to +10 dB)
XXXS2LZ
Down
DWNZ
Subwoofer #3 trim (000 - 020, sets -10 to +10 dB)
XXXS3LZ
Left
LFTZ
Subwoofer #4 trim (000 - 020, sets -10 to +10 dB)
XXXS4LZ
Right
RGTZ
Current Zone Balance Select (then use UPZ and DWNZ)
IBALZ
Menu
MENZ
Balance (000 - 026, sets right off, left +6, through right +6,
left off 1/2 dB steps)
XXBALZ
Enter
ENTZ
Remote Zone Balance (then use UPZ and DWNZ)
BRLZ
Previous
PRVZ
Mute Current Zone
MUTZ
Mute Main Zone
MUTMZ
Mute Remote Zone
MUTRZ
Auto-Status Commands
Disable Auto Status
ASTDZ
Night Compression
NTCZ
Enable Auto Status
ASTEZ
Normal Compression
NMCZ
Get Status
STAZ
Max Compression
MXCZ
Generic Zone Direct Select Commands (works on current
zone)
Device Select Commands
Dvd Device Select
DVDZ
7.1 Input select
AMCZ
DVDR Device Select
DVDRZ
Analog Audio Input-1
AS1Z
Satellite Device Select
SATZ
Analog Audio Input-2
AS2Z
VCR Device Select
VCRZ
Analog Audio Input-3
AS3Z
TV Device Select
TVZ
Analog Audio Input-4
AS4Z
CD Device Select
CDZ
Analog Audio Input-5
AS5Z
Tuner Device Select
TUNZ
Analog Audio Input-6
AS6Z
DVR Device Select
DVRZ
Analog Audio Input-7
AS7Z
Game Device Select
GAMEZ
Analog Balanced Input
AB1Z
Tape Monitor Select
TPZ
Analog Tape Select
ATPAZ
Analog VCR Select
AVCAZ
Coax-1 Digital Audio Input Select
CO1Z
Coax-2 Digital Audio Input Select
CO2Z
Coax-3 Digital Audio Input Select
CO3Z
Coax-4 Digital Audio Input Select
CO4Z
Optical-1 Digital Audio Input Select
OPT1Z
Optical-2 Digital Audio Input Select
OPT2Z
Optical-3 Digital Audio Input Select
OPT3Z
Optical-4 Digital Audio Input Select
OPT4Z
Level Commands
Up
UPZ
Down
DWNZ
Main Speaker Volume (000 - 152)
XXXMVLZ
Remote Zone Speaker Volume (000 - 152)
XXXRVLZ
Center Trim Select (then use UPZ and DWNZ) (must be on
main zone)
ICVLZ
Surround Trim Select (then use UPZ and DWNZ) (Send Twice
for Back Trim Select)(must be on main zone)
IRVLZ
Sub Trim Select (then use UPZ and DWNZ)(must be on main
zone)
ISUBZ
Center speaker trim (000 - 020, sets -10 to +10 dB)
XXXCVLZ
Surround speaker trim (000 - 020, sets -10 to +10 dB)
XXXSRLZ
RS-232 Control Cont...
Video Direct Select Commands (works on selected zone)
Main TV Device Select
TVMZ
Main VCR Device Select
VCRMZ
Select Main Zone for Video Direct Select
DIMZ
Select Zone 2 for Video Direct Select
DI2Z
HDMI video-1
HM1Z
Remote Zone Direct S+A72elect Commands (use only when
both zones are on)
HDMI video-2
HM2Z
Remote Analog Audio Input-1
AS1RZ
HDMI video-3
HM3Z
Remote Analog Audio Input-2
AS2RZ
HDMI video-4
HM4Z
Remote Analog Audio Input-3
AS3RZ
Component video-1
CM1Z
Remote Analog Audio Input-4
AS4RZ
Component video-2
CM2Z
Remote Analog Audio Input-5
AS5RZ
Component video-3
CM3Z
Remote Analog Audio Input-6
AS6RZ
Composite video-1
CS1Z
Remote Analog Audio Input-7
AS7RZ
Composite video-2
CS2Z
Remote Analog Balanced Input
AB1RZ
Composite video-3
CS3Z
Remote Analog Tape Select
TPARZ
Composite video-4
CS4Z
Remote Analog VCR Select
VCARZ
S video-1
SV1Z
Remote DVR
VDRZ
S video-2
SV2Z
Remote Game
GAMRZ
S video-3
SV3Z
Remote CD
CDRZ
S video-4
SV4Z
Remote DVD
DVDRZ
Remote DVDR
DRDRZ
Remote Satellite
SATRZ
Main Zone Direct Select Commands (main zone must be on)
Main Analog Audio Input-1
AS1MZ
Remote Tape
TPRZ
Main Analog Audio Input-2
AS2MZ
Remote Tuner
TUNRZ
Main Analog Audio Input-3
AS3MZ
Remote TV
TVRZ
Main Analog Audio Input-4
AS4MZ
Remote VCR
VCRRZ
Main Analog Audio Input-5
AS5MZ
Main Analog Audio Input-6
AS6MZ
Power Commands
Main Analog Audio Input-7
AS7MZ
Power On
1PWRZ
Main Analog Balanced Input
AB1MZ
Power Off
0PWRZ
Main Analog Tape Select
TPAMZ
Main Analog VCR Select
VCAMZ
Main DVR Device Select
DVRMZ
Main Game Device Select
GAMMZ
Main CD Device Select
CDMZ
Main DVD Device Select
DVDMZ
Main DVDR Device Select
VDRMZ
Main Satellite Device Select
SATMZ
Main Tape Device Select
TPMZ
Main Tuner Device Select
TUNMZ
Zone Select Commands
Main Zone
MANZ
Remote Zone (Zone 2 Power toggle If Main Zone Is Off)
REMZ
Room EQ Commands
Room EQ Select (xxx = 000-004) (000 = off) (001-004 selects
memory 1-4)
Trigger Commands
xxxEQMZ
RS-232 Control Cont...
Trigger-1 (OFF)
0TR1Z
021
Front Row Mode
Trigger-1 (ON)
1TRIZ
022
On Stage Mode
Trigger-2 (OFF)
0TR2Z
023
Enhanced Stereo Mode
Trigger-2 (ON)
1TR2Z
024
Orchestra Mode
Trigger-3 (OFF)
0TR3Z
025
Mezzanine Mode
Trigger-3 (ON)
1TR3Z
026
Full Range + Sub Mode
Trigger-4 (OFF)
0TR4Z
027
Monophonic Mode
Trigger-4 (ON)
1TR4Z
028
Pre Amp mode
029
2496 decode mode
Decode Mode Select Commands
Mode 1
MS1Z
Mode 2
MS2Z
Pro Logic
MVZ
Stereo
STZ
Preamp
PAZ
Numeric Mode Select Commands
Mode Set (000 - 029, sets mode) (see below)
000
Dolby Digital
001 Dolby Digital 2/0 Stereo Mode (Pass Mode)
002 Dolby Digital 2/0 Pro Logic IIx Movie Mode
003 Dolby Digital 2/0 Pro Logic IIx Music Mode
007
DTS 5.1 Music™
008
DTS 5.1 Movie™
009
DTS 5.1 Matrix™
010
DTS 6.1 Discrete™
011
Stereo Mode (Pass Mode)
012
Pro Logic IIx Movie Mode
013
Pro Logic IIx Music Mode
017
DTS Neo:6 Cinema 6 Mode
018
DTS Neo:6 Music Mode
019
Party Mode
020
General Admission Mode
XXXMODZ
RS-232 Feedback
OVERVIEW
The Evolution 707 is equipped with a system that can report back its operational status via the RS232 port. The system reports it’s operational status by transmitting a block of status data. The block
is configured as 18, 8 bit words. The first and last word always contains hexadecimal code 55 to
facilitate message framing and synchronization. When the data block is sent through an RS-232 port,
each 8 bit word transmitted will also have 1 stop bit associated with it.
The feedback system is only available via the RS-232 port. The Status can be activated in 2 ways.
The first way is to ask for status to be sent by sending the RS-232 command “STAZ”. The second way
is to enable auto status by sending the RS-232 command “ASTEZ”, Once this command is sent, the
Evolution 707 will transmit a status block whenever the status changes. Auto Status is disabled by
sending the RS-232 command “ASTDZ”. Auto Status remains enabled until AC power is removed or
turned off.
All numeric values described in the following are decimal values unless otherwise noted. The description of the eighteen 8 bit words are as
follows:
WORD 1: Start of Message
Bit
Bit 7 – 0:
7
0
6
1
5
0
4
1
3
0
2
1
1
0
0
1
6
5
Zone 2
Mute
4
Current
Zone
3
Input
Trigger
2
Zone 2
Only
1
Zone 2
Power
0
Main
Power
Hexadecimal 55
WORD 2: General Status I
Bit
7
System
Mute
User Mute
Bit 7:
System Mute
1 = Internal mute is active
Bit 6:
Main Mute
1 = Main mute is active
Bit 5:
Zone 2 Mute
1 = Zone 2 mute is active
Bit 4:
Current Zone
1 = Zone 2 is active
Bit 3:
Input Trigger
1 = 12V input trigger is active
Bit 2:
Zone 2 Only
1 = Only Zone 2 power is on
Bit 1:
Zone 2 Power
1 = Zone2 power is on
Bit 0:
Main Power
1 = Main power is on
RS-232 Feedback Cont...
WORD 3: General Status II
Bit
7
Menu
Mode
6
Auto Status
Enabled
5
PLL Locked
4
Trigger 4
On
3
Trigger 3
On
Bit 7:
Menu mode
1 = Menu mode is active
Bit 6:
Auto Status
1 = Auto Status Enabled
Bit 5:
PLL Locked
1 = PLL is locked (Valid Digital input signal detected)
Bit 4:
Trigger 4 on
1 = Trigger 4 is on
Bit 3:
Trigger 3 on
1 = Trigger 3 is on
Bit 2:
Trigger 2 on
1 = Trigger 2 is on
Bit 1:
Trigger 1 on
1 = Trigger 1 is on
Bit 0:
DSP Running
1 = DSPs are not reset
2
Trigger 2
On
1
Trigger 1
On
0
DSP
Running
WORD 4: Current Device
Bit
7
Z2 CD3
6
Z2 CD2
5
Z2 CD1
4
Z2 CD0
3
MN CD3
2
MN CD2
1
MN CD1
0
MN CD0
5
VOL 5
4
VOL 4
3
VOL 3
2
VOL 2
1
VOL 1
0
VOL 0
4
VOL 4
3
VOL 3
2
VOL 2
1
VOL 1
0
VOL 0
Bits 7 - 4: Zone 2 Current Device
Bits 3 - 0: Main Zone Current Device
Devices
0
DVD
1
DVDR
2
SAT
3
VCR
4
TV
5
CD
6
TUNER
7
DVR
8
GAME
9
TAPE
WORD 5: Main Volume
Bit
Bit 7 - 0:
7
VOL 7
6
VOL 6
Current Main Volume setting 0 - 152
WORD 6: Zone 2 Volume
Bit
Bit 7 - 0:
7
VOL 7
6
VOL 6
5
VOL 5
Current Zone 2 Volume setting 0 - 152
RS-232 Feedback Cont...
WORD 7: Video Input
Bit
7
VID IN 7
5
VID IN 5
4
VID IN 4
3
VID IN 3
2
VID IN 2
1
VID IN 1
0
VID IN 0
7
6
5
MN AUD
MN AUD
MN AUD
IN 7
IN 6
IN 5
Main Zone Audio Input
4
MN AUD
IN 4
3
MN AUD
IN 3
2
MN AUD
IN 2
1
MN AUD
IN 1
0
MN AUD
IN 0
Bit 7 - 0:
6
VID IN 6
Current Video Input
Video Inputs
1
S-Video 1
2
S-Video 2
3
S-Video 3
4
S-Video 4
5
Component Video 1
6.
Component Video 2
7.
Component Video 3
8
Composite Video 1
9
Composite Video 2
10.
Composite Video 3
11.
Composite Video 4
12.
Composite Video 5
13.
Composite Video 6
14.
HDMI Video 1
15.
HDMI Video 2
16.
HDMI Video 3
17.
HDMI Video 4
WORD 8: Main Zone Audio Input
Bit
Bit 7 - 0:
Audio Inputs
1
Digital: COAX 1
2
Digital: COAX 2
3
Digital: COAX 3
4
Digital: COAX 4
5
Digital: Optical 1
6
Digital: Optical 2
7
Digital: Optical 3
8
Digital: Optical 4
9
HDMI SPDIF
10
HDMI AUTO
11
Analog: B1
12
Analog: S1
RS-232 Feedback Cont...
13
Analog: S2
14.
Analog: S3
15
Analog: S4
16
Analog: S5
17
Analog: Tape
18.
Analog: VCR
19.
Analog: Cast 1
20.
Analog: Cast 2
21.
5.1 Input Digital
22.
5.1 Input Analog Preamp
WORD 9: Zone 2 Audio Input
Bit
Bit 7 - 0:
7
Z2 AUD
IN 7
6
Z2 AUD
IN 6
5
Z2 AUD
IN 5
4
Z2 AUD
IN 4
3
Z2 AUD
IN 3
2
Z2 AUD
IN 2
1
Z2 AUD
IN 1
0
Z2 AUD
IN 0
4
Center
Enabled
3
Input
Stream 3
2
Input
Stream 2
1
Input
Stream 1
0
Input
Stream 0
Zone 2 Audio Input
Audio Inputs
11
Analog: B1
12
Analog: S1
13
Analog: S2
15
Analog: S3
15
Analog: S4
16
Analog: S5
17
Analog: Tape
23
Analog: VCR
24
Analog: Cast 1
25
Analog: Cast 2
WORD 10: Speakers / Current Audio Decode Mode
Bit
7
Back
Enabled
6
Sub
Enabled
5
Surround
Enabled
Bit 7:
Back Enabled
1 = Back Speaker(s) is(are) enabled
Bit 6:
Sub Enabled
1 = Subwoofer is enabled
Bit 5:
Surround Enabled
1 = Surround Speakers are enabled
Bit 4:
Center Enabled
1 = Center Speaker is enabled
Bits 3-0
Current Input Stream Mode
RS-232 Feedback Cont...
Input Stream Modes
1.
PCM
2.
Dolby Digital 2.0
3
Dolby Digital
4
DTS 5.1
5
24 Bit, 96KHz PCM
6
PCM Digital Input
7
PCM Analog Input
8
Dolby Digital X/Y
9
5.1 (6 Channel Discrete)
10
DTS 6.1 ES Matrix™
11
DTS 6.1 ES Discrete™
12
DTS 6.1 ES Matrix & Discrete™
13
DTS 2496
14.
AAC 2.0
15.
AAC 5.1
16.
AAC XY
17.
AAC 1+1
18.
Multi Channel Preamp
19.
HDMI IIS
20.
HDMI PCM2
WORD 11: Current Audio Decode Modes
Bit
7
CAD 7
Bit 7 - 0:
6
CAD 6
5
CAD 5
4
CAD 4
3
CAD 3
2
CAD 2
Current Audio Decode Modes
IF Stream ID =
Hex
Decimal
6
6
Stereo Mode (Pass Mode)
1
1
Pro Logic IIx Movie Mode
2
2
Pro Logic IIx Music Mode
3
3
Multi-Channel Input Mode
7
7
DTS Neo:6 Cinema 6 Mode™
9
9
2496 decode mode
0A
10
DTS Neo:6 Music Mode™
0B
11
DTS Neo:6 Cinema 6 + THX Mode™
0C
12
Party Mode
0E
14
PCM Digital
1
CAD 1
0
CAD 0
RS-232 Feedback Cont...
General Admission Mode
0F
15
Front Row Mode
10
16
On Stage Mode
11
17
Enhanced Stereo Mode
12
18
Orchestra Mode
13
19
Mezzanine Mode
14
20
Full Range + Sub Mode
15
21
Monophonic Mode
16
22
Analog only preamp mode
17
23
IF Stream ID =
7
7
Stereo Mode (Pass Mode)
1
1
Pro Logic IIx Movie Mode
2
2
Pro Logic IIx Music Mode
3
3
Multi-Channel Input Mode
7
7
DTS Neo:6 Cinema 6 Mode™
9
9
2496 decode mode
0A
10
DTS Neo:6 Music Mode™
0B
11
DTS Neo:6 Cinema 6 + THX Mode™
0C
12
Party Mode
0E
14
General Admission Mode
0F
15
Front Row Mode
10
16
On Stage Mode
11
17
Enhanced Stereo Mode
12
18
Orchestra Mode
13
19
Mezzanine Mode
14
20
Full Range + Sub Mode
15
21
Monophonic Mode
16
22
Analog only preamp mode
17
23
IF Stream is Dolby Digital, Stream ID =
2
2
Stereo Mode (Pass Mode)
18
24
Pro Logic IIx Movie Mode
19
25
Pro Logic IIx Music Mode
1a
26
IF Stream is Dolby Digital, Stream ID =
3
3
Dolby Digital
2f
47
Dolby Digital 5.1 + PLIIx MOVIE
30
48
Dolby Digital 5.1 + PLIIx MUSIC
b1
177
Dolby Digital 5.1 EX
c7
199
Dolby Digital Plus
d8
216
PCM Digital CONT...
ANALOG
Dolby Digital
Dolby Digital
RS-232 Feedback Cont...
Dolby Digital 1+1
41
65
Dolby Digital 1/0
42
66
Dolby Digital 3/0
43
67
Dolby Digital 2/1
44
68
Dolby Digital 3/1
45
69
Dolby Digital 2/2
46
70
IF Stream is DTS, Stream ID =
4
4
DTS 5.1 Music™
35
53
DTS 5.1 Movie™
32
50
DTS 5.1 MATRIX™
b3
179
DTS 5.1 DISCRETE™
b7
183
DTS 96K 24 Bit™
48
72
IF Stream is AAC 20, Stream ID =
E
14
AAC 2.0
4b
75
IF Stream is AAC 51, Stream ID =
E
14
AAC 5.1
4f
79
IF Stream is AAC 11, Stream ID =
11
17
AAC 1+1
4a
74
AAC 1L1
55
85
AAC 1R1
56
86
IF Stream is AAC XY, Stream ID =
10
16
AAC 1/0
58
88
AAC 3/0
4c
76
AAC 3/1
4d
77
AAC 3/2
4e
78
AAC 7.1
50
80
IF Stream is HDMI, Stream ID =
13
19
HDMI PCM 2 Channel
D8
216
HDMI PCM 5.1 Channel
DD
221
HDMI PCM 7.1 Channel
DE
222
Dolby TrueHD 48K
D9
217
Dolby TrueHD 96K
DA
218
Dolby Digital Plus
DB
219
DTS MA™
DC
220
DTS HRA™
DF
223
Dolby Digital CONT...
DTS
AAC 2.0
AAC 5.1
AAC 1+1
AAC XY
HDMI Auto
RS-232 Feedback Cont...
DTS LBR™
E0
224
IF Stream ID =
14
20
Stereo Mode (Pass Mode)
1
1
Pro Logic IIx Movie Mode
2
2
Pro Logic IIx Music Mode
3
3
Multi-Channel Input Mode
7
7
DTS Neo:6 Cinema 6 Mode™
9
9
2496 decode mode
0A
10
DTS Neo:6 Music Mode™
0B
11
DTS Neo:6 Cinema 6 + THX Mode™
0C
12
Party Mode
0E
14
General Admission Mode
0F
15
Front Row Mode
10
16
On Stage Mode
11
17
Enhanced Stereo Mode
12
18
Orchestra Mode
13
19
Mezzanine Mode
14
20
Full Range + Sub Mode
15
21
Monophonic Mode
16
22
Analog only preamp mode
17
23
HDMI SPDIF
WORD 12: Main Zone Balance / Compression Mode
Bit
7
Reserved
6
Cmode 1
5
Cmode 0
4
BAL 4
3
BAL 3
Bits 4 - 0: Balance Setting 0 – 26
Bits 5 - 6: Compression Mode
Balance Settings
0
Right Off
9
Left +2.0
18
Right +2.5
1.
Left +6
10
Left +1.5
19
Right +3.0
2.
Left +5.5
11
Left +1.0
20
Right +3.5
3.
Left +5.0
12
Left +0.5
21
Right +4.0
4.
Left +4.5
13
Centered
22
Right +4.5
5.
Left +4.0
14
Right +0.5
23
Right +5.0
6.
Left +3.5
15
Right +1.0
24
Right +5.5
7.
Left +3.0
16
Right +1.5
25
Right +6.0
8.
Left +2.5
17
Right +2.0
26
Left Off
Compression Modes
1.
Max
2.
Normal
3.
Night
2
BAL 2
1
BAL 1
0
BAL 0
RS-232 Feedback Cont...
WORD 13: Room EQ/Zone 2 Balance
Bit
7
6
5
4
3
2
1
0
Room EQ 2
Room EQ 1
Room EQ 0
BAL 4
BAL 3
BAL 2
BAL 1
BAL 0
2
CT 2
1
CT 1
0
CT 0
Bit 7 - 5:
Room EQ Setting
Room EQ Setting
0
Room EQ OFF
1
Room EQ Memory 1
2
Room EQ Memory 2
3
Room EQ Memory 3
4
Room EQ Memory 4
Bits 4 - 0: Balance Setting 0 – 26
Balance Settings
0
Right Off
9
Left +2.0
18
Right +2.5
9
Left +6
10
Left +1.5
19
Right +3.0
10
Left +5.5
11
Left +1.0
20
Right +3.5
11
Left +5.0
12
Left +0.5
21
Right +4.0
12
Left +4.5
13
Centered
22
Right +4.5
13
Left +4.0
14
Right +0.5
23
Right +5.0
14
Left +3.5
15
Right +1.0
24
Right +5.5
15
Left +3.0
16
Right +1.5
25
Right +6.0
16
Left +2.5
17
Right +2.0
26
Left Off
WORD 14: Center Trim
Bit
7
Reserved
6
Reserved
5
Reserved
4
CT 4
3
CT 3
Bits 4 - 0: Center Trim
Trim Settings
0
-10 dB
6
-4 dB
12
+2 dB
18
+8 dB
1
-9 dB
7
-3 dB
13
+3 dB
19
+9 dB
2
-8 dB
8
-2 dB
14
+4 dB
20
+10 dB
3
-7 dB
9
-1 dB
15
+5 dB
4
-6 dB
10
0 dB
16
+6 dB
5
-5 dB
11
+1 dB
17
+7 dB
RS-232 Feedback Cont...
WORD 15: Surround Trim
Bit
7
Reserved
6
Reserved
5
Reserved
4
RT 4
3
RT 3
2
RT 2
1
RT 1
0
RT 0
Bits 4 - 0: Surround Trim
Trim Settings
0
-10 dB
6
-4 dB
12
+2 dB
18
+8 dB
1
-9 dB
7
-3 dB
13
+3 dB
19
+9 dB
2
-8 dB
8
-2 dB
14
+4 dB
20
+10 dB
3
-7 dB
9
-1 dB
15
+5 dB
4
-6 dB
10
0 dB
16
+6 dB
5
-5 dB
11
+1 dB
17
+7 dB
WORD 16: Back Trim
Bit
7
Reserved
6
Reserved
5
Reserved
4
BT 4
3
BT 3
2
BT 2
1
BT 1
0
BT 0
Bits 4 - 0: Back Trim
Trim Settings
0
-10 dB
6
-4 dB
12
+2 dB
18
+8 dB
1
-9 dB
7
-3 dB
13
+3 dB
19
+9 dB
2
-8 dB
8
-2 dB
14
+4 dB
20
+10 dB
3
-7 dB
9
-1 dB
15
+5 dB
4
-6 dB
10
0 dB
16
+6 dB
5
-5 dB
11
+1 dB
17
+7 dB
WORD 17: Sub Trim
Bit
7
Reserved
6
Reserved
5
Reserved
4
ST 4
3
ST 3
2
ST 2
1
ST 1
0
ST 0
Bits 4 - 0: Sub Trim
Trim Settings
0
-10 dB
6
-4 dB
12
+2 dB
18
+8 dB
1
-9 dB
7
-3 dB
13
+3 dB
19
+9 dB
2
-8 dB
8
-2 dB
14
+4 dB
20
+10 dB
3
-7 dB
9
-1 dB
15
+5 dB
4
-6 dB
10
0 dB
16
+6 dB
5
-5 dB
11
+1 dB
17
+7 dB
4
1
3
0
WORD 18: End of Message
Bit
Bit 7 – 0:
7
0
Hexadecimal 55
6
1
5
0
2
1
1
0
0
1
RC-5 Control
RC-5 Control
RC-5 Code Set
1. Preparing for RC-5 Connectivity
The Evolution 707 can be controlled using RC-5 remote control communication protocol. All of
the remote control functions as well as the majority of internal functions can be accessed via RC-5
communication. The Evolution 707 is designed to receive un-modulated data only. The input does
supply power(+5v) to be used with several IR receiving devices.
NOTE: When the RC-5 IR receiver port is in use, the front panel IR receiver is disabled.
2. Settings
Settings will vary for different remote devices, the table below describes code sets commenly used
for popular remote control systems.
3. RC-5 Cable Pin-out
A stereo tip, ring, sleeve 1/8” mini connector is used in the following configuration:
Tip = RC-5 data, Ring = +5 V, Sleeve = GND.
RC-5 Control Cont...
COMMAND
System
(Hex)
Command
(Hex)
System
(Dec)
Command
(Dec)
RC5 Word
(Hex)
CCF Codes
Sub
Rear
Back
Center
Mute
Down
Menu
Right
Enter
Left
Tape
Up
Prev
EQ Off
EQ Memory 1
EQ Memory 2
EQ Memory 3
EQ Memory 4
Multi-Channel
Balance
B1
S1
S2
S3
S4
S5
COAX1
COAX2
OPT1
OPT2
OPT3
OPT4
Tape On
Tape Off
S-Video1
S-Video2
S-Video3
S-Video4
Composite1
Composite2
Composite3
Zone 2 VOL +10
Zone 2 VOL -10
Music1
Stereo
Zone 2 VOL Zero
Main Vol Zero
PWR ON
PWR OFF
Mute On
Mute Off
Main VOL +10
Main VOL -10
Pro Logic
Music2
DVD
DVDR
1C
1C
1C
1C
1C
1C
1C
1C
1C
1C
1C
1C
1C
1C
1C
1C
1C
1C
1C
1C
1C
1C
1C
1C
1C
1C
1C
1C
1C
1C
1C
1C
1C
1C
1C
1C
1C
1C
1C
1C
1C
1C
1C
1C
1C
1C
1C
1C
1C
1C
1C
1C
1C
1C
19
19
19
1
2
3
6
7
B
C
D
E
F
10
11
12
14
15
16
17
18
19
1A
1B
1C
1D
1E
1F
20
21
22
23
24
25
26
27
28
29
2A
2B
2C
2D
2E
2F
31
32
33
35
36
37
38
39
3A
3B
3C
3D
3E
0
1
2
28
28
28
28
28
28
28
28
28
28
28
28
28
28
28
28
28
28
28
28
28
28
28
28
28
28
28
28
28
28
28
28
28
28
28
28
28
28
28
28
28
28
28
28
28
28
28
28
28
28
28
28
28
28
25
25
25
1
2
3
6
7
11
12
13
14
15
16
17
18
20
21
22
23
24
25
26
27
28
29
30
31
32
33
34
35
36
37
38
39
40
41
42
43
44
45
46
47
49
50
51
53
54
55
56
57
58
59
60
61
62
0
1
2
3701
3702
3703
3706
3707
370B
370C
370D
370E
370F
3710
3711
3712
3714
3715
3716
3717
3718
3719
371A
371B
371C
371D
371E
371F
3720
3721
3722
3723
3724
3725
3726
3727
3728
3729
372A
372B
372C
372D
372E
372F
3731
3732
3733
3735
3736
3737
3738
3739
373A
373B
373C
373D
373E
3640
3641
3642
5000 0000 0000 0001 001C 0001
5000 0000 0000 0001 001C 0002
5000 0000 0000 0001 001C 0003
5000 0000 0000 0001 001C 0006
5000 0000 0000 0001 001C 0007
5000 0000 0000 0001 001C 000B
5000 0000 0000 0001 001C 000C
5000 0000 0000 0001 001C 000D
5000 0000 0000 0001 001C 000E
5000 0000 0000 0001 001C 000F
5000 0000 0000 0001 001C 0010
5000 0000 0000 0001 001C 0011
5000 0000 0000 0001 001C 0012
5000 0000 0000 0001 001C 0014
5000 0000 0000 0001 001C 0015
5000 0000 0000 0001 001C 0016
5000 0000 0000 0001 001C 0017
5000 0000 0000 0001 001C 0018
5000 0000 0000 0001 001C 0019
5000 0000 0000 0001 001C 001A
5000 0000 0000 0001 001C 001B
5000 0000 0000 0001 001C 001C
5000 0000 0000 0001 001C 001D
5000 0000 0000 0001 001C 001E
5000 0000 0000 0001 001C 001F
5000 0000 0000 0001 001C 0020
5000 0000 0000 0001 001C 0021
5000 0000 0000 0001 001C 0022
5000 0000 0000 0001 001C 0023
5000 0000 0000 0001 001C 0024
5000 0000 0000 0001 001C 0025
5000 0000 0000 0001 001C 0026
5000 0000 0000 0001 001C 0027
5000 0000 0000 0001 001C 0028
5000 0000 0000 0001 001C 0029
5000 0000 0000 0001 001C 002A
5000 0000 0000 0001 001C 002B
5000 0000 0000 0001 001C 002C
5000 0000 0000 0001 001C 002D
5000 0000 0000 0001 001C 002E
5000 0000 0000 0001 001C 002F
5000 0000 0000 0001 001C 0031
5000 0000 0000 0001 001C 0032
5000 0000 0000 0001 001C 0033
5000 0000 0000 0001 001C 0035
5000 0000 0000 0001 001C 0036
5000 0000 0000 0001 001C 0037
5000 0000 0000 0001 001C 0038
5000 0000 0000 0001 001C 0039
5000 0000 0000 0001 001C 003A
5000 0000 0000 0001 001C 003B
5000 0000 0000 0001 001C 003C
5000 0000 0000 0001 001C 003D
5000 0000 0000 0001 001C 003E
5000 0000 0000 0001 0019 0000
5000 0000 0000 0001 0019 0001
5000 0000 0000 0001 0019 0002
RC-5 Control Cont...
SAT
VCR
TV
CD
Tuner
DVR
GAME
Main Zone
Rem Zone
VCR Input
TAPE Input
COMPONENT3
COMPONENT1
COMPONENT2
COAX3
COAX4
TRIGGER1 On
TRIGGER1 Off
TRIGGER2 On
TRIGGER2 Off
TRIGGER3 On
TRIGGER3 Off
TRIGGER4 On
TRIGGER4 Off
Z2 PWR On
Z2 PWR Off
Pre Amp
SELECT Z2 Direct
SELECT MAIN Direct
Max Dynr
Night Dynr
Norm Dynr
SOFTKEY A
SOFTKEY B
SOFTKEY C
SOFTKEY D
DIGIT 0
DIGIT 1
DIGIT 2
DIGIT 3
DIGIT 4
DIGIT 5
DIGIT 6
DIGIT 7
DIGIT 8
DIGIT 9
SET MODE
HDMI 1
HDMI 2
HDMI 3
Factory Test Mode
HDMI 4
19
19
19
19
19
19
19
19
19
19
19
19
19
19
19
19
19
19
19
19
19
19
19
19
19
19
19
19
19
19
19
19
19
19
19
19
19
19
19
19
19
19
19
19
19
19
19
19
19
19
19
19
3
4
5
6
7
8
9
A
B
D
E
F
10
11
12
13
16
17
18
19
1A
1B
1C
1D
1E
1F
23
26
27
28
29
2A
2B
2C
2D
2E
30
31
32
33
34
35
36
37
38
39
3A
3B
3C
3D
3E
3F
25
25
25
25
25
25
25
25
25
25
25
25
25
25
25
25
25
25
25
25
25
25
25
25
25
25
25
25
25
25
25
25
25
25
25
25
25
25
25
25
25
25
25
25
25
25
25
25
25
25
25
25
3
4
5
6
7
8
9
10
11
13
14
15
16
17
18
19
22
23
24
25
26
27
28
29
30
31
35
38
39
40
41
42
43
44
45
46
48
49
50
51
52
53
54
55
56
57
58
59
60
61
62
63
3643
3644
3645
3646
3647
3648
3649
364A
364B
364D
364E
364F
3650
3651
3652
3653
3656
3657
3658
3659
365A
365B
365C
365D
365E
365F
3663
3666
3667
3668
3669
366A
366B
366C
366D
366E
3670
3671
3672
3673
3674
3675
3676
3677
3678
3679
367A
367B
367C
367D
367E
367F
5000 0000 0000 0001 0019 0003
5000 0000 0000 0001 0019 0004
5000 0000 0000 0001 0019 0005
5000 0000 0000 0001 0019 0006
5000 0000 0000 0001 0019 0007
5000 0000 0000 0001 0019 0008
5000 0000 0000 0001 0019 0009
5000 0000 0000 0001 0019 000A
5000 0000 0000 0001 0019 000B
5000 0000 0000 0001 0019 000D
5000 0000 0000 0001 0019 000E
5000 0000 0000 0001 0019 000F
5000 0000 0000 0001 0019 0010
5000 0000 0000 0001 0019 0011
5000 0000 0000 0001 0019 0012
5000 0000 0000 0001 0019 0013
5000 0000 0000 0001 0019 0016
5000 0000 0000 0001 0019 0017
5000 0000 0000 0001 0019 0018
5000 0000 0000 0001 0019 0019
5000 0000 0000 0001 0019 001A
5000 0000 0000 0001 0019 001B
5000 0000 0000 0001 0019 001C
5000 0000 0000 0001 0019 001D
5000 0000 0000 0001 0019 001E
5000 0000 0000 0001 0019 001F
5000 0000 0000 0001 0019 0023
5000 0000 0000 0001 0019 0026
5000 0000 0000 0001 0019 0027
5000 0000 0000 0001 0019 0028
5000 0000 0000 0001 0019 0029
5000 0000 0000 0001 0019 002A
5000 0000 0000 0001 0019 002B
5000 0000 0000 0001 0019 002C
5000 0000 0000 0001 0019 002D
5000 0000 0000 0001 0019 002E
5000 0000 0000 0001 0019 0030
5000 0000 0000 0001 0019 0031
5000 0000 0000 0001 0019 0032
5000 0000 0000 0001 0019 0033
5000 0000 0000 0001 0019 0034
5000 0000 0000 0001 0019 0035
5000 0000 0000 0001 0019 0036
5000 0000 0000 0001 0019 0037
5000 0000 0000 0001 0019 0038
5000 0000 0000 0001 0019 0039
5000 0000 0000 0001 0019 003A
5000 0000 0000 0001 0019 003B
5000 0000 0000 0001 0019 003C
5000 0000 0000 0001 0019 003D
5000 0000 0000 0001 0019 003E
5000 0000 0000 0001 0019 003F
Questions and Answers
Q: When I play a blu-ray disc, the front panel display of the Evolution 707 reads Dolby IIx instead of
TrueHD how do I get the right decode mode?
A: When you see Dolby IIx appear on the front panel display, this means the Evolution 707 is receiving
LPCM data. This can be because:
1. The output is connected via optical or coaxial S/PDIF cables and the Blu-ray machine is set to output
2 channel PCM
2. The Blu-ray machine has a menu setting that makes all Bitstream formats LPCM. Consult the blu-ray
machine owner’s manual for set up specifics.
3. The setup for the Blu-ray disk is set to LPCM output.
Q: When I change channels on my TV cable box, the audio and video have to reset every time. How do I
make this stop?
A: This is caused by the cable box changing audio and video data for each channel. The Evolution 707 has
to re-sync each time causing a delay. The best course of action for this is to set the cable box up for a
fixed video output, as opposed to variable. This will keep the video constant and only change audio
when the signal has changed.
Q: After connecting and calibrating the system, I no longer have center channel information coming out
of the speaker. What have I done wrong?
A: The very first thing to check in any potential channel failure is the connection to the power amplifiers
from the processor and then amplifiers to speakers. If all seems to be in working order check to see
if the Evolution 707 is in “Phantom Center” mode, this can be enabled by pressing the “center” quick
select button twice which will disable the physical center channel and redirect center information to
the left and right speakers.
Q: When I play a standard DVD on my Blu-ray machine the video works fine, but when I try and play a Bluray disc the video keeps dropping out. How can I fix this annoying problem?
A: There are a number of possible causes for this type of problem, a few common examples are listed
below:
1. The HDMI video output of the Blu-ray machine is set to an output format your video monitor or
projector can not accept. Standard DVD can output up to 1080i, but a Blu-ray disc can output up to
1080P which may be too much for your video display. Try changing the video output resolution.
2. The HDMI cable connecting the Blu-Ray machine to the Processor or the HDMI cable to the video
display from the processor is not of sufficient bandwidth to carry the High resolution audio
and video signals. Consult your dealer to make sure the HDMI cables used are correct for your
application.
3. The Software for your Blu-ray machine is not up to date and requires the latest version.
Q: I have connected my SACD player to the Evolution 707 via HDMI and do not get any sound.
A: The Evolution 707 does not support the Digital DSD standard over HDMI. Utilize the discrete analog 5.1
input for best performance.
Warranty
This Krell product has a limited warranty of five years for parts and labor on circuitry from date of purchase or six years from date
of original shipment from the Krell factory. Should this product fail to perform at any time during the warranty, Krell will repair it at no
cost to the owner, except as set forth in this warranty.
The warranty does not apply to damage caused by acts of God or nature.
The warranty on this page shall be in lieu of any other warranty, expressed or implied, including, but not limited to, any implied warranty
of merchantability or fitness for a particular purpose. There are no warranties which exceed beyond those described in this
document. If this product does not perform as warranted herein, the owner’s sole remedy shall be repair. In no event will Krell be liable
for incidental or consequential damages arising from purchase, use, or inability to use this product, even if Krell has been advised of the
possibility of such damages.
Proof of purchase in the form of a bill of sale or receipted invoice substantiating that the unit is within the warranty period must be
presented to obtain warranty service. The warranty begins on the date of retail purchase, as noted on the bill of sale or receipted invoice
from an authorized Krell dealer or distributor.
The warranty for Krell products is valid only in the country to which they were originally shipped, through the authorized Krell distributor for that country, and at the factory. There may be restrictions on or changes to Krell’s warranty because of regulations within a
specific country. Please check with your distributor for a complete understanding of the warranty in your country.
If a unit is serviced by a distributor who did not import the unit, there may be a charge for service, even if the product is within the warranty period.
Freight to the factory is your responsibility. Return freight within the United States (U.S.A.) is included in the warranty. If you have
purchased your Krell product outside the U.S.A. and wish to have it serviced at the factory, all freight and associated charges to the factory are your responsibility.
Krell will pay return freight to the U.S.A.-based freight forwarder of your choice. Freight and other charges to ship the unit from the
freight forwarder to you are also your responsibility.
Krell is not responsible for any damage incurred in transit. Krell will file claims for damages as necessary for units damaged in transit
to the factory. You are responsible for filing claims for shipping damages during the return shipment.
Krell does not supply replacement parts and/or products to the owner of the unit. Replacement parts and/or products will be furnished
only to the distributor performing service on this unit on an exchange basis only; any parts and/or products returned to Krell
for exchange become the property of Krell.
No expressed or implied warranty is made for any Krell product damaged by accident, abuse, misuse, natural or personal disaster, or
unauthorized modification.
Any unauthorized voltage conversion, disassembly, component replacement, perforation of chassis, updates, or modifications performed
to the unit will void the warranty.
The operating voltage of this unit is determined by the factory and can only be changed by an authorized Krell distributor or at the factory. The voltage for this product in the U.S.A. cannot be changed until six months from the original purchase date.
In the event that Krell receives a product for warranty service that has been modified in any way without Krell authorization, all warranties on that product will be void. The product will be returned to original factory layout specifications at the owner’s expense before it is
repaired. All repairs required after the product has been returned to original factory specifications
will be charged to the customer, at current parts and labor rates.
All operational features, functions, and specifications and policies are subject to change
Service
Return Authorization Procedure
If you believe there is a problem with your component, please contact your dealer, distributor, or the Krell
factory to discuss the problem before you return the component for repair. To expedite service, you may wish to
complete and e-mail the Service Request Form in the Service section of our website at: www.krellonline.com
To return a product to Krell, please follow this procedure so that we may serve you better:
1. Obtain a Return Authorization Number (R/A number) and shipping address from the Krell Service
Department.
2. Insure and accept all liability for loss or damage to the product during shipment to the Krell factory
and ensure all freight (shipping) charges are prepaid.
3. The product may also be hand delivered if arrangements with the Service Department have been
made in advance. Proof of purchase will be required for warranty validation at the time of hand
delivery.
NOTE: Use the original packaging to ensure the safe transit of the product to the factory, dealer, or
distributor. Krell may, at its discretion, return a product in new packaging and bill the owner for such
packaging if the product received by Krell was boxed in nonstandard packaging or if the original
packaging was so damaged that it was unusable. If Krell determines that new packaging is required,
the owner will be notified before the product is returned.
To purchase additional packaging, please contact your authorized Krell dealer, distributor, or the Krell
Service Department for assistance.
To Contact the Krell Service Department:
Telephone 203-799-9954 Monday-Friday, 9:00 am to 5:00 pm EST
Fax 203-799-9796
E-Mail [email protected]
World Wide Web http://www.krellonline.com