1
Data Conversion from
CSA Professional to CSA Expert
A
A.
Summary of Data Conversion
3
B.
Preparation in CSA Professional
3
1.
2.
3.
Data Review
Results of Data Review
Mass Amendment for Entity ID
3
5
11
C.
Data Import in CSA Expert
13
1.
2.
3.
Selection of Source Data
Data Mapping
Data Import
13
14
16
D.
Data Modification after Import
16
1.
2.
Bank Account
User-defined Field
16
17
CSA Expert User Manual
A.
Appendix A: Data Conversion from CSA Professional to Expert
Summary of Data Conversion
The process of data conversion can be divided into three main stages. The procedures of each
stage are summarized as follows:
1.
Review data of CSA Professional
run Data Review utility to generate a report of inspection
2.
Modify data in CSA Professional if necessary
modify or supplement data according to the Data Review report
3.
Import data to CSA Expert
-
run Data Import utility
-
map data until error free
-
import data to CSA Expert
-
after data import, modify User-defined Field code, bank account information and
jurisdiction if needed
B.
1.
Preparation in CSA Professional
Data Review
The data structure of CSA Expert is different from CSA Professional. Before data conversion. you
may need to revise certain data in CSA Professional to make them compatible with CSA Expert.
For example, CSA Professional allows having the "&" sign in Entity ID but not in CSA Expert.
"Data Review" is a utility that help you validate the data before converting them from CSA
Professional to CSA Expert, you should run this utility program to inspect the data in CSA
Professional, and to fix all problems found before doing the data conversion.
You are advised to run Data Review utility at a
workstation of CSA Professional.
Follow these steps to check the data:
1)
Download the latest Data Review program at:
Visit: http://www.plsoft.com
Select CSA > Download Centre > Utilities > Expert
download EXPCOV.EXE then run the downloaded utility Data Review utility at
the computer with CSA Professional.
OR
Update CSA Professional to the latest version, then select { Tools > Data Review (for
CSA Expert) }.
Appendix A - 3
CSA Expert User Manual
Appendix A: Data Conversion from CSA Professional to Expert
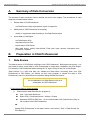
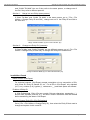
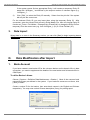
3) Enter the data path of CSA Professional.
4) Click [ Start ] to check the data
5) Click [ Print ] to generate the Data Review report to MS-Word
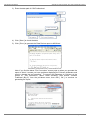
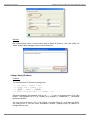
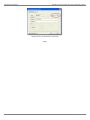
Note: If you find the below “File Conversion” screen pops up when you generate the
report to Word, it means you have problems displaying the Chinese characters and
need to change the text encoding. To convert the characters to Chinese. at the
screen of “File Conversion”, select “Other encoding”, then choose “Chinese
Traditional (Big 5)” from the pull-down menu, then click [ OK ] to continue on
generating the report.
Appendix A - 4
CSA Expert User Manual
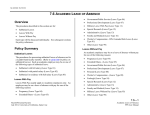
2.
Appendix A: Data Conversion from CSA Professional to Expert
Results of Data Review
The report contains the following issues:
Issue A: Duplicate Client ID (Active vs. Inactive Client)
In CSA Professional, inactive Clients at { Client > Inactivate Client Management } is stored
separately from active Clients. In CSA Expert, both active and inactive Clients are
physically stored in the same file for straight data integrity purpose. If one of your inactive
Client IDs contradicts an active one, you will have the problem of “Duplicated Client ID”.
This section lists out all Client IDs that are found from both sides (active and inactive
Client). You are recommended to change the ID of either side to a unique one, or simply
delete the Inactive Client if the data is no longer be used (for instance, it is an old record of
an active Client).
Solution 1: Change Client ID of the Active Client and / or the Inactive Client in CSA
Professional
Go to { File > File Utilities > Change Client ID }, then select the duplicate active Client ID
and change it to a unique one.
Go to { File > File Utilities > Change Client ID (Inactive Client) }, then select the
duplicate inactive Client ID and change it to a unique one.
Solution 2:
Delete useless Inactive Client in CSA Professional
Go to { File > Inactive Clients Management > Delete Inactive Client } to delete the
Inactive Client.
Issue B: Jurisdiction Missing (The place of incorporation)
The point is that Jurisdictions (Place of Incorporation) of some clients (for both Part IX and
overseas) are missing in the Client Master File (within the "Oversea" tab). Jurisdiction is a
required as well as defined data in CSA Expert (it is represented by a code selectable
from the Jurisdiction/Country pick-list). To maintain data uniqueness, you are advised to
enter the name of the same Jurisdiction in a consistent style. For example, use either one
of "USA”, “U.S.A.”, “United States” or “United States of America” for all companies
incorporated in the United States.
Appendix A - 5
CSA Expert User Manual
Appendix A: Data Conversion from CSA Professional to Expert
Solution: Fill in Jurisdictions of Part IX / Overseas Companies in CSA Professional
Go to { File > Client Mater File }, call up the record of the concerned Client, and fill in the
Jurisdiction in a standardized format.
Note: If you do not know the exact Jurisdiction before Data Conversion, you may leave
it blank in CSA Professional for the time being. During data conversion, select “---” in
the Data Import Utility. You can enter the correct Jurisdiction in CSA Expert when you
find in on the later day.
Issue C: Invalid Entity ID (Entity Master File)
Duplication (Case –insensitive)
Rules of Entity ID in Entity
A single person in CSA should have only one Entity ID. If he have more than one
sets of particulars for filing, e.g. different addresses, use Serial Number (S/N) to
identify. For example, Chan Tai Man has three registered addresses, then his
records in Entity Master File should be:
Entity ID
S/N
Chan Tai Man
Chan Tai Man
Chan Tai Man
01
02
03
If there is another person with the same name, this another “Chan Tai Man” should
use a different Entity ID such as “Chan Tai Man_02” or “Chan Tai Man Peter”.
In CSA Professional, Entity IDs “Chan Tai Man” and “CHAN TAI Man” are regarded
as two different persons. However, we find the users seldom use the upper and
lower cases to identify two different persons. In most cases, “Chan Tai Man” and
“CHAN TAI MAN” actually is the same person with duplicate IDs.
Problem of Duplicate Entity IDs
CSA Expert does not allow two Entity IDs that the only difference is the upper and
lower cases. As in the above example, you need to change merge “Chan Tai Man”
Appendix A - 6
CSA Expert User Manual
Appendix A: Data Conversion from CSA Professional to Expert
and “CHAN TAI MAN” into one if they refer to the same person, or change one of
the IDs if they refer to different persons.
Solution 1:
Merge into one Entity (same person)
If “Chan Tai Man” and “CHAN TAI MAN” is the same person, go to { File > File
Utilities > Change Entity ID and S/N }, change one set of the Entity ID and S/N to
the other one.
Merge “CHAN TAI MAN” (01) into “Chan Tai Man” (01)
Solution 2:
Change one Entity ID (2 persons)
If “Chan Tai Man” and “CHAN TAI MAN” are two different persons, go to { File > File
Utilities > Change Entity ID and S/N } to change one Entity ID to another one.
Change “CHAN TAI MAN” (01) to “Chan Tai Man Peter” (01)
Invalid Word Found
Rules of IDs in CSA Expert
For technical reasons, CSA Expert accepts a straighter rule on composition of IDs,
such Client ID, Entity ID, Banker ID, etc. For all IDs in CSA Expert, only alphabet
(A–Z, a–z), number (0–9), hyphen (-), underscore ( _ ) and blank space are allowed.
Problem of Entity ID
In CSA Professional, Entity IDs may contain Chinese characters, apostrophe ( ' )
and all other symbols (such as “&”). All these “invalid” characters must be deleted
before transferring the data to CSA Expert.
Solution: Change Entity ID in CSA Professional
Go to { File > File Utilities > Change Entity ID }, then select the Entity ID that need to
change and replace it with a new ID.
Appendix A - 7
CSA Expert User Manual
Appendix A: Data Conversion from CSA Professional to Expert
If you have a long list of Entity IDs in problems, changing them through the above
function one-by-one may be quite time consuming. A mass amendment function
enables you to change them at once through a single text file. Please refer to the
next section “3 – Mass Amendment for Entity ID”.
Issue D: Missing Passport Issuing Country
In CSA Expert, Passport Issuing Country is a defined data (it is represented by a code
selectable from the Jurisdiction/Country pick-list). This code is used in some program
logic (e.g. whether to print the data on statutory forms). Thus, you need to fill in the
missing Passport Issuing Country in the Entity Master File. To maintain a uniqueness of
data, you are advised to enter the description of country in the same style. For example,
use either one of "USA”, “U.S.A.”, “United States” or “United States of America” for all
passports issued in the United States.
Solution:
Fill in Passport Issuing Country in CSA Professional
Go to { File > Entity Mater File }, call up the record of the concerned Entity and fill in the
Passport Issuing Country in a standardized format.
Note: If you cannot find the exact country before Data Conversion, you may leave it
blank in CSA Professional. During data conversion, all blank passport issuing country
will be ignored. You can enter the correct country when you edit the Entity in CSA
Expert
Appendix A - 8
CSA Expert User Manual
Appendix A: Data Conversion from CSA Professional to Expert
Issue E: Bank A/C Signer (No correspondent Entity, for reference)
Just like jurisdictions and passport issuing countries, bank account signers in CSA
Professional are also free-format data. In CSA Expert, however, Bank Signers are defined
Entities.
This part of the report lists out all the signers found in CSA Professional. You need to
match them with the correct Entities. For those signers that are not Entities, you need to
pre-define them in the Entity Master File BEFORE doing the Data Import Utility where you
can match a free-format name with an Entity one by one.
Solution:
Create a corresponding Entity for each Bank Signer in CSA Professional
Check if the signers' names on the list are Entities. If they are not Entities, add them in
the Entity Master File.
Note: If you cannot assign an Entity record to those bank signers before data
conversion, you may leave them as they are in CSA Professional. During data
conversion, the utility will automatically create an Entity record (ACSigner_#) for all the
unmatched signers and assume that they are all individuals. You can change the Entity
type and ID by using the “Change Entity ID and S/N” in CSA Expert on the later day.
Issue F:
Members and Officers (Record duplicated)
Both CSA Professional and Expert do not allow an Entity to hold the same Capacity more
than once in one Client. Even for reappointment, you should complete all the jobs of 1st
appointment, resignation and the 2nd appointment, and keep the latest becoming and
cessation dates in the “Members and Officers” (for Professional) or “Capacity” (for Expert).
Rules of IDs in CSA Expert
Entity ID in CSA Expert is case-insensitive (“Chan Tai Man” equals to “CHAN TAI MAN”).
A same Capacity cannot be held by an Entity twice, even with different serial number.
One Entity should have only one record in one type of Capacity in one Client. The
history of appointment, resignation and reappointment are kept as historical data in the
Capacity file.
Appendix A - 9
CSA Expert User Manual
Appendix A: Data Conversion from CSA Professional to Expert
For example, if you use “Chan Tai Man” and “CHAN TAI MAN” to handle two periods of
appointment in Professional, only one record will be carried forward to Expert. The
becoming date and cessation may not be correct.
Solution:
If you have an Entity has more than one records in one Capacity, you should keep only
one record and delete the others. The becoming date and cessation date are for the
latest appointment.
For example, you have “Chan Tai Man” (01), “Chan Tai Man” (02) and “CHAN TAI MAN”
(03) having a directorship of a company, and all these “Chan Tai Man” refer to the same
person. You may keep “Chan Tai Man” (01) and delete the other two records. The
becoming date is the latest appointment date; cessation is empty as he is a present
director.
Issue G: Bank Branch/Office (Summary for reference)
In CSA Expert, the banks and their branch offices need to be pre-defined in “Bank Branch
/ Office Definition File”. This report gives you the list to define them in CSA Expert after
data conversion. This issue should be solved in CSA Expert.
Issue H: Invalid Date
This section check the invalid dates of the following cases:
a date earlier than 1st January 1800, the default earliest date can be handled by CSA
last AGM date, next AGM due date, last AR date or next AR due date earlier than the
incorporation of a company
becoming or cessation date of a Capacity earlier than the incorporation date of a
company
You need amend the invalid dates in CSA Professional. The invalid date will not be
immigrated to CSA Expert that the field will be left blank.
The AGM, AR and incorporation dates can be found in Client Master File. The becoming
and cessation dates are in the “Members and Officers”.
Appendix A - 10
CSA Expert User Manual
Issue I:
Appendix A: Data Conversion from CSA Professional to Expert
History of Change of Particulars of Entity
Records of Entities changing particulars in CSA Professional cannot be transferred to CSA
Expert because of the fundamental difference in the two versions. If you want to keep the
job history (history of Entity changes particulars), you need to re-enter them manually.
In CSA Professional, the job of “Change of Particulars” is handled at the Client (company)
level. Therefore it actually means “the Change of Particulars of an Entity as an Officer of
a Client”. CSA Expert deals with this job in a very different way. It is handled exactly at
the Entity level. You change it once and apply the result to all Clients concerned.
The Data Preview Utility provides a summary report of those changes as historical records.
You are recommended to keep this report for further actions to be taken in CSA Expert.
3.
Mass Amendment for Entity ID
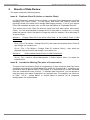
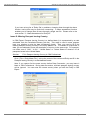
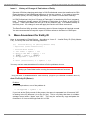
Here is an example of Data Review. According to “Issue C - Invalid Entity ID (Entity Master
File)”, the Entity IDs have the following problems:
(C) Invalid Entity ID (Entity Master File)
- Duplicate (Case-insensitive) - Invalid Word Found 1. Lau LL&CC > Symbol : "&"
2. Wong’s CPA &WS > Symbol : "’"
4. 黃德華 > Symbol : "黃德華"
5. AU AppleMY > Symbol : "
"
6. Maza (Intertional) L > Symbol : "("
You may use two mass amendment functions to fix the problems at once.
Backup you Data folder before running the mass amendment functions. *
* Copy the folder “F:\WINCSA50\DATA” make a backup. (Suppose you CSA data is located in Drive F.)
Auto Fix Entity ID (Return)
Problem:
In the example above, one of the problem is:
5. AU AppleMY > Symbol : ""
If you look at the Entity record of this person, the name is separated into 2 lines and “MY”
is missing in the ID (because it is on the 2nd line). This is very likely that there is a hidden
carriage return before “Apple” and “MY”. This may be caused by copy-and-paste the
forename in 2 lines to the single field of it in CSA.
Appendix A - 11
CSA Expert User Manual
Appendix A: Data Conversion from CSA Professional to Expert
Solution:
Run “Data Review” again, check the box “Auto fix Entity ID (Return)”, then click [ Start ] to
delete all the hidden carriage return found in Entity IDs.
Change Entity ID (Mass)
Problem:
The other problem in the above example are:
1.
2.
4.
6.
Lau LL&CC > Symbol : "&"
Wong’s CPA > Symbol : "’"
黃德華 > Symbol : "黃德華"
Maza (International) L > Symbol : "("
Chinese characters and symbols such as “&”, “ ‘ ”, “()” are not accepted as an ID in CSA
Expert. Only alphabet (A–Z, a–z), number (0–9), hyphen (-), underscore ( _ ) and blank
space are allowed.
You may use the function { File > File Utilities > Change Entity ID } to change the Entity
IDs one-by-one or use the mass amendment function “Change Entity ID (Mass)” to
change them at once.
Appendix A - 12
CSA Expert User Manual
Appendix A: Data Conversion from CSA Professional to Expert
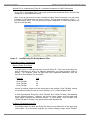
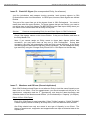
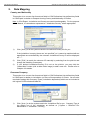
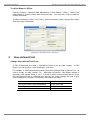
Solution:
1.
Choose { Tools > Change Entity ID (Mass) }
2.
Click [ Open Source File ] to open “ExpEID.Txt” in Notepad.
3.
Amend the Entity IDs in the “ExpEID.Txt” file. For example, delete or replace all
the invalid symbols by “underscore” ( _ ), and replace the Chinese Entity ID with
English.
Lau LL&CC >> Lau LL_CC
Wong’s CPA >> Wong CPA
黃德華 >> Huang De Hua
Maza (International) L > Maza International L
4.
C.
Click [ Process ] to start amendment of Entity ID
Data Import in CSA Expert
1.
Selection of Source Data
Now, you are about to do the actual process of data import from CSA Professional.
In CSA Expert, choose { Tools > Data Transfer > Data Import (from Professional) }
-
Enter the data path of CSA Professional (e.g. "C:\WINCSA50\Data" for most single
user, and typically "F:\WINCSA50\DATA" for network users if the file server is Drive F),
and then press [ Open ].
Appendix A - 13
CSA Expert User Manual
2.
Appendix A: Data Conversion from CSA Professional to Expert
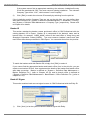
Data Mapping
Country and Nationality
This section is to convert free-format text fields in CSA Professional into defined key fields
in CSA Expert in relation to Passport Issuing Country and Nationality of Entities.
Note: In CSA Expert, Jurisdiction and Country are used interchangeably. For the purpose
of this Manual, it is sometimes expressed as “Jurisdiction/Country” where appropriate.
1)
Click [ Auto ] to let the system match the Jurisdiction/Country IDs for you.
If the jurisdiction is empty (shown as “not specified”) or it cannot be matched with an
appropriate one automatically, the unknown Jurisdiction/Country ID will be displayed
as “---”.
2)
Click [ Edit ] to match the unknown ID manually by selecting from the pick-list and
change the matching if necessary.
3)
If your desired Jurisdiction/Country ID is not on the pick-list, you may click the
“Instant New” button (with a white folder image) to add a new one. Please refer to
Chapter 4 for details.
Overseas Company
This section is to convert free-format text fields in CSA Professional into defined key fields
in CSA Expert in relation to Jurisdiction (or Place of Incorporation) of Clients. You are also
required to assign their Company Types (Jurisdiction dependent) which are not included in
the original CSA Professional data set.
1)
Click [ Auto ] to let the system match the Jurisdiction IDs for you. Company Type is
the default one of the Jurisdiction as defined at { System > Definition File
Maintenance > Jurisdiction / Country }.
Appendix A - 14
CSA Expert User Manual
Appendix A: Data Conversion from CSA Professional to Expert
If the system cannot find an appropriate matching, the unknown Jurisdiction/Country
ID will be matched with “BVI”, the most common missing jurisdiction. The unknown
Company Type will be “LOC”, which means “Local Company”.
2)
Click [ Edit ] to match the unknown ID manually by selecting from the pick-list.
If the Jurisdiction and/or Company Type are not on the pick-lists, you may define them
after data conversion at { System > Definition Data Maintenance > Jurisdiction / Country }
and { System > Definition Data Maintenance > Company Type } respectively. Please refer
to Chapter 4 for details.
Banker ID
This section matches the banker's name and branch office in CSA Professional with the
existing banker's ID in Expert. Banker ID is composed of the banker’s name and its
branch office, for example, “HSBC_MAIN” refers to the head office of Hong Kong and
Shanghai Corporation Limited (HSBC). The most common bankers’ names and their
main offices have been pre-defined in CSA Expert. You can select them from the pick-list.
To match the bankers with their Banker IDs, simply click [ Edit ] to select it.
If you cannot find the appropriate banker and branch office from in the pick-list, you can
create a new banker ID here, then supplement the details of the banker and branch office
after data conversion. Banker is defined at { System > Definition Data Maintenance >
Banker Definition File } (refer to Chapter 4.6.14) and its branch office is defined at
{ System > Definition Data Maintenance > Bank Branch / Office Definition File } (refer to
Chapter 4.6.15).
Bank A/C Signer
This section matches bank account signer's name in CSA Professional with the Entity ID.
1)
Click [ Auto ] to let the system match the banker signer with Entity.
Appendix A - 15
CSA Expert User Manual
Appendix A: Data Conversion from CSA Professional to Expert
If the system cannot find an appropriate Entity, it will creates a temporary Entity ID
starts with “ACSigner_” and follows by the sequent number of unknown signer (e.g.
“ACSigner_1”.
2)
Click [ Edit ] to select the Entity ID manually. Select from the pick-list if the system
did not pick the correct one.
For the unknown Entity ID, you may leave them using the temporary Entity ID. After
conversion, enter the correct Entity record in Entity Master File, then use change Entity ID
function at { Tools > File Utilities > Change Entity ID and S/N } to change the Entity ID form
temporary ID to the correct one (e.g. from “ACSigner_1 (01) to “Chan Tai Man’ (01).
3.
Data Import
When there is no error in the Summary section, you can click [Start] to begin importing data to
CSA Expert.
D.
1.
Data Modification after Import
Bank Account
If you have created a new banker ID for the unknown banker and its branch office in data
conversion, you need to supplement the details of the new banker and its branch office in
CSA Expert.
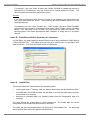
To define Banker's Name:
Choose { System > Definition Data Maintenance > Banker }. Most of the common bank
names have been pre-defined in the system. If your bankers' names are not there, click
[ New ] to add it.
Create a unique ID for the banker, then enter bank names in the English and Chinese
respectively. You may enter a short Chinese description (if any) for printing report.
Banker Definition File of CSA Expert
Appendix A - 16
CSA Expert User Manual
Appendix A: Data Conversion from CSA Professional to Expert
To define Branch / Office:
Choose { System > Definition Data Maintenance > Bank Branch / Office }. Most of the
head offices of common banks have been pre-fined. You may click [ Edit ] to add the
contact information.
To add a new branch / office, click [ New ], select the banker, create a unique ID and then
enter the contact information.
Bank Branch / Office Definition File of CSA Expert
2.
User-defined Field
Change User-defined Field Code
In CSA Professional, the code of User-defined Field is just an order number. In CSA
Expert, you can specify a "more meaningful" code for it.
For example, in CSA Professional the tenth (10th) User-Defined Field is "Annual Fee". Its
code is simply its order number "10". After data conversion, CSA Expert assigns a
temporary code named "NUM_1" for it. It is still an order number means that this is the
first User-defined Field of numerical type, but you can further change the code to give
some meanings to it through File Utilities in CSA Expert like these:
Description of the User-defined Field
The original code in CSA Professional
The temporary code after data conversion
The changed code in CSA Expert
Annual Fee
10 (the 10th field)
NUM_10
ANNFEE (max. 7 characters)
Appendix A - 17
CSA Expert User Manual
Appendix A: Data Conversion from CSA Professional to Expert
User-defined Fields in CSA Professional
Procedures to change User-defined Field code:
1)
Choose { Tools > File Utilities > Change User-defined Field Code }.
2)
In the field "From:", select the code you want to change.
3)
In the field "To:", enter the new code.
Change User-defined Field Code in CSA Expert
4)
Go to { System > Definition Data Maintenance > User-defined Field } to assign
access rights to users, if necessary.
Change User-defined Field Order
In CSA Professional, the order of user-defined field is fixed. As in the above example, the
order number of “Annual Fee” is always "10", even it is the 1st numerical field. In CSA
Expert, you can re-arrange the order number.
Procedures to change user-defined field code:
1)
Choose { System > Definition Data Maintenance > User-defined Field }.
2)
Select the field you want to change, and then click [ Edit ].
3)
In the “Order:” field, enter an unused order number.
4)
Assign access rights to users if necessary
Appendix A - 18
CSA Expert User Manual
Appendix A: Data Conversion from CSA Professional to Expert
Change order of User-defined Field in CSA Expert
~ END ~
Appendix A - 19