1
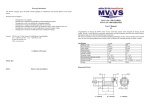
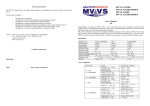
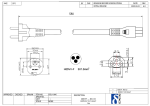
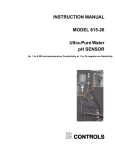
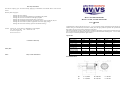
Warranty Information
The MVVS Company gives 36-month warranty applying to manufacture and material defects of the electric
motors.
Warranty does not apply to:
-
Contact:
Damages due to an accident.
Damages due to unprofessional handling or disassembling the product.
Damages due to use of an unbalanced or damaged propeller.
Damages due to usage of unoriginal spare parts or accessories.
Damages due to intaking foreign objects or substances, such as water, chemicals, dust, etc.
Damages due to incorrect use, such as application of incorrect supply voltage.
Damages due to incorrect assembly (provision of sufficient cooling).
MVVS, Ltd., tř. Kpt. Jaroše 35, 60200 Brno, Czech Republic
Tel.: +420 545 211 683 Fax: + 420 545 211 418
E-mail: [email protected]
Web: www.mvvs.cz
MVVS 2.0/1120 and 2.0/1600
MVVS 2.5/1120, 2.5/1350 and 2.5/1480
User’s Manual
1.1
Congratulations on buying the MVVS series 2.0 – 2.5 AC sensor-free electric motor designed for driving aircraft
models. Owing to used materials, brand-name unified parts and high production precision this product features
high quality, long service life and top performance parameters.
This motor is intended, owing to used conception combining advantages of static motors and those with external
rotor, for direct driving the propeller and thus for all types of aircraft models including FUN – FLY. In addition,
this conception is extremely suitable for glider models.
Specification
Certificate of Warranty
Sell-by date:
Seller:
RPM / volt
Stator diameter
Stator length
Shaft diameter
Nominal voltage
Number of poles
Working voltage
Recommended
amperage loading
Maximum loading
Number of cells
Weight
2.0 / 1120
26 mm
9 mm
4 mm
7.2 V
12
6 – 14 V
2.0 / 1600
26 mm
9 mm
4 mm
7.2 V
12
6 – 12 V
2.5 / 1120
26 mm
13 mm
4 mm
11 V
12
8 – 14 V
2.5 / 1350
26 mm
13 mm
4 mm
11 V
12
8 – 14 V
2.5 / 1480
26 mm
13 mm
4 mm
11 V
12
8 – 12 V
6 – 14 A
9 – 20 A
10 – 20 A
12 – 24 A
15 – 30 A
20 A / 30 s
3 – 4 Li-xx
87g
25 A / 30 s
2 – 3 Li-xx
87g
25 A / 30 s
3 – 4 Li-xx
109g
30 A / 30 s
3 – 4 Li-xx
109g
35 A / 30 s
3 – 4 Li-xx
109g
Buyer’s name and address:
Dimensioned Sketch
2,0
2,5
A = 31,5 mm
A = 36,5 mm
B = 32,5 mm
B = 37,5 mm
C = 49 mm
C = 54 mm
Area of Application
Motor
2.0 / 1120
2.0 / 1600
2.5 / 1120
2.5 / 1350
2.5 / 1480
Model
FUN-FLY 0,6 kg
Acrobat 0,7 kg
Training model 1,2 kg
Glider 1,2 kg
Minihotliner 0,8 kg
Double-motor model up to 1,8 kg
FUN-FLY 0,6 kg
Acrobat 0,7 kg
Training model l,2 kg
Glider 1,2 kg
Minihotliner 0,8 kg
FUN-FLY 0,85 kg
Acrobat 1 kg
Training model l,6 kg
Glider 1,6 kg
Minihotliner 1 kg
Double-motor model up to 2,5 kg
FUN-FLY 0,8 kg
Acrobat 1 kg
Training model l,7 kg
Glider 1,7 kg
Minihotliner 1,1 kg
Pylon model
Acrobat 1,2 kg
Training model l,2 kg
Glider 1,2 kg
Minihotliner 1,1 kg
Accumulator / Propeller
3 Li-xx / APC el. 10 x 5“
4 Li-xx / Aer Glas 8,5 x 5“
3 Li-xx / Aer Glas 9,5 x 6“
3 Li-xx / Graup CAM 9 x 5“
3 Li-xx / Aer CAM 9 x 5“
3 Li-xx / Aer Glas 8,5 x 6“
2 Li-xx / APC el. 10 x 5“
3 Lixx / Aer Glas 8,5 x6“, APC 8x4“
2 Lixx / Aer Glas 9,5 x 6“
2 Li-xx / Aer. CAM 9,5 x 5“
3 Li-xx / Aer Carb. 7 x 4,5“
4 Lixx / APC el. 9 x 4,5“
4 Lixx / Aer Glas 9,5 x 6“
3 Li-xx / Aer Glas – APC 10 x 7“
3 Li-xx / Aer CAM 10 x 6-7“
4 Li-xx / Aer CAM 9,5 x 5“
3 Li-xx / Aer Glas 9,5 x 6-7“
3 Li-xx / APC el. 10 x 5“
3 Lixx / Aer Glas 9,5 x 6“, APC 9x6“
3 Lixx / Aer Glas 9,5 x 6“, APC 9x6“
3 Li-xx / Graup CAM 9 x 5“
4 Li-xx / Aer CAM 9 x 5“
4 Li-xx / APC el. 9 x 4“
3 Lixx / Aer Glas 8,5 x 6“
2 Lixx / Aer Glas 10,5 x 7“
2 Li-xx / Aer CAM 10 x 6-7“
3 Li-xx / Aer CAM 9 x 5“
Safety Instructions
1)
2)
3)
4)
5)
6)
7)
8)
9)
10)
11)
12)
13)
14)
Use the motor for designed purposes only.
When operating models, follow regulations and laws effective in your country.
The manufacturer is not responsible for possible damages caused by operation of models and devices
driven by the MVVS motors.
Use only original spare parts.
Never interfere into the motor structure.
Before every flight check tightness of the propeller screw or chuck. If the propeller cone is used, check
its fixation as well. When mounting the cone, always follow appropriate instructions.
Check attachment to the motor bed regularly. Never start up loosened motor!
Use well balanced propellers only! Immediately replace damaged propellers or propellers that touched
the ground!
Never stand so that parts of your body are in the plane with the rotating propeller. Apply the same
principle for bystanders.
Never wear loose drifty clothing (tie, scarf, etc) when operating the model.
Never try to stop the motor with any part of your body.
Before starting the motor secure the model from setting in motion.
Keep all small objects in the safe distance from the running motor and never throw any objects into it.
When operating the motor, pay attention to keep possible bystanders, especially children, at least 10 m
away.
15) Never rectify the axis bent during an accident but provide its replacement. Do not start the motor
immediately after an accident but check it first. The contaminated motor should be delivered to the
manufacturer for repair.
Motor Installation into a model
Drill a central hole 13mm in diameter and other holes for motor screws according to the sketch into the
motor bulkhead in the model nose, unless already provided by the manufacturer. In addition, drill at least 4 holes at
least 8 mm in diameter for cooling air supply, so that to be positioned directly opposite to inlets in the face of the
installed motor. Use at least 2 screws M3 for fixation, so that they penetrate min. 5mm and max. 7mm into the
motor. In case shorter screws are used, there is a danger of thread extraction. If longer screws are used, there is a
danger of motor seizure or mechanical damage. When only two screws are used, they should be located
symmetrically to the motor axis. For motors designed to be driven by a combustion engine use the bed for rear
assembly supplied as special accessories. Never forget about holes for cooling air outlet, which is the necessary
condition for correct cooling function!
The rear motor cover is equipped with three connectors 3.5mm in diameter for connecting the motor to
the controller. In case the used controller is fitted with connectors of different diameters, or its female connectors
do not adhere firmly to the motor connectors, replace them with those supplied as motor accessories. Use of
incorrect connectors may cause damage to the motor and controller. Replace any two supply cables if the motor
rotates in the opposite direction.
Use high-quality chuck adapters of 4mm inside diameter for gripping the propeller. If an unsuitable or
poor-quality adapter is used, the rotating propeller may slip off and cause serious injury.
Drive Optimisation
By means of correct choice especially of propeller, accumulator and controller parameters it is possible
to change driving unit properties within wide range and thus flight behaviour and attained flight time. Use data
mentioned in tables as guidance for your decision-making. In case other propeller is used than that mentioned it is
necessary to check max. current using a clip-on ammeter. Use the controller that will supply current values
mentioned in specifications with reserve. We recommend use of the 22 – 44 A controller (depends on the motor
type). The regulator advance should be set to 20-25° or higher and frequency to 8 kHz. As to supply accumulators
do not exceed max. discharging currents because there is a danger of destruction.
Do not overload the motor unnecessarily because there is a danger of damage or deterioration of
performance parameters. If the motor operates within the range recommended in technical specifications, its
lifetime is limited by mechanical endurance only.
Suitable combinations of propellers and supply sources – see the table “Area of application”
Motor Maintenance
AC electric motors are not maintenance-demanding. The same applies to MVVS motors as well, as
maintenance only involves keeping the motor in dry and clean condition. If no accident happens, motor service life
is only limited by lifetime of bearings in hundreds of hours, depending on flying style and loading. Wear of
bearings shows by increased noise and radial allowance. Every accident may decrease bearing lifetime
significantly. We recommend entrusting the manufacturer with replacement of bearings.
If you decide to replace parts by yourselves, then always use original parts and MVVS tools only.
Note: Screws used for motor installation can be loosened using the Torx 9 spanner. Screws on the crankshaft
should be heated first to approx. 100 °C to disengage locking glue. Cover screws are treated with special paste
against seizure. Never wipe off this material to make possible next disassembly.