1
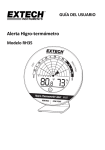
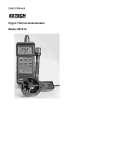
USER GUIDE Hygro‐Thermometer Alert Model RH35 EXTECH INSTRUMENTS Introduction Thank you for selecting the Extech Instruments Model RH35. This device is shipped fully tested and calibrated and, with proper use, will provide years of reliable service. Please visit our website (www.extech.com) to check for the latest version of this User Guide, Product Updates, and Customer Support. Safety International Safety Symbols This symbol, adjacent to another symbol or terminal, indicates the user must refer to the manual for further information. Double insulation Safety Notes o o o Remove the battery if the device is to be stored for longer than 60 days. Never dispose of batteries in a fire. Batteries may explode or leak. Never mix battery types. Always install new batteries of the same type. Cautions o o o o o o If the equipment is used in a manner not specified by the manufacturer, the protection provided by the equipment may be impaired. Batteries can contain harmful acids. Low batteries should be changed as soon as possible to prevent damage caused by leaking. Never use a combination of old and new batteries together, or batteries of different types. Wear chemical‐resistant protective gloves and glasses when handling leaking batteries. Do not place your product near extreme temperatures, vibrations, or shocks. Protect device from moisture. 2 RH35‐en‐EU_v1.1 7/14 EXTECH INSTRUMENTS Meter Description 1 Meter Front 1. 2. 3. 4. 5. 6. 7. 24‐hour mold radar animation Indoor temperature (°C/°F) and MIN‐ MAX / Dew point temperature Facial Icons for comfort level status MIN‐MAX Button Dew Point Button Relative Humidity % display Warning LED when risk of mold 2 6 3 4 5 Meter Back 1. 2. 3. 4. 5. 6. 7 1 Wall mount Battery compartment Battery compartment latch Alarm Sound ON/OFF switch (Speaker Symbol) Radar Animation ON/OFF switch (Arrow Symbol) Support stand (remove stand to access Alarm sound and Radar animation switches) 3 2 5 4 6 3 RH35‐en‐EU_v1.1 7/14 EXTECH INSTRUMENTS Operation Getting Started Remove the protective foil from the display. Open the battery compartment and remove the battery insulation strip. The device will sound the alarm and all LCD segments will be displayed for two seconds as the device switches ON. The indoor temperature, relative humidity, and corresponding facial symbol will appear on the display. This indicates that the meter is now ready for use. Note: Do not attach the support stand until the switches for the Radar Animation and Alarm Sound are set as desired. These two switches are concealed by the support stand when it is attached. Refer to the Description section of this guide for the location of the switches and refer to the dedicated sections below for more detail. 24 Hour Mold Radar Display The device measures the relative humidity % every 30 seconds and calculates the average value every 10 minutes. The innovative mold radar display graphically depicts the average on a 24‐hour time‐line. The time “0 h” represents the value for the current hour. “‐1” represents the last hour, “‐3” for the past 2‐3 hours, “‐6” for the past 4‐6 hours, “‐12” for the past 7‐12 hours, and “‐24” for the past 13‐24 hours. The relative humidity values are shown on grid lines from 15 to 85%. A reading higher than 65% RH indicates a potential for mold. Radar Animation ON/OFF Switch Remove the support stand to access the Radar Animation ON/OFF switch on the back of the unit (the switch is on the right identified by the arrow icons). Slide the switch UP to activate the Radar Animation. Slide the switch DOWN to deactivate the Radar Animation. Alarm Sound ON/OFF Switch Remove the support stand to access the Alarm Sound ON/OFF switch on the back of the unit (the switch is on the left identified by the audio icons). Slide the switch UP to activate the Alarm Sound beeper. Slide the switch DOWN to de‐activate the Alarm Sound beeper. If the relative humidity measurement is higher than 65%, the alarm beeper sounds for one minute and the red warning light (front panel, right) flashes. Press any button to stop the alarm sound. The warning light continues flashing until the measured humidity falls below 65%. Comfort Level The device displays one of two facial indicators representing the comfort level of the indoor climate. A smiling face indicates an ideal relative humidity range (40‐60%). A frowning face indicates an overly wet or dry condition (< 40% or > 60%). 4 RH35‐en‐EU_v1.1 7/14 EXTECH INSTRUMENTS Dew Point Temperature Display Press the Dew Point button to display the Dew Point Temperature for 5 seconds. The display will revert to the Air Temperature/Relative Humidity display mode after 5 seconds, automatically. Temperature Units Selection Press and hold the Dew Point button for 5 seconds to toggle the temperature units (°C and °F). Note: In MIN/MAX mode pressing and holding the Dew Point button clears the MIN or MAX memory (depending on which one is selected) and does not change the temperature units. Ensure that MIN/MAX mode is not activated when changing the temperature units. Minimum and Maximum Values Press the MIN/MAX button and the MAX icon will appear along with the highest indoor temperature and humidity readings captured since the last reset. To display the MIN values, press the MIN/MAX button again. The MIN icon will appear along with the lowest indoor temperature and humidity readings captured since the last reset. The instrument will automatically exit the MIN/MAX mode if no button is pressed. To exit to the normal display mode manually, press the MIN/MAX button again (the MIN and MAX indicators will switch OFF). To clear the MIN or MAX memory, press and hold the Dew Point button for three seconds while the MIN or MAX icon is showing. The MIN or the MAX indicator will flash as its memory is cleared. Table Top and Wall mounting Considerations The unit can be wall mounted using the wall mount access hole located on the rear of the device. Use the support stand for table top use. Note that the humidity level can vary greatly according to location; mount the unit as close to the area of concern as possible. 5 RH35‐en‐EU_v1.1 7/14 EXTECH INSTRUMENTS Maintenance Cleaning Clean the instrument with a soft damp cloth. Do not use solvents or abrasives. Battery replacement Remove the batteries if the product is not to be used for long periods. Change the batteries when the battery symbol appears empty on the display. Open the rear battery compartment and insert two new batteries 1.5V AAA observing correct polarity. Close the battery compartment before use. Battery Safety Reminders o Please dispose of batteries responsibly; observe local, state, and national regulations. o Never dispose of batteries in a fire; batteries may explode or leak. o Never mix battery types; install new batteries of the same type. o Never dispose of used batteries or rechargeable batteries in household waste. As consumers, users are legally required to take used batteries to appropriate collection sites, the retail store where the batteries were purchased, or wherever batteries are sold. Disposal: Do not dispose of this instrument in household waste. The user is obligated to take end‐of‐life devices to a designated collection point for the disposal of electrical and electronic equipment. Specifications Temperature Range ‐10°C to 60°C (14°F to 140°F) Temperature Accuracy ±1°C (±1.8°F) from 0 to 50°C (32 to 122°F), otherwise ±1.5°C (2.7°F) Relative Humidity Range 10 to 99% RH Accuracy ±4% from 30% to 80RH%, otherwise ±5% Batteries Batteries 2 x 1.5V AAA Dimensions 98 x 23 [50] x 98 mm (3.86 x 0.91 [2.04] x 3.86in.) Weight 87g (3.1oz.) Copyright © 2014 FLIR Systems, Inc. All rights reserved including the right of reproduction in whole or in part in any form www.extech.com 6 RH35‐en‐EU_v1.1 7/14