1
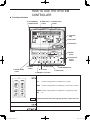
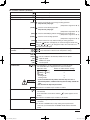
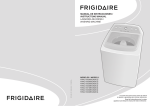
Operating Instructions System Controller Model No. CZ-64ESMC1U Before operating the unit, read these operating instructions thoroughly and keep them for future reference. 85464609159011 01_CZ-64ESMC1U_EN.indd 1 1006 Kadoma, Kadoma City, Osaka, Japan CV6233189673 2011/11/04 17:46:25 CONTENTS page PRODUCT INFORMATION ................................................................................. 2 ALERT SYMBOLS ............................................................................................... 2 INSTALLATION LOCATION ................................................................................. 3 ELECTRICAL REQUIREMENTS ........................................................................ 3 SAFETY INSTRUCTIONS ................................................................................... 3 HOW TO USE THE SYSTEM CONTROLLER .................................................... 4 Functions of buttons ................................................................................ 4 Display..................................................................................................... 7 How to start group operation ................................................................... 8 How to start collective operation ............................................................. 9 PRODUCT INFORMATION If you have problems or questions concerning your Air Conditioner, you will need the following information. Model and serial numbers are on the nameplate on the bottom of the cabinet. Model No. CZ-64ESMC1U Serial No. Date of purchase Dealer’s address Phone number ALERT SYMBOLS The following symbols used in this manual, alert you to potentially dangerous conditions to users, service personnel or the appliance: WARNING This symbol refers to a hazard or unsafe practice which can result in severe personal injury or death. CAUTION This symbol refers to a hazard or unsafe practice which can result in personal injury or product or property damage. 2 01_CZ-64ESMC1U_EN.indd 2 2011/11/04 17:46:26 INSTALLATION LOCATION • We recommend that this system controller be installed properly by qualified installation technicians in accordance with the Installation Instructions provided with the system controller. WARNING • • Do not install this system controller where there are fumes or flammable gases, or in an extremely humid space such as a greenhouse. Do not install the system controller where excessively high heatgenerating objects are placed. ELECTRICAL REQUIREMENTS 1. All wiring must conform to the local electrical codes. Consult your dealer or a qualified electrician for details. 2. Wiring must be done by a qualified electrician. CAUTION To warm up the system, the power mains must be turned on at least five (5) hours before operation. Leave the power mains ON unless you will not be using this appliance for an extended period. SAFETY INSTRUCTIONS • Read this Operating Instructions carefully before using this system controller. If you still have any difficulties or problems, consult your dealer for help. • The air conditioner is designed to give you comfortable room conditions. Use this only for its intended purpose as described in the Operating Instructions. WARNING • • • CAUTION • • • • Never touch the unit with wet hands. Never use or store gasoline or other flammable vapor or liquid near the air conditioner — it is very dangerous. The air conditioner has no ventilator for intaking fresh air from outdoors. You must open doors or windows frequently when you use gas or oil heating appliances in the same room, which consume a lot of oxygen from the air. Otherwise there is a risk of suffocation in an extreme case. Do not turn the air conditioner on and off from the power mains switch. Use the ON/ OFF operation button. Do not stick anything into the air outlet of the outdoor unit. This is dangerous because the fan is rotating at high speed. Do not let children play with the air conditioner. Do not cool or heat the room too much if babies or invalids are present. EN Note: • This device complies with Part 15 of the FCC Rules. Operation is subject to the following two conditions: (1) This device may not cause harmful interference, and (2) this device must accept any interference received, including interference that may cause undesired operation. • This equipment has been tested and found to comply with the limits for a Class B digital device, pursuant to part 15 of the FCC Rules. These limits are designed to provide reasonable protection against harmful interference in a residential installation. This equipment generates, uses and can radiate radio frequency energy and, if not installed and used in accordance with the instructions, may cause harmful interference to radio communications. However, there is no guarantee that interference will not occur in a particular installation. If this equipment does cause harmful interference to radio or television reception, which can be determined by turning the equipment off and on, the user is encouraged to try to correct the interference by one or more of the following measures: • Reorient or relocate the receiving antenna. • Increase the separation between the equipment and receiver. • Connect the equipment into an outlet on a circuit different from that to which the receiver is connected. • Consult the dealer or an experienced radio/TV technician for help. • FCC Caution: To assure continued compliance, follow the attached installation instructions. Any changes or modifications not expressly approved by the party responsible for compliance could void the user’s authority to operate this equipment. 3 01_CZ-64ESMC1U_EN.indd 3 2011/11/04 17:46:26 HOW TO USE THE SYSTEM CONTROLLER Functions of buttons A: ALL/ZONE/GR SELECT button B: ZONE select button C: GROUP select button F: Operation lamp D: ON button E: OFF button G: MODE button H: Temperature setting buttons O: VENTILATION button K: CHECK button M: SET button N: CL button I: FAN SPEED button J: FLAP button L: CENTRAL CTRL button A: ALL/ZONE/GR SELECT button Use this button to select one of the following: ALL: Used for turning all the air conditioners on and off. ZONE: Used for turning all the air conditioners of each zone on and off. GROUP: Used for turning all the air conditioners of each group on and (GR) off. NOTE A maximum of four zones and 16 groups (units) in a zone can be set. B: ZONE select button Use this button to select a zone (1 to 4) to operate individually. C: GROUP select buttons Use these buttons to select a group (1 to 16) to operate individually. 4 01_CZ-64ESMC1U_EN.indd 4 2011/11/04 17:46:26 Functions of buttons (Continued) D: ON button This button is for turning the selected air conditioner on. E: OFF button This button is for turning the selected air conditioner off. F: Operation lamp This lamp lights when the unit is turned on. G: MODE button Use this button to select one of the following five operations: (AUTO) (HEAT) (DRY) (COOL) (FAN) NOTE H: Temperature setting buttons : Used to automatically set cooling or heating operation. Only for heat pump type (temperature range: 62 to 80 °F) : Used for normal heating operation. Only for heat pump type (temperature range: 60 to 78 °F) : Used for dehumidifying without changing the room temperature. (temperature range: 64 to 86 °F) : Used for normal cooling operation. (temperature range: 64 to 86 °F) : Used to run the fan only, without heating or cooling operation. When the indication is displayed, you cannot change the mode from and or to or and . To change the mode, turn off all units once then select the mode again. : Press this button to increase the temperature setting. : Press this button to decrease the temperature setting. I: FAN SPEED button (AUTO) (HI.) (MED.) (LO.) : The air conditioner automatically decides the fan speed. : High fan speed. : Medium fan speed. : Low fan speed. 1. Use this button to set the airflow direction to a specific angle. The airflow direction is displayed on the remote controller. Operation mode Number of airflow direction settings (COOL) or (DRY) 3 (HEAT) or (FAN) 5 (AUTO) Cooling mode: 3 Heating mode: 5 • In the cool mode and dry mode, when the flaps are set in a downward position, condensation may form and drip around the vent. • Do not move the flap with your hands. J: FLAP button NOTE ( ) NOTE NOTE EN This function is available only for models U1 and T1. 2. Use this button to make the airflow direction sweep up and down automatically. Press this button several times until the ( ) symbol appears on the display. This function is available only for models U1, K1 and T1. 1) The flap setting can be performed only for units that have no remote controllers. 2) In the ALL or ZONE mode, no flap setting can be performed. If necessary, you should select the GROUP mode and use the FLAP button. 5 01_CZ-64ESMC1U_EN.indd 5 2011/11/04 17:46:26 Functions of buttons (Continued) This button is used only when servicing the air conditioner. K: CHECK button Do not use the CHECK button for normal operation. Use this button to inhibit individual operation by remote controller as follows: L: CENTRAL CTRL button 1: Individual ON/OFF operation is inhibited. 2: Individual ON/OFF, MODE and Temperature setting operation is inhibited. 3: Individual MODE and Temperature setting operation is inhibited. 4: Individual MODE operation is inhibited. No indication: Central control is cleared. (Individual operation) This button is used for setting indoor unit's address when installing the air conditioner. M: SET button NOTE N: CL button Do not use the SET button for normal operation. Use this button to reset the filter sign . The air conditioner has the timer for the filter and informs you when the filter needs cleaning. O: VENTILATION button Use this button when you installed a fan available in the market. Pressing this button turns on and off the fan. When turning off the air conditioner, the fan will also turned off. While the fan is operating, If will appear in the display. is displayed when pressing the ventilation button, no fans are installed. 6 01_CZ-64ESMC1U_EN.indd 6 2011/11/04 17:46:27 Display Description A: When the unit is in the heating standby mode, the indicator appears. B: The currently selected operation mode is displayed. C: The currently selected FAN SPEED, Airflow Direction and SWEEP settings are displayed. D: This indication appears when the filter needs cleaning. E: This indication appears only when an abnormality occurs within a unit. F: The currently selected mode (ALL, ZONE or GROUP), ZONE number and GROUP number are displayed. EN GROUP number display (no figure: no number registered) GROUP state display ( [ ] registered group, Operation state display ( on, no sign: off, currently selected group) alarm) G: The currently selected central control mode (1, 2, 3 or 4) is displayed. H: Lights when any of the air conditioners under the system control is operating; turns off when none of the air conditioners under the system control is operating. Blinks when any conditioner is operating under abnormal conditions and its protection functionality is working. I: When the button is pressed for more than four seconds, the TEST indicator appears. J: This indication appears when the temperature is set. K: When turning on the power switch of the system controller. sign blinks for a few minutes. While blinking, any controls using the system controller are inhibited. This is because the system controller is verifying connected groups. 7 01_CZ-64ESMC1U_EN.indd 7 2011/11/04 17:46:27 How to start group operation To start group operation Stop Power Turn the power supply switch on more than 5 hours before starting operation. 1 Press the SELECT button and select GROUP. 2 Select the ZONE No. including the group to be operated by pressing ZONE button. 3 Select the GROUP No. to be operated by pressing GROUP select buttons 4 Press the ON button. 5 Set the operation mode by pressing the MODE button. 6 Set the desired temperature by pressing one of the temperature setting buttons 7 Set the desired fan speed by pressing the FAN SPEED button. 8 Set the airflow direction to a specific angle or sweep mode. 9 By pressing , select your desired setting. Individual: Controls with the remote controller are possible. Central 1: Individual ON/OFF operation with the remote controller is inhibited. Central 2: Individual ON/OFF, MODE, and Temp, setting operations with the remote controller are inhibited. Central 3: Individual MODE and Temp, setting operations with the remote controller are inhibited. Central 4: Individual MODE operation with the remote controller is inhibited. • Under Central/Individual settings other than listed above, “CENTRAL” is displayed. Stop Confirming the GROUP No. to be selected, press the OFF button. NOTE . . • The flap setting can be performed only for units that have no remote controllers. • AUTO Depending on the difference between the temperature setting and Operation: the room temperature, heating and cooling alternate automatically so that a uniform room temperature is maintained. 8 01_CZ-64ESMC1U_EN.indd 8 2011/11/04 17:46:27 How to start collective operation To start collective operation (ALL or ZONE) Stop Power Turn the power supply switch on 5 hours or more before starting operation. 1 Press the SELECT button and select ALL or ZONE. In case of ZONE collective operation. 2 Select the ZONE No. to be operated by pressing ZONE button. 3 Press the ON button. 4 Set the operation mode by pressing the MODE button. 5 Set the desired temperature by pressing one of the temperature setting buttons 6 Set the desired fan speed by pressing the FAN SPEED button. 7 Select the control mode. Stop Confirming the ZONE No. to be selected or ALL indication, press the OFF button. NOTE . EN In the ALL or ZONE mode, no flap setting can be performed. If necessary, you should select the GROUP mode and use the FLAP button. 9 01_CZ-64ESMC1U_EN.indd 9 2011/11/04 17:46:28 DC0911-11111 Printed in Japan 01_CZ-64ESMC1U_EN.indd 10 2011/11/04 17:46:28