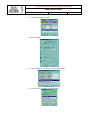
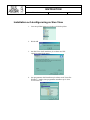
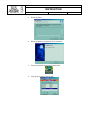
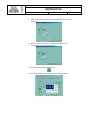
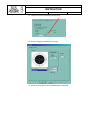
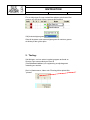
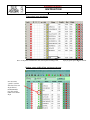
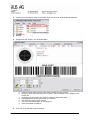
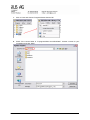
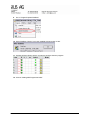
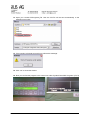
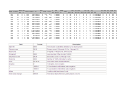
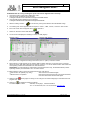
1
1 Teknisk specifikation 2 Användarhandbok till kontrollenheten 3 Bilaga till användarhandboken 4 Instruktion vid skjutplats 5 Simulera skjutning med demoskott 6 Hur göra om någon ändrat på inställningarna i kontrollenheten 7 Ändra inställningen från 10 m till 50 m i kontrollenheterna. 8 Instruktion för hantering av programvara samt underhåll av tavla System 7 Användarhandbok www.sius.se Användarhandbok System 7, 2011-08-18 Användarhandledning för kontrollenheten CU941 Följande användarhandledning beskriver kontrollenhetens funktioner för en 80 m löpande älgbana, 50 m löpande viltbana och inskjutningsbana. Innehållsförteckning 1. 2. 3. 4. 5. 6. 7. 8. 9. 10. 11. 12. 13. 14. 15. 16. 17. 18. 19. 20. 21. Bildskärmslayout Manövrering Inställningar Skjutprogram Kontrollera menyn Tavlor (fria serier) Fasta Program Användarprogram Match Kommunikation Underhåll Log Taveltest Tavlans mätelektronik (LME) PC dator Kontrollenhet Uppstartsvarianter Demoskott Fjärrkontroll Återkommande frågor (FAQ) Begreppsförklaringar 3 6 9 9 10 10 11 12 12 12 13 14 14 15 16 16 17 17 17 19 20 Sida 2 av 20 Användarhandbok System 7, 2011-08-18 1. Bildskärmslayout Information om pågående skjutning visas i olika fält på bildskärmen. Rubriklist Listfönster Skottfönster Programförlopps fönster Funktionstangentfönster Statusfönster Tavelfönster I ovanstående exempel har valts layouten ”Klassisk”. Vid leverans är layouten inställd på ”Final”. Tavelfönstret är i detta fall större och inkluderar de både nedre rutorna. Vid träffbildsskytte kan det vara en fördel att använda ”Klassisk” layout i och med att informationen om 1.1. Tavelfönster Med funktionstangenten Zoom kan olika förstoringssteg väljas. Eller med handkontrollerns Zoom knapp. Visningsskalan ändras då i motsvarande grad i tavelfönstret. Symbolen för det senast avfyrade skottet kan ställas in oberoende av symbolen för de övriga skotten. Som fabriksinställning har för båda symbolen ”Cirkel” valts. Kontrollenheten visas då skotthålen i överdriven storlek. Informationen ”Skala” medger en bedömning av tavelstorleken. Därigenom kan en uppfattning får om avståndet mellan skott och avståndet skott till tavelcentrum. Visningen av kaliber ((tolken storlek) och skala kan urkopplas via inställningarna. Detta är gjort som fabriksinställning för jakt. Sida 3 av 20 Användarhandbok System 7, 2011-08-18 För inskjutningstavlan bibehålls dock kaliber informationen. Man får då en linjal som ger en bra uppfattning om storleken. När bomskottsensorn är inkopplad visas i nedre högra hörnet denna symbol. När nedanstående korslagda markörspadar visas har något inträffat vid skjutplatsen. Bomskottsensorn har icke registrerat att ett skott avfyrats: 1.2. Skottfönster I detta fall visas ett fönster från älgen. Skott nr 2 har tagit i ring 5 och siffran ett till höger talar om att skottet är innanför det anatomiska träffområdet på älgen. En 0 anger att träffen tagit utanför det anatomiska träffområdet. Vid vildsvinsskytte bl.a. samt skytte mot inskjutningstavlan visas ett P efter tvåan vilket anger att skottet är ett provskott. 1.3. Listfönster Siffran till vänster anger skottnumret. Pilen visas träffläge sett från tavlans mitt. Därefter följer valören. Flaggan till höger om siffran 5 betyder att en träff i innerfemman föreligger. I utskriften på skrivaren framställs innerfemman som ”*”. Därefter följer träff inom det anatomiska träffområdet som visas som 1. En 0 anger träff utanför det anatomiska träffområdet. 1.4. Programförloppsfönster Programförloppsfönster kan bara ses om det valts in, och det kan urkopplas via inställningarna. I fabriksinställningen visas detta fönster. Sida 4 av 20 Användarhandbok System 7, 2011-08-18 Programförloppsfönstrets innehåll beror på det inställda programmet. I ovanstående figur visas ett ”Fast Program” för vildsvinsskytte, där antalet skott är fast fördefinierat. Den aktiva gruppen visas mot vit bakgrund. Symbolen ”>>” anger att det efter gruppen ”E10” följer ytterligare grupper. På liknande sätt sker visning vid användarprogram och vid en Match. Vid ’fria serier’ visas endast de tre avfyringsvarianterna P- (provskott), E(enkelskott) och D- (dold skottserie). Det går att välja fritt mellan avfyringsvarianterna och antalet skott är inte fördefinierat. 1.5. Statusfönster Det förekommer ett antal viktiga statusinformationer: Med mindre text visas dessutom ytterligare statusinformation: Sida 5 av 20 Användarhandbok System 7, 2011-08-18 1.6. Rubriklist I rubriklisten visas tavelnumret samt aktuellt datum och klockslag. Formatet för datumvisning kan ändras. 1.7. Funktionstangentfönster Funktionstangenterna F1 till F5 har olika funktioner. Beroende på i vilken mod Kontrollenheten arbetar kan funktionstangenterna tilldelas olika funktioner. I funktionstangentfönstret visas samma information som på den lilla LCDdisplayen på kontrollenhetens tangentbord. Men LCD-displayen är för varje funktionstangent begränsad till fyra tecken (se listan över förkortningar i ”Bilaga till driftsinstruktion för System 7”). Hur navigering kan ske i menyträdet beskrivs i avsnitt ”Manövrering”. 2. Manövrering 2.1. Manöversätt Kontrollenheten kan användas på olika sätt. Manövrering via tangentbordet (meny) är den gynnsammaste varianten. Samtliga funktioner som är tillgängliga hos Kontrollenheten kan styras via tangentbordet. Undantagna från detta är endast användarprogrammen. Dessa kan enbart laddas via en streckkodsläsare eller från en central dator. Den stora fördelen med manövrering via streckkoder är att de viktigaste instruktionerna kan sammanställas på ett pappersark, varigenom manövreringen kan reduceras till det nödvändigaste. Manövrering med fjärrkontrollen är ytterligare ett sätt för att enkelt föra in en ny skytt och starta om skjutprogrammet. 2.2. Meny (manövrering via tangentbord) Menyn är strukturerad som ett träd. På liknande sätt som hos moderna datorsystem är de befintliga elementen indelade i kataloger, mappar och filer (instruktioner). Trädets rot är i översikten placerad i mitten. Från roten förgrenar sig katalogerna och mapparna. Ju mera katalogerna och mapparna är förgrenade desto mera detaljerade är informationen och instruktionerna. Sida 6 av 20 Användarhandbok System 7, 2011-08-18 Trädets kompletta struktur visas överskådligt i ”Bilaga till driftsinstruktion för System 7”. Dessutom motsvarar denna struktur samtidigt innehållsförteckningen för streckkodsbeskrivningarna. För navigering inom trädet används följande tangenter och funktionstangenter: Sida 7 av 20 Användarhandbok System 7, 2011-08-18 När ett skjutprogram väljs växlar menyn automatiskt till kontrollmenyn. I kontrollmenyn finns direkt de viktigaste instruktionerna tillgängliga vid den valda programtypen. Se avsnitt ”Programstyrning”. 2.3. Streckkoder Vid inläsning av en streckkod skall streckkodsläsaren placeras direkt och ca 12 cm rakt ovanför den aktuella streckkoden. Därefter trycks inläsningsknappen in. För en fungerande manövrering av systemet måste streckkoderna föreligga som högvärdiga utskrifter eller kopior. Streckkodsläsaren kvitterar inlästa streckkoder genom olika ”beep”-signaler. Ett ”beep” betyder godkänd inläsning av streckkoden, två ”beep” innebär att Sida 8 av 20 Användarhandbok System 7, 2011-08-18 instruktionen visserligen har blivit korrekt inläst men att den inte stöds av systemet eller att den för tillfället inte kan utföras. Vid tre ’beep’ föreligger ett inläsningsfel eller en ogiltig streckkod. Tillåtna streckkoder är endast de som är listade i ”Bilaga till driftsinstruktion för System 7” eller sådana som framställts med hjälp av Barcode-biblioteket. Andra streckkoder kan leda till funktionsfel hos enheten. Kontrollenheten (endast CU941) har på höger sida ett hårdvarugränssnitt (kontaktdon) till vilket en streckkodsläsare kan anslutas. Med denna streckkodsläsare kan alla inmatningar göras som också kan göras via tangentbordet. Därutöver kan även användarprogram läsas in som tidigare framställts med datorprogrammet Barcode-Library (Gratisprogram hämtas från hemsidan www.sius.com) eller med SIUSDATA®. Streckkoderna är organiserade på samma sätt som Kontrollenhetens tangentbord. I ”Bilaga till driftsinstruktion för System 7” är samtliga tillgängliga streckkoder listade. Menyträdet kan därvid användas som en kompletterande innehållsförteckning. Som streckkoder används ”Interleave 2 of 5”-koder. Koderna är skyddade med en kontrollsiffra. Därigenom filtreras läsfel och felaktiga koder. 2.4. PC Med mjukvaran SIUSDATA® kan alla instruktioner sändas samtidigt till samtliga kontrollenheter som är anslutna till samma nätverk. Med denna funktion är det enkelt att hos alla kontrollenheter samtidigt ändra samma inställningar eller ladda ett program. Tillvägagångssättet beskrivs i dokumentationen för SIUSDATA®. 3. Inställningar Kontrollenheten erbjuder ett stort antal inställningsmöjligheter. Praktiskt taget alla kundbehov kan täckas med dessa inställningar. Från språket via ett uppstartningsprogram till diverse presentationsvarianter kan allt programmeras. Hur inställningarna är organiserade framgår mest överskådligt i menyträdet. Vid leverans har vi föreslagit en kundinställning. Dessa inställningar kan användaren ändra. Filter är en funktion för att dölja inställningar som inte används. 4. Skjutprogram De program som kan lagras i kontrollenheten kan indelas i fyra grupper: Sida 9 av 20 Användarhandbok System 7, 2011-08-18 5. Kontrollera menyn 6. Tavlor (fria serier) I en Fri Serie är antalet skott som skall skjutas inte fastlagt i förväg. Skytten kan själv avsluta skjutningen genom grupptotal eller stotal. På så sätt kan valfria program skjutas. Något fast föreskrivet förlopp för detta kan emellertid inte fås via Kontrollenheten . Detta funktionssätt är därför speciellt lämpligt för vana användare som är väl förtrogna med de program som skall skjutas. Efter att en Fri Serie ställts in visas följande i programförloppsfönstret: Sida 10 av 20 Användarhandbok System 7, 2011-08-18 De tre bokstäverna betecknar de tre skjutarterna som finns tillgängliga. Vid ”P-” kan provskott avfyras. Valörerna för provskotten adderas inte till den sammanlagda totalen. Genom att trycka på funktionsknappen ”\Enkelskott” kan växling till ”E-” ske. Enkelskott visas direkt efter varje enskilt skott. I motsats härtill visas serieskott under ”D-” först efter att en seriegrupp avslutats eller efter att uttryckligen instruktionen ”Visa” utförts. Bindestrecket ”-” betyder att det är fråga om en öppen grupp. Antalet skott som kan skjutas är valfritt. Vid en Fri Serie kan följande instruktioner utföras. 7. Fasta Program Fasta Program är lagrade i Kontrollenhetens icke flyktiga minne. Ett Fast Program ger en fast ordningsföljd för skottgrupperna. Kontrollenheten garanterar att det bestämda förloppet följs. Fasta Program är exempelvis programmet för löpande älg med två skott per löp och två löp per serie. Programförloppsfönstret hos detta Fasta Program har följande utseende: Ett nytt Fasta Program kräver en ny programversion hos kontrollenheten. Sida 11 av 20 Användarhandbok System 7, 2011-08-18 8. Användarprogram Användarprogram kan skapas med PC-mjukvaran Barcode-Library eller i SIUS DATA®. Med sådana program kan egna programförlopp definieras. Det är också möjligt att sammanställa ett användarprogram där tavelbilden växlar under programmets utförande. Det är emellertid inte möjligt att samtidigt ändra andra inställningar med streckkoden för användarprogrammet. När det för ett program till exempel krävs en viss utskrift måste denna ställas in separat. Inställning av användarprogram kan ske via streckkoder eller en PC. Likaså är det inte möjligt att konfigurera användarprogram med hjälp av tangentbordet. I övrigt fungerar användarprogram identiskt lika som Fasta Program. 9. Match Skytten kan individuellt växla från provskott till tävlingsskott. Detta kan ske ex. via fjärrkontrollen genom att trycka på knappen Match. Så länge inget tävlingsskott avfyrats kan skytten återgå till provskott. 10. Kommunikation De olika systemkomponenterna (Kontrollenhet, LON-mätelektronik (tavlan), och PC) är sammanlänkade via en fältbuss LON. Genom detta kommunikationsnät kan systemkomponenterna kommunicera med varandra. LON-mätelektroniken överför skottrådata till kontrollenheten så att kontrollenheten kan beräkna skottvalören och infoga denna korrekt i det pågående programmet. Detta är den viktigaste förbindelsen. Utan kommunikation från kontrollenheten till LONmätelektroniken kan ingen skjutverksamhet startas. Ett avbrott i förbindelsen med LON-mätelektroniken signaleras av kontrollenheten genom indikeringen ”OFFLINE” i statusfönstret. Kontrollenheten ger förutom skottinformationen även annan information till PC:n, för att där data från alla banor kan sammanfattas och utvärderas. För att förhindra en överbelastning av nätverket indelas det vid installation av större anläggningar med flera banor i olika segment. Kraven på kablering och användning av routers beskrivs i hårdvaruinstruktionen. För felfri funktion krävs att systemkomponenterna adresseras via en adress som är indelad i en subnet- och nodadress. Nodadressen definierar systemkomponenterna själva. Alla systemkomponenter för en bana (lane) måste vara inställda för samma subnet-adress (tavelnummer). Detta sker antingen via en LNR-box (Lane Number Box) och tillhörande vridströmbrytare eller genom inställningar och programmering som hos kontrollenheten (se ”System\Hårdvara\Manöverenhett\Set Subnet” och ”System\Hårdvara\Figur\Anslut”). Systemkomponenterna detekterar automatisk om de adresserade komponenterna är tillgängliga. Sida 12 av 20 Användarhandbok System 7, 2011-08-18 11. Underhåll 11.1. Rapporter Rapporten över inställningarna har reducerats så långt att den endast omfattar inställningar som skiljer sig från fabriksinställningarna. Efter fullständig inställning av kontrollenheten efter användarens önskemål är det meningsfullt att skriva ut och arkivera rapporten över inställningarna. Med hjälp av rapporten kan även en reparerad eller utbytt manöverenhet åter ställas in för den önskade konfigurationen. 11.2. Skottrapport Skottrapporten kan användas för redovisningar. Skottrapporten innehåller detaljerade uppgifter om de olika skotthändelserna. Sida 13 av 20 Användarhandbok System 7, 2011-08-18 12. Log I den interna loggen är alla händelser lagrade som erfordras för dokumentationen och för en eventuell återställning efter ett strömavbrott. Varje händelse visas på minst två rader. I den övre raden anges tidpunkten för händelsen i 1/100-sekunder. I den andra raden skrivs händelsens klass och en representativ text ut. Vid skott dokumenteras koordinaterna för skottläget på en ytterligare linje. Nedan förklaras de viktigaste uppgifterna i en loggutskrift. 13. Taveltest Utskrift av taveltesten: Sida 14 av 20 Användarhandbok System 7, 2011-08-18 Taveltesten ger information om mjukvaru- och hårdvaruversionerna samt information om den LON-mätelektronik som är inställd på samma tavelnummer som den manöverenhet från vilken taveltesten utlöses. Betydelsen av de olika värdena förklaras i följande tabell: PIC betecknar hårdvaruversionen och ”Version\Release” betecknar mjukvaruversionen avseende LON-mätelektroniken. Tidsdifferensen erhålls från den tidpunkt vid vilken LON-mätelektroniken har avsänt taveltesten minus den tidpunkt vid vilken kontrollenheten utvärderar taveltesten. En tidsdifferens lägre än 100 millisekunder är normal. Större tidsdifferenser tyder på felaktig tidssynkronisering. 14. Tavlans mätelektronik (LME) LON-mätelektroniken omfattar nedanstående komponenter. Dessa komponenter kan detekteras via taveltesten (”\System\Underhåll\BITtest\ Taveltest”). Sida 15 av 20 Användarhandbok System 7, 2011-08-18 I mätelektroniken måste samma tavelnummer (subnet-adress) finnas som hos den tillhörande kontrollenheten. Tavelnumret kan endast programmeras via kontrollenheten. Förfarandet beskrivs i kap.”Anslutning av tavlan” eller i ”Bilaga till driftsinstruktion för System 7” under ”\System\Hardvåra\Figur\Anslut”. Alternativt kan dessutom tavlorna bestyckas med en LNR-box eller en LNRkretskort. I ett sådant fall behövs inte programmeringen via kontrollenheten. 15. PC dator Med hjälp av en ”LON-dongle” kan även en vanlig dator (PC) anslutas till LONnätverket. Det finns ett antal programvaror som tagits fram för drift tillsammans med manöverenheterna. 16. Kontrollenhet Kontrollenheten (CU931 eller FPE06) innehåller huvuddatorn för varje träffindikeringsanläggning. Det finns olika mjukvaruprogram som kan laddas in i dessa enheter. I den föreliggande dokumentationen beskrivs versionen ”System 7”. I kontrollenheten finns följande komponenter: Sida 16 av 20 Användarhandbok System 7, 2011-08-18 LON-programvaran och Manöverenhet-programvaran kan laddas med PCprogramvaran LONORG®. För Boostrap-loader-programvaran är denna funktion ännu inte tillgänglig. Altera-versionen kan ändras genom byte av en socklad IC-komponent. Genom att trycka ned Help-tangenten fås en utskrift av ovanstående uppgifter. 17. Uppstartsvarianter 18. Demoskott Ett demoskott utlöses med Ins-tangenten under förutsättning att anläggningen är inställd för ”Demo”. 19. Fjärrkontroll Sida 17 av 20 Användarhandbok System 7, 2011-08-18 Fjärrkontroll lådan RC941 kan anslutas till kontrollenheten. Den är tänkt för skyttar så att de från sin placering kan inmata de viktigaste instruktionerna utan att behöva lämna sin placering. Zoom-knapp Med ZOOM-knappen kan, såsom redan beskrivits i kap. ”Manövrering”, tavlans bildsegment förstoras. Meny-knapp Under förutsättning av inställningen ”\System\Hardvåra\RC92\Match Meny” är aktiverad kan man med Meny-knappen få kontrollmenyn som listfönster direkt på monitorn. Med Meny- och Match-knappen kan sedan urvalet i detta fönster flyttas uppåt eller nedåt. När rätt instruktion valts ut kan denna bekräftas med Enterknappen (Zoom-knappen). Om ingen aktion skall äga rum måste instruktionen ”Cancel” utföras. Meny försvinner omedelbart när någon annan händelse (t.ex. skott eller felmeddelande) föreligger. Match-knapp Match-knappen har, förutom den ovan beskrivna navigeringsfunktionen, under en ISSF-ställningsMatch en särskild funktion. Skytten kan genom nedtryckning av Match-knappen individuellt växla från prov- till tävlingsskott. Han får även återgå till provskott såvida han inte har startat Matchen. Denna funktion kan genomföras via RC941 (Fjärrkontroll lådan) eller på kontrollenheten med dess funktionstangenter. Efter provskott kan skytten växla tillbaka till det ordinarie programmet genom att trycka ned Match-knappen. Vid Fria Serier kan man med hjälp av Match-knappen stega genom prov, enkelskott och dolda skott. Med programmet DIANA kan Matchknappen vid viltmålsskytte användas för att föra in en ny figur vid vändning av vagnen.. Sida 18 av 20 Användarhandbok System 7, 2011-08-18 20. Återkommande frågor (FAQ) – Varför är en viss instruktion eller en viss katalog inte åtkomlig via menyn? Med filterfunktionen kan menyområden undantas från visning. Se därför till att filtren är inställda enligt de individuella behoven. – Hur kan anläggningen genomtestas? I demo-moden kan man med Ins-tangenten hämta skott från LONmätelektroniken. Därigenom testas kommunikationen med LONmätelektroniken och funktionen hos stora delar av kontrollenheten. Demomoden kan aktiveras/deaktiveras via ”\System\Inställningar \Annan\Demo”. Aktuell aktiveringsstatus visas i statusfönstret. – Kontrollenheten förblir ”OFFLINE” och skotten visas inte i det inställda programmet. Kontrollenheten kan inte kommunicera med LON-mätelektroniken. Kontrollera LON-mätelektronikens strömförsörjning samt konfigurationen av tavelnumret. Kontrollera kableringen och anslut eventuellt LON-mätelektroniken på nytt. (Se ”Anslutning av tavlan”.) – Kontrollenheten startar alltid med engelska som valt språk. Inställningarna inklusive språkvalet förblir intakta även vid ett strömavbrott. Det förloras först när buffertbatteriet är urladdat. Kontrollenheten visar (Lågt batteri eller CRC fault) efter uppstart i listfönstret och ger under startförloppet tre ’beep’-signaler i följd. – Hur kan man skjuta kommenderat på en skjutplats? Manöverenheterna kan fjärrstyras med PC-programvaran SIUSDATA®. Med denna programvara kan alla anslutna manöverenheter kontrolleras och konfigureras. Sida 19 av 20 Användarhandbok System 7, 2011-08-18 21. Begreppsförklaringar Sida 20 av 20 Föreg. serie Skrivt ut Skotträknare Ogiltigt skott Log Bilaga till driftsinstruktion för System 7 Rapport Symbol Form Storlek Invertera Sista skott Last Shot Window Visa Deferred Shots Visa 10X Symbol Skott Standard ISSF Rörligt mål Skidskytte 10m ISSF Schweiz 25m Schweiz A B ISSF CISM Schweiz Skriver F1 Figurer 300m Nollställa skottnummer Delsumma Layout Funktions tangenter Manöverenhet Status blinkar Övningsfönster Large font in Listwindow Grupp Belgium Jakt Skandinavien Militär Övrigt Övrigt Inställningar ISSF Rörligt mål Femkamp Övrigt 10m ISSF CISM Sui 25m Meddelande Rörligt mål Simulera resultattavla Divisor F2 Program ISSF CISM Militär Språk F4 System 50m Sui Övrigt Schweiz Home 300m Justera tid Datumformat Möjliggöra Repetering återställa fria serier Automatisk uppstart SC-Programs Start Single Execution Scale Factor Set Scale Factor Target Alternative Automatisk nollställning Övrigt Skandinavien Övrigt Skandinavien Distans Kategorie Vapen Användar grupp Funktion Mode Filter Övrigt Jakt Kaliber Zoom TOTAL Resultat Utskrift Repetera SC-Programs Felfunktion Avbryt Radera tavlan Ställ in timer Övrigt Starta timer Timer Nollställ timer Ta bort timer Legalisering ange vapen Ange ställning Skytt ID krav Text MTP MTP Parametrar Tid OP Lag mästerskap A B Övrigt FS F5 Krav Use Always Control Mode Demo F3 Kontrollera Underhåll Kontroll inställningar Inställningar Skotträknare Rapport Ogiltigt skott Log Debug BIT-test Taveltest Tangentbord Resultattavla Nollställa monitor Resultattavla Resultattavla Meny Manöverenhet Set subnet Info RC92 F5 Logga in Legalisering Vapentyp Ställning Skytt nummer Hårdvara Figur Match Meny Figur byte Känslighet Bandmatning Use Always Use Always Anslut Time Control Unit SIUS AG BASYS7AH1SR1 Menu.mmp - 21.03.2005 Visa meddelanden Info tavelmatning Visa figurnamn Kaliber Indikera ISSF CISM ISSF DJV SWE Use Always Skriv ut skjutprotokoll Tiondel Provskott Delsumma Print Overtime Antal tomrader Skandinavien Norge Use Always Visa format Tiondel Radera tavlan efter skott Presentation 50m Skidskytte Utskriftsformat Kors skott Ogiltigt skott Bästa skott Kolumnkonfiguration ISSF Gevär Finkaliber Grovkaliber Form Storlek Invertera Time Control Unit Duell mode Graphic Printer Modell Im Langhag 1 Skott sensor CH-8307 Effretikon +41 (52) 354 60 60 Fax: +41 (52) 354 60 66 www.sius.com [email protected] Reload Reprint Shot Counter Invalid shots Log User Manual Appendix System 7 Reports Symbol Last Shot Last Shot Window 10m ISSF Switzerland 25m Display Inner ten Form Size Inverse Shot Standard ISSF Switzerland A B F1 Targets 300m Group Italy Austria Hunting Scandinavia Full Bore B C 1/x Other Other ISSF Running Target Pentathlon Other 10m ISSF CISM Sui Other 25m Running Target Simulator SCB Divisions Language F4 System Language Adjust Clock Time Date format Enable Repeat Free series start setting Startup program SC-Programs Start Single Execution Scale Factor Set Scale Factor Target Alternative Enable Autoreset 50m Home F2 Programs ISSF CISM Switzerland Other 300m Scandinavia Other Military Distance Category Weapon User Group Function Mode Filter Full Bore Austria Scandinavia Calibre Use Always Control Mode Demo Other Settings Control Hunting Zoom TOTAL Score Print screen Repeat SC-Programs Malfunction Abort Clear target window Set Timer Other Start Timer Timer Reset Timer Remove Timer Reports Settings Shot Counter Invalid shots Log Debug Self Test Target test Keyboard Scoreboard Maintenance F3 Control Control unit reset SCB SCB Menu Control unit Set Subnet RC92 Legalisation Weapon required Position required Firer number required Requirements Info Hardware F5 Logon Legalisation Weapon Type Position Firer number SIUS AG BASYS7AH1ER1 Menu.mmp - 21.03.2005 Display Messages Target Feed Message Text MPI MPI Parameter Sui Other OP Group championship A B Other FS F5 Message Display target name Display calibre Indication ISSF CISM ISSF DJV SWE Reset Shot Number Subtotal Layout Function Keys Control unit Status flashing Practice progress window Large font in Listwindow Other Settings Norway Target Match Menu Target changer Sensitivity Use Always Paper feed Use Always Connect Distance Index Time Control Unit Use Always Print Protocol Secondary Score Sighters Subtotal Print Overtime Number of line feeds Printing Belgium Military Use Always Screen-format Secondary Score Clear target after shots Presentation Scandinavia Norway Print-format Cross Shot Illegal Shot Best shot Column Configuration 50m Biathlon ISSF CISM Switzerland Screen Deferred Shots Symbol ISSF Running Target Biathlon Other Rifle Small Bore Big Bore Form Size Inverse Time Control Unit Duel mode Im Langhag 1 Graphic Printer Model Shot sensor Effretikon CH-8307 +41 (52) 354 60 60 Fax: +41 (52) 354 60 66 www.sius.com [email protected] Contents English Page 0 Targets 0 10m ISSF Running Target Biathlon Other 0 0 0 0 25m ISSF Switzerland 0 0 0 50m ISSF Switzerland Rifle Small Bore Big Bore Biathlon 0 0 0 0 0 0 0 300m ISSF CISM Switzerland A B Scandinavia Norway Belgium Other Italy 09.08.2010 0 0 0 0 0 0 0 0 0 0 0 Contents English Page Austria Hunting Scandinavia Military 0 0 0 0 Full Bore Norway 0 B C 1/x Other 0 0 0 0 0 Programs 0 10m 0 ISSF Running Target Pentathlon Other 0 0 0 0 25m ISSF CISM Sui Other 0 0 0 0 0 50m ISSF CISM Running Target ISSF DJV SWE 09.08.2010 0 0 0 0 0 0 0 Contents English Page 0 Sui Other 0 0 300m ISSF CISM Switzerland OP Group championship A B Other FS F5 Scandinavia Other 0 0 0 0 0 0 0 0 0 0 0 0 Other Full Bore Austria Scandinavia Military Hunting Control Zoom TOTAL Score Print screen Repeat 09.08.2010 0 0 0 0 0 0 0 0 0 0 0 0 Contents English Page 0 SC-Programs Malfunction Other 0 0 Abort Clear target window Timer Set Timer Start Timer Reset Timer Remove Timer 0 0 0 0 0 0 0 System 0 Reports 0 Reload Reprint Shot Counter Invalid shots Log 0 0 0 0 0 Settings Presentation 0 Shot 0 0 Last Shot Symbol 0 Form 0 Size 0 Inverse 0 Last Shot Window 0 Screen 0 Deferred Shots 0 Display Inner ten Standard Symbol 09.08.2010 0 0 0 0 Contents English Page Form 0 Size 0 Inverse 0 Print-format 0 Use Always 0 Screen-format Secondary Score Clear target after shots 0 Cross Shot Illegal Shot Best shot 0 0 0 0 0 Printing Column Configuration 0 Use Always 0 Print Protocol Secondary Score Sighters Subtotal Print Overtime Number of line feeds 0 Reset Shot Number Subtotal 0 0 0 0 0 0 0 Other Control unit Layout Function Keys Status flashing Practice progress window Large font in Listwindow Message Display Messages Target Feed Message Display target name Display calibre Indication Parameter 0 0 Group 09.08.2010 0 0 0 0 0 0 0 0 0 0 0 0 0 0 Contents English Page 0 MPI 0 Text MPI 0 Simulator SCB Divisions 0 0 Language Language Time 0 0 Adjust Clock Date format 0 0 0 Other 0 Start Enable Repeat Free series start setting Startup program SC-Programs Single Execution Scale Factor Set Scale Factor Target Alternative Enable Autoreset Filter Distance Category Weapon User Group Function Mode Calibre Use Always 09.08.2010 0 0 0 0 0 0 0 0 0 0 0 0 0 0 0 0 0 0 0 Control Mode Demo 0 Settings Control 0 0 Contents English Page Maintenance 0 Reports 0 Settings Shot Counter Invalid shots Log Debug Self Test Target test Keyboard Scoreboard Control unit reset 0 0 0 0 0 0 0 0 0 0 Hardware 0 SCB SCB 0 Control unit 0 Menu Set Subnet 0 0 0 RC92 Match Menu 0 0 Target Target changer Sensitivity Use Always Paper feed 0 0 0 0 Use Always 0 Connect Distance Index 0 Time Control Unit Time Control Unit 09.08.2010 0 0 0 0 Contents English Page Duel mode Graphic Printer Model Shot sensor 0 0 0 Logon 0 Info 0 Requirements Legalisation Weapon required Position required Firer number required Legalisation Weapon Type Position Firer number 09.08.2010 0 0 0 0 0 0 0 0 0 09.08.2010 SIUS AG (c) 2004 1 / 112 Targets Targets Free series are programs which do not prescribe any set numbers of shots. They are especially suitable for completing open training courses. With free series all official shoots can be simulated. 10m The directory 10m is the compilation of all target images which typically are used over a distance of 10 metres. ISSF Official targets of the ISSF are filed in this directory. Air Rifle 10 metre running target; ISSF Rules, Section 6.3.2.3; diameter 45.5mm; black reflector from ring 4 06000019000201(62) to 9 Air Pistol 10 metre air pistol target; ISSF Rules, Section 6.3.2.6; diameter 155.5mm; black reflector from ring 7 to 10 06000019000203(56) Switzerland Targets that are used only in Switzerland are stored in this directory. Air Rifle 10 metre target with the dimensions of the official ISSF target. But unlike the latter, with the secondary score in one hundredth rings instead of the one tenth ring score of the ISSF. 06000019000205(50) Air Pistol 10 metre target with the dimensions of the official ISSF target. But unlike the latter, with the secondary score in one hundredth rings instead of the one tenth ring score of the ISSF. 09.08.2010 SIUS AG (c) 2004 06000019000207(44) 2 / 112 Targets\10m\Switzerland Volkscheibe A10 air rifle target with large 10-er ring for public events. 06000019000209(38) Running Target The target pictures for the running target are filed in this directory. The discipline is also supported in the 10 metres by the ISSF. Standard 10 metre running target; ISSF Rules, Section 6.3.2.7.2; diameter 50.5mm; black reflector from ring 06000019001200(72) 5 to 10 Final 10 metre running target; ISSF Rules, Section 6.3.2.7.2; diameter 50.5mm; black reflector from ring 06000019001201(69) 5 to 10 Biathlon The target pictures for biathlon are filed in this directory. Biathlon targets can be found under 10 metres and 50 metres. 15 Target image with 15 millimetre circle. 06000019001302(57) 20 Target image with 20 millimetre circle. 06000019001301(60) 09.08.2010 SIUS AG (c) 2004 3 / 112 Targets\10m\Biathlon 35 Target image with 35 millimetre circle. 06000019001300(63) Other Zimmerstutzen German target 06000019000210(35) Croatian AR Target 06000019000211(32) 25m The directory 25m is the compilation of all target images which typically are used over a distance of 25 metres. ISSF Official targets of the ISSF are filed in this directory. Precision 25 / 50 metre precision pistol target PP10; ISSF Rules, Section 6.3.2.5, Diameter 500mm; black reflector from ring 7 to ring 10 06000019000303(47) Rapid Fire 25 metre rapid fire target, ISSF Rules, Section 6.3.2.4, Diameter 500mm; black reflector from ring 5 to 10 06000019000305(41) Switzerland Targets that are used only in Switzerland are stored in this directory. 09.08.2010 SIUS AG (c) 2004 4 / 112 Targets\25m\Switzerland O10 Swiss ordnance rapid fire pistol target (military); outline with ovals; Form 34.17 06000019000407(26) Big bore pistol Many 25 metre targets are also shot with large calibre pistols (9.65mm). In order that the calibre setting can be correctly selected, these targets are listed twice. Precision 25 / 50 metre precision pistol target PP10; ISSF Rules, Section 6.3.2.5, Diameter 500mm; black reflector from ring 7 to ring 10 06000019000311(23) Rapid Fire 25 metre rapid fire target, ISSF Rules, Section 6.3.2.4, Diameter 500mm; black reflector from ring 5 to 10 06000019000313(17) O10 Swiss ordnance rapid fire pistol target (military); outline with ovals; Form 34.17 06000019000707(96) 50m The directory 50m is the compilation of all target images which typically are used over a distance of 50 metres. ISSF Official targets of the ISSF are filed in this directory. Rifle 50 metre precision rifle target; ISSF Rules, Section 6.3.2.2; diameter 154.4mm; black reflector from one section of ring 3 to ring 10, diameter 112.4mm 09.08.2010 SIUS AG (c) 2004 06000019000301(53) 5 / 112 Targets\50m\ISSF Final 06000019000302(50) Pistol 25 / 50 metre precision pistol target PP10; ISSF Rules, Section 6.3.2.5, Diameter 500mm; black reflector from ring 7 to ring 10 06000019000303(47) Switzerland Targets that are used only in Switzerland are stored in this directory. Rifle A5 50 metre small calibre rifle target with five rings; diameter 154.4mm; black reflector from one section of ring 2 to ring 5. 06000019000307(35) A10 50 metre precision rifle target; ISSF Rules, Section 6.3.2.2; diameter 154.4mm; black reflector from one section of ring 3 to ring 10, diameter 112.4mm 06000019000308(32) A20 50 metre precision rifle target; diameter 154.4mm; black reflector from one section of ring 6 to 20, diameter 112.4mm 09.08.2010 SIUS AG (c) 2004 06000019000309(29) 6 / 112 Targets\50m\Switzerland A100 50 metre precision rifle target with a one hundred ring score instead of the ISS ten ring score; diameter 154.4mm; black reflector diameter 112.4mm 06000019000310(26) Small Bore Swiss pistol targets with small calibre (5.6mm) setting. PA4 Pistol target A40; circular target with four rings. 06000019000401(44) PA10 Pistol target A10; circular target with ten rings. 06000019000402(41) PA100 Pistol target A100; circular target with one hundred rings. 06000019000403(38) PB5 Pistol target B5; circular target with five equal rings and an outline whereby the outline is worth at least three points. 06000019000404(35) PB10 Pistol target B10; circular target with ten equal rings and an outline. 09.08.2010 SIUS AG (c) 2004 06000019000405(32) 7 / 112 Targets\50m\Switzerland PB100 Pistol target B100; circular target with one hundred equal rings and an outline. 06000019000406(29) O10 Swiss ordnance rapid fire pistol target (military); outline with ovals; Form 34.17 06000019000407(26) Big Bore Big bore pistol PA4 Pistol target A40; circular target with four rings. 06000019000701(17) PA10 Pistol target A10; circular target with ten rings. 06000019000702(14) PA100 Pistol target A100; circular target with one hundred rings. 06000019000703(11) PB5 Pistol target B5; circular target with five equal rings and an outline whereby the outline is worth at least three points. 09.08.2010 SIUS AG (c) 2004 06000019000704(08) 8 / 112 Targets\50m\Switzerland PB10 Pistol target B10; circular target with ten equal rings and an outline. 06000019000705(05) PB100 Pistol target B100; circular target with one hundred equal rings and an outline. 06000019000706(02) O10 Swiss ordnance rapid fire pistol target (military); outline with ovals; Form 34.17 06000019000707(96) Morgarten Outline target with five scores, whereby the value two is assigned to five ellipses and the value one to the rest of the outline. 06000019000410(17) Biathlon The target pictures for biathlon are filed in this directory. Biathlon targets can be found under 10 metres and 50 metres. 35mm Target image with 35 millimetre circle. 06000019001306(45) 45mm Target image with 45 millimetre circle. 06000019001305(48) 09.08.2010 SIUS AG (c) 2004 9 / 112 Targets\50m\Biathlon 85mm Target image with 85 millimetre circle. 06000019001304(51) 110 Target image with 110 millimetre circle. 06000019001303(54) 300m The directory 300m is the compilation of all target images which typically are used over a distance of 300 metres. ISSF Official targets of the ISSF are filed in this directory. A10 06000019000002(77) CISM The A10 target which is used in military contests does not differ from the A10 target which is used in ISSF disciplines. So that the filter function can be better used, the category CISM was separately introduced. A10 06000019000002(77) Switzerland Targets that are used only in Switzerland are stored in this directory. A A-targets with varied scores: A5 06000019000001(80) 09.08.2010 SIUS AG (c) 2004 10 / 112 Targets\300m\Switzerland A6 06000019000005(68) A10 06000019000002(77) A100 06000019000003(74) A10/FA10 06000019000014(41) A10 final 06000019000015(38) B B-targets with different scores (field target B Form. 34.21.2.88): B4 06000019000004(71) 09.08.2010 SIUS AG (c) 2004 11 / 112 Targets\300m\Switzerland B10 06000019000008(59) B100 06000019000009(56) PB5 Pistol target PB5 06000019000010(53) F5 06000019000007(62) Scandinavia Targets that are used only in Scandinavia are stored in this directory. The exception is animal images (moose and reindeer) which can be found under '\Other\Hunting\Moose'. Norway Nor7 06000019001101(78) Nor8 06000019001102(75) 09.08.2010 SIUS AG (c) 2004 12 / 112 Targets\300m\Scandinavia NSF 15m 06000019001410(24) DFS 15m 06000019001411(21) DFS100 06000019001103(72) DFS 200 06000019001412(18) DFS 300 06000019001413(15) New Swedish target 06000019001100(81) 16FIG 06000019001105(66) 09.08.2010 SIUS AG (c) 2004 13 / 112 Targets\300m\Scandinavia 16V 06000019001106(63) C30 06000019001104(69) A10 Reduced 200 06000019001414(12) Belgium Targets from Belgium A10 06000019000002(77) Oly100 Oly100 Target 06000019001501(42) Oly200 Oly200 Target 06000019001502(39) 09.08.2010 SIUS AG (c) 2004 14 / 112 Targets\300m\Belgium Schijf K Schijf K Target 06000019001503(36) Schijf 4 Schijf 4 Target 06000019001504(33) Schijf 5 Schijf 5 Target 06000019001505(30) Schijf S Schijf S Target 06000019001506(27) NTTC4 06000019001507(24) NTTC5 06000019001508(21) Other All targets that do not clearly fall under one of the preceding distances are included in the category 'Other'. Italy 09.08.2010 SIUS AG (c) 2004 15 / 112 Targets\Other\Italy Bersaglio 1 06000019002400(61) Bersaglio 2 06000019002401(58) Bersaglio 9 06000019002402(55) P1 06000019002403(52) P2 06000019002404(49) P3 06000019002405(46) A10 100m 06000019002406(43) 09.08.2010 SIUS AG (c) 2004 16 / 112 Targets\Other\Italy A10 200m 06000019002407(40) A10 300m 06000019002408(37) Austria ASR \ASR\Pistol Pistol A 5m 06000019001700(27) Pistol A 10m 06000019001701(24) Pistol B 5m 06000019001702(21) Pistol B 10m 06000019001703(18) 09.08.2010 SIUS AG (c) 2004 17 / 112 Targets\Other\Austria Pistol D 5m 06000019001704(15) Pistol D 10m 06000019001705(12) Pistol C 7m 06000019001706(09) Pistol C 15m 06000019001707(06) Pistol C All 06000019001708(03) Pistol E 20m 06000019001709(97) Pistol E All 06000019001710(94) 09.08.2010 SIUS AG (c) 2004 18 / 112 Targets\Other\Austria \ASR\Rifle Rifle A 10m vertical 06000019001602(30) Rifle A 20m vertical 06000019001603(27) Rifle B 10m horizontal 06000019001604(24) Rifle B 20m horizontal 06000019001605(21) Rifle B 10m ellipse 06000019001606(18) Rifle B 20m ellipse 06000019001607(15) 09.08.2010 SIUS AG (c) 2004 19 / 112 Targets\Other\Austria Rifle C 15m 06000019001608(12) Rifle C 30m 06000019001609(09) Rifle C All 06000019001610(06) Rifle D 40m 06000019001611(03) Rifle D All 06000019001612(97) Classic \Classic\Pistol A10 06000019001810(85) 09.08.2010 SIUS AG (c) 2004 20 / 112 Targets\Other\Austria A100 06000019001811(82) Klein links 06000019001801(15) Klein rechts 06000019001802(12) Gross links 06000019001803(09) Gross rechts 06000019001804(06) Klein Klein 06000019001805(03) Klein Gross 06000019001806(97) 09.08.2010 SIUS AG (c) 2004 21 / 112 Targets\Other\Austria Gross Klein 06000019001807(94) Gross Gross 06000019001808(91) Precision 25 / 50 metre precision pistol target PP10; ISSF Rules, Section 6.3.2.5, Diameter 500mm; black reflector from ring 7 to ring 10 06000019001812(79) \Classic\Rifle R10 06000019001800(18) A10 06000019000002(77) A100 06000019000003(74) 09.08.2010 SIUS AG (c) 2004 22 / 112 Targets\Other\Austria Anschuss Scheibe 06000019001809(88) \Classic\MG \Classic\MG\A MG Ziel A1 06000019001900(09) MG Ziel A2 06000019001901(06) MG Ziel A3 06000019001902(03) MG Ziel A4 06000019001903(97) MG Ziel A5 06000019001904(94) 09.08.2010 SIUS AG (c) 2004 23 / 112 Targets\Other\Austria MG Ziel A6 06000019001905(91) MG Ziel A7 06000019001906(88) MG Ziel A8 06000019001907(85) \Classic\MG\B MG Ziel B1 06000019001908(82) MG Ziel B2 06000019001909(79) MG Ziel B3 06000019001910(76) 09.08.2010 SIUS AG (c) 2004 24 / 112 Targets\Other\Austria MG Ziel B4 06000019001911(73) MG Ziel B5 06000019001912(70) MG Ziel B6 06000019001913(67) MG Ziel B7 06000019001914(64) MG Ziel B8 06000019001915(61) \Classic\MG\C MG Ziel C1 06000019002000(97) 09.08.2010 SIUS AG (c) 2004 25 / 112 Targets\Other\Austria MG Ziel C2 06000019002001(94) MG Ziel C3 06000019002002(91) MG Ziel C4 06000019002003(88) MG Ziel C5 06000019002004(85) MG Ziel C6 06000019002005(82) MG Ziel C7 06000019002006(79) MG Ziel C8 06000019002007(76) 09.08.2010 SIUS AG (c) 2004 26 / 112 Targets\Other\Hunting Hunting Moose Summary of the moose targets: \Moose\Left Moose 5-5-4-3 Moose target with the scores 5-5-4-3 and 10-8-6-4. 06000019001401(51) Moose Moose target with tenner score. 06000019001404(42) Moose SWE Swedish moose target with 5-5-4-3 score. 06000019001407(33) Moose Calf Swedish Elkcalf target with 5-5-4-3 and Hit-Score 06000019001409(27) \Moose\Right Moose 5-5-4-3 Moose target with the scores 5-5-4-3 and 10-8-6-4. 06000019001402(48) 09.08.2010 SIUS AG (c) 2004 27 / 112 Targets\Other\Hunting Moose Moose target with tenner score. 06000019001405(39) Moose SWE Swedish moose target with 5-5-4-3 score. 06000019001408(30) Moose Calf Swedish Elkcalf target with 5-5-4-3 and Hit-Score 06000019001415(09) \Moose\Double Moose 5-5-4-3 Moose target with the scores 5-5-4-3 and 10-8-6-4. 06000019001400(54) Moose Moose target with tenner score. 06000019001403(45) Moose SWE Swedish moose target with 5-5-4-3 score. 06000019001406(36) Boar Summary of bore targets: 09.08.2010 SIUS AG (c) 2004 28 / 112 Targets\Other\Hunting Wild Boar 5 Running target 50 metre (ISSF-Bore 5; DJV No. 5); ISSF Rules Section 6.3.2.7.1 Diameter 60mm 06000019000110(44) Wild Boar 5 Right Running target 50 metre (ISSF-Bore 5; DJV No. 5); ISSF Rules Section 6.3.2.7.1 Diameter 60mm 06000019000104(62) Wild Boar 2 DJV Number 2; Bore Art. No. S100AA010V1 06000019001514(03) Bear Bear Target Bear Left 06000019001213(33) Bear Right 06000019001214(30) Bear 06000019001215(27) Other Bear Target 09.08.2010 SIUS AG (c) 2004 29 / 112 Targets\Other\Hunting Kronhjort 06000019002500(52) Roebuck left 06000019002501(49) Roebuck right 06000019002502(46) Chamois DJV Number 1; Chamois Art. No. S100AA008V1 06000019000108(50) Fox DJV Number 2; Fox Art. No. S100AA009V1 06000019000106(56) Roe DJV Number 4; Roebuck Art. No. S100AA007V1 06000019000102(68) 09.08.2010 SIUS AG (c) 2004 30 / 112 Targets\Other\Hunting Danish Roebuck 06000019000115(29) Reindeer Reindeer DV-! Norway; Art. No. S100AA012 06000019000114(32) Roe Left Hubertus Reh linkslaufend (Spezialscheibe für Kanton St. Gallen) 06000019000112(38) Chamois Hubertus Hubertus Gams rechtslaufend (Spezialscheibe für Kanton St. Gallen) 06000019000113(35) Precision 25 / 50 metre precision pistol target PP10; ISSF Rules, Section 6.3.2.5, Diameter 500mm; black reflector from ring 7 to ring 10 06000019000303(47) Scandinavia Targets that are used only in Scandinavia are stored in this directory. The exception is animal images (moose and reindeer) which can be found under '\Other\Hunting\Moose'. Military 09.08.2010 SIUS AG (c) 2004 31 / 112 Targets\Other\Scandinavia 2x1/3 figure 06000019001112(45) 1/1+1/3 figure 06000019001113(42) Full Figure 06000019001107(60) 1/8+1/2 figure 06000019001114(39) Half Figure 06000019001108(57) One Third Figure 06000019001109(54) Eighth figure 06000019001110(51) 09.08.2010 SIUS AG (c) 2004 32 / 112 Targets\Other\Scandinavia Precision 06000019001115(36) Full Bore 300y 06000019002300(70) 500y 06000019002301(67) 600y 06000019002302(64) 300m 06000019002303(61) 500m 06000019002304(58) 09.08.2010 SIUS AG (c) 2004 33 / 112 Targets\Other\Full Bore 600m 06000019002305(55) Long Range 06000019002306(52) Norway B B45 06000019002210(49) B65 06000019002211(46) B100 06000019002212(43) Smaen 06000019002213(40) 09.08.2010 SIUS AG (c) 2004 34 / 112 Targets\Other\Norway Minismaen 06000019002214(37) C C15 06000019002100(88) C20 06000019002101(85) C25 06000019002102(82) C30 06000019002103(79) C35 06000019002104(76) 09.08.2010 SIUS AG (c) 2004 35 / 112 Targets\Other\Norway C40 06000019002105(73) C50 06000019002106(70) 1/x 1/3Mini 06000019002200(79) 1/3 06000019002202(73) 1/4Mini 06000019002201(76) 1/4Figur 06000019002207(58) 09.08.2010 SIUS AG (c) 2004 36 / 112 Targets\Other\Norway 1/4 06000019002203(70) 1/6 06000019002204(67) 1/8 06000019002205(64) 1/10 06000019002206(61) Other 13x40 06000019002107(67) 30x10 06000019002108(64) 09.08.2010 SIUS AG (c) 2004 37 / 112 Targets\Other\Norway Stripe 06000019002109(61) Prisme 06000019002110(58) S25 06000019002111(55) Hjul 06000019002112(52) 150Sirkel 06000019002113(49) 55Sirkel 06000019002114(46) 40Tonne 06000019002208(55) 09.08.2010 SIUS AG (c) 2004 38 / 112 Targets\Other\Norway 14Tonne 06000019002209(52) 09.08.2010 SIUS AG (c) 2004 39 / 112 Programs Programs The programs are subdivided according to the usual distance, and according to categories of additional properties (e.g. Federation programs, group championships). The individual programs are designated with the target picture (e.g. A5), the type or fire (T=Test shots, S=Single fire, D=Serial fire) and the number of shots in this type of fire (T2 = 2 test shots, S5 = single fire 5 shots, D3 = serial fire 3 shots, T0 = test free/open, i.e. an open-ended number of test shots can be fired). 10m The directory 10m is the compilation of all programs which typically are shot over a distance of 10 metres. ISSF Air Rifle 40 20000735(55) Air Rifle 60 20000734(58) Air Pistol 40 20000737(49) Air Pistol 60 20000736(52) Running Target 3030 20000760(77) 2020 20000761(74) Mixed 20000762(71) Biathlon 15mm 06000019001302(57) 20mm 06000019001301(60) Pentathlon 09.08.2010 SIUS AG (c) 2004 40 / 112 Programs\10m\Pentathlon Pentathlon 20 20000450(37) Pentathlon 3*10 20000460(07) CE 20000451(34) Sighters 20000452(31) Other Air Rifle 30 20000756(89) Air Rifle 20 20000757(86) Air Rifle 3*10 20000754(95) Air Pistol 20 20000739(43) Zimmerstutzen 30 20000748(16) Rapid Fire Pistol 20000765(62) 25m The directory 25m is the compilation of all programs which typically are shot over a distance of 25 metres. ISSF Rapid Fire Pistol 20000730(70) Sport Pistol 20000733(61) Center Fire Pistol 20000731(67) Standard Pistol 20000732(64) CISM Sport Pistol 20000733(61) 09.08.2010 SIUS AG (c) 2004 41 / 112 Programs\25m\CISM Center Fire Pistol 20000731(67) Military Rapid Fire Men 20000750(10) Military Rapid Fire Women 20000753(01) Sui OP 20000830(61) FS 20000831(58) Other SP15 20000751(07) 50m The directory 50m is the compilation of all programs which typically are shot over a distance of 50 metres. ISSF Rifle 60 20000725(85) Standard Rifle 3*20 20000726(82) Free Rifle 3*40 20000724(88) Pistol 60 20000727(79) CISM Rifle 60 20000725(85) Standard Rifle 3*20 20000726(82) Biathlon 09.08.2010 SIUS AG (c) 2004 42 / 112 Programs\50m\Biathlon 35mm 06000019001306(45) 45mm 06000019001305(48) 85mm 06000019001304(51) 110 06000019001303(54) Running Target ISSF 3030 20000770(47) 2020 20000771(44) Mixed 20000772(41) DJV Wild Boar 5 20000775(32) SWE 09.08.2010 SIUS AG (c) 2004 43 / 112 Programs\50m\Running Target Running Roebuck 20000851(95) Running Moose 20000852(92) Sui OP 20000832(55) FS 20000833(52) Morgarten 20000361(13) PB5 D4D6 20000072(07) Other Rifle 3*10 20000755(92) Rifle 30 20000758(83) 300m The directory 300m is the compilation of all programs which typically are shot over a distance of 300 metres. ISSF Free Rifle 3*40 20000721(97) Free Rifle 60 20000722(94) Standard Rifle 3*20 20000723(91) Rifle 2x30 20000717(12) CISM Standard Rifle 3*20 20000723(91) 09.08.2010 SIUS AG (c) 2004 44 / 112 Programs\300m\CISM Rapid Fire 3x20 Military Rapid Fire 3*20 20000816(06) Switzerland OP Complete 20000840(31) OP A5 Sighters 20000839(34) OP Part 1 A5 S5 20000838(37) OP B4 Sighters 20000836(43) OP Part 2 B4 S5 D2 D3 D5 20000837(40) Group championship A5P Unlimited test shots feature on the A5 window 20000398(96) A10P Unlimited test shots feature on the A10 window 20000397(02) Field A GM Field A 20000084(68) Field B GM Field B 20000014(84) Field D GM Field D 20000083(71) A \A\A5 \A\A5\Shot by Shot S0 20011011(73) S4 20000019(69) 09.08.2010 SIUS AG (c) 2004 45 / 112 Programs\300m\Switzerland S5 20000012(90) S6 20000013(87) S8 20000020(66) S10 20000015(81) \A\A5\Deferred D0 20000010(96) D5 20000023(57) D6 20000024(54) D3D3 20000025(51) D4D4 20000026(48) D5D5 20000016(78) \A\A5\Deferred\Include sighters P2 D2 D3 D5 20000344(64) P1 D2 D3 D4 D5 20000346(58) P2 D2 D2 D3 D3 20000348(52) \A\A5\Combined S4D4 20000006(11) S5D3 20000021(63) 09.08.2010 SIUS AG (c) 2004 46 / 112 Programs\300m\Switzerland S2 D3 D5 20000009(02) S4 D3 D3 20000022(60) S5 D3 D4 20000007(08) S6 D3 D3 20000676(38) S2 D2 D3 D5 20000008(05) \A\A5\Combined\Include sighters S6D4 20000002(23) P2 S1 D3 D6 20000027(45) P2 S2 D3 D3 20000668(62) P2 S2 D3 D5 20000003(20) P2 S5 D3 D4 20000667(65) P3 S6 D3 D3 20000001(26) P2 D2 D2 D3 D3 20000005(14) P1 S2 S3 S4 S5 20000004(17) \A\A10 \A\A10\Shot by Shot S0 20000031(33) S5 20000033(27) 09.08.2010 SIUS AG (c) 2004 47 / 112 Programs\300m\Switzerland S6 20000034(24) S8 20000035(21) \A\A10\Shot by Shot\Include sighters Opening shooting 20000763(68) P2S6 20000666(68) S10 20000029(39) S6S4 20000038(12) \A\A10\Deferred D0 20000030(36) D5 20000043(94) D6 20000044(91) D3D3 20000045(88) \A\A10\Deferred\Include sighters P2D1 20000694(81) P2 D2 D3 D5 20000040(06) P2 4*D5 20000028(42) \A\A10\Combined S3D3 20000041(03) S4D4 20000042(97) 09.08.2010 SIUS AG (c) 2004 48 / 112 Programs\300m\Switzerland S5D3 20000046(85) S6D4 20000032(30) S2 D3 D5 20000039(09) S2 D3 D5 20000357(25) S4 D3 D3 20000210(78) S3 S4 D4 D4 20000677(35) \A\A10\Combined\Include sighters S4D4 20000047(82) S5D3 20000037(15) S6D6 20000048(79) P2 S5 D2 D3 20000356(28) P2 4*D5 20000695(78) Prone 4*S10 20000589(08) Standing 4*S10 20000579(38) Kneeling 4*S10 20000569(68) \A\A100 P0 20000396(05) \A\A100\Shot by Shot 09.08.2010 SIUS AG (c) 2004 49 / 112 Programs\300m\Switzerland S0 20000051(70) S2 Nachdoppel 20000052(67) S3 20000053(64) S4 20000054(61) S5 20000055(58) S6 20000056(55) S10 20000057(52) P1S4 20000665(71) D0 20000050(73) D4D4 20000049(76) P2 S5 D2 D3 20000058(49) B \B\B4 P0 20000395(08) \B\B4\Shot by Shot S0 20000061(40) S6 20000062(37) \B\B4\Deferred D0 20000060(43) 09.08.2010 SIUS AG (c) 2004 50 / 112 Programs\300m\Switzerland D5 20000064(31) D6 20000063(34) D3D3 20000065(28) D4D4 20000066(25) P2 D4 D6 KOM 20000349(49) \B\B4\Combined S3 D3 D3 20000067(22) S3 D3 D6 20000379(56) S3 D3 D3 D3 20000069(16) S4D4 20000345(61) S6 D3 D3 D6 KOM 20000359(19) \B\B4\Combined\Include sighters P2 S1 S3 S6 20000068(19) P2 S2 D3 D5 20000669(59) S4D4 20000070(13) P2 S6 D6 D6 20000075(95) \B\B10 P0 20000968(35) 09.08.2010 SIUS AG (c) 2004 51 / 112 Programs\300m\Switzerland S0 20000076(92) D0 20000077(89) S2 D3 D5 20000376(65) S2D2 20000078(86) D3D5 20000079(83) \B\B100 P0 20000967(38) S0 20000081(77) D0 20000080(80) S10 20000082(74) \B\PB5 P0 20000394(11) S0 20000071(10) D0 20000073(04) D4D6 20000072(07) Other FS 20000059(46) Knabenschiessen The youth shooting practice is solely for the Zurich Youth Shoot. Therefore it has a special score (A6) 20000399(93) and a special printout. In youth shooting 5 shots are fired at an A5 target. The innermost ring (5-er ring) is valued with 6 points. The outermost ring counts for 2 09.08.2010 SIUS AG (c) 2004 52 / 112 Programs\300m\Switzerland points instead of 1 point. Each hit outside the outermost ring that nonetheless hits the target counts for 1 point. Moreover at the end each target hit is further awarded 1 point and this sum is included in the total result. The maximum is therefore 5 x 6 points + 5 hits = 35 points. Morgarten 20000362(10) Pfäffiker winter practice Hit score for single firer: every 10 shots in 10-er score; for group score 2. Pass (E4) in 100-er score. 20000377(62) Ustertag-Scheibe 20000738(46) Vögelinsegg 20000363(07) Hans Waldmann Schiessen 20000776(29) F5 D0 20000976(11) S0 20000986(78) Scandinavia Swedish program Double P0 S5 S5 S5 S5 20000718(09) 10 P0 S5 S5 20000719(06) 25 P0 S5 S5 S5 S5 S5 20000720(03) Swedish championship First relay P0 S5 S5 S5 20000705(48) Middle relay P0 S5 S5 20000706(45) Final P0 S5 S5 20000707(42) 09.08.2010 SIUS AG (c) 2004 53 / 112 Programs\300m\Scandinavia Reserved P0 S5 S5 S5 S5 20000708(39) Final reserved P0 S5 S5 S5 20000709(36) Other Rifle 3*10 20000728(76) Other All targets that do not clearly fall under one of the preceding distances are included in the category 'Other'. Full Bore 3yDL 20000860(68) 5yDL 20000861(65) 6yDL 20000862(62) LRDL 20000863(59) Austria Pistol \Pistol\1 1 Pistol A 5m 20000500(81) Pistol A 10m 20000501(78) \Pistol\2 2 Pistol B 5m 20000502(75) Pistol B 10m 20000503(72) \Pistol\3 3 09.08.2010 SIUS AG (c) 2004 54 / 112 Programs\Other\Austria Pistol D 5m 20000504(69) Pistol D 10m 20000505(66) \Pistol\4 4 Pistol D 5m 20000504(69) Pistol D 10m 20000505(66) 5 5 20000504(69) 6 6 20000504(69) 7 7 20000506(63) 8 8 20000508(57) 9 9 20000508(57) 10 10 20000507(60) 11 11 20000509(54) 12 12 20000510(51) Rifle \Rifle\5 5 Rifle A 10m vertical 20000511(48) Rifle A 20m vertical 20000512(45) \Rifle\6 6 09.08.2010 SIUS AG (c) 2004 55 / 112 Programs\Other\Austria Rifle B 10m horizontal 20000513(42) Rifle B 20m horizontal 20000514(39) \Rifle\7 7 Rifle B 10m ellipse 20000515(36) Rifle B 20m ellipse 20000516(33) \Rifle\8 8 Rifle B 10m ellipse 20000515(36) Rifle B 20m ellipse 20000516(33) 9 9 20000515(36) 10 10 20000515(36) 11 11 20000515(36) 12 12 20000519(24) 13 13 20000519(24) \Rifle\14 14 Rifle C 15m 20000517(30) Rifle C 30m 20000518(27) 15 15 20000520(21) 16 16 20000521(18) 09.08.2010 SIUS AG (c) 2004 56 / 112 Programs\Other\Scandinavia Scandinavia Targets that are used only in Scandinavia are stored in this directory. The exception is animal images (moose and reindeer) which can be found under '\Other\Hunting\Moose'. Military 2x1/3 figure 20000740(40) 1/1+1/3 figure 20000741(37) Full Figure 20000742(34) 1/8+1/2 figure 20000743(31) Half Figure 20000744(28) One Third Figure 20000745(25) Eighth figure 20000746(22) Precision 20000747(19) Hunting Moose 20000850(01) Moose LR Running 20000853(89) 09.08.2010 SIUS AG (c) 2004 57 / 112 Control Control The control menu contains all the functions that are necessary during a running program. The menu pops up automatically into this view after a program is selected. Zoom Most target pictures can be represented in three different sizes (zoom levels). The zoom command switches to the next size. When the smallest size has been reached, then the next zoom command brings up the largest size again. 099052(52) Match In the course of a match, by means of the Match button (RC92) the major commands for controlling the match can be carried out by the firer. Thus the setting can be changed from the test group to the first single group. So long as the single group has not yet shot, triggering this command again can enable a return to the test group. In user practices and in free series this command does not appear in the menu. In this case (if the RC92 is pressed or if the corresponding barcode is input) a group total is triggered. 990636(75) Sighters In free series the fire type can be restarted at any time with the commands Test, Single and Series. 99063400(49) Shot by Shot In free series the fire type can be restarted at any time with the commands Test, Single and Series. If the fire type is already set to single, with this command the single group can be totalised and immediately a new group can be started. In this way for example every 10 shots a group total of an ISSF shoot can be simulated. 99063401(46) Subtotal Closes off the current open group and prints out a group total. The function is available only when an open group (P-, S- or D-) is shot. A group where the number of shots is prescribed cannot be skipped. If shooting takes place without a shot logoff, then shots which have totally missed the target must be reported to the system with the command '\Other\Insert zero shot'. 990530(05) Total In a free series the group total corresponds to the intermediate total or to a position total. The current group is added up. This corresponds to a subtotal. In addition all the groups since the last group total are counted together and removed. Thereafter the group can be continued. 990531(02) TOTAL In a free series the match total stops the current program (program total). It triggers a subtotal and a group total. In addition all shot values (except test shots) are added together and shown as the 'large' total. Other programs than the free series (match, user practice and fixed programs) cannot be stopped prematurely. They can only be broken off 09.08.2010 SIUS AG (c) 2004 990532(96) 58 / 112 Control\TOTAL and filled with manual nulls. An abort can be brought about by the command '\Other\Abort' or by loading another program. In the event of an abort the shot values are also added together and displayed. Deferred In free series the fire type can be restarted at any time with the commands Test, Single and Series. If the fire type is already set to Series, with this command the series group can be shown and totalised. Subsequently a new series group is automatically started. 99063402(43) Show In a group with serial shots all shots fired up to the present moment are displayed in advance. 099054(46) Correspondingly at the end of the group, only those shots which have not yet been displayed are shown. In groups with the fire type Test or Single Shot the barcode has no effect. Score In free series the command Value can change the secondary score to the primary score. This is useful 990643(54) if first a qualifier and then a final are shot. At most official shoots the finals are scored in tenths, but the qualifiers are scored in whole tens. If the command is carried out a second time, then the original score is switched on again. With the commands '\Other\Next Primary Score' and '\Other\Next Secondary Score' the primary and secondary scores can be controlled. Print screen The current screen content is printed on the graphic printer (Only D931/CBM210). It is not possible to print out on the dot matrix printer D93. 099050(58) Repeat Restarts a closed off practice with the same settings (firer number, firer name, weapon and position). This 91(18) command can be blocked with the setting '\Other\Start\Permit Repeat\(Off)'. SC-Programs Practice In programs that show a match structure, under 'Group' it is possible to select which setting you want to begin with. In this way for example only the final of a match can be shot. During the match in progress, under 'Group' the setting 'Test' can be selected. This test corresponds to the regulated exceptional test which can be permitted after weapon malfunction. If the setting 'Test' is selected, then under 'Group' only the position that was shot most recently appears. Choosing this position enables you to return to the official match. Malfunction In the 25m pistol disciplines, various rules are defined which lay down the procedures for weapon failures. According to the discipline and the type of weapon failure (allowable / non allowable) the fired shots must be completed and evaluated. Individual commands enable the system to correctly calculate the end result and to correctly show the individual shots on the screen as well as on the scoreboard. Fill Series The active group is stocked with zeros. This also happens when the group have not yet shot. 09.08.2010 SIUS AG (c) 2004 99063700(22) 59 / 112 Control\Malfunction\Insert zero shot Insert zero shot Inserts a shot with the value 0 into the current program. This function is needed if shooting took place without the use of the shot sensor and the target was missed. The system itself cannot recognise the shot in this situation. 099058(34) Allowable A permitted weapon malfunction (decision of the referee) permits the firer to complete the group according to the discipline (sport pistol, central fire pistol in rapid fire section) or to repeat it (standard pistol, rapid fire). The execution of this command produces at least one log entry. 99063701(19) Non-Allowable Non allowable weapon failures normally result in the open group being completed with zero and no repeat 99063702(16) being available to the firer. Additionally a log entry is produced. Compute series 'Calculate series' completes the handling of weapon malfunctions. Even when several repetitions have had to be shot, on this command the shots are correctly selected and counted according to the rules of the ISSF. 99063703(13) Other Frequently used operating elements can be found directly under the Control menu\Other. Abort Produces in addition to the match total an abort (log entry) in order to mark the current group as invalid. 50(44) Insert zero shot Inserts a shot with the value 0 into the current program. This function is needed if shooting took place without the use of the shot sensor and the target was missed. The system itself cannot recognise the shot in this situation. 099058(34) Clear target window Clears the shots from the target window without removing them from the score. (see also the setting 'Clear target window after shots') 099062(22) Clear List Clears all entries from the list window, without removing the fired shots from the score. 990630(93) Convert last sighting shot 09906901(97) Convert both sighters 09906902(94) Timer This commands are used to control the embedded Timer. 09.08.2010 SIUS AG (c) 2004 60 / 112 Control\Other\Timer Set Timer Sets the Timer to the entered value and displays it in the titlebar 990650(33) Start Timer starts the timer 990651(30) Reset Timer Resets the timer to the value set by the Set Timer command 990652(27) Remove Timer Disables the Timer and removes it from the Display 990653(24) Fix timer values Here is a collection of fix timer values to configure the timer via Barcode 30s 30s 9906600030(34) 40s 40s 9906600040(04) 50s 50s 9906600050(71) 60s 60s 9906600060(41) 90s 90s 9906600090(48) 300s 5 min 9906600300(97) 1h 1h 9906603600(91) Next Primary Score Every target image has a number of score methods installed, which can be used to evaluate the target. With the command '\Other\Next Primary Score' these different score methods can be scrolled through. These amendments can only be made for free series. It should also be observed that different score methods are not strongly compatible one with another. It is therefore not advisable to change the score method while a program is running. 9906421999(45) Next Secondary Score Just as for the primary score, so too can the score method for the secondary score be changed. 9906422999(52) Edit Barcode 990646(45) 09.08.2010 SIUS AG (c) 2004 61 / 112 System System Settings and commands that in normal shooting operation must rarely be changed or used. Some of the functions available are also reserved for specific user groups (administrator and Sius staff). Reports With many reports information about past programs can be printed out. Reload The last ten groups can subsequently be loaded once more and considered with the discussion mode. However in a subsequently loaded group no further amendments can be carried out. The shot picture can in this way once again also be created from completed programs and displayed. 1 Load the last program that was shot in order that it can be discussed. 99063800(13) 2 Load the program before last in order that it can be discussed. 99063801(10) 3 Load the third from last program in order that it can be discussed. 99063802(07) 4 Load the fourth from last program in order that it can be discussed. 99063803(04) 5 Load the fifth from last program in order that it can be discussed. 99063804(01) 6 Load the sixth from last program in order that it can be discussed. 99063805(95) 7 Load the seventh from last program in order that it can be discussed. 99063806(92) 8 Load the eighth from last program in order that it can be discussed. 99063807(89) 9 Load the ninth from last program in order that it can be discussed. 99063808(86) 10 Load the tenth from last program in order that it can be discussed. 99063809(83) Reprint In the event of a paper jam or other printer problem it can happen that a score sheet does not print out as desired. Finished groups can therefore be repeatedly printed out. 1 Print out the last program again. 09905520(69) 09.08.2010 SIUS AG (c) 2004 62 / 112 System\Reports\Reprint 2 Print out the program before last again. 09905521(66) 3 Print out the third from last program again. 09905522(63) 4 Print out the fourth from last program again. 09905523(60) 5 Print out the fifth from last program again. 09905524(57) 6 Print out the sixth from last program again. 09905525(54) 7 Print out the seventh from last program again. 09905526(51) 8 Print out the eighth from last program again. 09905527(48) 9 Print out the ninth from last program again. 09905528(45) All Reprint all programs remaining in the log. 09905529(42) Shot Counter Mechanical shot counters: The optional mechanical shot counter only counts the shots on your own target. It cannot be reset. Demo shots or inserted no scores are not counted. A detailed description of the whole function can be found in the user manual under 'Mechanical shot counters'. Software shot counters: The software shot counter counts shots in different categories. Own shots, cross shots, missed shots, demo shots etc. are differentiated and displayed separately. The shot count report is displayed in the list window and provided a printer is connected and switched on, is printed out. The shot counters are connected to the control units. If the settings are reset to factory settings, the shot counts are also reset to zero. The same occurs when the battery has to be changed. With a normal interruption to the power supply, the values are not lost. The software shot counters can also be reset independently of the settings under '\Maintenance\Reports\Shot Counters'. Report Shot Counter The current shot numbers are displayed on the screen and on the printer. 09903608(82) Invalid shots Non-allowable shots (shots during the Stop, Pause or the Show Phase and cross shots) are not only counted, they are kept in the control unit as pending and can be queried at any time. The shots are then shown with the time and if possible with the score. With a warm start or with the command 'Erase' under '\Maintenance\Invalid Shots' the report can be rejected. The shots remain in the log throughout and furthermore can be documented in a log printout. Show The report on invalid shots is displayed in the list window. 990562(06) Print The report on invalid shots is printed out on the connected printer. If the printer is not turned on, the report is rejected. 09.08.2010 SIUS AG (c) 2004 990564(97) 63 / 112 System\Reports\Invalid shots Log Events that are of relevance for the duration of a program are filed in the memory (events memory, log). This information is needed to be able to reproduce a program after a power interruption. The CU931 investigates this data at every system start-up. If it is established that the last program to be shot was not correctly ended, then a repetition process is introduced. By means of the log past programs can also be reloaded or a copy can be printed once again. The log is stored in the volatile memory of the control unit, which is buffered with a battery. The data is protected from misinterpretation by a check sum. If the check sum is not correct at system start-up, for example due to a faulty battery, the log is initialised again. The control unit communicates this by a triple beep and a report in the list window. The log is restricted in memory size. In the event of an overload, the oldest events are overwritten by the most recent on a rolling basis. Typically more than ten programs can be stored in the log. The log can also be manually erased under '\Maintenance\Reports\Log'. The format of the printout is described in the user manual. All All events are printed out in chronological order. The oldest events first, and the most recent events at the 09905500(32) end. The printout can be broken off at any time by switching off the printer. 10 The ten most recent events are printed out in chronological order. 09905501(29) 20 The twenty most recent events are printed out in chronological order. 09905502(26) 50 The fifty most recent events are printed out in chronological order. 09905505(17) Inverse All events are printed out in reverse chronological order, the most recent events first, and the oldest events at the end. The printout can be broken off at any time by switching off the printer. 09905509(05) Settings The performance of the control unit can be adapted to the user's own needs by means of very many different settings. Programs can behave differently according to the properties selected. On the other hand, it is possible for fixed programs to overwrite particular properties. So for example shots are printed out differently in ISSF programs to other programs. It is also possible for programs to select a setting simply as a basic setting, which subsequently (after the program has been switched on) can be changed again by the user. The printout of shots in ISSF disciplines can subsequently be changed again under 'Presentation\Shot\Standard\Print format'. Presentation All the settings that affect the images of objects in the wider sense are stored under 'Presentation'. This applies not only to representation on the screen, but also to forms of representation on the printer and other display equipment. Shot The directory '\Presentation\Shot' contains settings which alter the appearance of the shots. This affects not only the shot symbol but also the image in the shot window, in the list window and on the printer. \Shot\Last Shot In the directory '\Last shot' the settings which influence the depiction of the last represented shot are stored. \Shot\Last Shot\Symbol The symbol of a shot can be varied according to appearance, size and background. \Shot\Last Shot\Symbol\Form The form of the symbol can be preset individually for the last shot and jointly for all other shots. 09.08.2010 SIUS AG (c) 2004 64 / 112 System\Settings\Presentation Cross The shot is displayed with a cross. 09907110(52) Number The shot is displayed with its shot number. 09907111(49) None The shot is not displayed. 09907112(46) X The shot is displayed with an X. 09907113(43) Dot The shot is displayed with a dot. 09907114(40) Thin Cross The shot is displayed with a thin cross. 09907115(37) Circle The shot is displayed with a cross. 99071106(17) Calibre (Default) The shot is represented in its true dimensions as a circle, as long as it is no smaller than 5 Pixel. When the dimensions are too small, the image changes automatically to a 'cross'. 99071107(14) \Shot\Last Shot\Symbol\Size The image size of the shot can be altered. The size is given in screen dots (Pixels). In the calibre form this setting has no effect. 14 Dots 99073300(31) 16 Dots 99073301(28) 18 Dots 99073302(25) 20 Dots 99073303(22) 22 (Default) Dots 99073304(19) 24 Dots 99073305(16) 26 Dots 99073306(13) 28 Dots 99073307(10) 09.08.2010 SIUS AG (c) 2004 65 / 112 System\Settings\Presentation 30 Dots 99073308(07) 32 Dots 99073309(04) \Shot\Last Shot\Symbol\Inverse All symbols are primarily conceived as a white symbol on a dark background. Most targets are black in the centre. The graphics can be inverted. The symbol will then be depicted as a black symbol on a white background. Off (Default) The shot is represented normally. 09907140(59) On The shot is represented in inverse colours. 09907141(56) \Shot\Last Shot\Last Shot Window In the shot window alongside the shot value, the shot number and a secondary score are indicated. In order to make the representation still clearer, it can be worthwhile to omit the secondary score or the shot number. It is also possible to switch the shot window off altogether. \Shot\Last Shot\Last Shot Window\Screen In the shot window alongside the shot value, the shot number and a secondary score are indicated. In order to make the representation still clearer, it can be worthwhile to omit the secondary score or the shot number. It is also possible to switch the shot window off altogether. Off The display field for the last shot is faded out. 09907050(38) Primary In the shot window only the primary score is shown. 09907051(35) SNr Prim In the shot window the shot number and the primary score are shown. 09907052(32) SNr Prim Sec (Default) In the shot window the shot number, primary and secondary score (100-er score, ISSF tenner ring score) are displayed. 09907053(29) Timer 09907054(26) \Shot\Last Shot\Last Shot Window\Deferred Shots On (Default) On 99080701(41) Off Off 99080700(44) \Shot\Last Shot\Display Inner ten Most target pictures have a small ring defined which besides the normal score is valued as a particularly good hit. A hit in this ring (the inner ten, Mouche) can be displayed on the control unit by an animated picture on the target window. 09.08.2010 SIUS AG (c) 2004 66 / 112 System\Settings\Presentation Off An inner ten (Mouche) hit is displayed as normal. 99074100(56) On (Default) In the event of a hit on the inner ten (Mouche) the control unit shows concentric circles of different 99074101(53) sizes one after another several times in the centre of the target. \Shot\Standard In the directory '\Standard' all the settings which affect the depiction of all shots except the last shot are stored. \Shot\Standard\Symbol The symbol of a shot can be varied according to appearance, size and background. \Shot\Standard\Symbol\Form The form of the symbol can be preset individually for the last shot and jointly for all other shots. Cross The shot is displayed with a cross. 09907030(01) Number The shot is displayed with its shot number. 09907031(95) None The shot is not displayed. 09907032(92) X The shot is displayed with an X. 09907033(89) Dot The shot is displayed with a dot. 09907034(86) Thin Cross The shot is displayed with a thin cross. 09907035(83) Circle The shot is displayed with a cross. 99070306(89) Calibre (Default) The shot is represented in its true dimensions as a circle, as long as it is no smaller than 5 Pixel. When the dimensions are too small, the image changes automatically to a 'cross'. 99070307(86) \Shot\Standard\Symbol\Size The image size of the shot can be altered. The size is given in screen dots (Pixels). In the calibre form this setting has no effect. 14 Dots 09907040(68) 16 Dots 09907041(65) 09.08.2010 SIUS AG (c) 2004 67 / 112 System\Settings\Presentation 18 (Default) Dots 09907042(62) 20 Dots 09907043(59) 22 Dots 09907044(56) 24 Dots 09907045(53) 26 Dots 09907046(50) 28 Dots 09907047(47) 30 Dots 09907048(44) 32 Dots 09907049(41) \Shot\Standard\Symbol\Inverse All symbols are primarily conceived as a white symbol on a dark background. Most targets are black in the centre. The graphics can be inverted. The symbol will then be depicted as a black symbol on a white background. Off The shot is represented normally. 09907320(04) On (Default) In the event of a hit on the inner ten (Mouche) the control unit shows concentric circles of different 09907321(01) sizes one after another several times in the centre of the target. \Shot\Standard\Print-format The print format dictates the image of a shot on the printout. Print formats are often prescribed directly by programs. So the printout at an international contest is laid out differently to that of a compulsory confederation practice in Switzerland. \Shot\Standard\Print-format\Use Always On 99073199(43) Off (Default) 99073198(46) Default (Default) The printer prints the shot with shot number, direction arrow, primary and secondary score. 09.08.2010 SIUS AG (c) 2004 99073100(49) 68 / 112 System\Settings\Presentation Xy On the printer the primary and secondary score and the XY coordinates are printed out. 99073101(46) t x/y As well as the primary score, the time of the shot and its coordinates are displayed. 99073109(22) Time In the 'Time' format the time difference from the first shot of the group is always depicted. 99073108(25) Debug The debug format is only intended for test purposes. It supplies all the values which have been measured 99073102(43) by the LON electronic measuring system. As well as register values the recorded temperature and other information is listed. \Shot\Standard\Screen-format Default (Default) The shot is displayed with shot number, direction arrow, primary and secondary score in the list window. 99070800(62) Xy In the list window the primary and secondary scores and the XY coordinates are displayed. 99070801(59) t x/y As well as the primary score, the time of the shot and its coordinates are displayed. 99070809(35) Time Display format 'Time' the time gap to the first shot of the current group will also be displayed. 99070808(38) Debug The debug format is only intended for test purposes. It supplies all the values which have been measured 99070802(56) by the LON electronic measuring system. As well as register values the recorded temperature amongst others is listed. \Shot\Standard\Secondary Score The secondary score can be always switched off. Off The secondary score is switched off. 09907120(22) On (Default) The secondary score is switched on. 09907121(19) \Shot\Standard\Clear target after shots In test and single groups the setting 'Clear target window after shots' enables the target window to be regularly cleared and so to remain clear. Thereby the shots are counted comprehensively by group. But this is only in test and single groups. In series groups all shots are shown one after another without shots being cleared in between. Consequently with the setting 10 in the following program: 'T2 S4 S4 S4' the target window is cleared after 2 shots 09.08.2010 SIUS AG (c) 2004 69 / 112 System\Settings\Presentation (because the test group has come to an end and the shoot will continue with a single group). Additionally the same action is carried out in the last 'S4' group after the second shot (because 10 shots have been used in the single groups). 0 Clears the target window after twenty shots. 99078600(39) 5 Clears the target window after five shots. 99078605(24) 10 (Default) Clears the target window after ten shots. 99078610(09) 20 Clears the target window after twenty shots. 99078620(76) \Shot\Cross Shot In the directory '\Cross shots' the settings which influence the depiction of cross shots (shots from another lane onto one's own target) are stored. \Shot\Cross Shot\Show Cross shots are indicated with a symbol in the right bottom corner of the target window. The symbol remains active for seven minutes. If the last cross shot is more than seven minutes old, then the symbol is extinguished again. Additionally in the list window an entry can be generated which draws attention to the cross shot. Off (Default) The showing of cross shots is suppressed in the list window. The first cross shot is displayed with a symbol in the target window in the bottom right corner. 09907060(08) On Cross shots are displayed in the list window with the entry 'cross shot'. 09907061(05) \Shot\Cross Shot\Print As well as being shown in the target window, cross shots can also be printed. Off (Default) Cross shots are not displayed on the printer. In particular if printing is done onto pre-printed sheets (federal programs, field shooting) cross shots may not influence the formatting. 09907170(66) On A cross shot is output on the printer. 09907171(63) \Shot\Illegal Shot In the directory '\Invalid shots' all the settings which affect the depiction of shots outside the permitted time, during the stop, pause or show phase, are stored. \Shot\Illegal Shot\Show Invalid shots can be displayed in the list window. Off The showing of non-allowable shots is suppressed in the list window. 99073400(22) On (Default) Invalid shots are indicated in the list window with 'Invalid Shot'. 09.08.2010 SIUS AG (c) 2004 99073401(19) 70 / 112 System\Settings\Presentation \Shot\Illegal Shot\Print Invalid shots can be printed. Off Invalid shots are not printed. 99073500(13) On (Default) An non-allowable shot is printed out on the score sheet as 'non-allowable shot'. 99073501(10) \Shot\Best shot In serial groups the best shot (low shot) at the end can be shown once more and printed out in round brackets together with the shot number. Off The display of the best low shot is suppressed. 99079700(37) On (Default) The best low shot is displayed in series groups. 99079701(34) Printing In the directory '\Presentation\Printing' all the settings which control the printer can be changed. \Printing\Column Configuration For the matrix printer D93 printer paper which is perforated in the centre is available. With the column configuration the program can be set up to print out in two columns at once. The perforated paper can subsequently be separated down the middle. It should however be observed that certain shot print formats (e.g. with ISSF disciplines) cannot be placed on half of the paper. The information is cut off after 19 characters. This can lead to loss of information on the printout. \Printing\Column Configuration\Use Always On 99071399(11) Off (Default) 99071398(14) Left The program is printed out aligned left. The full width of the paper is available. 09907130(89) Right The program is printed out on the right half of the paper. Only half the width of the paper is available. 09907131(86) Double (Default) The program is printed out twice in parallel. Only half the width of the paper is available in each case. 09907132(83) \Printing\Print Protocol The printing out of shots on the printer during a program can always be switched on and off with 'Print records'. Off The records are not printed. 99076300(52) 09.08.2010 SIUS AG (c) 2004 71 / 112 System\Settings\Presentation On (Default) The records are printed. 99076301(49) \Printing\Secondary Score Although the secondary score is shown, the printout of the secondary score can be suppressed. Off (Default) The secondary score is not printed. 09907250(20) On The secondary score is printed. 09907251(17) \Printing\Sighters Test shots are usually printed out just like all other shots. However, in order that pre-printed score sheets are not overwritten with test shots, it is possible to block the printing out of test shots. Off Test shots are displayed only on the screen. 09907160(96) On (Default) Test shots are displayed on the printer. The exception to this is shooting programs consisting of only one test group. These shots are never printed. This was done so that pre-prepared score sheets could be sued correctly. 09907161(93) \Printing\Subtotal The shots of every group are counted together and the result is displayed in the list window and on the printer. It is possible to suppress these totals on the printout. Off Subtotals or group totals are not printed. 09907210(43) On (Default) Subtotals or group totals are printed. 09907211(40) \Printing\Print Overtime Off 99080600(53) On (Default) 99080601(50) \Printing\Number of line feeds After a program the printer should advance the paper so far that with continuous paper it can be torn off correctly on the cutting edge of the printer. With pre-printed score sheets it can happen that this paper feed must be altered. With '\Number of Empty Lines' it is possible to specify how many empty lines (paper feed) should be printed after a program. 0 Empty lines 99074000(65) 1 Empty lines 99074001(62) 09.08.2010 SIUS AG (c) 2004 72 / 112 System\Settings\Presentation 2 Empty lines 99074002(59) 3 Empty lines 99074003(56) 4 Empty lines 99074004(53) 5 Empty lines 99074005(50) 6 Empty lines 99074006(47) 7 Empty lines 99074007(44) 8 Empty lines 99074008(41) 9 Empty lines 99074009(38) 10 Empty lines 99074010(35) 11 (Default) Empty lines 99074011(32) 12 Empty lines 99074012(29) 13 Empty lines 99074013(26) 14 Empty lines 99074014(23) Number of line feeds After a program the printer should advance the paper so far that with continuous paper it can be 990645(48) torn off correctly on the cutting edge of the printer. With pre-printed score sheets it can happen that this paper feed must be altered. With '\Number of Empty Lines' it is possible to specify how many empty lines (paper feed) should be printed after a program. Shoot With the settings '\Presentation\ Program' or '\Presentation\ Group' the form of depiction of expressions and readouts in the list window can be changed. But many programs have their own fixed format. These settings should only be changed in consultation with Sius AG. \Shoot\Print 09.08.2010 SIUS AG (c) 2004 73 / 112 System\Settings\Presentation \Shoot\Print\Header Empty 99075100(63) Name (Default) 99075105(48) Short 99075101(60) Line feed 99075102(57) \Shoot\Programed Timers This settings determines if the programmed Timers for ISSF-Disziplines should be used or not. Off (Default) Disables the programmed Timers fo ISSF-Disziplines 99080800(35) On Activates the programmed Timers for ISSFDisziplines 99080801(32) Practice With the settings '\Presentation\ Program' or '\Presentation\ Group' the form of depiction of expressions and readouts in the list window can be changed. But many programs have their own fixed format. These settings should only be changed in consultation with Sius AG. \Practice\Print \Practice\Print\Footer Total (Default) 99075407(15) Total with SeqNr 99075412(97) Group The directory '\Presentation\Group' contains settings which influence the behaviour of individual groups. \Group\Reset Shot Number If this option is selected, the shots within this group are always numbered beginning with a 1. Otherwise the shots within the whole practice are continuously numbered. Test shots are excluded from this. Off (Default) The shot numbers are continuously numbered in a program. 99073700(92) On The numbering of the shots begins again with '1' with every group. 99073701(89) \Group\Subtotal The group totals in a program can be displayed in the program progress window. For completed groups the fire type and the number of shots (e.g. E2 S4) are replaced by the respective subtotals. 09.08.2010 SIUS AG (c) 2004 74 / 112 System\Settings\Presentation Off (Default) The end of program window shows the types of fire and the active group. 99073600(04) On In the program progress window the fire type of the concluded groups is replaced by the subtotal of the current group. 99073601(01) Other In the directory '\Presentation\Other' can be found the settings which cannot be assigned to another group. \Other\Control unit Settings affecting the basic layout of the image are stored under '\Screen'. \Other\Control unit\Layout The image on the control unit can be adjusted to meet individual needs as far as possible. Classic (Default) The classic representation best meets the most frequent needs of firers. 99073900(74) Stop at Left If the screen is mounted on the right hand side of the firer, it can be useful for the status notification to be visible by means of a small movement of the head. For this reason the status window in the layout 'Stop Left' was moved. In the layout 'Stop Left' the status window was omitted for reasons of space. Parameters that are represented in the status window are no longer displayed in the list window. 99073901(71) Final If the screen of the control unit is to be made visible also for the spectators, the target image can be made as large as possible with the 'Final' layout. In the 'Final' layout the status window, the practice progress window and the selection window are not shown. 99073902(68) \Other\Control unit\Function Keys The window with the menu keys is displayed on the LCD of the control unit and at the lower edge of the screen. In portable devices (handheld) the function key window should not be switched off because this device has no LCD. Off The bar with the function keys is concealed. Details of the keypad mode are only available on the LCD of 99074400(29) the control unit. On (Default) The bar with the function keys is also overlayed on the screen. 99074401(26) \Other\Control unit\Status flashing In order that the firer's attention can better be drawn to the screen, the most important status information (stop, offline) flashes in the status window. This effect, which can also be distracting, can be turned off with this setting. Off (Default) The status window will indicate no status by flashing. 99078800(21) 09.08.2010 SIUS AG (c) 2004 75 / 112 System\Settings\Presentation On The most important information (stop, offline, show) is displayed flashing. 99078801(18) \Other\Control unit\Practice progress window The display of the program progress window can be suppressed. Off The end of program window is not displayed. 99074300(38) On (Default) The end of program window is displayed. 99074301(35) \Other\Control unit\Large font in Listwindow Specifies font used in list window. Off (Default) Normal font is used in list window. 99080200(89) On Large font is used in list window. 99080201(86) \Other\Message Under '\Messages' the way the control unit handles messages can be configured. \Other\Message\Display Messages The control unit displays various texts as reports in the list window. Many of these reports are laid out in such a way that they are also displayed on the LCD near the keyboard. With this setting these outputs can be limited. Off Reports are no longer displayed. 99073800(83) On-screen Only reports that are displayed in the list window are shown. The readouts on the LCD are suppressed. 99073801(80) This setting is useful when the display screen is to be set up directly next to the control unit. In this situation readouts on the LCD can then be suppressed. On LCD Only reports that are displayed in the LCD are shown. The readouts in the list window of the screen 99073802(77) are suppressed. This setting is useful when the control unit is to be set up some distance away from the display screen. Usage is then mainly controlled via the LCD. On Both (Default) All reports are displayed both on the LCD and in the list window of the screen. 99073803(74) \Other\Message\Target Feed Message The S10, the S25/50, the S101 and other targets have a materials handling (paper or rubber band feed). If the motors stall, the material runs out or the band jams, then the target reports a band feed error to the control unit. It is essential to correct this error as missing band feed can lead to incorrect measurements in the detection system. However, the display of the error message can be suppressed. This only serves a useful purpose when no targets with band feed have been installed or for test purposes, when no band is available, but the unit nonetheless needs to run in simulation mode. 09.08.2010 SIUS AG (c) 2004 76 / 112 System\Settings\Presentation Off Reported line feed errors are suppressed. 99073000(58) On-screen (Default) Reported line feed errors are only displayed in the list window of the screen. 99073001(55) On printer Reported line feed errors are only printed. 99073002(52) On Both Reported line feed errors are shown in the list window and printed. 99073003(49) \Other\Display target name The target description and the names of the active score methods are displayed in the upper left corner of the target window. Off The target description and the score information are suppressed. 99074200(47) On (Default) In the target window the target name and the score information are shown. 99074201(44) \Other\Display calibre The calibre is displayed together with the measurement in the upper left corner of the target window. If the calibre is written inside round brackets, then in addition this means that the score is calculated as centre score. The advantage of score methods with central score is that they are independent of the calibre. Off The calibre information is suppressed. 99078300(66) On (Default) The calibre information is displayed. 99078301(63) \Other\Indication There are situations in which the firer should not be informed about the shot which has been fired. If the screen is switched off, then the shot situation is not relayed. No entry is made in the list window and no printout is produced. Only the shot number is displayed in the shot window. Off All displays (graphics window, list window, shot window and printer) are suppressed. The shot information is visible only on an associated PC and in the log. The function is used when statistical measurements need to be made and the firer must not be influenced by the result. 09907260(87) On (Default) Images are no longer suppressed. 09907261(84) Parameter Parameters are optional functions that can be turned on if desired. Parameters can be set in many ways. There are parameters that affect the image, parameters that calculate statistical values, and many more. Parameters must be switched on before a particular program is input. MPI The MPI (mean point of impact) calculates the mean point of impact of the last five shots and indicates this spot as 09.08.2010 SIUS AG (c) 2004 77 / 112 System\Settings\Parameter coordinates in the statistics window and as a small square in the target window. The number of shots that were included in the calculation of the MPI can also optionally be displayed in the statistics window. \MPI\Text The text readout in the statistics window can be suppressed. Off Only the small square on the site of the mean hit point is indicated. The text readout in the statistics window is suppressed. 99079500(55) On (Default) In addition to the graphic square in the statistics window a text with direction and place details is displayed via the MPI. 99079501(52) \MPI\MPI The MPI can be turned on and off as a whole (graphics and text). Off The MPI is not calculated. 99078100(84) On (Default) The MPI is calculated. 99078101(81) Simulator SCB The SCB parameter (scoreboard) simulates the details of a scoreboard in the statistics window. Off The SCB is not copied. 99080100(01) On (Default) The scoreboard is replicated in the statistics window. 99080101(95) Divisions The divider is a score method which is used above all in Germany. It shows the distance of the point of entry of a shot from the centre of the target in 1/10 millimetre. The goal of a firer is to achieve the lowest possible number of dividers. The divider exists as a parameter and is displayed in the statistics window. In addition the divider values of all shots in one program are added up. The divider can be chosen as a score method in free series. In this way it is possible to select the divider as a primary or secondary score. Off (Default) The divider parameter in the statistics window is turned off. 99079300(73) On The divider parameter in the statistics window is turned on. 99079301(70) Fi The parameter Fi indicates the distance between the shots which are furthest apart in a group in the statistics window. Off (Default) The parameter Fi is not calculated. 99079100(91) On The parameter Fi is calculated. 99079101(88) 09.08.2010 SIUS AG (c) 2004 78 / 112 System\Settings\Parameter FiFi The parameter FiFi indicates the distance between the shots which are furthest apart in an entire program in the statistics window. With very large numbers of shots, this parameter is very calculation intensive and the operating rate of the control unit can become noticeably slower. Off (Default) The parameter FiFi is not calculated. 99079200(82) On The parameter FiFi is calculated. 99079201(79) Biathlon Off (Default) 99079000(03) On 99079001(97) Spread The distance between those shots which lie furthest apart horizontally is calculated and displayed in the statistics window. The distance between those shots which lie furthest apart vertically is similarly calculated and displayed. Off (Default) The X and Y ranges are not calculated. 99080000(10) On The X and Y ranges are calculated. 99080001(07) Language The control unit supports several languages. The language of the user guidance can be individually adjusted. English (Default) The menu operation is displayed in English. 99070200(19) Deutsch The menu operation is displayed in German. 99070201(16) Language The control unit supports several languages. The language of the user guidance can be individually adjusted. English (Default) The menu operation is displayed in English. 99070200(19) Deutsch The menu operation is displayed in German. 99070201(16) Francais The menu operation is displayed in French. 99070202(13) Español The menu operation is displayed in Spanish. 99070207(95) Dansk The menu operation is displayed in Danish. 99070204(07) 09.08.2010 SIUS AG (c) 2004 79 / 112 System\Settings\Language Norsk The menu operation is displayed in Norwegian. 99070205(04) Svenska The menu operation is displayed in Swedish. 99070206(01) Italiano The menu operation is displayed in Italian. 99070203(10) Russian 99070208(92) Time The clock time that is shown in the title bar can be set and the form of the representation can be changed. Adjust Clock The clock time can be set on every control unit. If several control units are connected together over a LON network, then every adjustment to the time will be relayed to all the control units. At best the time on the control unit is always synchronised with the lowest subnet number. The control unit with the lowest subnet number is therefore automatically responsible for ensuring that all the connected devices are synchronised. To ensure correct escore of shots, above all when shooting takes place with a shot logoff, the correct clock time on all devices is most important. Year minus 1 One year will be subtracted from the year set now. 99063100(76) Year plus 1 One year is added to the year that is set now. 99063101(73) Month minus 1 One month will be subtracted from the month set now. 99063102(70) Month plus 1 One month is added to the month that is set now. 99063103(67) Day minus 1 One day will be subtracted from the day set now. 99063104(64) Day plus 1 One day will be added to the day set now. 99063105(61) Hour minus 1 One hour will be subtracted from the hour set now. 99063106(58) Hour plus 1 One hour is added to the hour that is set now. 99063107(55) Minute minus 1 One minute will be subtracted from the minute set now. 99063108(52) Minute plus 1 One minute is added to the minute that is set now. 99063109(49) 09.08.2010 SIUS AG (c) 2004 80 / 112 System\Settings\Time Set second zero The selected minute starts afresh. 99063110(46) Date format The date format can be adjusted according to the circumstances of the country. Short format The date in short format looks for example like this: 27.09 17:32 99076900(95) European (Default) The date in 'European' format looks for example like this: 27.09.2004 17:32 99076901(92) European with Seconds The date in 'European plus seconds' format looks for example like this: 27.09.2004 17:32:15 99076902(89) US The date in 'US' format looks for example like this: 09/27/2004 17:32 99076903(86) US+Seconds The date in 'US plus seconds' format looks for example like this: 09/27/2004 17:32:15 99076904(83) Other The directory '\Other\Settings' contains all settings that cannot be unequivocally classified in any other category. Start Start settings concern the system startup(switching on) on the one hand, and variations in program start settings on the other hand. \Start\Enable Repeat After a program has been shot the control menu changes automatically. When the status changes to 'Stop', a new button 'Repeat' appears. There are occasions when a firer may shoot a program only once. In this case the permission for 'Repeat' must be denied. Off The function 'Repeat' is barred. 99077100(77) On (Default) The function 'Repeat' is permitted. 99077101(74) \Start\Free series start setting Free series are represented in the practice progress window with three open groups. The method of operation of the free series is described in the user manual. The start setting defines which of the three groups should be started. Sighters (Default) Every free series starts with the test group. In the practice progress window the test group T is on a white background. 99079400(64) Shot by Shot Alternatively a free series can also be started directly with the open single group S-. 09.08.2010 SIUS AG (c) 2004 99079401(61) 81 / 112 System\Settings\Other \Start\Startup program If a program has been selected this can be saved as a start-up program. The control unit will then in future automatically load the start-up program as long as no rebuild has been launched. User programs cannot be consigned as start-up programs. If the start-up program is saved after a user program has been loaded, in future the control unit will start up with a free series but with the right target. Clear If an autostart program has been saved, then this setting is erased. In future the control unit will not automatically select any program when turned on. 990798000000(58) Save The program that has currently been chosen will load automatically in future when the control unit is turned on. 990798065535(72) \Start\SC-Programs \Start\SC-Programs\Single Execution Off (Default) 99081100(08) On 99081101(05) \Start\Scale Factor In some situations targets have to be scaled because of shooting range reasons. For creating comparable shooting programs it is possible to resize targets in that way that other distances may be simulatet. For example a 300 Meter target was resized to 2/3 to use it at 200 Meter distance. Scale Factor can now be set to 667 for using the original 300 meter target from the catalogue but shooting on smaller, nearer target on 200 meter. Reset Resets the scale factor to its standard value. 9908101000(58) Scale Factor (600) 9908100600(94) Set Scale Factor Starts an editor for having the scale factor entered. Its value has to be between 100 and 9999 where 1000 is the standard value. 99064700(29) \Start\Target Alternative Setting for special variants of programs. Default Default 99080900(26) Right Used for Moving Mosse Exercise starting on right side instead of left side. 99080901(23) \Start\Enable Autoreset Under certain conditions the resources of the control unit can become limited. This affects mainly the on hand working memory, its fragmentation and the working speed of the control unit. If certain limits are exceeded, the control unit can restart by itself and thus fix the resource shortage. This only occurs when the status of the control unit has been on 'Stop' for a long time or if the screen saver is activated. In these situations the control unit starts up again automatically. 09.08.2010 SIUS AG (c) 2004 82 / 112 System\Settings\Other Off The control unit may not be restarted automatically. 99078400(57) On (Default) The control unit may restart automatically under certain conditions. 99078401(54) Filter With many filters the menu can be shortened to those items which the user finds most essential. For instance if a certain distance is selected, all other distances and the programs associated with them can be suppressed. Thus so-called filter dimensions are created (user groups, distance, category etc.). A filter dimension contains several filter characteristics. The dimension 'User Group' comprises the characteristics Standard, Advanced, Administrator and Sius. A comprehensive description of the filter options can be found in the user manual. \Filter\Distance All the targets and programs were organised as a first priority by distance. Target images that are used exclusively for one distance are filed accordingly. The distance filter is the most effective filter. \Filter\Distance\Other Targets and programs that cannot be assigned unequivocally to one distance, or that are regularly used for various distances. Off (Default) The filter characteristic is deactivated. 990635030400(49) On The filter characteristic is activated. 990635030401(46) \Filter\Distance\10m Targets and programs that are employed for 10 metre distance. Off (Default) The filter characteristic is deactivated. 990635030000(85) On The filter characteristic is activated. 990635030001(82) \Filter\Distance\25m Targets and programs that are employed for 25 metre distance. Off (Default) The filter characteristic is deactivated. 990635030100(76) On The filter characteristic is activated. 990635030101(73) \Filter\Distance\50m Targets and programs that are employed for 50 metre distance. Off (Default) The filter characteristic is deactivated. 990635030200(67) On The filter characteristic is activated. 990635030201(64) \Filter\Distance\300m Targets and programs that are employed for 300 metre distance. 09.08.2010 SIUS AG (c) 2004 83 / 112 System\Settings\Other Off (Default) The filter characteristic is deactivated. 990635030300(58) On The filter characteristic is activated. 990635030301(55) Reset Switch off all settings of this filter dimension and thereby deactivate filtering in this dimension. 990635039902(61) \Filter\Category Programs and targets are grouped in second priority after categories. This was with the intention that programs or a target could be assigned as far as possible to the most widespread category. This means for example that the pistol target for 50 metres is to be found under ISSF, although this target is also frequently used in Switzerland. But ISSF is a more general category than Switzerland. Therefore this target image was stored under ISSF. \Filter\Category\Other Programs or targets that do not fit into any other category. Off (Default) The filter characteristic is deactivated. 990635010800(67) On The filter characteristic is activated. 990635010801(64) \Filter\Category\ISSF Targets and programs that are regulated by the ISSF. Off (Default) The filter characteristic is deactivated. 990635010000(42) On The filter characteristic is activated. 990635010001(39) \Filter\Category\CISM Targets and programs that are regulated by the CISM. Off (Default) The filter characteristic is deactivated. 990635010100(33) On The filter characteristic is activated. 990635010101(30) \Filter\Category\Hunting Targets and programs that are used exclusively as hunting targets or hunting programs. Off (Default) The filter characteristic is deactivated. 990635010400(06) On The filter characteristic is activated. 990635010401(03) \Filter\Category\Belgium Targets and programs that are used almost exclusively in Belgium.. 09.08.2010 SIUS AG (c) 2004 84 / 112 System\Settings\Other Off (Default) The filter characteristic is deactivated. 990635011000(49) On The filter characteristic is activated. 990635011001(46) \Filter\Category\Sui Targets and programs that are used almost exclusively in Switzerland. Off (Default) The filter characteristic is deactivated. 990635010200(24) On The filter characteristic is activated. 990635010201(21) \Filter\Category\Scandinavia Targets and programs that are used almost exclusively in Scandinavia. Off (Default) The filter characteristic is deactivated. 990635010300(15) On The filter characteristic is activated. 990635010301(12) \Filter\Category\Military The category Military forms a subcategory in various regions. For example in Scandinavia public shoots and military contests are common. With the category 'Military' the targets and programs that are used exclusively for public sport are excluded. Off (Default) The filter characteristic is deactivated. 990635010900(58) On The filter characteristic is activated. 990635010901(55) Reset Switch off all settings of this filter dimension and thereby deactivate filtering in this dimension. 990635019902(18) \Filter\Weapon Certain types of weapons are only employed for certain distances. For example air pressure weapons are employed only for 10 metres and 25 metres, and pistols are not used for 300 metres. For a setup where exclusively pistols are to be shot, all rifle targets and rifle programs can be masked by the use of a filter. \Filter\Weapon\Other All targets and programs that cannot be assigned to another weapon type. Off (Default) The filter characteristic is deactivated. 990635050400(92) On The filter characteristic is activated. 990635050401(89) \Filter\Weapon\Rifle Targets and programs that are shot exclusively with rifles. 09.08.2010 SIUS AG (c) 2004 85 / 112 System\Settings\Other Off (Default) The filter characteristic is deactivated. 990635050000(31) On The filter characteristic is activated. 990635050001(28) \Filter\Weapon\Pistol Targets and programs that are shot exclusively with pistols. Off (Default) The filter characteristic is deactivated. 990635050100(22) On The filter characteristic is activated. 990635050101(19) \Filter\Weapon\Air Rifle Targets and programs that are shot exclusively with air rifles. Off (Default) The filter characteristic is deactivated. 990635050200(13) On The filter characteristic is activated. 990635050201(10) \Filter\Weapon\Air Pistol Targets and programs that are shot exclusively with air pistols. Off (Default) The filter characteristic is deactivated. 990635050300(04) On The filter characteristic is activated. 990635050301(01) Reset Switch off all settings of this filter dimension and thereby deactivate filtering in this dimension. 990635059902(07) \Filter\User Group With the filter 'User Group' a simplified user authorisation can be adopted. Different levels of authority are assigned to the different user groups. \Filter\User Group\Standard A standard user can use only the normal shooting operation. He is forbidden to change settings or even to configure hardware components. Off (Default) The filter characteristic is deactivated. 990635040000(58) On The filter characteristic is activated. 990635040001(55) \Filter\User Group\Advanced An 'Advanced' user can amend the major settings and print out supplementary reports. Off (Default) The filter characteristic is deactivated. 990635040100(49) 09.08.2010 SIUS AG (c) 2004 86 / 112 System\Settings\Other On The filter characteristic is activated. 990635040101(46) \Filter\User Group\Administrator Maintenance tasks and hardware settings can only be amended if at least one administrator is configured. Off (Default) The filter characteristic is deactivated. 990635040200(40) On The filter characteristic is activated. 990635040201(37) \Filter\User Group\Sius Special functions are reserved for Sius staff. Off (Default) The filter characteristic is deactivated. 990635040300(31) On The filter characteristic is activated. 990635040301(28) Reset Switch off all settings of this filter dimension and thereby deactivate filtering in this dimension. 990635049902(34) \Filter\Function All the functions of the control unit were organised in function groups. By filtering individual function group the fields which are not needed can be masked. \Filter\Function\Other Functions which cannot be assigned to another function group. Off (Default) The filter characteristic is deactivated. 990635020200(94) On The filter characteristic is activated. 990635020201(91) \Filter\Function\Logon Functions which are needed for the identification of firer. Off (Default) The filter characteristic is deactivated. 990635020000(15) On The filter characteristic is activated. 990635020001(12) \Filter\Function\Free Series Functions which are needed only in free series. Off (Default) The filter characteristic is deactivated. 990635020100(06) On The filter characteristic is activated. 990635020101(03) 09.08.2010 SIUS AG (c) 2004 87 / 112 System\Settings\Other \Filter\Function\Programs Functions which are needed only in free series. Off (Default) The filter characteristic is deactivated. 990635020300(85) On The filter characteristic is activated. 990635020301(82) \Filter\Function\Firer number When only the function 'Firer number' is permitted, but not the function 'Report', then the firer number can be retrieved but the other information about position, weapon, sight etc. remains invisible. Off (Default) The filter characteristic is deactivated. 990635020400(76) On The filter characteristic is activated. 990635020401(73) Reset Switch off all settings of this filter dimension and thereby deactivate filtering in this dimension. 990635029902(88) \Filter\Mode In contrast to the other settings, the Mode does not filter any menu functions. In previous Sius systems the mode was urgently needed so that the correct detection system would be recognised. In the control unit this information is no longer necessary. But the mode can be used as before as a lock. Every target and every program identify a particular mode. A group can only be loaded when the filter Mode is set to 'Off' or when the program mode corresponds to the set mode. This lock also functions when the target or the program are entered via barcodes. If for example the mode '300m' is selected, no further hunting images can be selected. The control unit always issues an appropriate error warning in the list window. Off (Default) All the programs can be selected. 99071899(63) Air pressure weapons Shooting mode for air pressure weapons and programs that are shot over a 10 metre distance. (Mode 2) 99071802(63) 25m Mode for 25 metre and 50 metre small calibre and large calibre pistols as well as for small calibre rifles. 99071803(60) (Mode 3) 50m Targets and programs that are shot from 50 metres. This concerns large and small calibre pistols and small calibre rifles as well as special Swiss groups (Morgarten). (Mode 4) 99071804(57) 300m Targets and programs for 300 metre disciplines (Mode 0) 99071800(69) Hunting Hunting targets and hunting programs (Mode 1) 99071801(66) 09.08.2010 SIUS AG (c) 2004 88 / 112 System\Settings\Other Scandinavia Scandinavian targets (Denmark, Norway, Sweden) (Mode 11) 99071811(36) Running Target Targets and programs for the running target for 10 and 50 metres (Mode 12) 99071812(33) Biathlon Targets and programs for biathlon disciplines (Mode 13) 99071813(30) Calibre With most targets and programs a certain calibre is implicitly assumed. With targets that are well known to be fired at with different weapons types and thus with different calibres, the most common selection options are already available. The calibre is used on the one hand for the image in the graphics window, and on the other hand certain score methods require the calibre to calculate the score. In the modern ISSF disciplines the score is calculated by means of the shot hole centre (centre score). The calibre is fixed (e.g. air pressure disciplines 4.5mm.) Even when a larger calibre is employed, these disciplines are evaluated with the calibre that was fixed. Such score methods are identified in the target window with the note 'centre score'. With older targets that are evaluated with edge score, the selected calibre has an effect on the score. Changes to this setting are therefore logged. \Calibre\Use Always On 99079699(40) Off (Default) 99079698(43) Off All disciplines that are not assessed with a fixed given calibre are assessed with centre score. 990796000000(26) 450 All disciplines that are not assessed with a fixed given calibre or with centre score are assessed with 4.5mm calibre. 990796000450(34) 560 All disciplines that are not assessed with a fixed given calibre or with centre score are assessed with 5.6mm calibre. 990796000560(92) 800 All disciplines that are not assessed with a fixed given calibre or with centre score are assessed with 8.0mm calibre. 990796000800(51) 900 All disciplines that are not assessed with a fixed given calibre or with centre score are assessed with 9.0mm calibre. 990796000900(42) 965 All disciplines that are not assessed with a fixed given calibre or with centre score are assessed with 9.65mm calibre. 09.08.2010 SIUS AG (c) 2004 990796000965(41) 89 / 112 System\Settings\Other 1158 990796001158(44) 1270 990796001270(96) Control Mode The control mode regulates various stages of the remote control. The control unit is configured so that for example it can be controlled remotely by Siusdata ®. Local (Default) All functions can be carried out via the keyboard or the barcode reader. 09907790(49) Practice Control In certain ISSF disciplines (e.g. 3*40 rifle shoot) the control unit goes into a paused state. This state can be released with a command from SiusData ®. In this way a change of position can be ordered for a whole score. 09907791(46) Remote If the control unit is totally remotely controlled, entries via the keyboard or the barcode reader are barred. 09907792(43) Demo The demo mode is displayed in the status window (small font). In demo mode shots can be created via the insert key ('Ins'). The control unit requests the connected target to create a shot at a chance coordinate and to send this back to the control unit. The demo shot implicitly tests both the connected target and the communication. Demo mode is switched off every time at startup. Off (Default) Turns off the demo mode. 09907000(91) On Selects demo mode. 09907001(88) Activate remote barcode This command sets the CU in the remote barcode mode. While activated all Barcodes from the connected Barcodereader will be sent to the specified Lane. To change the selected lane press the specified keys on the keyboard, to exit remotebarcode mode press escape. The configuration of the key-lane selection can be downloaded from siusdata, default setting is 099067(07) Demonstration Mode 099068(04) Settings Control It is possible to store one's own setting configurations in the permanent memory of a control unit. These customer settings will not be lost even with a change of battery. Even during a 'cold start' these settings will not be overwritten by the factory settings. So it can be guaranteed that your own settings can also be selected as standard. The settings will only be lost if a new software version is loaded. It is possible to save these settings as a file on a computer and with SiusData to load them via the LON network onto all connected control units. Warm start: A warm start is triggered by a short power failure or by the explicit command '\Maintenance\Warm-Start'. The current settings are preserved during a warm start. Cold start: A cold start can be forced if during boot-up the cold start button is pressed (above the two 1mm drillholes on the back of the control unit, on the right near the control unit socket). The control unit confirms the cold start 09.08.2010 SIUS AG (c) 2004 90 / 112 System\Settings\Settings Control with a beep. A cold start is also necessary if the memory content is lost due to too little battery power during an electricity failure. The control unit announces this process with the message 'crc-Failed'. In a cold start the user settings that were most recently saved are always loaded. The devices are supplied with various user settings. In particular the filters are preconfigured for the customer. Factory Settings With the command 'Factory Settings' all settings in the volatile memory are reset to the factory settings. 09903601(06) The customer settings are stored. In the event of a system 'cold start' the customer settings are also reloaded with this command. In order for the factory settings to be selected as the standard settings after a 'cold start', they must be saved as customer settings following this command. Customer Settings All settings that were changed during the current operation are reset to the customer settings. The same occurs if a cold start takes place on the control unit, or if the buffer battery is changed. 09903612(70) Save Customer Settings The settings in current use are saved as customer settings. This process writes data from the volatile memory into the non-volatile memory. The process only lasts a few seconds but it is very important that it is carried out completely as otherwise the control unit can be damaged. If the process is not carried out completely, it can happen that the control unit will no longer start after the next interruption to the power supply. In this event the software would have to be reinstalled. The control unit must not be switched off during the memory process. The power supply must not be interrupted. The conclusion of the memory process is signalled with a beep. 09903613(67) Maintenance The directory '\Maintenance' contains functions which go beyond daily use. Diagnosis, upkeep and error searches are supported through various start points. These functions should be carried out only by well trained staff. Reports Expanded reports are listed under '\Maintenance\Reports'. Also kept here are the functions which are available for erasing the data belonging to these reports and so to set the corresponding report to zero. For example the log can be deleted or the software shot counter can be reset to zero. Settings Printing out settings: Print Prints out a list of the current settings that differ from the factory settings. In addition the shaft settings of 09903602(03) the target images and the filter configurations are listed, insofar as these differ from the factory settings. Shoot Many settings are taken over into a program when the program is launched. Additionally a program use of additional settings that were stored when the program was being developed. The command '\Settings\Program' prints all the settings of the actively selected program. 09.08.2010 SIUS AG (c) 2004 09903610(76) 91 / 112 System\Maintenance\Reports Shot Counter Mechanical shot counters: The optional mechanical shot counter only counts the shots on your own target. It cannot be reset. Demo shots or inserted no scores are not counted. A detailed description of the whole function can be found in the user manual under 'Mechanical shot counters'. Software shot counters: The software shot counter counts shots in different categories. Own shots, cross shots, missed shots, demo shots etc. are differentiated and displayed separately. The shot count report is displayed in the list window and provided a printer is connected and switched on, is printed out. The shot counters are connected to the control units. If the settings are reset to factory settings, the shot counts are also reset to zero. The same occurs when the battery has to be changed. With a normal interruption to the power supply, the values are not lost. The software shot counters can also be reset independently of the settings under '\Maintenance\Reports\Shot Counters'. Reset Shot Counter Resets the software shot counter back to zero. 09903609(79) Invalid shots Non-allowable shots (shots during the Stop, Pause or the Show Phase and cross shots) are not only counted, they are kept in the control unit as pending and can be queried at any time. The shots are then shown with the time and if possible with the score. With a warm start or with the command 'Erase' under '\Maintenance\Invalid Shots' the report can be rejected. The shots remain in the log throughout and furthermore can be documented in a log printout. Clear The report on the latest cross shots and illegal shots is erased. 990560(12) Log Events that are of relevance for the duration of a program are filed in the memory (events memory, log). This information is needed to be able to reproduce a program after a power interruption. The CU931 investigates this data at every system start-up. If it is established that the last program to be shot was not correctly ended, then a repetition process is introduced. By means of the log past programs can also be reloaded or a copy can be printed once again. The log is stored in the volatile memory of the control unit, which is buffered with a battery. The data is protected from misinterpretation by a check sum. If the check sum is not correct at system start-up, for example due to a faulty battery, the log is initialised again. The control unit communicates this by a triple beep and a report in the list window. The log is restricted in memory size. In the event of an overload, the oldest events are overwritten by the most recent on a rolling basis. Typically more than ten programs can be stored in the log. The log can also be manually erased under '\Maintenance\Reports\Log'. The format of the printout is described in the user manual. Clear The log memory is explicitly wiped. Because this means that previous programs are irretrievably erased, this command must be authorised by a further confirmation. Confirm 099057(37) Log Hex The 'Log-Hex' is an expanded log printout which prints out all events additionally in hexadecimal form. This printout allows events to be analysed at a very detailed level. The printout is exclusively used to search for software errors. 990559(15) Debug With the '\Debug' reports internal conditions of the control unit can be displayed. This report permits a diagnosis of the control unit in respect of the demand, the speed of operation or the load. They serve to enable the speed and reliability of the devices to be optimised. Report Processes Reports the number of runs as well as the time taken by the individual processes. 09.08.2010 SIUS AG (c) 2004 09903611(73) 92 / 112 System\Maintenance\Reports Classes Prints a report that indicates for each class how many instances are presently available, how often the designer has been contacted and how high the greatest occurrence of the class was in the past. 09903605(91) Self Test Hardware components can be tested by some special commands. These tests are normally used to fulfill the final check of a new installation. They can be used to filter an erroneous function while the system is running. Shot Counter The mechanical shot counter can be made to start counting by a self test. The chosen number triggers the corresponding number of counting pulses. Thus the fastest possible meter pulse rate can be selected. The mechanical counter cannot skip any of these pulses. 1 Counting impulse(s) on the mechanical shot counters 99035121(11) 2 Counting impulse(s) on the mechanical shot counters 99035122(08) 3 Counting impulse(s) on the mechanical shot counters 99035123(05) 4 Counting impulse(s) on the mechanical shot counters 99035124(02) 5 Counting impulse(s) on the mechanical shot counters 99035125(96) 6 Counting impulse(s) on the mechanical shot counters 99035126(93) 7 Counting impulse(s) on the mechanical shot counters 99035127(90) 8 Counting impulse(s) on the mechanical shot counters 99035128(87) 9 Counting impulse(s) on the mechanical shot counters 99035129(84) Target test The target test requests the most important status information from the LON electronic measuring 99063300(58) system. Along with the software and hardware version, the temperature, the assembly alignment and the Target Index Code are conveyed. The running time of the enquiry indirectly provides information on how well synchronised the equipment is with respect to time. The target test can be used to test the network cabling to the LON electronic measuring system and the functioning of the communication chips on the control unit and the LON electronic measuring system. The target test only functions if a LON electronic measuring system is connected and linked to the control unit via the 09.08.2010 SIUS AG (c) 2004 93 / 112 System\Maintenance\Self Test correct subnet (please refer to '\Hardware\Target\Connections'). Keyboard The keyboard test switches the control unit into a special keyboard test mode. Every keystroke is confirmed by an entry in the list window. Hitting the Escape key permits this keyboard test to be exited. 09903505(03) Scoreboard The scoreboard itself has a test program available. This test program can be started from the control unit on its own scoreboard (subnet Addressing must be in agreement). 09903508(91) Beep The beep test issues a series of ten short beeps one after another. They must be acoustically audible 09903511(82) from the control unit. Control unit reset With a warm start the control unit is forced to start up again (reboot process). This corresponds to the same process as when the control unit is turned on without power for a short time. (see also '\Settings\Setting controls') Confirm 09903600(09) Debug Functions that serve only for error detection are stored under '\Maintenance\Debug'. Debug Mode The debug mode allows all events which are being processed in the control unit also to be represented visually. This representation permits a precise search for errors. In the case of reproducible error, it can happen that you will be instructed by Sius colleagues to turn on this debug mode, so that the printout can subsequently be analysed and the error can thereby be controlled. Off (Default) The events processed by the control unit are not displayed. 99070700(71) On The events processed by the control unit are displayed in the list window. 99070701(68) Print The events processed by the control unit are displayed in the list window and additionally on the connected printer. 99070702(65) Trap This function is only used for errors that are very difficult to reproduce. In the software versions that are specially produced for this, an 'error case' can be programmed in. At the moment when the error is recognised, a special response can be triggered. Mostly the debug mode is activated as a special treatment. Off (Default) The control unit operates without special error recognition. 99078200(75) On The special treatment is activated. 99078201(72) 09.08.2010 SIUS AG (c) 2004 94 / 112 System\Hardware Hardware Settings that directly affect the hardware components of the control unit are stored under '\Hardware'. Some of these components are optionally available for the equipment and only have an effect when these components are running. SCB SCB Communication to the scoreboard can be basically suppressed. Communication reduces the speed of execution of the control unit by several percent. It is therefore worthwhile to configure the SCB as 'Off' when it is not present. Communication to the SCB must be switched on before a program is loaded. Off (Default) The SCB is not responded to. 99078900(12) On The SCB is responded to. 99078901(09) Control unit '\Screen' contains several hardware settings that directly affect the control unit. Set Subnet Sius AG devices communicate with one another via the field bus LON. Each device has its own address. One part of this address is the so-called subnet. The LON electronic measuring system and the control unit with the same subnet always belong together. Different lanes must be correspondingly differentiated in the subnet. Every LON electronic measuring system sends its own detected shots to the control unit in the same subnet in which it is itself addressed. A LON electronic measuring system with subnet 5 sends its shots to the control unit with subnet 5. By setting a subnet on a control unit only the address of the control unit is affected. A previously linked LON electronic measuring system must be reconnected after this alteration (please refer to '\Hardware\Target\Connect' and instructions for use. Insofar as a LON electronic measuring system is located in the same subnet, the status of the control unit changes from 'Offline' to 'Stop' or 'Ready' according to whether a program is selected or not. The subnet can be selected via the 10-er keyboard. Pressing the Enter key confirms a given value. With 'Esc' the entry can be cancelled. The F5 key allows incorrect entries to be corrected in time. \Set Subnet\1..9 1 (Default) 9907270001(58) 2 9907270002(55) 3 9907270003(52) 4 9907270004(49) 5 9907270005(46) 6 9907270006(43) 7 9907270007(40) 09.08.2010 SIUS AG (c) 2004 95 / 112 System\Hardware\Control unit 8 9907270008(37) 9 9907270009(34) \Set Subnet\10..19 10 9907270010(31) 11 9907270011(28) 12 9907270012(25) 13 9907270013(22) 14 9907270014(19) 15 9907270015(16) 16 9907270016(13) 17 9907270017(10) 18 9907270018(07) 19 9907270019(04) \Set Subnet\20..29 20 9907270020(01) 21 9907270021(95) 22 9907270022(92) 23 9907270023(89) 09.08.2010 SIUS AG (c) 2004 96 / 112 System\Hardware\Control unit 24 9907270024(86) 25 9907270025(83) 26 9907270026(80) 27 9907270027(77) 28 9907270028(74) 29 9907270029(71) \Set Subnet\30..39 30 9907270030(68) 31 9907270031(65) 32 9907270032(62) 33 9907270033(59) 34 9907270034(56) 35 9907270035(53) 36 9907270036(50) 37 9907270037(47) 38 9907270038(44) 39 9907270039(41) \Set Subnet\40..49 09.08.2010 SIUS AG (c) 2004 97 / 112 System\Hardware\Control unit 40 9907270040(38) 41 9907270041(35) 42 9907270042(32) 43 9907270043(29) 44 9907270044(26) 45 9907270045(23) 46 9907270046(20) 47 9907270047(17) 48 9907270048(14) 49 9907270049(11) \Set Subnet\50..59 50 9907270050(08) 51 9907270051(05) 52 9907270052(02) 53 9907270053(96) 54 9907270054(93) 55 9907270055(90) 56 9907270056(87) 09.08.2010 SIUS AG (c) 2004 98 / 112 System\Hardware\Control unit 57 9907270057(84) 58 9907270058(81) 59 9907270059(78) \Set Subnet\60..69 60 9907270060(75) 61 9907270061(72) 62 9907270062(69) 63 9907270063(66) 64 9907270064(63) 65 9907270065(60) 66 9907270066(57) 67 9907270067(54) 68 9907270068(51) 69 9907270069(48) \Set Subnet\70..79 70 9907270070(45) 71 9907270071(42) 72 9907270072(39) 09.08.2010 SIUS AG (c) 2004 99 / 112 System\Hardware\Control unit 73 9907270073(36) 74 9907270074(33) 75 9907270075(30) 76 9907270076(27) 77 9907270077(24) 78 9907270078(21) 79 9907270079(18) \Set Subnet\80..89 80 9907270080(15) 81 9907270081(12) 82 9907270082(09) 83 9907270083(06) 84 9907270084(03) 85 9907270085(97) 86 9907270086(94) 87 9907270087(91) 88 9907270088(88) 89 9907270089(85) 09.08.2010 SIUS AG (c) 2004 100 / 112 System\Hardware\Control unit \Set Subnet\90..99 90 9907270090(82) 91 9907270091(79) 92 9907270092(76) 93 9907270093(73) 94 9907270094(70) 95 9907270095(67) 96 9907270096(64) 97 9907270097(61) 98 9907270098(58) 99 9907270099(55) DeltaX The absolute point of entry can be shifted in the horizontal direction. This can be used to compensate for assembly inaccuracies. X-0.1mm to the left 99072800(76) X+0.1mm to the right 99072801(73) X-1mm to the left 99072802(70) X+1mm to the right 99072803(67) X-10mm to the left 99072804(64) X+10mm to the right 99072805(61) 09.08.2010 SIUS AG (c) 2004 101 / 112 System\Hardware\Control unit DeltaY The absolute point of entry can be shifted in the vertical direction. This can be used to compensate for assembly inaccuracies. Y-0.1mm downwards 99072900(67) Y+0.1mm upwards 99072901(64) Y-1mm downwards 99072902(61) Y+1mm upwards 99072903(58) Y-10mm downwards 99072904(55) Y+10mm upwards 99072905(52) Menu The keyboard menu can be switched off. This is especially helpful when the configuration is to be used only via the barcode reader. The barcode reader offers the advantage that the commands and programs permitted for the user can be compiled on one sheet of paper. Off The keyboard menu is suppressed. Use of the equipment is possible only via a barcode reader or a 99078000(93) central computer. On (Default) The keyboard menu is switched on again. If the menu is switched off, it can no longer be switched 99078001(90) on via the keyboard. Normally it must be switched on again by a barcode, from a central computer or by means of a cold start. A further possibility is to switch the menu on again by the code '282806'. The code must be entered in one go on the transparency keyboard. For this reason it should be made available only to experienced persons. Keystroke Escape 9906442001(82) Opt 9906442002(79) Help 9906442003(76) Next Window 9906442004(73) 09.08.2010 SIUS AG (c) 2004 102 / 112 System\Hardware\Control unit Enter 9906442005(70) Zoom 9906442006(67) Menu 9906442007(64) Match 9906442008(61) Backspace 9906442009(58) F1 9906441001(75) F2 9906441002(72) F3 9906441003(69) F4 9906441004(66) F5 9906441005(63) Right 9906443001(89) Up 9906443002(86) Left 9906443003(83) Down 9906443004(80) Home 9906443005(77) End 9906443006(74) Page Up 9906443007(71) 09.08.2010 SIUS AG (c) 2004 103 / 112 System\Hardware\Control unit Page Down 9906443008(68) Insert 9906443009(65) 0 (Default) 9906440000(71) 1 9906440001(68) 2 9906440002(65) 3 9906440003(62) 4 9906440004(59) 5 9906440005(56) 6 9906440006(53) 7 9906440007(50) 8 9906440008(47) 9 9906440009(44) Set Subnet Sius AG devices communicate with one another via the field bus LON. Each device has its own address. 99064000(92) One part of this address is the so-called subnet. The LON electronic measuring system and the control unit with the same subnet always belong together. Different lanes must be correspondingly differentiated in the subnet. Every LON electronic measuring system sends its own detected shots to the control unit in the same subnet in which it is itself addressed. A LON electronic measuring system with subnet 5 sends its shots to the control unit with subnet 5. By setting a subnet on a control unit only the address of the control unit is affected. A previously linked LON electronic measuring system must be reconnected after this alteration (please refer to '\Hardware\Target\Connect' and instructions for use. Insofar as a LON electronic measuring system is located in the same subnet, the status of the control unit changes from 'Offline' to 'Stop' or 'Ready' 09.08.2010 SIUS AG (c) 2004 104 / 112 System\Hardware\Control unit according to whether a program is selected or not. The subnet can be selected via the 10-er keyboard. Pressing the Enter key confirms a given value. With 'Esc' the entry can be cancelled. The F5 key allows incorrect entries to be corrected in time. RC92 Optionally a RC92 (shoot box) can be connected to a control unit. The RC92 is controlled by means of three buttons (Zoom, Menu and Shoot). Match Menu Via the Menu button an additional window can be opened on the screen. This window lists all the functions available in the Control Menu. In this way the control unit can be remotely controlled by the firer without having to leave his position. In official ISSF contests the firer is not permitted to carry out these functions himself. It must therefore be possible to switch off the Shoot Menu. Off The match menu is switched off. The Match button on the RC92 has no function. 99079900(19) On The match menu is switched on. 99079901(16) Short format Only a reduced number of functions is available (Clear Graphics). 99079902(13) Target Settings that must be communicated to the LON electronic measuring system are stored under '\Target'. These settings are also frequently dependent on the program selected and therefore can be overwritten if necessary. Target changer Some detection systems are quipped with a target changer (S101, S310). Each target image has been programmed with a basic setting or a shaft. If a program with a specific target is selected, the preselected shaft is automatically activated. If the detection system is not equipped with a changing mechanism, the command is ignored. If the target image is mounted in a different shaft or if the target image on the control unit does not correspond to the physical target image, the shaft can be changed by means of the target changer commands. The target image is hereby automatically programmed for the new choice of shaft. If the same program is selected again later, the latest shaft to be selected will again be selected in any case. A (Default) The 'shaft' A corresponds to the fixed frame of the detection system. 09907190(06) B The shaft B is the alternative frame. 09907191(03) C With the target S101 there are two alternative frames available. The shaft C is the second alternative frame. 09907192(97) Sensitivity The detection systems are fitted with various amplifier settings for the microphone. For most systems and weapons a low sensitivity is the correct setting. In the 25 metre rapid fire pistols with a very small recoil are used. The speed of the projectile is correspondingly small and the impact on the rubber very light. For these disciplines a high sensitivity is necessary so that the shot can always be correctly picked up. But the setting must be set to high only in these disciplines because with other firearms otherwise crosstalk onto neighbouring lines could ensue. The setting is normally correctly adjusted for the programs and must not be adjusted manually. \Sensitivity\Use Always 09.08.2010 SIUS AG (c) 2004 105 / 112 System\Hardware\Target On 99072099(45) Off (Default) 99072098(48) Low (Default) Low sensitivity is required for most bullets. 09907200(73) High High sensitivity is needed above all for sport shooting (25m), which is shot with high recoil weapons, typically on targets S10 and S25/50 09907201(70) Paper feed After every shot, detection systems controlling a materials handling unit (paper or rubber tape) trigger an automatic feed unit. The feed unit is measured in millimetres. Depending on the discipline and the weapon, the tape must be fed a greater or lesser distance. These distances are laid down in the target images. But every discipline can define its own actual setting values. The tape feed for a 10 metre discipline is 20 millimetres. In ISSF finals the feed distance is increased to 30 millimetres. The tape feed can be changed after a program has been selected. \Paper feed\Use Always On 99077899(08) Off (Default) 99077898(11) 0 mm 99077800(14) 1 mm 99077801(11) 2 mm 99077802(08) 3 mm 99077803(05) 4 mm 99077804(02) 5 mm 99077805(96) 10 mm 99077810(81) 20 (Default) mm 99077820(51) 09.08.2010 SIUS AG (c) 2004 106 / 112 System\Hardware\Target 30 mm 99077830(21) 40 mm 99077840(88) 50 mm 99077850(58) Connect This barcode switches the control unit over to a special configuration mode. The control unit waits 99063200(67) for a service PIN message from any LON electronic measuring system. This message can be created on the LON electronic measuring system, either when the service PIN is pressed or when shooting takes place. But a shot triggers a Service PIN message only if the LON electronic measuring system was not previously configured. Every LON electronic measuring system that first reports this Service PIN message is reprogrammed by the control unit to its own subnet address. This function is used only if the LON electronic measuring system does not have its own LNR (lane number box). Distance Index 0 (Default) 99081200(96) 1 99081201(93) 2 99081202(90) 3 99081203(87) 4 99081204(84) Time Control Unit Time Control Unit Off (Default) 99080300(80) On 99080301(77) Duel mode 09.08.2010 SIUS AG (c) 2004 107 / 112 System\Hardware\Time Control Unit Off (Default) 99080400(71) On 99080401(68) Graphic Printer Model Undefined Printer (Default) 99080500(62) D931-SP 99080501(59) D931 99080502(56) iDP3240 99080503(53) Shot sensor The shot sensor allows cross shots and no scores to be detected. Without the shot sensor all shots are interpreted as own shots on the own target. Even a shot from a neighbouring lane onto the own target is interpreted as an own shot and included in the calculation of the results. With the shot sensor, within a certain timescale after the Shot Off signal the corresponding Shot On signal must be produced. If only a Shot Off signal is produced, the firer has not hit the target. The shot sensor can be connected to the control unit as an optional extra. At the moment when the control unit recognises the shot sensor, it switches this on automatically. If the shot sensor is removed, the control unit recognises this after a short period of time and automatically switches the shot sensor off again. Off On installations without a shot logoff, this setting will be switched off automatically. It is possible to switch off the shot logoff manually even though it is connected. 09907010(61) On (Default) The setting shot logoff ON is automatically cancelled if no shot logoff is connected. 09907011(58) 09.08.2010 SIUS AG (c) 2004 108 / 112 Logon Logon In order that the system can adhere to the necessary rules, under certain circumstances particular information about the firer and his weapon is needed. All this information can be recorded under the section 'Registration'. Info Requirements With set assumptions the system requires information about weapon, position and/or firer number before a group can be loaded. As long as this information is missing the group cannot be input. Legalisation If a legalisation unequal to 0 is chosen, then both the practice and the firer must produce the same legalisation in their codes in order for it to be authorised. The legalisation of the firer is however only active if the firer number is requested at the same time. This command is not to be confused with the command firer legalisation, under which the legalisation of the firer can explicitly be provided. Fact: the settings '\Requirements\Legalisation' and '\Register\Legalisation' must agree or one or other must be set to 0 in order that a program can be started and shooting can take place. 0 (Default) No legalisation is required. 99077000(86) 1 Demanded legalisation 99077001(83) 2 Demanded legalisation 99077002(80) 3 Demanded legalisation 99077003(77) 4 Demanded legalisation 99077004(74) 5 Demanded legalisation 99077005(71) 6 Demanded legalisation 99077006(68) 7 Demanded legalisation 99077007(65) 8 Demanded legalisation 99077008(62) 9 Demanded legalisation 99077009(59) Weapon required In order that in contests it can be determined which program was shot with which weapon, it is possible to force the setting 'Position required'. Before a program can be loaded, a weapon type must be declared. Off (Default) Weapon identification is optional. 99077300(59) 09.08.2010 SIUS AG (c) 2004 109 / 112 Logon\Info\Requirements On A weapon specification must be input before a program can be selected. 99077301(56) Position required In order that in contests it can be determined which program was shot in which position, it is possible to force the setting 'Position required'. Before a program can be loaded, a position must be declared. Off (Default) Reporting of position is optional. 99077200(68) On A position report must be input before a program can be selected. 99077201(65) Firer number required The firer number identifies the firer (see also '\Registering\Firer number'. Off (Default) The firer number is optional. 99077400(50) On A firer number must be input before a program can be selected. 99077401(47) Legalisation Legalisation can be loaded either individually or together with a firer number practice code. The firer must as a result input his firer number first (inclusive of legalisation) and then a program. Only when both legalisations agree, or one or other has a zero value, can the program be launched. Otherwise the screen gives the error message 'Wrong legalisation'. A firer in possession of the legalisation 0 in his practice code can shoot all programs, and a program that shows a legalisation 0 can be shot by all firers. 0 (Default) Legalisation of the firer 99077700(23) 1 Legalisation of the firer 99077701(20) 2 Legalisation of the firer 99077702(17) 3 Legalisation of the firer 99077703(14) 4 Legalisation of the firer 99077704(11) 5 Legalisation of the firer 99077705(08) 6 Legalisation of the firer 99077706(05) 7 Legalisation of the firer 99077707(02) 09.08.2010 SIUS AG (c) 2004 110 / 112 Logon\Legalisation\8 8 Legalisation of the firer 99077708(96) 9 Legalisation of the firer 99077709(93) Weapon Type For the assessment of a contest, it can be important that the type of weapon used in a program that has been shot is known, for example if various rank listings are to be established for storm rifle 90 and storm rifle 57. In such a case the weapon type can be set. With the setting '\Requirements\Weapon type' the specification of a weapon type can be insisted upon before a program can be installed. Otherwise the program would be declined with a message 'weapon type needed'. The weapon type selected is displayed on the screen and on the paper printout. Off (Default) 99076800(07) Rifle 99076801(04) Free Rifle 99076821(41) Carbine 99076802(01) Stgw 57 99076803(95) Stgw 90 99076804(92) Free Pistol 99076805(89) Sport Pistol 99076806(86) Sport Pistol Big Bore 99076807(83) Sport Pistol Small Bore 99076808(80) Ordnance pistol 99076809(77) Ordnance pistol 75 99076810(74) Position For the assessment of a contest, it can be important that the position in which shooting took place is known. In such a case the position can be input either on the menu or via a barcode. With the setting '\Requirements\Position' the specification of a position can be insisted upon before a program can be installed. The position selected is displayed on the screen and on the paper printout. 09.08.2010 SIUS AG (c) 2004 111 / 112 Logon\Position\Off Off (Default) 99077600(32) Prone 99077601(29) Prone supported 99077604(20) Kneeling 99077603(23) Standing 99077602(26) Firer number The firer number identifies the firer. The firer number can also be loaded via a barcode (Sius barcode 99063900(04) inclusive of legalisation or SSV licence card) or via the keyboard. The firer number is transferred to the central processor. From the central processor the name of the firer can be construed from the firer number. The firer number is displayed on the screen and on the printer. Should the setting Firer number needed' be activated and 'Repeat allowed' be switched off, then the firer number is erased after each program. This ensures that with this configuration before every program a firer number must be introduced. 09.08.2010 SIUS AG (c) 2004 112 / 112 Abkürzungen: Shortcuts 1 10 Moose 2 2x30 Rifle 2x30 3 3*10 3*10 3*20 3*40 30 Air Rifle 3*10 Rifle 3*10 Standard Rifle 3*20 Free Rifle 3*40 Rifle 30 5 5 Moose 5-5-4-3 6 60 60 600 Free Rifle 60 Rifle 60 Scale Factor (600) A A1 A10 A101 A102 A103 A10m A10m A2 A20m A3 A4 A5 A-5m A6 A7 A8 Abrt Act Act AdjC Admn Advn MG Ziel A1 Precision A10 100m A10 200m A10 300m Pistol A 10m Rifle A 10m vertical MG Ziel A2 Rifle A 20m vertical MG Ziel A3 MG Ziel A4 MG Ziel A5 Pistol A 5m MG Ziel A6 MG Ziel A7 MG Ziel A8 Abort MPI SCB Adjust Clock Administrator Advanced Air Allo AP20 AP40 AP60 APis AR20 AR30 AR40 AR60 ARif AUT Auto Air pressure weapons Allowable Air Pistol 20 Air Pistol 40 Air Pistol 60 Air Pistol Air Rifle 20 Air Rifle 30 Air Rifle 40 Air Rifle 60 Air Rifle Austria Startup program B B1 B1 B10m B10m B2 B2 B20m B3 B3 B4 B5 B-5m B6 B7 B8 BesS BFrn Biat BigB BLft BO10 BO20 Boar Boar Boar Both Brcd BRgt Bersaglio 1 MG Ziel B1 Pistol B 10m Rifle B 10m horizontal Bersaglio 2 MG Ziel B2 Rifle B 20m horizontal Bersaglio 9 MG Ziel B3 MG Ziel B4 MG Ziel B5 Pistol B 5m MG Ziel B6 MG Ziel B7 MG Ziel B8 Best shot Bear Biathlon Big Bore Bear Left Rifle B 10m ellipse Rifle B 20m ellipse Wild Boar 2 Wild Boar 5 Wild Boar 5 Right On Both Edit Barcode Bear Right C C1 MG Ziel C1 C15m Pistol C 15m Abkürzungen: Shortcuts C15m C2 C3 C30m C4 C5 C6 C7 C-7m C8 Cal Cal Calf CAll CAll Carb Catg CFP CGaS Cham Chmp Clas Clck Clmn Clr ClrG ClrL Clss Cmbn Cmpl Cnct Cntr Comp ConB Conf ConL Crcl CroA Cros CrSh CtMo CtmS CU CU CURs D Rifle C 15m MG Ziel C2 MG Ziel C3 Rifle C 30m MG Ziel C4 MG Ziel C5 MG Ziel C6 MG Ziel C7 Pistol C 7m MG Ziel C8 Calibre Display calibre Moose Calf Pistol C All Rifle C All Carbine Category Center Fire Pistol Clear target after shots Chamois Swedish championship Classic Time Column Configuration Clear Clear target window Clear List Classes Combined Complete Connect Control Compute series Convert both sighters Confirm Convert last sighting shot Circle Croatian AR Target Cross Cross Shot Control Mode Customer Settings Control unit On-screen Control unit reset D100 D10m D15m D200 D300 D40m D-5m DAll DAN Dbl Debg Debg Defe DeMo Dflt Dfrd DisF Disp Dist Dist Divi D-SP Duel DFS100 Pistol D 10m DFS 15m DFS 200 DFS 300 Rifle D 40m Pistol D 5m Rifle D All Dansk Double Debug Debug Mode Deferred Shots Demonstration Mode Default Deferred Screen-format Screen Distance Distance Index Divisions D931-SP Duel mode E E20m EAll Emty EnAR ENG ERpt ESP Euro EurS Pistol E 20m Pistol E All Empty Enable Autoreset English Enable Repeat Español European European with Seconds F FacS FB Fig1 Fig2 Fig3 Fig8 Fill FldA FldB FldD Fltr Factory Settings Full Bore Full Figure Half Figure One Third Figure Eighth figure Fill Series Field A Field B Field D Filter Abkürzungen: Shortcuts Fnal FncK Foot FRA Free Free Free FRes Frmt FrNo FrNo Frst Func Final Function Keys Footer Francais Free Rifle Free Series Free series start setting Final reserved Date format Firer number Firer number required First relay Function G GC GER GrGr GrKl GrLi Grp GrRe Group championship Deutsch Gross Gross Gross Klein Gross links Group Gross rechts H HH+ Head hGms Hnt Hnt HrdC HrdW hRoe Hwal Hour minus 1 Hour plus 1 Header Chamois Hubertus Belgium Hunting Print screen Hardware Roe Left Hans Waldmann Schiessen I IDP3 Ilgl IncS Indi Ins0 InTn Invr InvS ITA iDP3240 Illegal Shot Include sighters Indication Insert zero shot Display Inner ten Inverse Invalid shots Italiano K KlGr KlKl KlLi KlRe Knbn Knee Kybd Klein Gross Klein Klein Klein links Klein rechts Knabenschiessen Kneeling Keyboard L Lang Layt LCD Legl LFed LfLw Locl LogH Logn LSht LSW Language Layout On LCD Legalisation Line feed Large font in Listwindow Local Log Hex Logon Last Shot Last Shot Window M M1 M2 M3 MalF Mddl Menu MinMin+ Mntn MonMon+ Moos Morg MP20 MP30 Msg Mtch 2x1/3 figure 1/1+1/3 figure 1/8+1/2 figure Malfunction Middle relay Match Menu Minute minus 1 Minute plus 1 Maintenance Month minus 1 Month plus 1 Running Moose Morgarten Pentathlon 20 Pentathlon 3*10 Message Match N N15m NSF 15m NAMf Non-Allowable No Number Abkürzungen: Shortcuts No NoLf NOR NOR NrOI NSwe NTC4 NTC5 NxtP NxtS SNr Prim Number of line feeds Norsk Norway Number of Instancies diff New Swedish target NTTC4 NTTC5 Next Primary Score Next Secondary Score O Off Oly1 Oly2 OP_A OP_B OPAS OPBS OpnS Or75 OrdP Othr Graphic Printer Model On printer Print Printing Report Processes Programs Swedish program Prone Print Overtime Print Protocol R 0 Oly100 Oly200 OP Part 1 OP Part 2 OP A5 Sighters OP B4 Sighters Opening shooting Ordnance pistol 75 Ordnance pistol Other P P60 PA00 Para PB00 Pent PFed PffW PiBB PiBB PiSB Pist Pist Pos Pos PPrW PrCo Prct Prec Pres Prim PrnF PrnF Prnt Prnt Prnt Prnt Proc Prog Prog Pron PrOT Prot Pistol 60 PA100 Parameter PB100 Pentathlon Paper feed Pfäffiker winter practice Big bore pistol Sport Pistol Big Bore Sport Pistol Small Bore Free Pistol Pistol Position Position required Practice progress window Practice Control Practice Precision Presentation Primary Print-format Prone supported R BC RapF Repo Repo Rept Requ Res RF3x RFP RFPM RFPW Activate remote barcode Rapid Fire Report Shot Counter Reports Repeat Requirements Reserved Rapid Fire 3x20 Rapid Fire Pistol Military Rapid Fire Men Military Rapid Fire Women Rght Right Rifl Rifle RLd Reload Rmot Remote Rmov Remove Timer Roeb Running Roebuck Rprn Reprint Rset Reset Rset Reset Shot Counter Rset Reset Timer RsNo Reset Shot Number Run Running Target Rus Russian S Save SbyS SCB SclF Scnd ScNI Scor Save Customer Settings Shot by Shot Simulator SCB Scale Factor Scandinavia Save number of instancies Score Abkürzungen: Shortcuts SCPr ScrB Sec Sec0 SecS SeCt Sens SeqN SetS SetS Sett Sett Sg57 Sg90 Shoo Show Shrt Shrt ShtC Shts Sigh SiSe SjF4 SjF5 SjFK SjFS SlfT SmlB SpPi SSns Stat Stnd Stnd StPi StpL Strt SubT Sui SWE SWE Symb Sys SC-Programs Scoreboard SNr Prim Sec Set second zero Secondary Score Settings Control Sensitivity Total with SeqNr Set Scale Factor Set Subnet Set Timer Settings Stgw 57 Stgw 90 Shoot Display Messages Short Short format Shot Counter Shoot Sighters Single Execution Schijf 4 Schijf 5 Schijf K Schijf S Self Test Small Bore Sport Pistol Shot sensor Status flashing Standard Standing Standard Pistol Stop at Left Start Timer Subtotal Switzerland Moose SWE Svenska Symbol System T t xy t x/y TChg Target changer TCU Time Control Unit TgAl TgFM TgNm Tgts ThiC Timr Timr TOTL Trgt Trgt Target Alternative Target Feed Message Display target name Targets Thin Cross Programed Timers Timer TOTAL Target Target test U UsrG User Group USSe US+Seconds V Voeg Vögelinsegg W Weap Weapon Weap Weapon required Weap Weapon Type X X X+01 X+1 X+10 X-01 X-1 X-10 XY DeltaX X+0.1mm X+1mm X+10mm X-0.1mm X-1mm X-10mm Spread Y Y YY+ Y+01 Y+1 Y+10 Y-01 Y-1 Y-10 Z DeltaY Year minus 1 Year plus 1 Y+0.1mm Y+1mm Y+10mm Y-0.1mm Y-1mm Y-10mm Abkürzungen: Shortcuts Zi30 Zimmerstutzen 30 INSTRUKTION VID SKJUTPLATS 1. Slå på spänningen 2. Tavlan kommer fram på monitorn 3. Skjut provskotten [P] 4. Tryck Match på fjärrkontrollen eller kontrollenheten när du är klar med provskotten [S]. (D är dold skjutning där skotten inte visas förrän omgången är klar och skytten trycker på Visa) 5. När du är klar med tävlingsskotten tryck på TOTAL för att avsluta. Ny skjutning? Tryck på Repetera (finns i menyn via fjärrkontrollen eller på kontrollenheten). 1 (1) d okumentegenskap . INSTRUKTION FÖR SKJUTLEDAREN SIMULERA SKJUTNING MED DEMOSKOTT Dok-nr: XNA 250108 Datum: 2011-08-18 d okumentegenskap . 1. Välj: Home sedan System\Inställningar\Övrigt\Demo\På 2. För att simulera skott tryck på ”INS” (0). 3. Utropstecknet efter skottets valör anger att skottet är simulerat. d okumentegenskap . INSTRUKTION FÖR SKJUTLEDAREN HUR GÖRA OM NÅGON ÄNDRAT PÅ INSTÄLLNINGARNA I KONTROLLENHETEN Dok-nr: XNA 250110 Datum: 2011-08-18 d okumentegenskap . 1. Gör markeringssystemet spänningslöst. 2. Stoppa in en smal pinne (exempelvis en popnit) i det översta hålet av de båda små hål som finns ungefär i mitten på kontrollenhetens baksida, vid kontakterna. (Bakom plåten finns nämligen en liten kontakt fastsatt på ett kretskort, så var försiktig). 3. Håll kvar pinnen, slå på nätspänningen. Efter ca 15 s hörs en ton från kontrollenheten. En text kommer upp på bildskärmen (Kundinställningar åter…). Ta ur pinnen. 4. Därmed har de sparade kundinställningarna återhämtats och kontrollenheten fungerar som tidigare. Ändra kontrollenheter och SiusData från 10 m till 50 m eller tvärtom! 1. Klicka på ikonen Funktionstangenter i SiusData. 2. Klicka på Import. 3. Välj filen Functions2_konfigurering_50m.ini när du ställer om till 50m eller Functions2_konfigurering_10m.ini för 10m, filerna finns i mappen SiusData. När filen är markerad tryck på Öppna. 4. Tryck på OK. 5. Gör samtliga tavlor ”aktiva” dvs. gröna. 2013-03-05 6.Klicka på knapparna 1 – 4 i ordning, vänta ca 30s mellan knapp tryckningarna. När ni har klickat på knapp 4 kommer ett pip att höras från kontrollenheten. 7. Klicka på ikonen Funktionstangenter i SiusData. 8. Klicka på Import. 9. Välj filen Functions2_Tävling.ini. Klicka på Öppna. 10. Tryck på OK. 11. Klicka på ikonen ”allmänna inställningar” 12. Vid bantyp välj för 50m. Eller för 10m välj 13. Klart. Vi påminner om nya programmen för ISSF tävlingar som finns på vår hemsida www.sius.se under Nyheter – Sport. 2013-03-05 1. Introduktion 1 2. Hämtning av dokument och programvara 2 3. Kontrollera mjukvaruversion 3 4. Installation LonDongle 4 5. Reset LonDongle 5 6. Installation SiusData 6 7. Uppgradering SiusData 7 8. Installation och uppgradering SiusView 8 8. Uppgradering mjukvara i kontrollenhet och tavla 9 10. Registrering av skyttar i SiusData 10 11. SiusData vid tävling 11 12. Skapa skott i simuleringsmod SiusData 12 13. SC-Program 13 14. Underhåll tavla S10 14 15. Underhåll tavla S25/50 15 16. Felrapport 16 17. Förklaring av csv fil 17 18. Error navigator 18 19 20 www.sius.se UTBILDNING SA941 Elektroniskt markeringssystem 2011-02-06 Introduktion Målsättningen för utbildningen är att ge nödvändig kunskap för att använda och underhålla SIUS anläggningar samt att kunna genomföra tävlingar med resultatredovisning och publikinformation med utnyttjande av systemets möjligheter. Utbildningen omfattar: Grundläggande information om tekniken Underhåll och service Problembestämning Resultatredovisning med PC-programmet Shooter och SIUS systemet Uppgradering av programvara Sida 2 av 2 Hämtning av dokument och programvaror www.sius.se Hämtning av dokument och programvaror INSTRUKTION Dok. nr: XNA 250155 • Gå till hemsida: www.sius.se Datum: 2011-02-05 Sidan: 2 av 3 Hämtning av dokument och programvaror INSTRUKTION Dok. nr: XNA 250155 Datum: 2011-02-05 Sidan: 3 av 3 Kontrollera mjukvaruversion www.sius.se Kontrollera mjukvaruversion INSTRUKTION Dok. nr: XNA 250151 Datum: 2011-02-05 Sidan: 2 av 2 För att se vilken version av mjukvaran man har gör som nedan. • Detta gäller för SiusData & SiusView • Klicka på ”frågetecknet” • Klicka på Om • Här ser man versionen Installation LON DONGEL www.sius.se INSTALLATION LONDONGEL INSTRUKTION Dok. nr: XNA 250154 Datum: 2011-02-05 Sidan: 2 av 3 OBS! Anslut INTE LonDongeln till datorn innan SiusData är installerad 1. 2. Anslut USB kontakten till datorn, när bilden nedan kommer upp välj Nej inte den här gången klicka på Nästa Välj som på bilden nedan, klicka på nästa INSTALLATION LONDONGEL INSTRUKTION Dok. nr: XNA 250154 Datum: 2011-02-05 3. Markera Sök igenom flyttbar media …………. Klicka på Nästa 4. Klicka på Slutför, detta kommer att ske två gånger Sidan: 3 av 3 Installaton SIUS SNI 1. Anslut Sius SNI till datorn 2. Öppna Kontrollpanelen ->System ->Enhetshanteraren 3. Högerklicka på Sius Network Interface välj egenskaper välj uppdatera drivrutin 4. Välj det markerade alternativet 5. Leta rät på mappen SNI på CD;n ock klicka på nästa 6. Klicka på installera 7. Sius SNI är nu klar att använda 2 Reset LonDongle www.sius.se Reset LonDongle INSTRUKTION Dok. nr: XNA 250150 Datum: 2011-02-05 Sidan: 2 av 4 Om du inte får kontakt med banan kontrollera att lysdioderna lyser som på bilden nedan. Om de inte lyser som bilden visar utan de istället lyser gult gör reset på Lon Dongeln enligt följande: • • • Öppna kontrollpanelen Klicka på system Klicka på fliken Maskinvara Reset LonDongle INSTRUKTION Dok. nr: XNA 250150 Datum: 2011-02-05 • Välj • Klicka på ”pluset” vid XLON • Högerklicka på Egenskaper Sidan: 3 av 4 Reset LonDongle INSTRUKTION Dok. nr: XNA 250150 • Klicka på reboot • .. Datum: 2011-02-05 Sidan: 4 av 4 Installation och konfigurering av Sius Data www.sius.se Installation och konfigurering av SiusData INSTRUKTION Dok. nr: XNA 250153 Datum: 2013-03-19 Sidan: 2 av 12 1. Leta reda på mappen SiusData på cd:n och klicka på filen Setup.exe 2. Välj installations språk 3. Klicka på OK 4. Om SiusData skall installeras på en dator med XPoperativsystem klicka nästa Installation och konfigurering av SiusData INSTRUKTION Dok. nr: XNA 250153 Datum: 2013-03-19 Sidan: 3 av 12 5. Om SiusData skall installeras på en dator med Vista eller Windows 7 ändra så att programmet installeras på C:\Sius Ascor\SiusData 6. Klicka på Nästa 7. Klicka på Nej 8. När installationen är klar starta SiusData genom att klicka på ikonen på skrivbordet Installation och konfigurering av SiusData INSTRUKTION Dok. nr: XNA 250153 Datum: 2013-03-19 9. Välj Svenska klicka på OK 10. Klicka på OK 11. Välj CtmShoot2_75a_Main.ini eller senare version 12. Välj Functions2_Empty.ini klicka på OK Sidan: 4 av 12 Installation och konfigurering av SiusData INSTRUKTION Dok. nr: XNA 250153 Datum: 2013-03-19 13. Markera XLon USB skriv in antalet tavlor 14. Klicka OK 15. Klicka Avsluta 16. Starta SiusData från skrivbordet Sidan: 5 av 12 Installation och konfigurering av SiusData INSTRUKTION Dok. nr: XNA 250153 Datum: 2013-03-19 Sidan: 6 av 12 17. Markera det översta alternativet ”Öppna ny Tävling….” 18. Klicka OK 19. Skriv in Licensnumret för Lon Dongeln (är tryckt på Lon Dongeln) 20. Klicka på ikonen Allmänna inställningar Installation och konfigurering av SiusData INSTRUKTION Dok. nr: XNA 250153 Datum: 2013-03-19 Sidan: 7 av 12 21. Under bantyp välj “Air pressure weapons” 22. Fliken fjärrkontroll, välj inställningar som nedan 23. Fliken Data backup, om SHOOTER skall användas som resultatsystem skapa en mapp rakt under C:\ och kalla den ex. resultat (C:\resultat) klicka sedan på Lägg till Installation och konfigurering av SiusData INSTRUKTION Dok. nr: XNA 250153 Datum: 2013-03-19 Sidan: 8 av 12 24. Välj mappen resultat som skapades i punkten ovan, klicka på OK 25. Fliken ”Visa tavlor” välj inställningar som nedan 26. Kopiera filerna ” Functions2_10M.ini” och ” Functions2_konfig10M.ini” samt ”CustomerBarcodes.txt” från Cd:n till mappen SiusData på datorn 27. Kopiera alla bitmap ikoner från mappen bitmappikoner på Cd:n till mappen SiusData 28. Klicka på ikonen Funktionstangenter Installation och konfigurering av SiusData INSTRUKTION Dok. nr: XNA 250153 Datum: 2013-03-19 Sidan: 9 av 12 29. Klicka på import 30. Markera filen ” Functions2_konfigurering_10M.ini” klicka på öppna 31. Gör samtliga banor ”aktiva” genom att klicka på den gråa rutan för varje bana så att den blir grön 32. Klicka på funktionstangenterna i ordning 1 till 4 vänta ca 30sek mellan knapptryckningarna efter man tryckt på knapp fyra kommer ett pip att höra från kontrollenheten vilket innebär att anpassningen är sparad. till Installation och konfigurering av SiusData INSTRUKTION Dok. nr: XNA 250153 Datum: 2013-03-19 Sidan: 10 av 12 33. Klicka på ikonen Funktionstangenter 34. Klicka på Import 35. Markera filen ” Functions2_Tävling.ini” klicka på öppna Installation och konfigurering av SiusData INSTRUKTION Dok. nr: XNA 250153 Datum: 2013-03-19 Sidan: 11 av 12 36. Klicka på OK dessa funktionstangenter används för att ställa in fjärrkontrollen, radering av grafiken samt Match knapp vid ex. finaler 37. Klicka på ikonen ”Anpassa verktygsrad” 38. Denna funktion används för att begränsa antalet ikoner i verktygsraden, markera den som skall tas bort och tryck på <<Ta bort 39. Detta är en lämplig uppsättning ikoner 40. Klicka på ikonen ”skrivarinställningar” Installation och konfigurering av SiusData INSTRUKTION Dok. nr: XNA 250153 Datum: 2013-03-19 Sidan: 12 av 12 41. Detta är en lämplig inställning för utskriften av skjutprotokoll, under Text1 skriver ni in tävlingens namn Uppgradering av Sius Data www.sius.se Uppgradering av Sius Data INSTRUKTION Dok. nr: XNA 250144 • • Datum: 2011-02-05 Sidan: 2 av 4 Kopiera hela mappen C:\Program\SiusAscor\SiusData till ex. C:\temp Stäng SiusFtpServer genom att högerklicka på den och välj • Hämta uppgraderingen från www.sius.se ► Programvaror • Unzip filen SiusData_Update.zip • Klicka på filen setup.exe • Klicka på Kör, klicka på OK för språkval Svenska. Klicka på OK för bekräftning borttagning av fil • Uppgradering av Sius Data INSTRUKTION Dok. nr: XNA 250144 Datum: 2011-02-05 • Klicka på filen setup.exe igen. • Klicka på OK • Klicka på Nästa • Svara Nej. Sidan: 3 av 4 Uppgradering av Sius Data INSTRUKTION Dok. nr: XNA 250144 • Datum: 2011-02-05 Sidan: 4 av 4 Starta SiusFtpSever genom att klicka på den i mappen C:\Program\SiusAscor\SiusData • Från den gamla SiusData som ni sparade tidigare (C:\temp) kopiera filerna RCI.ini, siusdata.ini, SCPrograms_10.ini, Functions2_konfig10M.ini, Functions2_10M.ini CustomerBarcodes.txt samt alla *.bmp filer. • Starta SiusData • • Om inte skyttar vars namn innehåller (ÅÄÖ) inte visas rätt på monitorn kontrollera filen RCI.ini, det skall stå som nedan AsciiConversion = 0 Skrivskydda filen efter den sparats Installation & uppgradering Sius View www.sius.se INSTALLATION SIUS VIEW INSTRUKTION Dok. nr: XNA 250152 Datum: 2011-02-05 Sidan: 2 av 6 Installation och konfigurering av Sius View 1. Leta rätt på filen Setup.exe på cd;n och klicka på den 2. Klicka OK 3. Om SiusView skall installeras på en dator med XPoperativsystem klicka nästa 4. Om programmet skall installeras på en dator med Vista eller Windovs 7 ändra så att programmet installeras på C:\Sius Ascor\SiusView INSTALLATION SIUS VIEW INSTRUKTION Dok. nr: XNA 250152 Datum: 2011-02-05 5. Klicka på Nästa 6. Klicka på Slutför, programmet är nu installerat 7. Starta programmet med ikon på skrivbordet 8. Välj språk Svenska och tryck OK Sidan: 3 av 6 INSTALLATION SIUS VIEW INSTRUKTION Dok. nr: XNA 250152 Datum: 2011-02-05 Sidan: 4 av 6 9. Skriv in IP-adress till datorn som SiusData körs på och tryck på Nästa 10. Bocka i Aktivera och skriv in IP-adress till datorn som SiusData körs på och tryck på Nästa 11. Klicka på ikonen Gemensamma inst. 12. Klicka på Ändra och markera med musen antalet banor INSTALLATION SIUS VIEW INSTRUKTION Dok. nr: XNA 250152 Datum: 2011-02-05 13. I fliken Översikt tavla klicka på Flera tavlor 14. Detta är lämpliga inställning för visning 15. Starta om programmet för att inställningarna skall gälla Sidan: 5 av 6 INSTALLATION SIUS VIEW INSTRUKTION Dok. nr: XNA 250152 Datum: 2011-02-05 Sidan: 6 av 6 Uppgradering: • Kopiera mappen SiusView till ex. C:\temp • Kör installationsprogrammet två gånger (första gången raderas programmet) • När installationen är klar kopiera filen auxmon.ini (konfigureringsinställningar) från den gamla versionen av SiusView som ni sparade i första punkten till C:\Program\Sius Ascor\Siusview Uppgradering av tavla och kontrollenhet Ladda ner senaste versionen av mjukvaran från: www.sius.se ► Programvaror Klicka på Update, välj spara fil till ex. C:\temp Filen är zippad, öppna den genom att klicka på den tills den är unzippad. Klicka på Lon Org Under mappen LmeLon kopiera filen LME_20p.NXE (eller senare) till C:\Program\Sius Ascor\LonOrg\Download\LmeLon Under mappen Me68000 kopiera filen ME931_System_75a_Main_SWEDISH.68k (eller senare) till C:\Program\Sius Ascor\LonOrg\Download\Me68000 Under mappen NIOS kopiera filerna NIOS_LS10_10i.flash eller nyare och NIOS_HS10-Sport_11e. Flash eller nyare Starta LonOrganizer Klicka på ikonen Common Kontrollera att det står XLon USB vid PC Lon alt. SIUS NetvorkInterface annars ändra Ändra denna inställning till 2sek Välj Download och flik ME931 Klicka på då söks efter installerade kontrollenheter Klicka på knappen Refresh då kommer kontrollenhetens programversioner att visas. Klicka på File vid Download (68000) Välj den senaste filen i detta fall ME931_System_75d_Main_SWEDISH.68k Klicka på OK Bryt spänningen till banorna vänta 10sek. slå på spänningen till banorna, klicka på Start när bilden på monitorn blir randig Nerladdningen till kontrollenheten startar tar ca. 20 min under nerladdningen kommer bilden på monitorn att ”rulla” När nerladdningen är klar klicka på Refresh och kontrollera att versionen är den rätta. Uppgraderingen till tavlor under LME fliken och under fliken NIOS för HS och LS tavlorna sker på samma sätt men man behöver inte starta om banan innan nerladdningen Efter att nerladdningen är klar starta om banan Nu måste kontrollenheten konfigureras för språk, avstånd mm. Se instruction Installation SiusData För att slutföra installationen skall även nya filer kopieras till SiusData Kopiera filerna från mappen System7_Main_Update\Main till mappen där SiusData finns Instruktion för registrering av skyttar i Sius Data www.sius.se INSTRUKTION FÖR REGISTRERING AV SKYTTAR I SIUS DATA INSTRUKTION Dok. nr: XNA 250133 Datum: 2011-02-05 Sidan: 2 av 4 Instruktion för registrering av skyttar i Sius Data. Det finns två sätt för att registrera skyttar för användande i SiusData, ett som används vid träning för att få namn på utskrift och ev. kontrollremsa och ett vid tävling. 1. Träning I SiusData klicka på ikonen ”Visa skyttar” ,klicka på knappen Infoga. Fyll i StartNr ex.1 på första skytten och Namn och Klubb. För nästa skytt fyll i startnummer 2 Namn och Klubb o.s.v. Spara filen när alla skyttar är registrerade genom att klicka på knappen Export. Svara OK på frågan om sortering. Välj lämpligt filnamn ex. föreningens namn och lämplig mapp ex. C:\PROGRAM\SIUS ASCOR\SIUSDATA. OBS!! Glöm inte att spara filen genom att klicka på export annars är registreringarna borta. När man startar en träning så skall man importera samma fil som man skapade ovan genom att klicka på ikonen Visa skyttarna och sedan på import och väljer den fil som ni sparade ex. Västerås.csv. INSTRUKTION FÖR REGISTRERING AV SKYTTAR I SIUS DATA INSTRUKTION Dok. nr: XNA 250133 Datum: 2011-02-05 Sidan: 3 av 4 För att välja skytt för resp. tavla klicka på den gula ikonen före namnet och välj skytt i listan (sorteras på förnamn) Välj önskat skjutprogram Sänd till skyttens namn samt skjutprogram till monitorn genom att klicka på den gröna pilen 2. Tävling: Vid tävlingar, om inte externt resultat program används ex. Shooter, kan man använda en Excel fil (SiusDataResultatMacro) för registrering av skjutlag samt insamling av resultat. Skriv in Startnummer, Namn och Förening klicka på det lilla ”plusset” INSTRUKTION FÖR REGISTRERING AV SKYTTAR I SIUS DATA INSTRUKTION Dok. nr: XNA 250133 Datum: 2011-02-05 Sidan: 4 av 4 Skriv in tavelnummer och skjutlag i respektive fält. Klicka på minustecknet för att ”stänga” sidan. Klicka sedan på ikonen Exportera skyttar. För att välja skytt för resp. tavla klicka på den gula ikonen före namnet och välj skytt i listan (sorteras på förnamn) Välj önskat skjutprogram Sänd skyttens namn samt skjutprogram till monitorn genom att klicka på den gröna pilen, rutan i kolumnen ”ctiv” måste vara grön d.v.s. banan är aktiv. När skjutlaget är klart klickar man på ikonen ImportData i Excel dokumentet. SiusData vid tävling www.sius.se SiusData vid tävling INSTRUKTION Dok. nr: XNA 250149 Datum: 2011-02-09 Sidan: 2 av 4 OBS! INNAN SIUS DATA STARTAS RENSA ALLA FILER I MAPPEN DÄR SKJUTRESULTATEN SPARAS: C:\ resultat 1. Starta Sius Data, Välj det översta alternativet. Skriv in eget fil namn eller använd föreslaget datum, OBS: Det får inte vara några mellanslag I filnamnet. Om SHOOTER används ha max sex tecken i filnamnet Tryck på OK Om inte ”papperkorgen” fösvinner starta o det näst översta alternativet. Klicka på ikonen ”VISA SKYTTARNA” 2. Klicka på Import. Via nätverket sök mappen skjutlagslistor på datorn där SHOOTER körs. 3. Gör detta inför varje lag, om någon omplacering av skyttar skulle ha skett. Klicka på ikonen ”VISA BANOR” 4. Välj ikonen ”ÖPPNA NYTT LAG” 5. SiusData vid tävling INSTRUKTION Dok. nr: XNA 250149 Datum: 2011-02-09 Sidan: 3 av 4 Skriv in lagets nummer eller tryck på öka. 6. Välj rätt skjutprogram nere till vänster 7. Klicka på gröna pilen 8. När alla skyttar är klara spara resultatet till SHOOTER genom att trycka på ikonen ”DATA BACKUP” 9. Inför nästa skjutlag börja från punkt 2. FINAL OBS! Inför final skall Sius Data startas om och ny databas skall skapas, se punkt 1. SiusData vid tävling INSTRUKTION Dok. nr: XNA 250149 Datum: 2011-02-09 Sidan: 4 av 4 Flytta skytt inom skjutlaget Skriv in skyttens startnummer som skall flyttas till ledig bana, Radera namn på SiusView om banan går tom För att ta bort ”gamla” resultat från SiusView om skytt saknas i nästkommande lag, aktivera då banan som saknar skytt tryck på gröna pilen för den banan. SiusData skapa skott i simuleringsmod www.sius.se SiusData skapa skott i simuleringsmod INSTRUKTION Dok. nr: XNA 250148 Starta SiusData I simuleringsmod Öppna CU 931 Tangentbord Datum: 2011-02-05 Sidan: 2 av 3 SiusData skapa skott i simuleringsmod INSTRUKTION Dok. nr: XNA 250148 Datum: 2011-02-05 Sidan: 3 av 3 Sen är det bara att skapa skott med dessa knappar Antal skott i serien Skjutlaget skapas som en vanlig tävling, dock måste man använda dom skjutprogrammen som finns som standard ex. OBS! DET FUNGERAR INTE MED DE SKJUTPROGRAM SOM FINNS UNDER ”EGEN TÄVLING” SC-Program www.sius.se SC-Programs instructions: SC-Programs are customer programs which can be sent to the control unit and will be saved in the SC directory. This Guide is a short description how to create such a SC-Program and send it to a control unit: 1. Open the Program Barcode Library. 2. Click on “Program\Settings…” 3. -Check if you are using the version 7.3e_Final for SA9003. If not, change it. -Set the directory to the path where SiusData is installed and click “Ok”. 1 4. Create your own program. Click on the folder “User” and choose “Insert\Customer barcode\” 5. It appears a new window – the “Barcode editor”. a. Insert the name of the program. This name will appear on the monitor b. Choose a short name with maximum 4 letters. They will appear on the display of the control unit. c. Change to the right modus (Air pressure weapons, ISSF/SSSV 2550, …) d. The legalisation is a free option which you can let 0. e. The external number is also optional. f. You may insert a description of your program. g. Insert the desired competition 6. Click “Ok” to accept and close the window. 2 7. Click on User and Choose “Program\Create shortcut file” 8. Check if the current folder is “C:\programs\Sius Ascor\SiusData\”. Choose a name for your competition and click “Save” 3 9. Go to “Program\Update SiusData” 10. Open SiusData. Check if you have installed at least version 2.03e. 11. Activate all those lines to which you want to send the shortcut program. 12. Choose “Settings\SCProgramme laden” 4 13. Open your created SCPrograms_File. Now the SC-File will be sent automatically to the selected control units. 14. If the transfer is finished successful you will see this message: 15. Click “Ok” to close this window. 16. Now you can find the program in the control unit under “System\Control\SC-Programs” (F3,F3) 5 Elektroniskt markeringssystem Underhåll tavla LS10 HS10 SIUS MIATRON AB Tfn: 021-600 13 (+4621 600 13) Internet: http://www.sius.se E-post: [email protected] Dokument nr XNA 250145 SIUS / 2011-02-05 Innehållsförteckning 1. 2. 3. 4. 5. 6. 1. Allmänt ....................................................................................................................... 2 Uppbyggnad och funktion ........................................................................................... 2 Underhåll .................................................................................................................... 2 Förbrukningsmaterial .................................................................................................. 3 Materialbeställning ...................................................................................................... 3 Noteringar ................................................................................................................... 3 Allmänt Den elektroniska mättavlan LS10 och HS10 är konstruerad för alla 10 m luftvapendiscipliner, samt gevär 50 m. Vänligen beakta följande anvisning för underhållet av tavlan. 2. Uppbyggnad och funktion När kulan passerar genom tavlan detekteras kulan av tre oberoende infraröda lasermätsystem. Kulans position detekteras med en hög noggrannhet. Den höga noggrannheten kan även utnyttjas för att visa kulans form! Därför är LASERSCORE® värdens noggrannaste tavla. Eftersom mätningen sker vid tavlans horisontella plan finns ingen risk för parallaxfel om skjutningen sker snett mot tavlan. Detta är helt unikt och uppnås inte av någon annan tavla. Som tillval finns bland annat belysning och skottverifiering med pappersremsa, nödvändigt vid internationella ISSF mästerskap. Skottverifieringsmodulen monteras mot tavlans baksida. Den väderskyddade elektroniken möjliggör att tavlan kan användas, inte bara för 10 m luftgevär och pistol utan även för korthåll gevär utomhus. 3. Underhåll Underhållet av tavlan säkrar en felfri drift. Följande punkter skall beaktas: att tavlans inre är rengjord och att de tre mottagarna inte är täckta av stoft Tips! Inför varje tävling skall tavlan rengöras. Scheibenwartung S10-Lon_d, Version 1.0 -2- SIUS AG / April 2012 4. Förbrukningsmaterial Pos. 1 2 3 4 5 5. Artikel nr Beskrivning LS10A043R2 Försättstavla (PVC) Gevär S20A022LS10/100 Försättstavla Gevär papper LS10A040R2 Försättstavla (PVC) 50 m Gevär LS10A044R2 Försättstavla (PVC) Pistol S20A023/10 Försättstavla Pistol papper Materialbeställning Förbrukningsmaterial och reservdelar kan du beställa från: SIUS MIATRON AB Mälbyvägen 26 722 33 Västerås Tfn: 021-600 13 (+4621 600 13) Internet: http://www.sius.se E-post: [email protected] 6. Noteringar Scheibenwartung S10-Lon_d, Version 1.0 -3- SIUS AG / April 2012 Felrapport www.sius.se Felrapport INSTRUKTION Dok. nr: XNA 250156 Datum: 2011-02-05 Felrapport till SIUS skall innehålla: 1) Felbeskrivning Utskrift genom följande tangenttryckning på kontrollenheten: 2) Hjälp tangenten 3) Home\System\Underhåll\BIT-test\Taveltest 4) Home\System\Rapport\Log\Allt 5) Home\System\Underhåll\Rapport\Log\Log Hex 6) Home\System\Underhåll\Rapport\Inställningar\Utskrift Sidan: 2 av 2 F|UNODULQJFVYILO www.sius.se Start Nr Pri. Score 201 202 203 204 205 201 202 203 204 205 201 202 203 204 205 10 10 10 10 9 9 9 10 10 9 9 9 10 9 9 Match Ban tiondel Divisions shot nr. 0 0 0 0 0 1 1 1 1 1 1 1 1 1 1 1 2 3 4 5 1 2 3 4 5 1 2 3 4 5 10.4 10.2 10.8 10.5 9.9 9.9 9.8 10.7 10.1 9.5 9.6 9.7 10.9 9.5 9.8 439 600 120 359 839 839 920 200 680 1159 1080 999 39 1159 920 Tid 46:43.7 46:49.8 46:55.9 47:02.2 47:08.3 47:23.8 47:29.8 47:35.9 47:42.2 47:48.3 48:03.8 48:09.8 48:15.9 48:22.2 48:28.3 Inner In Time X-kord. Y-kord. tia time since ch 0 0 1 0 0 0 0 1 0 0 0 0 1 0 0 3.11 6 0.85 3.6 -5.94 -8.4 -6.51 1.41 4.81 8.2 -10.8 -7.07 0.28 0 6.51 -3.11 0 0.85 0 -5.94 0 6.51 1.41 -4.81 -8.2 0 -7.07 0.28 11.6 6.51 1 1 1 1 1 1 1 1 1 1 1 1 1 1 1 655.35 655.35 655.35 655.35 655.35 655.35 655.35 655.35 655.35 655.35 655.35 655.35 655.35 655.35 655.35 Sweep dir. Demo 0 0 0 0 0 0 0 0 0 0 0 0 0 0 0 0 0 0 0 0 0 0 0 0 0 0 0 0 0 0 Prac- Ins Total Fire Log Log Shoot tice Del kind Group kind event type Time 24 24 24 24 24 24 24 24 24 24 24 24 24 24 24 0 0 0 0 0 0 0 0 0 0 0 0 0 0 0 0 0 0 0 0 0 0 0 0 0 0 0 0 0 0 1 1 1 1 1 0 0 0 0 0 0 0 0 0 0 0 0 0 0 0 1 1 1 1 1 1 1 1 1 1 0 0 0 0 0 1 1 1 1 1 1 1 1 1 1 3 3 3 3 3 6 6 6 6 6 7 7 7 7 7 3 3 3 3 3 3 3 3 3 3 3 3 3 3 3 110440375 110440984 110441593 110442218 110442828 110444375 110444984 110445593 110446218 110446828 110448375 110448984 110449593 110450218 110450828 Re- Wea- Pos- Target Ext. lay pon ition ID Nr. 0 0 0 0 0 0 0 0 0 0 0 0 0 0 0 0 0 0 0 0 0 0 0 0 0 0 0 0 0 0 0 0 0 0 0 0 0 0 0 0 0 0 0 0 0 64 64 64 64 64 64 64 64 64 64 64 64 64 64 64 0 0 0 0 0 0 0 0 0 0 0 0 0 0 0 Company-Documentation Error Navigator SA931 Error Navigator SA931 File: ErrorNavigatorSA931_en_V2.0.doc Page 1 of 13 Company-Documentation Error Navigator SA931 General ATTENTION: Plug out the devices before opening them! This Instruction for troubleshooting is made to localise system errors independently. The errors/questions are listed in order to circumscribe more and more the error, if you go trough them step by step. The troubleshooting is based on the World cup system SA931. Most of these functions apply for other SIUS Ascor systems also. To troubleshoot the error the manual is necessary! If after circumscribing the error, an exchange of the faulty device (i.e. with second system) makes the system work again, the confirmation of the found error is made. If you request SIUS for further assistance please prepare this document and the made test results. Remark: For better understanding you can find pictures of the CU931 and LME circuit-boards in section “Software update” . On malfunctions and false conclusions due to manipulations, on devices and their electronics, which are NOT mentioned hereafter SIUS is not liable. Troubleshooting Error No device shows any reaction Question Is the fuse in order Is the voltage-switch of the power supply set right Is the cabling correct LED1 in device is not blinking (CU931 / Target) 1 Remedy Please exchange the fuse according to manual → ATTENTION: Check state of devices, eventually send them back to SIUS to repair Set voltage–switch to 110 respectively to 220 VAC - Check cabling according to manual - Check that the cables are snapped in correctly Send device or electronic circuit board back to SIUS to repair Light-diode (Lamp) on case or on electronic circuit board File: ErrorNavigatorSA931_en_V2.0.doc Page 2 of 13 Kommentar [JE1]: Company-Documentation Error Navigator SA931 Error Question LED in CU931 / Target The LED on shooter monitor are blinking, but else (M931) does not lit no reaction LED on shooter monitor (M931) is blinking Picture on monitor (M931, M1421) appears on power-up and but ceases after Is the brightness set right on monitor After the download of a new “68000 Software” LED is light (green) System is hanging Target can not be assigned to CU931 Remedy Connect monitor to the mains (220V) and turn it on Check data cable connection, exchange monitor (M931) or CU931 Turn up brightness Set brightness Check “Hardware Identifier Jumper” on CU931, does it correspond to your software, or download the “68000 Software” again - Lock the RJ45 connector in the socket. - Press the ServicePin at least 1 min. - Was the LME allready configured (LED flash slowly), it can’t configurred by a shot once again. SIUSLANE has a red RS232- - Check the selected COM Port Status indication, settings ok.? - Check the setting of the jumpers on target circuit boards: “Lamp” for LON and “RS232” for SIUSLANE. If a jumper was set wrongly the circuit board should be sent back to SIUS for control. SIUSLANE has a red RS232- Only for cabling test: Status indication, cabling ok.? Set one jumper across. If the monitor shows “offline“ Is the LON-network set up ideal CU931 is hanging with the message “Maxload“ on the display The system is booting, makes a reset and boots again File: ErrorNavigatorSA931_en_V2.0.doc If the connection is ok the status turns to green. Delete network configuration and reconfigure according to manual - Network-ends are set with terminations - Brach lines are not longer than 2m - For special systems (PC, Router etc.) consult the manual Download “68000 Software”. Is the error not fixed send the device back to SIUS - Are there only 2/10 systems per corresponding power supply. - The voltage of the power supply is too low (min. 24VDC). Page 3 of 13 Company-Documentation Error Navigator SA931 Error PC is hanging Question Get the LonDongle disconnected while the PC was running No communication between PC and LonDongle Was there a new version of SIUSData intalled The system is booting but operaton is not possible “Selftest” made without connected printer D931? Are settings made on the CU931 which are not reproducible Was filter set unintentional Was unintentional set remote to on Does the monitor show “offline“ or does SIUSLANE have a red RS232 status display Discipline choice makes the following question pop up: “All Data Required“, but can not been activated File: ErrorNavigatorSA931_en_V2.0.doc Remedy Send the LonDongle for check to SIUS. Æ NEVER change a printerport device while the PC is running (no HotSwap) Read “troubleshooting_en.htm” at the directory SIUSData\Help. - Rename all *.ini files to *.ini.old and restart SIUSData. - The installation must be run twice. Once for remove the old version, twice to install the new one. Connect and turn on printer D931 or make a restart Make a ColdStart (Reset) on the system. → ATTENTION: make ColdStart only according to manual. Saved filter will not cleared. 1. Switch off filter with “282806” (possible anywhere) 2. Set back filter (factory setting) 3. Save filter Make a ColdStart (Reset) on the system. → ATTENTION: make ColdStart only according to manual. Check connection between CU931 and target, eventually wrong software in the target electronic. Set FiDa OFF in “IdRq“ settings in “OPTIONS” menu Page 4 of 13 Company-Documentation Error Navigator SA931 Error The operation does not function correctly. Question Are the SelfTest functions executable.(Printer D931 is necessary) The barcode reader is not working correctly Malfunctions of keyboard On special event’s (e.g. select a new target) the system boot Malfunctions of the display File: ErrorNavigatorSA931_en_V2.0.doc Remedy Make all possible SelfTests: − Printout with key Help − Selected settings (Sett/Prnt) − Shot memory (Log/All and LogH) − Target Test (Trgt) → ATTENTION If you request SIUS for help please prepare printouts; eventually fax them. If barcode reader has no red light in front clean the lens or exchange barcode reader: if still not working, send back devise an reader to SIUS to repair Was unintentional set remote to on Conduct Selftest (Self) (Printer D931 is necessary On defect send back device to SIUS to repair The memory is overflow with remaning data and will be cleaned. Æ If “Automatic Softstart” is ON (default), the system make this under controll by it self. Æ Do not change this setting! Conduct Selftest (Self) (Printer D931 is necessary) On defect send back device to SIUS to repair Page 5 of 13 Company-Documentation Error Navigator SA931 Error Malfunctions of the system Question The printer does not print Remedy - Conduct printer hardware selftest (plug in while pressing LINE FEED and SELECT) If no printout is made send the printer back to SIUS to repair. - Conduct printer software seftest (Self) If there is no printout made contact SIUS. – In the menu “OPTIONS“ move the cursor to the complete right “>6“ (over the position “Lng“). On the display in the upper right corner “ON“ or “OFF“ appears, press ENTER. Now the “Printer protocol“ menu comes up. Set to “ON“. The printer feeds the paper but Is the printer paper inserted correctly? no printout is made The shiny side has to be visible. Printer prints only very weak Conduct printer hardware selftest (plug in while pressing LINE FEED and SELECT). “Head Rank“ letters have to correspond with the letters on the printing unit, otherwise contact SIUS. No paper feed on printer Paper is jammed in “printer paper cover” or the barrel needs to be cleaned with alcohol Direction arrows are print as Conduct selftest (Self). The arrows have to be in special characters the character set. If there are no arrows on the printout contact SIUS Printout of matrix printer is bad The ink ribbon is not inserted correctly or it needs to be changed LED on D931 is lit red No paper or release handle is open, otherwise (ALARM) printing unit is defect LED on D931 is not lit, but If the printer has been opened the LED could be functions well. (ALARM, covered. Send back printer to SIUS to repair PRINTER, SELECT) On 25m range the light signals - Check cabling between TCU25 and VJ45LS are not working - Check if the Lamp/RS232 jumper on each LME/target are on position Lamp Red and green phase are Inverse cabling in VJ45LS inverted On the second 25m bay only Switch both channels of the TCU25 on INTERN the TCU25 has a reaction but (internal), and the Master on OFF not the light signals The LONdongle is not working - Read the troubleshooting_en.html in the correctly SIUSDATA\Help-directory. - Restart SIUSDATA (Settings in LONdongle are reconfigured) - In LonOrg search for LONdongle and devices. If the LONdongle is not listed contact SIUS File: ErrorNavigatorSA931_en_V2.0.doc Page 6 of 13 Company-Documentation Error Navigator SA931 Error The displayed shot is not correct Question Remedy Comment: The discipline is not It is possible to shoot a 300m big bore rifle depending ofn the target type discipline on a S10-LON target. The TIC / MIX of the target informs this to the CU931 (see manual) Is the target maintained - Clean microphones correctly and the acoustic - Mend the acoustic chamber chamber in order - Replace the backup-masks - Exchange the heavy used front masks and rubber membranes → see manual Are the microphones clean Remove dust and lead particles with brush Do the microphones work By knocking the microphones the corresponding properly LEDs on the target electronic are lit On S10 and S25/50 a automatic paper/rubber feed is made Display Miss without At target with framhit detector can display falsely a shotsensor Miss when it be hit by a grazing shot After a shot “No paper feed“ is - Insert or replace paper/rubber band according to displayed manual. - For S10-LON targets: Close target frame - For S25/50 targets: Check transportation motor. - Check “rubber band feed circuit board” for correct fitting and cleanness Is the band feed set correctly Paper band feed S10: Air rifle 2cm in SIUSLANE Air pistol 4cm Rubber band feed S25/50: SB rifle 1mm Pistol 2mm → ATTENTION: For proper function use band only once Is the setup of the target Make Target Test (Targ) and check temperature correct? and TIC / MIX according manual. If the setup is not (Printer D931 necessary) correct send back target to SIUS to repair Nr. TIC MIX 0 LME only Normal 1 S10 2 S25/50 3 S25 Rotated180 4 S100 5 S300 Flip0 6 DB100 7 DB128 Flip180 8 S101 Are the shots in “Demo-Mode” If no shots appear re-boot the system. displayed If error is not fixed send back target to SIUS to repair Is the shot sensor setting right Set shot sensor on/off correctly and check “Hidden Miss“ (HMss) OFF → Zero is shown ON → Zero is only marked in log File: ErrorNavigatorSA931_en_V2.0.doc Page 7 of 13 Company-Documentation Error Navigator SA931 Error The displayed shot is not correct Question Is the position of the shot sensor / weapon right Are the light sensors of the shot sensor dirty Are the light sensors exposed to direct sun light Shot indication without Did someone shoot on a a fired shot neighbour lane 10.9 without a shot on several lanes No shot indication Are shots displayed in demo mode SIUSLANE has a red RS232Status indication Is any device exposed to rain (humidity) Is the measurement bar of a S110, S300 wet after rain File: ErrorNavigatorSA931_en_V2.0.doc Remedy Are noise separation walls mounted? → see manual Clean the plexiglas window of the light sensors with a humid cloth Protect shot sensor from direct sun light - Turn on shot sensor - On systems without shot sensor print out the log (on lane and neighbour lanes). Check the missing shot according to the time marks. Print log and compare time marks of the 10.9’s of the different lanes. → If the time is the same: The system is on the same phase (230VAC) as an other consumer: i.e. neon lamp (light on/off), electro-heating or compressor. If no shots appear re-boot the system. If error still occurs, send the target back to SIUS to repair Are the jumpers in the right direction on RS232, (not across!) Are all joints, covers and shutters present and closed Check rain protection according to manual Page 8 of 13 Company-Documentation Error Navigator SA931 Available Test Functions Test-Function SA931 SA921 Printer Test MAINT./Test/Self MAINT./Test/Self Line Test MAINT./Test/Line MAINT./Test/Line Memory Test Monitor Automatic Automatic Target Test MAINT./Test/Targ MAINT./Test/Targ Keyboard and Self Test MAINT./Test/Self MAINT./Test/Self Individual Scoreboard Test Azt Demo On (Tip on “shot sensor” OPT./Demo/ON OPT./Demo/ON or press “Ins“-key) Demo Off OPT./Demo/OFF OPT./Demo/OFF Print protocol OPT./ 5x“>6“/ENTER Monitor status MAINT./Serv/Stat MAINT./Serv/Stat Print log MAINT./Serv/PrnL MAINT./Serv/PrnL Shot Sensor On OPT./Sens/ON OPT./Sens/ON Shot Sensor Off OPT./Sens/OFF OPT./Sens/OFF Print “hidden miss” Off OPT./HMss/OFF OPT./HMss/OFF Print “hidden miss” On OPT./HMss/ON OPT./HMss/ON Show “hidden miss” Off OPT./HMss/OFF OPT./HMss/OFF Show “hidden miss” On OPT./HMss/ON OPT./HMss/ON Network Test MAINT./Test/Net Configure Network MAINT./Net Set time and date MAINT./Time Set language OPT./Lng OPT. ⇒ OPTIONS / MAINT. ⇒ MAINTENANCE (Menu names, reach with “Next Window“) File: ErrorNavigatorSA931_en_V2.0.doc Page 9 of 13 Company-Documentation Error Navigator SA931 Software UpDate The control unit (CU931) has 4 Software components. 1. For the logic (electronic) the PLD (Programmable Logic Device) Software is responsible. This is in direct relation to the circuit board print (Hardware) and can not be inserted into any circuit board version. The software has to be loaded into the PROM (Programmable Read-only Memory) with a programmer. The PROM can not be erased or reprogrammed. The version can be checked on the “Monitor Status“ printout or in LONorg. 2. For the communication between the control unit and the target the LON-software is responsible. This communication-software has to be in accordance with the target LON-software! This Software is situated in the LON-chip, a flash (electronically deleteable read-only memory) and can be downloaded with the PC-software called LONorg. The version can be checked on the “Monitor Status“ printout or in LONorg. 3. The Boot Strap Loader (BSL) loads or refreshes the monitor software and makes a plausibility check at the boot up. The software is saved in the lowest area of the operating program flash and can be downloaded with a parallel download cable (See appendix) . If the BSL is exchanged the operating program is deleted! This implicates that the operating program has to be re-downloaded. The version can be checked on the CU931 display during booting, on the “Monitor Status“ printout or in LONorg. The monitor software (68‘000) is in effect the operating program. This software is situated in the upper area of the operating program flash and can be downloaded with the PC-software called LONorg. The version can be checked on the shooters monitor at the end of booting, on the “Monitor Status” printout CU931 PLD Processor BSL 68‘000 Software PLD LOGIC LON Processor & Flash Fuse LED LON (rot) / 68'000 (green) LON-Network HIC Flash for BSL and 68‘000 Processor PLD Logik RAM PLD Software Battery for RAM-Data LCD contrast LON Processor and Flash File: ErrorNavigatorSA931_en_V2.0.doc Download-connector BSL Page 10 of 13 Company-Documentation Error Navigator SA931 The target electronic (LME) has 2 software components. 1. For the logic (electronic) the PLD (Programmable Logic Device) Software is responsible. This is in direct relation to the circuit board print (Hardware) and can not be inserted into any circuit board version. The software has to be loaded into the PROM (Programmable Read-only Memory) with a programmer. The PROM can not be erased or reprogrammed. The version can be checked on the “Target Test” printout as PIC (PLD Identification Code) or in LONorg. 2. For the communication between target and control unit the LON-Software is responsible. It also receives the shot data and sends it to the control unit. This communication-software has to be in accordance with the control unit LON-software! This Software is situated in a flash (electronically deleteable read-only memory) and can be downloaded with the PC-software called LONorg. The version can be checked on the “Monitor Status“ printout or in LONorg. LME PLD PLD LOGIC LON Shot data processing LON Software Mic processing Mic-processing Amplification Software LON-Network Processor Target variant RAM LON/RS232 HIC MIC 1...4 (rot) and Software (green) LED PLD Software PLD - LON LON-Processor Logic Software LON LED and Service Pin Download Software Software maintenance can be made with the PC-program called LONorg and a LONdongle. The software versions can be checked and newer software can be downloaded. LONorg is automatically installed if you install SIUSDATA or you can get it as ZIP-file called:“LonOrg_1_16.zip“. De-zip it into the root directory of C: and all program and directories are made to run the software. Update BSL The BSL is the same version in all control units and does not need to be updated normally. If in some cases the BSL has to be updated, it can be done with the “Downloader“ in LONorg, over the parallel download cable (see annex). To be able to use the “Downloader“ in LONorg the activation code be inserted. has to ATTENTION: If the BSL is updated the operating software is deleted and has to be re-downloaded! File: ErrorNavigatorSA931_en_V2.0.doc Page 11 of 13 Company-Documentation Error Navigator SA931 ATTENTION: Due to a wrong handling the repair of all devices might become necessary! 1. Connect the SA931 system with LONdongle to a PC 2. Copy the CU931 update-file into the directory: C:\Program Files\Sius Ascor\SiusData\LonOrg\Download\ME 68000. 3. Copy the LME (target) update-file into the directory: C:\Program Files\Sius Ascor\SiusData\LonOrg\Download\LME 4. Start the LONorg software in the directory C:\Program Files\Sius Ascor\SiusData\LonOrg\ 5. The LONorg main screen appears with the registers: “CU931“, “LME“, “Known“, “Unknown“ and “Router“. 6. If the main screen does not appear click on to activate it. 7. Search for all devices in the LON-network with. 8. The screen should display the following for CU931 or LME (targets): Register CU931 Register LME (targets) If the system was configured according to the manual, the x in “(SN x)“ is the lane number 9. Now all CU931 or LME (targets) can be marked; With the button “Refresh”, the versions of the connected devices is shows. With “File“ button the new software of point 2. or 3. Can be selected. With “Start” button the corresponding software is downloaded to the selected devices. ATTENTION: The LON-software is downloaded to the selected devices only, the 68'000-software (monitor/operating software) is downloaded to ALL connected CU931! 10. Press “Refresh” button to check the downloaded version of all devices. Select devices and download again. º LON-version not updated (very rarely): Disconnect all devices which had a successful download º 68‘000-version not updated: from the LON-network and download again. 11. With this button program start. the language of LONorg can be changed. The selected language is activated at the next 12. Clicking on , for detailed information (help file). For further inquiries contact: SIUS AG, Im Langhag 1, CH-8307 Effretikon Tel.: +41 52 354 60 60, Fax: +41 52 354 60 66, www.sius.com File: ErrorNavigatorSA931_en_V2.0.doc Page 12 of 13 Company-Documentation Error Navigator SA931 Annex S te c k e r 2 S te c k e r 1 1A 25 1B 13 1 14 M a le S ig n a l P lu g 1 C a b le 1 P lu g 2 as3 8 1 P - D0 P – D1 P – D2 P – D3 P – D4 P – D5 P – D6 P – D7 X P - S tr o b e S ta r t P - B usy GND as0 8 3 P in C o lo u r P in 1B 1A 2B 2A 3B 3A 4B 4A 5B 5A 6B 5A B rau n 2 3 4 5 6 7 8 9 1 16 11 25 R ed O rang e Y e llo w G reen B lu e P u r p le G rey W h it e B la c k B rau n R ot BSL Parallel download cable File: ErrorNavigatorSA931_en_V2.0.doc Page 13 of 13 PROGRAMVARA Datum: 2012-11-19 Bifogade CD innehåller programvaran för Er PC vid skjutledaren. Vänligen installera direkt under C:\Sius Ascor\............ 1 (1)