1
Patrons
5
Patrons overview .................................................................... 326
Editing patron records............................................................ 327
Importing patron records ....................................................... 344
Exporting patron records ....................................................... 351
Batch processing patron records ............................................ 358
Creating a patron custom index............................................. 372
Importing patron images........................................................ 377
325
SCC5um1200kn
Patrons overview
You manage your patron records database by adding, editing, and deleting individual
patron records as well as groups of patron records. You can also import and export files
of patron records and set up a custom index. With accurate records, you can keep track of
your patrons and their circulation activities.
Setting up
Before you add patron records to your database (either by entering individual records or
by importing new records), make sure you have the necessary patron types already set up.
For more on setting up types, see "Setting up patron types" in the Setup chapter of this
manual.
Backing up
Back up your database files before and after you make major changes or additions to your
records. For more on backups, see "Backing up Spectrum data" in the Backup chapter of
this manual.
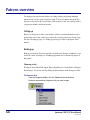
Choosing a task
The Patrons tasks include Edit, Import, Export, Batch Process, Custom Index, and Import
Patron Images. You choose tasks by clicking the Patrons button on the Navigator toolbar.
To choose a task
From the Navigator toolbar, click the Patrons button and choose
the menu command for the patron task you want to open.
326
Spectrum CIRC/CAT User Manual
SCC5um1200kn
Editing patron records
You add, edit, and delete individual patron records so you can keep track of your patrons
and their circulation activities.
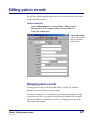
To open Patron Edit
From the Winnebago menu, choose Patrons > Edit, or click the
Patrons button in the Navigator toolbar and choose Edit. The
Patron Edit window opens.
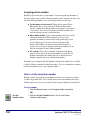
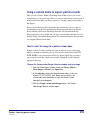
Patron Edit window
In this window, you can
add, edit, and delete
patron records.
Managing patron records
To manage patron records, use the Patron Edit window. You add, edit, and delete
individual patron records in this part of the program.
If you haven’t already done so, you should set up patron types before adding or editing
your patron records. Also, if you plan to use the patron user-defined fields, you should
name those fields before you edit patron records (see "Setting up patron types" in the
Setup chapter of this manual).
Patrons: Editing patron records
SCC5um1200kn
327
Loading patron records
Before you can edit or delete an existing record, you must load it into the Patron Edit
window. You can look up a patron record in several ways. Before you load a record, you
may want to change the index by which your records are sorted. You can sort and search
your records by patron number, patron name, patron type, or any of the three user-defined
fields.
When you open the Patron Edit window, the default patron record is displayed. The
default record is usually not the first record when your database is sorted by the selected
index. You must click one of the load buttons (First, Previous, Look Up, Next, or Last) or
use the equivalent menu command before the database is sorted according to the selected
index. For example, if Patron Number is the selected index, and you want the lowest
patron number to display in the window, you must select First from the Record menu
after opening the window.
How to load a record by specifying its position
Example scenario: You want to edit one of your patron records. You know the patron’s
last name begins with Z, but you don’t remember how to spell it. You can sort your
records to quickly find the patron’s record.
First
Previous
To load a record by specifying its position
1 Click the Patrons button in the Navigator toolbar and choose
Edit.
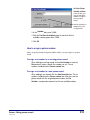
2 From the Index box, choose Patron Name. All of your patron
records are now sorted by name.
3 Click the Last Record button. The last record is loaded, which
in this case is a patron name beginning with Z.
Next
Last
328
4 Click the Previous Record button until you reach the record
you were looking for. (Note: The Previous Record and Next
Record commands are not available until you have loaded
another patron record.)
Spectrum CIRC/CAT User Manual
SCC5um1200kn
How to load a specific record
Example scenario: You want to edit one of your patron records. You know the patron
number is 10157.
To load a specific record
1 Click the Patrons button in the Navigator toolbar and choose
Edit.
2 From the Index box, choose Patron Number.
Look Up
3 Click the Look Up Patron button. The Find Patron window
opens, where you enter the value of the record you’re
searching for (using the selected index).
4 Enter 10157 in the Patron Number box.
5 Click OK. The record is loaded. Note: If an exact match is not
found, the next record that most closely matches the value
entered is loaded.
Note: If you choose Patron Name as the index, two text boxes are displayed in the Find
Patron window for the first and last name. To perform a search, you must at least enter a
value in the Last Name box. You can enter a partial last name in the Last Name box to
find the closest match if, for example, you’re not sure of the spelling. If you enter text in
the First Name box only, the first record according to the Patron Name index is loaded.
Adding new patron records
When a new patron wants to check out a material or exercise some other library privilege,
you must add the patron to the database by filling out a new patron record.
You can incorporate new patron records into your database in two ways:
• Add the records manually (ideal for adding a small number of
records).
• Import a file of records (ideal for adding many records).
The following steps explain how to add patron records manually. However, if you need to
add a large number of patron records from a disk, you should import those patron records
(see "Importing patron records" in this chapter).
Patrons: Editing patron records
SCC5um1200kn
329
How to add a new patron record
New Record
button
Example scenario: You want to create a record for a new library patron, Pat Nielsen. Pat
will graduate in 2005, which in your program is patron type 5.
To add a patron record
1 Click the Patrons button in the Navigator toolbar and choose
Edit. The default patron record is displayed in the window. (If
you haven’t saved a default record yet, the boxes contain no
data.)
2 You can accept the default patron number or enter a different
number. (To choose a patron number to assign to the new
patron record, see "Assigning patron numbers".)
3 In the Last name box, enter Nielsen.
4 In the First name box, enter Pat.
5 Enter the rest of the patron information in the appropriate
boxes.
6 In the Patron type box, enter 5. The description of the patron
type is displayed to the right of the box and the names of the
user-defined fields change depending on the patron type you
entered.
Note: You should choose a patron type before you enter data in
the user-defined fields.
7 Click the Save Record button. The current date appears in the
Patron Edit window after Added.
TIP: Press the Tab key to move to the next box, or press the Shift + Tab keys
simultaneously to move to the previous box
330
Spectrum CIRC/CAT User Manual
SCC5um1200kn
Editing existing patron records
You can edit an existing patron record. Editing is similar to adding a new record—just
load the record and enter new data or modify the existing data.
How to edit a patron record
Example scenario: One of your patrons, Megan Wyatt, has moved, so you need to change
her address in Patron Edit.
To edit a patron record
1 Click the Patrons button in the Navigator toolbar and choose
Edit.
2 Load the patron record you want to edit. For instructions, see
"Loading patron records".
3 Edit the patron record’s address data in the Patron Edit window
as necessary.
4 Click the Save Record button. The current date appears in the
Patron Edit window after Edited.
Note: At any point while editing a patron record, you can revert to the last saved version
of the record. The previously saved version of the record is loaded—without maintaining
any changes made since the last time the record was saved. See "Reverting to the last
saved version" for detailed instructions.
Patrons: Editing patron records
SCC5um1200kn
331
Assigning patron numbers
Each library patron must have a patron number. You can assign the patron number or
have the program assign a number. The patron number can be changed at any time. You
can select and assign numbers to new and existing records in several ways:
• Use the number already entered. When you first open the Patron
Edit window, there is no record loaded. The Patron Edit window
displays a number in the Patron number box that hasn’t been assigned
to a record yet. You can leave this number in the Patron number box
and start entering your new record information.
• Enter another number. Assign a patron number to the new record by
entering the number in the Patron number box. (If you set up
partitions, the number you enter must be in the patron range you set
up. See "Setting up your location" in the Setup chapter of this
manual.) If the number you enter has already been assigned to a
patron record, a message is displayed that the patron number is in use
and you are informed to enter a different number
• Set a number. Choose the Use Number command from the Patron
menu to look up and set the next patron number to be used. The Use
Number command uses the number that you set with the Set Next
Number command or the next available patron number.
The number you set using the Set Next Number command is the number that is available
for the Use Number command from the Patron menu. (You’re not loading the set number
in the Patron number box yet—just setting the number.)
How to set the next patron number
Example scenario: You want the patron numbers for the next set of patron records that
you add to begin with 101xx. You’ve already entered some patron numbers that begin
with this number, but you’re not sure what was the last patron number used in this series.
To set a number
1 Click the Patrons button in the Navigator toolbar and choose
Edit.
Set Next
Number button
332
2 Click the Set Next Number button. The Set Next Patron
Number window opens.
Spectrum CIRC/CAT User Manual
SCC5um1200kn
Set Next Patron
Number window
In this window, you
enter or look up the
number to assign to
the next patron
record.
Partition information is
displayed only if you
set up partitions.
3 In the Number box, enter 10100.
4 Click the Find Next Available button to search for the first
available number greater than 10100.
5 Click OK.
How to assign a patron number
After you specify what the next patron number will be, you can assign it to a patron
record.
To assign a set number to an existing patron record
When editing an existing record, choose Use Number: n from the
Patron menu (where n equals the number you set). The set
number is loaded into the Patron number box.
To assign a set number to a new patron record
When adding a new record, click the New Record button. The set
number is loaded into the Patron number box. After you save the
patron record with the assigned patron number, the Use
Number: n command increments to the next available number.
Patrons: Editing patron records
SCC5um1200kn
333
Assigning patron types
You can assign a patron type to a record or change the patron type currently assigned to a
record. The way you assign a patron type varies, depending on whether you know the
numbers attached to each of your patron types. For example, you may know you have a
patron type called Faculty, but you may not know that it is type 2.
You can change a record’s patron type three ways: click the Select Patron button, choose
the Set Type command from the Patron menu, or just enter the type number in the Patron
type box. Either way, after you change a type you should check the record’s user-defined
information in the bottom of the Patron Edit window. This data is specific to each patron
type. You name these fields in Patron Types Setup (see "Setting up patron types" in the
Setup chapter of this manual).
How to assign a patron type
Example scenario: You’ve discovered that a patron record lists the wrong grade level for
a patron, so you need to change the patron to the 2005 Class patron type. You can’t
remember what type number is associated with that patron type.
To assign a patron type to a record when you don’t know the type
number
1 Click the Patrons button in the Navigator toolbar and choose
Edit.
2 Load the patron record you want to edit. For instructions, see
"Loading patron records".
Select Patron Type
button
334
3 Click the Select Patron Type button. The Patron Types window
opens, listing the available patron types.
Spectrum CIRC/CAT User Manual
SCC5um1200kn
Patron Types
window
In this window, you
choose the patron’s
type, which
categorizes the
patron.
4 Select the patron type you want to assign to the record, in this
case 16 – 2005 Class.
5 Click OK. Note that the names of the user-defined fields in the
Patron Edit window change accordingly.
6 Click the Save Record button. The current date appears in the
Patron Edit window after Edited.
Example scenario: A student will be skipping a grade level and you need to assign her to
the 2006 Class patron type. You know that the type number associated with that type is
17.
To assign a patron type to a record when you do know the type number
1 Click the Patrons button in the Navigator toolbar and choose
Edit.
2 Load the patron record you want to edit. For instructions, see
"Loading patron records".
3 In the Patron type box, enter 17. The description of the patron
type, 2006 Class, is displayed to the right of the box. Note that
the names of the user-defined fields in the Patron Edit window
change accordingly.
4 Click the Save Record button. The current date appears in the
Patron Edit window after Edited.
Patrons: Editing patron records
SCC5um1200kn
335
Renewing patron privileges
When you renew privileges for a patron, you update the expiration date of that patron’s
library privileges. Even if a patron’s privileges have not expired yet, you can still change
the length of time privileges are valid.
There are two methods for updating expiration dates: by monthly intervals or on a
specific date. The method used for a particular patron depends on the patron type. Before
renewing a patron’s expiration date, check the update method you chose by opening the
Patron Type Setup window. For more information, see "Setting up patron types" in the
Setup chapter of this manual.
When you choose the Renew Privileges command, the expiration date changes
immediately without an alert. The new expiration date appears in the upper area of the
Patron Edit window. To undo this change, exit the record without saving or choose
Revert to Saved from the Record menu.
You can also renew patrons' circulation privileges from the Circulation window when
their patron records are loaded. For more information , see "Renewing patron privileges"
in the Circulation chapter of this manual. Or, you can renew all patrons with the same
patron type using Patron Batch Process. See "Batch processing patron records" for more
information.
How to renew a patron's privileges
Example scenario: A patron’s privileges have expired and you want to renew them.
To renew a patron’s privileges
1 Click the Patrons button in the Navigator toolbar and choose
Edit.
2 Load the patron record you want to renew. For instructions, see
"Loading patron records".
Renew Privileges
button
3 Click the Renew Privileges button. The new expiration date
appears in the Patron Edit window. The new date depends on
the patron type the patron is assigned to.
4 Click the Save Record button.
TIP: To undo this change, exit the record or choose Revert to Saved from the Record
menu before you save the record.
336
Spectrum CIRC/CAT User Manual
SCC5um1200kn
Saving patron records
After you enter new data for records you’re adding or editing, you can save the records.
You don’t have to save records this way (if you make changes and then proceed, you
must choose whether to save or discard the changed records). However, saving this way
is useful when you’ve made a number of changes and you want to save before you enter
more data.
Save Record
button
To save a patron record
After adding or editing a patron record, click the Save Record
button.
Reverting to the last saved version
At any point while editing a patron record prior to saving the changes, you can revert to
the last saved version of the record. You might use this feature after you’ve made
considerable changes to a record, only to discover the changes you made were wrong.
You could then revert to the last saved version—removing the erroneous changes.
To revert to a saved patron record
From the Record menu, choose Revert to Saved. The previously
saved version of the record is loaded—without maintaining any
changes made since the last time the record was saved.
Patrons: Editing patron records
SCC5um1200kn
337
Managing default patron records
When you create a new patron record, the program automatically fills in information for
you based on the default record. This saves you data-entry time since you do not need to
enter this information yourself. For example, you may want to enter the city, state, and
zip code information in the default record if your patrons all live the same city.
How to create a default patron record
Example scenario: Most of your patrons live in the city where your library is located:
Springfield, MN. You decide to enter this information in the default patron record so you
don’t have to type it every time you create a new record.
To create a default patron record
1 Click the Patrons button in the Navigator toolbar and choose
Edit.
2 In the City box, type Springfield.
3 In the State box, type MN.
4 In the Postal code box, type 56087.
Save as Default
button
5 Click the Save as Default button. The record data is saved as
your default record. This is entered for you every time you
create a new patron record.
TIP: Press the Tab key to move to the next box, or press the Shift + Tab keys
simultaneously to move to the previous box
How to delete a default patron record
If you have previously saved a default patron record, you can remove some or all of the
default data.
Example scenario: Someone accidentally clicked the Save as Default button when a
patron record was open. Now whenever you open Patron Edit or create another record,
this information is displayed. You want all of the fields to be blank when you create a
new record.
338
Spectrum CIRC/CAT User Manual
SCC5um1200kn
To delete a default patron record
1 Click the Patrons button in the Navigator toolbar and choose
Edit. The default patron record appears in the window.
2 In each field, delete the default data. Note: You cannot leave the
Patron type field blank.
3 Click the Save as Default button.
TIP: Press the Tab key to move to the next box, or press the Shift + Tab keys
simultaneously to move to the previous box
Deleting patron records
In Patron Edit, you can delete a patron record to eliminate an obsolete record from your
collection. You should delete patron records of people who move or no longer want to
use the library; or, if you have a school library, of students transferring or graduating.
However, you can’t delete a record if the patron has checked out or reserved materials or
has messages or fines. You also can’t delete a record you just added or edited without
saving it first.
If you delete a record by mistake, you can recover it as long as it’s still displayed. If you
haven’t done anything else, the record you deleted is still visible in the window. To
recover the record, make a minor change to the data (for example, place your cursor in
any box in the Patron Edit window, delete one character, and replace it with the same
character). Then choose Save from the Record menu to put the record back in the
database.
How to delete a patron record
Example scenario: A patron has moved out of your district, so you want to delete his
name from Spectrum CIRC/CAT.
To delete a patron record
1 Click the Patrons button in the Navigator toolbar and choose
Edit.
2 Load the patron record you want to delete. For instructions, see
"Loading patron records".
Patrons: Editing patron records
SCC5um1200kn
339
3 Click the Delete Record button. The program confirms that
you want to delete the record. If the patron has material
checked out, the program warns that you cannot delete the
patron record.
4 Click Delete to confirm the deletion. The record data remains
on screen, except the expiration date, usage, and add and edit
dates. After you load another record, you cannot reload the
deleted record’s data.
340
Spectrum CIRC/CAT User Manual
SCC5um1200kn
Managing patron images
In the Patron Edit window, you can add and view a single patron image. You can also
view a patron image in the Circulation part of the program. Using this image, you can
verify that the correct patron is checking out materials.
There are two ways to add patron images to the program:
• Adding an image to a single patron record. This is done in Patron Edit.
• Importing multiple patron images and mapping them to existing patron
records using a map file. This is done in the Import Patron Images part
of the program. See "Importing patron images" in this chapter for
more information.
Creating patron image files
If you don’t get patron images from a vendor, you can create computer image files from
your patrons’ pictures. There are third-party software programs that generate computer
images from pictures. In order to use patron images in Spectrum, the computer images
must be bitmap file format. Microsoft Windows uses a .bmp file extension to indicate
bitmap images.
Sagebrush recommends using patron barcode numbers as the naming scheme for your
image files, so you can easily correlate each patron record with the correct image. For
example, say Terry Smith’s patron barcode number is 098765432. You could name
Terry’s image file 098765432.bmp. When you link Terry’s record with the correct image
in Patron Edit, you would search for the 098765432.bmp file.
Adding patron images
If you want to add a patron image to a single patron record, you can do this in Patron
Edit. The patron image you associate with the patron record must be a bitmap image.
When you add a patron image, you are adding it to the Spectrum CIRC/CAT database.
You should keep the original bitmap file in case the image is accidentally deleted from
the database.
Patrons: Editing patron records
SCC5um1200kn
341
How to add a patron image
Example scenario: A new student has moved into your district. You’ve already scanned a
picture of her and created a bitmap file. Now you want to add her picture to Spectrum
CIRC/CAT.
To link a patron’s image
1 Click the Patrons button in the Navigator toolbar and choose
Edit.
2 Load the patron record you want to add the image to. For
instructions, see "Loading patron records".
3 From the Patron menu, choose Add Patron Image. The Link
Patron Image window opens.
4 Locate the drive or folder that contains the patron image file.
5 In the folder list, double-click the folders until you open the
folder that contains the patron image file.
6 Select the bitmap file of the patron image.
7 Click Open. The image is displayed in the patron record.
8 Click the Save Record button.
You can also use these instructions to add a different image to a patron record that
already has an image associated with it.
Viewing patron images
The Patron Edit window displays an image of the patron, if available. When you click the
image, a window opens with an enlarged version of the image. The image is only
available after you enter a valid patron number and if patron image data is loaded.
Note: In order for patron images to display correctly on a Windows-based computer,
monitor color settings must be set at a minimum of High Color (16 bit) or higher. On a
Macintosh computer, monitor color settings need to be set at a minimum of 256 Colors.
342
Spectrum CIRC/CAT User Manual
SCC5um1200kn
How to view a patron image
Example scenario: You want to view a larger image of a patron.
To view a patron’s image
1 Click the Patrons button in the Navigator toolbar and choose
Edit.
2 Load the patron record that contains the image you want to
examine. For instructions, see "Loading patron records".
3 In the Patron Edit window, click the patron image. A window
opens with an enlarged version of the patron’s image.
4 Click the enlarged image to return to the Patron Edit window.
Removing patron images
You can remove an image file from a patron record.
When you delete a patron image, you are permanently deleting it from the Spectrum
CIRC/CAT database. You should always keep the original bitmap file in case the image
is accidentally deleted from the database.
How to remove a patron image
Example scenario: You accidentally added Pat Nielsen’s image to Kelly Wolf’s patron
record. Because you don’t have a picture of Kelly to add to the system, you just want to
remove Pat’s image from Kelly’s patron record.
To remove a patron image
1 Click the Patrons button in the Navigator toolbar and choose
Edit.
2 Load the patron record that contains the image you want to
remove. For instructions, see "Loading patron records".
3 From the Patron menu, choose Remove Patron Image. A
window opens to confirm you want to remove the image.
4 Click Remove. The image is no longer displayed in the window.
5 Click the Save Record button.
Patrons: Editing patron records
SCC5um1200kn
343
Importing patron records
You can import patron records into your database from a file on a floppy disk or CD or
from a different location on your hard disk. The time required to import patron records
depends on the size of the file you’re importing and the speed of your computer. You
may want to import large files when your library is closed.
Note: If you have Windows 98 on your client computer, make sure that Power
Management is not turned on while you import from a client computer to the server. If
Power Management shuts down your client computer during the import process, your
database could become corrupt. You can access Power Management through the Control
Panel. While you import, you should also turn off any other program that shuts down or
suspends activity on your computer.
Backing up
Back up your database files before and after you import patron records. For more on
backups, see "Backing up Spectrum data" in the Backup chapter of this manual.
To open Patron Import
From the Navigator toolbar, click the Patrons button and choose
Import. The Patron Import window opens.
344
Spectrum CIRC/CAT User Manual
SCC5um1200kn
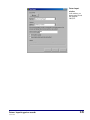
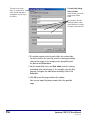
Patron Import
window
In this window, you
import patron records
into Spectrum
CIRC/CAT.
Patrons: Importing patron records
SCC5um1200kn
345
Assigning patron numbers
You can choose the number to begin assigning new patron numbers if the file doesn’t
already have numbers assigned. By default, the program assigns the next highest patron
number after the last used one—but you can change this to any number you want to
assign to patron records.
You may have created a partition to separate your patron and material numbers (see
"Setting up your location" in the Setup chapter of this manual). If you’re using a partition,
the program alerts you if all of the numbers in that patron partition are in use.
When the program updates by name or patron number, it looks for an exact match. If
there is no match, it creates a new record. You should enter a starting number for new
patron records even if you’re updating existing records.
Note: Always enter a number in the "Start numbering at" box in the Patron Import
window. In this way, if there are conflicts and different numbers are assigned, you know
where to look for those records. We suggest using a number higher than what your
database will ever reach, yet within the partition—this makes the patron records easily
identifiable.
Performing a patron import
When you import patron records, you must select the file to import to and the file’s
format, select the import method, assign numbers to new records, and set import options.
For more information about the Patron Import window, see "About the Patron Import
window" in the Patrons chapter of the Spectrum CIRC/CAT Reference Manual.
How to import patron records
Example scenario: You have a file of patron records to import into Spectrum CIRC/CAT.
It is a tab-delimited file named patrons.txt. You know there may be some patrons in the
file that are already in Spectrum CIRC/CAT, so you want to replace any existing patron
records with the new record if the patron numbers match.
To import patron records
1 From the Navigator toolbar, click the Patrons button and
choose Import. The Patron Import window opens.
2 Click the Browse button.
346
Spectrum CIRC/CAT User Manual
SCC5um1200kn
3 Locate and select the file to import, in this case patrons.txt and
click the Open button. The file name is displayed in the Patron
Import window.
If Spectrum CIRC/CAT detects that the incorrect format is
selected, an alert window opens to inform you. Click Yes to
automatically change the file to the correct format.
4 From the Format list, select the format of the file being
imported. In this case, choose Delimited with tabs.
5 Select the method of importing. In this case, choose Update by
number from the Method box.
6 In the Start numbering at box, enter 500250. Patron numbers
are assigned to any records whose patron numbers already exist
in the program starting at this number.
7 Select Clear patron usage.
8 Select Import date added and date last edited.
9 Click Import to start importing.
If you’ve already imported a patron file, a window opens stating
that the p_import.log already exists.
10 Click Append to add error messages to the existing log file.
Click Overwrite to replace the existing error messages saved in
the file with new error messages.
The import process begins. When it is complete, a window
opens and displays the number of records added to the
database. If any errors were detected, you can click the View
File button to view the error log. For more information, see
"How to open the p_import log file immediately after the
import process" later in this chapter.
To pause or stop the import, see "Pausing or stopping a patron
import" later in this chapter.
Patrons: Importing patron records
SCC5um1200kn
347
Pausing or stopping a patron import
While the program is importing patron records, you can click Pause to temporarily halt
the importing processing or Stop to cancel importing. Note: You can only select Stop
after Pause is selected.
If you cancel importing during the import process, only the patron records that the
program has already processed are in your database. The record being processed when
you click Stop—and any records after that one—are not imported.
You can’t restart importing patron records again from where you left off after you stop
the import. If you try to re-import records from this file, the program starts processing the
entire file. To import records from this file again and not create duplicate records, make
sure you choose one of the update import methods ("Update by number" or "Update by
name".
How to pause or stop a patron import
To pause the import
Click Pause. The program temporarily halts the import. (Click
Import to resume importing.)
To stop the import
1 Click Pause.
2 Click Stop. The program stops importing records but the
Patron Import window remains open.
After importing patron records
When the import process is complete, an information window opens showing the number
of records that were added to the database and the number of records that weren’t added.
To view errors that occurred when importing patron records, click the View file button in
the information window. This opens the p_import.log file.
348
Spectrum CIRC/CAT User Manual
SCC5um1200kn
Addressing patron import errors
The program reports problems with records being imported both during and after the
import process. You should address all errors either while importing or after importing,
as appropriate. Errors that can’t be automatically corrected by the program or addressed
by the user during importing are recorded in a log, or error, file. After you finish
importing, you can check the contents of this log. You should check the listed records in
the log thoroughly. If data in any of the imported patron records is missing or incorrect,
add or edit the patron record in the Patron Edit part of the program. See "Editing patron
records" earlier in this chapter.
For information about specific error messages, refer to "Patron Import troubleshooting"
in the Troubleshooting appendix of the Spectrum CIRC/CAT Reference Manual.
How to open the p_import.log file immediately after the
import process
After importing, the Patron Import status window displays information about the number
of records that were imported, the number of records that were not imported, and so on.
Any import errors are listed in the p_import.log file.
To open the p_import.log file after the import process
If the import process generates errors, the Patron Import status
window contains a View File button. To open the log, click the
View File button.
How to open the p_import.log file after closing the Patron
Import status window
You can view import errors even after closing the Patron Import status window.
To open the p_import.log file (Windows)
1 Click the Start menu in the Windows desktop.
2 Click Find.
3 Click Files or Folders. The Find: All Files window opens.
4 Enter p_import.log in the Named box.
Patrons: Importing patron records
SCC5um1200kn
349
5 Choose the drive to search by clicking the arrow beside the
Look in box.
6 Click Find Now.
7 Double-click the p_import.log file listed in the bottom of the
Find window.
8 If the computer prompts you with an option to open the file,
choose NotePad. The p_import.log file opens so you can view
the import errors.
To open the p_import.log file (Macintosh)
1 Double-click the Hard Disk icon.
2 Open the Spectrum folder.
3 Locate the p_import.log file.
4 Double-click the file to open it.
5 The log file opens in a word processing program such as
SimpleText so you can view the import errors.
350
Spectrum CIRC/CAT User Manual
SCC5um1200kn
Exporting patron records
You can export patron records from your database to a file. You may want to do this
when you need to import your patron records into another program. You may also want
to export patrons before you delete patrons. If a mistake is made while deleting patrons,
you can re-import those patrons and no data is lost. (This example is in addition to
keeping good backups.)
You can export individual records or a range of records.
Note: If you have Windows 98 on your client computer, make sure that Power
Management is not turned on while you export from a client computer to the server. If
Power Management shuts down your client computer during the export process, your
database could become corrupt. You can access Power Management through the Control
Panel. While you export, you should also turn off any other program that shuts down or
suspends your computer.
Backing up
Back up your database files before you export records. For more on backups, see the
"Backing up Spectrum data" in the Backup chapter of this manual.
To open Patron Export
From the Navigator toolbar, click the Patrons button and choose
Export. The Patron Export window opens.
Patrons: Exporting patron records
SCC5um1200kn
351
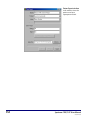
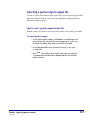
Patron Export window
In this window, choose the
options necessary to
export patron records.
352
Spectrum CIRC/CAT User Manual
SCC5um1200kn
Exporting patron records individually
You can export patron records individually by specifying their patron numbers.
How to export patron records individually
Example scenario: You want to export the patron with patron number 60544.
Furthermore, you want the exported record to be tab delimited and in a file called
p_export.001.
To export records individually
1 From the Navigator toolbar, click the Patrons button in the
window and choose Export. The Patron Export window opens.
2 From the Export box, select Patrons Individually.
3 From the Format box, select the format to export the file. In
this case, select Delimited with tabs.
4 Enter the patron number to export, 60544, in the Index value
box.
5 Enter the file name to export to, p_export.001, in the Output
file box. Or click Browse to select the destination file and path.
6 Click Export.
TIP: You can add additional patron records to this same file if you want to export more
than one individual record. Just repeat steps 4 and 6 for each record that you want to
export.
Patrons: Exporting patron records
SCC5um1200kn
353
Exporting a range of patron records
You can specify a range of patron records and have the program export all patrons that
fall within that range. The arrangement of records within the export file depends on the
type of range you select. For example, if you select a range of records by patron type, the
records are sorted by patron type.
How to export a range of patron records
Example scenario: You want to export all patrons with a patron type of 1, 2, or 3.
Furthermore, you want the exported records to be delimited with tabs, and you want to
place the exported records into a file called p_export.002.
To export patron records in a range
1 From the Navigator toolbar, click the Patrons button in the
window and choose Export. The Patron Export window opens.
2 From the Export box, select Patrons Within a Given Range.
3 From the Format box, select the Delimited with tabs format.
4 From the Index box, select the index to sort the records. In this
case, select Patron Type.
5 Enter the range of patron records you want to export. In this
case, enter 1 in the Start at box and 3 in the End at box.
Note: If you select a custom index from the Index box, click
Change Custom Index Range to change the range (see "Using
a custom index to export patron records") later in this chapter.
6 Enter the export file name, p_export.002 in the Output file box,
or click Browse to select the destination file and path.
7 Click Export.
354
Spectrum CIRC/CAT User Manual
SCC5um1200kn
Using a custom index to export patron records
When you select "Patrons Within a Given Range from the Export" box, you can use a
custom index to set the export range. Before you select a custom index, you must create it
in the Patron Custom Index part of the program (see "Creating a patron custom index" in
this chapter).
Because you can have up to three data fields in the custom index, you set a range for
custom indexes using the Custom Index Range Selection window instead of using the
Start at and End at boxes in the Patron Export window. The Custom Index Range
Selection window is only available after you select a custom index in the Index box and
click the Change Custom Index Range button. The custom index displays the index name
you assigned in Patron Custom Index.
How to select the range for a patron custom index
Example scenario: You have a mailing list of patrons that live in your city that were
added to your database within the past year. You created a custom index called CITY
DATE ADDED to sort your patron records by city and date added. Now you want to
export only the records that contain your city name, Springfield, and fall within the
appropriate date range.
To open the Custom Index Range Selection window and set a range
1 From the Patron Export window, make sure Patrons Within a
Given Range is selected in the Export box.
2 In the Index box, choose the desired custom index. In this case,
choose CITY DATE ADDED. Note: Before you can do this, the
custom index must already be set up in the Patron Custom
Index part of the program.
3 Click the Change Custom Index Range button. The Custom
Index Range Selection window opens.
Patrons: Exporting patron records
SCC5um1200kn
355
Custom Index Range
Select window
The name of the custom
index—as assigned in the
Patron Custom Index part of
the program—is at the top of
the window.
In this window, you set the
range for the custom
index.
Each group lists the index
field name and has a Start
at and End at box for setting
the range of that index field.
4 The window contains a box for each field in the custom index.
For the first field, in this case City, enter the starting and ending
values for the range. In this example, enter Springfield in both
the Start at and End at boxes.
5 For the second field, in this case Date added, enter the starting
and ending values for the range. In this example, enter the date
from one year ago in the Start at box and today’s date in the
End at box.
6 Click OK to save the range and close the window.
Now you can export the patron records within the specified
range.
356
Spectrum CIRC/CAT User Manual
SCC5um1200kn
Selecting a patron export output file
You have to specify the destination of the exported files. You can enter the path and file
name of the destination file, or you can select the output file by clicking the Browse
button and locating it yourself.
How to select a patron export output file
Example scenario: You want to save the exported records to a file called p_export.004.
To select the file to export
1 In the Patron Export window, click Browse. A window opens for
you to locate and select the file you’re exporting to. If you want
to export to a floppy disk, make sure the disk is inserted.
2 In the File name box, enter the name of the file, in this case
p_export.004.
3 Click Save. The window closes, and the file name you selected
is automatically entered into the Output file box in the Patron
Export window.
Patrons: Exporting patron records
SCC5um1200kn
357
Batch processing patron records
You can use the batch process feature to change information in your patron records. The
phrase "batch process" refers to the action of modifying groups of records in your
database. You can use this feature to make the following modifications to groups of
patron records:
• Add, edit, or clear data such as patron user-defined data.
• Change fields such as patron types (for example, when groups of
students move to the next grade) and expiration dates.
• Delete groups of patron records. Note: You cannot delete patrons
records for patrons that have materials checked out or reserved, or that
have fines or messages attached.
You can batch process all of your records, records in a selected range, records that meet
certain conditions, or records in a selected range that meet certain conditions.
Note: If you have Windows 98 on your client computer, make sure that Power
Management is not turned on while you batch process on the computer. If Power
Management shuts down your computer during the batch process, your database could
become corrupt. You can access Power Management through the Control Panel. While
you batch process, you should also turn off any other program that shuts down or
suspends activity on your computer.
Backing up
Back up your database files before and after you make major changes to your records.
For more on backups, see "Backing up Spectrum data" in the Backup chapter of this
manual.
358
Spectrum CIRC/CAT User Manual
SCC5um1200kn
How to start Patron Batch Processing
Follow the directions below to start the batch process.
To start batch processing
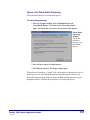
1 From the Navigator toolbar, click the Patrons button and
choose Batch Process. The Patron Batch Processing window
opens, which provides an overview of the patron batch process.
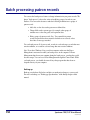
Patron Batch
Processing
window
This window
provides an
overview of the
patron batch
process.
2 View the basic steps of the batch process.
3 Click Next to continue. The Range window opens.
The batch process feature has a "wizard" look—which guides you through each step of a
multi-step process. It offers helpful information and explains options along the way.
Follow the instructions in the windows, and use the Back and Next buttons to navigate
through the windows. Click Exit in any window to cancel the batch process.
Patrons: Batch processing patron records
SCC5um1200kn
359
Understanding batch process steps
When you first start the Batch Process feature, an introductory window opens that
explains the four basic steps involved in batch processing your material records.
Here is a description of the various windows you encounter when batch processing. Each
window corresponds to a step in the batch process.
360
Window
Description
Range
Lets you set the range of records to process. The batch process
won’t necessarily modify all of these records. However, while
processing, the program only inspects these records.
Conditions
(This step is optional.) Lets you set the conditions, if any, for
the records to process. By specifying one or more conditions,
you identify the particular characteristic(s) of the records to be
modified. Only those material records in the range that meet the
condition(s) set in this step are modified.
Actions
Lets you set the modification(s) to be made. Here you specify
how you want to change the records in the range that meet the
condition(s).
Finalize
Lets you verify the settings of your batch process before you
start processing.
Spectrum CIRC/CAT User Manual
SCC5um1200kn
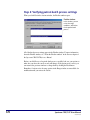
Step 1: Specifying the patron records to process
The first step in batch processing is to specify the records that you want processed. You
can do this by specifying a range of records.
Initially, the range is set to include all of your patron records. However, you can narrow
the range to best meet your needs.
If you have a lot of records in your database and don’t need to change them all,
specifying a range of the records you need to process can substantially reduce batch
processing time. All the patrons in the range you set up may not be modified; however,
all these records are inspected to find those that do require processing, according to the
criteria you set up.
You specify records in the Range window. For more information about the Range
window, see "About the Range window" in the Patrons chapter of the Spectrum
CIRC/CAT Reference Manual.
How to specify a range of patron records to process
Example scenario: You want to batch process only those records with patron types 1, 2,
and 3.
To specify a range of records
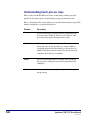
1 In the Range window, select the field that you want to base
your range on. In this case, choose Patron Type from the Field
box.
Range window
In this window, you
define the range of
records to process.
Patrons: Batch processing patron records
SCC5um1200kn
361
2 Enter the starting and ending values of the range. In this case,
type 1 in the Start at box and 3 in the End at box.
3 Click Next to continue to the Conditions window.
Step 2: Setting patron batch process conditions
When you set batch process conditions, only those records that have certain
characteristics, such as a certain postal or location code, are processed. The program
won’t modify any records in your range that don’t meet your condition(s). For example,
you may want to change only the records you added to the database after January 1, 2000.
In this situation, you could use a condition to process only the records added after that
date. These conditions work in conjunction with the range you set in the Range window.
It’s not necessary to set conditions to batch process your records. If you don’t want to set
conditions, click the Next button to continue. All records within the range you specify in
the Range window are processed.
You can set up to five conditions for the batch process.
Adding, editing and removing patron batch conditions
When you click Add or Edit in the Conditions window, the Add Condition window or
Edit Condition window opens. You use these windows to enter the details of a condition.
Remember, the batch process modifies only those patron records that meet the
condition(s) specified, if any.
You can add, edit and remove conditions.
How to add a patron batch condition
Example scenario: You want the program to batch process only those records which have
the postal code 56087. This is the only condition that you want to specify.
362
Spectrum CIRC/CAT User Manual
SCC5um1200kn
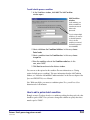
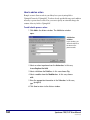
To add a batch process condition
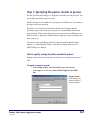
1 In the Conditions window, click Add. The Add Condition
window opens.
Add Condition
window
In this window, you
define a condition a
record must meet in
order to be
processed.
If you’re using multiple
conditions, you need to
set Boolean operators.
If this is the first
condition you entered,
the Boolean operators
are unavailable.
2 Select a field from the Condition field box. In this case, choose
Postal code.
3 Select a condition from the Condition box. In this case, choose
is equal to.
4 Enter the condition value in the Condition value box. In this
case, enter 56087.
5 Click Next to continue to the Actions window.
You can now set the options for this condition. For more information, see "Setting
options for batch process conditions". For more information about the Add Condition
window, see "About the Add and Edit Condition windows" in the Patrons chapter of the
Spectrum CIRC/CAT Reference Manual.
Note: With some fields, you cannot set condition options. If so, you will see a Save
button instead of a Next button.
How to edit a patron batch condition
Example scenario: You have already set a condition specifying that the postal code value
should be equal to 56087. Now you want to change this condition to specify that values
must be equal to "56083".
Patrons: Batch processing patron records
SCC5um1200kn
363
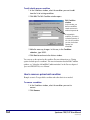
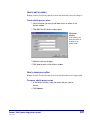
To edit a batch process condition
1 In the Conditions window, select the condition you want to edit
from the list of existing conditions.
2 Click Edit. The Edit Condition window opens.
Edit Condition
window
In this window, you
define a condition a
record must meet in
order to be processed.
If using multiple
conditions, you need to
set Boolean operators. If
this is the first condition
you have, the Boolean
operators are
unavailable.
3 Make the necessary changes. In this case, in the Condition
value box, type 56083.
4 Click Next to continue to the Actions window.
You can now set the options for this condition. For more information, see "Setting
options for batch process conditions". For more information about the Edit Condition
window, see "About the Add and Edit Condition windows" in the Patrons chapter of
Spectrum CIRC/CAT Reference Manual.
How to remove a patron batch condition
Example scenario: You specified a condition and realize that it is not needed.
To remove a condition
1 In the Conditions window, select the condition you want to
remove.
2 Click Remove.
364
Spectrum CIRC/CAT User Manual
SCC5um1200kn
Using multiple conditions and Boolean operators
When creating a batch process, you can set more than one condition. When adding a
second or subsequent condition, you must include a Boolean operator (AND or OR) so
that the program knows how to apply the multiple conditions. These options are both
available in the Add Condition window whenever you add multiple conditions.
Setting options for patron batch process conditions
Sometimes when you set batch process conditions, you need to set options for those
conditions. When you click Next in the Add Condition or Edit Condition windows, the
Condition Options window is displayed. Note: This window opens only if you can further
define the value(s) entered for the condition.
The condition options compare the condition value(s) you enter with the values in the
selected field for all the patron records in the specified range. For example, you may add
a condition that processes patron records with location codes that begin with numbers
greater than 10. You need to click the Next button in the Add Condition window to set
options for that condition. You would then select Numeric as your condition option,
because the condition value—10—is a number.
It’s not necessary to specify options for every condition you set. Depending on what you
select from the Condition box in the Add Condition window or the Edit Condition
window, you see either a Next or a Save button. The Next button takes you to the
Condition Options window. The options displayed depend on what condition you select
from the Condition box.
For information about the Condition options window, see "About the Condition Options
window" in the Patrons chapter of the Spectrum CIRC/CAT Reference Manual.
Patrons: Batch processing patron records
SCC5um1200kn
365
How to set options for patron batch process conditions
Example scenario: You have set up a condition that specifies that city values must be
equal to "Springfield". The program lets you specify two options for this condition:
"Case-sensitive" and "Ignore punctuation". You want to specify that the condition be
case-sensitive and that the program ignore punctuation.
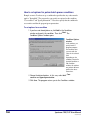
To set options for a condition
1 If you have not already done so, click Add in the Conditions
window and specify the condition. Then click Next. The
Condition Options window opens.
Condition Options
window
In this window, you
specify how the
program compares
the condition value
you enter with the
values in the selected
field.
Depending on the
conditions selected in
the Add Condition or
Edit Condition
window, this window
may contain different
options than those
shown here.
2 Choose the desired options. In this case, select both Casesensitive and Ignore punctuation.
3 Click Save. The program returns you to the Conditions window.
366
Spectrum CIRC/CAT User Manual
SCC5um1200kn
Step 3: Setting patron batch process actions
When you click Next in the Conditions window, the Actions window opens.
Actions window
This window displays the
actions that will be taken
on the patron records
that fall within the
specified range and meet
the specified conditions.
For information about the Actions window, see "About the Actions window" in the
Patrons chapter of the Spectrum CIRC/CAT Reference Manual.
In the Actions window, you can open the Add Action and Edit Action windows. In the
Add Action or Edit Action window, you select the action to be done, the field to apply
the action to, and how the field is to be changed. You can define up to five
modifications—depending on the actions that you select (if you choose to delete, no
additional modifications are allowed). When you have finished, you should be able to
read your settings like a sentence. For example, an action might read "Replace the field
Postal code with 56083."
After at least one action is entered, the range options in the Range window are not
available to modify until you remove all actions.
You can add, edit and remove conditions.
Patrons: Batch processing patron records
SCC5um1200kn
367
How to add an action
Example scenario: Some records in your library have your city misspelled as
"Springfeld" instead of "Springfield". You have already specified the range and condition
necessary to process these records. Now you want to specify an action that changes the
contents of the city fields to "Springfield".
To add a batch process action
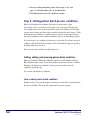
1 Click Add in the Actions window. The Add Action window
opens.
Add Action
window
In this window, you
define the actions to
be taken on the
patron records.
2 Select an action to perform from the Action box. In this case,
choose Replace the field.
3 Select a field from the Field box. In this case choose City.
4 Select a modifier from the Modifier box. In this case, choose
with.
5 Enter the appropriate information in the Value box. In this case,
type Springfield.
6 Click Save to return to the Actions window.
368
Spectrum CIRC/CAT User Manual
SCC5um1200kn
How to edit an action
Example scenario: You already entered an action and realize that you need to change it.
To edit a batch process action
1 Select the action you want to edit from the list of actions in the
Actions window.
2 Click Edit. The Edit Action window opens.
Edit Action
window
In this window, you
define the actions to
be taken on the
patron records.
3 Make the necessary changes.
4 Click Save to return to the Actions window.
How to remove an action
Example scenario: You already entered an action and realize that it is no longer needed.
To remove a batch process action
1 In the Actions window, select the action that you want to
remove.
2 Click Remove.
Patrons: Batch processing patron records
SCC5um1200kn
369
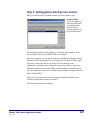
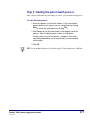
Step 4: Verifying patron batch process settings
When you click Next in the Actions window, the Finalize window opens.
Finalize window
In this window, you can
review the range,
conditions, and actions
for the patron batch
process.
All of the batch process settings appear in the Finalize window. For more information
about the Finalize window, see "About the Finalize window" in the Patrons chapter of
the Spectrum CIRC/CAT Reference Manual.
Before you click Process to begin the batch process, carefully look over your options to
make sure you chose the correct records and changes. If the options aren’t correct, you
can return to the previous windows to change them by clicking the Back button.
Remember, if actions exist, the range options in the Range window are unavailable for
modification until you remove the actions.
370
Spectrum CIRC/CAT User Manual
SCC5um1200kn
Step 5: Starting the patron batch process
Once you have verified that all your settings are correct, you can start the batch process.
To start the batch process
1 Review the options in the Finalize window. (If the current batch
process options aren’t correct, you can change them by clicking
Back or cancel the entire process by clicking Exit.)
2 Click Process to start the batch process (click Stop to cancel the
process). When the batch process is done, an information
window informs you that the process is complete. (If an action
cannot be performed on one or more records, you are informed
of the reason.)
3 Click OK.
TIP: To start another batch process, click Start Again. To exit batch process, click Exit.
Patrons: Batch processing patron records
SCC5um1200kn
371
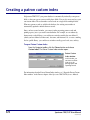
Creating a patron custom index
In Spectrum CIRC/CAT, your patron database is automatically indexed by some patron
fields, so that you can sort your records by these fields. You can also create and save your
own custom index. The custom index can be based on a single field or multiple fields.
When new patron records are added to the database, the existing custom index is
automatically updated to include the new records.
Once you have created an index, you can use it when exporting patron records and
printing reports, just as you would a standard index. For example, to sort students by
homeroom in a school library, you could create an index sorted by the user-defined 1
(which you have defined as homeroom), last name, and first name. Or, to create a mailing
list for a public library, you could create an index sorted by postal code, state, and city.
To open Patron Custom Index
From the Navigator toolbar, click the Patrons button and choose
Custom Index. The Patron Custom Index window opens.
Patron Custom
Index window
In this window, you
can create a custom
index to use for
printing reports and
exporting records.
For information about the Patron Custom Index window, see "About the Patron Custom
Index window" in the Patrons chapter of the Spectrum CIRC/CAT Reference Manual.
372
Spectrum CIRC/CAT User Manual
SCC5um1200kn
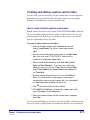
Creating and editing a patron custom index
To create or edit a patron custom index, you enter an index name, select the appropriate
fields and have the program build the index. If the index already exists, the program
informs you and confirms that you want to rebuild the index.
How to create and edit a patron custom index
Example scenario: You want to create an index called CITY DATE ADDED, which first
sorts by city and then sorts by the date the record was added. In other words, you want
records arranged by city. However, for records that have the same city, you want that
group of records further sorted by date added.
To create or edit a patron custom index
1 From the Navigator toolbar, click the Patrons button and
choose Custom Index. The Patron Custom Index window
opens.
2 Enter the name of the patron custom index in the Index Name
box. In this case, type CITY DATE ADDED. Notice that the
characters are displayed in capital letters.
3 Select the fields to be indexed by in the First Field, Second
Field, and Third Field boxes. (If you don’t use a field, select
(None) in its box.) In this case, choose City for the First Field;
choose Date Added for the Second Field; choose (None) for
the Third Field.
4 To check whether the patron files are in use, click Check for
Users. The Check for Users window opens, informing you
whether other users are using the patron files. You cannot build
a custom index while the patron files are in use.
5 Click OK to close the Check for Users window.
6 Click Build. The Build Patron Custom Index window opens and
shows the progress of the build process.
7 When the window indicates that the custom index is complete,
click Close.
Note: If you stop the build process, the index is not built. To build it, you must restart the
process. (If you don’t explicitly build a custom index, the index files are created the next
Patrons: Creating a patron custom index
SCC5um1200kn
373
time a program opens them, so they show up on your hard disk, but they won’t have
useful information in them.)
Patron Custom Index
window
After you build a custom
index, the index name and
fields are displayed in the
boxes.
Renaming the patron custom index
You can rename a patron custom index without having to rebuild the index.
How to rename the patron custom index
Example scenario: You have already built a patron custom index called CITY DATE
ADDED. Now you want to change the index name to CITY DATE.
To rename a patron custom index
1 From the Navigator toolbar, click the Patrons button and
choose Custom Index. The Patron Custom Index window
opens showing the existing custom index.
2 For the index you want to change, enter the new name in the
Index Name box. In this case, enter CITY DATE.
3 Click Build. The program informs you that only the name has
changed.
4 Click OK to update the name.
374
Spectrum CIRC/CAT User Manual
SCC5um1200kn
Removing the patron custom index
If you no longer need a particular patron custom index, you can remove it from the
system. To remove it, you must rebuild the index.
How to remove the patron custom index
Example scenario: You have previously created a patron custom index called PATRON
TYPE EXP DATE. You no longer need this index and now want to remove it.
To remove a patron custom index
1 From the Navigator toolbar, click the Patrons button and
choose Custom Index. The Patron Custom Index window
opens showing the existing custom index.
2 For the index that you want to remove, in this case PATRON
TYPE EXP DATE, delete the name of the patron custom index in
the Index Name box.
3 Click Build. The Build Patron Custom Index window opens.
4 When the custom index is complete, click Close. Each of the
field boxes has (None) selected.
Patrons: Creating a patron custom index
SCC5um1200kn
375
Using the patron custom index
You can use a patron custom index when exporting patron records and when printing
reports. When performing these activities, your custom index can be selected from the
Index box. You will notice that custom index names are always displayed in capital
letters.
When exporting records or printing a report, if you select a patron custom index, the
default custom index range is displayed. The Change Custom Index Range button is also
enabled. When you click this button, the Custom Index Range Selection window opens,
so that you can use the index to specify a range. To help you do this, the Custom Index
Range Selection window lists the field(s) used to build the index and lets you specify a
range for each. The first index field defaults to the lowest and highest values in the
database so all records are initially included in the range. The second and third index
fields, if available, are blank by default.
For example, you could a create mailing list of patrons that live within your city that were
added to your database within the past year. You could create a custom index to sort your
patron records by city and date added, then export only the records that contain your city
name and fall within the appropriate date range.
For more information on using a patron custom index, see "Using a custom index to
export patron records" in the Patrons chapter and "Selecting a custom index range"in the
Reports chapter of this manual.
376
Spectrum CIRC/CAT User Manual
SCC5um1200kn
Importing patron images
Patron images are displayed in the Circulation and Patron Edit parts of the program.
Using this image, you can verify that the correct patron is checking out materials.
There are two ways to add patron images to the program:
• Add an image to a single patron record. This is done in Patron Edit.
See "Managing patron images" in the "Editing patron records" section
of this chapter for more information.
• Import multiple patron images and map them to existing patron
records using a map file. This is done in the Import Patron Images part
of the program.
In Import Patron Images, you can import multiple patron images into your database from
a file on a CD, floppy disk, or a different location on your hard disk. Typically, the map
file and patron images are provided by a photography vendor such as Herff Jones and
Lifetouch. This feature is useful for importing class pictures at the beginning of the
school year.
Note: In order to use patron images in Spectrum, the computer images must be in bitmap
file format. Microsoft Windows uses a .bmp file extension to indicate bitmap images.
When you import patron images, you are adding them to the Spectrum CIRC/CAT
database. You should always keep the original bitmap files in case an image is
accidentally deleted from the database. You can then add a single bitmap image to a
patron record in the Patron Edit part of the program.
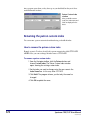
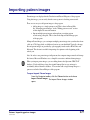
To open Import Patron Images
From the Navigator toolbar, click the Patrons button and choose
Import Patron Images. The Import Patron Images window
opens.
Patrons: Importing patron images
SCC5um1200kn
377
Import Patron
Images window
In this window, you can
import a file of patron
images.
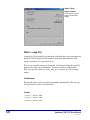
What is a map file?
A map file is a file provided by your photograph vendor that lists each patron number and
bitmap file. The file must list the data in quote-comma-quote delimited format. Each
patron record must be on a separate line of text.
There are two acceptable formats for the map file: 2-field format and 5-field format. The
fields must be in the order described below, and cannot contain any additional data.
When you request files from your vendor, make sure you specify one of the following
formats.
2-field format
This map file format contains two fields, patron number and bitmap file. This is the type
of file provided by vendors such as Herff Jones.
Example
"649465","00001.BMP"
"687692","00002.BMP"
"859428","00003.BMP"
378
Spectrum CIRC/CAT User Manual
SCC5um1200kn
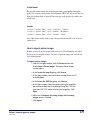
5-field format
This map file format contains five fields (listed in order): patron number, bitmap file,
grade level, last name, and first name. Since Spectrum CIRC/CAT only uses the first two
fields, the last three fields are ignored. This is the type of file provided by vendors such
as Lifetouch.
Example
"465649","00004.BMP","010","COLLINS","TRACY"
"692687","00005.BMP","007","BAKER","MICHAEL"
"428859","00006.BMP","011","ALLEN","TARA"
Note: Other vendors may be used as long as they provide the map file in one of the two
formats above.
How to import patron images
Example scenario: Your photography vendor sent you a CD containing the new school
photos for the second grade students. You want to import the images and overwrite last
year’s student pictures.
To import patron images
1 From the Navigator toolbar, click the Patrons button and
choose Import Patron Images. The Import Patron Images
window opens.
2 In the Locate the map file group, click Browse.
3 In the Open window, locate and select the map file on the CD
and click Open.
4 In the Locate the BMP files group, click Browse.
5 In the Open window, locate the folder where your image files
are saved and select one of the bitmap (.bmp) files. This tells
Spectrum CIRC/CAT where to locate your image files. Click
Open.
6 Make sure the Replace all existing images with incoming
images option is selected.
7 Click Import.
Patrons: Importing patron images
SCC5um1200kn
379
If you’ve already imported a patron file, a window opens stating
that the p_photos.log already exists. Click Append to add error
messages to the existing log file. Click Overwrite to replace the
existing error messages in the file with new error messages.
The import process begins. When it is complete, a window
opens and displays the number of images added to the
database.
8 Click OK to return to the Import Patron Image window. If any
errors were detected, you can click the View File button to
view the error log.
To pause or stop the import, see "Pausing or stopping a patron
image import".
When you import patron images, you are adding them to the Spectrum CIRC/CAT
database. You should always keep the original bitmap files in case an image is
accidentally deleted from the database. You can then add a single bitmap image to a
patron record in the Patron Edit part of the program.
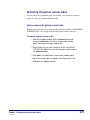
Pausing or stopping a patron image import
While the program is importing patron images, you can click Pause to temporarily halt
the importing processing or Stop to cancel importing. Note: You can only select Stop
after Pause is selected.
If you pause the import, you can click Import to resume importing where you left off.
If you stop the import, only the patron images that the program already processed will be
in your database. The image being processed when you click Stop—and any images after
that one—will not be imported.
380
Spectrum CIRC/CAT User Manual
SCC5um1200kn
How to pause or stop a patron image import
Follow the instructions below to pause or stop a patron image import.
To pause the import
Click Pause. The program temporarily halts the import. (Click
Import to resume importing.)
To stop the import
1 Click Pause.
2 Click Stop. The program stops importing records but the
Import Patron Images window remains open.
Patrons: Importing patron images
SCC5um1200kn
381
382
Spectrum CIRC/CAT User Manual
SCC5um1200kn