1
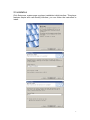
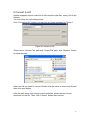
WatchNet Player
User Manual
1
WATCHNETDVR LAB.
Contents
1 Foreword…………………………………………………..4
1.1 General Introduction…………………………………………….4
1.2 Supported File Formats…………………………………………4
2 Installation…………………………………………………5
3 Player Toolbar Navigation……………………………….7
4 File Operations……………………………………………8
4.1 Play the File……………………………………………..8
4.1.1 Select from the File List…………………………………………………8
4.1.2 Drag the File to the Player………………………………………………8
4.1.3 Auto Play……………………………………………………………………8
4.2 Menu……………………………………………………..9
5 Convert to AVI……………………………………………..10
6 Recording ………………………………………………….11
7 MoreInformation ………………………………………….12
2
3
1 Foreword
1.1 General Introduction
This player is a super media player. It supports video file of digital video
recorder
(DVR),Video Server, IP camera and other products. The player also supports
AVI
converter. This is a player of high-quality and fluent video, integrating
advantages of
other players and at the same time features its own unique new functions.
1.2 Supported File Formats
File format: (support recording, snapshot, frame rate setting and etc)
*.DAV, *.MP4, *.264
Compression format
*.MP4 *.264
Image formats.
*.JPG, *.BMP
4
2 Installation
Click Setup.exe, system pops up player installation initial interface. This player
features simple and user-friendly interface, you can follow the instruction to
install.
5
6
3 Player Toolbar Navigation
In player interface, there are following items:
1: Click it will open the “Open File” dialog, select one file and start play.
2: Play
3: Stop
4: Start record
5: Previous file
6: Backward
7: Frame by frame backward
8: Frame by frame forward
9: Forward
10: Next file
11: Snapshot
12: Sound value.
13: Current status: Here you can view play status bar, play mode and volume
status (on or off).
14: Convert to AVI: System can convert the video file of suffix name such as
*.MP4, *.DAV, *.MPEG, *.264 to AVI format.
15: Full-screen: There are two ways: click full-screen button to review in full
screen mode. The other way is to double click current window to review in full
screen.
16: Play mode: shuffle or repeat.
17: Change language: The player supports two languages: English/Chinese.
System pops up dialogue box asking for restarting. Click OK, system
automatically restart.
7
4 File Operations
4.1 Play the File
There are three ways for you to play file.
4.1.1 Select from the File List
Click play icon, system pops up the following dialogue box. In Figure 2, you
can select one or more video files. Click open to open the file(s). All selected
video file(s) will be displayed in the playback list.
4.1.2 Drag the File to the Player
You can drag the file into the player directly.
4.1.3 Auto Play
If there are video files in player folder. You can double click player to begin
auto play.
You can click previous or next view the previous file or next file in
current folder.
Note:
When there is no other file in current folder, system repeat playing current file
when
you click previous or next button.
8
4.2 Menu
Click the small button at the right top corner will show the menu:
There are the following items:
Open file - Click it will popup a dialog for select media file.
Setting
- Open it will popup a setting window, we can set the image
color here, also we can setup the file association here, and we can set the
snapshot and recording path here.
Control
- We can jump to home or end of the file, also we can jump
to a certain position by “Locate” option.
Multi Display - Click this option will popup a dialog, and we can set “Left”
“Top” “Right” “bottom” in this dialog, after setup, the player will popup a new
image window, and the certain area will play in this additional window, and play
together with the main image window.
Clip
- We can make video clip by this option, click “Clip” and will popup
ad dialog, in this dialog we can set the start point and end point, and create a
video clip.
Help - Click this potion will popup a dialog, display current video file detail
information, and also display the hotkey for operate the player.
About - Display the player version number.
9
5 Convert to AVI
System supports convert video file of suffix such as mp4,Dav, mpeg ,264 to avi
formats.
You can follow the instructions below.
Click “Convert to AVI” button, you can see an image as shown in Figure 4.
Figure 4 Convert to AVI
There have a “Source File” path and “Target File” path, click “Browser” button
to setup the path.
Select the file you want to convert. Double click file name or select one file and
then click open button.
After the path setup, then select output resolution, please set the correct
resolution for the file. Then, click “Convert” button start convert.
10
6 Recording
Click “Start Recording” button, system starts recording. You can see the “Stop”
button change to “Stop recording” button.
Click “Stop recording” button after finishing recording.
Then, the record file saved in your “record path”.
Tips:
After recording, you can drag status bar to the desired location and then click
“stop recording” button to record files. In this way you can save a lot of time.
11
7 More Information
If you still have any problems about these functions, please contact with our
engineers.
12