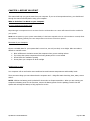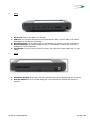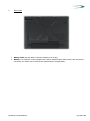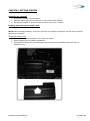
1
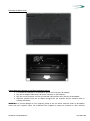
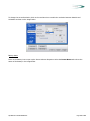
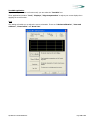
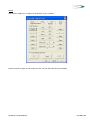
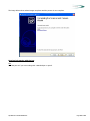
User Manual
QuadPad 2
www.quaduro.com/support
Table of Contents
Copyright ............................................................................................................................................... 3
Software Licenses ................................................................................................................................. 3
Safety Notices ....................................................................................................................................... 3
CHAPTER 1: BEFORE YOU START .......................................................................................................... 7
What to do before You Work on your Computer ........................................................................................... 7
Let your Computer acclimatize itself ......................................................................................................... 7
Placement of your Computer ................................................................................................................... 7
Suitable place to work ............................................................................................................................. 7
CHAPTER 2: INTRODUCTION ................................................................................................................ 8
Introducing your computer ......................................................................................................................... 8
Unpacking the Computer ......................................................................................................................... 8
1. Front View ...................................................................................................................................... 9
2. Side 1 ........................................................................................................................................... 10
3. Side 2 ........................................................................................................................................... 11
4. Side 3 ........................................................................................................................................... 11
5. Bottom Side .................................................................................................................................. 12
CHAPTER 3: GETTING STARTED .......................................................................................................... 13
Setting up the Computer ........................................................................................................................... 13
Inserting and removing the Battery Pack ................................................................................................... 13
Inserting the Battery pack ..................................................................................................................... 13
Removing the Battery Pack .................................................................................................................... 14
Connecting the computer to an External Power Source ............................................................................... 14
Operating on Battery Power ...................................................................................................................... 15
Charging the Battery Pack ......................................................................................................................... 15
CHAPTER 4: USING THE COMPUTER ................................................................................................... 16
Automatic Battery Pack Charging Function ................................................................................................. 16
Battery Status....................................................................................................................................... 16
Battery Low Warning ............................................................................................................................ 16
CMOS Battery ....................................................................................................................................... 16
Using the A- Menu ............................................................................................................................... 16
Changing the resolution ............................................................................................................................ 16
TouchKit Application ................................................................................................................................. 19
Built-in-Camera ........................................................................................................................................ 21
CHAPTER 5: TROUBLE SHOOTING ...................................................................................................... 28
General Hardware problems/ possible cause and Solution ........................................................................... 28
1. A freeze on the system during program operation ........................................................................... 28
2. System Not Resuming Operation .................................................................................................... 28
3. The LCD screen is too dark or too bright ......................................................................................... 28
QUADPAD 2 USER MANUAL.
Page 1 of 32
4. Beeping sound .............................................................................................................................. 28
5. The system can not shutdown properly ........................................................................................... 28
6. What are the major steps to follow when the system does not turn on properly after it shutdown Error!
Bookmark not defined.
7. How to extend battery life .............................................................................................................. 28
8. Wireless LAN connection is disconnected after 2~3 minutes, and the connection is not recovered. ..... 28
9. The computer is unable to connect to the Internet. ......................................................................... 28
10.
The Wireless LAN is connected, but I can not connect to or to another computer. ......................... 29
11.
The signal strength is excellent but cannot connect to the network. .............................................. 29
12.
Contacting Your Dealer .............................................................................................................. 29
13.
What steps should be taken when water accidentally get inside the Tablet PC ............................... 29
14.
The Tablet PC could not resume after it enter the Standby mode .................................................. 29
15.
The system can’t resume operation............................................................................................. 30
16.
Display problem ......................................................................................................................... 30
Appendix ............................................................................................................................................. 31
Specification............................................................................................................................................. 31
QUADPAD 2 USER MANUAL.
Page 2 of 32
Copyright
This publication, including all photographs, illustrations and software, is protected under international copyright
laws, with all rights reserved. Neither this manual, nor any of the material contained herein, may be reproduced
without the express written consent of the manufacturer.
Disclaimer: The manufacturer makes no representations or warranties with respect to the contents hereof and
specifically disclaim any implied warranties of merchantability or fitness for any particular purpose. The
manufacturer is not liable for technical and editorial error for this guide. The manufacturer reserves the right to
revise or make changes to this publication without notice or obligation of the manufacturer to notify any person
of such revision or changes.
Software Licenses
The software included with the product and referenced in this document is furnished under a License Agreement.
This Agreement specifies permitted and prohibited uses of this product.
General Guidelines
◊
◊
◊
◊
Read all of the instructions carefully.
Save the instructions for future use.
To ensure correct and safe use, follow all warnings and instructions marked in the product
documentation and within the computer.
Except as explained elsewhere in this manual, do not attempt to service the computer yourself. Opening
or removing covers might expose you to dangerous voltage points or other risks. Refer all servicing of
marked components to qualified personnel.
Safety Notices
Please read these safety instructions carefully.
◊
◊
◊
◊
◊
All precautions and warnings on the equipment should be carefully noted.
Please disconnect the computer from the AC outlet before cleaning.
Never pour any liquids into any openings or directly onto the computer unit. This could result in fire or
electrical shock.
Ensure the voltage range of the power outlet is between 100V and 240V before connecting the computer
unit. Exceeding the maximum rated voltage may cause damage to the AC adapter or to the computer.
This could result in fire or electrical shock.
Do not leave this equipment in a non-temperature controlled environment; storage temperatures below
4°C (39°F) or above 35°C (95°F) may damage the unit.
QUADPAD 2 USER MANUAL.
Page 3 of 32
Safety Notices for the Power Cord
This equipment has a 3-wire power cord. Replace the power cord if it becomes damaged. Contact your dealer for
an exact replacement.
In the U.S.A. and Canada, the power cord must be a UL-listed detachable power cord (in Canada, CSA-certified).
3-wire cord
SVT or SJT, 18 AWG, 3-conductor
Provided with a molded-on cord connector body at the other end. The cord length must not exceed 3 meters.
Outside the U.S.A. and Canada, the plug must be rated for 250 VAC, 2.5 amp minimum, and must display an
international agency approval marking. The cord must be suitable for use in the end-user’s country. Consult your
dealer or the local electrical authorities if you are unsure of the type of power cord to use in your country.
Voltage changes occur automatically in the power supply.
Notice of EMC Compliance
This equipment has been tested and found to comply with the limits for a Class B digital device, pursuant to Part
15 of the FCC Rules. These limits are designed to provide reasonable protection against harmful interference in a
residential installation.
This equipment generates, uses, and can radiate radio frequency energy and if not installed and used in
accordance with the instruction manual may cause harmful interference to radio communications. However, there
is no guarantee that interference will not occur in a particular installation.
If this equipment does cause harmful interference to radio or television reception, which can be determined by
turning the equipment off and on, the user is encouraged to try to correct the interference by one or more of the
following measures:
◊
Reorient or relocate the receiving antenna.
◊
Increase the separation between the equipment and receiver.
◊
Connect the equipment into an outlet on a circuit different from that to which the receiver is connected.
◊
Consult the dealer or an experienced technician for help.
◊
Use only shielded I/O cables to connect I/O devices to this equipment.
You are cautioned the changes or modifications not expressly approved by the party responsible for compliance
could void your authority to use the equipment.
This device complies with Part 15 of the FCC Rules. Operation is subject to the following two conditions: (1) this
device will not cause harmful interference, and (2) this device must accept any interference it receive including
interference that may cause undesired operation.
This device and its antenna(s) must not be co-located or operating in conjunction with any other antenna or
transmitter.
QUADPAD 2 USER MANUAL.
Page 4 of 32
FCC Radiation Exposure Statement
This Transmitter has been demonstrated co-location compliance requirements with (Wireless LAN/Model No:
Q802XKG).This transmitter must not be co-located or operating in conjunction with any other antenna or
transmitter.
◊
◊
This equipment complies with FCC RF radiation exposure limits set forth for an uncontrolled environment.
To maintain compliance with FCC RF exposure compliance requirements, avoid direct contact to the
transmitting antenna during transmitting.
Any changes or modifications (including the antennas) made to this device that are not expressly
approved by the manufacturer may void the user’s authority to operate the equipment.
Canadian EMI Compliance Statement
This Class B digital apparatus meets all requirements of the Canadian Interference - Causing Equipment
Regulations.
European Union CE Marking Declaration
This product has been tested and found to comply with the EMC requirement subject to the EU directive for CE
marking.
Ultra Mobile is herewith confirmed to comply with the requirements set out in the Council Directive on the
Approximation of the Laws of the Member States relating to Electromagnetic Compatibility (89/336/EEC), Lowvoltage Directive (73/23/EEC) and the Amendment Directive (93/68/EEC), the procedures given in European
Council Directive 99/5/EC and 89/3360EEC.
The equipment was passed. The test was performed according to the following European standards:
◊
◊
◊
◊
EN
EN
EN
EN
300 328 V.1.6.1 (2004)
301 489-1 V.1.4.1 (2002) / EN 301 489-17 V.1.2.1 (2002)
50371: 2002
60950-1: 2001
Regulatory statement (R&TTE / WLAN IEEE 802.11b & 802.11g)
European standards dictate maximum radiated transmit power of 100mW EIRP and frequency range 2.4002.4835GHz; In France, the equipment must be restricted to the 2.4465-2.4835GHz frequency range and must be
restricted to indoor use.
◊
◊
Inside the buildings with a power (WORSE *) maximum of 100 MW on all the frequency band 24002483,5 MHz,
Outside the buildings with a power (WORSE *) maximum of 100 MW on the part 2400-2454MHz and with
a power (WORSE *) maximum of 10 MW on the part 2454-2483MHz
QUADPAD 2 USER MANUAL.
Page 5 of 32
Laser Compliance Statement for CD-ROM, DVD-ROM, CD-RW and DVD/CD-RW Combo Drives
The CD-ROM, DVD-ROM, CD-RW and DVD/CD-RW Combo drive for this computer are laser products. The
classification label of the drive is located on the bottom of the drive. Below is a sample of the classification label:
◊
CLASS 1 LASER PRODUCT
◊
LASER KLASSE 1
◊
LOUKAN 1 LASERLAITE
◊
APPAREIL A LASER DE CLASSE 1
◊
KLASS 1 LASER APPARAT
The drive is certified in the USA to comply with the requirements of the Department of Health and Human
Services 21 Code of Federal Regulations (DHHS 21 CFR) Subchapter J. for Class 1 laser products.
In other countries the drive is certified to comply with the requirements of EN60825.
QUADPAD 2 USER MANUAL.
Page 6 of 32
CHAPTER 1: BEFORE YOU START
This manual will help you get the most from your computer. If you are a less experienced user, you should read
through the manual carefully before using your computer.
What to do before You Work on your Computer
Let your Computer acclimatize itself
Rapid changes in temperature such as those from the cold outdoors to a warm office would not be suitable for
your system.
NOTE: Do not power up your system immediately if it has been exposed to hot or cold conditions. Instead, allow
the system to adjust gradually too room temperature over three to four hour period
Placement of your Computer
Choose a suitable place for your system that’s not too hot, too cold, too dark, or too bright. Glare can make it
difficult to read the screen.
◊
◊
◊
◊
Allow sufficient air circulation around the computer when you are working indoors
Try to keep the system components from being destroyed if it is over heated
Do not block the ventilation opening
Do not place your computer in direct sunlight
Suitable place to work
Your computer will run well under most conditions but avoid extreme temperatures and humidity levels.
There are some things you can tolerate that the computer can’t – things like static electricity, dust, water, steam
and oil.
NOTE: A lithium-ion battery pack is included for those who are frequent travellers. When you are running your
computer on battery power for the first time, remove the battery power from the package, install it into the
system and recharge the battery to fully prepare for service
QUADPAD 2 USER MANUAL.
Page 7 of 32
CHAPTER 2: INTRODUCTION
Introducing your computer
Your computer features the latest advances in portable computing technology. The computer modular design
provides maximum expandability without compromising portability.
WARNING: Please never try to disassemble the Tablet PC as we would not be responsible for any damages
caused by this action
Unpacking the Computer
The computer comes securely packaged in a shipping carton. Please contact your dealer if you find that anything
is missing or damaged after examining the contents. The shipping carton should contain the following items:
◊
◊
◊
◊
◊
AC-DC Adapter
Power Cord
Support CD
Quick Guide
Stylus Pen
Do not throw the packaging materials away. You may need them later if you have to ship the computer.
QUADPAD 2 USER MANUAL.
Page 8 of 32
Getting to know your computer
1.
Front View
1. LED Indicator:
Wireless
Indicator
WLAN ON: Orange
HDD
Indicator
HDD Accessing (Blinking: Green color)
Battery
Indicator
The battery charge indicator (LED) shows the status of the battery’s power
as follows:
Green: This indicates the system is ON.
Orange: This indicates the battery is charging when the system is off.
Off: This indicates the system is off and is not charging.
QUADPAD 2 USER MANUAL.
Page 9 of 32
2. CMOS Camera: This is where the built-in camera is located which you can use for any video
conferencing application.
3. Microphone: Use this microphone when you are on video conferencing
4. LCD Display: This system is equipped with a 10.2 inch display with 1024x600 WXGA LCD.
5. Power Switch: The power switch turns the computer on and off.
6. Power Switch Lock/Unlock Latch:
This latch serve as safety precaution to avoid you from accidentally pressing the power switch thus causing the
system to power down. Slide the latch into this position which indicates it is in open position enabling you to
power on the system with a slight pressing of the power switch
Slide the latch into this position which indicates it is closed. Here you may have to press the power switch harder
for you to power on the system.
2.
Side 1
1. Kensington Lock Keyhole
Your computer includes a keyhole to be used with a standard Kensington lock. You can connect the
computer lock to a large object with the Kensington lock to prevent theft of your system.
2. Ethernet / LAN Port
The port connects to a network hub via the RJ-45 cable and also conforms to 10/100 Base-TX
transmission protocol
QUADPAD 2 USER MANUAL.
Page 10 of 32
3.
Side 2
1. DC IN Jack: Plug the AC adapter into this jack.
2. USB Port: Your computer includes two Universal Serial Bus (USB) 2.0 ports. USB2.0 is the latest
development in Plug and Play technology.
3. Microphone Jack: The microphone jack (3.5-mm diameter) is where you connect a microphone.
4. Stereo Headphone: The stereo headphone jack (3.5-mm diameter) is where you connect the
headphones or external speakers.
5. Card Reader: The slot is where PC Card is inserted. The system also supports MMC, SD, 2-1 card
reader.
4.
Side 3
1. Ventilation Opening: Please don’t block this opening that serve as cooling purpose for the system.
2. External VGA Port: The 15-pin VGA analog port is for connecting the external CRT monitor or
projector.
QUADPAD 2 USER MANUAL.
Page 11 of 32
5.
Bottom Side
1. Battery Latch: Use this latch to release the battery from its bay.
2. Battery: Your computer comes equipped with a factory-installed battery pack module. After the battery
runs down, the module can be removed and replaced with a charged battery.
QUADPAD 2 USER MANUAL.
Page 12 of 32
CHAPTER 3: GETTING STARTED
Setting up the Computer
◊ Remove the computer from its package.
◊ Insert the battery pack into the computer so the pack can start charging.
◊ Connect the computer to an external power source. Turn on the computer.
Inserting and removing the Battery Pack
NOTE: Before inserting the battery, be sure the front side of the battery is facing the top side of the system as
shown in the illustration.
Inserting the Battery pack
◊ Turn over the computer and place it on a solid, flat surface.
◊ Align the battery into the battery compartment.
◊ Insert back the battery into the compartment and push down until the battery latch click sound to
indicate it is lock.
QUADPAD 2 USER MANUAL.
Page 13 of 32
Removing the Battery Pack
Connecting the computer to an External Power Source
◊ To connect the computer to an external AC power source using the AC adapter:
◊ Plug the AC adapter cable into the AC power connector on the computer.
◊ Plug one end of the power cord into an electrical outlet and the other end into the AC adapter.
◊ Whenever possible, keep the AC adapter plugged into the computer and an electrical outlet to
recharge the battery
WARNING: To prevent damages to your computer, please do not use inferior extension cords. An AC adaptor
comes with your computer. Never use a different kind of adaptor to power the computer or other electrical
QUADPAD 2 USER MANUAL.
Page 14 of 32
device. Don’t try to reset your computer while the hard disk is in use as it may result in the loss or destruction of
your data.
Operating on Battery Power
Your computer comes with a rechargeable battery pack that lets you operate the computer without an external
power source. When the battery pack is fully charged, you can operate the computer for approximately 3 hours
under typical conditions.
Charging the Battery Pack
The installed battery pack charges automatically whenever the computer is connected to the AC adapter and an
external power source. The first time you use the battery, be sure to fully charge it then fully discharge it before
recharging it until it is fully charged. Now it is ready for use.
QUADPAD 2 USER MANUAL.
Page 15 of 32
CHAPTER 4: USING THE COMPUTER
Automatic Battery Pack Charging Function
You can automatically charge the battery pack by using the AC Adapter.
NOTE: The charge time is almost two hours when the computer power is turned off.
Battery Status
Windows Vista has an applet in the Control Panel that will display an icon in the Windows taskbar indicating when
the computer is running on battery power or is attached to the AC adapter. This applet also displays a meter that
indicates how much charge is remaining in the battery.
Battery Low Warning
When the battery is in low status, its LED indicator will blink continuously and you will hear beeping sound .
CMOS Battery
There is a small built-in battery pack that supplies power to the system in order to maintain certain system
information while the power is off. If the computer is left without a power source for long period of time, this
battery will be exhausted and system information will be lost.
NOTE: To avoid damages, only use replacement batteries recommended by system provider. To prevent the loss
the loss of data when the system losses power, do not remove the battery pack while the power is on.
Using the A- Menu
Changing the resolution
To change the screen resolution, select the icon on “Intel” icon as shown on the image below.
QUADPAD 2 USER MANUAL.
Page 16 of 32
To change the screen Resolution, click on the resolution icon to switch the resolution between 800x600 and
1024x600 as shown on the image below.
Battery Status
Press on the battery icon to open up the Power Schemes Properties. Select the Power Meter tab to show the
status of the battery in the image below.
QUADPAD 2 USER MANUAL.
Page 17 of 32
QUADPAD 2 USER MANUAL.
Page 18 of 32
TouchKit Application
If your cursor pointer does not function well, you can select the “TouchKit” icon.
These applications includes: “Tools”, “Displays”, “Edge Compensation” to adjust your screen display when
applying the touch function.
Tools
This setting will enable you to adjust the screen orientation. These are “4 Points Calibration”, “Clear and
Calibrate”, “Linearization” and “Draw Test”.
QUADPAD 2 USER MANUAL.
Page 19 of 32
Display
This function enables you to adjust on the buttons of your computer.
Use this function to apply on the location on how your pen will touch the screen display.
QUADPAD 2 USER MANUAL.
Page 20 of 32
Built-in-Camera
To execute the camera of your system, do the following:
◊
From Start, proceed to the “Control Panel”.
QUADPAD 2 USER MANUAL.
Page 21 of 32
QUADPAD 2 USER MANUAL.
Page 22 of 32
Double click on the “Scanners and Cameras” item, as shown in the image below
Click on the “USB Video Device” to proceed.
QUADPAD 2 USER MANUAL.
Page 23 of 32
Click on the “Next” button to proceed with the installation.
Click on the “Take Picture” to capture the picture.
QUADPAD 2 USER MANUAL.
Page 24 of 32
The taken picture will appear on the right display.
QUADPAD 2 USER MANUAL.
Page 25 of 32
Click on the “Next” button to save the captured picture.
You will have three options to deal with the captured pictures.
QUADPAD 2 USER MANUAL.
Page 26 of 32
The image below shows where images are places and the process is now complete.
Entering information with the Pen
Pen
Hold the pen as if you were writing with a standard pen or pencil.
QUADPAD 2 USER MANUAL.
Page 27 of 32
CHAPTER 5: TROUBLE SHOOTING
This chapter describes locating and solving problems that you may encounter while using your computer.
General Hardware problems/ possible cause and Solution
A few common hardware problems and suggested solutions are presented below:
1. A freeze on the system during program operation
An error occurs during program currently being used.
Solution: An error with the Windows OS. Reboot the system using the Power button.
2. System Not Resuming Operation
If the system will not resume operation after system operation has been suspended, check the following
possible causes:
Solution: The battery may either be defective, or discharge to a critically low level. To correct this
problem, connect an external power supply such as AC adapter.
3. The LCD screen is too dark or too bright
Solution: Adjust the LCD brightness. Press the A-Menu button and click on Brightness Up or Brightness
Down.
4. Beeping sound
Solution: Connect the computer to an external power source immediately.
5. The system can not shutdown properly
Solution: Press and hold the power button for 4~6 seconds until the system shutdown manually.
6. What should I do if the battery fully discharges?
Solution:
◊
Remove the battery and connect the AC adapter. Press on the reset button to turn on the
system.
7. How to extend battery life
Solution:
◊
◊
◊
Adjust the display brightness to minimum level.
Adjust the volume to minimum level.
Disconnect all PC card not often used.
8. Wireless LAN connection is disconnected after 2~3 minutes, and the connection is not recovered.
Solution: The reason may be caused by channel interference, change the channel of the AP and
reconnect.
9. The computer is unable to connect to the Internet.
Solution: Account for Internet service provider (ISP) is not properly configured. Ask for your ISP
assistance.
QUADPAD 2 USER MANUAL.
Page 28 of 32
10. The Wireless LAN is connected, but I can not connect to or to another computer.
Solution:
◊
◊
Check the device driver is properly installed.
Check that the device driver is properly installed. If the driver is not properly installed, you will
find a yellow exclamation mark on the network icon by clicking Start > Control Panel >
System > Device Manager > Network Adapters. If there is a yellow exclamation mark,
please reinstall the device driver with the system software Media.
11. The signal strength is excellent but cannot connect to the network.
Solution: Check the TCP/IP properties are configured properly. When you connect to an AP, click the
Wireless Network Connection icon on the taskbar and select the Support tab.
12. Contacting Your Dealer
If you still have a problem after reading the preceding section, the next step is to contact your dealer.
Your dealer can determine if the problem is something that requires the computer to be taken to the
shop. Before you call your dealer, however, please have the following information available:
Solution:
◊
◊
◊
◊
How is your computer configured? Your dealer needs to know what peripheral devices you are
using.
What messages, if any, are on the screen?
What software were you running at the time?
What have you done already to try to solve the problem? If you have overlooked a step, your
dealer may be able to solve the problem over the phone.
13. What steps should be taken when water accidentally get inside the Tablet PC
Solution:
◊
◊
◊
◊
◊
At this time be sure not to power on the Tablet PC or else it will cause more serious damage to
the computer
Unplug the adapter and take out the battery. Disconnect as well if there are any external devices
connected (like CD-ROM or flash drive)
Pour out the water that got inside the computer and use a soft cloth to remove the stain to avoid
any more damage
Use the fan to dry the whole system and any peripheral then send it to the closest service centre
for experienced personnel to diagnose and repair. This will reduce the damage to the system
As a special reminder, be sure not to put the computer inside the carry bag that has stain in
sending the computer for repair
14. The Tablet PC could not resume after it entered Standby mode
Solution:
◊
◊
Standby Mode – allows the computer or program save into the RAM. The system will enter the
saving mode. Press any key to resume the system
Hibernate Mode – allows the computer or program save into the HDD. At this time the power is
completely turn off. Press any key to resume the system
QUADPAD 2 USER MANUAL.
Page 29 of 32
15. The system can’t resume operation
Solution:
◊
◊
◊
◊
Malfunction of external memory or internal memory – an error will occur during saving into the
system memory, it will not execute normal operation
External peripheral connected to the system not compatible – such as external USB devices,
compact flash, MMC, Smart Media are complicated devices will easily cause the computer to
enter standby mode thus unable to resume operation
Un-suitable program or driver – any un-suitable driver could cause any extension file like .dll, .sys
and .exe would not allow the system to enter standby or hibernate mode
Operating System loses effect – the power saving mode of Microsoft operating system adopt
ACPI mode (advanced Configuration and Power Interface), the power scheme will be handle by
the OS thus affecting the power saving mode of the system
16. Display problem
Problem: Display LED too bright or too dark
Solution: Adjust the LED brightness; press the hotkey combination by brightness up or brightness down
Problem: The whole image does not display on the screen
Solution: This symptom will occur if you are executing any program or playing games design to run only
on 800x600 resolution. Adjust the display to a higher resolution.
Problem: Can not execute any function
Solution: This only happens when the system is in hold status. Slide the power/hold switch to power on,
this time the charge LED indicator will lit thus allowing you to restart your computer. If you are operating
the computer using the battery, examine the battery charge status
Problem: The power switch is not operating
Solution: This only happens when the system is in hold status. Slide the power/hold switch to power on,
this time the charge LED indicator will lit thus allowing you to restart your computer
QUADPAD 2 USER MANUAL.
Page 30 of 32
Appendix
Specification – indication only, please contact sales office for latest model.
Operating System: Windows XP Home
CPU: Intel Diamondville platform Atom N270 533MHz FSB, 512KB, L2 Cache (1.6G)
Chipsets:
◊ Core Logic: 945GSE + ICH7-M
◊ VGA: 945GSE ultra low power integrated 3D graphics
Audio: High Definition Audio
Memory: 1x DDRII SODIMM 533/667MHz
Maximum Memory: 2GB
BIOS:
◊ Insyde UEFI BIOS
◊ Boot from USB
◊ Plug & Play
◊ APM 1.2
◊ ACPI 2.0
HDD:
◊ 2.5 inch SATA HDD 80GB default, max 160GB (option)
◊ SATA to CF card type II (option)
Video: Intel 945 GSE, resolution 1024x600 as default
LCD Display: 10.2”, 1024x600 WXGA LCD
Card Reader: Support SD/MMC card slot
CMOS Camera: Built-in 1.3M pixel camera
Audio: Realtek ALC268Q-GR
Communication:
◊ Wireless 802.11 b/g (Mini PCIe) Qcom Ralink solution
◊ Touch panel 4 wires resistive (80 gram) + control board (USB)
AC/DC Adapter:
◊ Miniature size compact adapter type
◊ AC 100~240Volt / DC 12V 3A 36W
Battery Pack: 1 removable battery pack
Power Management: Support For ACPI 2.0
Physical/Mechanical:
◊ 192 (L) x 252 (W) x 28 (H-min) 36(H-mix) mm
◊ 1.18kg
Accessory Kit:
◊ Stylus pen
◊ Power adapter
◊ Power Cord
◊ Support CD
Regulatory Approval:
◊ Safety: CB Report
◊ ESD: Contact 4KV, Air 8KV
◊ RF: FCC ID, CE, TELEC, DGT, SRRC
QUADPAD 2 USER MANUAL.
Page 31 of 32