1
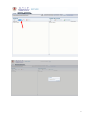
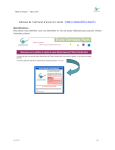
User Manual for the E-card System
URL for the e-card system and user interface
Function 1 – add group list
Method 1 – add directly by using the functional keys on the interface
Method 2 – upload the contact list in excel format
Function 2 – send e-cards individually
Function 3 – group-send e-cards
Function 4 – send e-cards on behalf of your bosses
Function 5 – sent history
1
URL for the e-card system: https://isw.umac.mo/eCard
Login in with your username and your check in/out password
2
After login-in, you will see the user interface shown below.
Function 1 – Create a group list
If you want to group-send the e-cards, first of all, you need to create a group list.
There are two ways to create the group lists.
Method 1 – add groups and contacts directly by using the function keys
1. Please click “New”, and create a name for the group, e.g. Group 1
3
4
2. The group name – “Group 1” is added to the left of the interface. Now you need to add
some contacts to the group, please click “Add Contact(s)”
3. Then you will enter the page shown below, please click “New” to enter a new contact
5
4. After created the new contacts, you need to select the contacts and click “Add Checked
Contact(s)”
5. Then the selected contacts will be added to the group
If you want to create more groups, please follow the same procedures mentioned above.
Please notice that contacts can be shared among groups, in other words, the same contact
can be added or linked to different group. Modification of a shared contact will affect all
sharing groups.
6
Method 2 – upload contact list in excel format
If you don’t want to add contacts individually, you can choose to upload the contact list in
excel format.
Please click “Download template” and save the excel file as a template to create your
contact lists in excel format.
Please key in your contacts. Remember to put all contacts in the same spreadsheet even if
they belong to different groups (e.g. group 1, 2 or 3, etc.)
7
When the contact list is ready, please click “Browse”, select the excel file and click “Import”.
Then the entire contact list will be imported to the system automatically.
In case there are group(s) with same name already existed (either created manually with
method 1 above or imported from another excel file previously), you can select either
“overwrite” or “merge” to handle the duplicated group contacts in your new excel file.
Tips:
1. If you just have a few updates (add, remove or move member contacts) on the groups,
you can do it on the interface directly.
2. If you need to make major revisions to a group, you can import the whole revised group
again from an excel file using the “overwrite” option.
3. If you select “overwrite”, the system will replace the old group with the new member
contacts.
4. If you select “merge”, the system will only append the new member contacts.
8
Function 2 – Send e-cards individually
1. Click “Send Mail”
2. Key in your name, the recipient’s name and email, subject and personal message
3. Click “Preview” at the left bottom corner of the window
9
4. Click “Preview” and you will see the following preview
5. Click “Confirm And Send” if there are no further amendments
6. Click “Back” to go back to the previous page for amendments
10
Function 3 – Group-send e-cards
1. Click “Send Mail”
2. Click “Yes” for Send To Group
3.
4.
5.
6.
Select the group
Key in personal message if necessary
Click “Preview”
Click “Confirm And Send” if there are no further amendments
Tips:
You can key in your personal message if you like. For example:
Dear all,
Wishing you a Merry Christmas!!
Regards,
Wini
11
If you want to show your friends’ names respectively on “Dear XXX” when you group-send
the e-cards, you can use “%RECIPIENT%” as the variable of the names of recipients. Click
“Preview” and the names will appear automatically.
12
Function 4 – Send e-cards on behalf of your bosses
This system enables you to send e-cards on behalf of your bosses. Please follow the steps
below:
1. Click “Yes” for Send By Delegation
2. Select your boss’s email
3. Please insert the name of the sender (your boss’s name)
4. If you are sending to a group, please follow the steps of Function 3
5. If you are sending e-cards individually, please follow the steps of Function 2
13
Function 5 – Sent history
Click “Sent History” and the system will display the history automatically.
You can also use the filter function to search by inputting the key words and press Enter in
the blank boxes. Remove the key words and press “Enter” again to reset the filter.
~~ End ~~
14