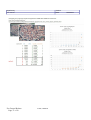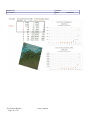
1
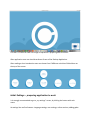
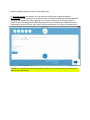
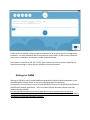
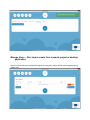
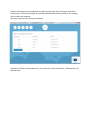
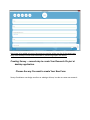
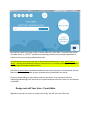
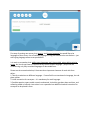
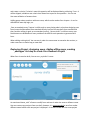
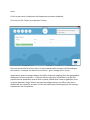
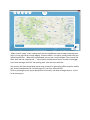
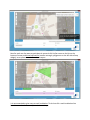
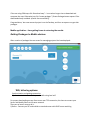
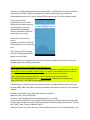
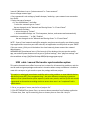
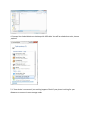
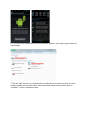
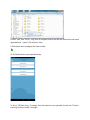
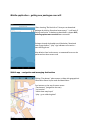
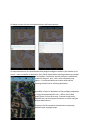
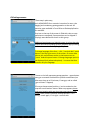
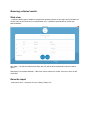
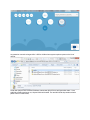
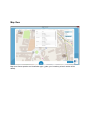
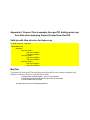
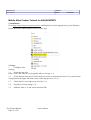
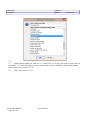
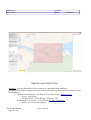
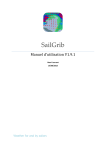
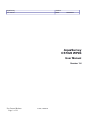
AquaSurvey Version: Date: User manual 15.05.2015 AquaSurvey CS7826 WP#4 User Manual Version 1.4 For General Release Page 1 of 39 Αtos, 15.05.15 AquaSurvey Version: Date: User manual 15.05.2015 Revision History Date Version 16.12.2014 0.1 Document creation Maksymilian Sila-Nowicki 17.12.2014 0.9 Updated Jacek Jarosz 15.01.2015 1.0 Major Updated Maksymilian Sila-Nowicki 19.01.2015 1.1 Major Updated Maksymilian Sila-Nowicki 22.02.2015 1.2. Corrections Maksymilian Sila-Nowicki 04.04.2015 1.3 Appendix , tiles generation Maksymilian Sila-Nowicki 14.04.2015 1.4 Major Updated Maksymilian Sila-Nowicki 15.05.2015 1.5 Updated Maksymilian Sila-Nowicki For General Release Page 2 of 39 Description Αtos, 15.05.15 Author AquaSurvey Version: Date: User manual 15.05.2015 Contents Introduction..........................................................................................................................................4 Purpose.............................................................................................................................................4 About This Release...............................................................................................................................4 Overview..........................................................................................................................................4 Manual..................................................................................................................................................4 Desktop App - First Run and Application Start...............................................................................4 Initial Settings – preparing application to work...............................................................................5 Settings for GADM ...................................................................................................................7 Manage Users – First step to create Your research project at desktop application..........................8 Creating Survey – second step to create Your Research Project at desktop application. .............10 Choose the way You want to create Your New Form..............................................................10 Design and edit Your form – Form Editor................................................................................11 Deploying Project: Assigning users, Adding offline maps, creating packages -3rd step to create Your Research Project ...................................................................................................................14 Mobile application – from getting forms to returning the results......................................................18 Getting Packages to Mobile devices..............................................................................................18 Wifi, tethering options:.............................................................................................................18 USB cable / manual file transfer synchronization option:......................................................20 Mobile application – getting new packages over wifi...................................................................24 Mobile app – navigation and managing destinations.....................................................................24 ...................................................................................................................................................25 Collecting answers.........................................................................................................................26 Managing results with new tabs.....................................................................................................27 GET RESULTS TO DESKTOP APPLICATION OVER USB......................................................28 Browsing collected results.............................................................................................................29 Stats view .................................................................................................................................29 Generate report..........................................................................................................................29 Map View..................................................................................................................................31 ..................................................................................................................................................32 Appendix A. Prepare Tiles in example from geoTiff. Adding raster map from files when deploying Project (Created from GeoTiff).....................................................................................32 Valid zip with tiles structure for Aqusurvey..............................................................................32 MapTiler....................................................................................................................................32 Mobile Atlas Creator Tutorial for AQUASURVEY..................................................................33 For General Release Page 3 of 39 Αtos, 15.05.15 Introduction This document contains User Manual for the release of the CS7826 WP4 AquaSurvey GPS FDC. Purpose The purpose of this document is to allow End User using AquaSurvey GPS FDC software. It’s dedicated for both: desktop and mobile part. Additional there is a part regarding synchronization between those two components. About This Release It is worth to mention, that new release has different way of Overview Technical overview of delivered software About Desktop version Version 1.5.2 Mobile version 1.515 Manual Please find attached below manual Desktop App - First Run and Application Start First Run. First Run can take a bit longer as aplication si preparing data structures. After application start user should see Home Screen of the Desktop Application. After reading a short introduction user can choose from 5 different activities of Main Menu on the top of the screen. Initial Settings – preparing application to work It is strongly recommended to go to „my settings” screen, by clicking the button with such name. At settings You use five features: Language settings, user settings, online serviece, adding gadm features, and displaying information about application. As language settings are optional, you can choose actually italian, english and polish. User settings are very important as you define here user identity. Being the desktop aplpication user generally means that You are playing role of Survey Coordinator. Providing correct ID (email) is way of enabling of possibility of geting back results sended from mobile devices to online server, as well as access Your users list, and proof that You are author of created forms. Field Admin is important as declaring yourself as admin User enables creating, publishing and deleting standard surveys. Online service in settings is place to save host (domain or ip) of online services: storing results backuped – not sent to desktop directly but stored to online buffer, as well as lists of users for every survey coordinator, and place to publish standard surveys. Test instance of services is 195.162.17.253, own instances of services can be created by any institution according to online services installation manual document. Settings for GADM Settings for GADM is tool to upload additional geographical administrative boundaries in json files dedicated to display results at map view using geographical boundaries. As Gadm files are very heavy in terms of used disk space, they are not attached to installation of AQUASURVEY desktop application. Users can obtain file with boundary shapes from their Aquasurvey app provider. It is recomennded to upload only level 2 gadm files as not all countries have all levels of administrative organization, thus application serves only level 2 boundary shapes as this level is considerd to be consistent beetwen countries. Manage Users – First step to create Your research project at desktop application. Users in this section are considered as equal to surveyours, whose will be collecting data using mobile app. Desktop user being survey coordinator can add user, edit users data, and import users from online service. Only users assigned to coordinator (identified by email provded in the settings) can be visible and imported. Users are resources that can be synchronized If Desktop is offline or demanded user is not on the list, Survey Coordinator – Desktop User can add new user: Users have to be added only once. New users are send to online user list of the coordinator every time Desktop is online and Coordinator is performing import user action. Creating Survey – second step to create Your Research Project at desktop application. Choose the way You want to create Your New Form Survey Coordinator can design new form or redesign old one, in order to create new research. New Survey creates form from scratch, User can also click „from draft” to choose from his/her own older forms, or „SELECT” standard survey beeing actually survey template published on online service by user playing adminstrative role. Sync standard surveys works two way, it downloads standard surveys , and - only if user is admin – sending new standard surveys to online services, tha means publishing them, and also sending request to delete standard survey. User who in not an admin can delete standard survey locally if he/she is not interested, but this does not affect list of standard surveys (template forms) published to the server. Of course downloading surveys requres internet connection. If no internet connection publishing and deleting from online service is performed next time User clicks sync and internet is available. Design and edit Your form – Form Editor. Regardless the way You chosen to create new survey, You will use Form Editor tool: First step of creating new survey is to name it, and choose languages You would like to be languages of Your survey. List of available languages is long and contains also rare dialects – just start typing language name to see possibilities. It is worth to remember, that adding more languages won't be possible when editing existing survey, but You do not have to translate survey to each chosen language – project will be created using only fully translated languages of demanded form. Please see the screenshot below, it ilustrates three important elements of work with form editor: 1. Tabs for translations to different language – if some field is not translated to language, the tab glows yellow. 2. Initial Instruction for surveyour – it is mandatory for each language. 3. Possible question types to add: numeric and textual, choicelists, gps data, date and time, and collecting media or barcode. Instruction is not a question but additional textual instruction for surveyour to be placed in form. For multiselect and select one questions it is important to provide names of options to choose: As You see above, questions have also more advanced options: hint, skip logic and validation: skip logic defines visibility criteria of the question – You can choose one of previous questions and create a criteria. If criteria is meet this question will be displayed during collecting, if not – it will be skipped; validation sets criteria that allows You to pass to next question – You can set Your own validation of answers here. Adding group makes container with own name, which can be used as form chapter – it can be defined with own skip logic, etc. „Save as standard survey” button is visible only to users playing admin role when designing new form (cannot build standard from standard directly, but You can sava draft from standard and then consider editing it again as new standard survey), „Save as draft” is visible to every user. Both buttons are disabled until user provide all the data for each question to generate valid form. When editing existing draft, You can save it under the same name to overwrite last version, or under new name to make copy as new draft. Deploying Project: Assigning users, Adding offline maps, creating packages -3rd step to create Your Research Project When form is saved as draft, You can see „my drafts” screen: As mentioned above „edit” allows to modify form and save it under the same or diferent name. You can create many projects from one draft, however, it is recommended to save form under different name before each new project is deployed – to avoid mistakes due the same project name. On this screen there is help button with deployment procedure explained. First, You can click “Deploy as new project” button: Then You see the local list of Your users, its time to decide which surveyors will be working on this research. If surveyor You want is not on the list – go to “manage users” screen. Assign button goes to creating packages with offline maps and assigning them with geographical destinations to each surveyours – it requires internet connection on Desktop or zip file with maptiles (can be prepared by external tools: maptiler, Mobile Atlas Creator or gdal2tiles, more in special appendix). Assign without map creates packages without any offline map, and no destinations are created for surveyors. Its fast and instant way of creating project, but some gis visualizations won't be possible. When normal “assign” users is performed, You can see different types of maps (choosing base layer is in top right corner of map widget). If You are offline – no map is initially visible until You upload zip with tiles. When tiles are uploaded, you can see it on the widget. If You cannot find them zoom out the map with the “-” minus button clicked several times, in order to see bigger area. Draw rectangle and click “set working area” over Your area with tiles. You can also use Open Street Maps vector map as source for generating offline maps for mobile app. Draw rectangle and click “set working area” over Your area with tiles. To do so, please go on the map to planed area of research, and draw rectangle area on it (one for all surveyours): Now for each user You want to participate in research click his/her name on the list on the bottom of screen and draw localizations (smaller rectangle, polygon etc on the left side of map widget), to set places to work for each surveyour. It is recommended to give name to each localization. To do that click n each localization You have drawn and write name of place in the text input. If You are using OSM map click “download map” – it can take a longer time to download and compress the map. Otherwise just click “create packages”. (Create Packages button apears if You downloaded map or added zip with tiles successfully). Congratulations, Your new research project is on the Desktop, and Your surveyours can get their packages. Mobile application – from getting forms to returning the results. Getting Packages to Mobile devices. After creation of packages You see screen for managing projects You have deployed: Wifi, tethering options: Synchronization and getting connection: Synchronization between desktop and mobile using local wifi For proper downloading surveys from server over TCP connection, You have to connect your Server and Mobile Phone to the same network. There are at least 2 ways to do it: 1)Online - Connect your PC and mobile to standard router with DHCP server workiing 2) Switch on mobile hotspot/tethering on android device - (Mobile Phone is now transformed into router with DHCP) - Option responsible for mobile hotspot/tethering should be in Wireless&network section in System Options.THEN Connect Your PC to Your mobile hotspot. On this screen Under Login&Options button, after making sure that above options works and you are in same network with the desktop, (these is indicated by Device IP on the top of the screen) please click “search for lan server”. App starts to search for desktop in local network, it can take some time. After “Server Found” message new URL of Desktop application apears in the URL field. Advanced users can change this ip in this Url manualy for example in case of more than one desktop application working in same area. Configure service for sending results over online service. Server Backup is option if You want to send collected results back to desktop, but not directly, using online service as a buffer to store results. It is useful if Your Mobile device has Internet connection, and You are far away from the Desktop of Your Survey Coordinator. Proper Server backup settings looks like: “http://<domain or ip of online services host>:49697/eclipse-aggregate-mysql”, For test purposes online service is running with: “http://195.162.17.253:49697/eclipse-aggregate-mysql”, Troubleshoting: if these does not work, please ask Your Local Administrator to make sure that tcp ports 8080, 49697 and 30316 are open in windows environment as well as in your local wifi network. Problem solving, when using “search for LAN server” feature: When Your see, “server NOT found”: 1) Check, if Your AquaKnow Survey desktop application is running. 2) Check if Your mobile device is connected to same network as Desktop (choose the same wifi). 3) Check type of network settings in Windows (Under windows 8 types of networks are "Private" and "Public" older "Home, Corporate, Public") “Search for LAN server” does not work, if Your Windows network is set to "Public Network", but it works if Windows is set to "private network" or "home network". How to change network type: 1: Set a password in the settings of mobile hotspot / tethering - open networks are assumed to be a Public 2: Select the type of network A: If You UseWindows 7 and older: -> select the network type to "home" You can change it at the "Network and Sharing Center" in “Control Panel” B: Windows 8 and later: -> select the type of "Private" -> in the network settings: set "Find computers, devices, and content and automatically establishes a connection ..." to ON / Enabled. You can change it at the "Network and Sharing Center" in “Control Panel” NOTE: Some of local networks and office networks, may have security policy not allowing some http: applications to work on port other than 80, our application currently works on port: 49697. If You are unsure, if this port is blocked on Your local network, please contact Your network administrator. WORKAROUND for advanced users: If You know ip of Your desktop, You can start the mobile app, use android system button menu to get to “general settings”, then “platform settings” and the set address to http://ipOfYourDesktop:8080/eclipse-aggregate-mysql USB cable / manual file transfer synchronization option: This option demands more effort from user but is robust for all connectivity problems, and also can be used to migrate packages and results in situation where survey coordinator is unable to meet with surveyour to gain results or pass the package with new project. This option is redesigned towar better usability and to solve problems on new Android devices affected by known MTP file management bug – the main difference comparing to previous releases is that Upload Results option expects zip with many results, and the zip file with results is generated as alternative to sending results to server when user is on “completed” tab in mobile device 1. Go to „my projects” menu, see the list of projects list” 2. Click GET PACKAGE on chosen Form, as seen on above screenshot from Desktop application 3. Choose User, Save zip file containing form on chosen place on Your disk. Unzip It. 4. Connect Your Android device to desktop with USB cable. You will be asked what to do, choose „explore” 5. If Your device is connected , but nothing happens Check if your phone is asking for your allowance to connect in mass storage mode. 6. If You still cannot explore the Device from desktop explorer, open explorer, go to device or mass storage 7. Find the "odk" Directory. It is quite often for mobile devices to have more than one main storage or additional sd card for data. Please check both external drives which apear in “computer” screen in Windows system y 8. enter "odk" then "forms", copy Your all unzipped content (xml file and folder with same name appended with “-media”) file with form here. 9. Remember about unpluging Your device safely 10. On Mobile Device open AquaKnow app 11. Go to “Fill Blank Form”, if package files with new form was uploaded, You will see "Finished scanning. All forms loaded." message. Mobile application – getting new packages over wifi. After choosing “file blank form” Surveyor can download packages by clicking “download new surveys” - it will work if setting connection to desktop as described in chapter Wifi, tethering options was successful was successful. Packages already donloaded are visible below “download new surveys button”, “play” sign indicates call to action – start fulfilling forms. Also deletion from local memory at unwanted forms can be performed on these screen now. Mobile app – navigation and managing destinations Clicking “Play button” takes sureyor to Map with geographical information about his/her tasks and destination. Four buttons on the top of screen means: -“Destinatons” (assigned to the user) -”my location” -”switch base map layers” -”play – go to collecting data” On below screens You see chosing destinations and base map layer. On maps destinations are represented as blue poligons and green markers (wirh number at its corner – same as number o destination lists). Places visited when colecting answers are marked as red markers. Destination actually choosen is additionally marked by Flag icon, and – this is osm-online base map option – is connected with user location with red line showing shortest line of achieving destination. Availabilty of layers is dependent to the packages preparation – if they were prepared with osm – offline, tiles (called geotiff) both or none ofline map. If intenet connection is available user can check general location on online map (but without destinations). Screen on the left represents three buttons representig available types of google maps. Collecting answers These step is quite easy, each AQUASURVEY form contains instruction for user a the begging and mandatory getotag question at the end. All question types available in Form Editor at Desktop Aplication are avaialble. Grey bar on the top of the screen is filled with color as next questions are answered. Some questions can be skipped if skip logic were defined for them or their group. Additional requirement on Android system is to have barcode scanner and voice recording services installed, apps providing such services can be find at „Google Play” store. To change language of the form – click „3 vertical dots” menu button in the top right corner of the screen. On some older phones this menu button can be on the bottom next to „home” Android system button. If change languages option is not displayed (only advanced options) – It means that form contains only one language. Screen on the left represents geotag question – upper button uses gps or network localisation to provide coordinates (can take some time up to 10 minutes, if uses gps, and so called „gps cold start” happens) If Surveyor knows actual position, ti can be marked on the map with mark location button. When map appears please mark your location with one short but trong touch on the screen. Black markers indicates touched position. If it is wrong – touch again, if it is right – confirm with Managing results with new tabs New feature in these version is to manage all results on one screen with two tabs. In progress is for uncompleted surveys, and completed, for surveys ready to send to desktop tool. Completed tab is the place when user decides which way results will be pushed to surveys coordinator desktop app. Send to server option has three possible options to choose: Main – sends result directly to desktop over wifi – if it was configured corectly. Backup – sends results to online storage where they can be pulled to desktop application (survey coordinator needs to have unique user id to claim for his/hers results). Zip – it creates zip file containing choosen results in odk_zip folder of main storage of mobile device – results are not considerd as sent, but they can be moved via usb cable, and upladed to desktop application. GET RESULTS TO DESKTOP APPLICATION OVER USB This option is redesigned towar better usability and to solve problems on new Android devices affected by known MTP file management bug – the main difference comparing to previous releases is that Upload Results option expects zip with many results, and the zip file with results is generated as alternative to sending results to server when user is on “completed” tab in mobile device 1. Use “send to server >> zip”, Reproduce steps 4 to 7 from above. 2. Enter "odk_zip" folder on mobile device. 3. Move ZIP with results results to Your desktop Disk. 4. On Desktop Application go to My Projects list, then use "upload results" button. TO UPLOAD result simply choose upload button and then choose the ZIP with results from Your disk. Number of uploaded result is number of results found in ZIP, some of them may be duplicates of previously downloaded, or may not belong to this survey coordinator – please check Monitor Work to see total number of results collected. 4)Upload at once clicking “open” 5. NOTE: You are not allowed to upload same results twice (it will have no effect, is skipped silently), or results for surveys not existing at my survey list (will cause error). 6. Push "Upload" button, after successful upload, You Can review Your complete results using Browse Results buttons next to items on list Form names. Browsing collected results. Stats view – it allows to define types of statistic to analyze each question (choose on new right, confirm checkbox on the left). Save as set check box is for administrator only - it publishes questionnaire as set with perdefined statistics After Apply – You will see statistics and charts, also You will be able to add textual comment to watch report. Raw Data (no screenshot attached) – Table view, choose columns for review, click icon to save on disk media files. Generate report It takes some time – at his point You are “ordering” Report file. As generation can take a longer while. It Will be visible when suystem explorer opens on the list of reports: Folder with project name contains subfolders named with project name and generation date – each subfolder contains results as csv, shp and folder with media. Csv and dbf inside shp contains relative paths to files in media folder, Map View Map view. Choose question and visualization type: ( gadm, your Locations, points for entries will be added). Appendix A. Prepare Tiles in example from geoTiff. Adding raster map from files when deploying Project (Created from GeoTiff) Valid zip with tiles structure for Aqusurvey. Zip folder structure - important <ZipFIleName>.zip MapQuest <tile layer folder> <tile layer <tile layer <tile layer folder> <tile layer <tile layer <tile layer folder> <tile layer <tile layer subfolde> subfolde> subfolde> subfolde> subfolde> subfolde> MapTiler To prepare tiles from geotiff You need tiling tool like mapTiler (free version at maptiler.com). Output of such tool is directory with directories inside. 1) Create folder called MapQuest - name is very important 2) Take files generated by MapTiler and put them into that folder 3) Zip that folder with any name B. Upload such zip file to the desktop application. AquaSurvey Version: Date: User manual 15.05.2015 Mobile Atlas Creator Tutorial for AQUASURVEY 1. Installation: Go to http://sourceforge.net/projects/mobac/ and download version appropriate for your Windows. Upack the archive and run Mobile Atlas Creator app: 2. Usage: 1. Configure atlas settings: 1.1 Select the map tiles source. Note, that sources vary in quality and/or coverage (1.1). 1.2 Select desired zoom level. Check all boxes from 0 to desired map zoom (1.2) (current zoom is displayed in the upper left-hand corner of the map preview (1.2.1) ). 1.3 Check the Recreate/adjust map tiles box (1.3) 1.4 Switch tile format to png (1.4) 1.5 Add new atlas (1.5) and select Osmdroid ZIP: For General Release Page 33 of 39 Αtos, 15.05.15 AquaSurvey Version: Date: User manual 15.05.2015 1.6 1.7 Name the atlas profile for later use (1.6.1) and save it (1.6.2)Use the cursor to select area to download (1.7.1) note, that big areas may contain a lot of tiles to download. Check their number under Zoom Levels section (1.7.2) 1.8 Click Add selection (1.8) For General Release Page 34 of 39 Αtos, 15.05.15 AquaSurvey Version: Date: User manual 1.9 15.05.2015 Create atlas by clicking Create Atlas (1.9) MapTiler and GDAL2Tiles Objective: To assess the number of tiles and their size generated using Gdal2tiles. EXAMPLETwo different images were processed to create tiles required to generate reference maps for AquaSurvey: - Landsat (Geotiff format - Look Natural Color 30m) Source: glovis.usgs.gov o Aprox. 185x185km o Original EPGS: 32632 WGS84 / UTM zone 32N - An Ortophoto (ecw format - 25 cm) Source: www.geoeuskadi.eus o Aprox. 2.3x1.1km after clipping. For General Release Page 35 of 39 Αtos, 15.05.15 AquaSurvey Version: Date: User manual 15.05.2015 o Original EPGS: 25830 ETRS89 / UTM zone 30N reprojected to WGS84. Instead of using directly GDAL2Tiles, an alternative is to install Maptiler http://www.maptiler.com/ which allows to freely process and generate tiles but with some limitations: - It calculates the most appropriate zoom levels but the free version does not allow custom zoom levels. - Maximum image size in pixels is 10k x 10k. Unlimited option only available under pro version. - Watermarks are added to the tiles. In the other hand, Gdal2Tiles is also available under the GDAL framework, which can be easily downloaded following http://trac.osgeo.org/osgeo4w/ recommendations. - 32bit and 64bit OSGeo4W (windows) installers can be found at: o http://download.osgeo.org/osgeo4w/osgeo4w-setup-x86.exe o http://download.osgeo.org/osgeo4w/osgeo4w-setup-x86_64.exe More info about GDAL can be found at http://www.gdal.org/ More info about sizes of files is explained below: For General Release Page 36 of 39 Αtos, 15.05.15 AquaSurvey Version: Date: User manual For General Release Page 37 of 39 Αtos, 15.05.15 15.05.2015 AquaSurvey Version: Date: User manual For General Release Page 38 of 39 Αtos, 15.05.15 15.05.2015