1
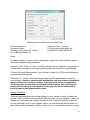
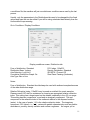
LacCore SOP Series
Horiba Grain Size Analyzer LA-920 Wet SOP
Purpose
To measure the particle size distribution of sediment samples using laser diffraction
analysis.
Cautionary Notes
The Horiba is not designed to contain vapors that may be hazardous. All potentially
dangerous chemical reactions should be complete before analysis in the Horiba and the
dispersant should be safe to use out of a fume hood. The use of vigorous pumping and
the ultrasonic probe may increase the amount of harmful gas emitted.
The ultrasonic probe may be damaged by the repeated use of strong acids at high
temperatures. Horiba should be consulted before any strong acids are used. The
following are all compatible with the Horiba: aqueous solutions, keytones, organic
solvents, alcohols, ethers, esters, chlorinated solvents, oxidizers, oils, fuels, acids,
alkalis.
Pretreatment
If you are considering removal of organic matter, biogenic silica or carbonates, details
concerning pretreatment procedures can be found a separate Grain Size Pretreatment
SOP. Each researcher should consider pretreatment but each pretreatment has
benefits and hazards, depending on the research question.
Start-Up
Preparing and calibrating the Horiba may take 1-2 hours at the beginning of each day.
After that, you may plan to measure about 10 samples per hour at maximum efficiency.
Clean up takes about 30 minutes at the end of the day. If the Horiba asks for a
password it is “Horiba” without the quotes.
1. Turn on the Horiba using the switch on the back of the machine (on the left). The
autosampler is usually left on because it is a little harder to get to, but it has a
separate switch on the back of the machine (on the left).
2. The computer and monitor “on” buttons are on the front of those machines.
3. Open “LA-920” from the desktop. The software has three views once opened, a
“3D” view, a “Measurement” view, and a “Display” view. The measurement view
contains the controls for the machine, the display view contains the data from the
measurements you have taken, and the 3D view displays multiple data plots at
once.
1
4. Make sure that there is at least half a tank of 0.5 g L-1 Na-hexametaphosphate
(SHMP) in the large bottle to the right of the Horiba. Dry SHMP is on the shelf
above the computer monitor and there should be a scale in the Horiba room.
Mix using dry chemical and low purity deionized water.
5. The Horiba has a base unit with an autosampler tray mounted on top that slides
on rails. Remove the small silver pin on the autosampler tray, and lift the black
sample collection funnel upwards out of the tray. Then, slide the autosampler
tray to the left to reveal the inner part of the Horiba. Use several Q-tips and DI
water to rinse out the black funnel (sample introducer). Make sure it is clean of
any sediment and film.
6. For use with the autosampler only, the black sample collection funnel on top of
the Horiba should be rinsed and cleaned with Q-tips and DI water.
7. For use with the autosampler only, clean the rinse chamber. Remove the
autosampler rinse chamber next to the sample collection funnel: Push the silver
button to disconnect the white tubing from the chamber, then lift the chamber
upwards out of the tray. Rinse it with DI and scrub it with Q-tips or paper towels,
if necessary. Replace the rinse chamber on the sample tray, reconnect the
tubing, and fill the rinse chamber with DI water.
8. For use with the autosampler only, fill the pump line. Fill the beaker on top of the
autosampler with DI water. Visually inspect the pump line, if sediment is present
it will need to be flushed out or the tubing will need to be changed. Password is
“Horiba” without the quotes.
a. To fill the pump line, go to Sequence / Schedule / Robot Control / Manual
Control.
b. Set arm position: x-axis: 2650 y-axis: 2400 z-axis: 2150.
c. Click “Move Arm”. Arm will move so that it is positioned over the rinse
chamber.
d. In the pump control section, click “Delivery”, then “On”.
e. Let it draw water for 5-6 seconds until the pump line is full and water sprays
out of the autosampler into the rinse chamber.
f. Click “off”.
g. Change the pump control back to “Suction”.
h. Exit back to the main software window.
9. On the Measurements screen, click the “Start Up” button. This process take
about 45 minutes. Do not skip this step, it includes the necessary warm up time.
10. On the Measurements screen, click the “Standard” button.
11. The Horiba will prompt you to add the standard when it is ready. Add 1 level
scoop of the Alox 240 standard, click “OK” and the Horiba will measure the
standard.
2
It is recommended that you run a standard at the start of the day, and at the end
of the day.
12. Then the machine will prompt you to select display and user conditions for your
samples. Select an existing condition file from the list and click “Open”. You will
be asked if you want to apply the Display Conditions to the current (open)
sample. Choose “no” unless it is your sample and you want to change its Display
Conditions. (If you do want to permanently change the current sample’s Display
Conditions, you must then “ save sample” in the File Menu) For most samples
select LRC.cn2 for both condition files.
Different ways to measure
This SOP outlines 4 different ways to run measurements on the Horiba.
1. Measuring samples using the autosampler (recommended).
2. Measuring samples added by hand with a preset sequence and scheduler (for
lots of samples).
3. Measuring samples added by hand with a preset sequence (for just a few
samples/standards).
4. Manual measurements (not recommended).
Measuring samples using the autosampler
This process uses the autosampler and the scheduler. Using the autosampler is
recommended, when possible, to standardize the subsampling and analysis. This
process may not be recommended for samples where significant portions of the
distribution are greater than 250 μm.
1. If the lid of the Horiba is open, be sure to close it and replace the black sample
collection funnel.
2. The samples should be dispersed in 5 g L-1 SHMP and agitated on a wrist-action
shaker at least 8 hours (overnight) preceding analysis.
3. Pour each sample into a numbered Horiba beaker and add DI water or 5 g L -1
SHMP so there is at least 50-75 ml in each beakers. The analysis will be most
efficient if all of your samples have approximately the same transmittance (e.g.
all dark brown or all light brown).
4. Place the samples on the autosampler. Go to Sequence / Schedule to open the
Scheduler. Enter the “sample name” and “position” (1 through 15) for each
sample. Beaker positions are identified on a sticker on the autosampler tray). In
the drop down menus, choose the method and condition files you wish to apply
to your samples. The Scheduler will auto-fill those selections down through your
3
list. LRC and autosampler are the common condition and methods files chosen.
You may also save this sample list in the Scheduler under File / Save As, but it is
not necessary to do so.
5. While the Scheduler is open, check the delivery system settings under Setup /
Robot Feeder. To begin, try these settings:
Under most circumstance, you should not change the sample location, stirrer
position or needle height coordinates. Making a mistake in these categories
could damage the autosampler.
Sample Pump Duration section (all in seconds)
Withdrawal: 15
Delivery: 20*
Rinse: 5
Empty liquid: 0
Stirrer ON: 100
Drip-Spin: 3
Needle Rinse:40
*Delivery time should always be slightly longer than withdrawal to make sure all
the sediment is washed out of the autosampler.
You may change the “Withdrawal” time if you need more (or less) sample to be
analyzed. For instance, if the machine always had to add more sample to adjust
the concentration to be within your transmittance boundaries, you could lengthen
the withdraw (and delivery) times. This is not necessary, but could save you
some time. Ultrasonic power of 4-6 and run time of 1 minute is also standard.
6. Still in the Scheduler, click “Execute” to begin the analysis.
7. If the sample is too opaque (i.e. transmittance is too low): The Horiba will
automatically add a small amount of SHMP solution then re-evaluate the
transmittance. This is a slow process and if it continues too long some coarse
particles may settle down into the plumbing. If you see that the initial
transmittance measurement is far too low, you can use an eyedropper to quickly
add more DI into the sample chamber. Be sure not to overflow the sample
introducer funnel or your results will be skewed.
8. If the sample is too dilute (i.e. transmittance is too high): The autosampler will
quickly get more sample and add it to the sample chamber. This is a fast
process and appears to be quite efficient. This automatic feature may be
disabled in the software so that you get an error message when the sample is too
dilute; in that case, you need to add more sample manually. If many of your
samples are too dilute you may increase the delivery time so that the
autosampler initially delivers more sample to the chamber. For instructions on
how to do that, see (4.) above.
4
Measuring samples added by hand with a preset sequence and scheduler (for lots of
samples)
This process is a combination of using the scheduler and adding sample by hand.
The machine is programmed to complete all the steps and prompt the user to add
the sample when needed. This process frees up the user to deal with the samples
more (and the less with the Horiba) and keeps the timing between the steps more
uniform than when everything is done by manually. This is the preferred method
when the autosampler cannot be used.
1. Go to Sequence / Schedule to open the Scheduler. Enter the “sample name.”
Leave “position” blank for each sample.
2. In the drop down menus, choose the methods and conditions files you wish to
apply to your samples. There is a condition file named “by hand” that is preset to
run samples using this method. It can be changed following the steps outlined in
the Conditions section below.
3. The Scheduler will auto-fill those selections down through your list. Still in the
Scheduler, click “Execute” to begin the analysis.
4. Once you click “Execute” the Horiba will run though all of the necessary steps
outlined in the Feeding Samples Manually (without the autosampler) section,
above, and then prompt the user to add the sample.
5. Add your sample to the sampler introducer chamber by pouring, using an
eyedropper, or scoop. Sample can be added in either dry or wet form.
Wet sample: Add no more than about 25 ml or the cell will overflow and skew
your measurements. Add the sample quickly and rinse down any excess
caught in the sample area.
Dry sample: Add only a few milligrams. Add the sample quickly and rinse
down any excess caught in the sample area.
6. Click “OK”.
7. The Horiba will finish running the sequence to take a measurement, rinse and
proceed on with the next sample.
8. You will be prompted each time to add sample.
Measuring samples added by hand with a preset sequence (for just a few
samples/standards) ~6 minutes per sample machine time
1. Click “Select Program” on the measurement screen.
5
2. From the drop down menu select the sequence you would like to run. See the
section on sequences below to choose the correct sequence. For most samples
select Run Ultrasonic. Other examples: Standards, City of Mpls Water Works.
3. Wait while the Horiba runs the sequence.
4. When prompted, add the sample to the sample introducing funnel.
Wet sample: Add no more than about 25 ml or the cell will overflow and skew
your measurements. Add the sample quickly and rinse down any excess
caught in the sample area.
Dry sample: Add only a few milligrams. Add the sample quickly and rinse
down any excess caught in the sample area. Turn on the ultrasonicator to
disperse the sample in solution.
You will know when you have added enough sample by watching the %T on
the left side of the screen. For most samples %T should be between 95%70%.
5. Click “OK” and the Horiba will continue the sequence to measure the sample.
6. Repeat steps 2-5 until all samples have been run.
7. If you are running the Standards sequence select the conditions files you wish to
use before continuing.
Manual measurements
Care should be taken when using this method. It is important to try and standardize the
measurements as much as possible and this method leaves the most room for changes
in timing.
1. Remove the silver pin and the black sample funnel from the machine and slide
the autosampler tray to the left. You can now see the back sample introducer
funnel in the machine.
2. Go to File / Open Conditions and apply the conditions file you wish to use with
your samples.
3. There is a pump that circulates sample within the Horiba during analysis. The
pump controller (on/off switch) is the blue square button near the top of the
screen. A pump speed of 6 is usually adequate, unless you have grains larger
than 500 μm as a significant (>5%) part of the sample. Click the blue box to turn
on the pump.
4. Click “Feed” to fill the plumbing.
6
5. Click “Align/Blank” to align the optics and blank the sensors for any remaining
material in the machine.
6. Add your sample to the sampler introducer chamber by pouring, using an
eyedropper, or scoop. Sample can be added in either dry or wet form.
Wet sample: Add no more than about 25 ml or the cell will overflow and skew
your measurements. Add the sample quickly and rinse down any excess
caught in the sample area.
Dry sample: Add only a few milligrams. Add the sample quickly and rinse
down any excess caught in the sample area. Turn on the ultrasonicator to
disperse the sample in solution.
7. Watch the two transmission percentages. The red is for the laser and the blue is
for the incandescent bulb. They will decrease rapidly as the sample circulates
past the sensor. If the transmission percentages are too high or too low, you
can: add more sample, add more DI, or click “Rinse” and start over at the
beginning of this procedure.
8. If you wish to ultrasonicate turn on the ultrasonicator. The controller (on/off
switch) is the yellow “Y” button near the top of the screen. One minute of
ulltrasonication at power level 6 should be enough for most samples. Setting can
be changed using the up and down arrows near the ultrasonicator icon.
9. Click the “Align and Measure” button and the optics will align and measure the
sample. This takes about a minute.
10. Click the “Rinse” button.
11. Repeat this procedure for each sample.
Clean Up:
1. Command the Horiba to rinse, feed, circulate for 3 minutes, and rinse.
2. Optional: feed, add 1-2 drops of natural or weak alkaline detergent, circulate 30
sec., rinse, feed, circulate 30 seconds, and rinse.
3. Wipe down the sample introducing funnel.
4. Wipe down the outside surface of the Horiba, if necessary, with damp paper
towel.
5. If the autosampler was used, rinse the autosampler by going to Sequence /
Schedule / Robot Control / Manual Control.
1. Set arm position: x-axis: 2650 y-axis: 2400 z-axis: 2150.
7
2. Click “Move Arm”. Arm will move so that it is positioned over the rinse
chamber.
3. In the pump control section, click “Delivery”, then “on”.
4. Let it draw water for ~10 seconds to flush any sediment residue out of the
autosampler and into the rinse chamber.
5. Click “off”.
6. Change the pump control back to “Suction”.
7. Click “Exit” then “OK”.
6. If the autosampler was used, remove the autosampler rinse chamber from the
autosampler tray, empty it into the sink, rinse with DI, empty, and then replace on
the autosampler tray.
7. If the autosampler was used, remove the sample funnel on the autosampler,
rinse with DI, and then replace on the autosampler tray.
8. If the autosampler was used, wash all beakers carefully using water and paper
towels. Make sure there is no sediment residue inside each beaker. You may
set them upside-down on paper towels to dry.
Saving Data
The software will automatically save a copy of your data, but it is in the format of the
software so you must export it as a text file. To save individual files with different file
names:
1. With the desired data set (sample) open in the display window, click on Export /
Export and export as a text file (.txt) to a folder that you choose. Save all files by
sample name.
2. There are arrow tabs at the top of the Display screen to scroll through data so
you can look at your past sample measurements and export them. Do this for
every sample.
3. Once all of your files have been exported, you can save your text files on a flash
drive or compress them and e-mail them to yourself.
Large numbers of data files can be saved as text files in bulk. The file name will be the
Horiba ID but can be renamed later.
1.
2.
3.
4.
Click on Export / Export
Click on Data Convert and select the desired data files.
Click on Title, re-title file names (optional), make sure the files are selected.
Click on Open.
It may look like nothing happened but if you use Windows Explorer to go to the
directory where the data is located (C:\Program Files\HORIBA\LA-920WET\data)
you will find your text files. There is a link to “Data” on the desktop that will take
you to the files.
8
Data management
The Horiba auto saves all files to the last used save location. As a default use
C:\Program Files\HORIBA\LA-920WET\data to save data. Once you are done
exporting your data it is a good idea to move your Horiba .d2w and .txt files to
Transfers/Analytical Data/New Data/Grain Size/”Your Project Name.” Not only does
clean up the active files in the Horiba database but it assures that your data is backed
up and will get archived.
Shut down
1. Turn off the computer. First, select “Shut Down” in the Windows menu, then
when the computer says, “You may now turn off the computer”, push the button
to turn it off.
2. Turn off the Horiba, using the switch located in the back on the lower left.
Horiba Settings
The Horiba has several different settings; the following are four that can have the
largest affect on analysis results and the time it takes to analyze samples.
Measurement Conditions: Used to analyze samples, cannot be changed after
measurement.
Display Conditions: Used to display results, can be changed after measurement.
Method Files: Used by the scheduler to analyze samples, cannot be changed after
measurement.
Automatic Concentration Settings: Used by the scheduler to analyze samples with the
autosampler, cannot be changed after measurement.
Measurement Conditions
Used to analyze samples, cannot be changed after measurement. Usually, only the
parameters in the Settings tab need to be changed.
Go to Conditions / Measurement Conditions to set these parameters.
9
Measurement conditions screen, settings tab
Circulation Speed: 6
Ultrasonic Power:
Sampling Times: Laser 25, Lamp 2
No. of Blanking Scans: 10
Ultrasonic Time: 1 (minute)
U-Sonic works during Meas: No.
Preferable T% Max: 90 Min:70
Notes:
Circulation Speed: You may use 4-8, depending on grain size, max circulation speeds
may lead to bubbles being measured.
Ultrasonic Time: 30 sec. to 2 min. is usually sufficient for most samples. Long periods of
ultrasonication can lead to heat build up and increase the solubility of some particles.
U-Sonic ON during Measurement: If yes, be sure to check for 10-20μm air bubbles that
may form and be measured.
Preferable T%: Varies, Horiba technicians state that 85% transmittance is ideal for
most analyses. However, samples with distributions that span orders of magnitude
may need lower min. and max. settings, possibly as low as 30% transmittance.
The Horiba does not take any actions based on this setting. The only thing this
setting does is change the size/position of the gray bars on the transmission
percent graph on the measurement screen.
Display Conditions
These are parameters that the Horiba will apply to your sample in order to display the
results. These conditions can be changed after you have run your samples, in case you
change your mind about the settings you want to use. Save the conditions to a file so
you can use them for all of your samples, and so you can designate that file when you
are setting up the autosampler. When you start, if you do not set new conditions or open
10
a conditions file, the machine will just use whichever conditions were used by the last
person.
Usually, only the parameters in the Distributions tab need to be changed but the fixed
values and span tab can be edited if you will be using calculated data directly from the
Horiba without reprocessing.
Go to Conditions / Display Conditions
Display conditions screen, Distribution tab
Form of distribution: Standard
Distribution Base: Volume
Axis Selection: LogX-LinY
Cumulative Distribution Graph: On
Axis Type: Bar or Line
R.R. Index: 116a001i
Density Distribution: Standard
ISO 9276-1 Format: Off
Size Class: Passing (Undersize)
Notes:
Form of distribution: Standard should always be used with sediment samples because
of the wide distribution range.
Relative Refractive Index: 116a001i may be used as a default for quartz samples.
Please consult LRC staff for assistance in choosing an appropriate relative refractive
index. This setting has a huge impact on the dataset, especially in the <20 μm range.
This setting has two components, a real and an imaginary component. The real
component is the refractive index of the sediment relative to the dispersal solution
(water). In the case of quartz 1.16 is the relative refractive index. The imaginary
component, 001i (where i √
), varies with particle characteristics such as particle
absorbance, porosity, density variation and surface roughness. As long as you’re
11
internally consistent with your optical model and R.R.I. settings, you can make valid
comparisons between your samples. However, it is not clear how well you can compare
your grain size results to other people’s grain size results. It is strongly recommended
that you note the R.R.I. setting (and associated assumptions) when publishing your
results.
Distribution Base: Volume should always be used unless comparing results to other
methods of grain size analysis. Conversion to number base should only be used if the
volume base distribution is symmetrical and only for comparison to other methods such
as microscopy.
To change the Display Conditions after analysis:
1. Open the sample (File / Open Sample) on the Display screen.
2. Go to Conditions / Display Conditions.
3. Click on the R.R. Index button, scroll down through the options to the setting
you want, and click Open, then click OK.
4. If you want to save the sample with this new R.R Index applied, go to File /
Save Sample. Otherwise, when you close the software or view another
sample, this sample will revert to its original Display conditions and R.R.
Index setting
To change the Display Conditions for multiple samples after analysis, use the Batch Edit
feature.
1. In File / Open Sample, make sure the database has all the samples that you
need to change.
2. If the database has some samples that you would like to exclude, use the
“Create Index” button in the data base screen and enter a parameter that is
common to the files you wish to change and create a group.
3. Click OK to exit the database screen.
4. In Group Processing menu select “Batch Operation”.
5. In the R.R. Index drop down list box select the new RRI value.
6. Click “Selected Database” check box (Make sure this has the selected
number and not the total database number).
7. Mark the checkbox ”Update Data on Disk”.
8. Press “OK” to convert the data.
Method File
Used by the scheduler to analyze samples, cannot be changed after measurement. It is
good to know about these setting but they probably won’t need to be changed unless
you need to set up a method for running samples by hand with the scheduler.
12
Go to Sequence / Schedule / Setup / Methods. Click on existing file, or create a new
file.
Dispersant: From Reservoir
Blanking
Delay: 20 (seconds)
(Yes) Blank Measurement
Add sample: From Autosampler*
Measurement
Delay: 15 sec
Num. times: 1
Repeat delay: 0 seconds
Draining and rinsing
(Yes) Drain and (check) Rinse
Rinse flue: From Reservoir
Notes:
Add sample: Change to “By Hand” if you would like to set up an automated process to
measure samples by feeding manually with the scheduler.
Automatic Concentration Settings
These settings determine how the autosampler automatically adjusts the sample
concentration to fit within your transmittance boundaries. You may increase the range
if the machine has trouble fitting both the laser and blue lamp. Go to Conditions /
Measurement Conditions to set these parameters.
Go to Sequence / Schedule / Setup / Concentration
(Yes) Auto Adjust Sample Concentration
Use T% from :Laser
Minimum Feed: 4
Maximum Feed: 30
Required T%: 84
T% Plus/Minus: 10
Conc. Delay: 60
Notes:
Use T% from: The laser usually diminishes more slowly than the blue light, so using the
laser to check transmittance will most quickly get you to your desired T%.
Required T% and T% Plus/Minus: Varies, Horiba technicians state that 85%
transmittance is ideal for most analyses. However, samples with distributions that
span orders of magnitude may need lower min. and max. settings, possibly as
low as 30% transmittance.
13
Conc. Delay: This setting may be lengthened if the Horiba is too aggressive in
automatically adjusting your sample concentration. For instance, when the Horiba
delivers a sample to the sample changer, The T% decreases. If the Horiba takes a
measurement while the T% is still falling, it may prematurely decide that a concentration
correction is needed. If the T% for your samples repeatedly falls below your minimum
setting by the time a real measurement is taken, change this setting. On the other
hand, it is desirable that the automatic readjustment process be done as quickly as
possible to avoid any settling or sample bias in the plumbing
Maintenance: Cleaning the cell (based on Horiba User’s Manual p.9)
1. Start up the Horiba.
2. Rinse twice, then drain.
3. Add isopropanol to fill the sample inducer.
4. Set the pump speed to 15, start the pump.
5. Look to see if the T% increases or channel baseline decreases for the next 5
minutes.
6. Rinse twice with deionized water
7. Repeat steps 3-6 two more times
8. Rinse 10 times with deionized water.
9. If necessary, see the LA-920 Instruction Manual (p.7) and the User’s Manual
(p.5) for instructions on how to remove the optical cell and clean it. The
instructions are located in the drawer below the computer monitor.
Instructions for installing the Horiba on a new computer
1. You will need windows XP and two serial ports.
2. The autosampler should be connected to the PCI card and the Horiba should be
connected to the onboard serial port.
3. In device manager check to make sure that the PCI card is COM 2 and the on
board serial port is COM 1.
4. Install LA-920 Wet Robot 3.46
a. This is the newest wet robot version of the software. For use on a
computer w/o the Horiba, the newest software is version 3.58, available
for download at Horibalabs.com
5. Install Gilson Special 586
a. Select COM 2 when prompted.
b. Click yes, to restart your computer
14
6. Copy the file FEEDINFO.sys in to the following directory C:\Program
Files\HORIBA\LA-920Wet
7. Open the Horiba LA-920 software.
8. When prompted for the optical data click browse and locate the folder “optical
data” select OK.
9. When prompted, select yes to build a database.
10. For use with the autosampler you need to re-map the robot arm.
11. Go to: Sequence/Scheduler/Set Up/ Robot Feeder and change the “XPOS” and
“YPOS” to match the following table.
POSITION
Sample 1
Sample 2
Sample 3
Sample 4
Sample 5
Sample 6
Sample 7
Sample 8
Sample 9
Sample 10
Sample 11
Sample 12
Sample 13
Sample 14
Sample 15
Sample Chamber
Rinse Pos.
Home Pos
XPOS
80
80
80
750
750
750
1400
1400
1400
2050
2050
2050
2650
2650
2650
1920
2650
0
YPOS
1600
1000
300
1600
1000
300
1600
1000
300
1600
1000
300
1600
1000
300
2400
2400
0
Click on OK to save changes. If these values do not work you will need to use the
manual control to locate the correct positions, then enter them in the spread sheet.
12. To use the autosampler you also need to set up a methods file following the
instructions in the methods section, above.
Sequences usedto operate the Horiba
Listed below are the details for sequences available for use with the Horiba. Many are
standard sequences that come with the Horiba but some are custom programmed by
LRC staff. Additional sequences have been written for specific projects and are
available for use.
15
Sequence Programs
Start Up (LRC)
Standards (LRC)
Polydisperse Standard (LRC)
Open Conditions Files, Feed, Circulate, Alignment, Blank, “Please Add Sample”,
Ultrasonic On, Ultrasonic Wait, Alignment, Measure, Drain, Feed, Circulate, Drain
Run!
Feed, Circulate, Alignment, Blank, “Please Add Sample”, Wait 10 seconds, Alignment,
Measure, Drain, Feed, Circulate, Drain
Run Ultrasonic!
Feed, Circulate, Alignment, Blank, “Please Add Sample”, Ultrasonic On, Ultrasonic
Wait, Alignment, Measure, Drain, Feed, Circulate, Drain
Run, then Run Ultrasonic
Feed, Circulate, Alignment, Blank, “Please Add Sample”, Wait 10 seconds, Alignment,
Measure, Ultrasonic On, Ultrasonic Wait, Alignment, Measure, Drain, Feed, Circulate,
Drain
This will produce two measurement files for the same sample. It can be useful when
trying to determine if you want to use ultrasonicator on your samples or not. Look for
the addition of 10-20μm bubbles that may be a result of the ultrasonicator.
Ultrasonic On, Add Sample, Run Ultrasonic
Feed, Circulate, Alignment, Blank, Ultrasonic On, “Please Add Sample”, Ultrasonic Off,
Ultrasonic On, Ultrasonic Wait, Alignment, Measure, Drain, Feed, Circulate, Drain
Blank
Feed, Circulate, Alignment, Blank
Measure
“Please Add Sample”, Wait 10 Seconds, Alignment, Measure
Measure Ultrasonic
“Please Add Sample”, Ultrasonic On, Ultrasonic Wait, Alignment, Measure
Ultrasonic On, Add Sample, Measure Ultrasonic
Ultrasonic On, “Please Add Sample”, Ultrasonic Off, Ultrasonic On, Ultrasonic Wait,
Alignment, Measure
Measure, then Measure Ultrasonic
“Please Add Sample”, Wait 10 seconds, Alignment, Measure, Ultrasonic On, Ultrasonic
Wait, Alignment, Measure
16
Rinse
Feed, Circulate, Drain
Average 3 Repeat Measurements, Save Average
Average Data in Memory 1, 2, & 3, Move Average to Main Result Position, Prompt
“Filename”, then Save
Auto Initial Align
Feed, Circulate, Initial Align, Drain
References
Jiilavenkatesa, A., Dapkunas, S. J., and Lum, L. H. 2001. Particle Size
Characterization.. U.S. Department of Commerce. Chapter 6: Size characterization by
laser light diffraction techniques.
Matthew Kirby. CSFU Paleoclimatology Laboratory Detailed Lake Mud Grain Size
Standard Operating Procedure. 10 April 2009.
Horiba, Inc. LA-920 Instruction Manual
Horiba, Inc. LA-920 Users Manual
Horiba, Inc. LA-920 Software Manual
Document History
Written by Laura Triplett for the LRC with contributions from Trevre Andrews.
Revised June 2007 by Laura Triplett.
Revised May 2010 by Jessica Heck.
17