1
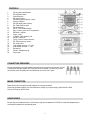
CD MICRO SYSTEM
TC1290MS
INSTRUCTION MANUAL
IMPORTANT SAFETY INSTRUCTIONS
.
When using any electrical apparatus always observe safety regulations and use basic safety precautions
to reduce the risk of fire, electric shock and personal injury, including the following.
1.
2.
3.
4.
5.
6.
7.
8.
9.
10.
11.
12.
13.
14.
15.
16.
17.
18.
19.
20.
21.
22.
Read, Keep and Follow these instructions, heeding all Warnings.
Keep out of reach of young children. This apparatus is not suitable for use by young children or infirm persons
without supervision. Young children must be supervised to ensure that they do not play with the apparatus.
WARNING. Do not insert any objects into any openings of an electrical apparatus.
WARNING. Do not touch any moving parts of any electrical apparatus.
WARNING. Do not use this apparatus near water. To avoid the risk of fire or electric shock, do not expose this
apparatus to rain or moisture. The apparatus shall not be exposed to dripping or splashes.
WARNING. No objects filled with liquid, such as vases, shall be placed on any electrical apparatus
Do not immerse in any liquid whilst in use or in cleaning. Clean only with a damp cloth, dry with a dry towel. Do
not use harsh abrasives as these may damage plastic parts.
DO NOT block any ventilation openings. Install in accordance with the manufacturer’s instructions. Always allow a
sufficient gap around the apparatus to avoid overheating.
DO NOT install near any heat sources such as radiators, gas heaters, stoves or other apparatus (including
amplifiers) that produce heat. Do not leave in direct sunlight.
WARNING. Do not place any naked flame source, such as lighted candles on any electrical apparatus
Connect to a suitable 230-240 ~ 50 Hz power supply only.
Always unplug from the power source when any electrical apparatus is not in use.
Do not abuse or damage a power cord. If any power cord is damaged, it must be replaced by the manufacturer, its
service agent or a similarly qualified person in order to avoid a hazard. A replaceable cord must be replaced with
an authorised replacement from an authorised service agent only.
Only use attachments/accessories specified by the manufacturer
Unplug this apparatus during lightening storms or when unused for long periods of time
Attention is drawn to the environmental aspects of disposing of any battery.
Refer all servicing to qualified personnel. Servicing is required when the apparatus has been damaged in any
way, such as when the power supply cord or plug is damaged, liquid has been spilled or objects have fallen into
the apparatus, the apparatus has been exposed to rain or moisture, does not operate normally, or has been
dropped
Do not attempt to service any double insulated apparatus. Double insulated apparatus requires specialist
servicing and knowledge to retain the safety of the apparatus.
WARNING. Do not use any electrical apparatus outdoors. If any electrical apparatus is to be used outdoors, use a
suitable Isolating transformer or Electrical Safety Switch (RCD).
For household use only, this apparatus is not intended for commercial use.
If this apparatus is to be used by a third party, please supply these instructions with it.
No liability will be accepted for any personal injury or damage caused by failure to follow these instructions
WARNING
CLASS 1 LASER PRODUCT
CLASS 1 LASER PRODUCT
CAUTION
INVISIBLE LASER RADIATION WHEN
OPEN AND INTERLOCKS DEFEATED.
AVOID EXPOSURE TO BEAM.
This product contains a low power laser device.
1
CONTROLS
1.
2.
3.
4.
5.
6.
7.
8.
9.
10.
11.
12.
13.
14.
15.
16.
17.
18.
19.
20.
21.
22.
23.
CD skip (search down) button
CD play/pause button
Volume max-min
CD program button
CD repeat (repeat playback) - button
Power on indicator
CD LED display (track number)
CD - Radio function switch
CD compartment
FM ST - FM - AM Band switch
Open - press to open the CD compartment
FM/Stereo - indicator
Power - on/off
“X. BASS” - Bass booster on/off
FM/AM - band scale
Tuning - knob for channel selection
CD - Skip (search up) -button
CD - Stop -button
Loud speaker terminals - R = right
Loud speaker terminals - L = left
FM-antenna
Phones - Headphone plug
Power cable
CONNECTING SPEAKERS
Connect the speakers to the red and black terminals on the back of the unit as shown. Use the
R-terminals for the right speaker and L-terminals for the left speaker. Flip down red or black
terminal flap; insert the speaker wire and release flap to lock the wire in place.
MAINS CONNECTION
Make sure that all the components and speakers are correctly connected.
Check that the rated voltage of your units matches the voltage of your power supply (230V-240VAC~50Hz)
Plug the AC Plug into the AC outlet.
HEADPHONES
Be sure that your headphones have a 3.5mm stereo plug with an impedance of 8-32 Ohms. When the headphones are
connected the speakers will automatically mute.
2
LISTENING TO THE RADIO
Press the power button to switch on the unit.
Set the function selector to the RADIO position.
Select the wave band (AM, FM or FM ST) by using the BAND selector.
Tune in your desired radio station by turning the Tuning knob.
Switch off by setting the function switch to the CD position or pressing the power button
NOTE: for best FM radio reception, extend out the Fm antenna cord. For AM reception, a built in ferrite antenna
receives the signals. Adjust the reception quality by turning the entire unit.
When the FM stereo signals are too weak or there is too much background noise it is better to switch the band selector
to FM (mono) position.
PLAYING A COMPACT DISC
Set the function selector to CD.
Press the CD-open button, place a disc in the centre with the label side up and close the CD door gently.
The total number of tracks available will be shown in the display
Pressing the PLAY button after inserting a CD will start the first track playing.
To pause the track, press the PLAY / PAUSE button while the track is playing. To return to normal playback press
the PLAY / PAUSE button once more.
To stop the CD playing press the STOP button
SELECTING A DESIRED TRACK IN STOP MODE
Press SKIP / SEARCH Up or Down until the desired track number appears on the LED display.
Press PLAY / PAUSE to begin playing that selected track. The selected track number will appear on the LED
display.
You can skip forward to another track by pressing the SKIP Up button. The tracks will skip forward once each time
the button SKIP button is pressed.
Pressing the SKIP Down button while in play mode will return you to the beginning of the track being played.
Pressing the button more than once will skip down a track each time it is pressed.
SEARCHING FOR A PASSAGE OF PLAY
While the song is playing, if you press and hold the SKIP Up / Down button you can listen to the track at a high speed
forward or backwards to find a particular passage of play. The sound will be played faster than normal but at a reduced
volume. Play will return to normal when the SKIP up / down button is released.
PROGRAMMING TRACKS
You can program in up to 20 tracks in any desired order for programmed playback.
Set the FUNCTION switch to CD
Press the PROGRAM button
Press the SKIP Up / Down button to select the track number that you wish to program in
Once you have selected the desired track number press the PROGRAM button
Repeat steps 2 & 4 to program in more tracks.
Once you have programmed in all the tracks you want, press the PLAY / PAUSE button to begin playback of the
programmed tracks. The playback will begin at the start of the first programmed track
A stored program will be erased when the function switch is moved to the Radio position or the unit is turned off.
3
REPEAT MODE
To repeat one or all tracks press the REPEAT button before or during playback. Pressing the REPEAT button once will
repeat the current track only, pressing it twice will repeat the entire CD, pressing three times will turn the repeat function off.
REPEAT ONE
REPEAT ALL
REPEAT OFF
TECHNICAL SPECIFICATION
•
•
•
Power supply:
Receiving Bands:
Tuning Range:
•
•
•
Speaker:
Output Power:
Headphone Impedance:
AC 230V-240V 50Hz
AM, FM (stereo)
FM 88 – 108 MHz
AM 540 – 1600 KHz
4 Ohm 5W x 2
2 x 2W RMS @ 10% THD
32 Ohm
4